Snow White and the Seven Dwarfs is an immensely important and influential film. Released in 1937, it was the first feature-length animated film, and for that reason was certainly quite an ambitious undertaking.
With breathtaking animation, memorable characters and timeless music, it remains popular even today.
At the heart of the story is the beautiful Snow White herself, and for fans of the film learning how to draw Snow White can be a really fun challenge to take on.
If you love this film and this character, then this guide should have plenty of thrills for you!
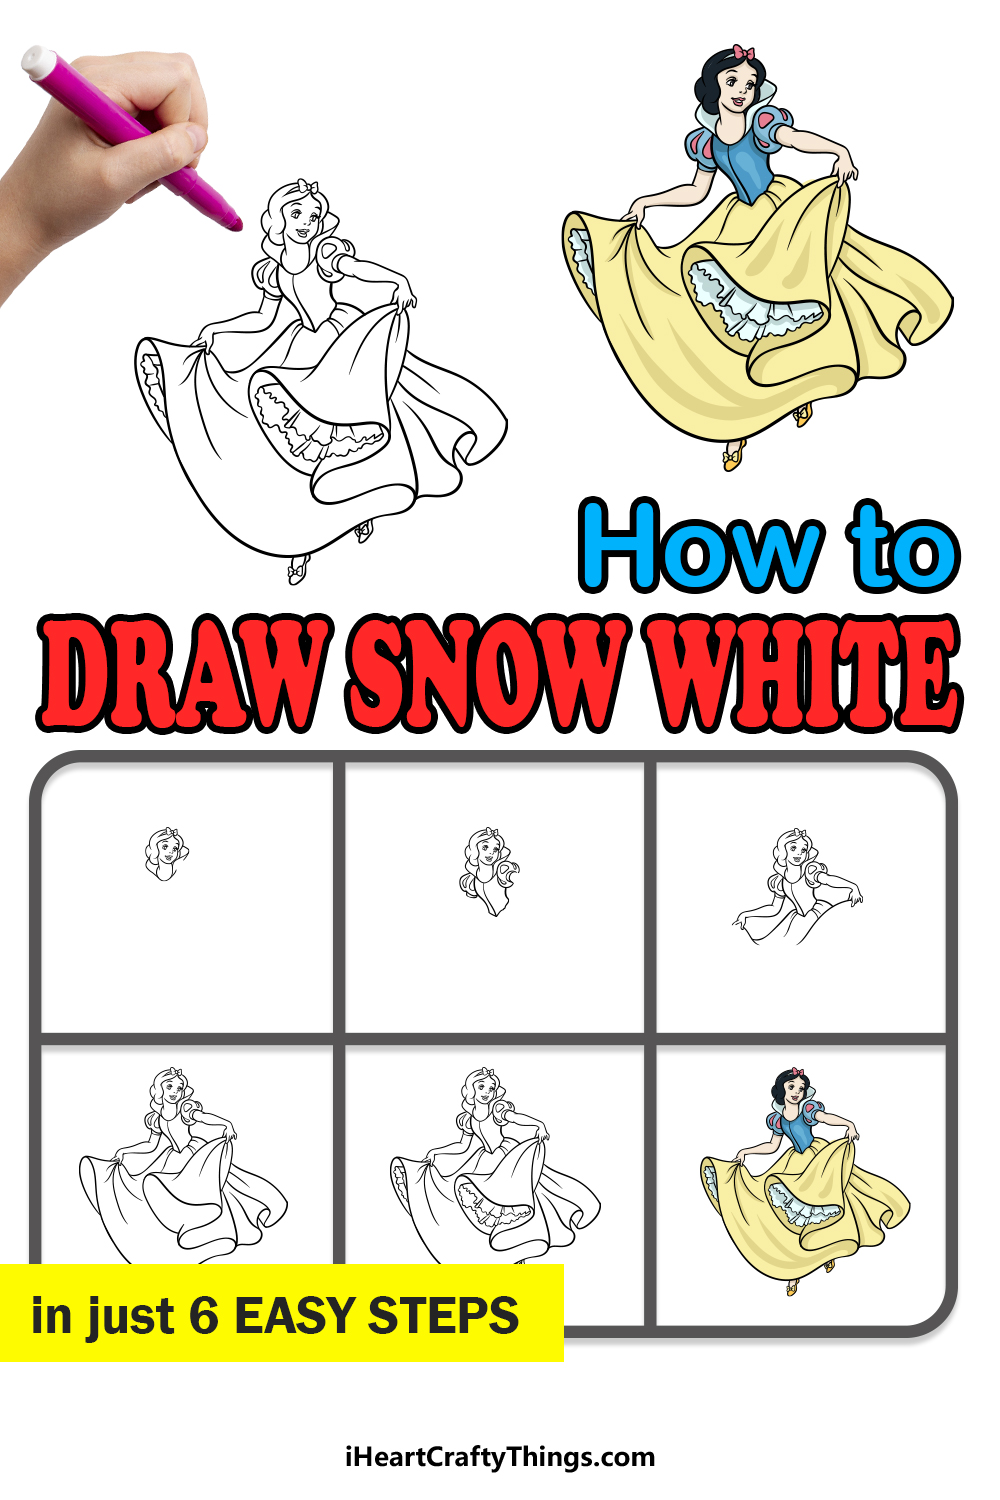
Our step-by-step guide on how to draw Snow White will show you how to recreate her while having lots of fun doing so.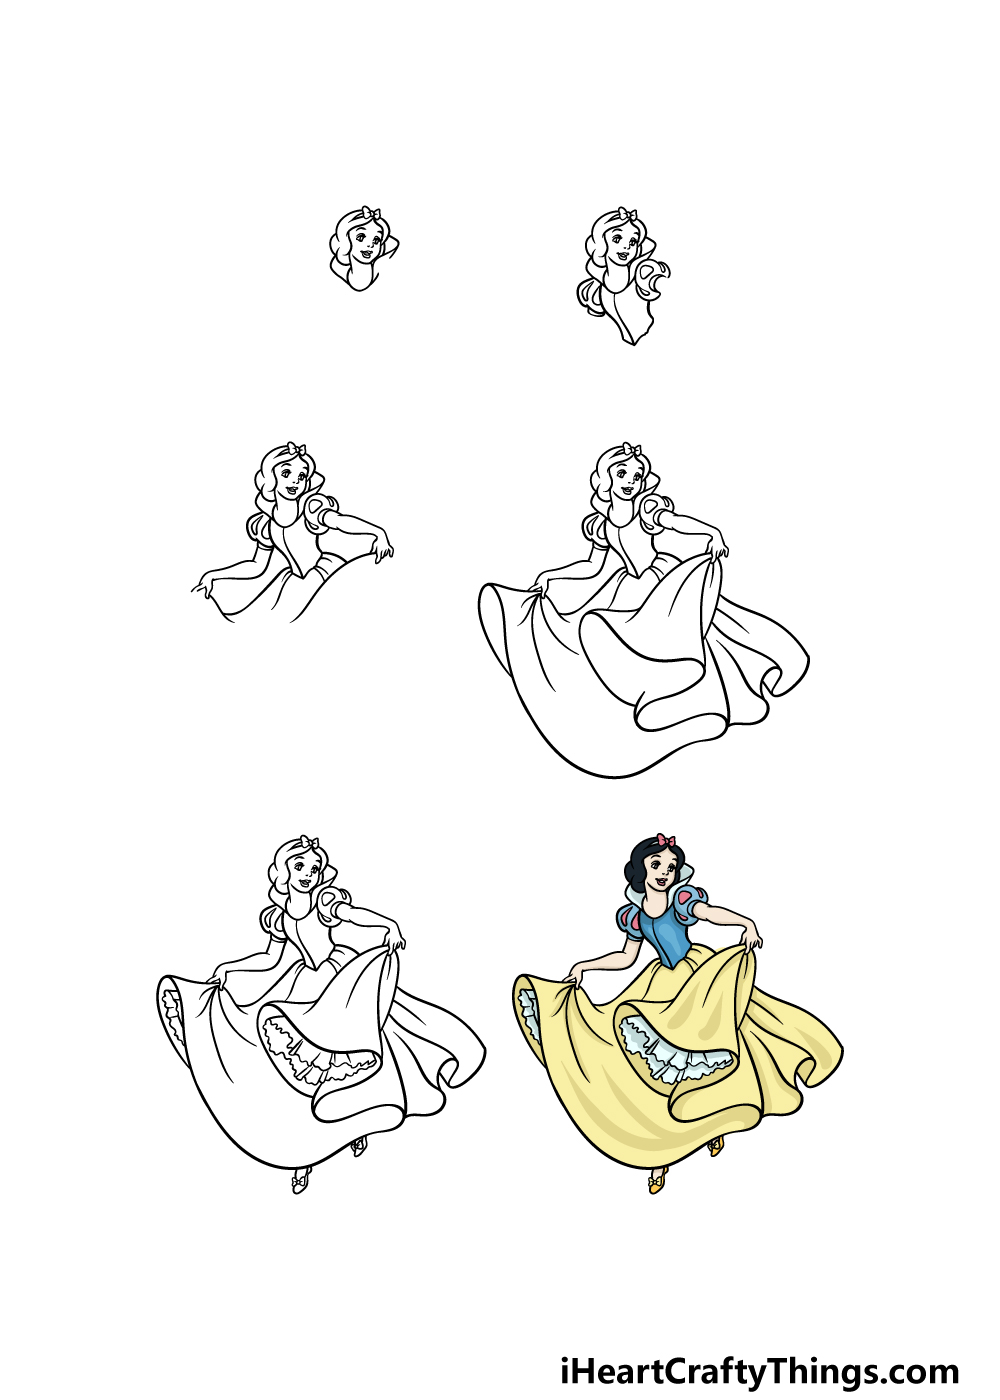
How to Draw Snow White – Let’s Get Started!
Step 1
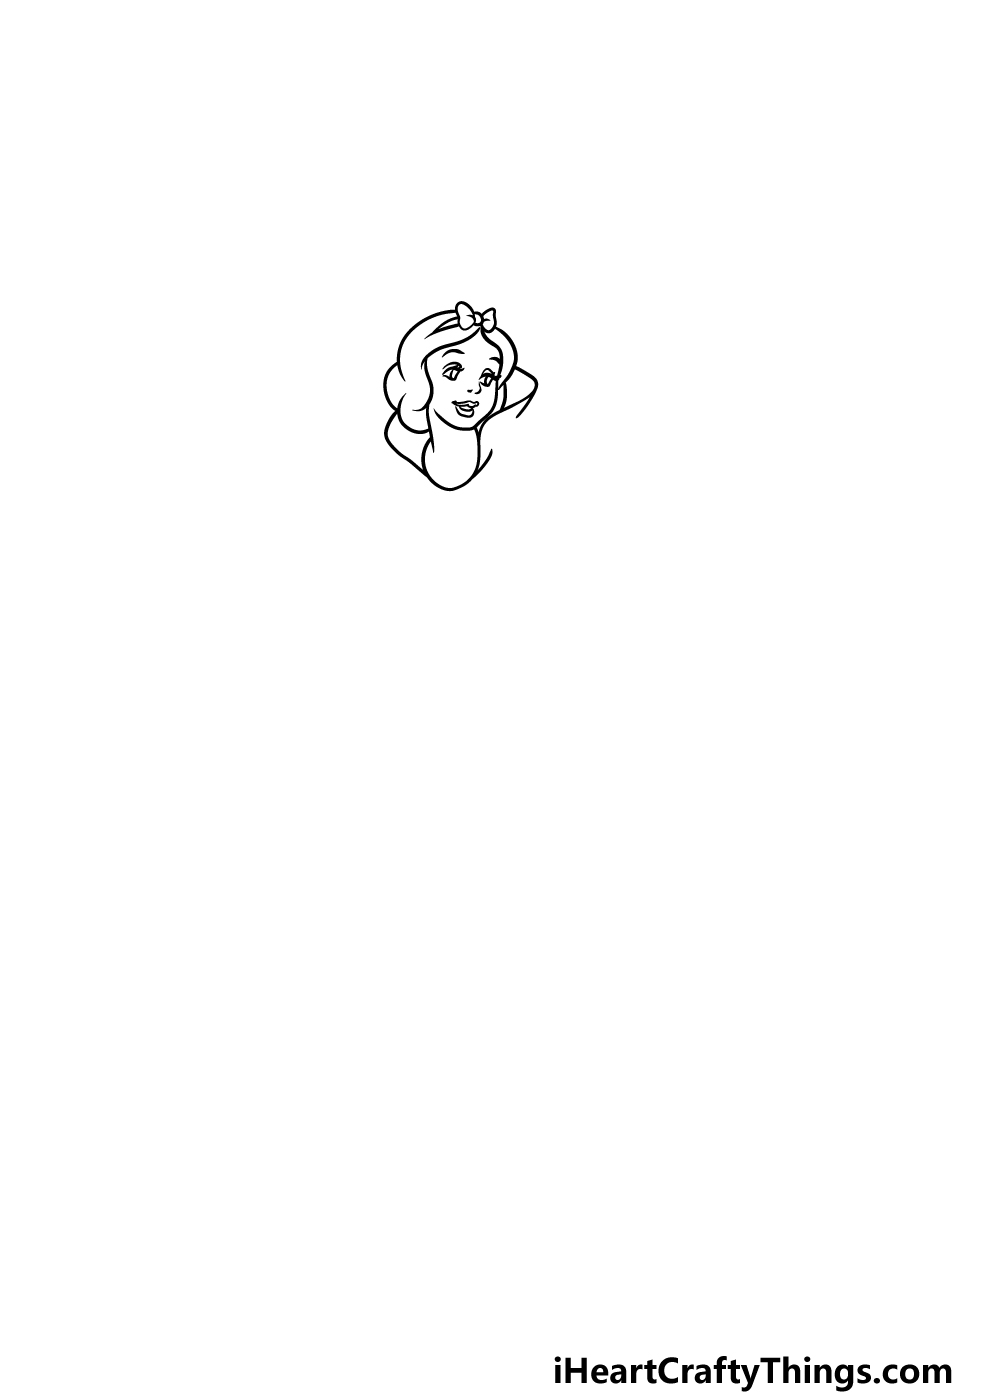
In this first step of our guide on how to draw Snow White, we will start with her head and face. To start her face, you should start with the outline for her face, which you can draw with a curved line.
Then, we will add the outline of her hairstyle. Her hairstyle is fairly complex, so for this part you may want to try your best to replicate the lines exactly as they appear in the reference image.
There will also be a little bow tied in her hair, so don’t forget to add that! Once you’re done with these outlines and have added her large collar, we will then add her eyes.
They will be relatively large and a little bit closed so that she has a wistful expression.
Finally, use some simple lines for her nose and mouth to finish off her expression to close off this step.
Step 2 – Next, start drawing her outfit
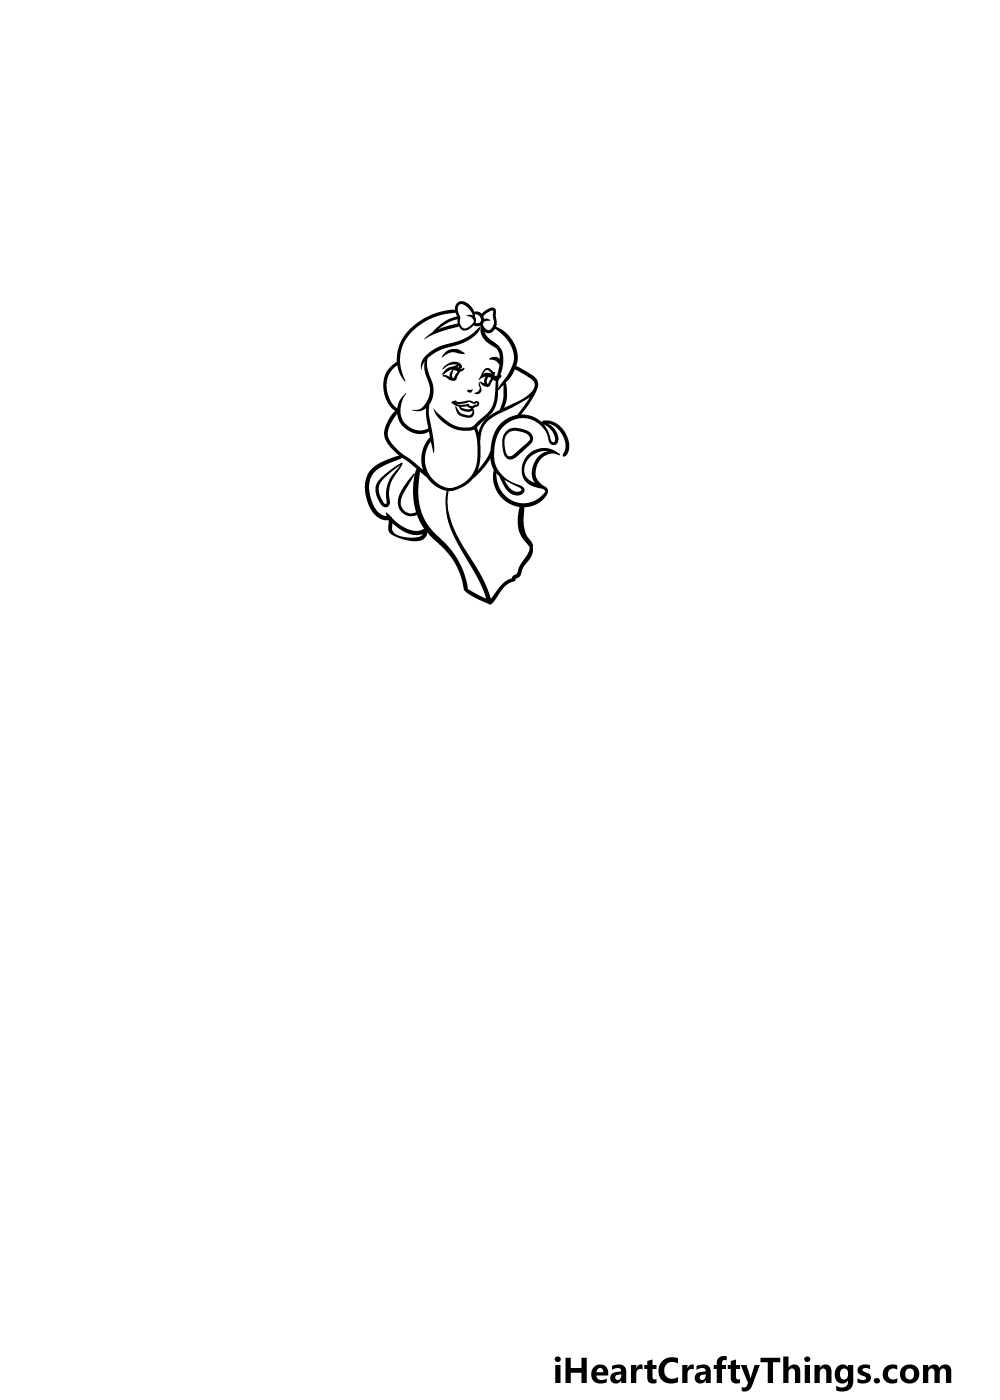
Now that you have completed her head, we can next move on to the outfit she is wearing. The sleeves of her dress are quite large and puffy, and you can draw them with some curved lines.
The chest of her dress can be drawn with some more wavy lines coming down, and there will be a line going down the center as well.
The reference picture will also show you how you should detail the sleeves and dress.
Step 3 – Draw her arms and start the skirt of her dress
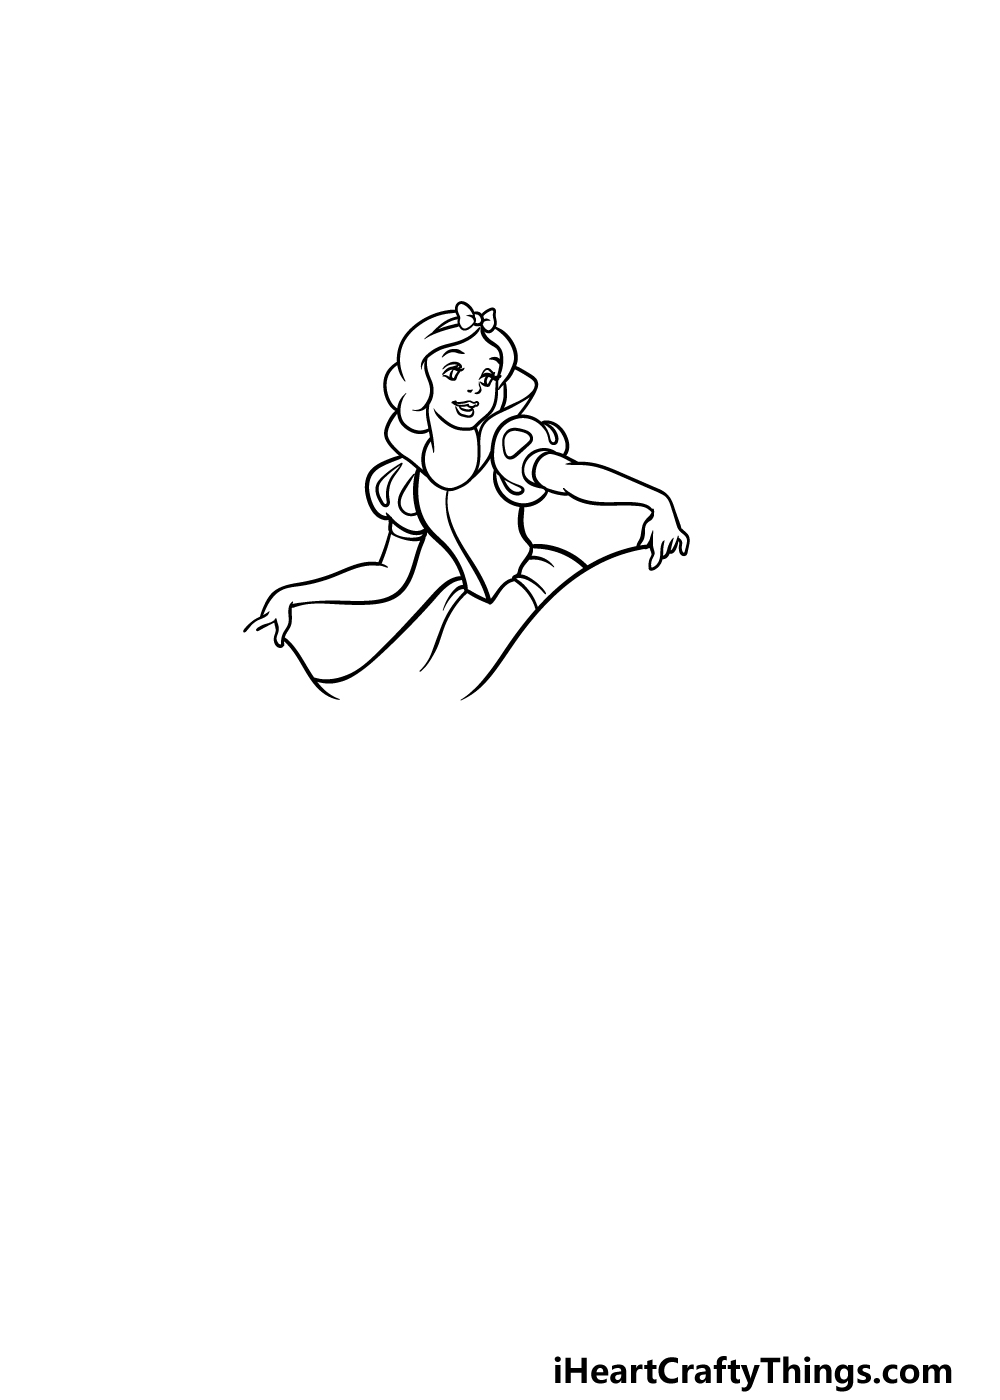
We will now be drawing her arms as well as the start of her dress skirt in this step of our guide on how to draw Snow White.
Her arms will extend from the openings left in her sleeves from earlier, and they can be drawn with some simple lines.
Her hands will be holding up the skirt of her dress to make it look like she is curtsying. Speaking of the skirt, we will draw it with some wavy lines, as shown in our example.
We will add more to this skirt in the next steps, so let’s move on when you’re ready!
Step 4 – Now, draw the rest of her flowy skirt
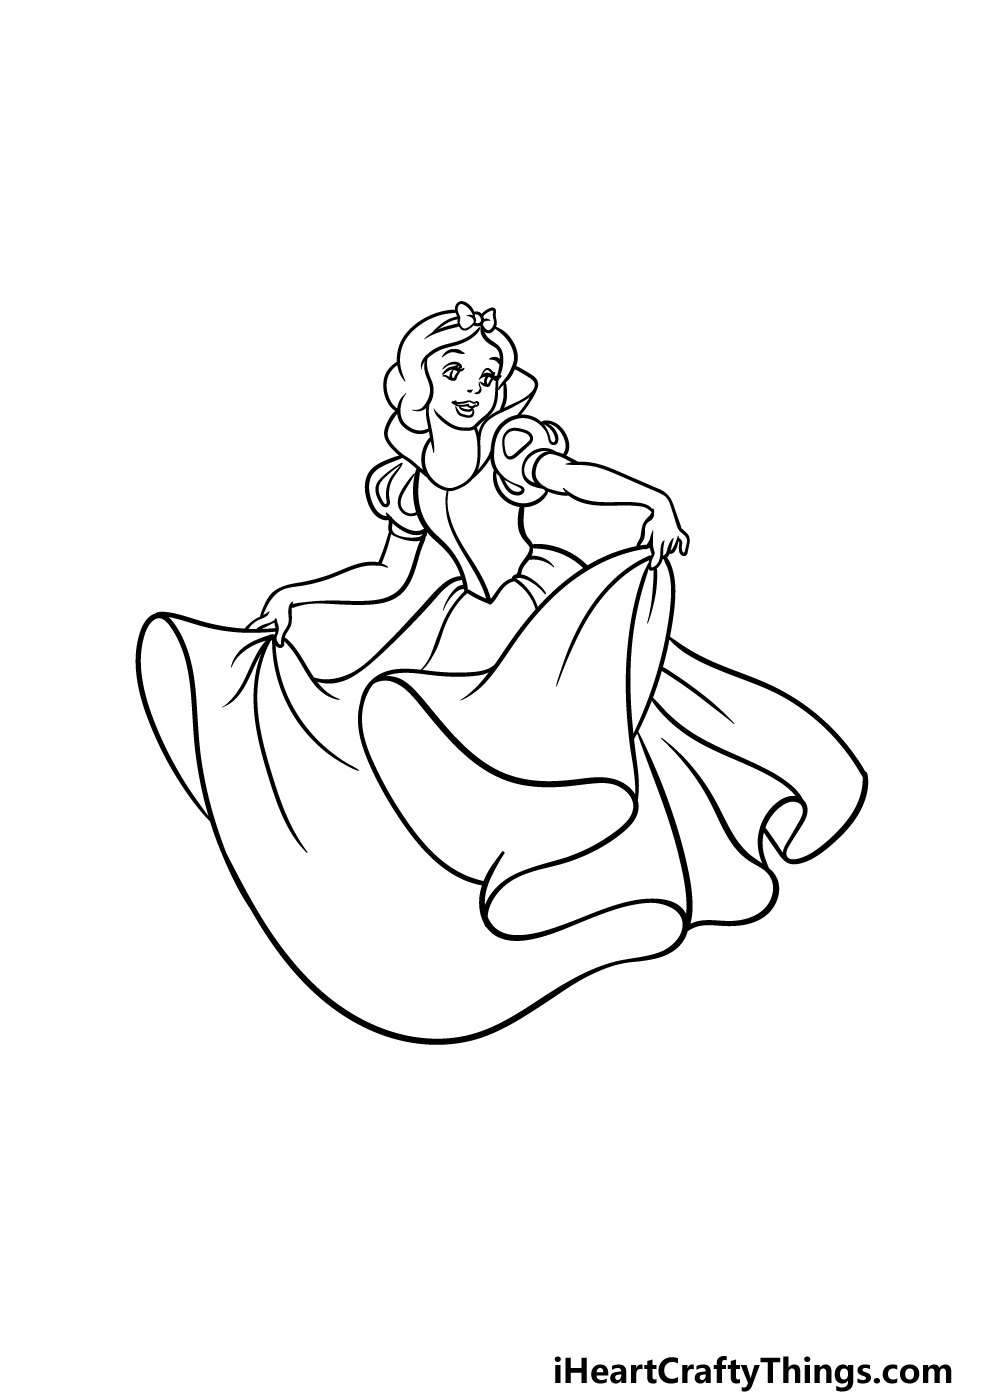
This fourth step of your Snow White drawing will probably be the trickiest step in this guide!
The reason for this is that we will be drawing her skirt flowing all around her, and drawing flowing fabric can be a bit hard to do.
It doesn’t mean that it is impossible, and as long as you take it slowly and follow the image closely then you’ll be able to do it!
While referring to and copying the reference picture, start extending the wavy lines down from the start of the skirt that you began in the previous step.
You could also simplify some of the lines and shapes if you’re struggling a bit, it would still look good even if you do that!
Step 5 – Add some final details to your Snow White drawing
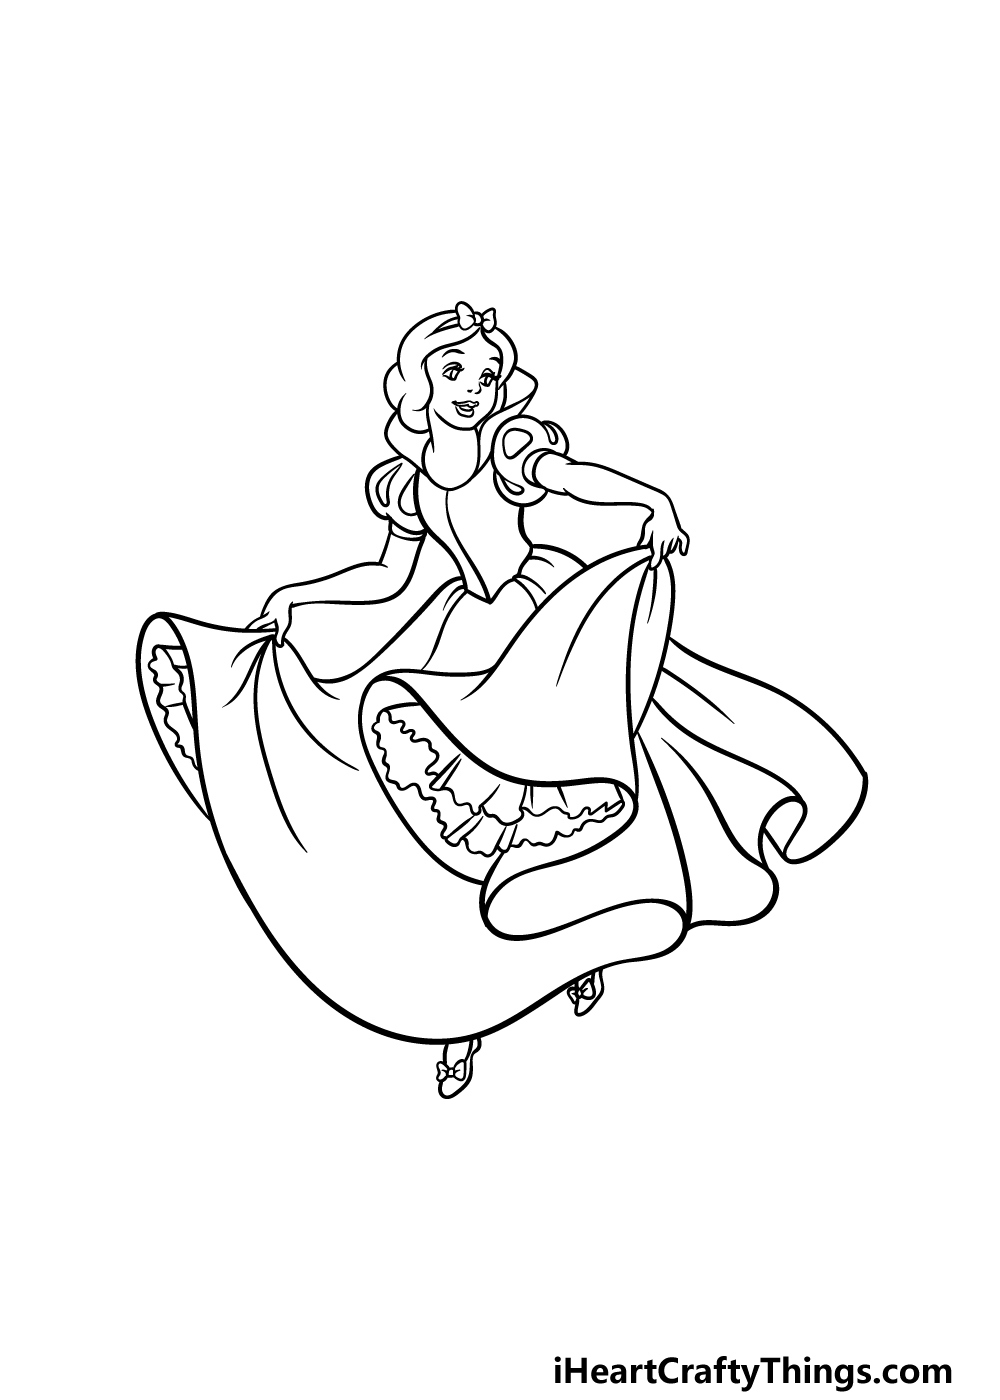
After quite an involved step in this guide on how to draw Snow White, we will keep it simpler in this fifth step as we draw the final details.
First, you can draw some frilly detailing to the underside of her skirt in the areas we show in our reference picture. Then, you can draw her feet clad in shoes with little bows on them beneath the skirt.
Once you have finished off these final details, you could also add some of your own elements and flair to this picture.
You could draw a background to show your favorite scene from the film or maybe surround her with some animals or a couple of the 7 dwarfs. These are a few ideas, but what do you think would finish this drawing off?
Step 6 – Finish off your Snow White drawing with some color
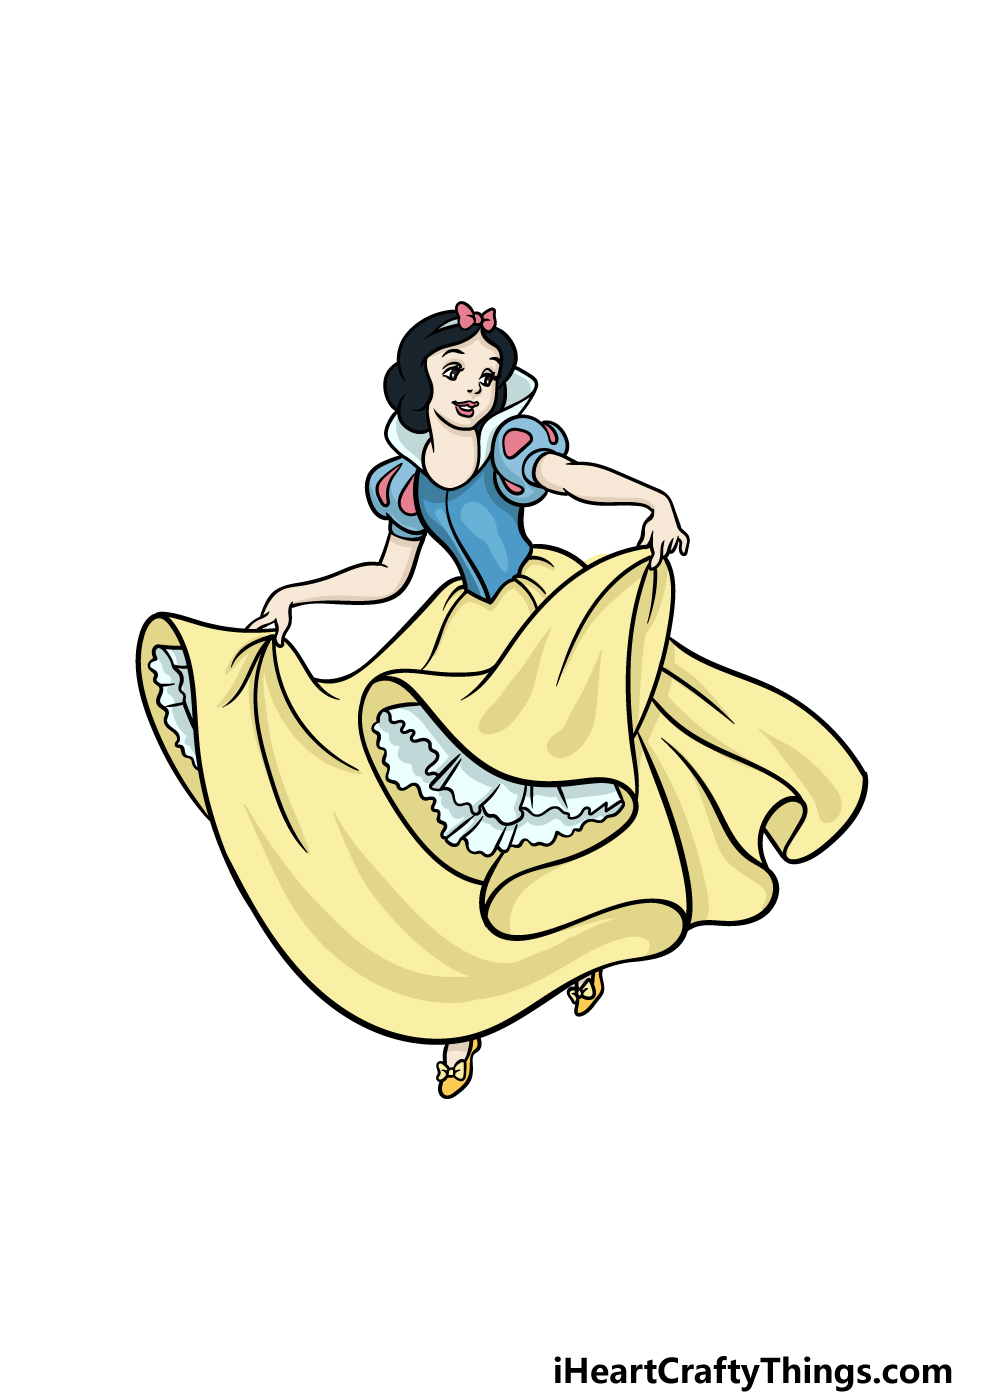
For this final part of your Snow White drawing, we will finish it off with some color. In our reference image, we went with the colors that she is seen with in the film.
That means some mild yellows for her skirt and blue with red detailing on the top half of her dress.
Then, we finished off with some black for her hair with some pink for the bow in it. You can follow this reference image to keep her looking accurate to the film, or you could change up the colors a bit!
Which colors and art mediums do you think you will use to finish your picture?
Do this to take your Snow White drawing to the next level
These 4 tips for your Snow White sketch will make you sing and dance with joy!
This drawing of Snow White shows her dancing around in a joyful way. In the movie, she often has fun with her animal friends, so these could be fun to add to this scene.
These could include little birds, squirrels and even deer. The examples we just gave are all animals we see her interact with in the film, but there are many others!
What are some other animals you could expect Snow White to dance around with that you could add here?
There are many human characters that you could also add to this image. For this tip, we would suggest adding some good characters to the scene.
A few examples would be the heroic prince that comes to Snow White’s rescue. Or, you could portray some of the 7 dwarfs that help Snow White in her time of need.
If you were to portray some of the dwarfs, would you stick to one or two or portray all seven of them?
This Snow White drawing shows her dancing, but once you have finished it you could try to draw her in other poses.
For example, you could have her in the famous pose she’s in after the evil queen has put her to sleep.
You could even recreate the famous scene where the kiss of the prince brings her back to life. What other poses would you like to recreate?
Finally, you could then finish off your Snow White sketch with a cool background. If you decided to try and create a specific scene from the film, then a background would be the perfect way to do it.
The background of the film has a hand-painted look, and you could get similar results by using some watercolor paints or other paint mediums.
You could recreate a background from the movie or create a new setting for Snow White to be a part of. Which will you choose?
Your Snow White Drawing is Complete!
This will conclude our guide on how to draw Snow White! This character is one of the trickier ones that we have featured in our drawing guides, so you should be extra proud of completing it.
By following the steps, taking it slowly and trying your best you can always overcome even the trickiest of drawing challenges.
Finishing the guide is not the end of the fun, as you can also keep adding to it with your own touches.
We mentioned a few ways that you could do this, and these ideas included drawing a background featuring scenes and characters from the film. These are just a few ideas, so what can you think of to add to it?
This guide is one of many we have waiting for you on our website, so be sure to keep checking in as we upload new ones often!
You worked hard on this Snow White drawing, so we would love to see the end result! You can show us by sharing it on our Facebook and Pinterest pages.