


Find out how to draw Snoopy with this fun and easy guide for kids! You can recreate the world’s most famous beagle with these tips.
Snoopy was introduced all the way back in 1950 as the creation of legendary cartoonist Charles M. Schulz. Snoopy appears in the Peanuts strip as the loyal companion of poor ol’ Charlie Brown.
He was more of a side character at first, but he soon became the most popular character in the strip. Even now, more than 70 years later, he’s still as famous and beloved as ever.
The style of Peanuts is deceptively simple, and it can be quite tricky to draw these characters. Worry not, though, as I will show you the best way to draw Snoopy.
You won’t believe just how fun it can be!
Watch This Guide On How To Make Your Snoopy Drawing
How to Draw Snoopy – Let’s get started!
Step 1
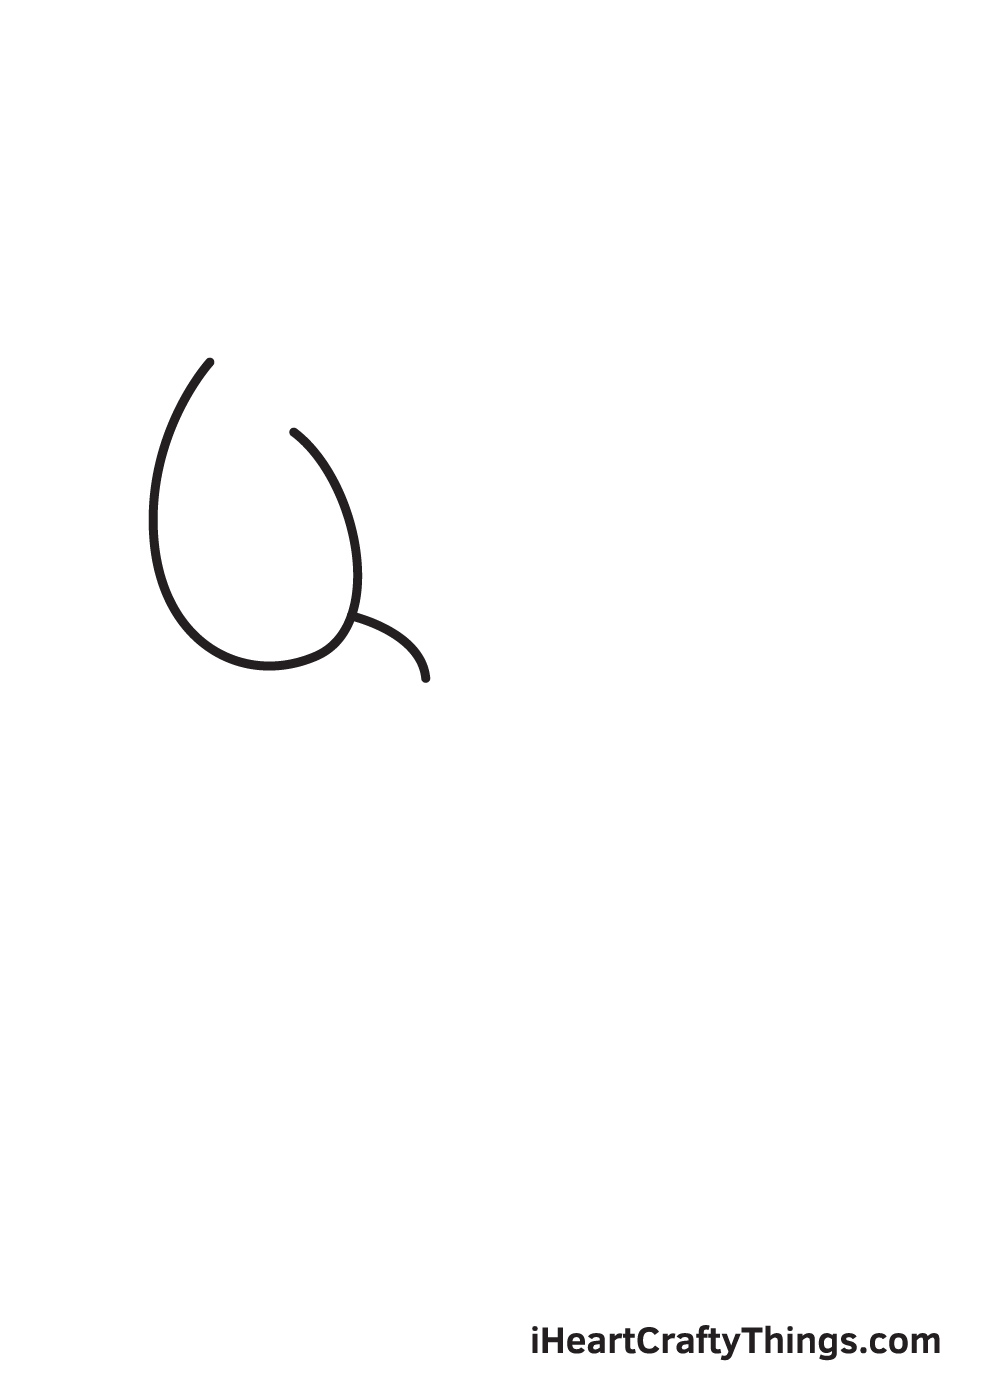
Begin by drawing an exaggerated U-shaped curved line to form the ear of Snoopy. The ear should be drawn on the upper left side of your paper to ensure that there’s sufficient space for Snoopy’s entire head and body.
To make sure that Snoopy will be drawn in the center, you can create reference lines by drawing an intersecting horizontal and vertical line across your paper.
This should divide your paper into four square spaces. The space on the upper left of your paper is where you should draw Snoopy’s ear.
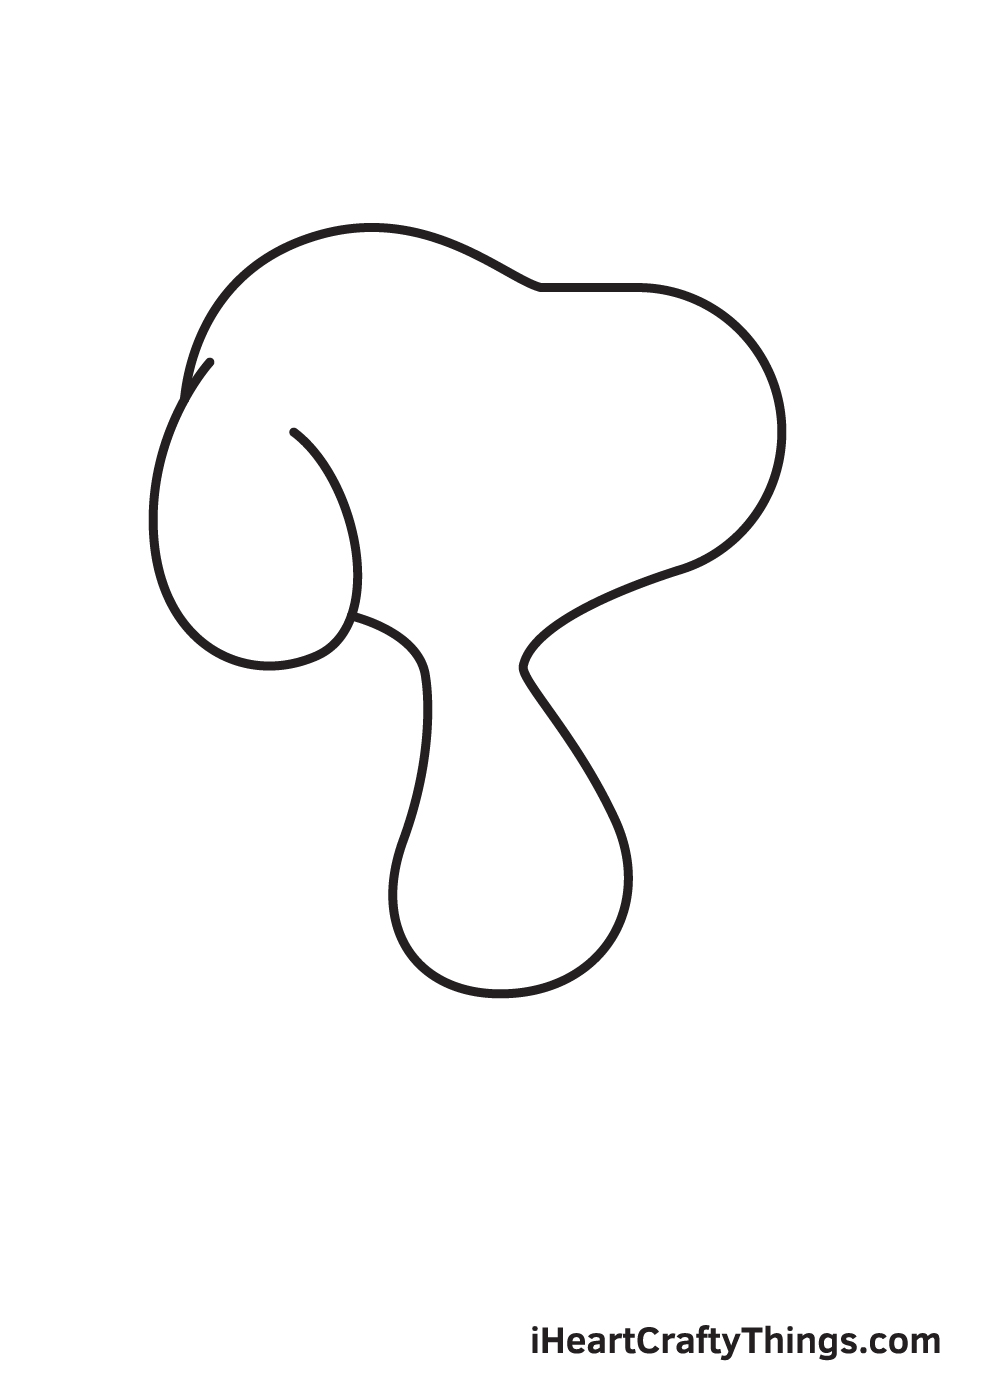
Step 2 – Create an Outline of Snoopy’s Head

Draw the head of Snoopy right beside its ear, which we drew in the previous step. Remember, Snoopy is facing towards the right side, thus the outline of the face must be on a side view.
Since Snoopy is a dog, don’t forget to emphasize the snout by making it the widest part of Snoopy’s head.
Step 3 – Rough Sketch the Body of Snoopy
Right underneath the head, draw an elongated shape with a round bottom. Make sure that the lower part of the body is wider than the upper part.
Avoid pressing down too hard with your pencil when sketching Snoopy’s body. It’s important to draw with light strokes so you can easily get rid of any unnecessary lines that overlap on some parts of Snoopy’s body later on.
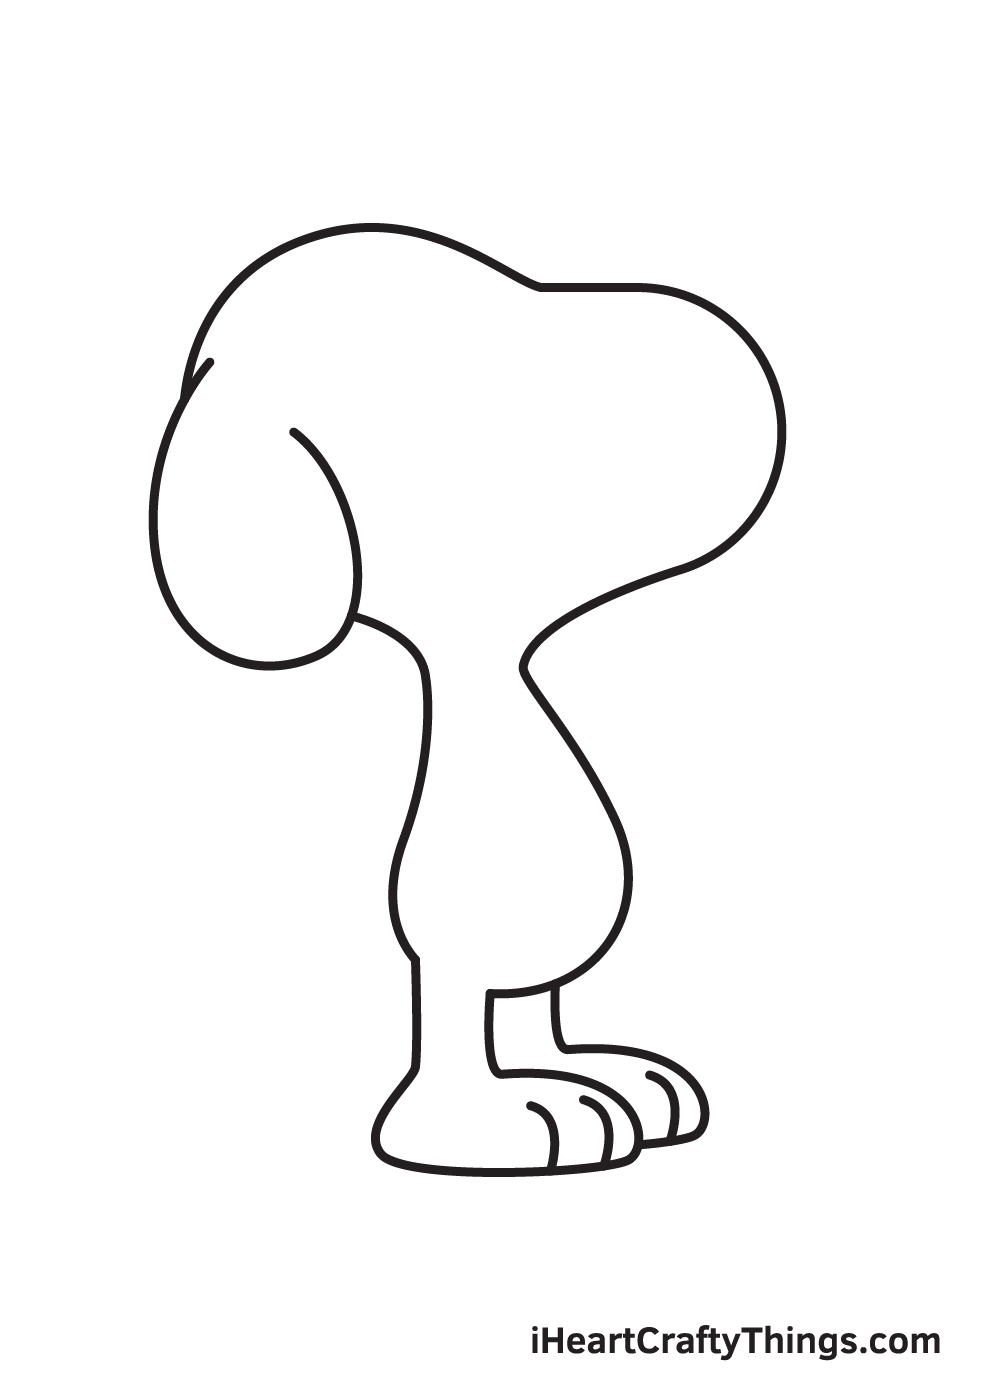
Step 4 – Afterwards, Draw Snoopy’s Left Leg
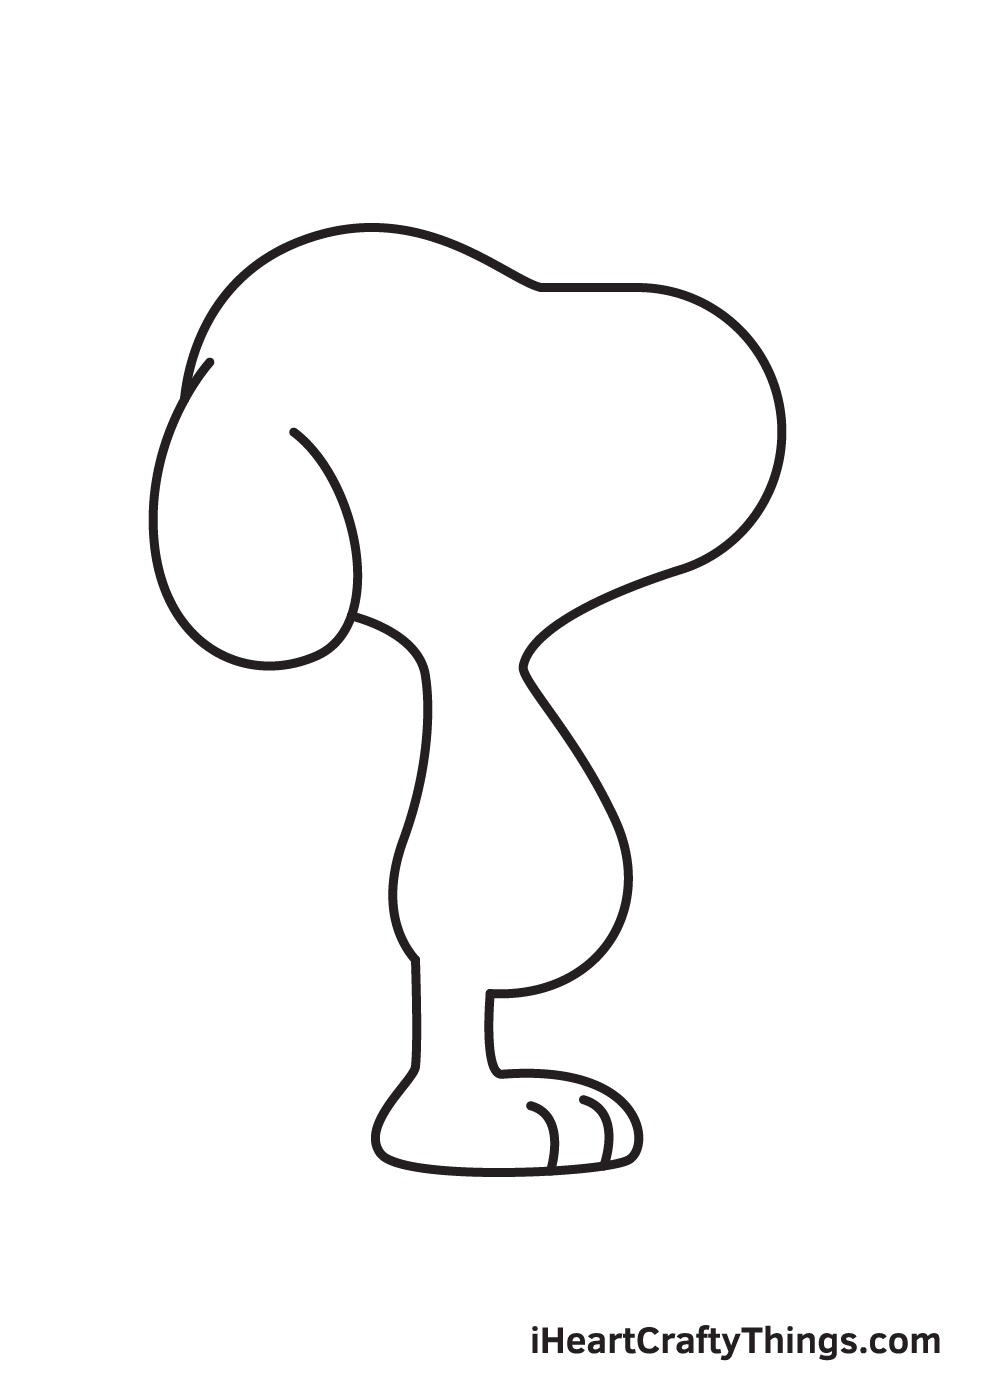
Continue by drawing two short parallel lines directly connected at the bottom of Snoopy’s torso. This forms the left leg of Snoopy.
Afterwards, draw a sideways oval shape with a flat bottom beneath the leg to create the foot.
Don’t forget to add two curved lines on Snoopy’s foot to create the lines in between the paws!
Step 5 – Next, Draw the Right Leg of Snoopy
Draw the right leg beside the leg we drew in the previous step.
Since Snoopy is facing sideways, this leg should only be visible halfway through, as shown in the illustration.
Step 6 – Then, Draw Snoopy’s Visible Arm
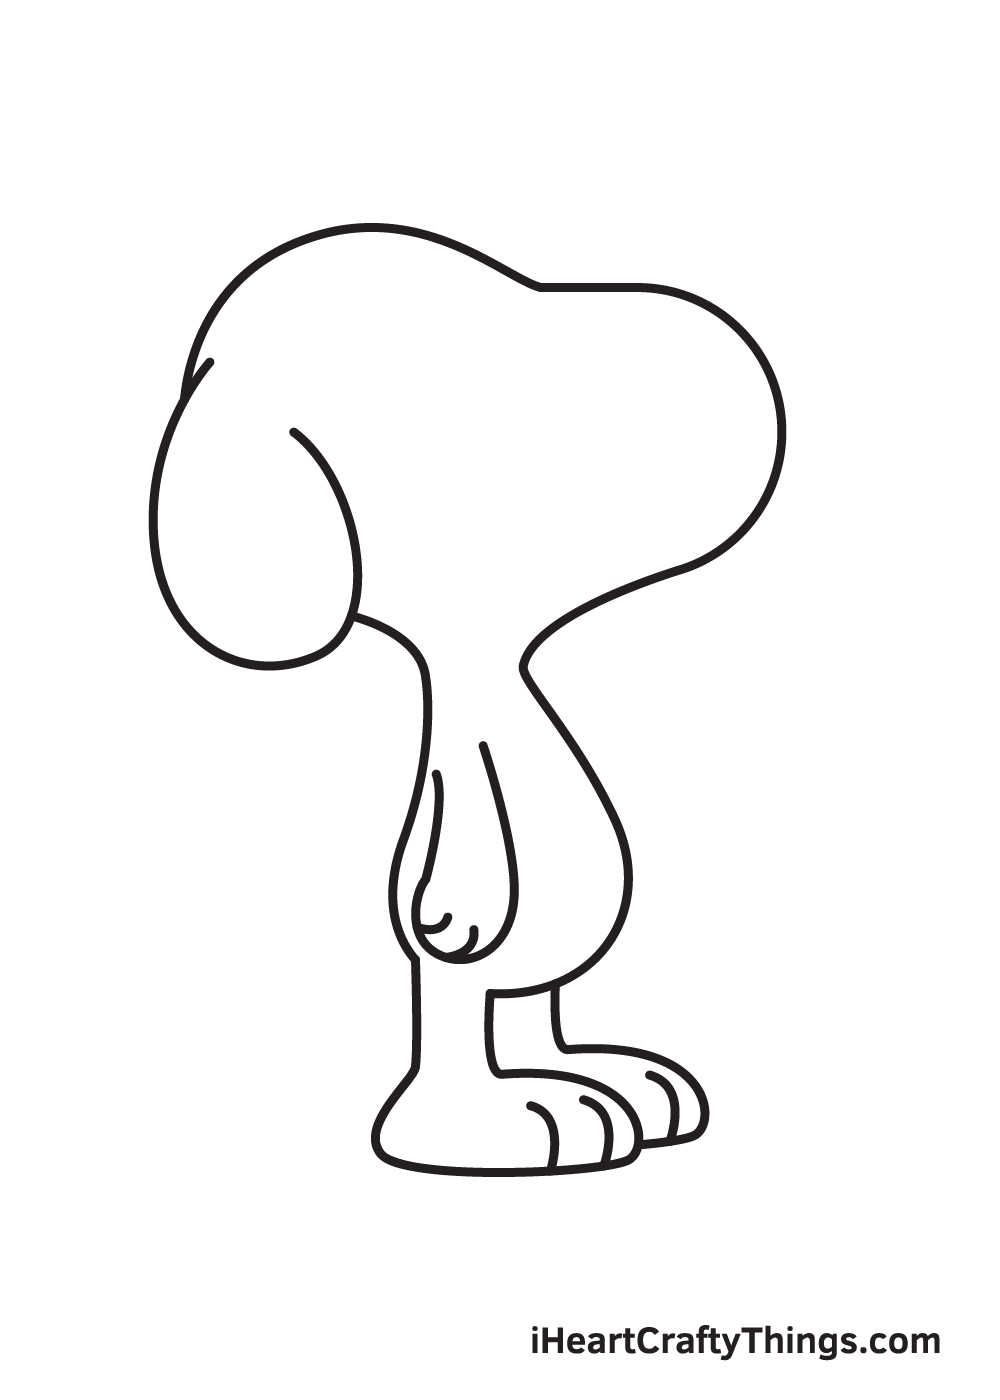
On the side of Snoopy’s torso, draw an elongated U-shaped curve forming the left arm.
Then, draw two short curved lines at the very bottom of the arm to create three separate paws.
Step 7 – Afterwards, Draw Snoopy’s Pointed Tail
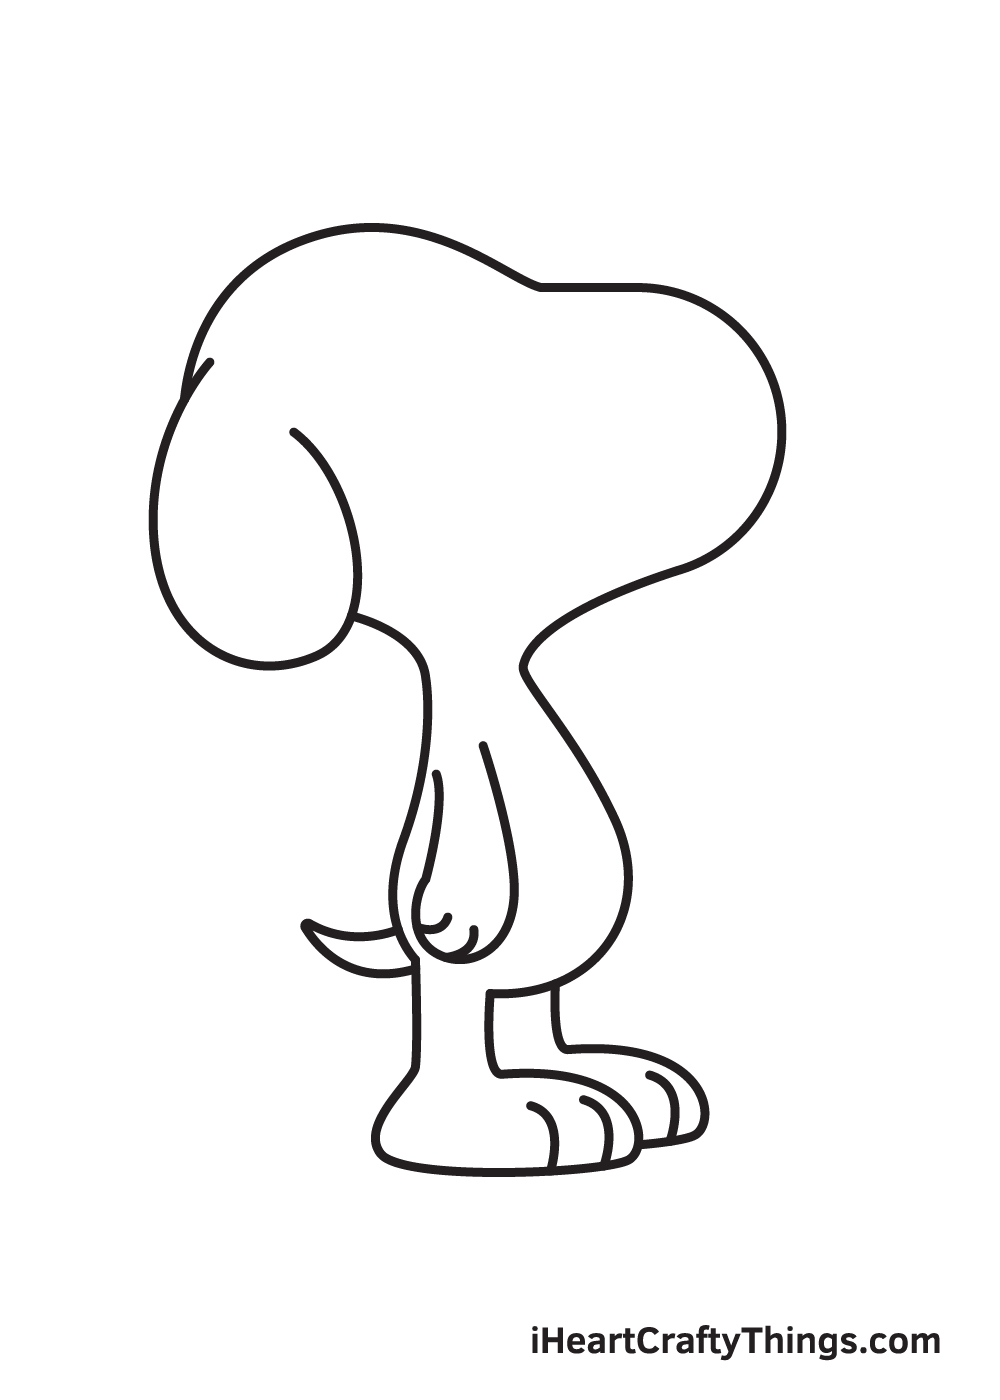
Draw a short, pointed shape attached to the lower part of Snoopy’s back.
This creates a tapered tail—one of Snoopy’s most distinct features!
Step 8 – Next, Draw Snoopy’s Collar and Nose
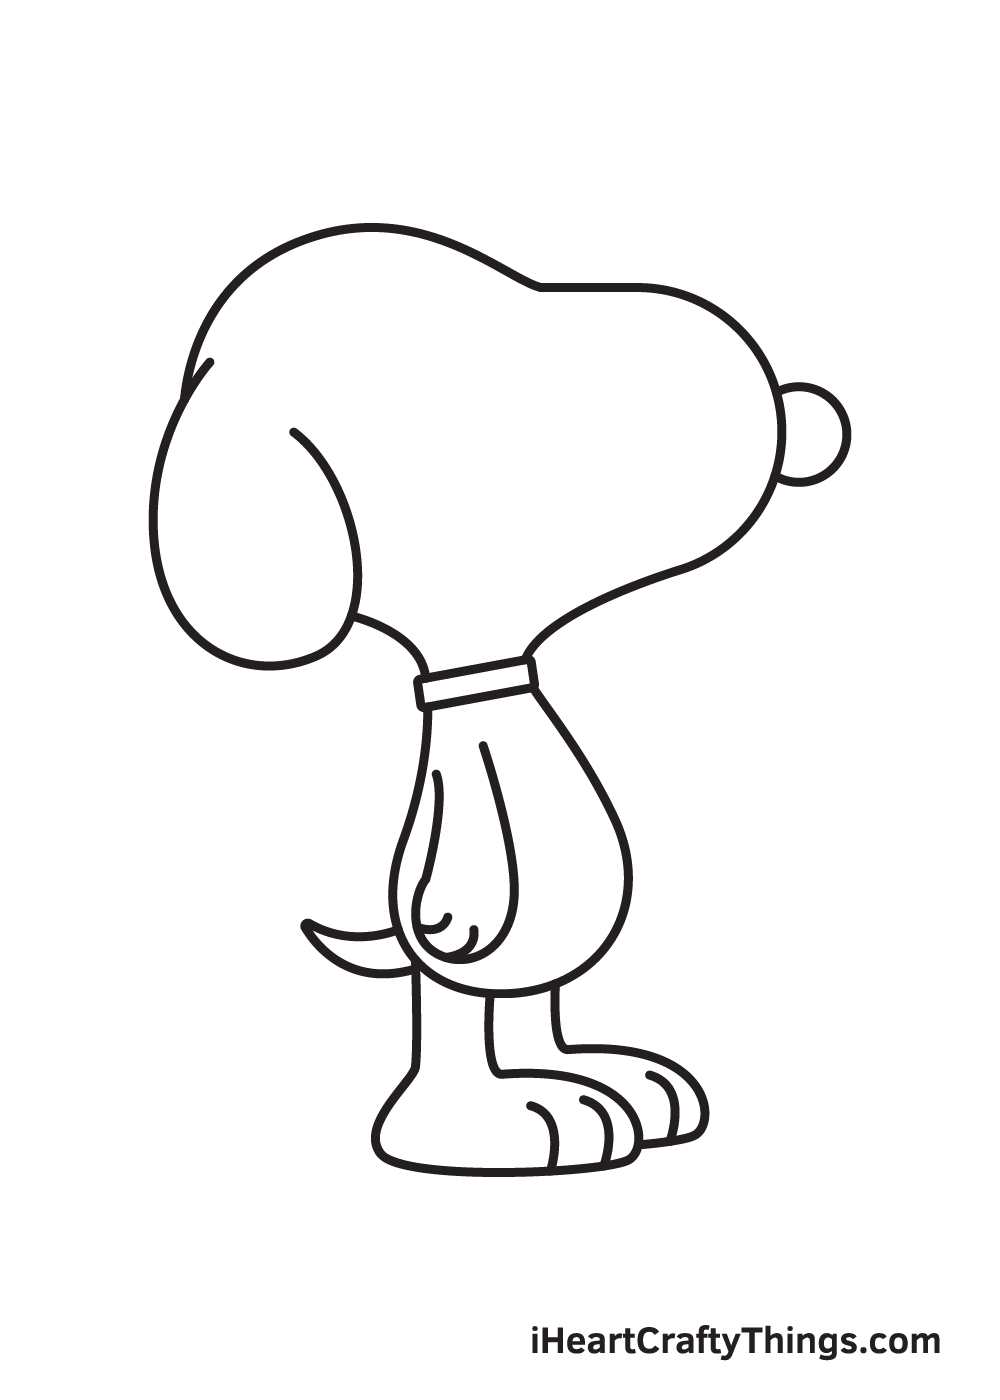
Dress up Snoopy by putting a collar around its neck. Simply draw a thin horizontal shape surrounding Snoopy’s neck to create the collar.
To form the nose, draw a semicircle directly connected to the edge of Snoopy’s face. Since Snoopy is facing towards the right side, the nose should be attached on the right edge, as shown in the illustration
Step 9 – Now, Add Details on Snoopy’s Face
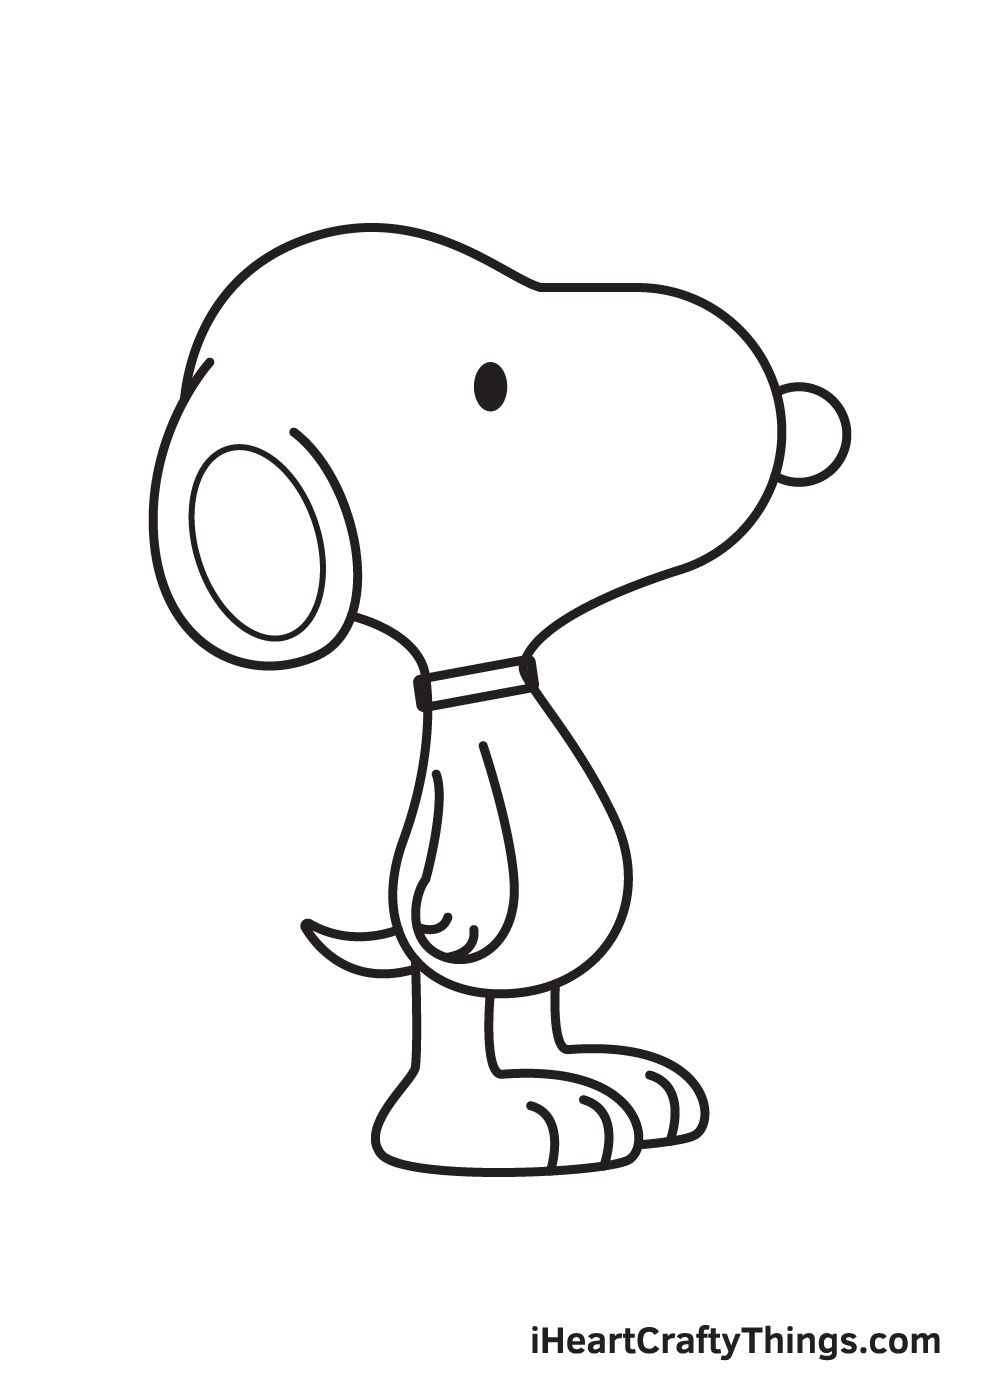
To complete the appearance of Snoopy, we will now be drawing its facial features one by one. Starting from the top to the bottom, proceed by drawing a small upright oval shape for the eye. Then, shade the entire eyes to add emotion.
Afterwards, draw an oval shape inside the ear of Snoopy. The shape should be parallel to the outline of the ear, creating an appearance of an inside ear.
There you have it—you have successfully drawn Snoopy. Now, it’s finally time for the step you’re probably most excited about, which is coloring Snoopy.
Snoopy’s coat is colored white. Some of the physical features of Snoopy, on the other hand, are black, such as his nose, ears, as well as a spot on his back.
You can choose to color Snoopy using his original colors or customize a unique set of colors to make Snoopy look more colorful. It’s all up to you! After all, it’s your work of art.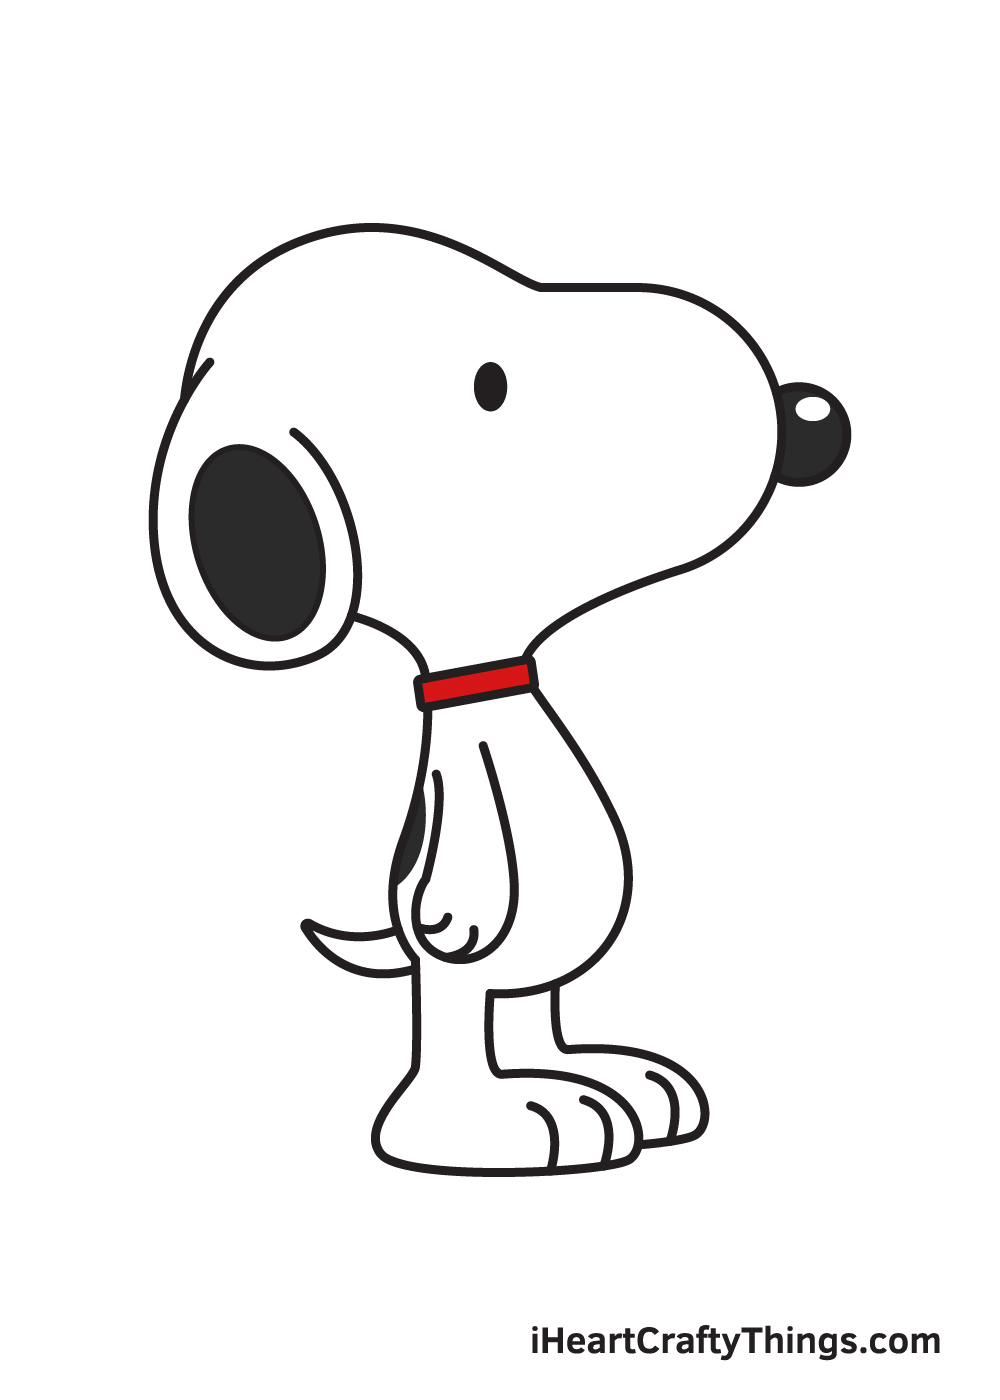
Here’s how you can make your Snoopy drawing even better…
Make this iconic character look even better with these fun tips!
There are so many famous objects and locations from the Peanuts series, and you could add them to your Snoopy sketch. For one obvious example, you could draw his famous red doghouse next to him.
That’s one idea, but there are many other well known locations and settings you could use for the background! What are some famous Peanuts settings you could use for this picture?
Adding famous locations is one thing to try, but there are plenty of characters you could add as well. You can make your Snoopy drawing even better by drawing your favorite Peanuts characters.
These could include ones like Charlie Brown, Linus, Lucy and many more! These characters are all drawn in a lovely simple style, so they should be easy to add.
If you need some help, you could use the comics or look up some pictures of the characters online. You could add one or two or maybe even try and add the whole cast of characters if you can fit them in!
Once you have the hang of this drawing of Snoopy, you can change the position and pose he is in. There are many ways that you could do this!
He could be in a dynamic pose such as running or jumping, or he could even just be extending an arm out. If you were to do this, you could change his pose by following the guide and changing just a few elements.
For the final suggestion we have for your Snoopy drawing, you can experiment with colors and art mediums. The colors of the series are usually a bit lighter and more muted, and you can replicate that yourself.
Using some colored pencils or watercolors would be perfect for replicating this style! If you wanted to make the colors brighter and more vibrant then that’s an option as well.
For this approach, maybe try out some colored pens or acrylic paints. What other mediums can you think of that you could use?
Your Snoopy Drawing is Complete!
We hope you enjoy this step-by-step Snoopy drawing tutorial. What’s fun about this tutorial is that it gives you complete control over your artwork.
You can customize the appearance of Snoopy and handpick the colors you will be using to create a one-of-a-kind Snoopy character.
Which cartoon character would you like to draw next? Let us know and we’ll do our best to deliver your requests.
We are regularly uploading new content on our “How to Draw” catalog, so don’t forget to keep checking back to explore brand-new drawing tutorials!
Once you’ve finished drawing and coloring Snoopy, make sure you flaunt your masterpiece. Take a photo of your artwork and share it on our Facebook page and on Pinterest.
Don’t be embarrassed, we’re sure it looks incredible!
We would love to see your adorable Snoopy drawing!