Warfare in days gone by was very different from how it appears today. But just because the tools were a bit less advanced back then, it didn’t mean that they were any less deadly!
History is full of devastating weapons that were used, and often a good shield could make a difference between life and death.
They also came in many different shapes and sizes depending on the era and nation using them, and learning how to draw a shield is a great way to imagine what yours might be like!
If you are a fan of old shields and weaponry, then this is the guide for you.
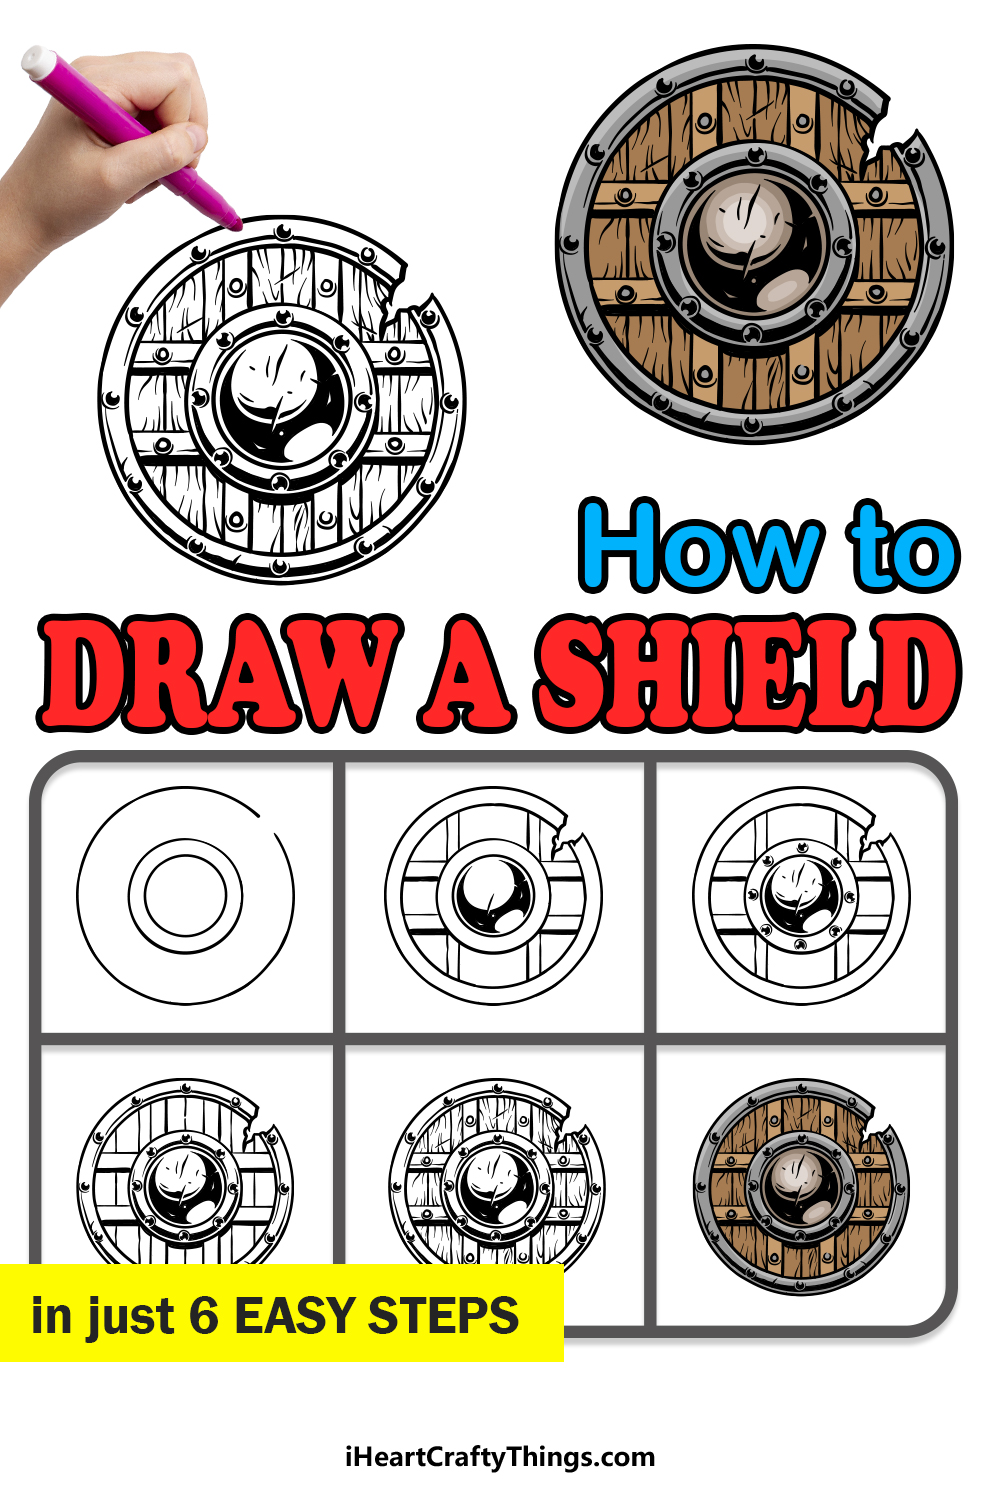
Our step-by-step guide on how to draw a shield will show you how you can design your very own awesome shield.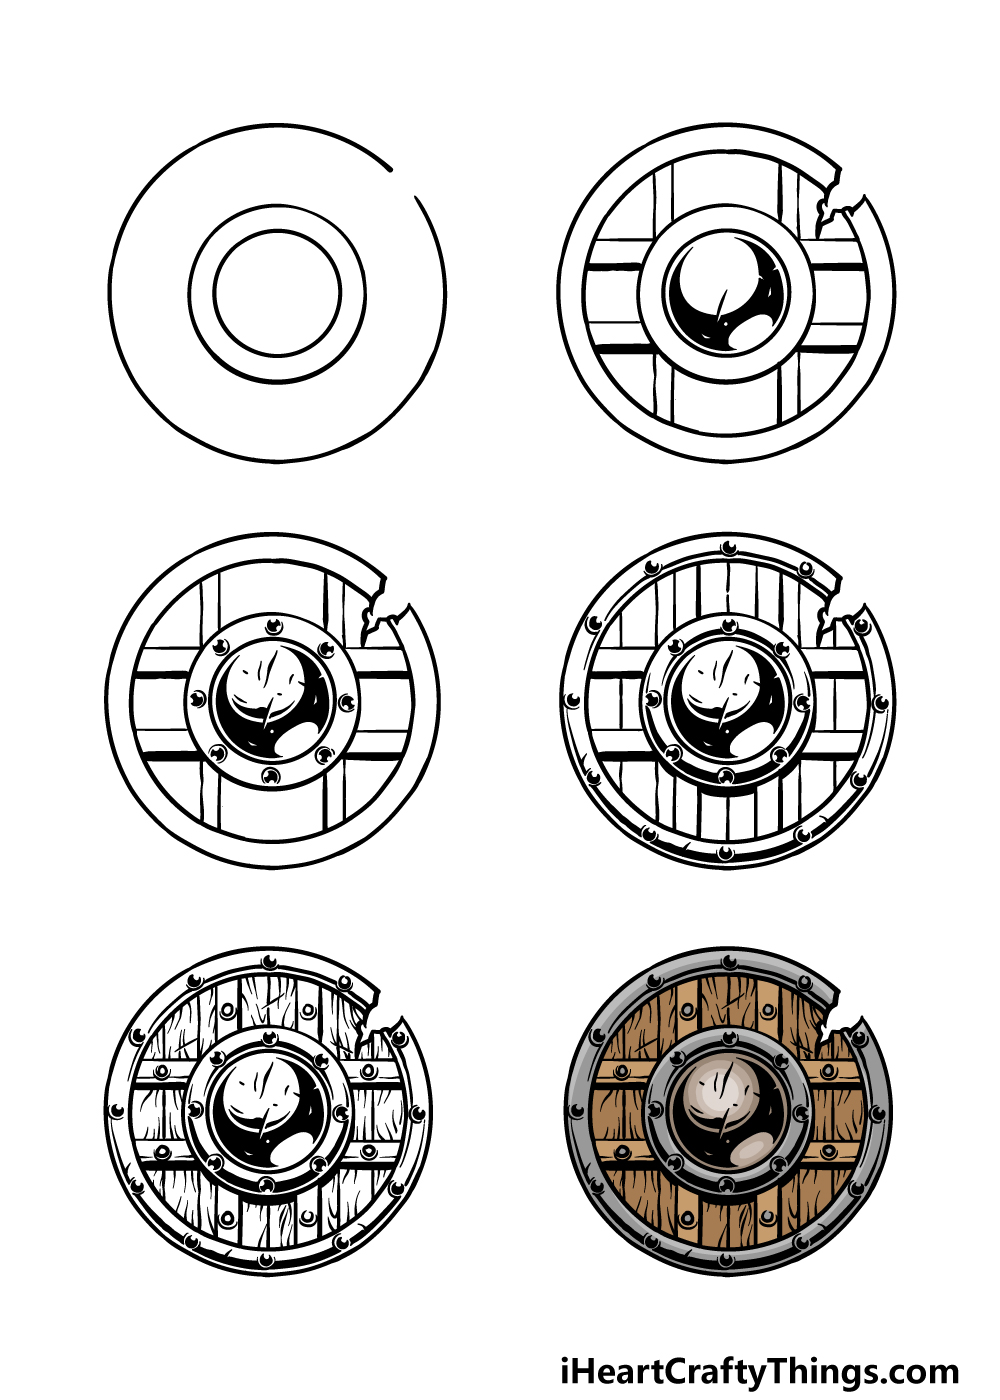
How to Draw A Shield – Let’s Get Started!
Step 1
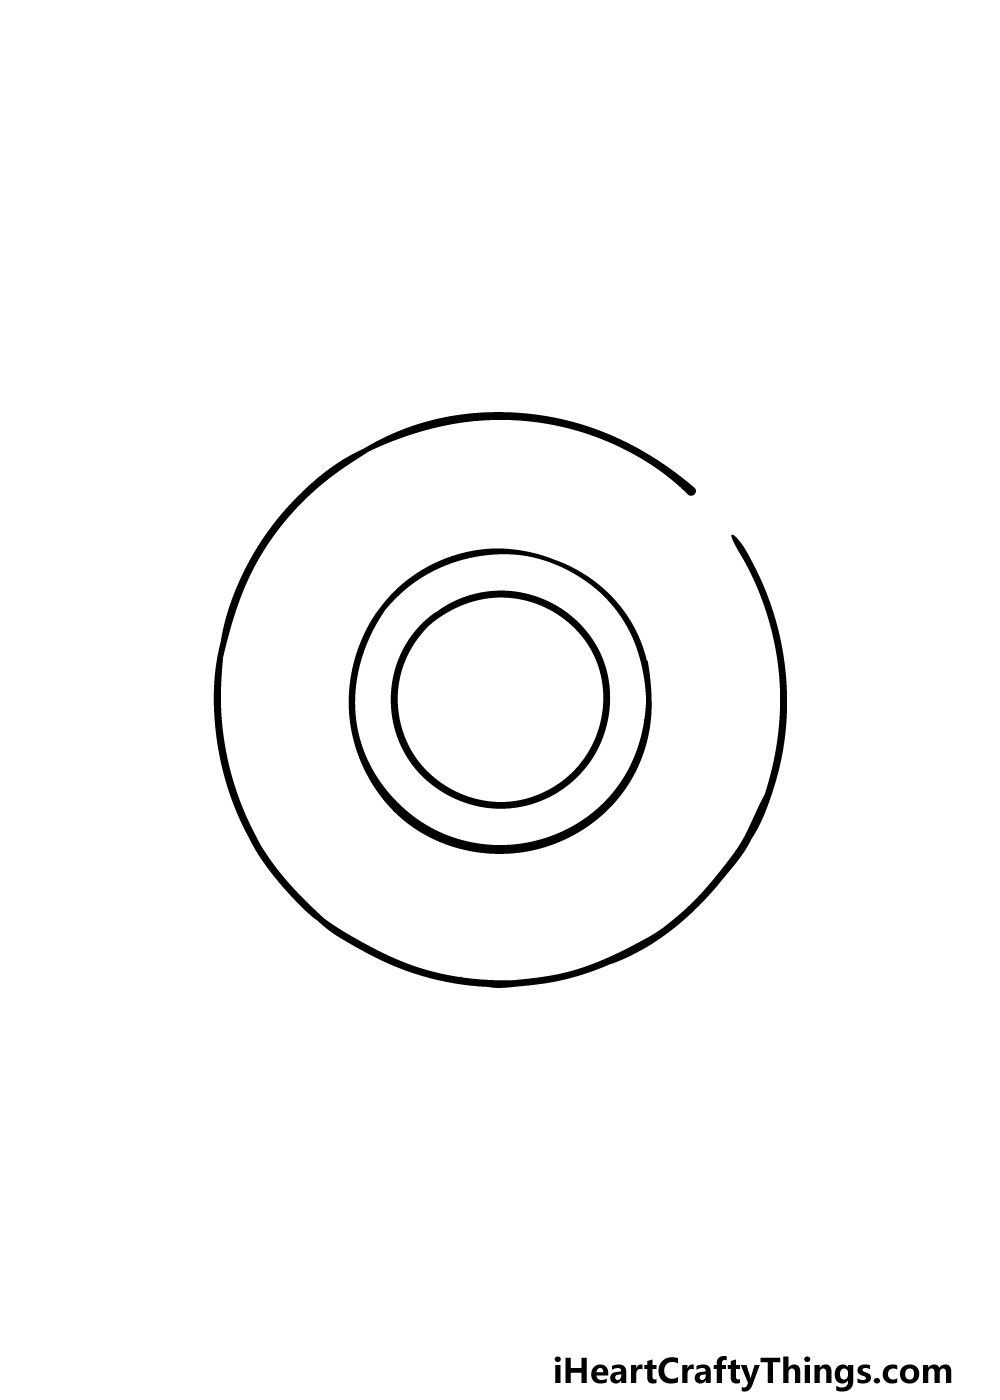
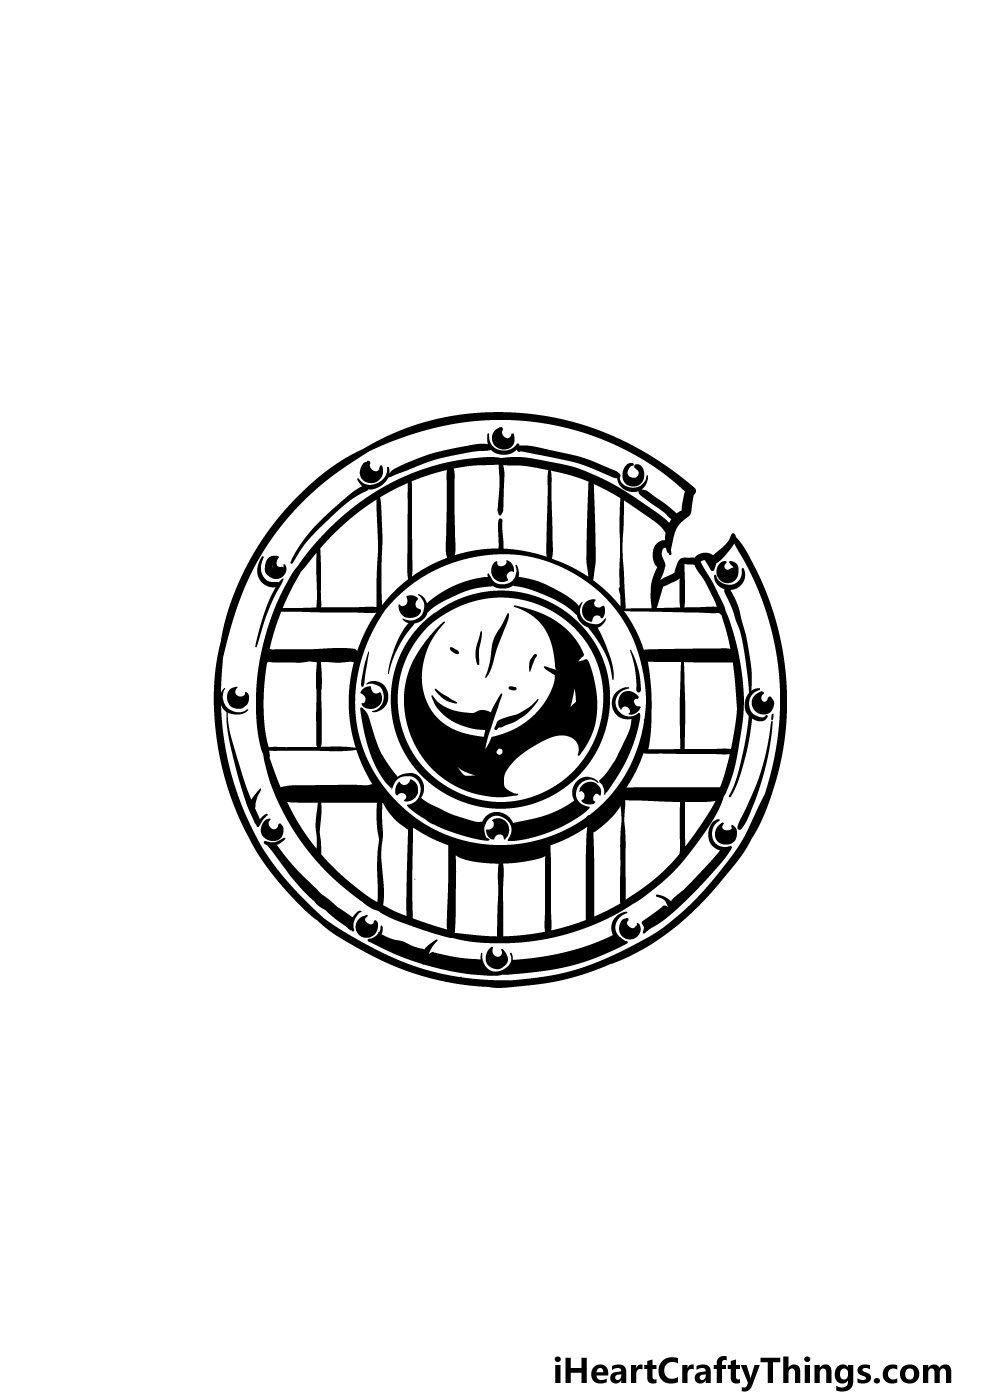
The piece that we will be drawing in this guide on how to draw a shield looks a bit like it could be a Viking shield.
These shields were often small and round, so that is what we will draw for the outline in this first step.
To do this, you would have a much easier time if you use a tool such as a drawing compass to create the outer circle. Be sure to leave a small space in the upper right-hand side of the shield, for reasons you will find out in a bit!
Then, finish off by drawing two more circles in the center of the shield. Then it’s on to step 2!
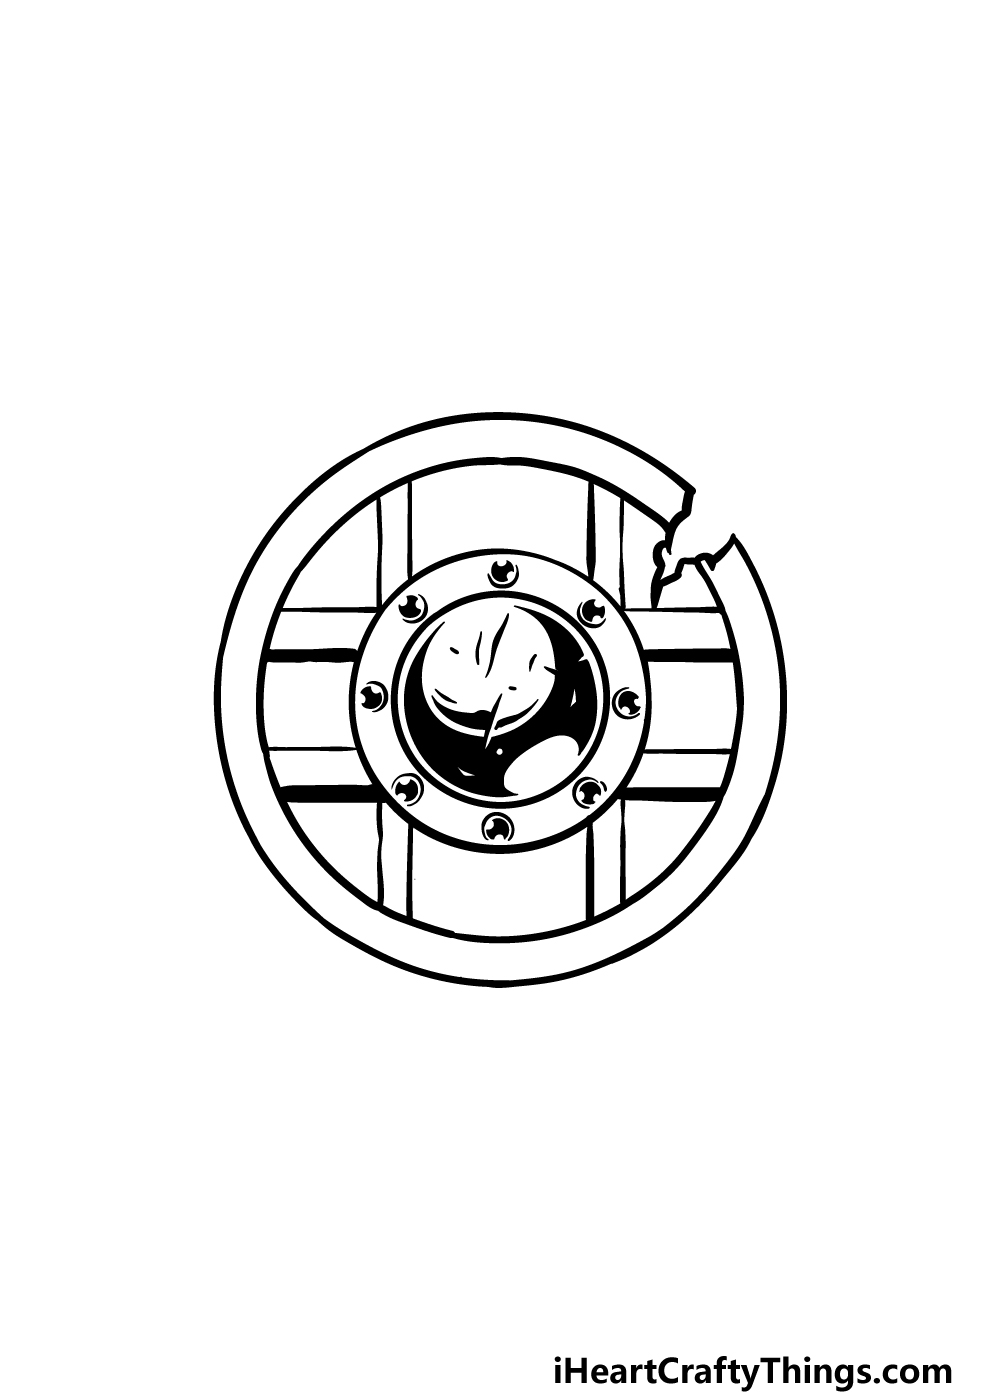
Step 2 – Next, draw some details for the shield

Now, we shall start laying the groundwork for the final details of your shield drawing. First, draw another circle near the inner perimeter of the shield outline.
Then, you will see why we left that space in the outline, as you can use some jagged lines for a hole in the shield, presumable where a sword smashed it in!
Then, we will be drawing a sort of grid pattern using some straight lines inside the outline of the shield.
Finally, you can draw a shape inside the circular center of the shield to show how light is shining on it. You can copy the shape directly from the reference image to help you!
Step 3 – Draw some more details for the shield
The third part of our guide on how to draw a shield will see you adding more details to the shield.
First, draw some slightly jagged lines on the central circle of the shield for some small nicks in it from past battles. This shield has certainly been well used!
Finally, draw some small black shapes along the perimeter of the central circle between it and the circle encasing it. These will serve as the bolts holding the shield together.
Step 4 – Now, keep adding even more detail
This shield drawing of yours is looking great already! In the next couple of steps, we will make it look even better with some more details.
For now, we will be adding some more of those bolts that you were drawing in the previous part. These ones will go near the outer perimeter of the shield and all around it.
Then, we will be adding some shading detail inside of the central circle of the shield. These details will be composed of a thin line on top and a thicker one at the bottom of it.
Finally, we will be adding more lines to the grid shape that you started in a previous step to make it look even more dynamic. Then we will finish off the final details in the next step, so let’s proceed!
Step 5 – Finish off your shield drawing

Before you add some color to your picture, we will first add some final details and elements in this step of our guide on how to draw a shield.
You can do this by adding some small, wavy lines onto the portion of the shield that would be made of wood. This will help it to look even more wooden!
Then, you can add some erratic lines throughout this area for yet more chips and nicks. Once these details are added, you can also add some extra elements of your own to really finish it off!
One fun idea would be to look up some Viking swords or axes and then draw one to accompany this shield. You could also create a background or even draw someone holding the shield and standing ready for battle!
These are just a few of the ideas you could try out, but be sure to get creative with it as you take this drawing even further!
Step 6 – Finish off your shield drawing with some color

This is the final part of your shield drawing, and in this one you can finish it off with some great colors.
In our reference image, we went with various shades of grey for the metallic parts of the shield. By using various shades, you can make the metal look a little more realistic!
In the same way, we used more than one shade of brown for the wooden aspects as well. Don’t forget to color in the little bolts and nails as well!
Once you have chosen all of the colors you would like to use, it will just be a matter of picking your art mediums.
You could go for some painterly acrylics and watercolors or perhaps some colored markers and pencils. What do you think would suit this drawing?
3 More tips to make your shield drawing easy!
Find out how you can make this easy to draw shield even easier with some fun tips!
We added plenty of awesome details to this shield drawing, including weathering on the metal and wooden parts. These details are all extras that just make the shield look even better.
While they are a great addition, they’re not necessary to the overall design of the shield. So, if you have a hard time drawing them then you could remove a few of these extra details.
They look good on the shield, so it would be recommended to remove as few as possible. Try to stick to areas that you are specifically struggling with so that you can keep any that aren’t giving you any trouble.
Another way to make this shield drawing easy to do would be by incorporating it into a larger design.
It may be assumed that adding to the image is a good way to make the image harder, but that doesn’t have to be the case!
For example, maybe you want to draw a simple cartoon Viking warrior holding this shield. If that were the case, you could draw him in the style of your choice and then adapt the shield into the same style.
This would be a great way to simplify the shield design while still having it fit into the scene you want to create. What kind of style could you use for this shield sketch?
Finally, you could use some additional art tools and techniques to make creating this shield drawing a bit easier. There are lots of round shapes on this shield, so we mentioned using a drawing compass for the outlines.
If you don’t have one available, then you can also use some round objects to trace around. These could be found around the house, and could include jar lids or any other such objects.
Simply trace around them, and you will have some perfect circular outlines to use for your shield! If you know of any other tools and techniques then definitely go for those too.
Your Shield Drawing is Complete!
We hope that working on this guide on how to draw a shield didn’t prove to be a battle for you!
There were a lot of shapes and details to get right in this drawing, so we hope that the various steps made it much easier for you to take on.
Don’t forget that you can also add details and elements to the shield, background and color choices! Just be sure to have fun with it and see what happens.
The fun isn’t over here though, as you can find more guides on our website. We upload new ones often, so definitely keep checking in!
Once your shield drawing has been completed, we hope that you will share it on our Facebook and Pinterest pages for us to see!