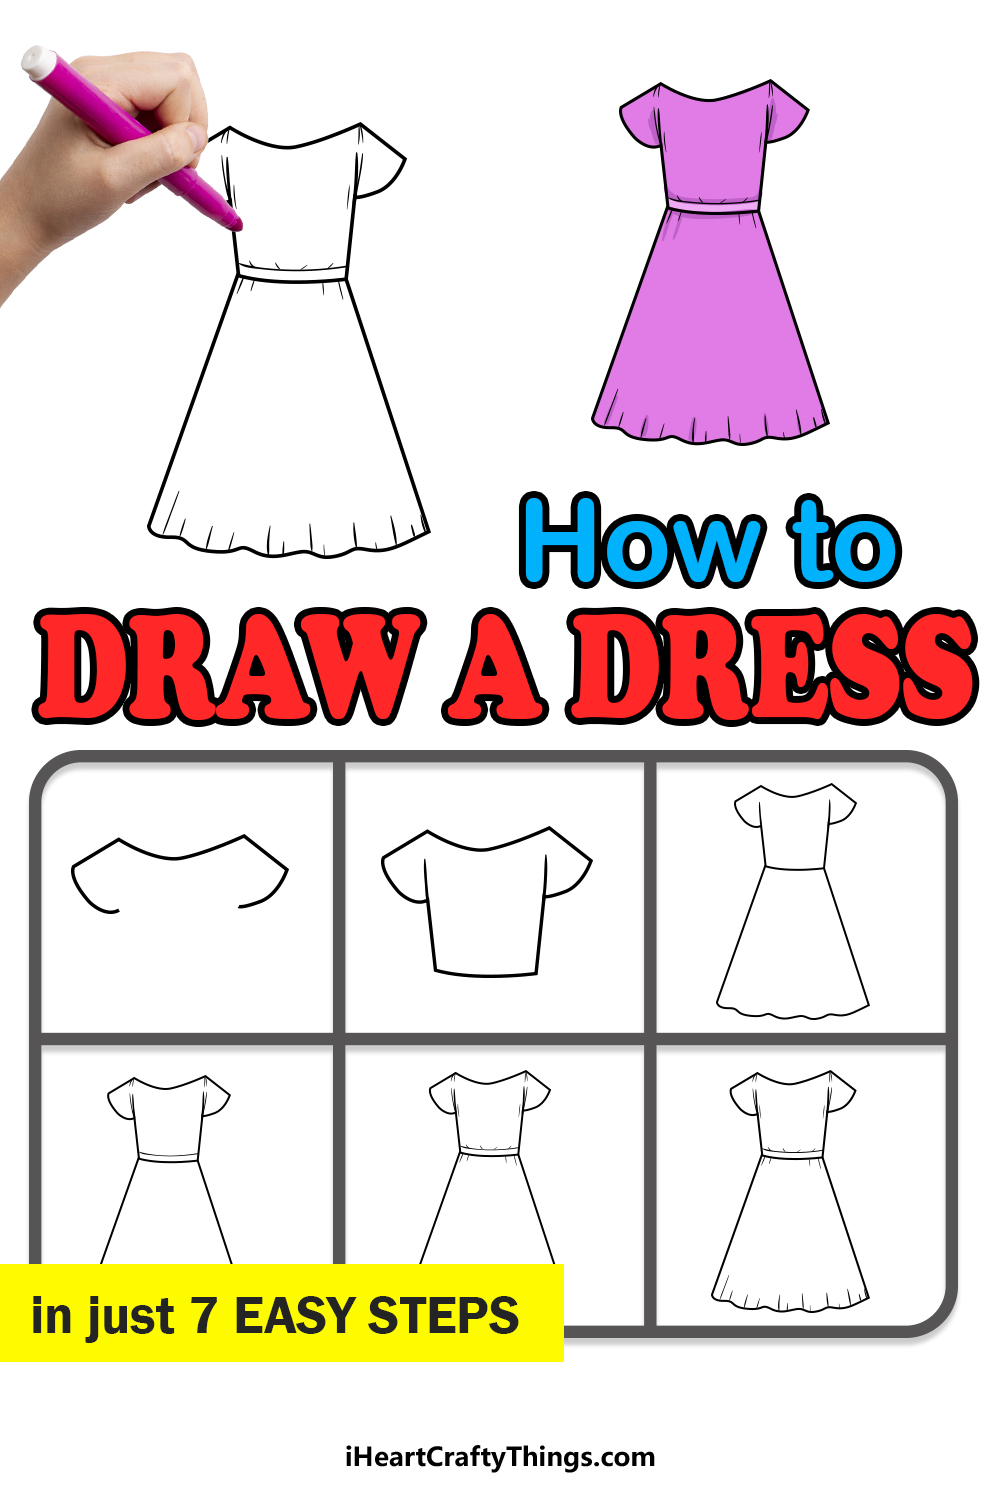
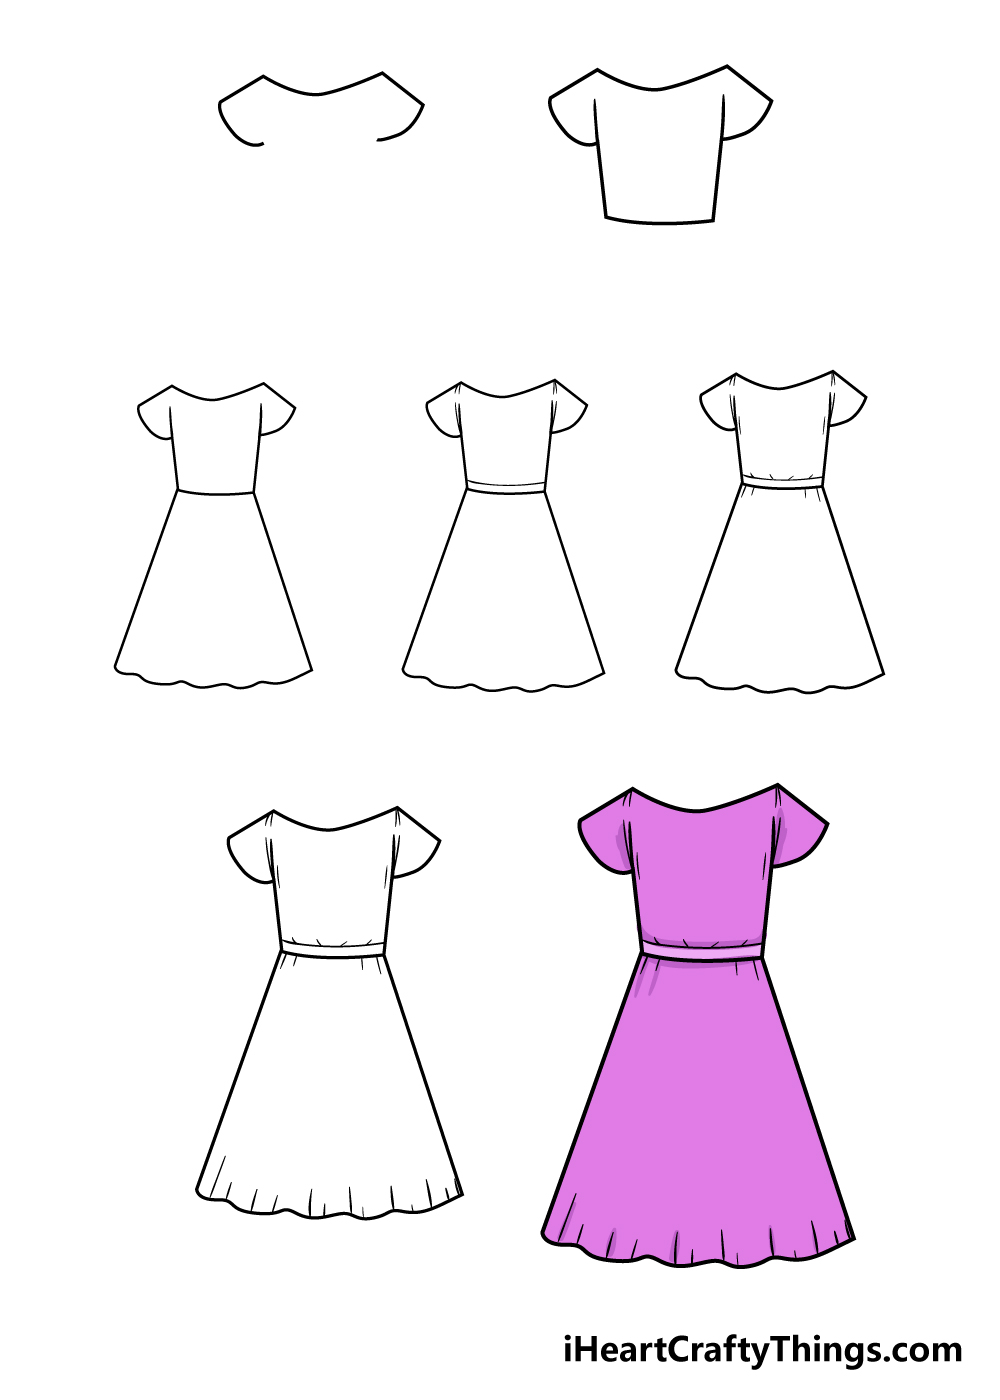
Live out your dreams of fashion design with this guide on how to draw a dress! You can create a pretty dress of your own just by following along.
Fashion is constantly changing and evolving, and everyone has their own favorite styles. Some people prefer dresses to be extravagant and fancy while others like ones that are simpler and more practical.
The best part is that neither opinion is wrong! By following this guide, you can see how to draw a simple dress design. Once you have the hang of it, you could change it with any colors and details you like.
It is also fun to draw any accessories you would like to wear with your finished dress. You could also take it further by drawing a character wearing the dress.
Perhaps they could even be based on you or someone you know! It all starts with the first step, so let’s embark on this journey together.
Watch And See How To Make A Pretty Dress Drawing
How to Draw A Dress – Let’s get Started!
Step 1
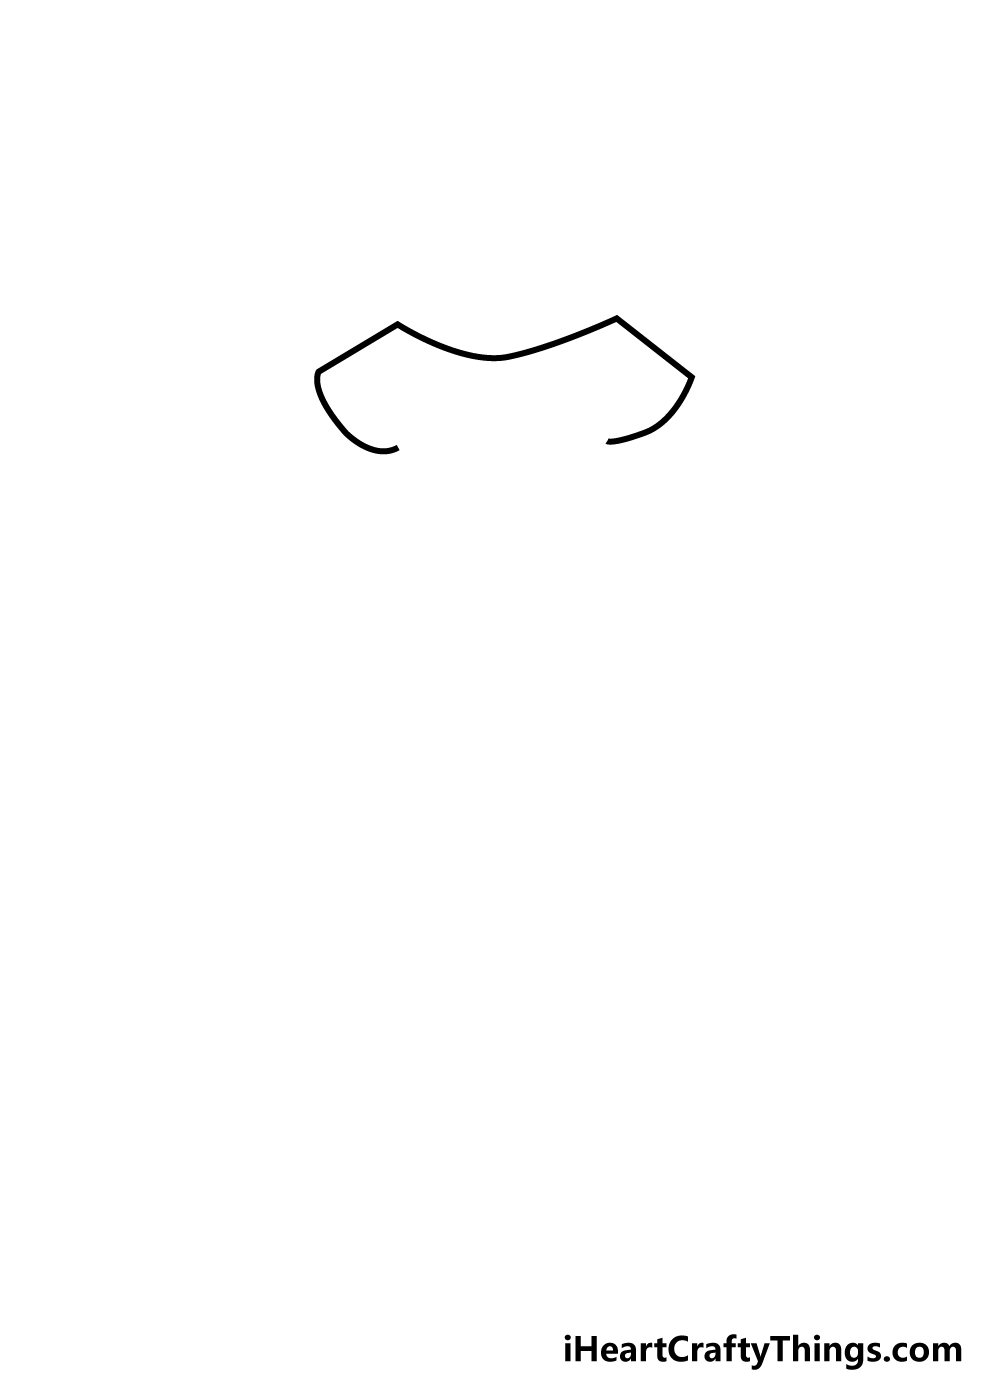
In the first step of our guide on how to draw a dress, we will start with the neck and sleeves of your dress. This will be drawn by using a curved line for the neckline of the dress.
Then, you can draw some angled lines that come down in a curve at the end to make the sleeves.
Once you have these elements looking as they do in the reference image, you’re ready for step 2!
Step 2 – Draw the chest of your dress
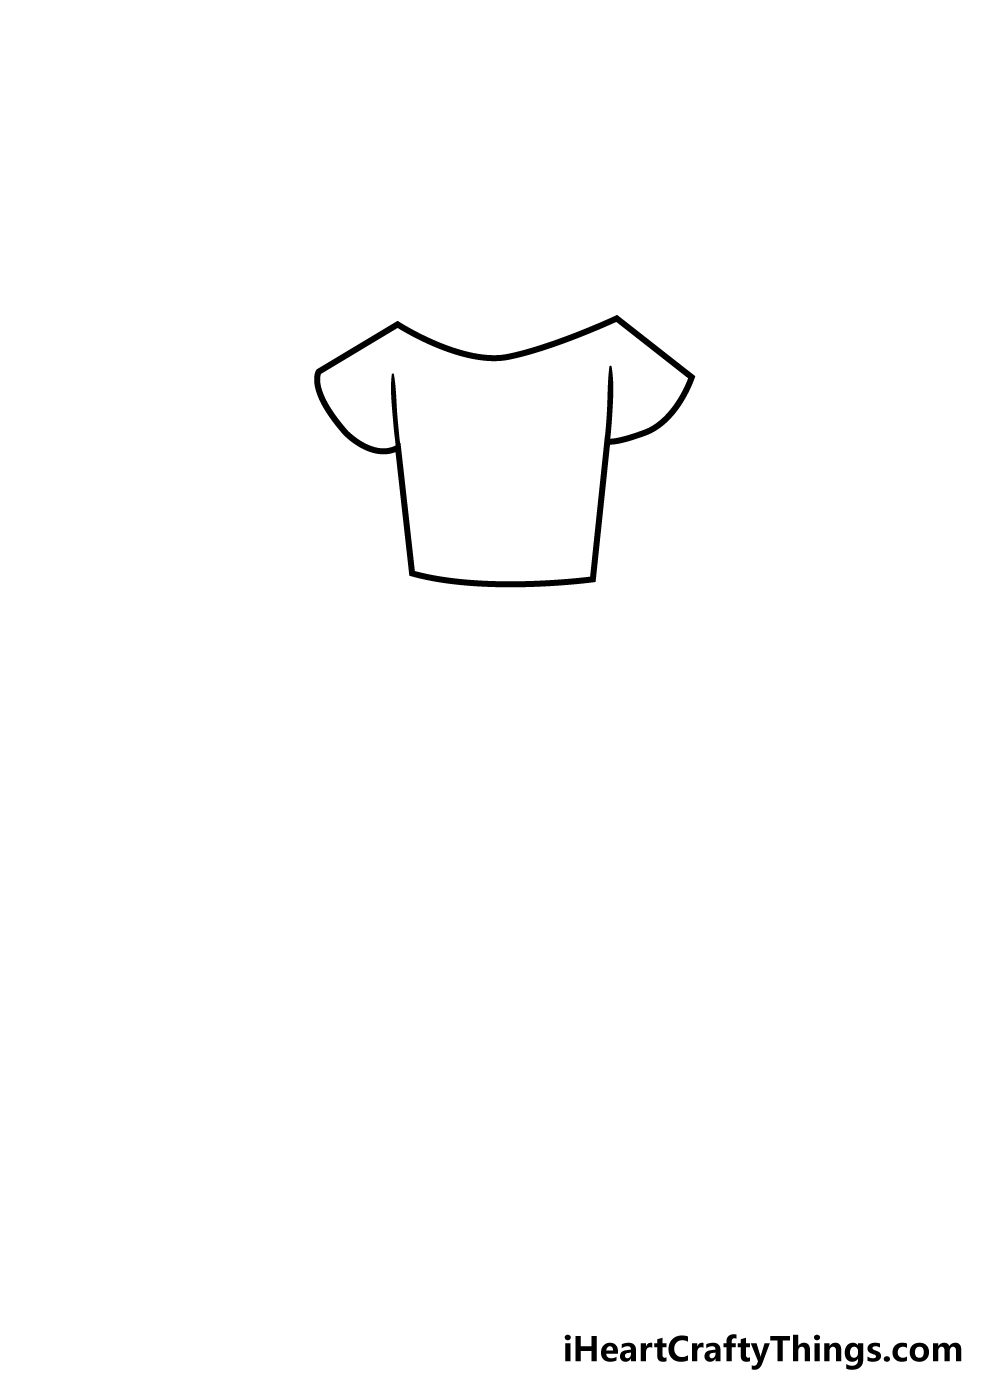
For this part of your dress drawing, we will be drawing a torso for it. To draw this part, draw two lines coming down from the inner side of the sleeves.
This will make a somewhat square shape with slightly sloped sides.
Step 3 – Now, draw the skirt of your dress

Your dress needs a flowy skirt portion, so let’s draw one in for this step of our guide on how to draw a dress.
To draw this part, simply have two lines moving outwards from the bottom of the part that you drew in the previous step. Once you have those lines drawn, you can join them together with a slightly flowing line.
You can use a flowy, curved line as this will show that there is a flowy hem at the bottom of the skirt portion.
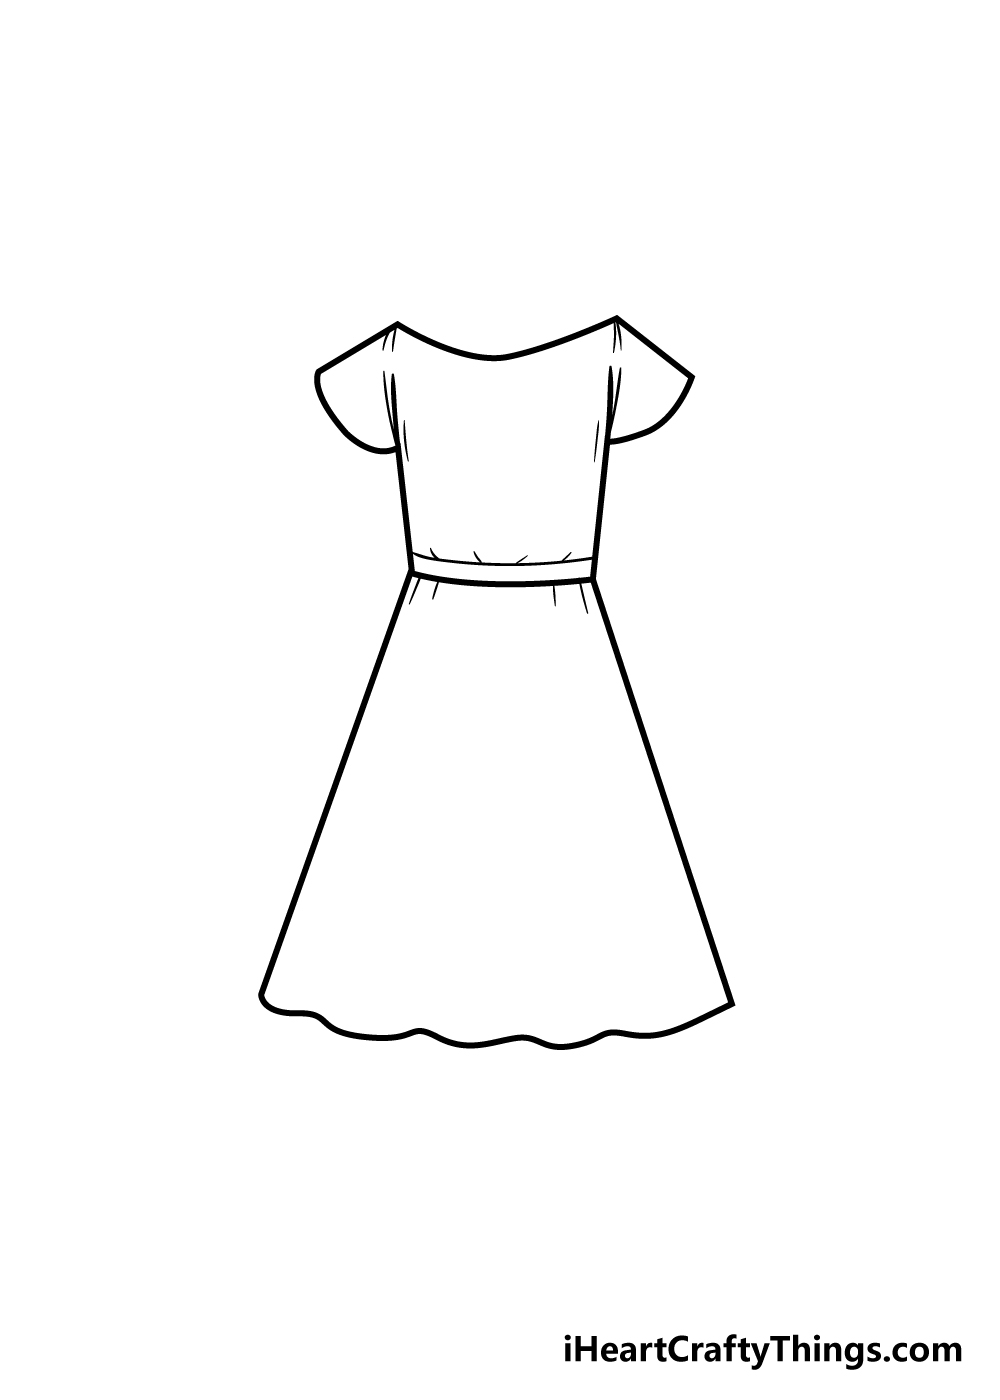
Step 4 – Start drawing some details for your dress in this step

We will start to add some details to your dress drawing in this step. To start with, add some thin lines to the start of the sleeves.
Then, carefully draw a line above the waist of the dress to create a belt-like strap portion.
Step 5 – Next, keep adding details to your dress
The last few steps of this guide on how to draw a dress will be all about adding in some final details and extra elements.
For now, you can simply add some details to the chest and the belt area to create some creases for your dress. Details such as this are subtle yet effective in creating a more dynamic look for your dress drawing.
Step 6 – Now, finish off the final details
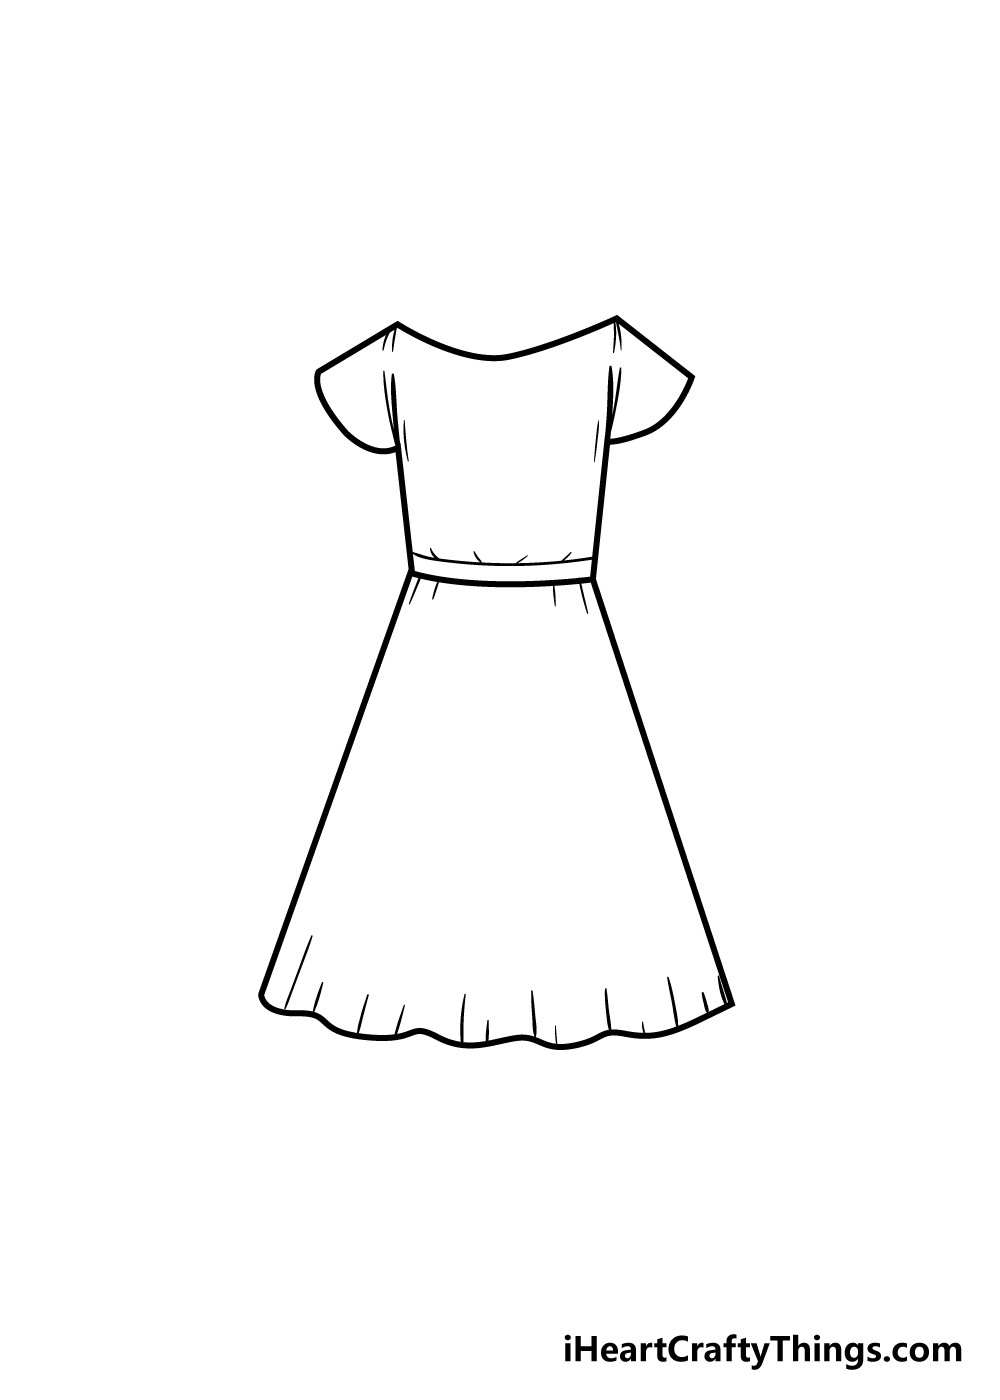
In this step of our guide on how to draw a dress, you can add the final details to your dress before moving on to the color.
The final details that we have added for our example were some lines at the hem of the dress. Much like the lines that we used in the previous steps, these help to add the look of creases and movement to the fabric.
With those details, your dress drawing is almost ready for coloring! You could move on to the next step, but you could also keep adding details to further personalize your drawing.
You could really let your creativity flow in this step, and use some extra elements to create a stunning new style.
You could do this by drawing some accessories for your dress, or even by creating some patterns for it.
If you need some inspiration, you could look up some fashion pictures online and try to incorporate elements that inspire you into your dress drawing.
Bonus: Show Who Is Wearing This Dress
In this guide on how to draw a dress, we briefly touched on how you could portray a character wearing this dress. We kept this suggestion pretty vague, but we wanted to cover some ways you could do this.
We think that there are two main things you should keep in mind if you would like to do this. The first should be who is wearing the dress and the second is what style they’re drawn in.
Focusing on that first aspect, we gave the idea of using yourself as the model, but that is just one possibility. If you don’t want to draw yourself, then you could instead use a character or a celebrity that you like.
Perhaps it’s a Disney princess or an actress that you’re a fan of, for a few examples. You could then use some pictures of them and then draw them wearing the dress you created.
You could even tailor the dress specifically to meet their style or look! Once you have decided who will be wearing this dress, you can then decide what style you’re using.
If you want to keep the drawing realistic, then you could try your best to have the character match the real person. Or, maybe you would prefer a more stylistic, cartoony interpretation.
It’s really up to you, and there are no wrong ways to do it! You could even just use the person you’d like to draw as a basis and then add details to create a unique person.
If you have too many ideas, then you could make a few attempts with different dresses and people wearing them. Who would you like to see wearing this dress that you have created?
When you’re happy with it, we can move to the final step.
Step 7 – Finish off your dress drawing with some color
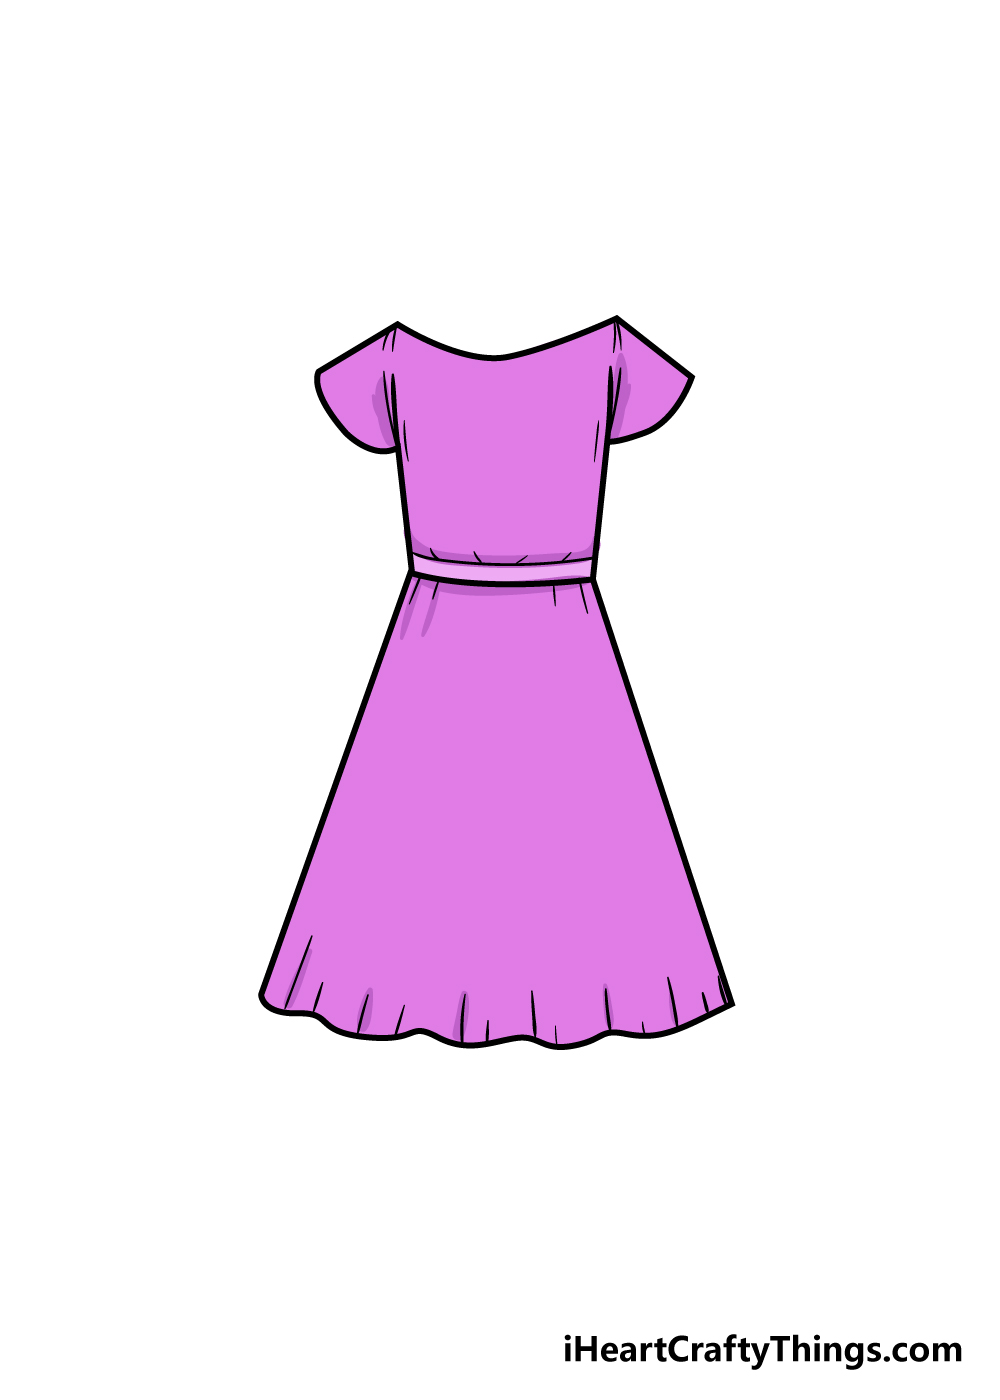
Now that you have finished your dress drawing, now you can have a lot of fun coloring it in! This is definitely a step where you should let your creativity and inspiration run free.
Fashion is all about expression through style and colors, so this gives you a lot of freedom to express yourself with the colors you use.
Will you use cooler blues and purples for a Winter look? Maybe you could use a bright and breezy floral pattern for a Summer feel or pair colors like white and red for an elegant eveningwear look.
If you’ve drawn any accessories or extra elements for your dress drawing, you can also color those in to match it.
There are also lots of great art mediums that you could use to color in your dress, from bright acrylic paints and colored pens to more subtle watercolors and colored pencils.
We can’t wait to see how you finish off your beautiful dress drawing!
4 More Ways To Make Your Dress Drawing Unique
Let out your inner fashion designer with these 4 fun and easy tips!
We left the design of this dress drawing pretty simple in this guide, and that looks great in its own way!
That being said, you can also add your own details and enemies to this blank canvas of a dress. This could be anything from floral patterns to polka dots or anything else you think would make it look pretty!
It’s all up to you, and you should definitely trust your creative instincts on this one. Whether you add some pattern details or keep it to solid colors, we know it will look amazing!
Another way you could make this dress sketch more unique would be by adding some accessories to go with it.
This could be anything from a matching purse to a hat or a sash. There are many accessories you could choose, and you could keep it vintage or more modern.
You can look up some fashion pictures online for some inspiration or just use your imagination entirely!
At the moment, this dress os floating in empty space. This looks great to show it off, but you could also draw a head and some limbs coming out of it to show who is wearing it.
You could even use yourself as a model to make it look as if you are wearing this dress! Also, this drawing of a dress would look great with some kind of background setting, especially if you draw someone wearing it.
We used a lovely purple in our example image, but there are so many colors that you could use instead.
Dresses can come in any color you can imagine, so if you have a favorite color it will look great here!
If you added any patterns or details onto the dress or added someone wearing it, then those give you some extra elements to color as well.
Why not try out some fun art tools and mediums as well? These can bring a whole new life to the colors that you choose!
Your Dress Drawing is Complete!
You have reached the end of our step-by-step guide on how to draw a dress! You have managed to draw and design a beautiful dress, and you should be very proud of what you have created!
We really hope that you found this tutorial easy and fun to use. We aimed to show you that by breaking it down into steps you can make any drawing challenge much easier.
Now it’s up to you to show us what you can do by personalizing your dress drawing! You can really get creative with this process, and there’s no limit to the creative ways you can make this drawing your own.
Whether you change some elements of the dress, create some accessories or incorporate some beautiful patterns, we can’t wait to see what you do!
You can also have lots of fun choosing some wonderful art tools and mediums to color in your dress, and you could create some wonderfully themed looks by just using your colors.
We have many more awesome step-by-step drawing guides like this one coming out often on our site, so please be sure to check in frequently to learn how you can draw many more amazing pictures!
Once you have completed your amazing dress drawing, please feel free to share it on our Facebook and Pinterest pages!
We will be looking forward to seeing what a creative fashion designer you can be!
Here Is A Dress Sketch To Inspire You!
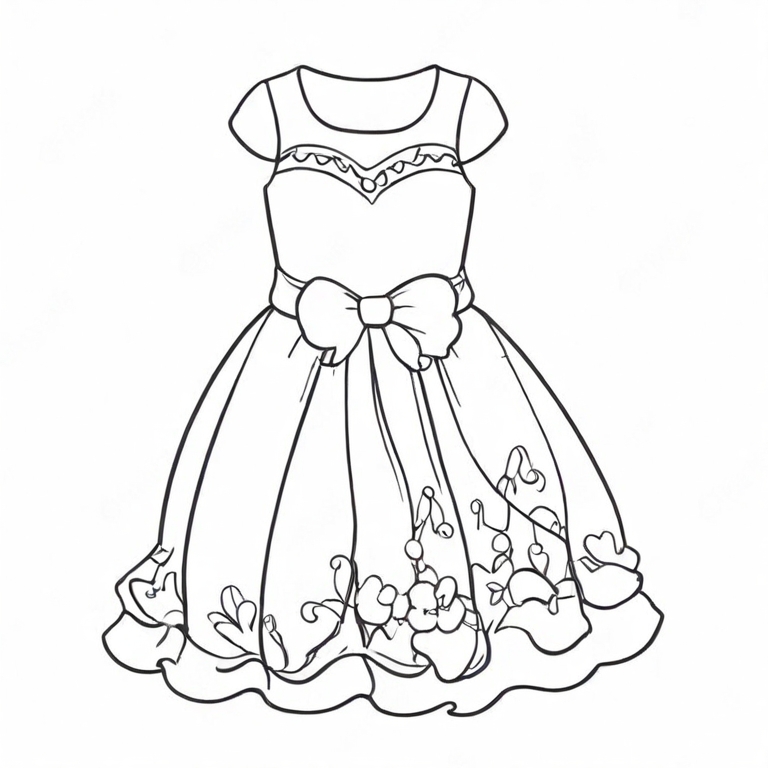
Many people dream of being fashion designers, and you can imagine what it would be like to be one with this picture! Our artist Amanda created a stunning dress sketch for kids to inspire you.
She included so many amazing details on this dress that can be admired. There is a beautiful bow on front of the dress, and there is a cute floral pattern near the base of the dress.
When you create your own dress drawing, you could change and add details as you see fit. This is a great way for you to showcase what your design skills can do, and there are so many ways to do it.
When you’re finishing off your drawing, remember that you can also use color to great effect to make your drawing more unique. What are some colors and details you could add?