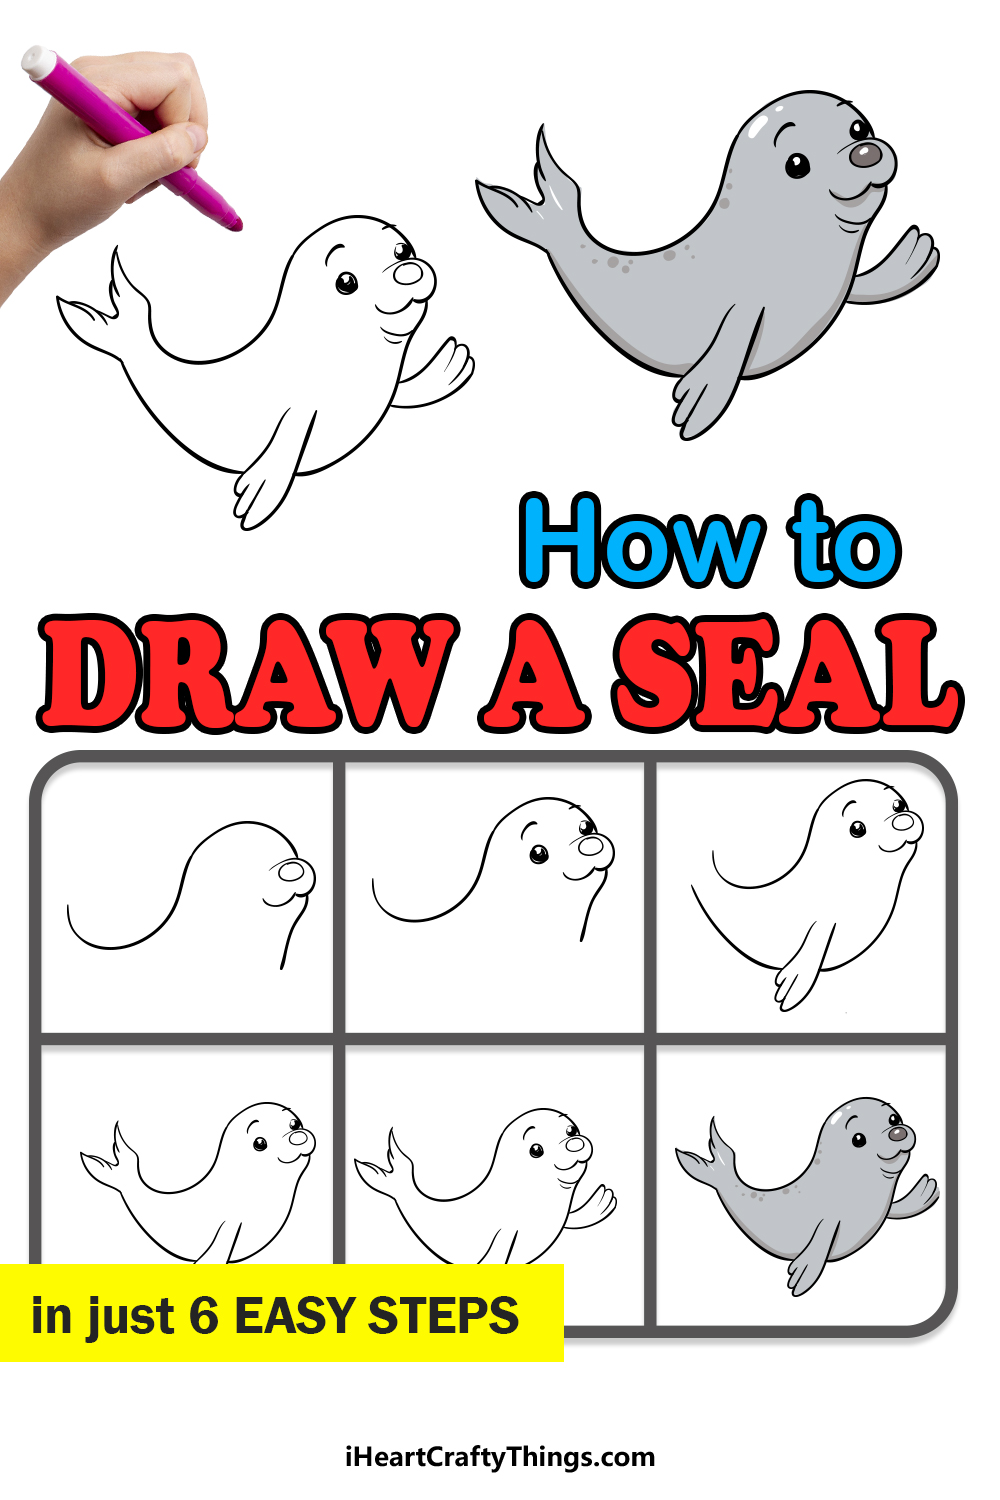
If you want to know how to draw a seal, then this easy guide for kids is for you! In just a few steps, you will be able to recreate this adorable ocean mammal.
I’ve always found seals to be exceedingly cute. There’s just something about how they look that makes them adorable, even if they can be quite rough and tough in real life.
Their unique, almost doglike appearance makes them a fun challenge to draw, but not everyone knows how to do it. This guide will show you how to make a cute cartoon version of one of these lovable creatures.
You can see it as a starting point, as once you have finished the guide you could add your own details and ideas as well. Whether it’s a background or some accessories, there are loads of things that you can incorporate!
Discover How To Make A Seal Drawing With This Guide
How to Draw A Seal – Let’s Get Started
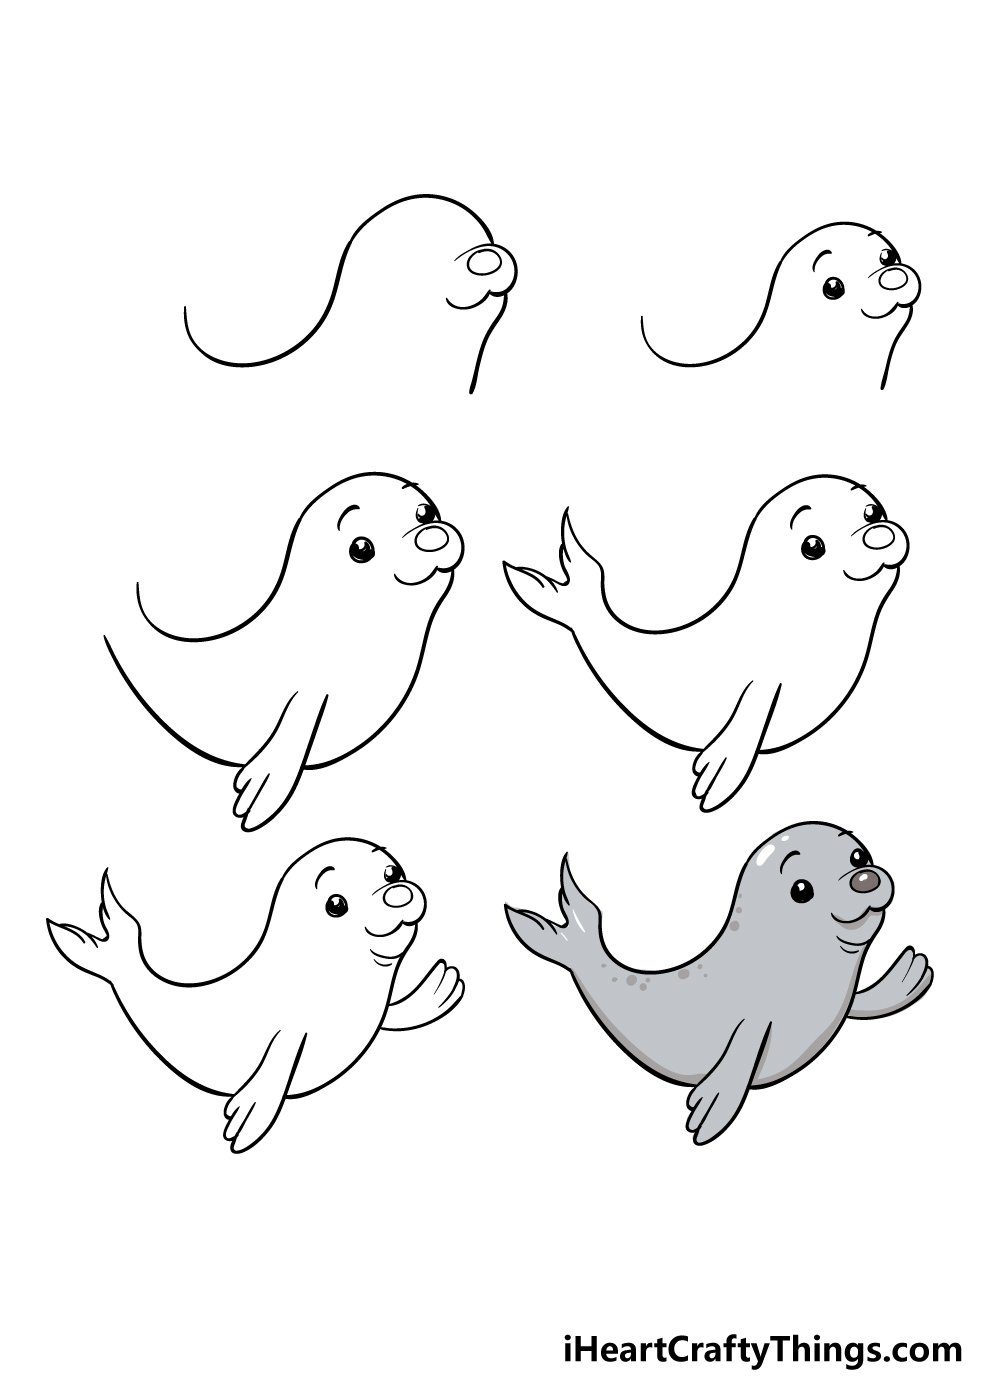
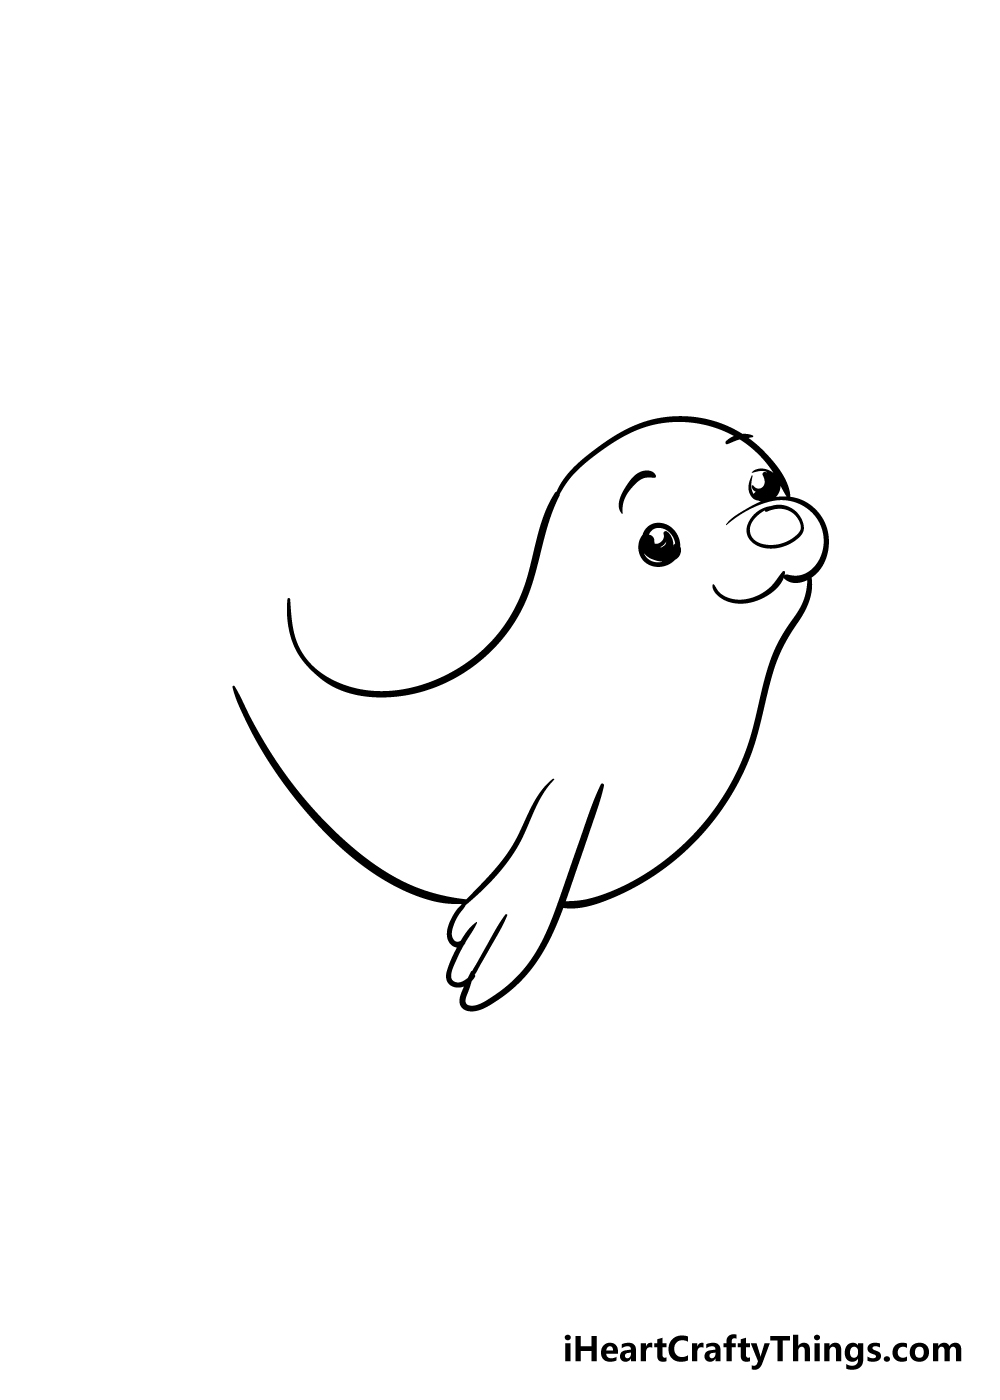
Step 1
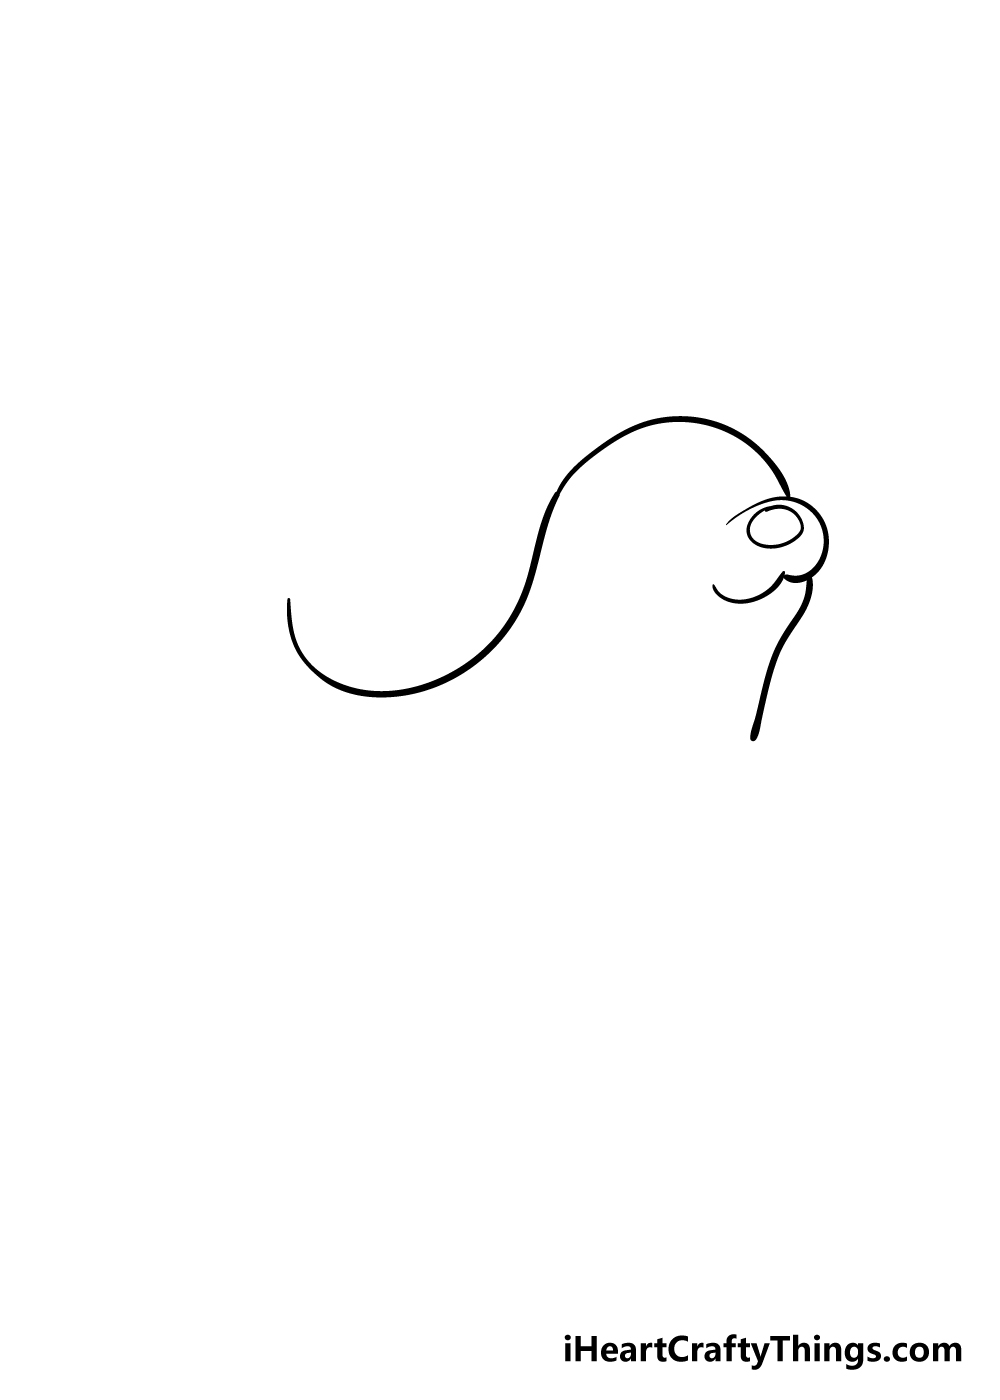
This first step of our guide on how to draw a seal will get started with you drawing the head and back of the seal.
First, the top of the head will be drawn with a curved, round line. This line will loop into a similarly curved line for the back of the seal, as shown in the reference image.
Then, once you have these lines drawn you can add a smaller curved line with two bumps in it to form the muzzle of the seal.
Then, you can add a circular shape for the nose of the seal. Finally, add one more line under the muzzle for the neck of your seal. With all that drawn, it’s on to step 2!
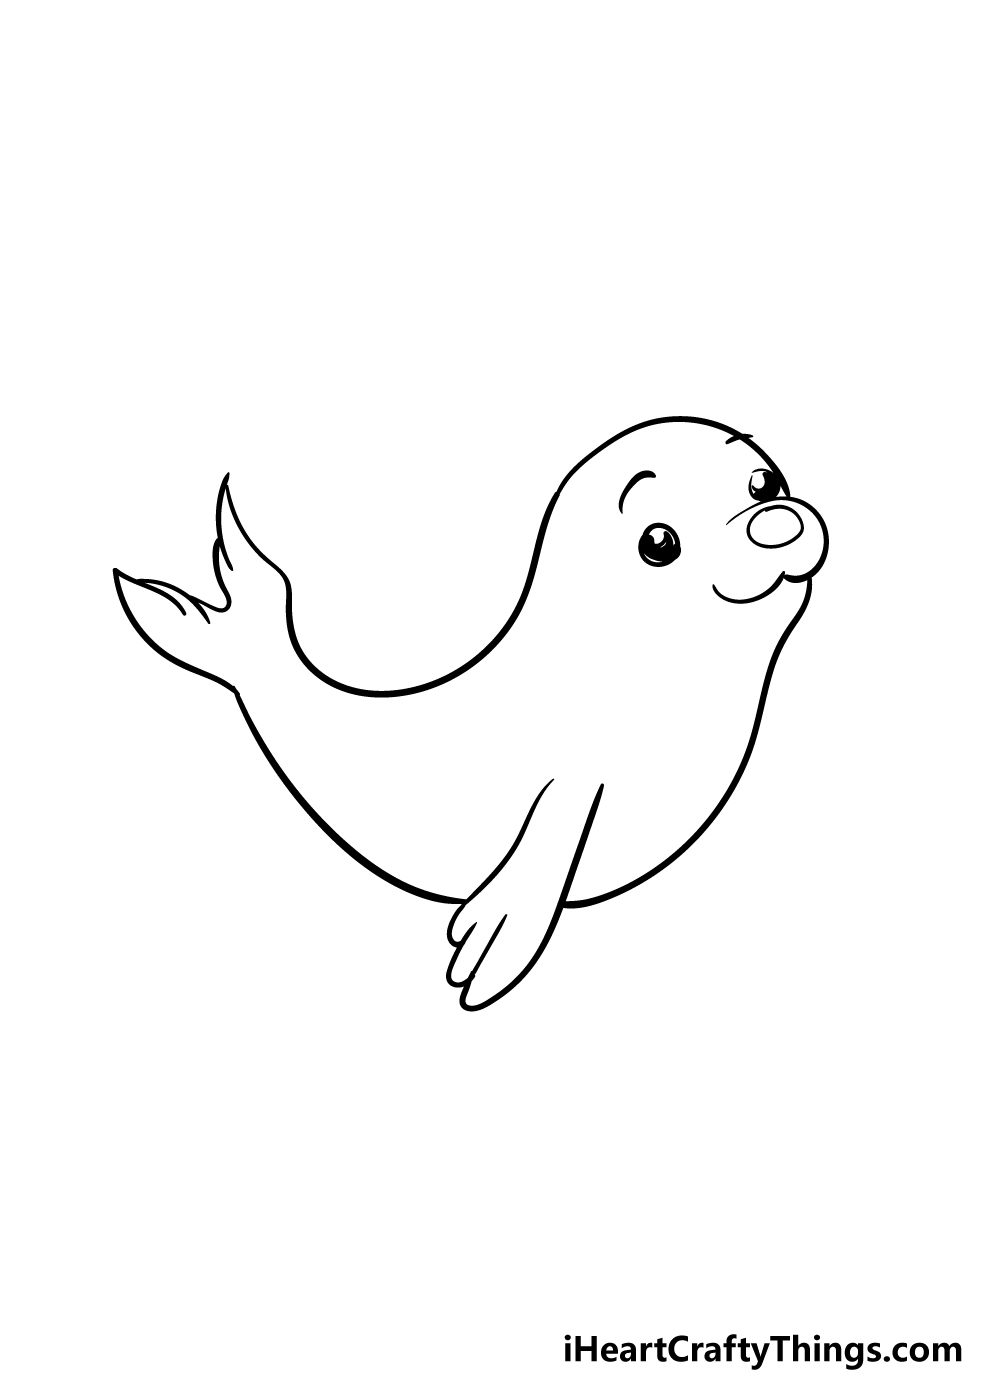
Step 2 – Draw the eyes for your seal drawing
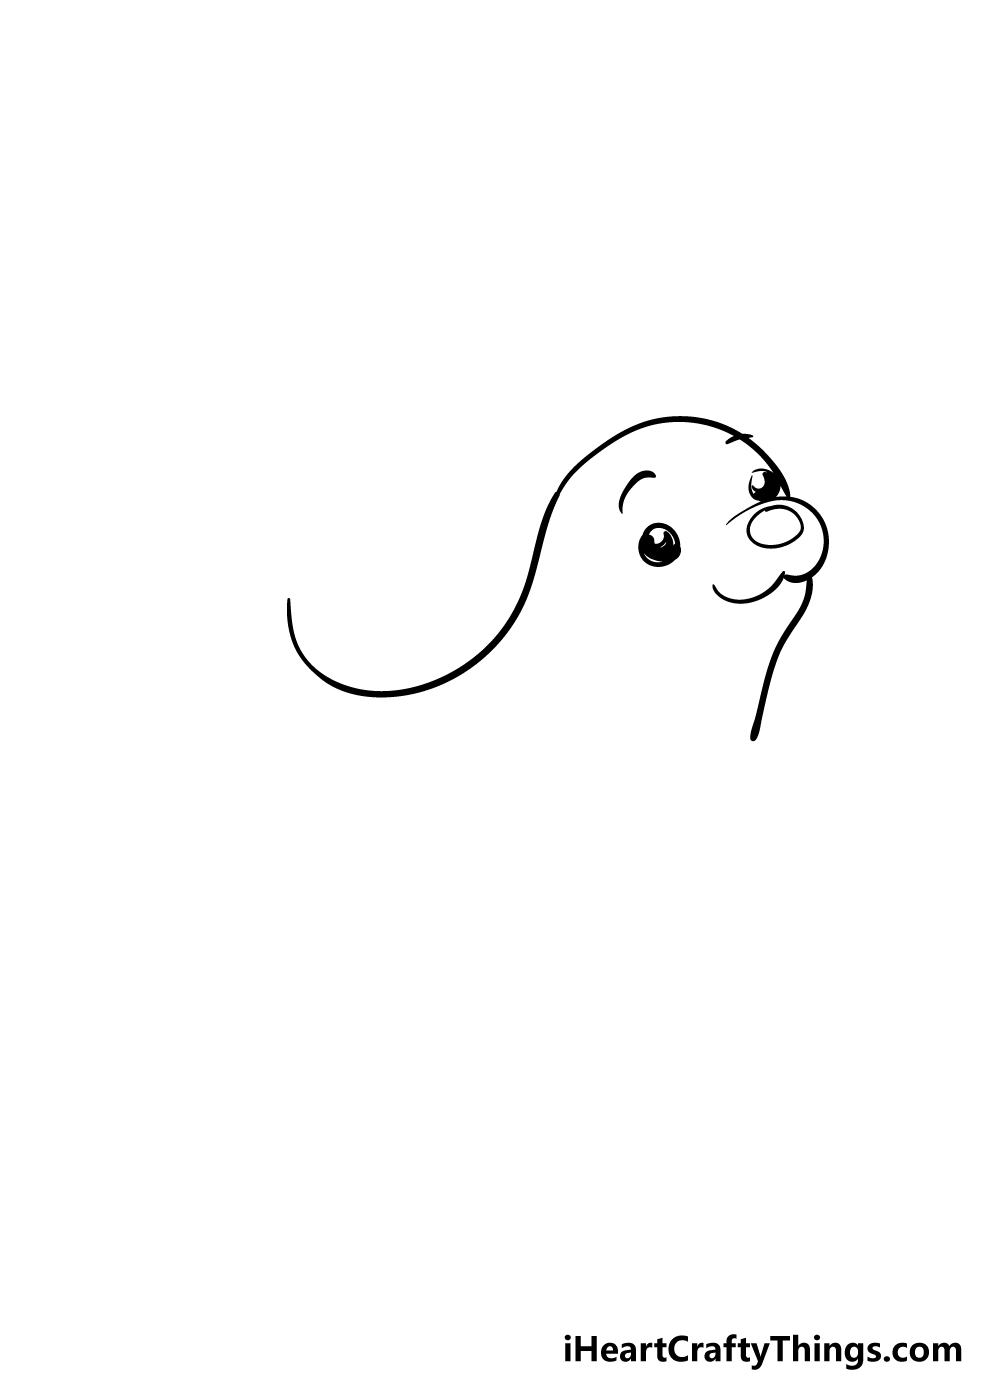
In this step of your seal drawing, you can simply add some eyes to the seal. These will be quite basic to draw, and you can draw two small circles that are relatively far apart on the face.
Then, you can color these in almost entirely, leaving only a small white dot inside each one.
Before you move on, be sure to draw some curved eyebrows above the eyes with some simple, curved lines.
Step 3 – Now, you can add the belly and first flipper of the seal
This third step of our guide on how to draw a seal will see you adding the first flipper and the belly of the seal.
It would be easiest to draw the flipper first, so you can add that with several curved lines connecting to one another.
Once you have this flipper drawn, you can draw the belly and start of the tail. The belly will extend down from the neck and go under the flipper.
It should get closer to the back line of the seal as it goes, as these lines will meet to form the tail.
Step 4 – Add the seal’s tail
This seal you’re drawing needs a tail to get around, so you had better give it one in this step of your seal drawing!
The tip of the tail will go at the end of the seal at the end of the two lines that you drew close together in the previous step.
As you can see in the reference image, the tail will be made of curved lines that come together in some sharp points.
With the tail drawn, it’s on to the final details!
Step 5 – Now, you can add the final details
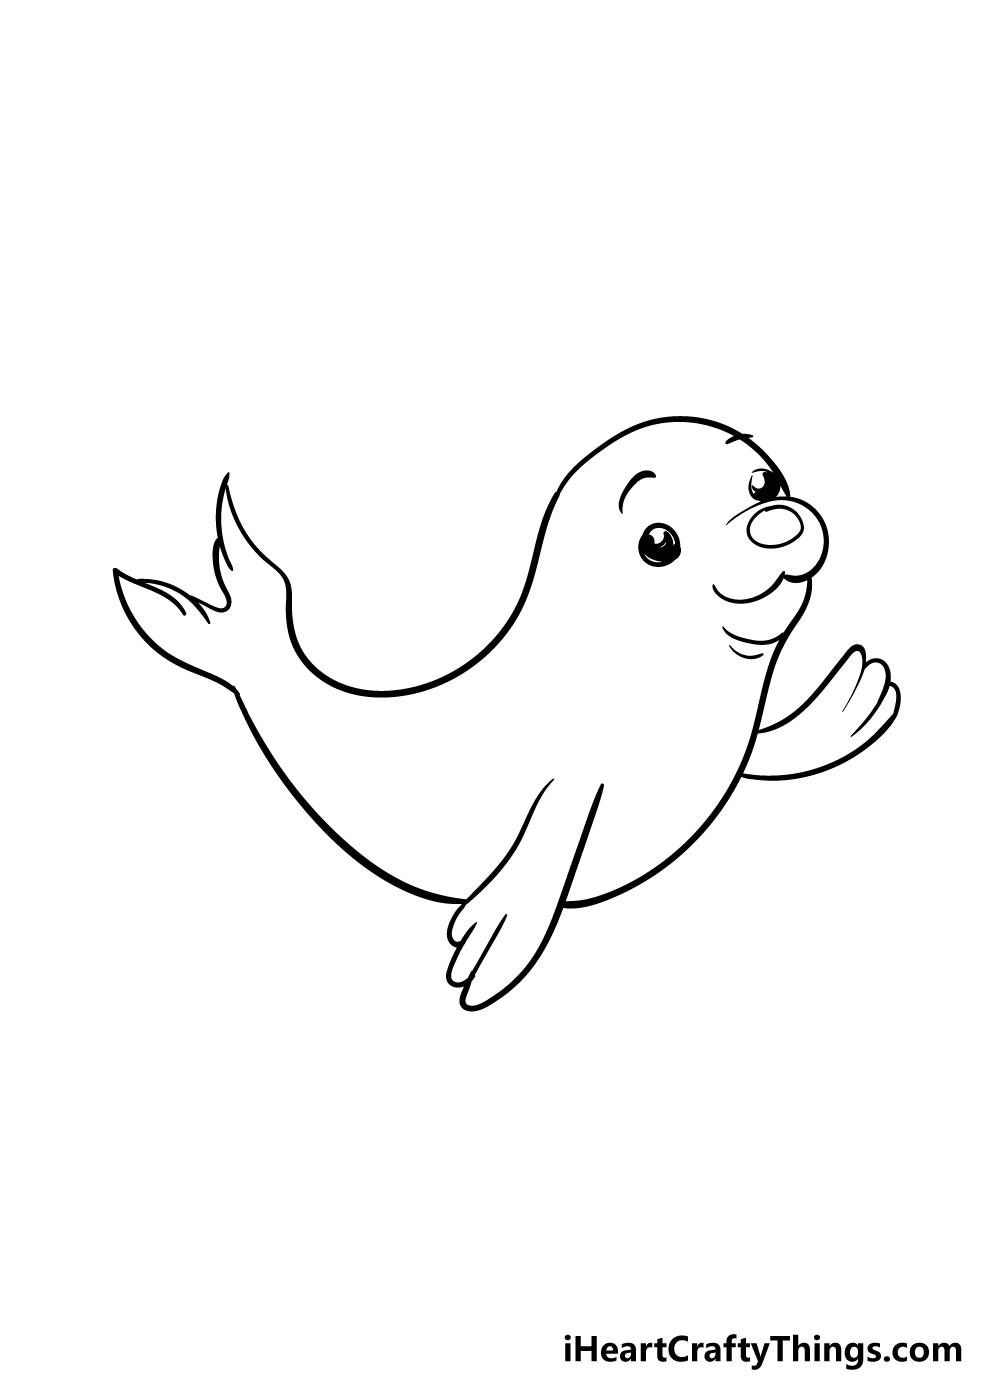
It’s almost time to move on to the coloring stage of your picture, but before you do that we have a few more details to add to your seal drawing.
First, you can draw another flipper coming from the side of the body to show that this cute seal is giving a friendly wave!
Then, once you have that second flipper drawn you can add some simple chin details to the face.
Those are the final details we would add, but before the final step you should add any details that you would like!
These could include extra fish swimming around the seal or could even be a beautiful, elaborate background scene.
How will you finish off this drawing before the final step?
Step 6 – Finish off your seal drawing with some color
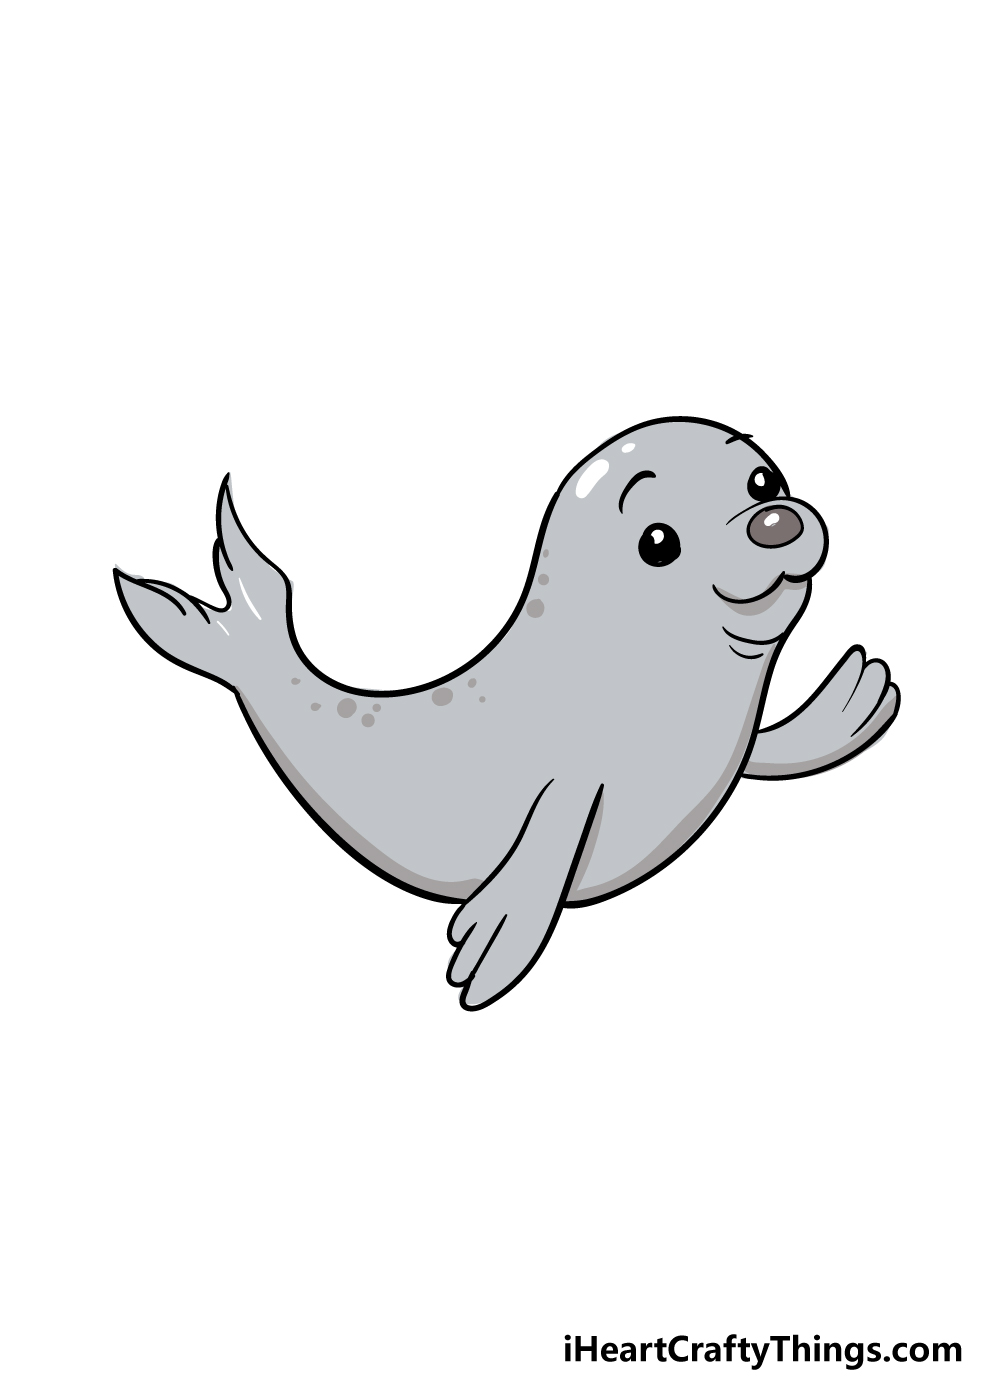
Now that your seal is completely drawn, this final step of our guide on how to draw a seal will let you have some fun coloring in your amazing drawing!
We used a grey color scheme for our example image, but this is just one out of an infinite amount of ways you could color in this cute sea dog!
You could stick to more realistic colors for this seal, but if you prefer you could also make it more stylistic with some of your favorite bright colors and patterns
. There are no wrong answers, and no matter what you choose it will look incredible! Choosing the colors is just half the fun, though, as you can also have fun choosing which art mediums you will use to finish it off.
I would use some nice watercolor paints for a softer look to this image, but you could also get an amazing look with some vibrant acrylic paints.
There are so many art tools you could use for this image, so what will you choose to finish it off?
Do this to take your seal drawing to the next level
Make this adorable seal sketch even better with these fun tips we have for you!
This drawing of a seal is so cute already, but it would only get even cuter if you added a friend to it!
You have mastered drawing a seal after finishing this guide, so adding a second one should be easy.
The second seal could look similar to the first one, but you could also add some changes to set it apart a bit.
This would be a great chance to create a fun seal adventure to admire!
What would these seal pals be up to in this image?
You could also populate this seal drawing with other ocean creatures for it to hang out with. These could be smaller creatures like crabs or maybe some seagulls.
Or, you could include larger animals like dolphins, whales or even sharks. There are many different animals that you could include, so it’s up to you to decide which would be your favorites!
How busy would you like to make this ocean artwork?
We kept the design of this seal simple and cartoony to make it easier to draw. Once you have the hang of the design, you could change it up a bit by altering the style.
One approach would be to make it look more realistic. If you wanted to do this, you could look up some pictures of real seals online to help you with the details.
You could even make it more cartoony if you wanted to!
Once you have added any extra animals and style choices to your seal sketch, you may want to finish off with a background. This is another idea where you would have tons of options!
You could go for a simple yet effective beach setting with sand, water and maybe some palm trees. Or, you could go for something a bit more creative and show the seal performing a trick with a beach ball.
These are just a few of the fun ideas you could use for this cute picture!
Your Seal Drawing is Complete!
That brings us to the end of this guide on how to draw a seal! We hope that this tutorial was not only super helpful for you, but also lots of fun for you to use!
Our goal with this guide was to show you how easy a new drawing can be when you have it broken down into more manageable steps. We hope that this guide proved that for you!
Now that you have completed this guide, you can keep the fun going with your own fun details. We mentioned drawing fish and other sea life swimming around this seal or a beautiful background to really finish it off.
This is your chance to show us how creative you can be, and we can’t wait to see what you come up with!
When you’re ready for more drawing fun, there are many more fun drawing guides for you to enjoy on our website.
We upload new guides often as well, so be sure to check in frequently to never miss out.
Once your seal drawing is finished, please remember to share it on our Facebook and Pinterest pages for us to admire. We can’t wait to meet your adorable seal friend!