


Unleash your inner tattoo artist with this guide on how to draw a rose tattoo for kids! You will be amazed at what you’re able to create when you follow these tips.
Tattoos are popular around the world, and they’re a great way to show off some incredible art that will be with you forever. When you want a tattoo, you’re pretty much limited only by your imagination.
Roses are popular when it comes to choosing tattoo subjects, as there is something about how they look that always makes them a compelling choice.
This guide is all about replicating a classic rose tattoo design, and you can even add some additional elements and customization once you have the hang of it.
It could be cool to add some text or some kind of background to make it even more unique!
Watch And Learn How To Make Your Rose Tattoo Drawing
How to Draw A Rose Tattoo – Let’s Get Started!
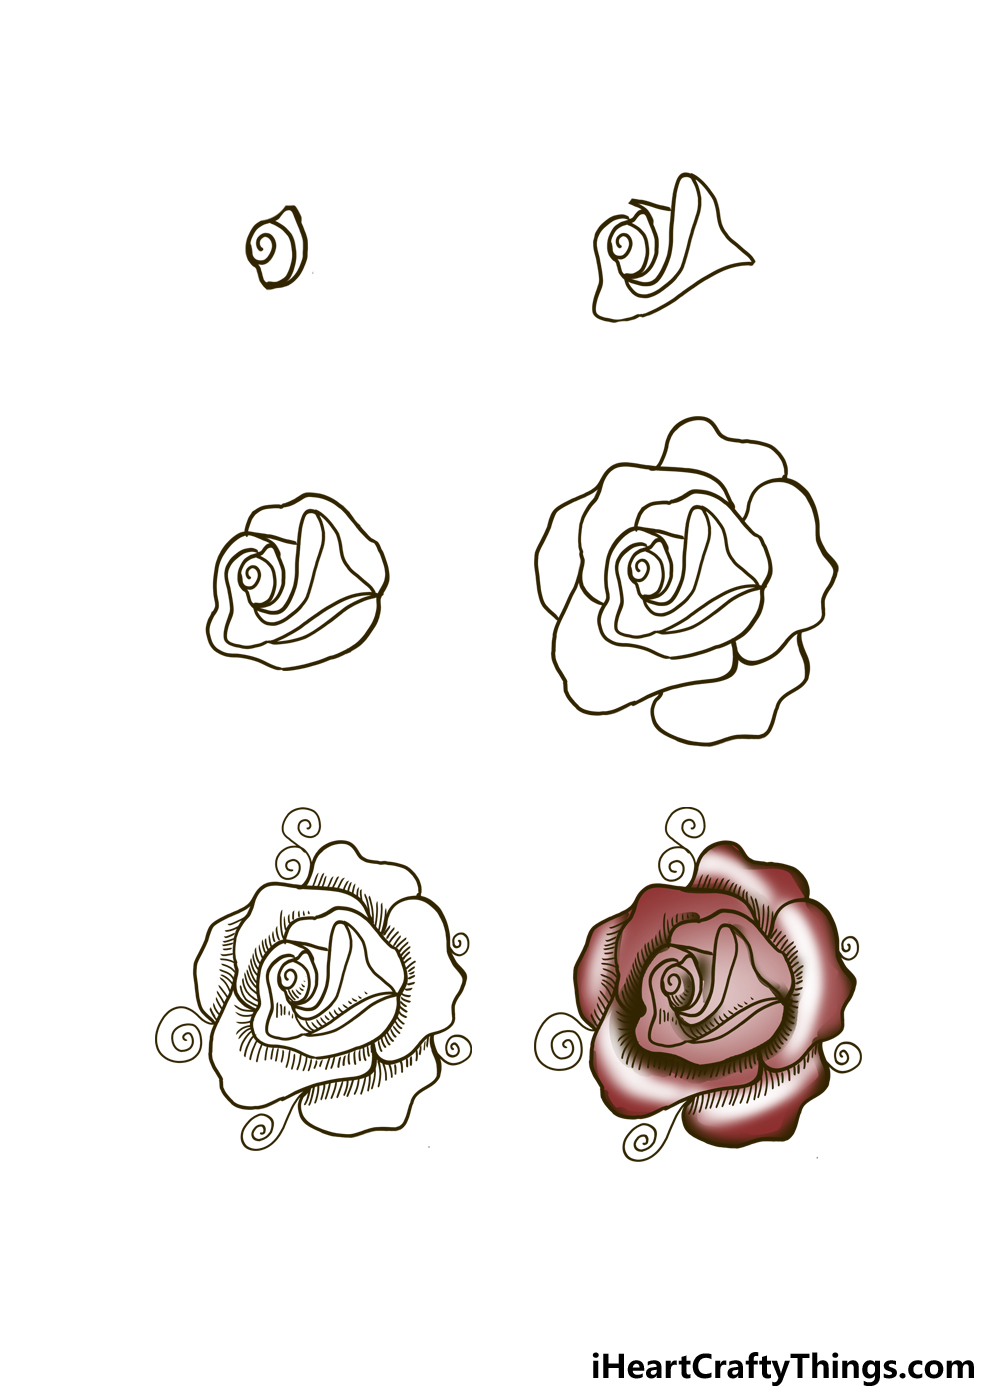
Step 1

The petals of a rose are arranged in a beautifully intricate way. There is a central bud at the center that fans out into gorgeous petals to create the rounded design we see.
This is a sight to behold, and it’s part of why so many people love the rose. This is what can make it quite tricky to draw, however.
To make it easier, we will begin at the center of the flower. Before we start drawing, you can map out your picture with a light pencil to make it easier.
Using your pencil, lightly press on the page and draw out the rough shape of the flower. You can also add the leaves, stem and any other details you will add throughout the design.
They can be very rough right now, but they will help you to envision the proportions and size of the design and make sure that everything fits on the page.
With that out of the way, let us draw the actual center of the flower. The center of the flower will be a curled in shape, a bit like the shell of a snail.
Start at the center and make a spiral shape that extends outward, as shown in our example. Once you have drawn this central spiral, we will add a small petal section on the right-hand side of the flower.
That’s all there is to it for now, and we can move on to step 2 and keep building onto this tattoo design.
Step 2: Draw the next section of petals for the flower

The first step of this guide was fairly simple, but now is where things can start to get a bit tricky. We would recommend taking this and the next few steps really slowly and carefully following the reference image.
If you place the twisty petals too haphazardly, you will end up with a chaotic image that doesn’t really maintain that classic rose shape or structure.
That small section we added to the right-hand side of the center in the first step will have a jagged line added to it to show the curl of the petal it is attached to.
Then, we can add a long rounded section to this part that curls around the entirety of the central portion of the rose tattoo.
This part will have a rounded tip at the top that extends higher than the center of the flower.
Then, we will add a large section to the lower portion of the rose tattoo. This section will start at the central spiral and loop under and around the rose.
At the right-hand side, this will extend into a pointy bit on the far right, as shown in the reference image.
It can all seem a bit complex, but when you follow the steps and look at the reference image it can be made so much easier.
That will do it for this second step, so lets keep adding to this rose tattoo design as we move on to step 3 of the guide.
Step 3: Add some more petals to the design

That previous step was a bit tricky, but this next one should be a little easier. The trick to learning how to draw a rose tattoo is to be mindful of the petals and how they interact with one another.
It’s not a matter of drawing a bunch of evenly-sized petals connecting to one another. Instead, some are twisty and curly, and they all need to come together in a specific way for it not to be a mess.
The reason this step should be a bit easier is that it is limited to two larger petals. They will go behind the sections we have drawn so far, and adding them will prepare us for the final petals and details in the next few steps.
The petal on the lower side of the flower will go from the halfway point on the left all the way under until it reaches the pointy tip at the section on the right side that we just added.
Finally, we will cap it all off with a line that covers the entire top portion of the rose, as shown in our example. This will be a rounded, somewhat wavy line that creates the look of a petal.
With these added, you will notice that the rose tattoo is starting to take shape! In the next two steps, we will focus on adding the final details and petals before we really bring this design to life with some colors.
Step 4: Now draw the rest of the petals

The fiddliest parts of this design are done, so it should all be more simple from this point onward.
The first few steps were quite intricate with twisty petals and buds, but the remaining petals are much larger.
In this step, we will be adding 5 or so additional petals, and they will all go behind the other ones that we have drawn so far. We would recommend starting with the petal on the far right.
This has a curved outline with a rounded pointy tip o the right. You can keep your hand loose as you draw these lines, as they don’t need to be perfect.
Next, we would suggest drawing the petal on the lower left side of the rose. This is a big petal, and the left side of it will droop down ever so slightly.
The reason we suggested drawing these ones first is that they will be more in the foreground, whereas the others will go behind them.
Next, you can draw a petal on the lower right side of the flower. This petal will begin and end on the previous two petals that we have drawn.
Finally, there will be a petal on the top right and left of the flower to finish off the layered look of this rose tattoo. If this sounded complicated at all, simply copy the reference image as closely as you can, and then you will see its not as hard as it seems.
With all these petals done, we can add some final touches and details to really bring it to life!
Step 5: Draw the final details for this rose tattoo
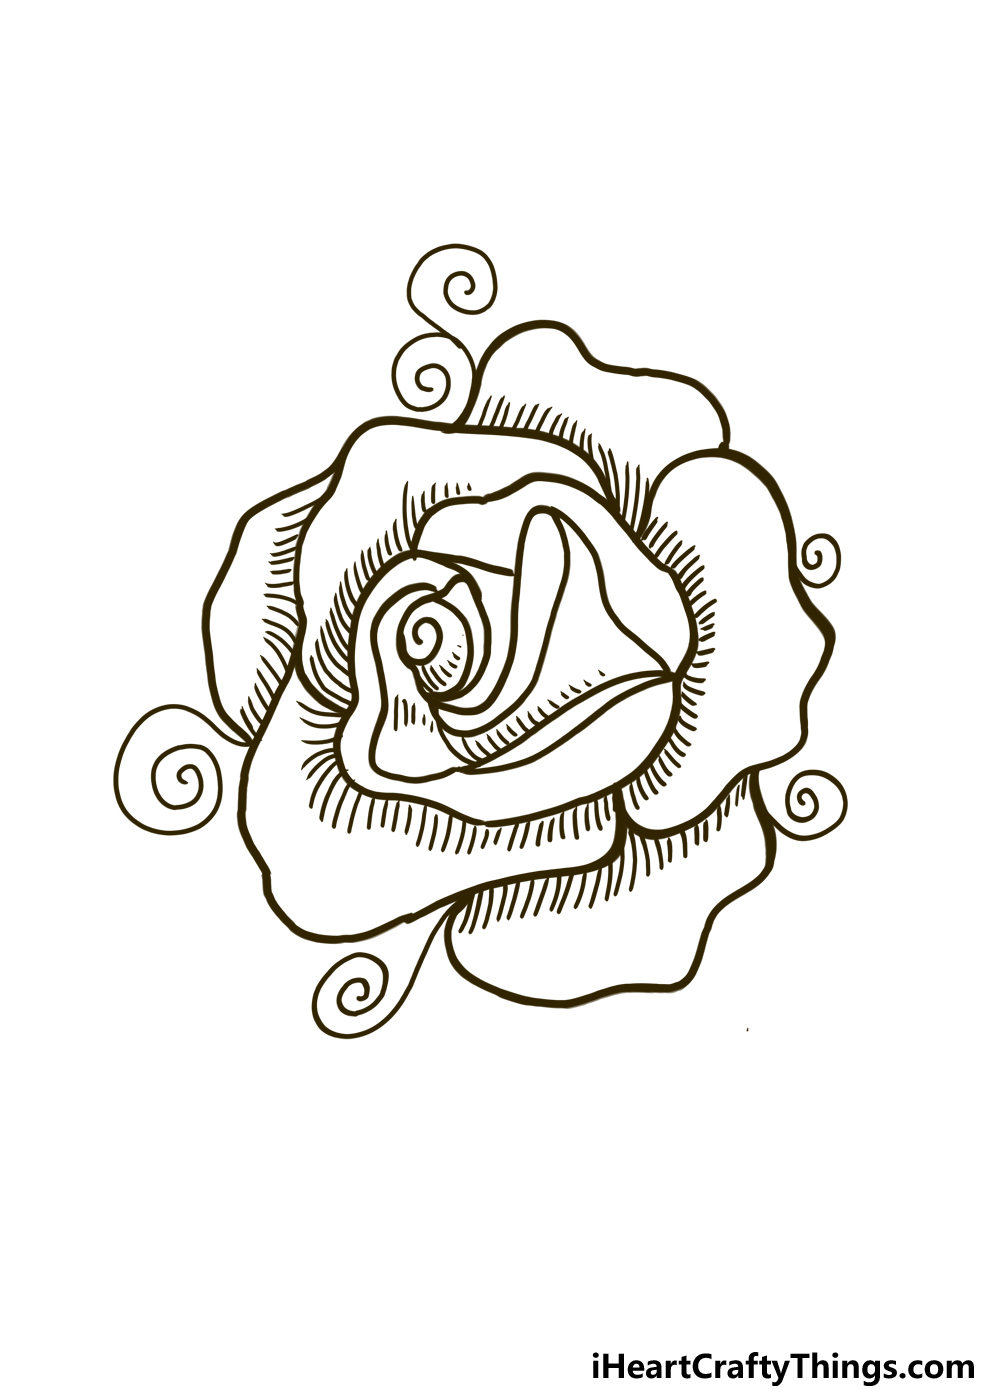
The main structure of this drawing of a rose tattoo is done now, as we have added all of the petals. Now all that remains is to make it stand out some more with some details.
We will show you a few details that you can add, but there will be some room for you to add your own ideas as well! First, we drew a few little spiral shapes poking off various areas of the rose.
These help to give the design a more intricate look. Then, we used some simple lines inside the petals for some added shading and texture. They’re simple, but they make a big difference.
These are the details that we added, but you don’t have to stop there! When it comes to tattoos, individual expression is the whole idea.
For that reason, you should feel free to add any details that speak to you. It could be as simple as adding a stalk with some thorns to make it look like a real rose.
Or, maybe you would like to have some leaves or additional petals around it. Text could also be added to add a personal touch to the design.
You may even like to go for something really cool like a skull holding a rose in its teeth. These are a few ideas, but there are infinitely more that you could try out!
What kind of design would you like to create for this rose tattoo?
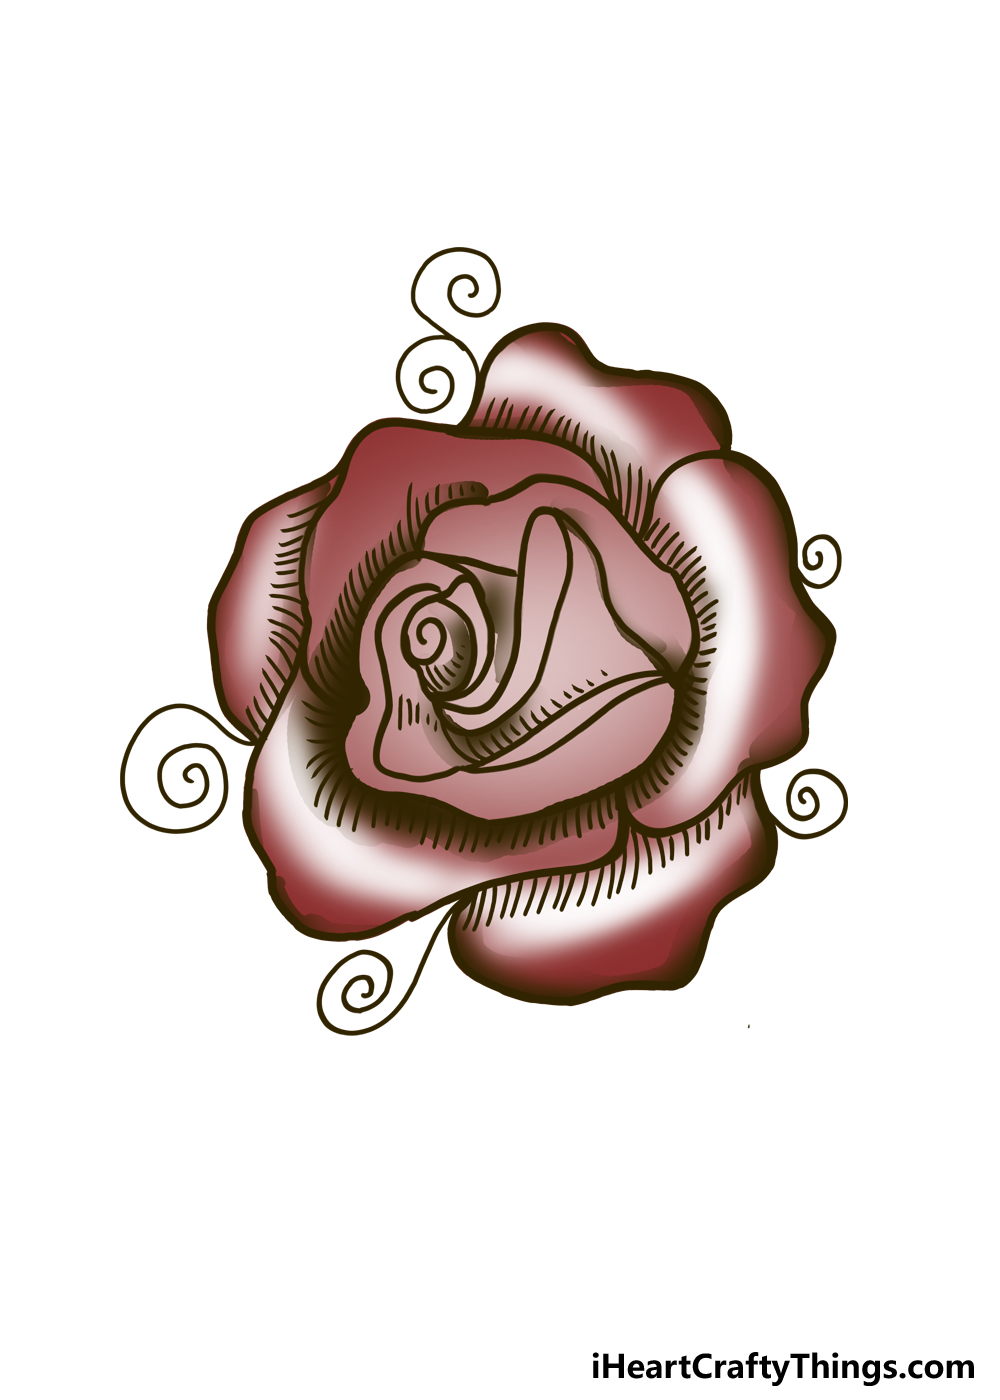
Step 6: Now, finish off with some color for this rose tattoo
In the previous step, we mentioned how there are practically infinite ways that you can customize your drawing with your own details. In the same way, there are tons of colors and ways of applying them that you can use.
In our example, we showed you one set of colors that you could use to finish off this rose tattoo. We used various shades of beautiful pinks for the petals, as you will see.
However, instead of using solid colors, we also incorporated some white highlights that give the rose tattoo a more dynamic look.
It also makes it look like there is light reflecting on the petals. Roses come in so many colors in nature that you could use any other colors you love for the design!
For instance, you may like to go for something really classic and have some gorgeous bright reds for the petals.
Or, maybe you would like something more gothic and incorporate some black and dark blues.
Choosing the colors is just one aspect, as you should also think about what you use to apply the colors. Using watercolor paints would be a great way to create a softer look for the colors.
If you want something brighter, then colored pens and markers would be a great way to do that.
These are a few mediums you can use, but be sure to experiment with all of your favorites!
How will you color in this rose tattoo?
Your Rose Tattoo Drawing is Complete!
Roses are so beautiful, and they can be a lot of fun to draw and paint. While it’s fun, they’re also incredibly tricky due to their intricate design.
We hope that this guide on how to draw a rose tattoo not only made it easier for you but also a lot more fun!
The goal for this guide was to break it down so that you can see how all of the individual elements interact with each other.
We also wanted to leave things open enough that you would be able to custiomize the design and add your own ideas.
Even though it may seem like a simple design in concept, there are thousands of ways to make it unique!
We are always happy to see how your artwork turns out, so we hope you will show off this drawing when it’s done.
You can do this by sharing it to our Facebook and Pinterest pages. It’s going to be awesome to see how you interpreted this rose tattoo design!
