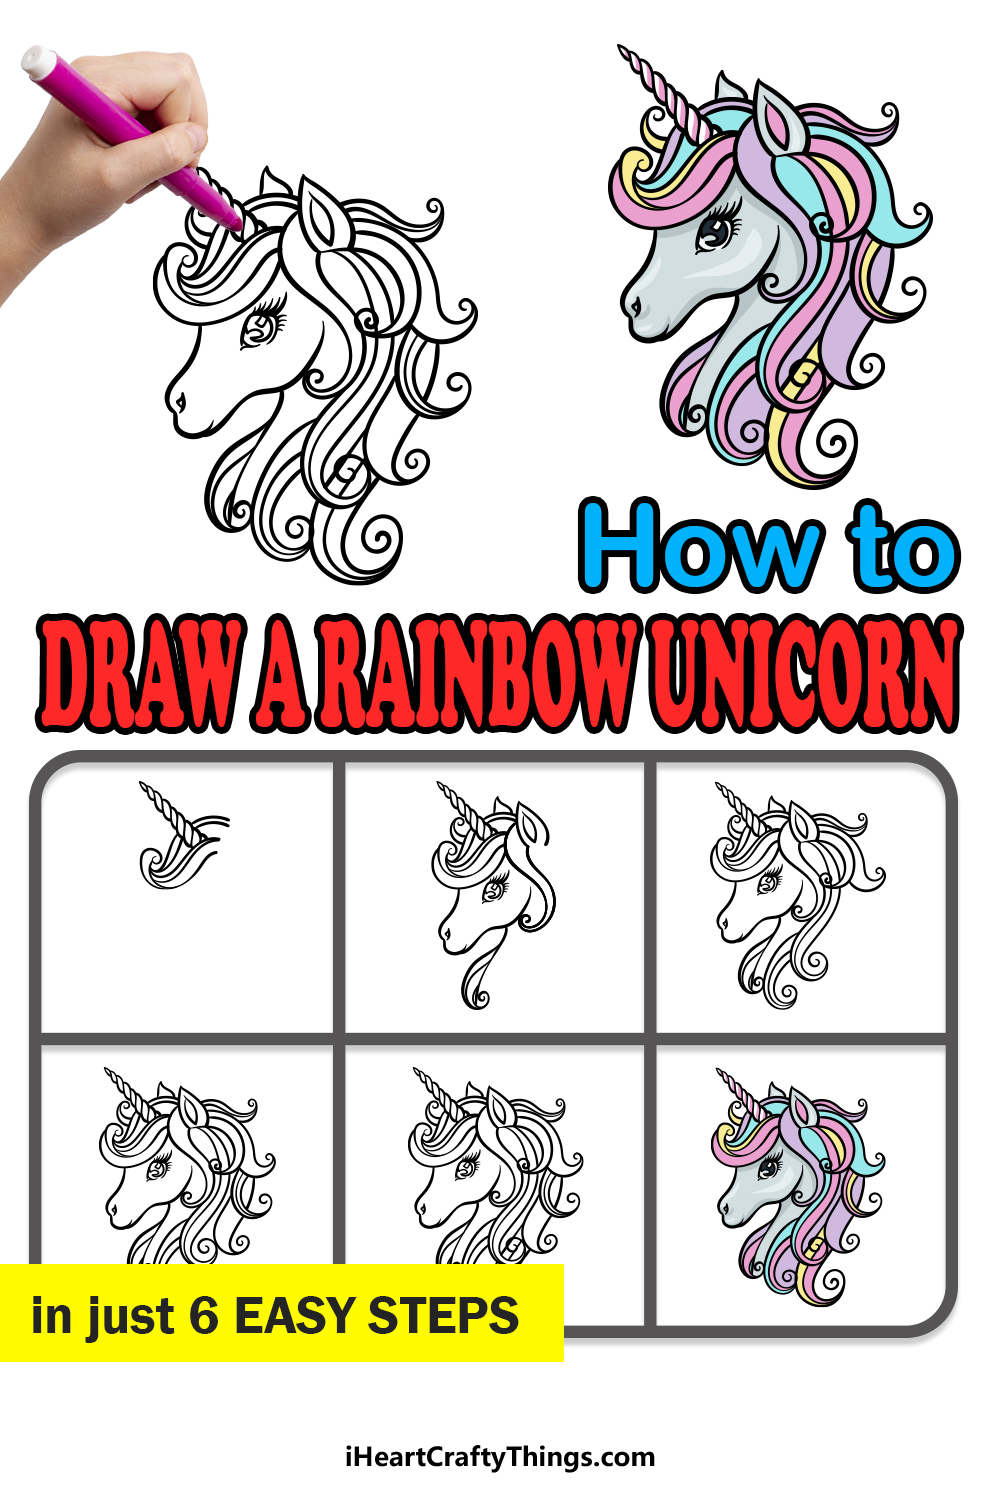
Unicorns are mythical creatures that have become very popular in recent years.
These magical animals look like horses with a single twisty horn on their faces, and they have captured the imaginations of many people around the world.
They are often associated with imagery such as hearts and rainbows, and for this reason fans of this magic beast often like to learn how to draw a rainbow unicorn.
If you would like to know how you can do just that while having tons of fun, then look no further than the guide in front of you right now!
This step-by-step guide on how to draw a rainbow unicorn in just 6 easy steps will show you all the steps you’ll need to replicate this magical animal.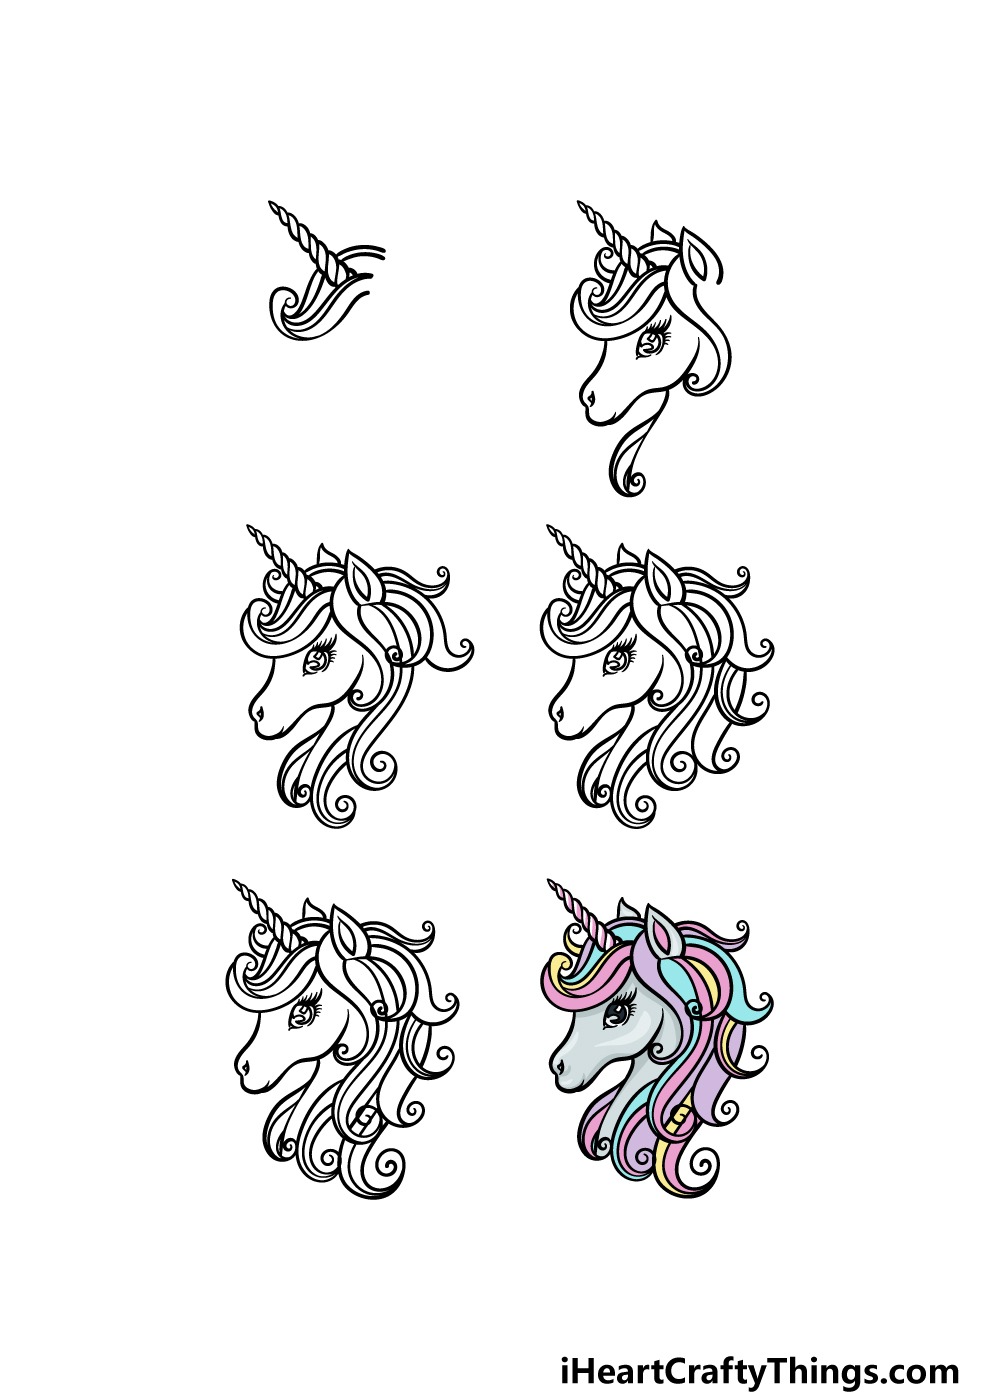
How to Draw A Rainbow Unicorn – Let’s Get Started!
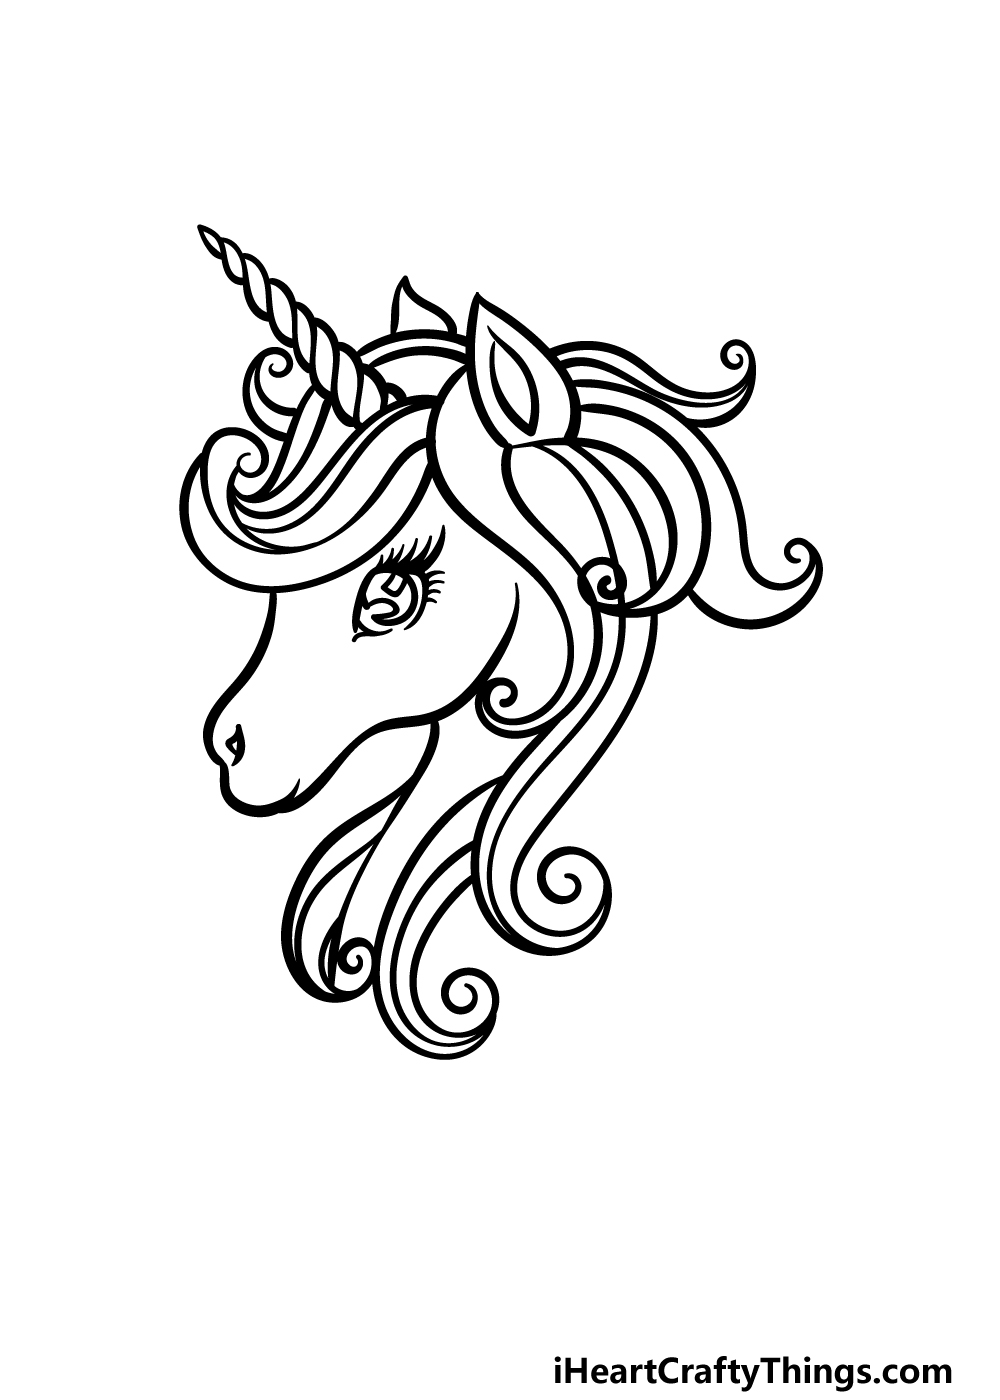
Step 1
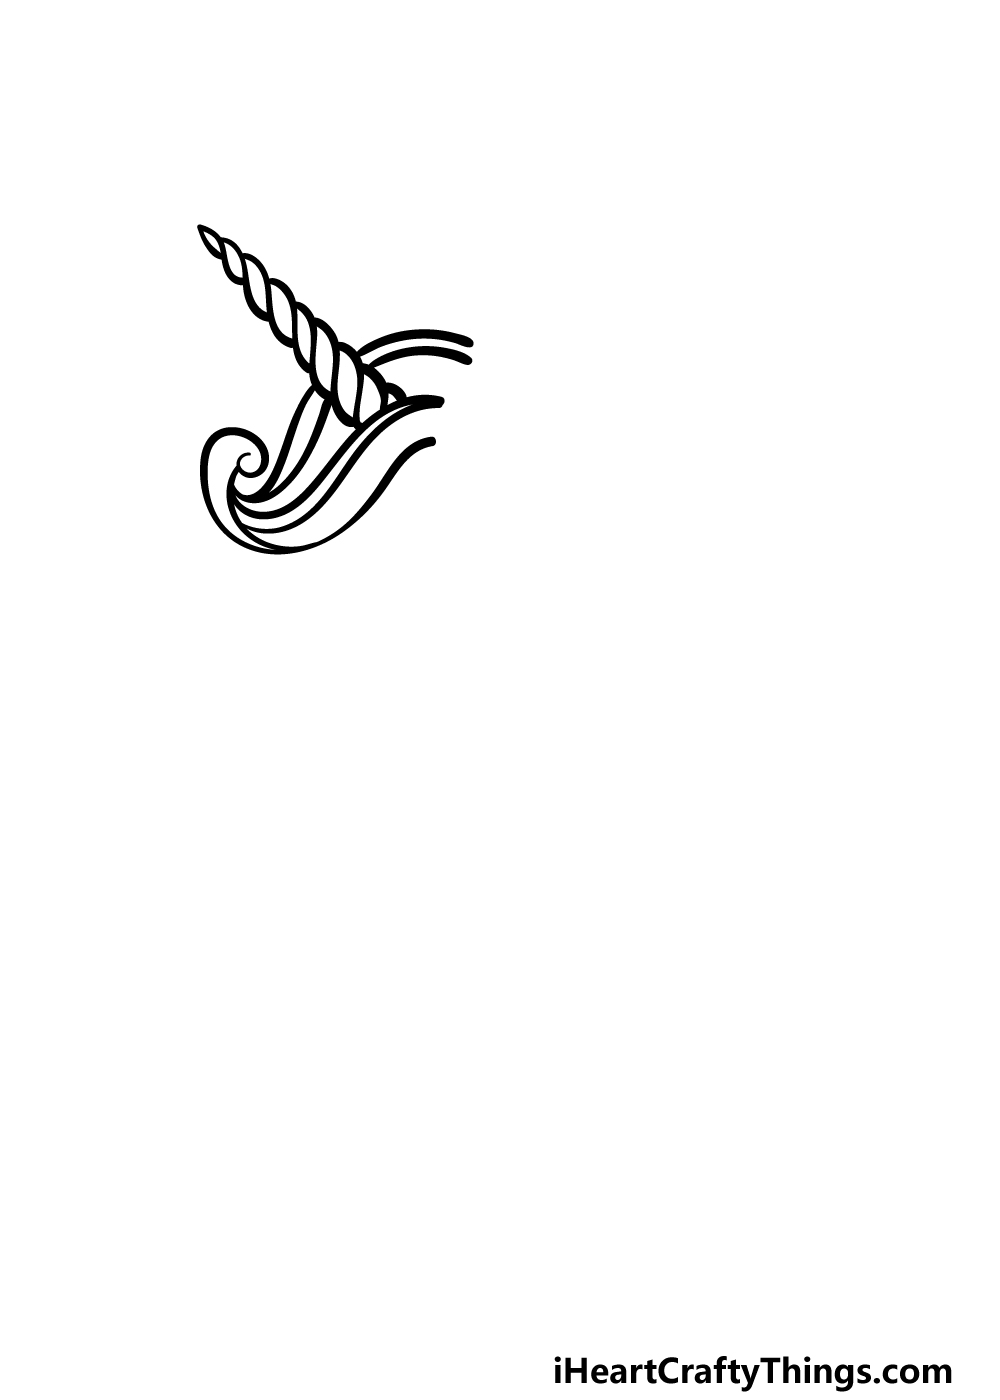
In this first step of our guide on how to draw a rainbow unicorn, we will begin with the most recognizable aspect of this mythical beast!
That will be the twisty horn on the head of the unicorn, but before we draw that we will draw the curving hair of the rainbow unicorn.
We will be using some curved and twisting lines for the hair of this rainbow unicorn, and it will curl up at the front of the mane.
Then, we will draw the horn itself poking out from the hair.
This horn will be drawn in several sections connecting to one another, and each section will get slightly more narrow the further you move along it. Then, you will be ready for step 2!
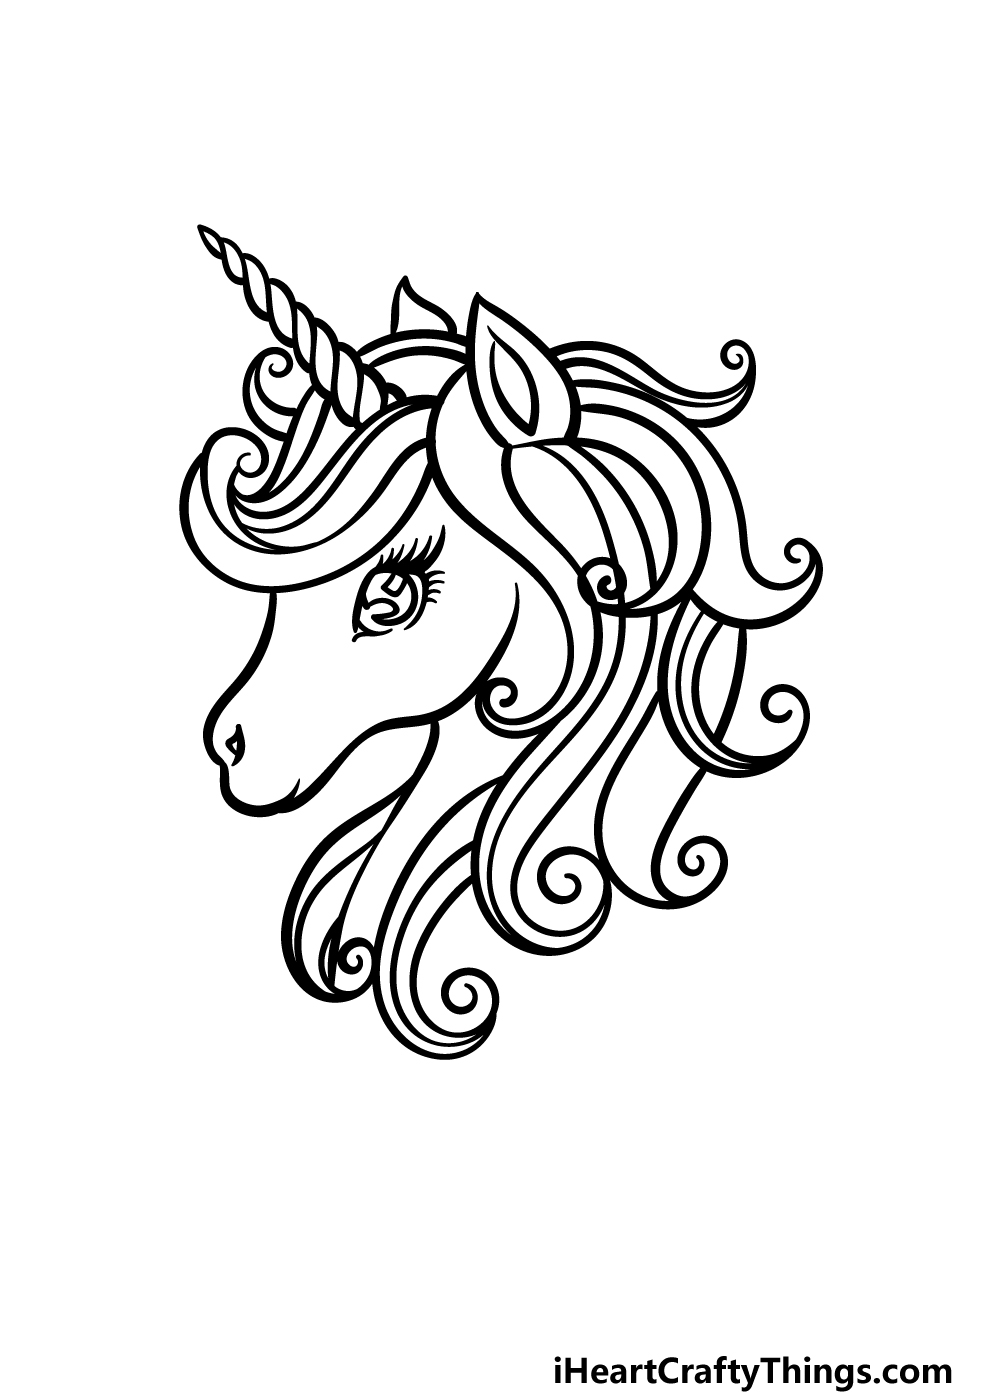
Step 2 – Now, draw some more of the hair and the face
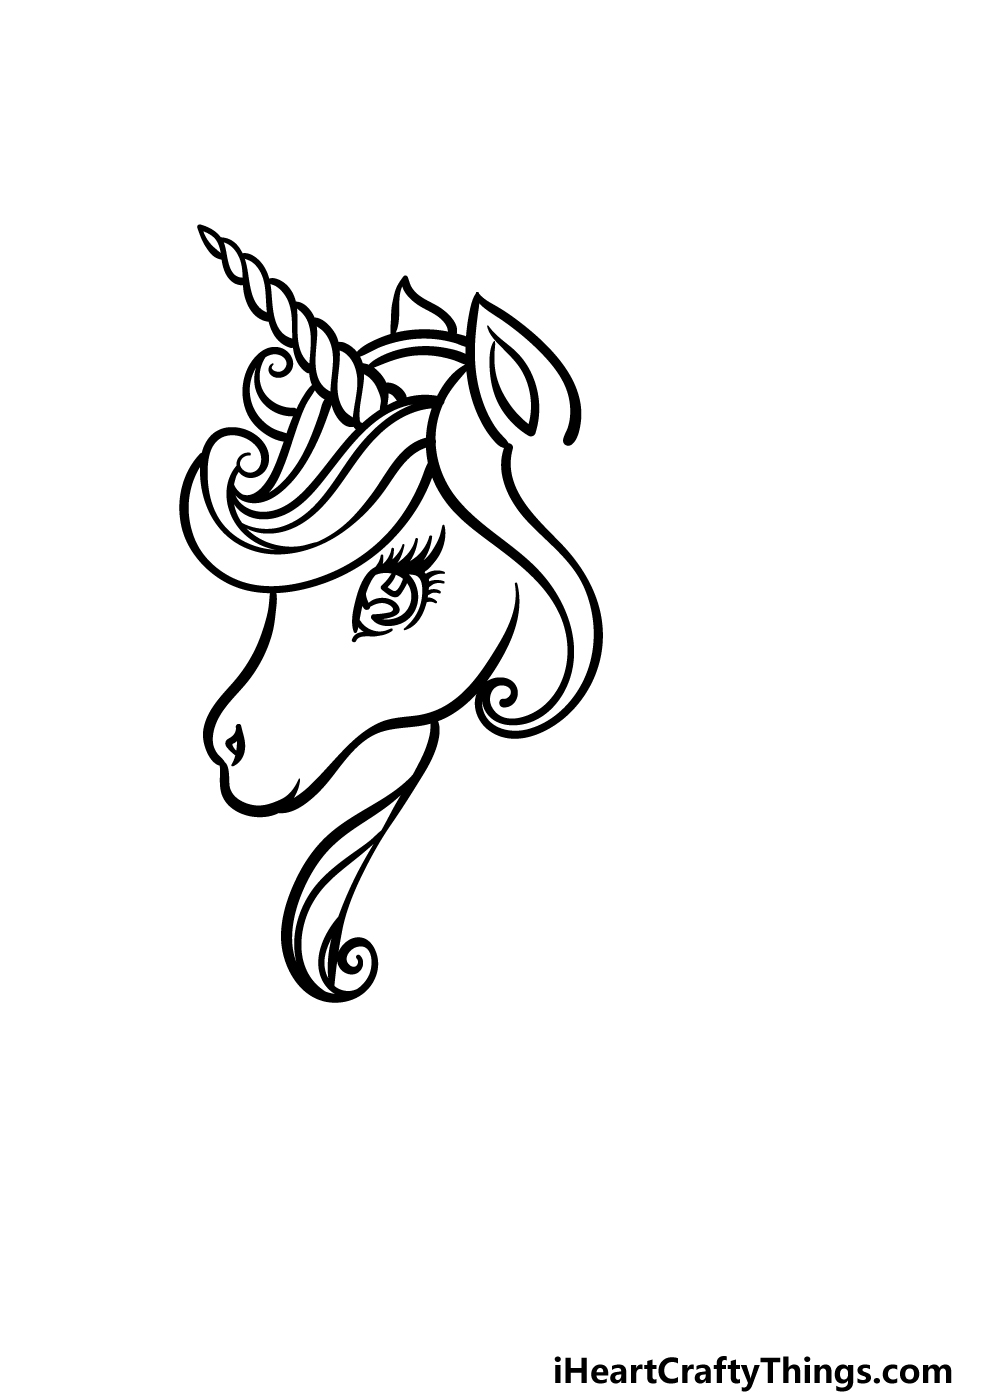
Now we shall be adding not only more hair to the mane of the animal but also the facial outline of this rainbow unicorn drawing.
First, use some more curved lines for a large curly portion dropping down from the hair of the unicorn. Then, we will add some rounded, pointy shapes poking out for the ears of the unicorn.
These ear outlines will also have some pointy oval shapes within them for the inner ears.
Then, use some more rounded lines for the face outline, and then add a thinner rounded muzzle to the end of it.
Finally, we will use some round shapes for the eye, and then add some small curved lines for the eyelashes around it.
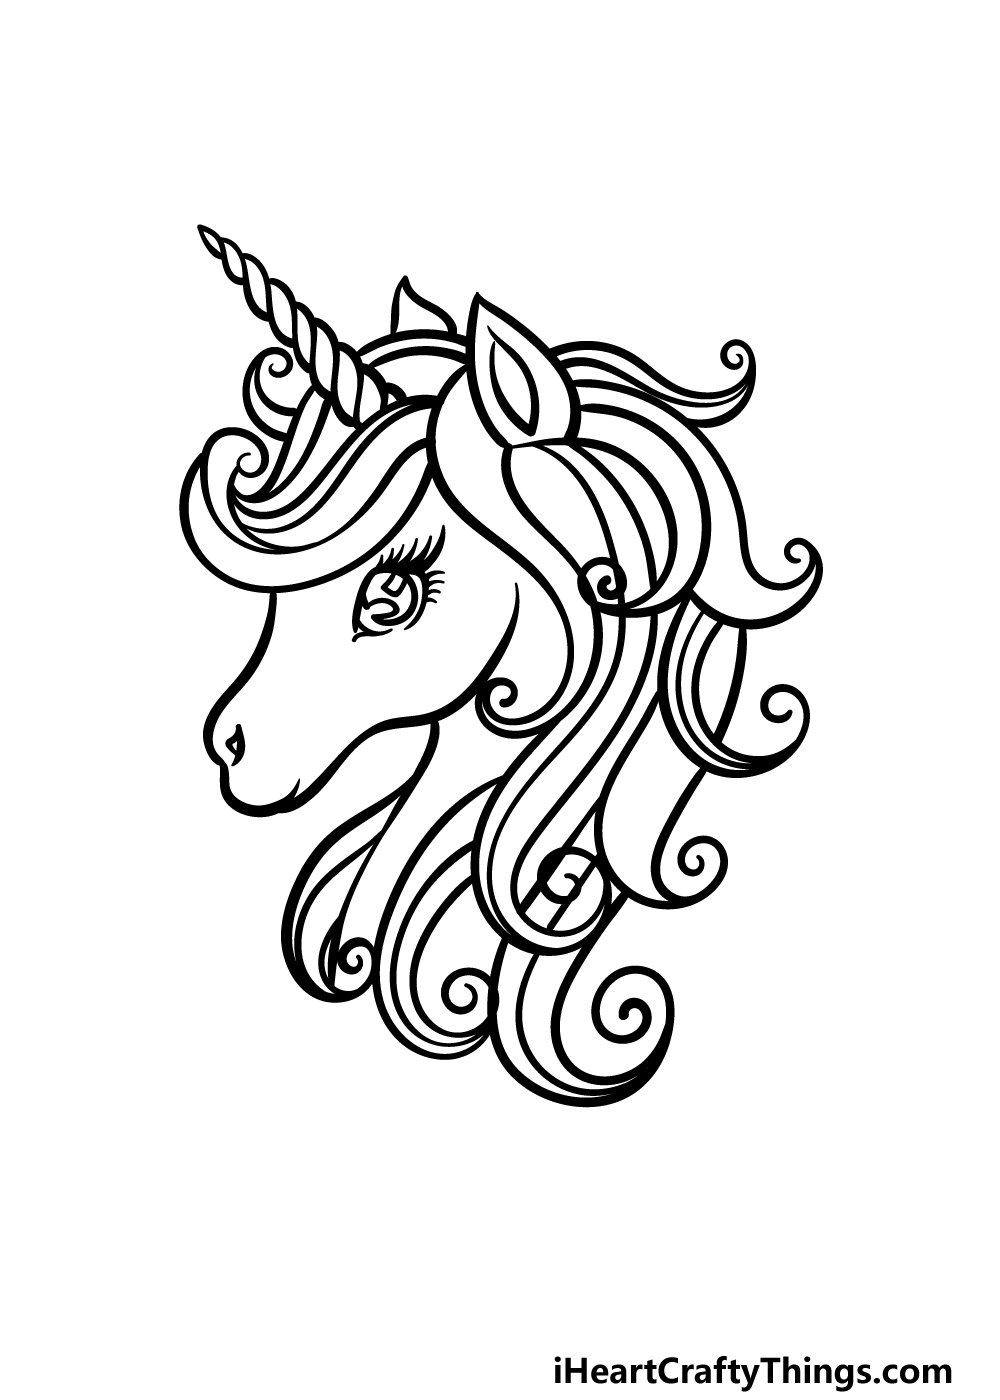
Step 3 – Draw some more curly hair portions
This third step of our guide on how to draw a rainbow unicorn will show you how you can make the mane look even more curly and luxurious.
To do this, we will be using even more curly lines to form the twisty locks of hair dropping down from the mane.
The reference image we have provided will show you how you can position these locks of hair before you move on to step 4 of the guide.
Step 4 – Next, draw some more locks of hair for this rainbow unicorn
We are aiming to give this rainbow unicorn drawing a lovely luxurious rainbow mane, and that’s why we shall spend the next few steps adding to the mane.
For this fourth part of the guide, we will be adding some more twisty locks to the back portion of the mane.
To do this, simply use some more of those long, curling lines that you have used so far for the rest of the mane.
We will finish off the final parts of the mane along with any final extra details in the next step of the guide!
Step 5 – Add the final details to your rainbow unicorn drawing
As we promised in the previous step of this guide on how to draw a rainbow unicorn, this step will see you finishing off the final details of the curly rainbow mane.
You will also have an opportunity to add any additional details and extra elements of your own!
First, add another large twisty curl to the base of the mane, and then add some more line details inside of it.
Once this is drawn, you will then be free to add any extra details of your own!
These could include a magical background that could either be a fun setting for the unicorn to be in or maybe some more stylistic shapes and patterns.
This part is up to you, so how do you think you will finish up this rainbow unicorn?
Step 6 – Finish off your rainbow unicorn drawing with color
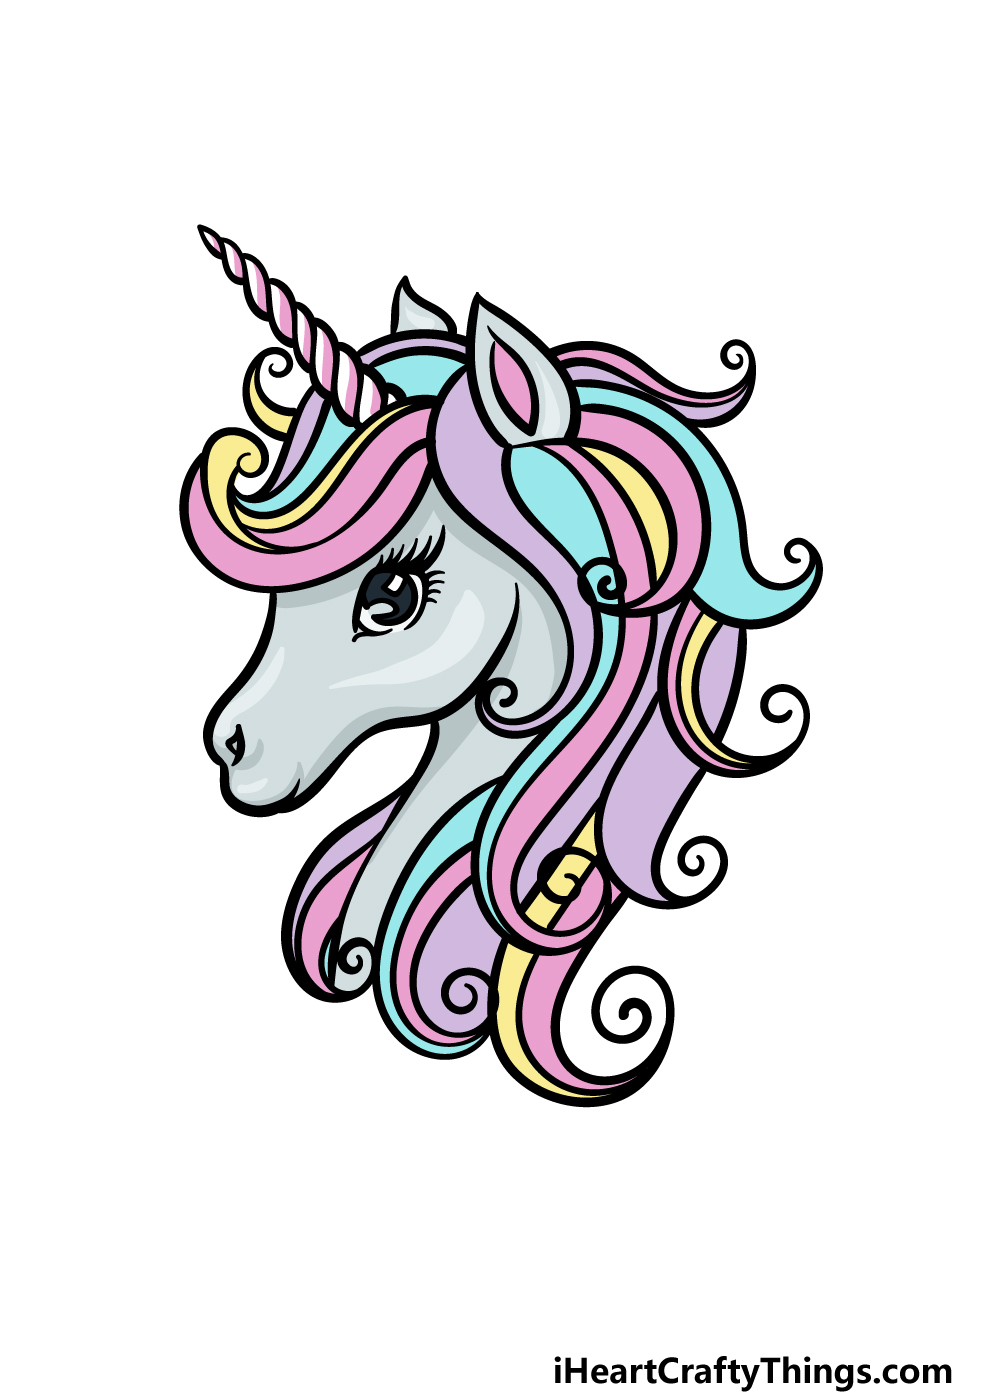
Now you’re ready to finish off this amazing rainbow unicorn drawing with some color!
As suggested by the name, we will be going with a beautifully vibrant color scheme for the mane of this rainbow unicorn.
In our example image, we incorporated many different shades of purples, yellows, pinks and blues to create an image that is colorfully diverse but also beautifully subdued.
You could incorporate similar colors for your own rainbow unicorn drawing, but be sure to also express yourself by using any other colors you would like!
All the colors of the rainbow are available to you, so you have many options for how to finish this off.
You can also change up the art tools and mediums you use to create some amazing color diversity. How will you finish up this beautiful drawing?
Bonus: Make Your Rainbow Unicorn Drawing Even More Magical With These Tips!
Your drawing of a rainbow unicorn is looking amazing! We’re about to cover ways you can color your drawing, and as you can guess from the rainbow description, these colors will be bright and bold.
While we will go over some of the more standard ways you can color in your image soon, we have a few more ideas you could use before you begin that process.
For starters, you could add some more of the unicorn. For this guide, we stuck to just the head to make it easier for you to do.
Now that you have completed it, you could add the rest of the unicorn if you wanted to. This could be a bit tricky, so you may want to grab some pictures of horses that you could use as a guide to drawing the rest of the body.
Adding other magical details could be great as well! These could include little stars, hearts and rainbows that are floating around the unicorn.
Adding these kinds of details will also give you even more details that you can color when we get to that section in the next step. Adding a background would also be a fantastic way to add to this drawing!
There are some imaginative ideas you could go for, and you could either use some classic fantasy locations or come up with your own location that you feel a unicorn may be in.
Using crafts like glitter and beads for a touch of extra magic would also be fantastic to finish everything off! You could even draw some other mythical creatures along with this unicorn.
What are some other ideas you have that you could add to this drawing?
3 More tips to make your rainbow unicorn drawing easy!
Create some artistic magic with these tips to make your rainbow unicorn sketch even easier!
Having lots of details has pros and cons, as it makes the drawing look better but can also make it much harder.
This is the case with this drawing of a rainbow unicorn, so you could tweak the level of detail.
You will notice there are loads of individual strands of the mane, and this could prove tricky to draw. You could make this aspect easier by using fewer of these strands for the mane.
This can be done by making the mane more of a solid feature without as many individual strands. If there are other details you struggle with, then these could be simplified instead!
By using some specific art tools and mediums, you can also make some of the details of this rainbow unicorn drawing easier. In the first tip, we spoke about the strands of the mane.
These would be quite tricky to draw with a pen or pencil, so you could try out some mediums like paint brushes in order to make it easier.
By using a small paintbrush, you can turn each strand of the mane into a single stroke.
This is just one example, but trying out different art tools can make those parts you struggle with surprisingly easier.
Unicorns may not be real, but they are very close to horses. For this reason, you could use some photos of horses to make your rainbow unicorn sketch easier.
You will find many photos of horses online, and many may even be posed similarly to the one in our reference image.
Once you have found a few photos, these can then help you refine the details and proportions of this rainbow unicorn.
Not only could these photos prove a great companion to the guide, they would also help if you wanted to add more of the unicorn’s body.
Also, they could be handy if you wish to try out different poses and expressions.
Your Rainbow Unicorn Drawing is Complete!
That will conclude this magical guide on how to draw a rainbow unicorn, and we hope that you had a wonderful time working on it!
We aimed to make this beautiful depiction both fun and easy for you to work on, and we hope that the steps showed you that you can create this beautiful picture with less frustration.
You can also add to this image by adding your own details, elements, ideas, background details and color choices!
This picture is all about expressing your imagination, so let it run wild as you finish up this image. We can’t wait to see what you do!
If you’re ready for a new drawing challenge, you can find your next guide to enjoy on our website! We have tons of guides ready for you to enjoy, and we plan to upload many more soon.
You can show off how wonderful your rainbow unicorn drawing looks by sharing the finished artwork on our Facebook and Pinterest pages!