When you’re a kid, there are few places more enjoyable to spend time in having fun than an awesome playground!
Playgrounds can be big or small, and there are many different activities that you can find in them. There are some that are generally found in them, such as slides, but it’s fun to imagine what else you would like to find in your own playground.
If that is something you would like to do, then learning how to draw a playground is the perfect way to do just that!
This is the tutorial for you if you would like to discover just how to do that.
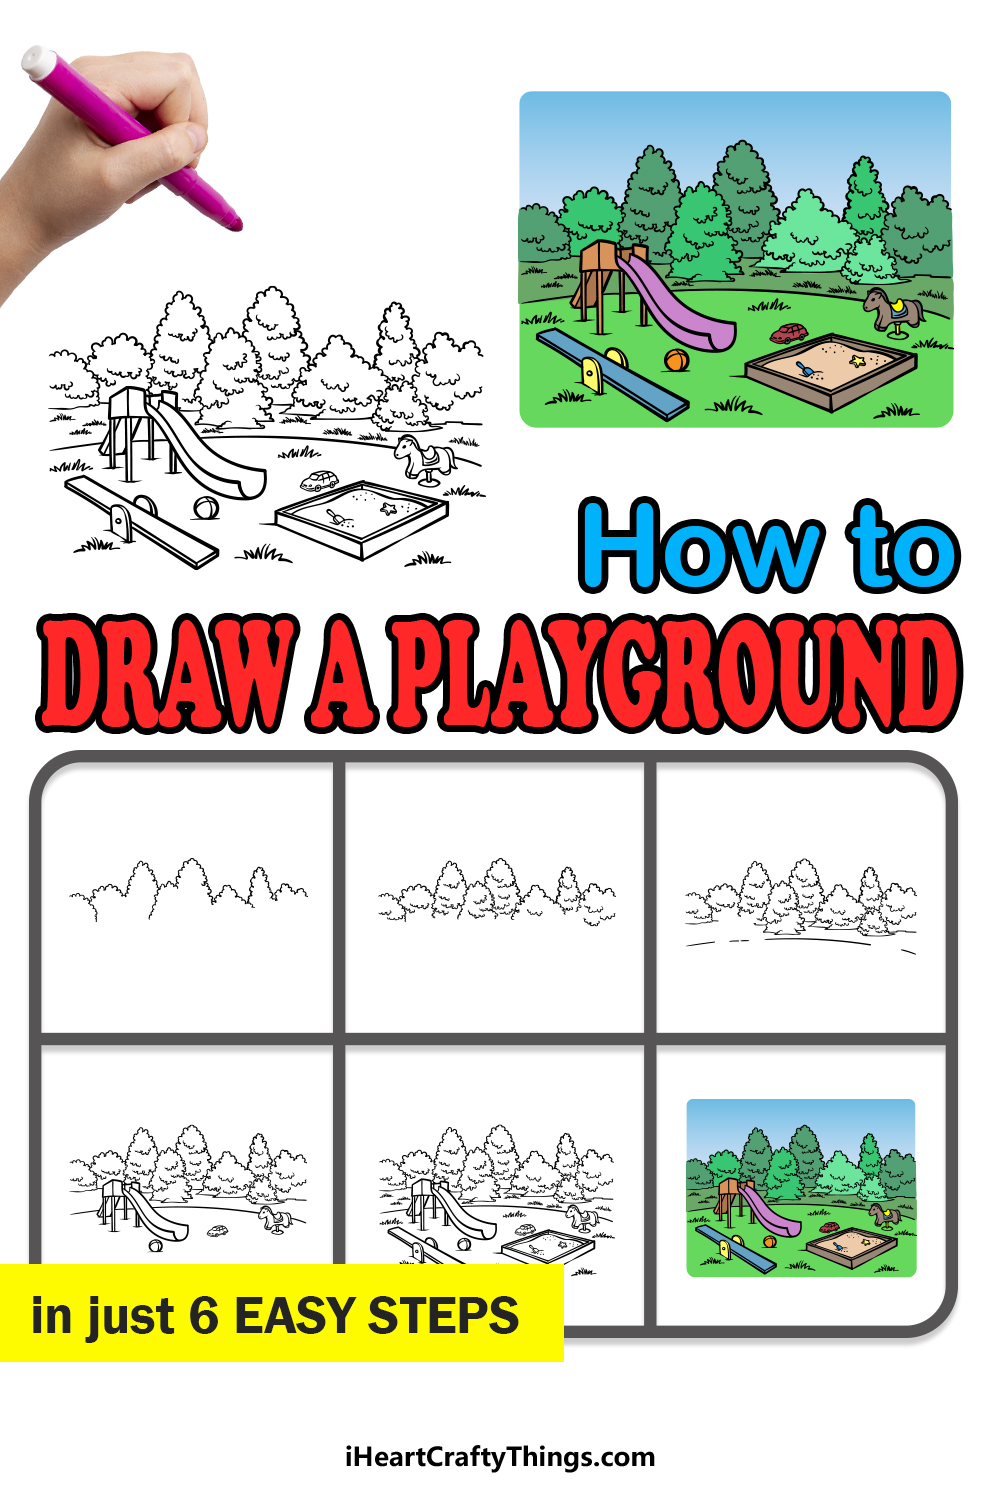
We hope that you have a lot of fun as we work on this step-by-step guide on how to draw a playground in just 6 easy steps!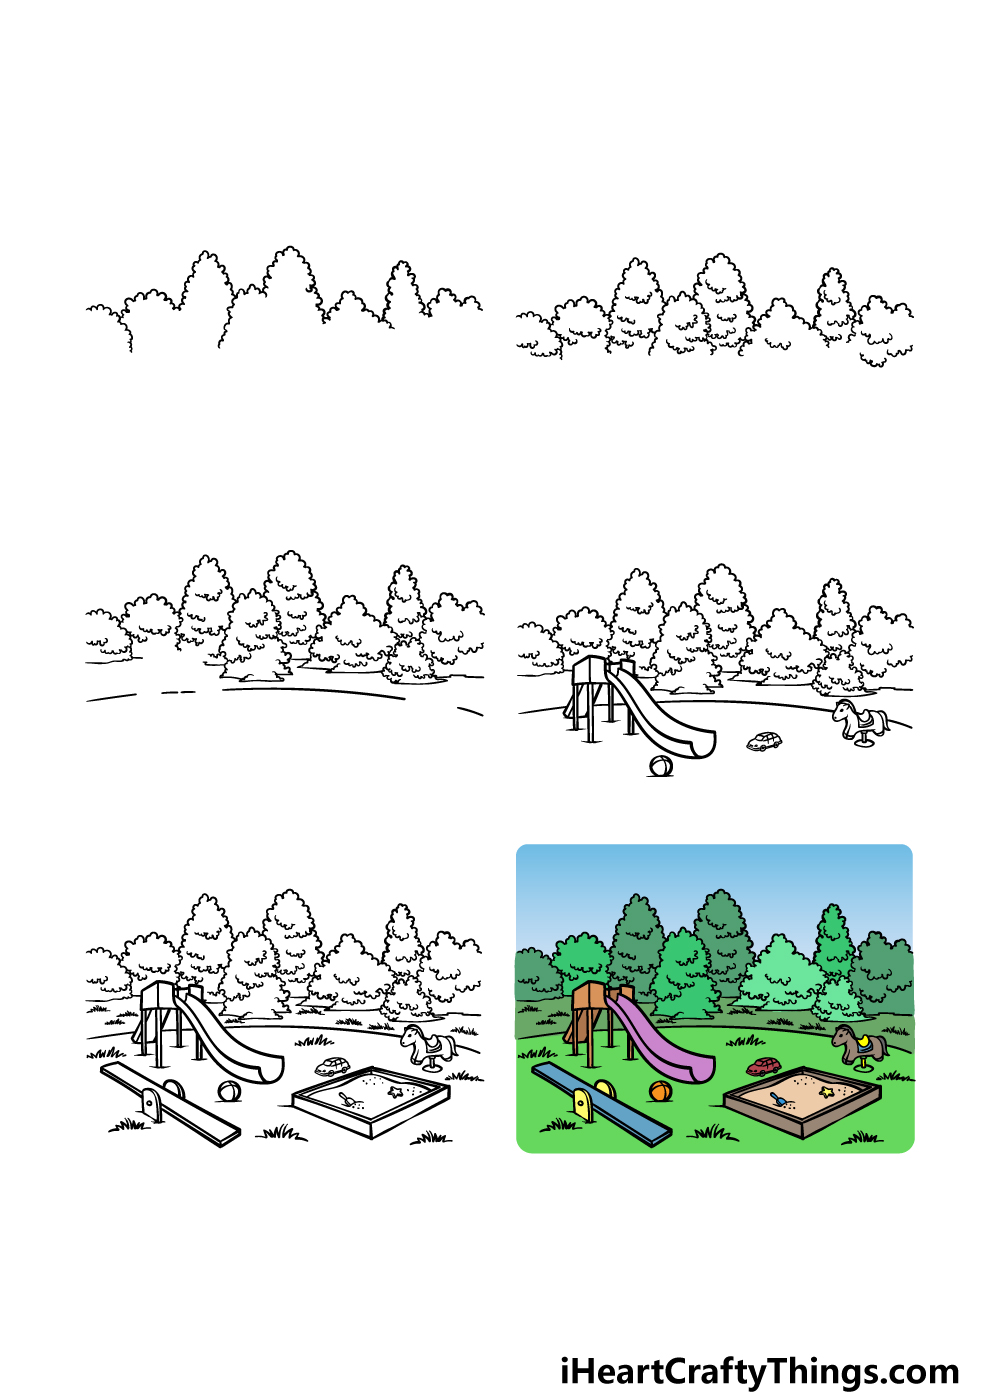
How to Draw A Playground – Let’s Get Started!
Step 1
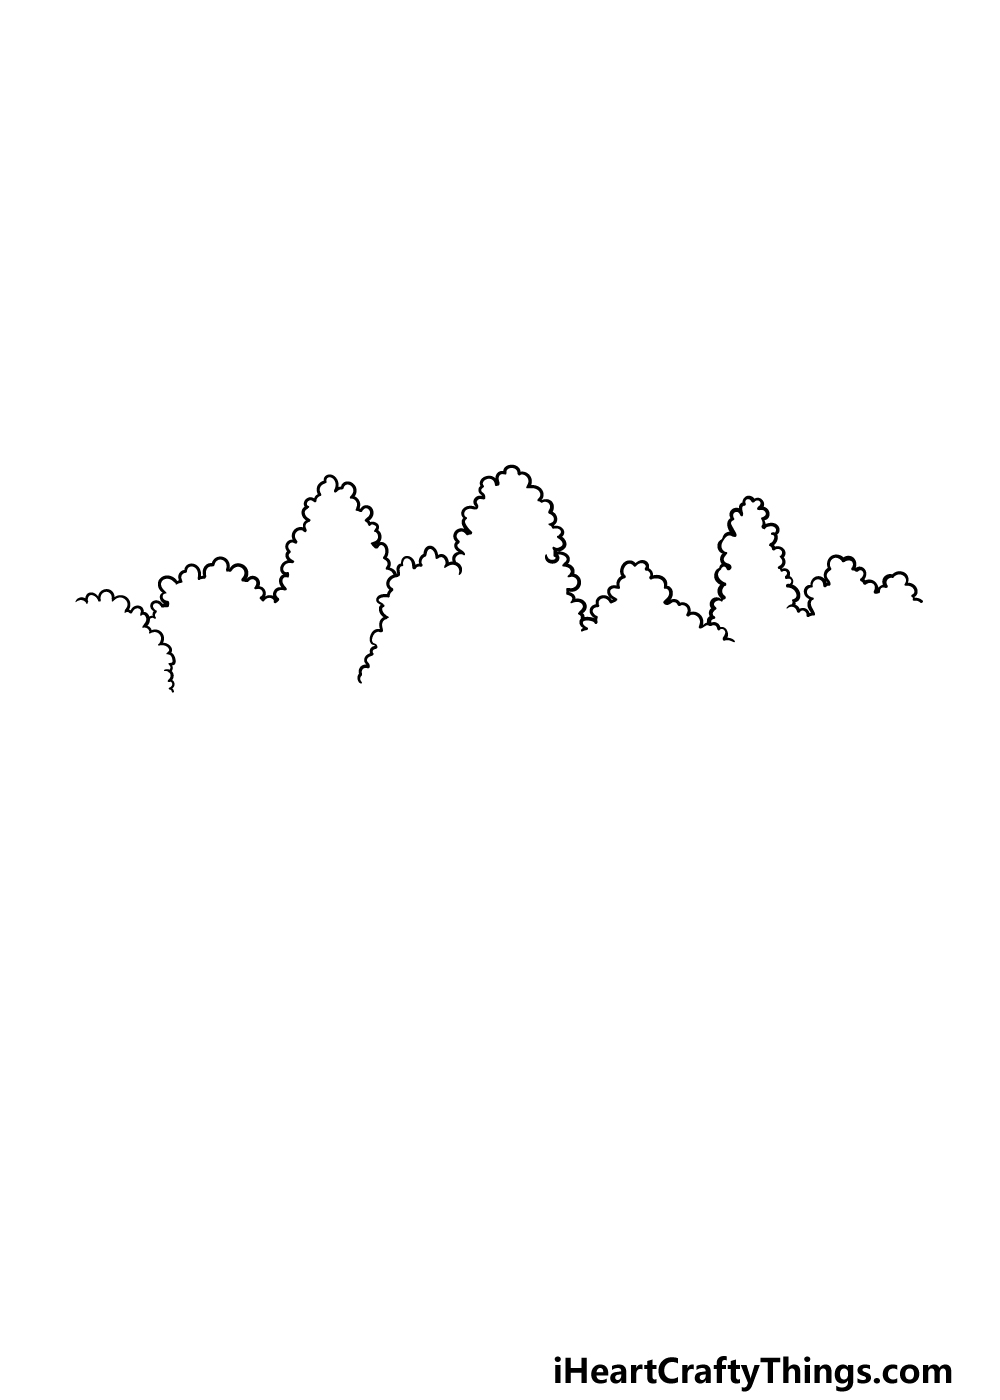
Playgrounds are almost always found in nature, and that means that they’re usually surrounded by plants and trees.
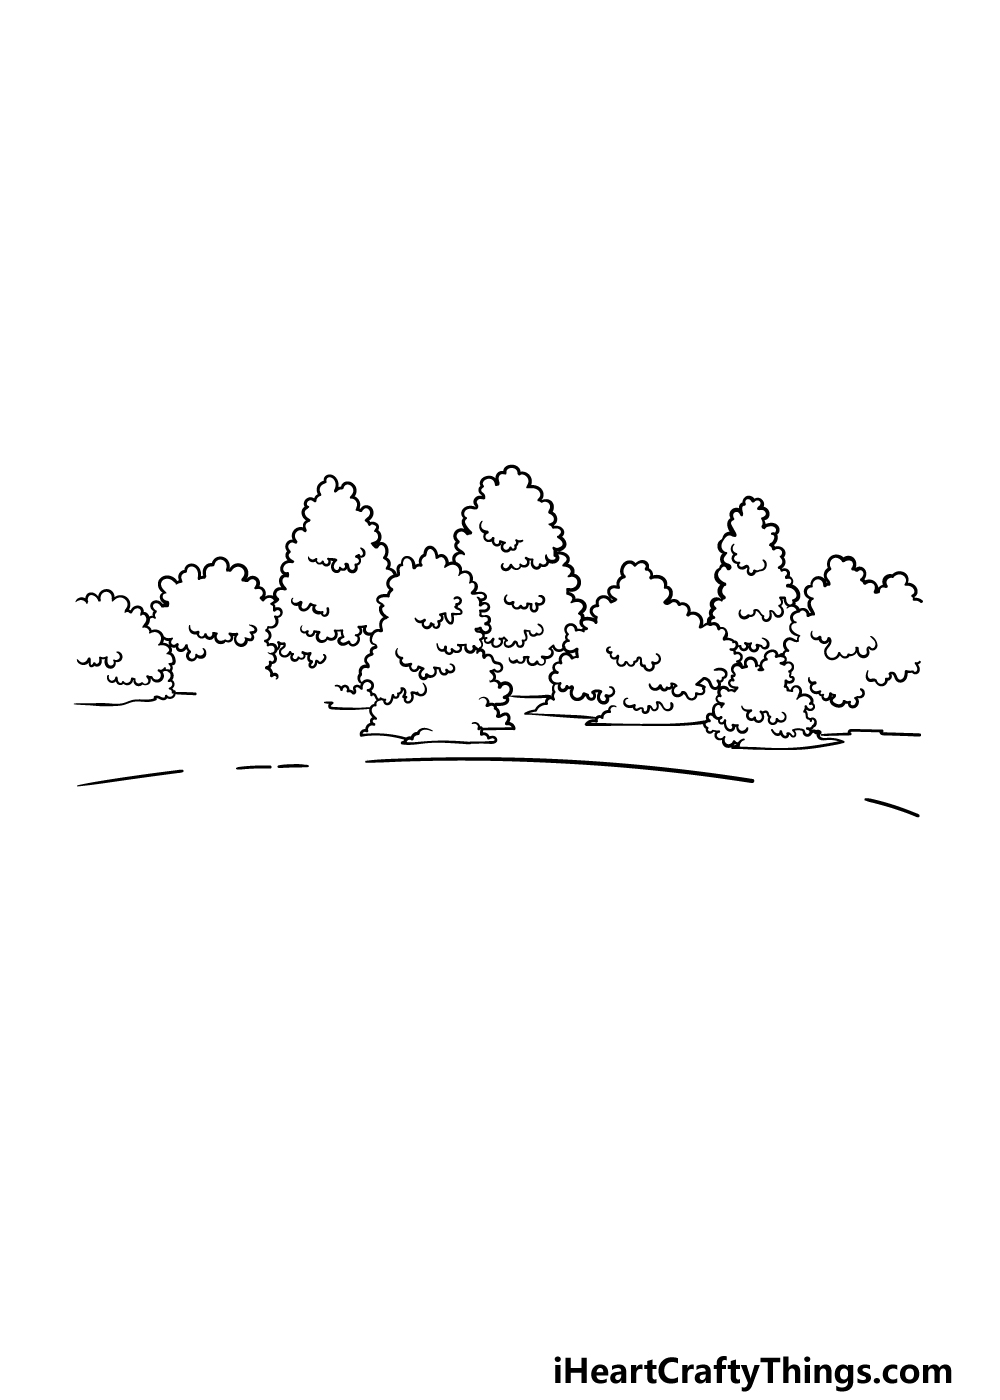
For that reason, we shall begin this guide on how to draw a playground with some trees at the border of it.
For now, we shall be drawing just the outlines of these trees, and for now we will leave the bases of the trees clear for more details later.
To draw this row of trees, we will be drawing multiple shapes pointing up into the air, and each one will be drawn with a bumpy line.
This bumpy line will make the trees look nice and leafy, and some of them will be overlapping with one another.
Once these outlines have been drawn, we can keep adding more details in the next steps.
Step 2 – Now, draw some details for the trees
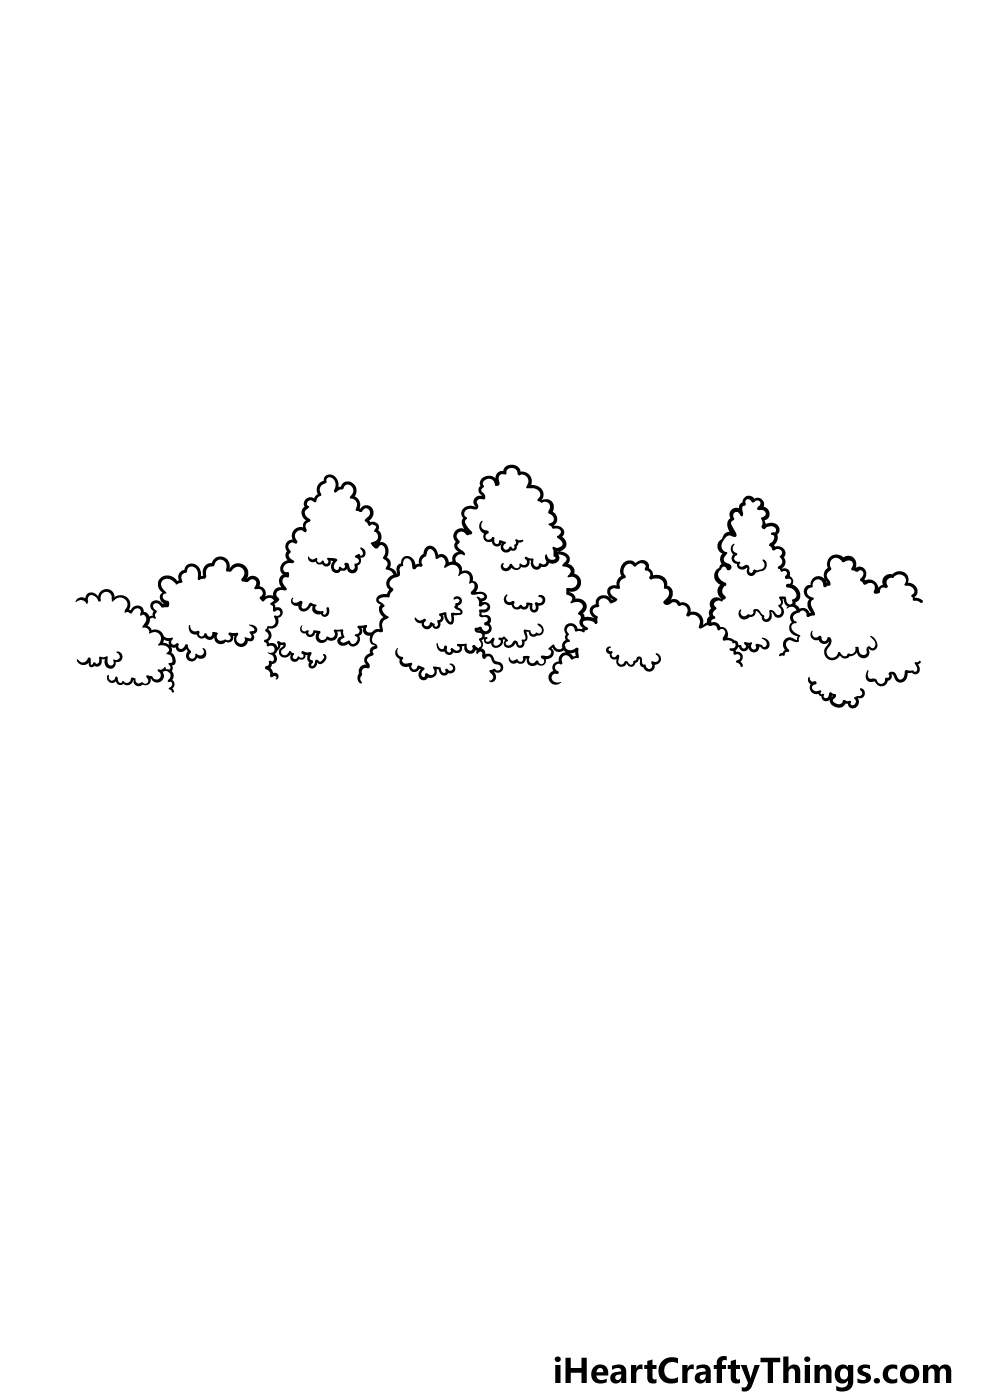
Now that you have the outlines for these trees in this playground drawing, we can start adding some details to them.
To do this, draw some more bumpy lines similar to the ones you used for the outlines of the trees inside of them.
Once again, these bumpy lines will help to make the trees look even leafier and textured.
We shall still be leaving the bases of the trees blank for now, but we will fill in those spaces very shortly.
Step 3 – Draw the bases for the row of trees
In this third step of our guide on how to draw a playground, we shall be drawing some bases for the row of trees that you have been working on.
As we draw these bases, try to refer to the reference image to see where spaces will be left. These spaces are there because some of the playground equipment will be poking up into this area.
First, use some more bumpy lines to create some bases for some of the trees in the row. These tree bases will primarily go on the trees on the right-hand side of the image.
Use some wavy lines to draw the ground beneath the trees, and then you can see where to leave some spaces in these lines by using the reference image.
Step 4 – Next, start drawing some of the playground equipment
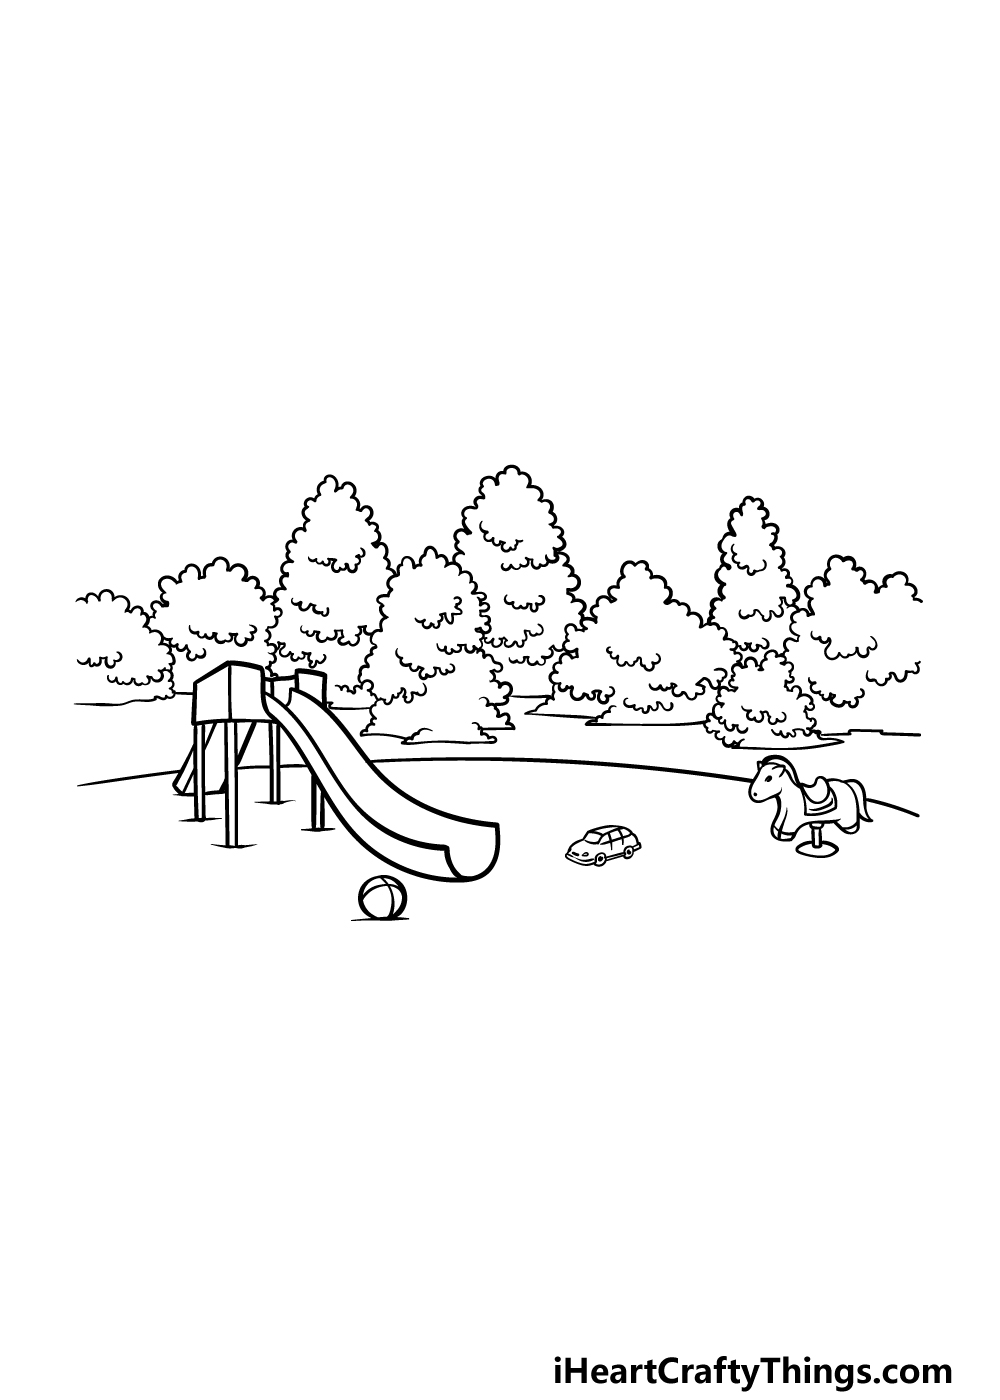
Every good playground needs some equipment to play on, so we shall start adding some in this step of your playground drawing. First, we shall draw a slide.
The slide has a small section on top, and then you can use some curved lines to have a slide coming down from it. You can also draw some toys lying near the slide such as a ball and a small toy car.
Finally, we will finish off this step by drawing a little rocking horse on a spring on the right-hand side of the playground.
Once this is drawn, this step will be complete and you can move on to the next one where we shall finish off the final details.
Step 5 – Add the final details to your playground drawing
This step of our guide on how to draw a playground will be all about finishing off the final details and elements to have you ready for coloring fun in the next step.
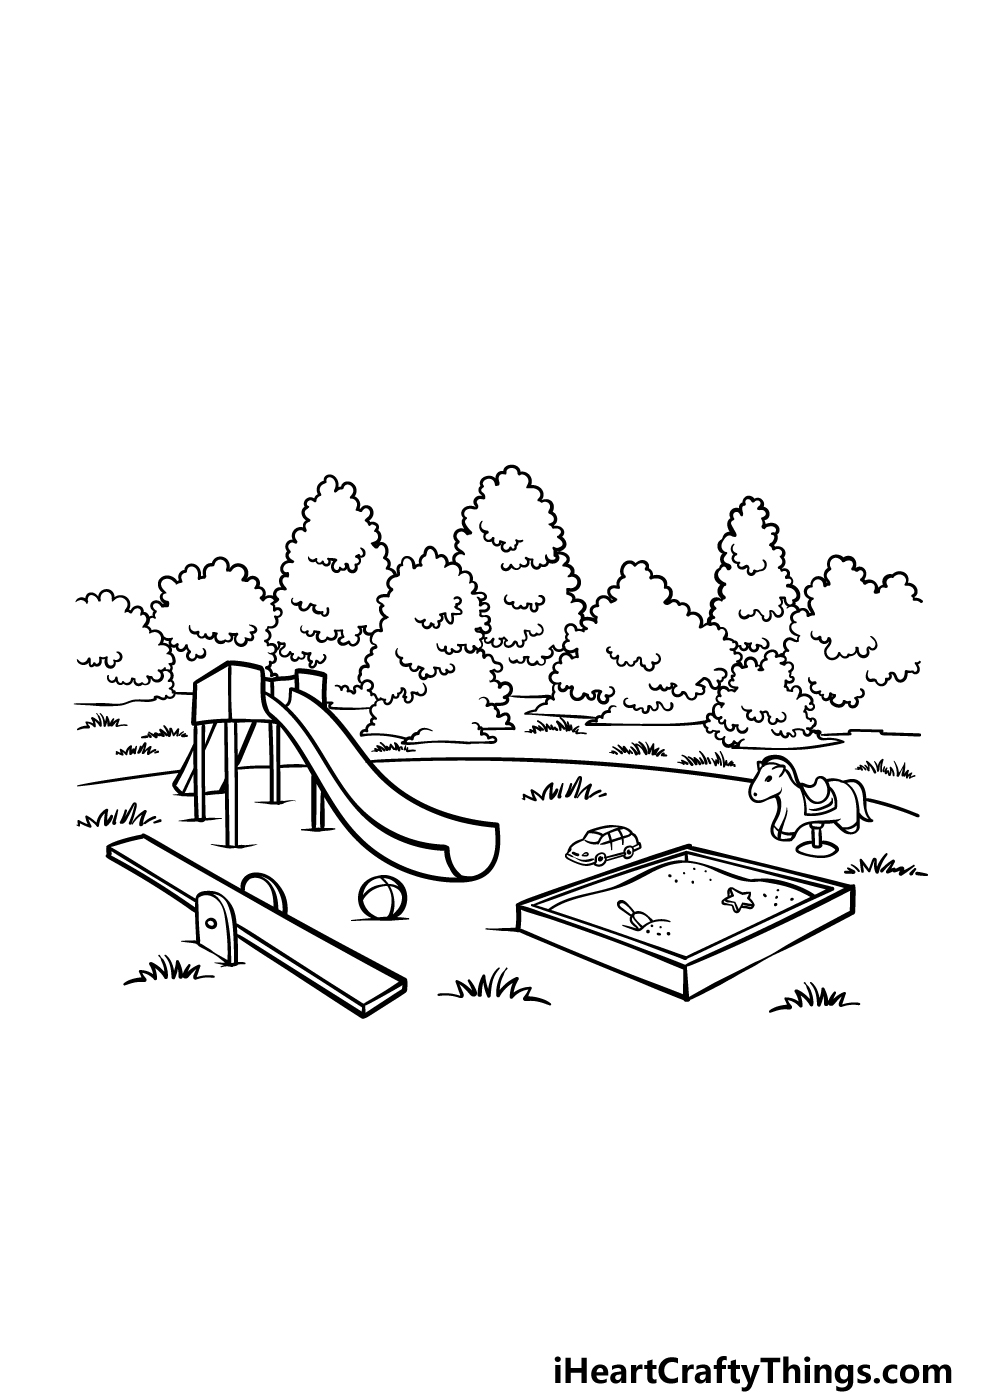
First, use some straight lines to draw a seesaw on the left side. Then, you can use some more straight lines to draw a square sandpit on the right.
This sandpit will also have a few toys inside of the sand.
Finally, finish off by using some jagged lines for the grassy details on the ground in this playground. Once these are all drawn, you’re ready to proceed!
Before you do, be sure to add any more details, elements or ideas that you may have. This is your chance to design your perfect playground!
Step 6 – Finish off your playground drawing with color
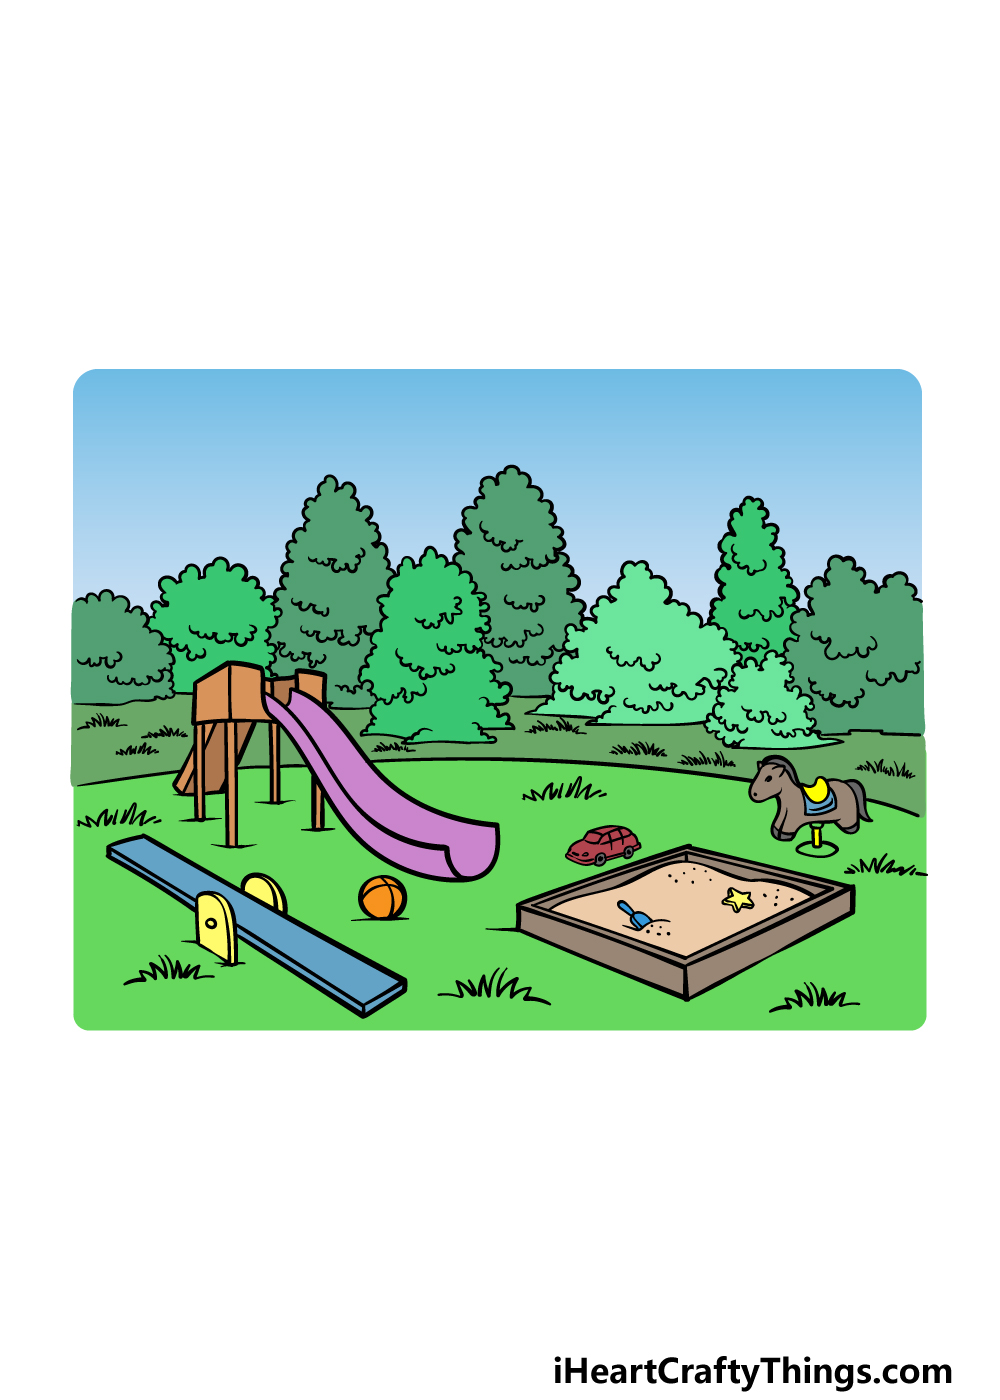
For the final part of your playground drawing, we shall finish it off with some color. In our reference image, we used lots of bright colors for the playground equipment as well as for the surroundings.
You could go for some similar colors in your own drawing, and if you did there are a few art mediums that would suit this bright color scheme nicely.
You could use some colored markers or acrylic paints as a few ideas, but there are tons of art mediums you could use!
You should also use any other color schemes that you think would best suit it, so what will you choose for your image? We can’t wait to see it!
3 More tips to make your playground drawing easy!
Play around with these tips we have that will make your playground sketch even easier!
There are lots of individual elements on display in this drawing of a playground.
These turn a seemingly simple composition into something more complex, but you can customize these elements to make it easier.
For instance, you could change or remove some of the playground rides in the playground.
If you would prefer to keep those intact, then you could focus on the trees in the background and remove or change them.
Whatever you end up changing, you should focus on the parts that are giving you the most trouble or that don’t fit your preferences.
When starting a drawing, it can be tempting to get excited and dive straight in with your pen. However, you could make this playground drawing much easier if you prepare it more.
First, you will want to use a pencil for these preparations. The reason is that unlike the pen, anything you draw with the pencil won’t be permanent.
Once you have your pencil in hand, try to map out the structure of the scene. This could include the horizon line along with any details and elements you wish to add.
Then, you can focus on adding more and more layers of details to build up the design. Once these are complete, then you can draw those final lines with your pen!
Finally, one of the best ways to make this playground sketch easier would be to use real life as your guide.
If you have a playground near where you live, then you can visit it to get some inspiration for your playground artwork.
If you aren’t able to visit a real playground, then you can find images online of real playgrounds.
Whichever approach you take, the playground you use as a reference doesn’t need to be identical to the one in our guide.
Even if it’s quite different, the playground could help you with the layout and finer details of the drawing.
Your Playground Drawing is Complete!
That brings you to the end of this guide on how to draw a playground.
It’s fun to imagine what your perfect personalized playground may have looked like, so we hope that it was lots of fun to visualize what it could look like!
When you’ve mastered our drawing, remember that you can add some details and elements of your own as well.
By adding more equipment, details and color choices you can personalize this drawing even further. Have fun getting creative and see what happens!
Once your picture is complete, you can find more guides to enjoy on our website. We have a huge selection with more on the way soon, so be sure to keep checking in to make sure you never miss out on the fun!
When you have completed your playground drawing, please share it on our Facebook and Pinterest pages so we can see how it turned out!