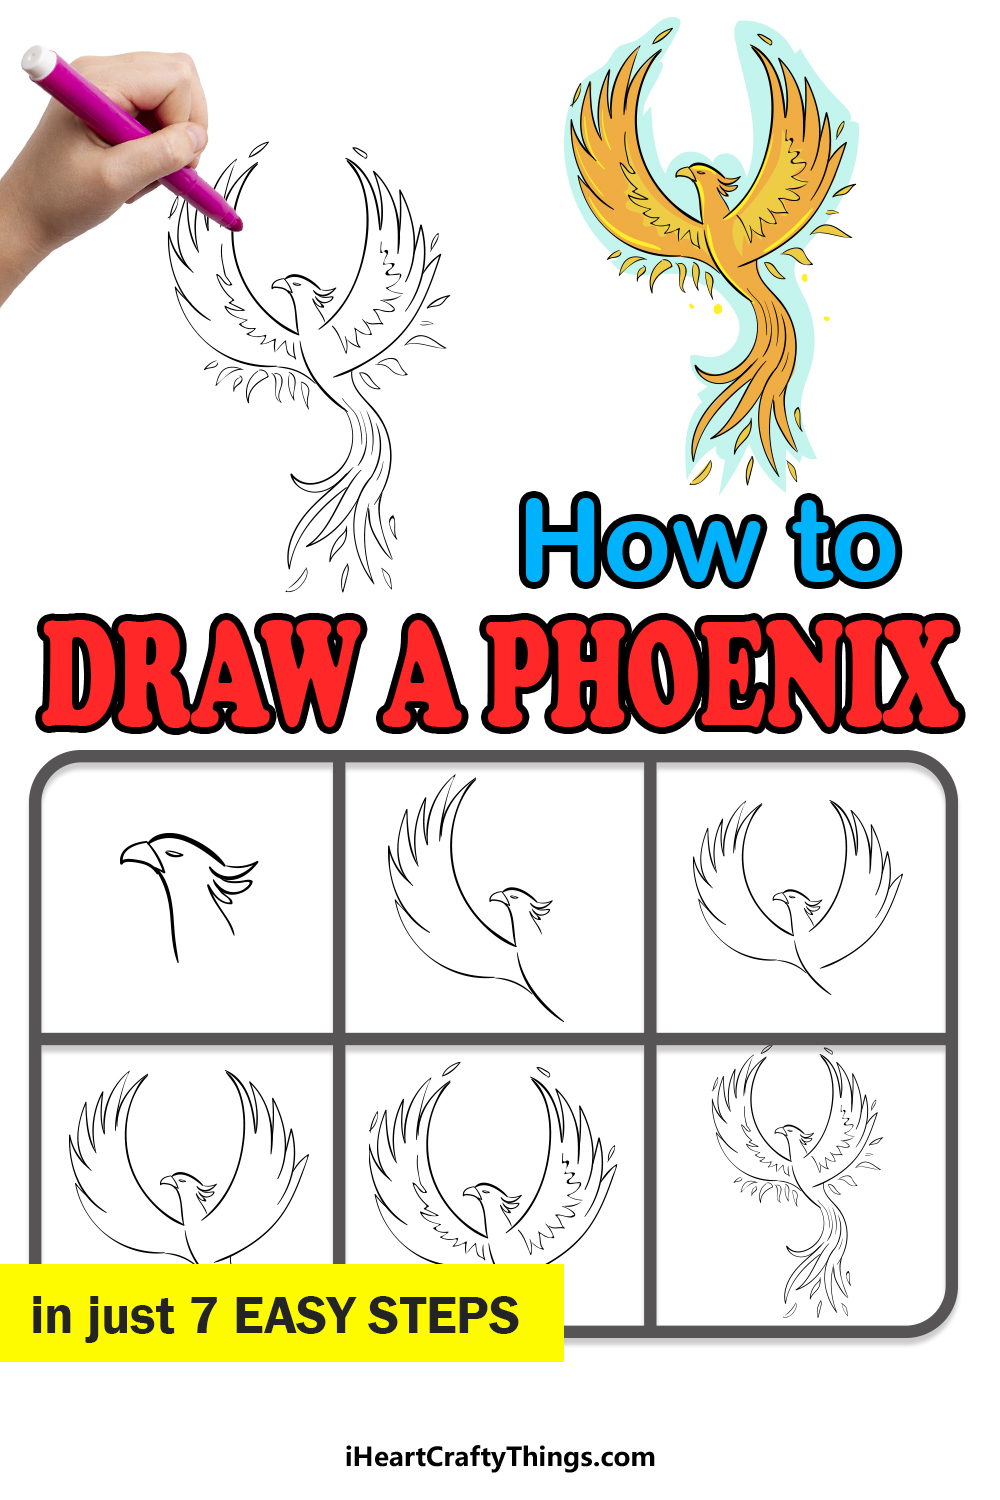
This guide on how to draw a phoenix has risen to help you recreate this mythological creature. You can create an amazing drawing to be proud of once you have worked through all the steps.
The phoenix is one of the most awe-inspiring mythological creatures of them all. There is something about how it is reborn from the ashes to rise anew that makes it truly compelling.
We also use the phoenix as a metaphor for rising above a difficult situation, and so there are many reasons as to why you may want to create some phoenix art.
This guide will walk you through all the steps you need to draw this stunning design. Once you have mastered it, you can add your own color choices and design elements as well.
You could even draw a background to make an entire scene around this phoenix!
Find Out How To Make Your Phoenix Drawing
How to Draw A Phoenix – Let’s get Started!
Step 1

To get this guide on how to draw a phoenix, we shall start with the head of the phoenix. There will be a curved line for the top of the head, and three sharp and flowing feathers at the back of the head.
Then, you can use a sharp, slightly bent triangular shape for the beak of the phoenix. The neck of the phoenix will also be quite long coming down from the head.
We will be connecting it the rest of the body in the next few steps so let’s move on to the next step!
Step 2 – Draw the first wing and chest of the phoenix
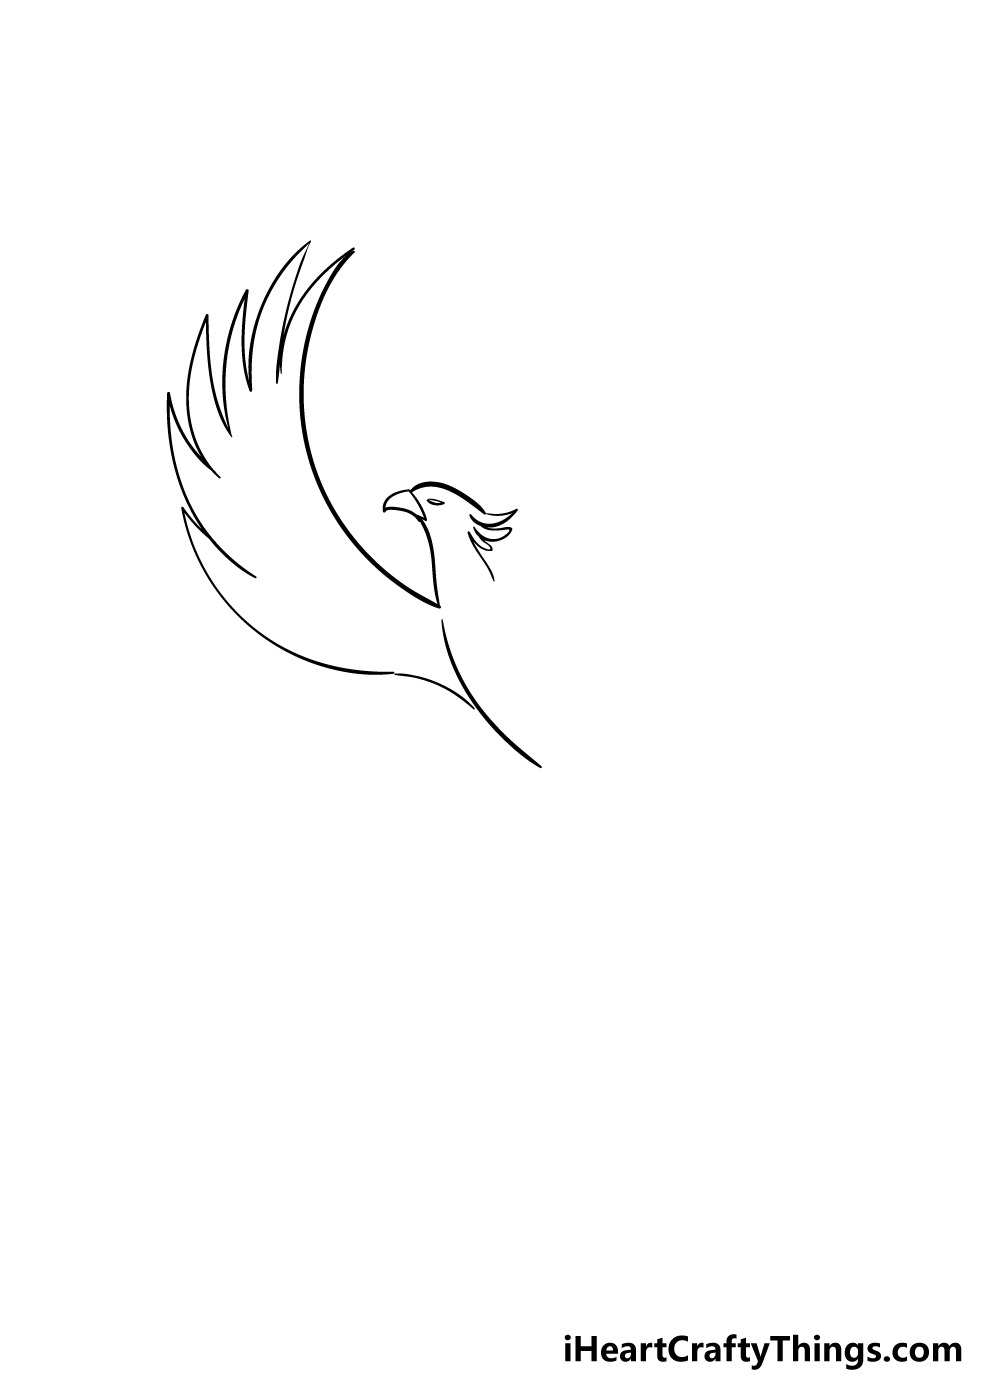
Your phoenix drawing will have long, curved wings that go upward dramatically. The top of the wing on the left will be connected to the bottom of the neck.
The wing will then curve upward, and you can use a series of sharply curved lines to form the feathers of the wings.
It will then curve back to the body in such a way that it will be the thinnest at the base of the wing.
Once you have the wing drawn then you can also use another curved line for the chest of the phoenix.
Step 3 – Add the second wing of the phoenix
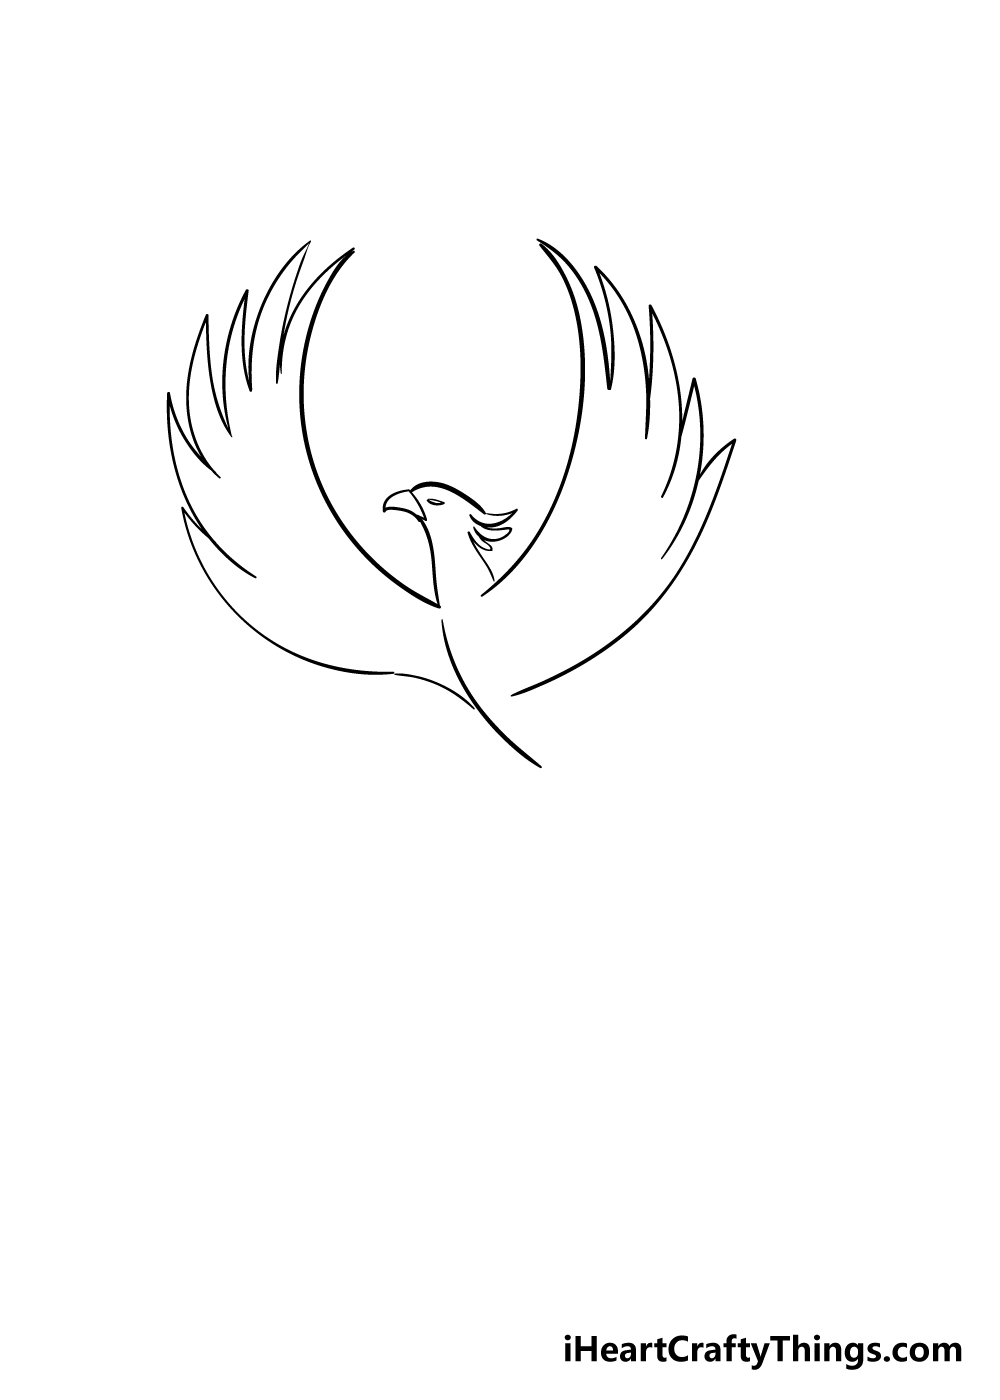
You’ve completed one wing in this guide on how to draw a phoenix, so you should have no problem adding a second one!
This wing will go on the right-hand side of the phoenix, and it will be very similarly structured to the other wing, only mirrored. With both wings looking great, let’s proceed!
Step 4 – Now draw a tail for your phoenix
One of the most recognizable features of the phoenix is its long, flowing tail. This wouldn’t be a complete guide without it, so we will add one to your phoenix drawing now.
The front of the tail will connect to the bottom of the chest, whereas the back of it will connect to the underside of the right-hand wing.
Much like the wings, this tail will have long, sharp feathers at the end that extend in different directions.
Then, once the tail outline is complete you can use some lines inside the wing to give some extra feather detail.
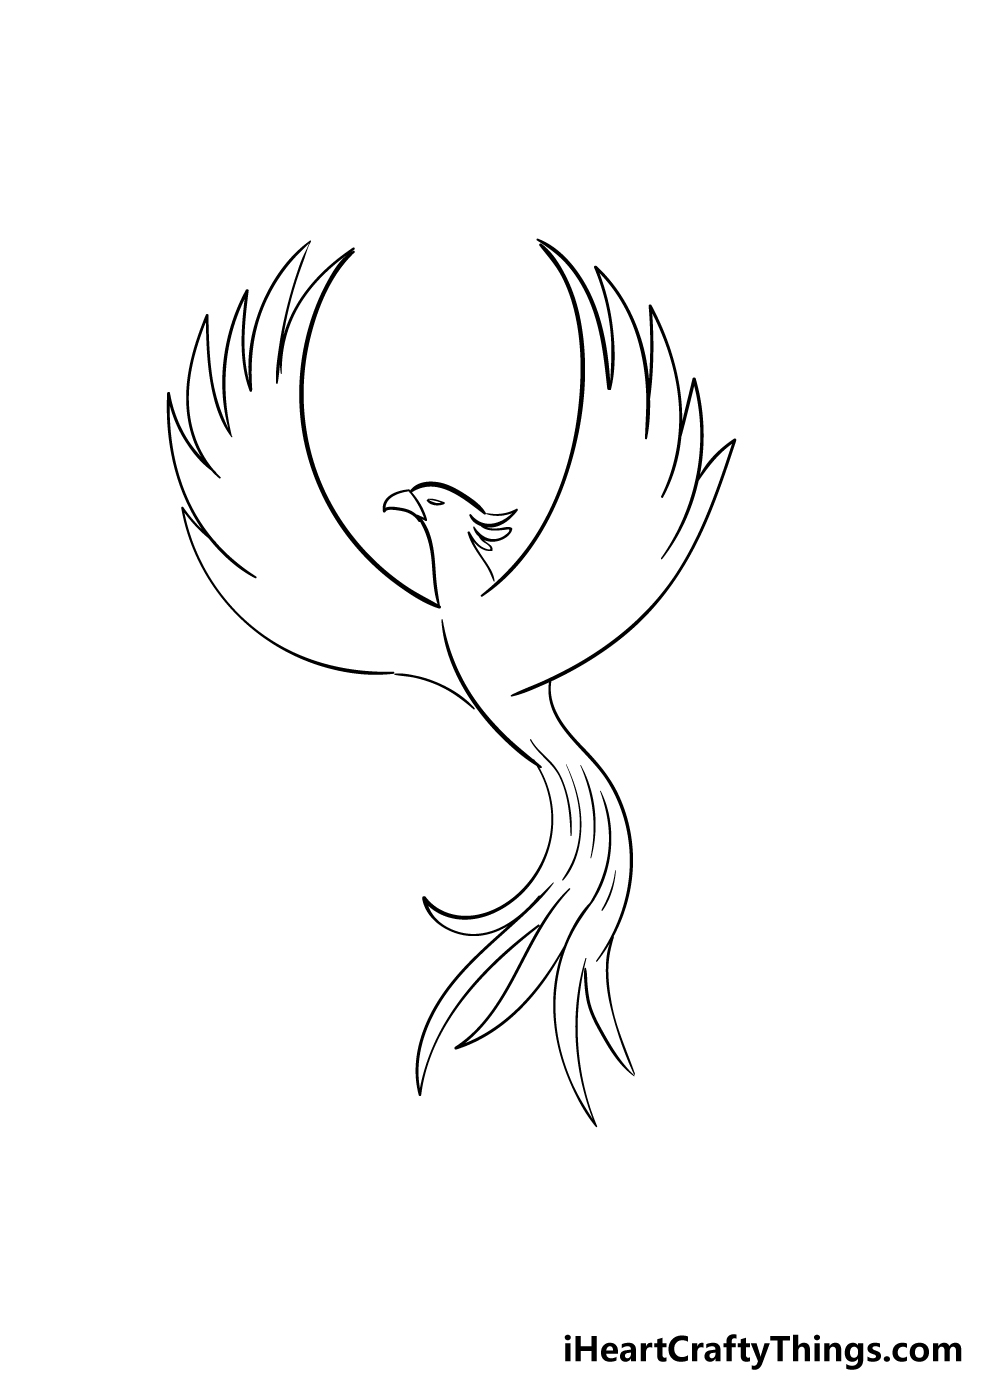
Step 5 – Draw some details onto your phoenix drawing
In this step of our guide on how to draw a phoenix, we shall be adding some details on and around the wings.
To do this, you can use some rows of sharp, jagged lines along the inner edge of the wing. This will help to provide some extra fiery wing detail.
Once you have those details added, you can also draw some small sharp shapes around the tips of the wings. These will be part of some fiery details that we will be finishing off in the final few steps.
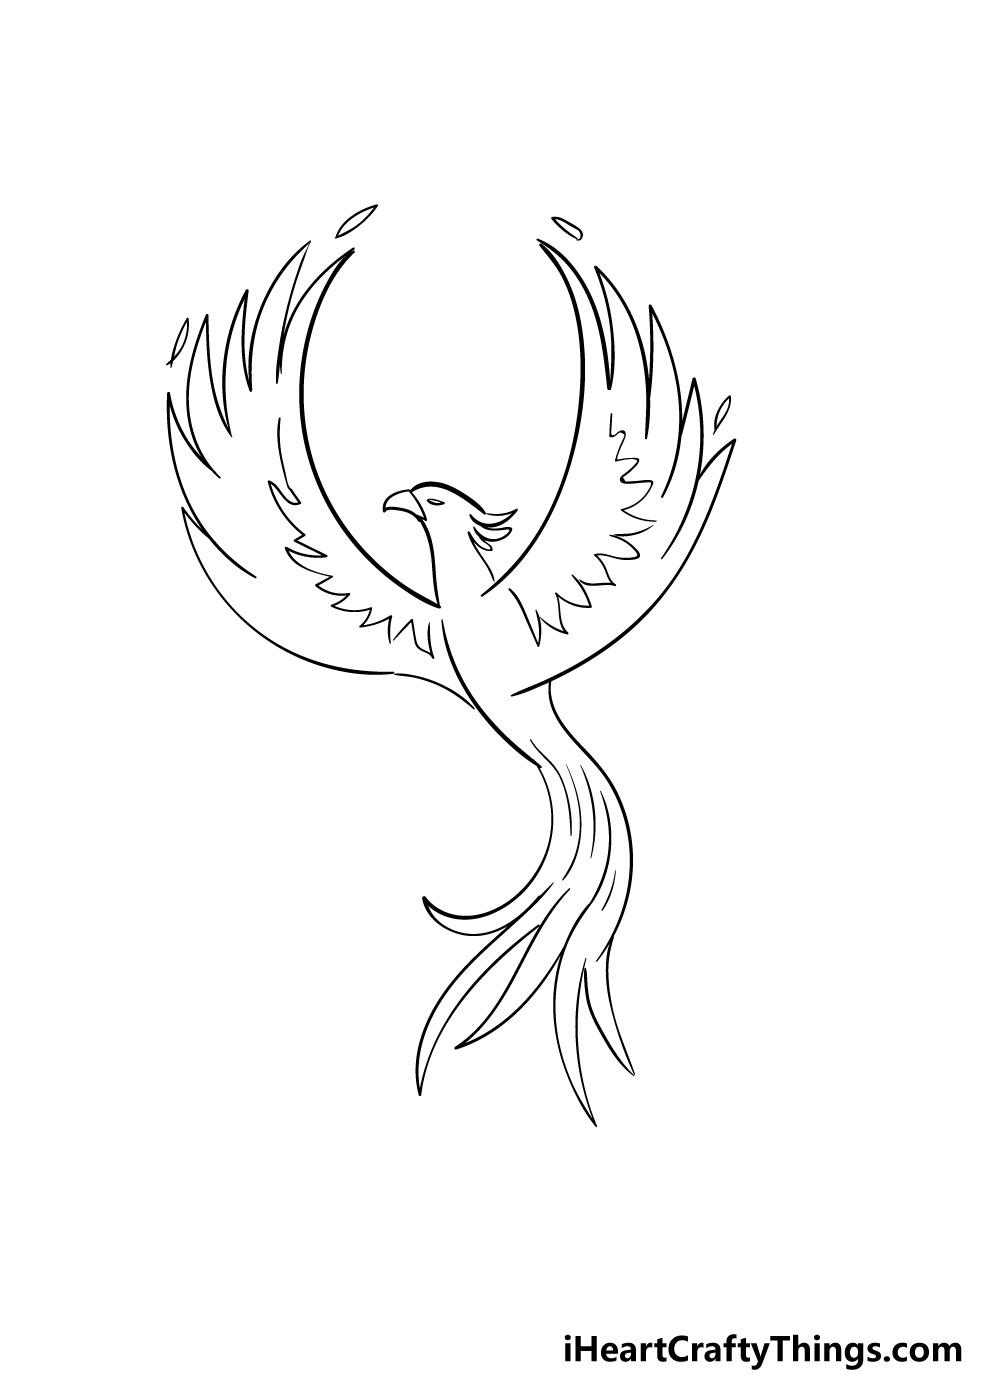
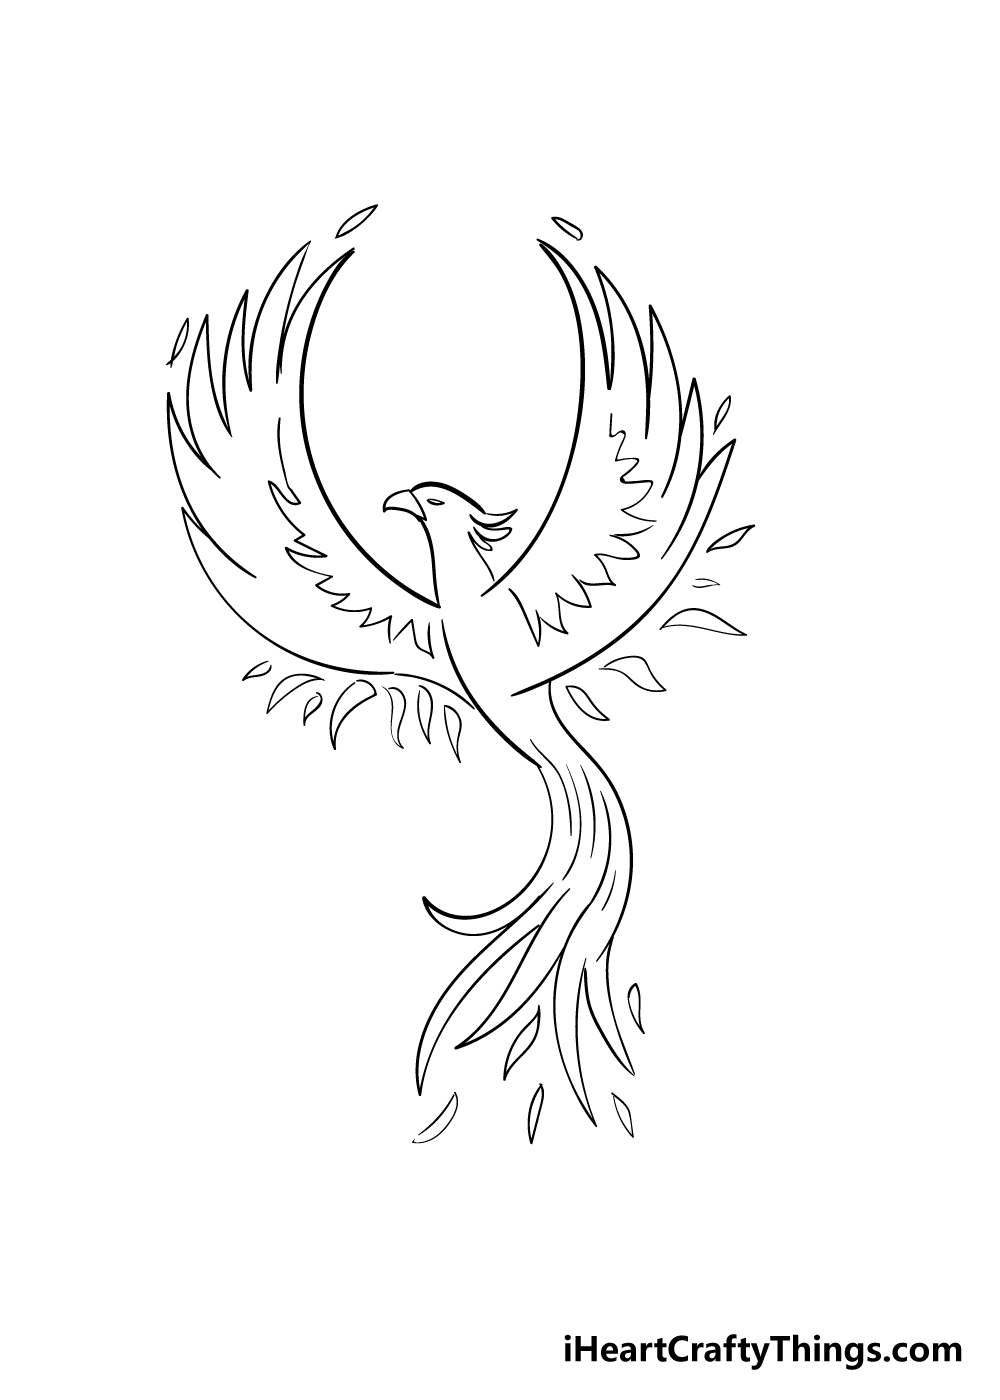
Step 6 – Finish off some extra fiery details in this step
Before we bring some bright and fiery colors to your phoenix drawing in the final step, we have a few last details to add.
To do this, simply draw in some more sharp shapes as you drew in the previous step around the wing tips. You can also add some around the tail, as seen in the reference image.
This is a step where you can also get creative with these details if you would like! You could add a lot more of these shapes to make an even more fiery phoenix.
Before you move on, you can also add any extra details that you would like. Perhaps you could draw a fiery background or have a fiery trail behind the phoenix.
These are just a few out of many ideas you could go for, so how will you finish off this image?
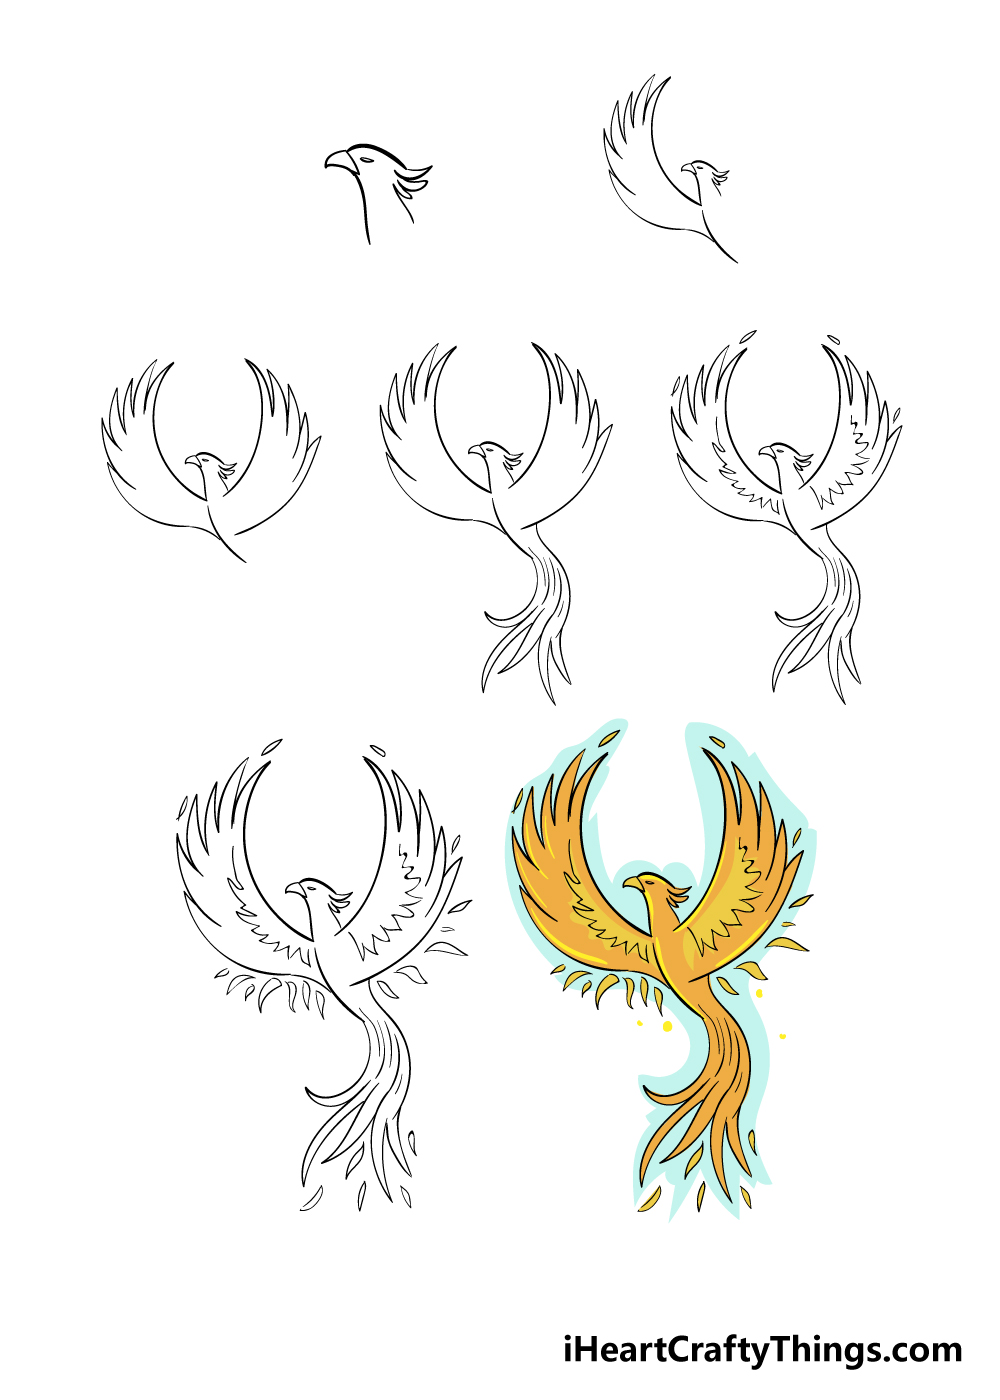
Step 7 – Finish off your phoenix drawing with some color
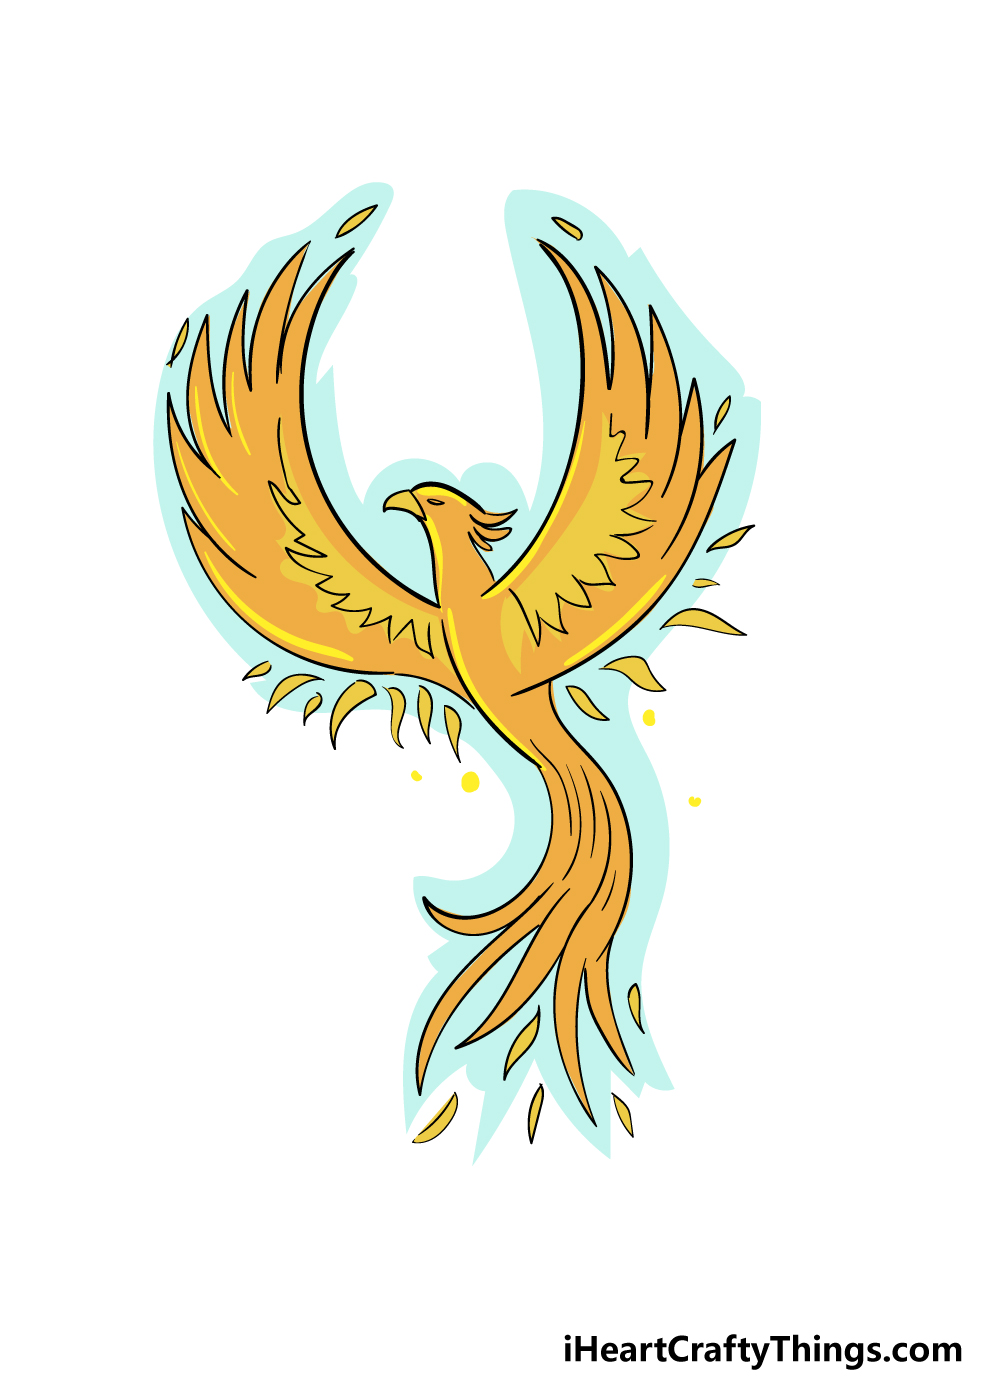
Now that your phoenix is completely drawn and you have added any extra details and background elements, you can have some fun coloring in your phoenix!
The phoenix is closely associated with fire, so this picture would be especially suited to lots of reds, yellows and oranges.
When coloring in this phoenix, I also think that art mediums which allow for some bright and vibrant colors would be perfectly suited to it.
My medium of choice for this picture would be some acrylic paints, but anything else you use will look incredible!
Paints would also be great for blending some fiery colors in the background to make it look there is an inferno behind the phoenix.
Do this to take your phoenix drawing to the next level
Rise to the challenge as we show you how to make this awesome phoenix drawing even better.
The phoenix is a creature often associated with fire and flames, and that ties into our first suggestion for this phoenix drawing.
You could draw all sorts of fun and interesting flame effects around the phoenix to make it look even better.
Drawing fire can be a bit tricky, so you may want to look up photos of fire along with cartoon portrayals. We will also see how you can use your colors to create these flame effects very shortly.
In the previous tip for this phoenix sketch, we spoke about using fire to enhance the image. We also mentioned how you can use your colors and art mediums to portray these flames.
When it comes to depicting the fire, you’ll want to use the softest mediums you have, as fire has no physical form.
The best medium would be watercolor paints, as these can be used to create lovely soft colors. Colored pencils would also be a good option, but what art mediums come to mind for you?
Using crafts and unusual materials can really enhance a drawing, and there are some you could use for this drawing of a phoenix. You could incorporate crafts such as glitter to add some sparkle, but there are other methods too!
For example, next time you’re at a barbecue you could grab some ash. Put a thin layer of glue beneath the phoenix and then sprinkle some of the ash to make it look like the phoenix is rising from it.
A phoenix is one of many fictional creatures we know of from legends. You could make this phoenix drawing look even cooler by adding some of these fictional creatures.
They could include some unicorns or fairies, but you could really go for anything you like. If you need some inspiration, you could look at some storybooks or find some pictures of mythical creatures online.
What are some mythical creatures you could use?
Your Phoenix Drawing is Complete!
That brings us to the end of this step-by-step guide on how to draw a phoenix!
This impressive image looks quite intimidating to draw when you first see it, but we hope that by following the steps in this guide you found it to be much easier than expected.
Your drawing doesn’t have to end here, however! You can extend the drawing fun by adding lots of your own touches and extra details.
Whether you do this with extra elements, an amazing background or with some art mediums and colors we know you will end up with an incredible phoenix artwork!
Our website is full of amazing drawing guides like the one you just completed, so we would love it if you would visit us there!
We upload new guides all the time, too, so be sure to check in as often as you can.
Once you have completed your phoenix drawing, you can share it on our Facebook and Pinterest pages for us to admire. We can’t wait to see how you completed this amazing picture!