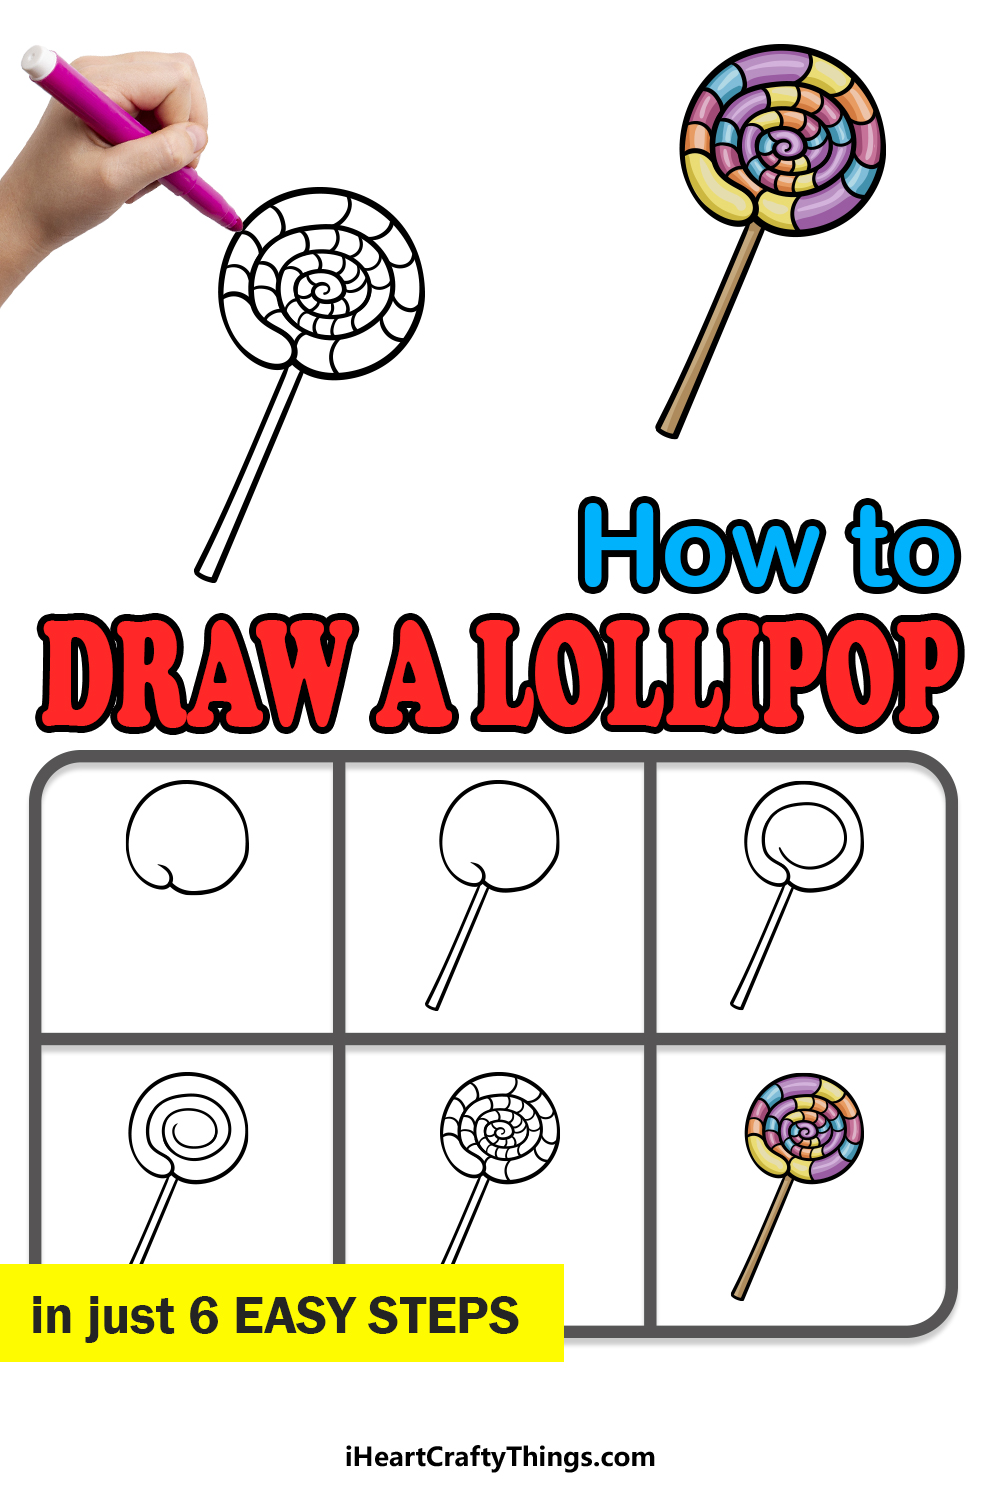
There are many tasty treats to enjoy, and lollipops are some of the tastiest ones you can have! These treats can come in an almost infinite amount of colors, structures and flavors.
If you have even a mild sweet tooth then there’s a lollipop for you to enjoy!
The classic lollipop structure is a sort of swirly shape, and while they look cool it can be a challenge to learn how to draw a lollipop when in this shape.
Worry not, however, as you’re on the right guide to see how it’s done!
We hope that you enjoy this step-by-step guide on how to draw a lollipop in 6 steps!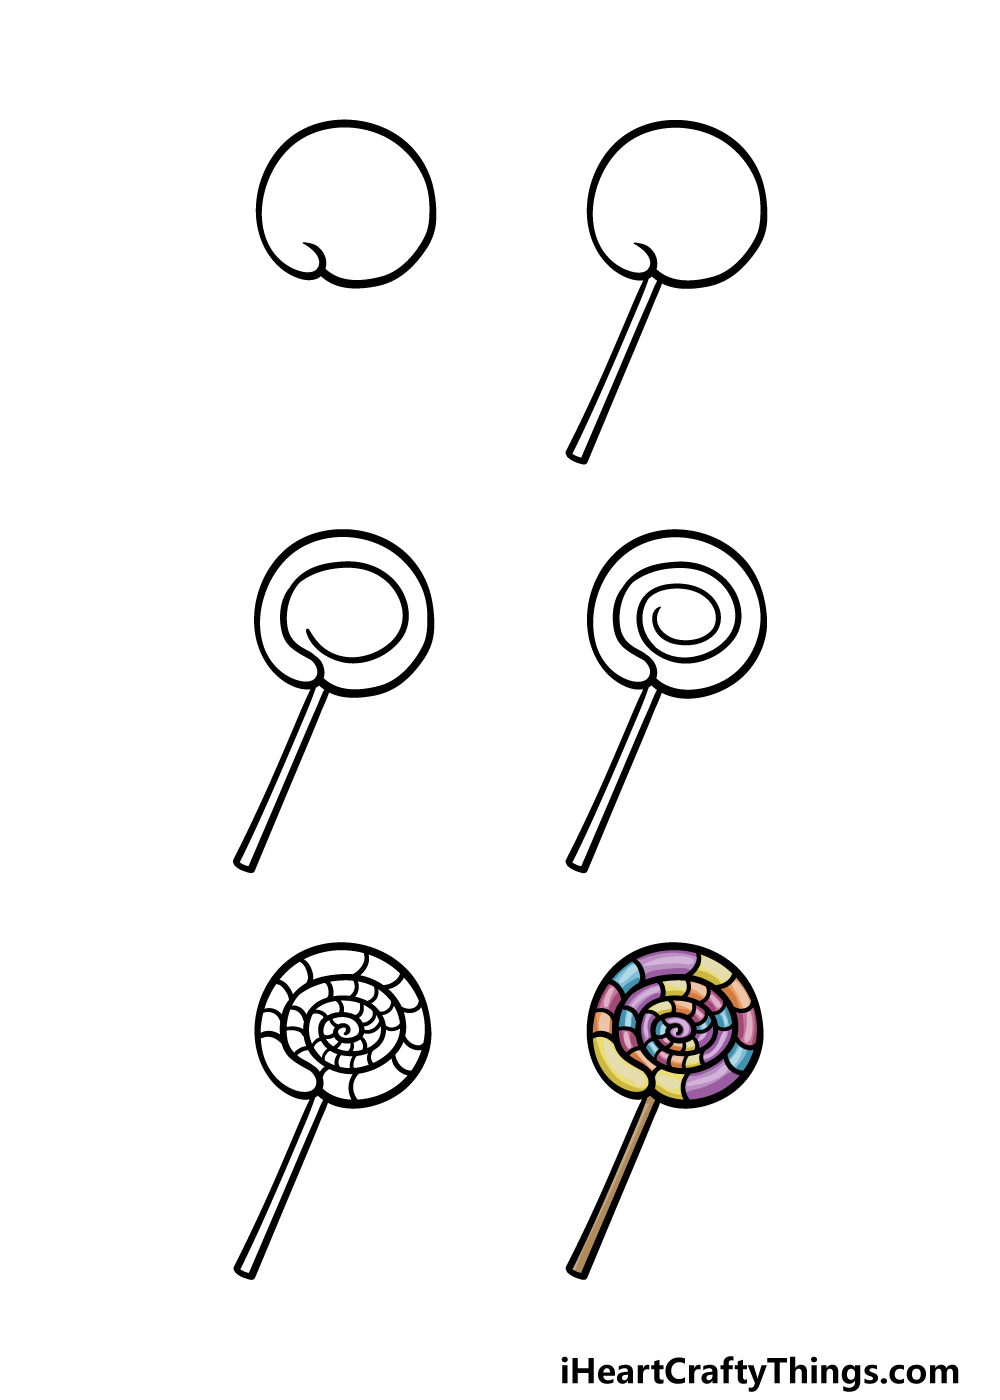
How to Draw A Lollipop – Let’s get Started!
Step 1
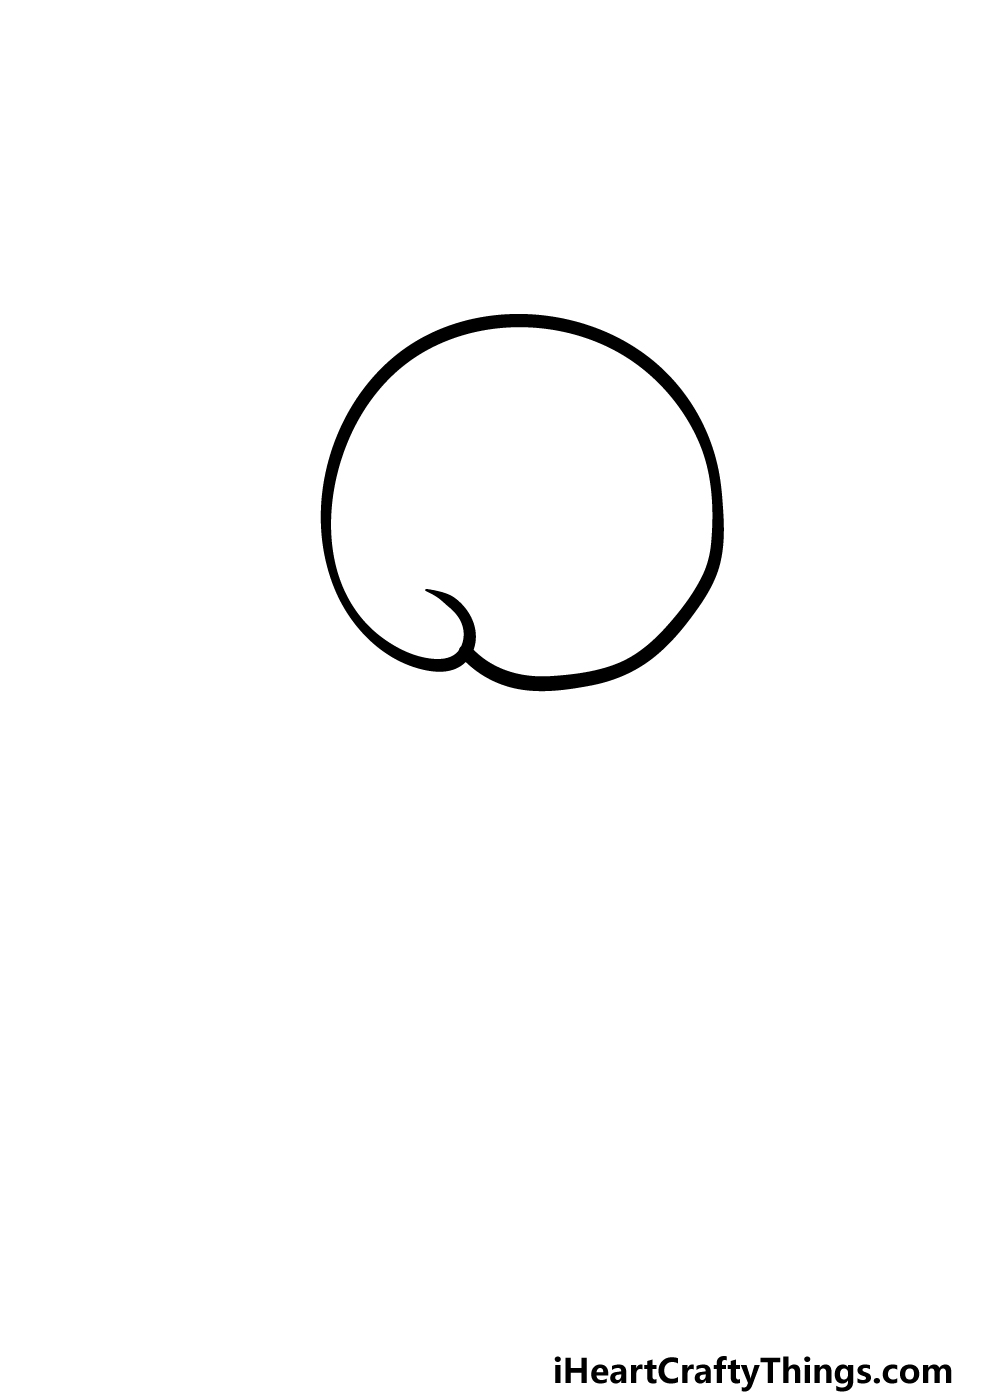
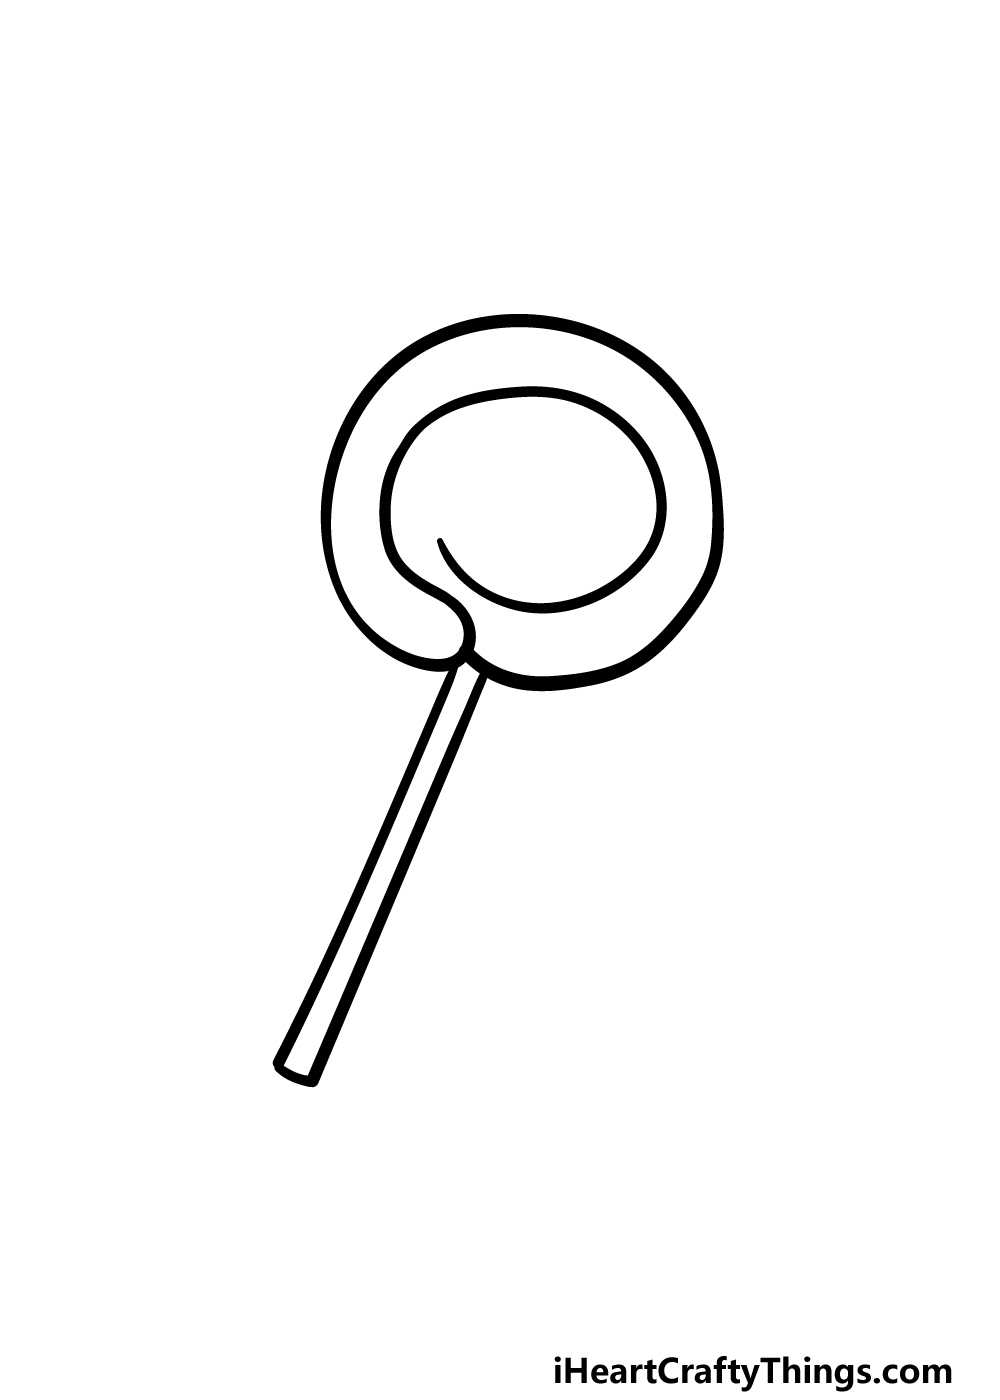
We will start with the outline for the lollipop in this first step of our guide on how to draw a lollipop! As mentioned, this lollipop will have a twisty shape to it.
To get this started, we will be starting with a circular shape for the outline of the lollipop. This won’t be a perfect circle, and the line will move inward near the bottom of the lollipop outline.
This part that pokes into the lollipop will curve a bit at the end, and it will form the start of the swirling shape for the lollipop in the next steps.
This may all sound a bit complicated, but it’s easier than it sounds! Simply follow the reference image to make sure you don’t get lost as you draw.
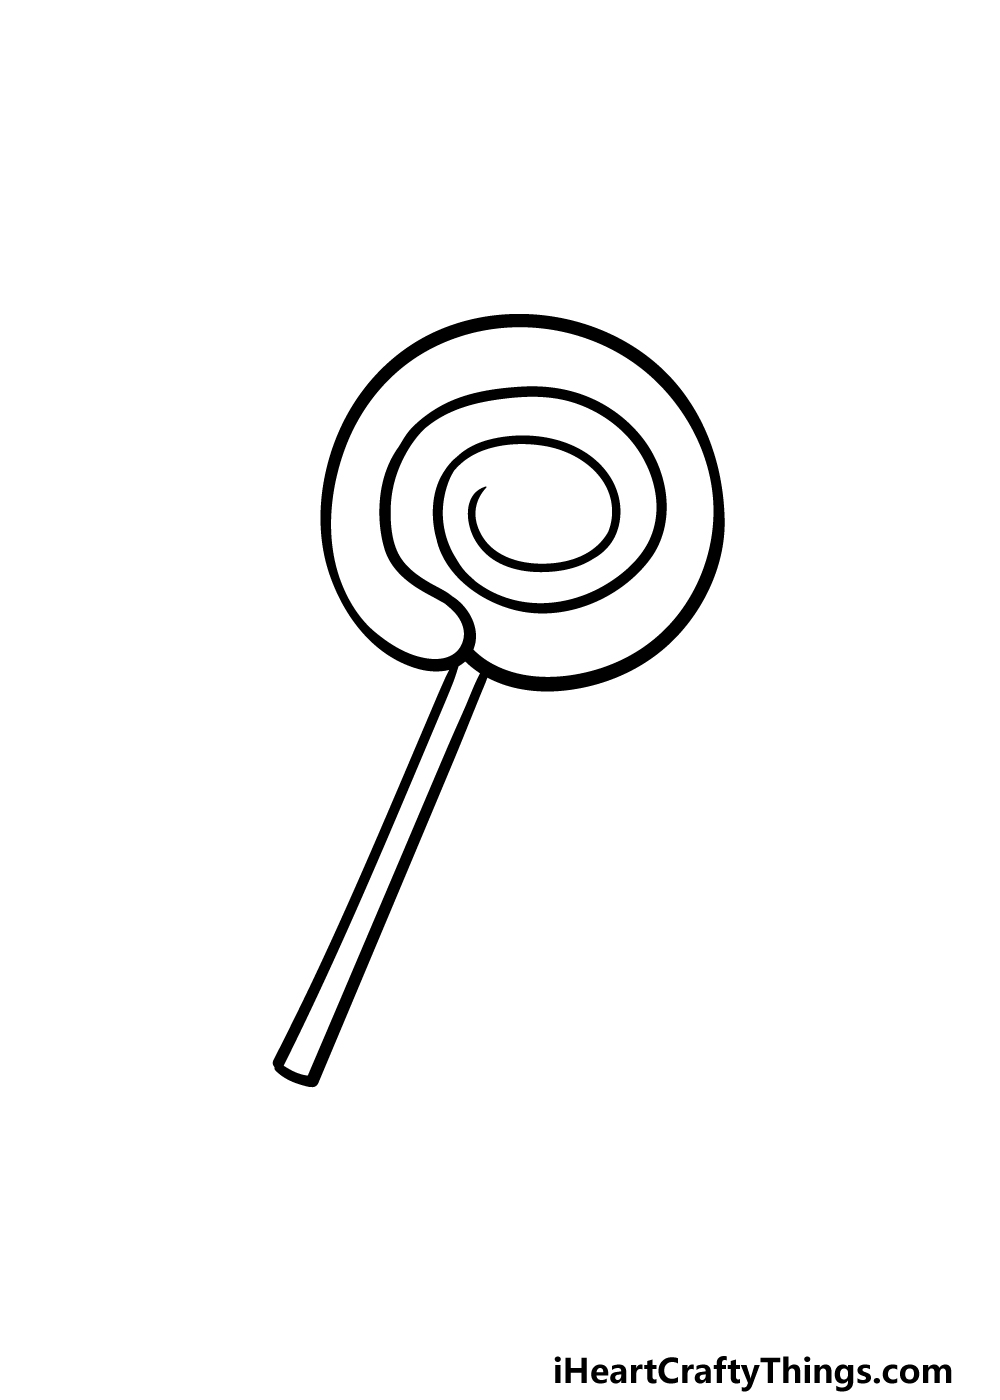
Step 2 – Next, draw the stick of the lollipop
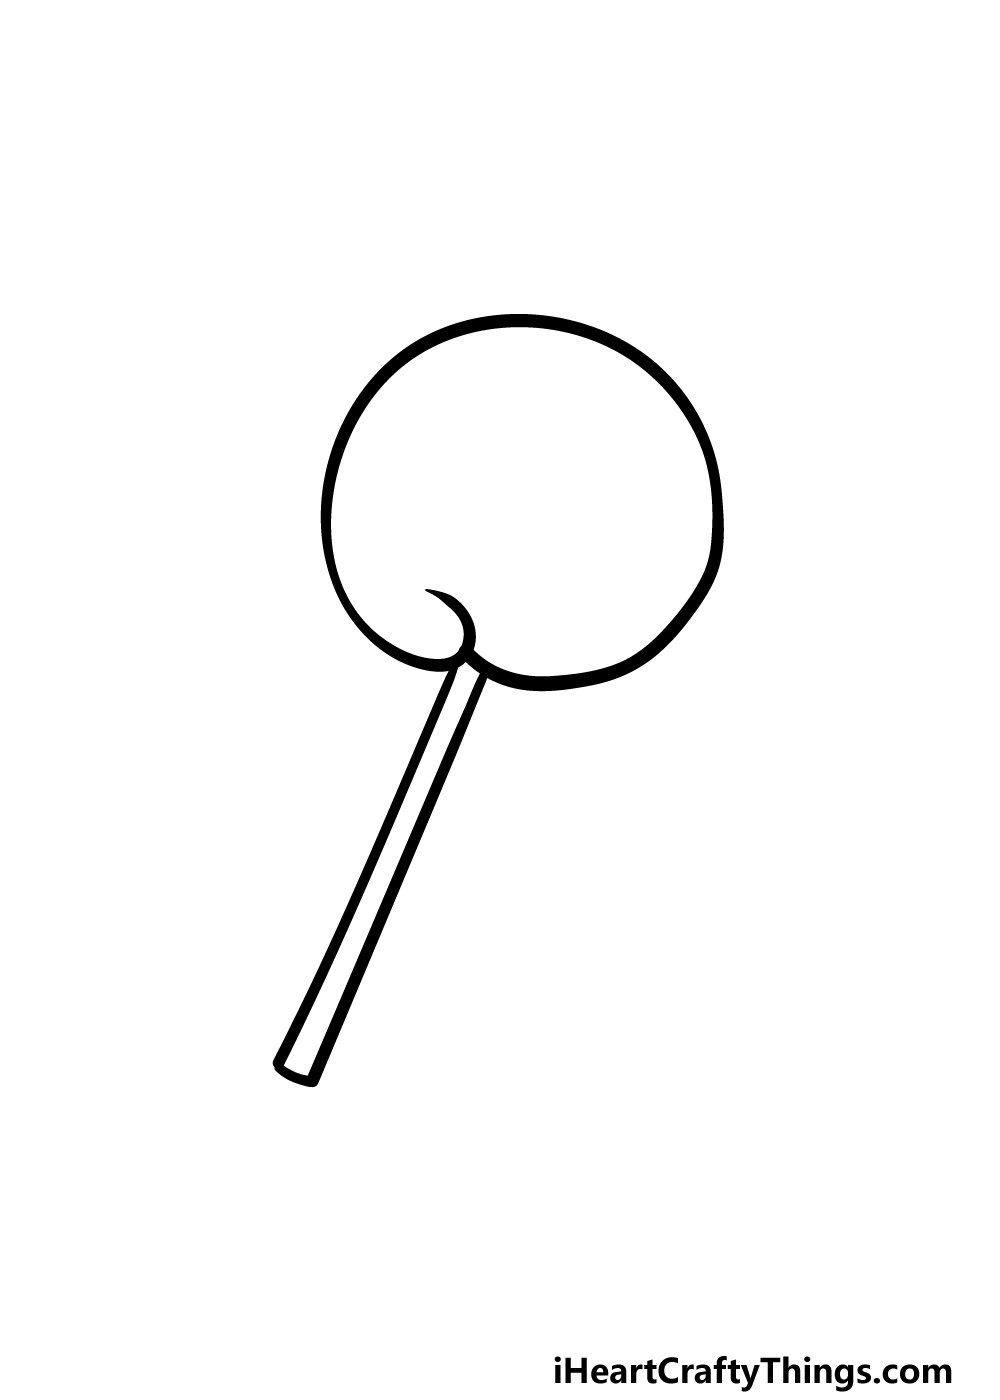
A lollipop would be quite sticky and unpleasant to eat without a stick to hold onto, so we will draw one in this step of your lollipop drawing.
This should be an easy step to complete, and you will make things much easier on yourself if you use a ruler to help you out.
Simply draw two straight lines close to one another down from the body of the lollipop. The stick will come out from near where the line moved inward on the lollipop in the first step.
You can finish off by connecting these lines with a short flat one at the bottom of it. That’s all there is to it, so let’s move on to step 3!
Step 3 – Now, start drawing the swirl of the lollipop
We started drawing the swirl of the lollipop in the first step of this guide on how to draw a lollipop, and in this step we will build on it.
You will start to see the purpose of the line that you draw into the outline of the lollipop now, as you will continue with this line for the swirl.
Simply draw a line curving inwards into the lollipop starting with that line poking into the lollipop.
Then simply follow the way the curved line looks in our reference image to draw that swirling line.
Step 4 – Next, keep extending the swirling line
We will be continuing the swirling pattern in this part of your lollipop drawing. Simply keep the line that you started in the previous step going as it twists further into the lollipop.
There will be a small space left at the center of this pattern by the end of this step, but we will fill that in along with some final decoration details in the next step.
Step 5 – Now, finish off your lollipop drawing
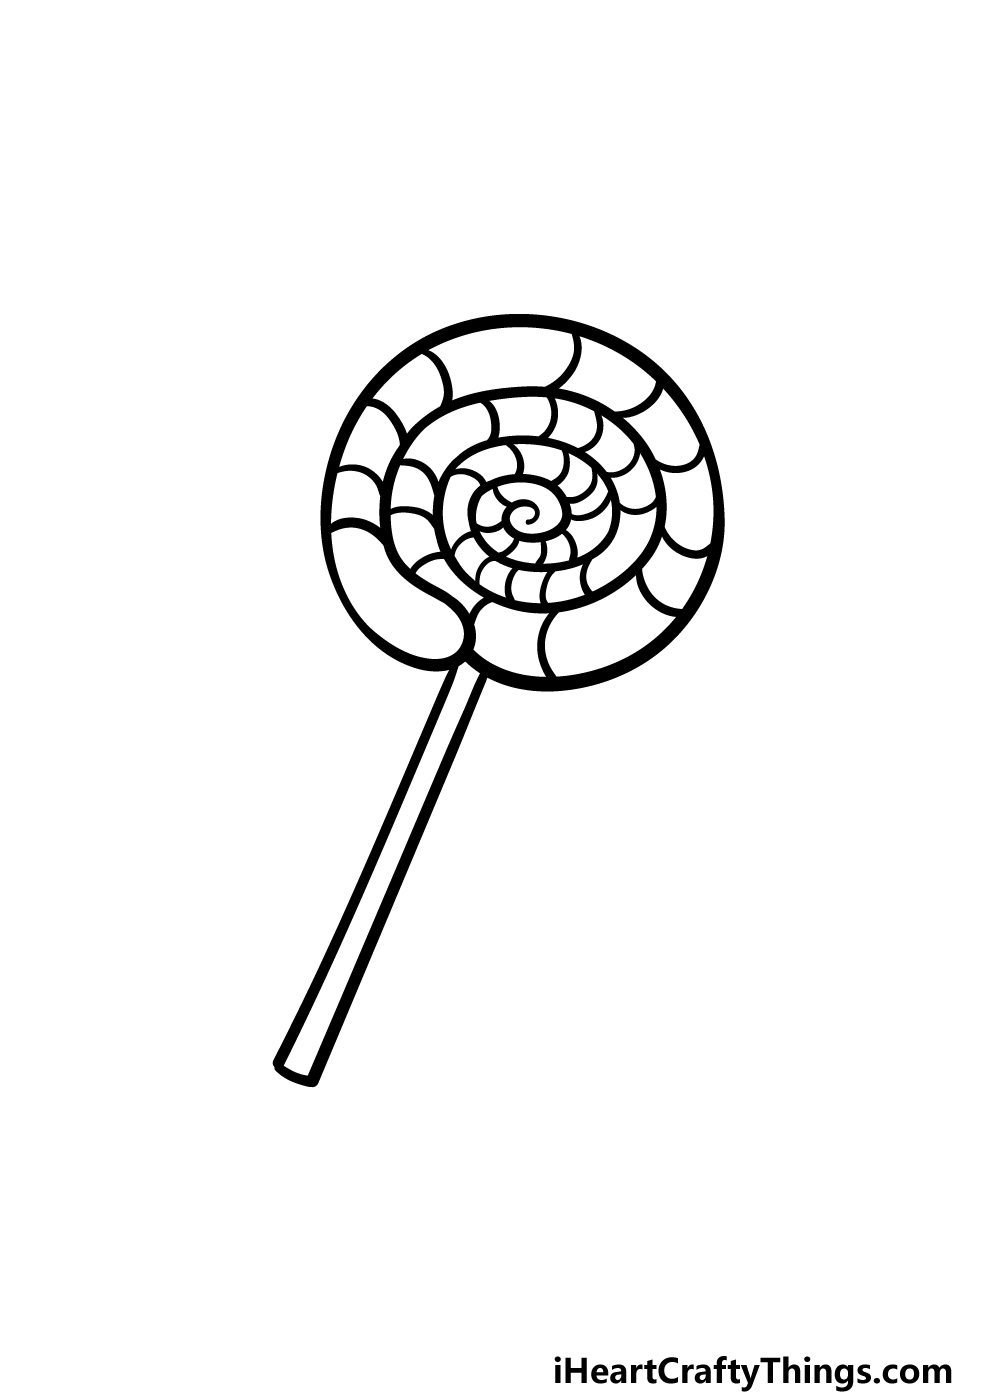
As mentioned in the previous step of this guide on how to draw a lollipop, we will be finishing off the swirl pattern as well as adding some final details in this part.
First extend the twisty swirl line further into the center of the lollipop. Once you have finished that twisty line, it’s time to decorate your lollipop!
This is an area where you could go for a different design to our one if you prefer, but for our one we will be adding some small curved lines across the various swirls of the lollipop pattern.
Doing this will create multiple sections inside of the lollipop, and that will give you a lot of options for bringing lots of amazing colors to it later!
Once you have finished the final details of this lollipop, you can move on to the final step. Before you do, you could also add some details of your own!
These could include fun details like a bite mark in the lollipop, or you could draw a background showing what other candies you would enjoy with this lollipop. Just don’t tell your dentist!
How will you finish off this drawing before the final step?
Step 6 – Finish off your lollipop drawing with some color
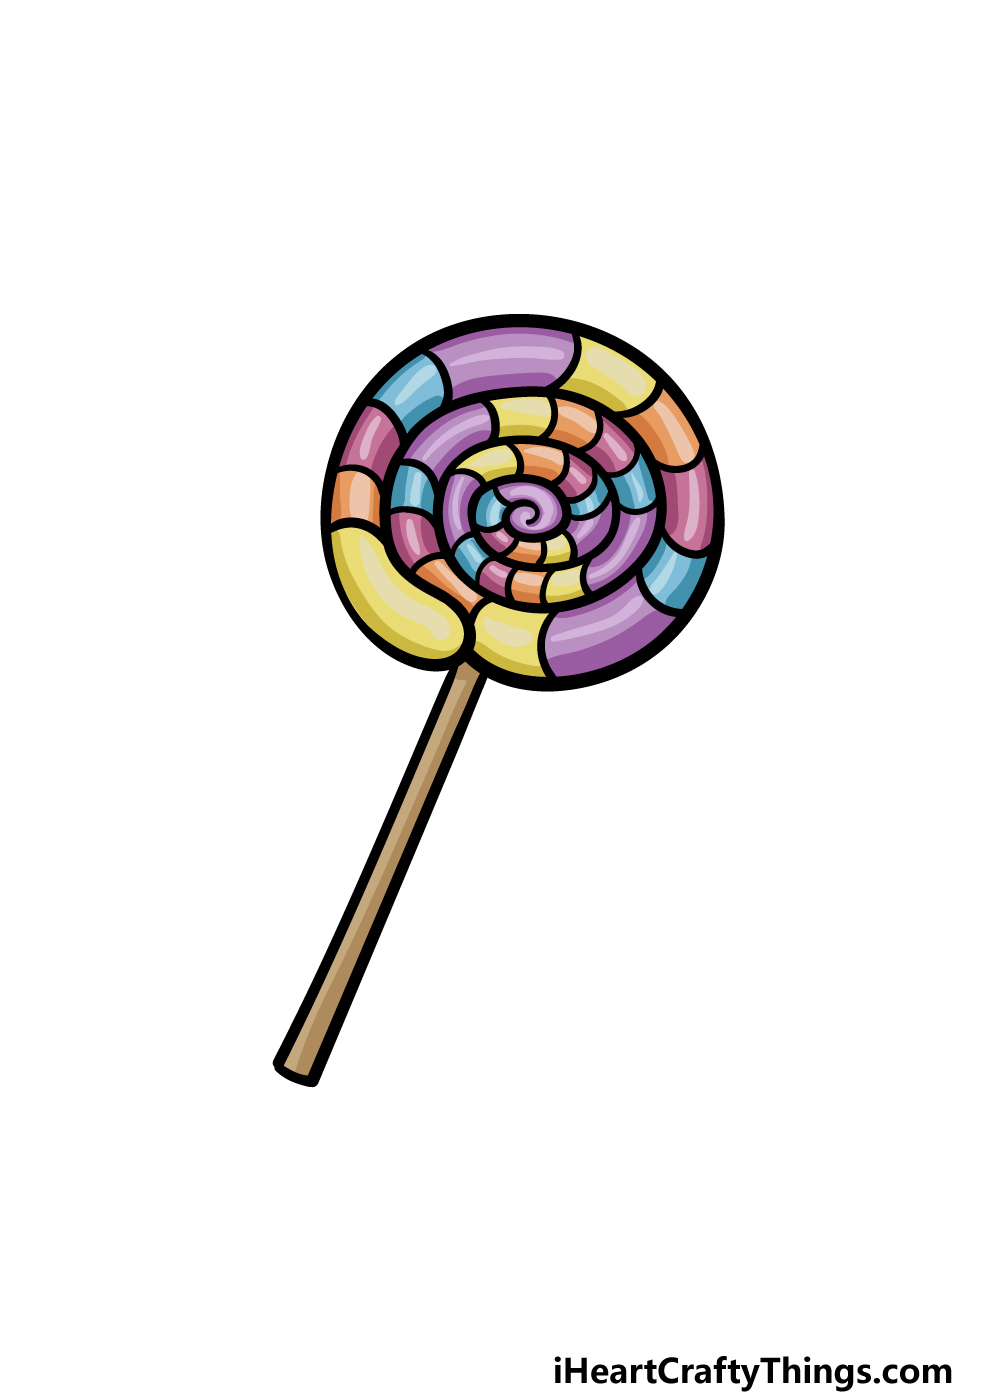
Now comes the part of this guide that may be the most fun of all! In this part of your lollipop drawing, you can finish off with some amazing colors.
We showed you one way that you could color in this picture in our reference image, but this is just a suggestion.
This is a great chance for you to use all your favorite bright and beautiful colors to finish it off!
If you went with our design, then you’ll have plenty of sections to color to create a colorful bonanza.
We can’t wait to see what amazing colors, patterns and art mediums you choose to finish off this wonderful and tasty drawing of yours.
Do this to take your lollipop drawing to the next level
Savor these tips we have for making your lollipop sketch even better!
This drawing of a lollipop has a classic round, twisty shape to it. It is a good size already, but you could make it even bigger if you wanted to!
In fact, this lollipop could be as big as you want, even if it’s not completely realistic. Who’s to say that the lollipop couldn’t be as big as someone’s head?
It could even be bigger than the person holding it! How big do you think you would like to make this lollipop you have created in this drawing?
We stuck to just a few colors for this lollipop, and while they look great you could also use any other colors that you like.
This could include some of the ones we used along with some new ones, or they could all be unique colors.
Not only could you have fun choosing colors, but you could also incorporate some interesting art tools and mediums to make the colors look really cool and unique.
In the first tip, we spoke about the size of your lollipop drawing, but you can also have some fun with the shape! The round spiral shape is a common one, but they can also come in many other shapes.
These could include squared shapes or maybe the shape of a star or a heart. That is just a small selection of shapes you could use, but there are so many others you could use!
When we spoke about the shape of your lollipop sketch, we mentioned how it could be the size of a head or a person. By adding a character to your drawing, you could show how big it is!
The person could be based on yourself or maybe someone you know, or you could make an entirely unique character.
Once you know who the character is based on, you could then have some fun choosing what art style you would like.
Who do you think you would like to show enjoying this lollipop?
Your Lollipop Drawing is Complete!
We hope that you enjoyed this mouthwatering guide on how to draw a lollipop! Drawing this kind of twisty pattern design can make this kind of drawing more tricky than expected.
With that in mind, this guide was made to show you how easy and fun it can be when you know what to do!
This guide isn’t where the fun has to end, however, as you can keep it going with your own details, background elements, additions or beautiful colors.
The more creative you can be the better, so have fun with it and see what you can do!
Another way to keep the drawing fun going would be to try out more of the drawing guides on our website. We hope you’ll visit often, as we upload new ones frequently!
We always love to see your amazing artworks, so once you have finished this lollipop drawing please share it on our Facebook and Pinterest pages for us to enjoy!