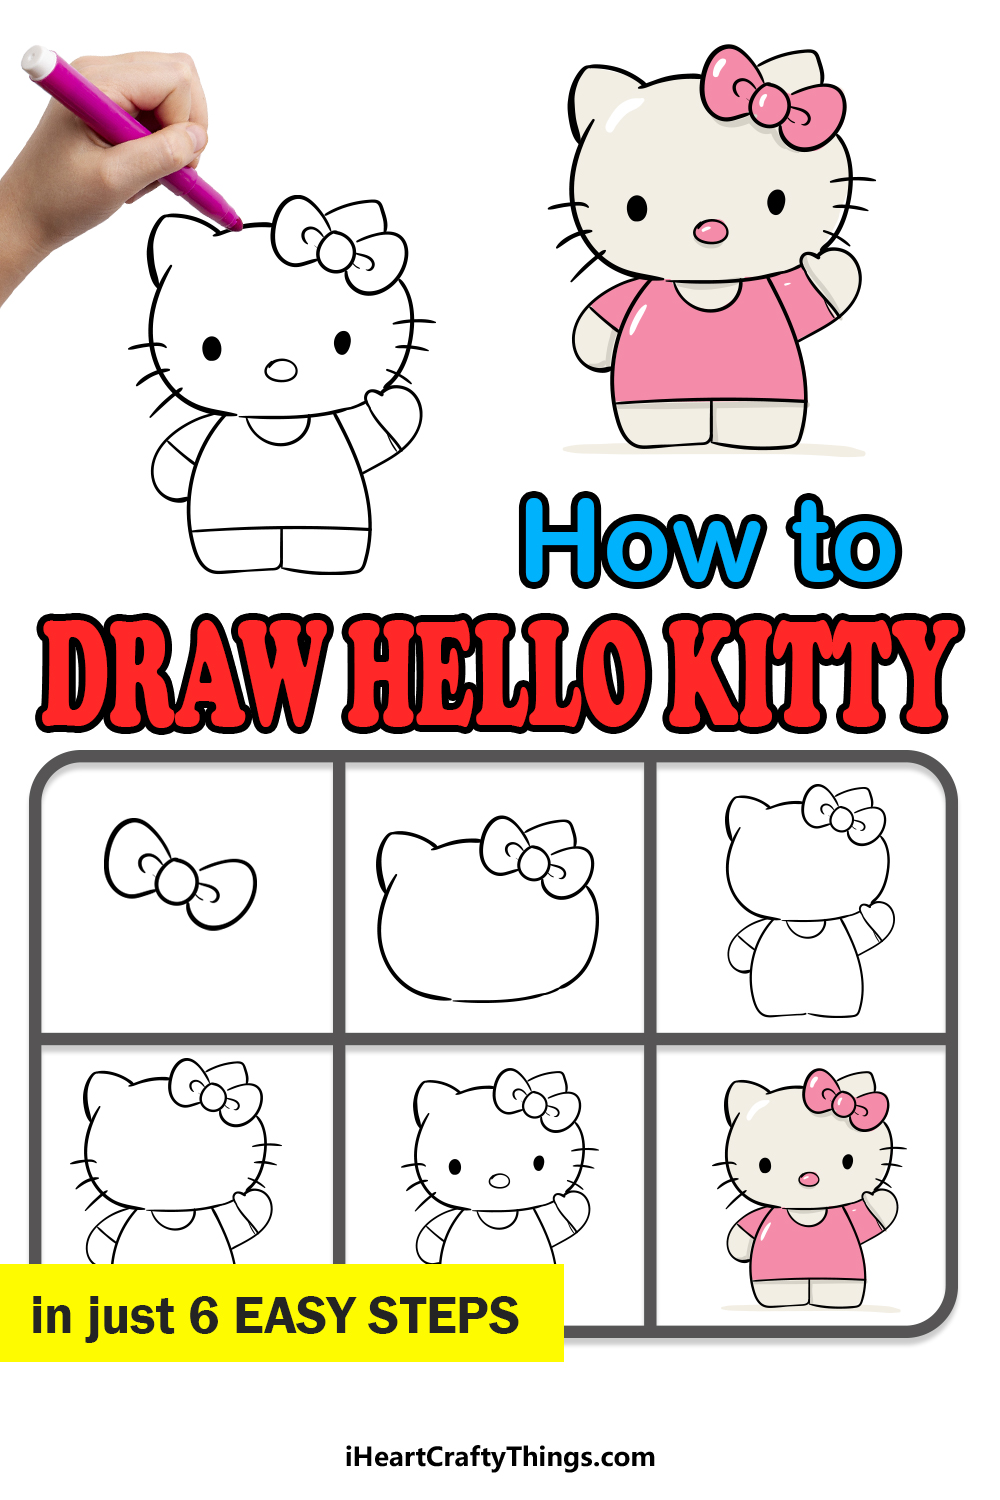
Learning how to draw the famous Hello Kitty is a fun and easy process with this step-by-step guide for kids. All ages will be able to follow this intuitive guide and master it quickly.
Hello Kitty is a global icon beloved by millions of people, so it’s no wonder why so many people want to learn to draw her. Despite her simple design, it can actually be a bit hard to get it right.
In these simple steps, I will break down the various shapes used to draw her and also show you where to place details such as her bow, eyes and nose. Once you see these basic elements come together, the design will click for you and make it much easier.
The guide will get you started, but then you can play around with different poses, clothing and backgrounds inspired by the world of Sanrio.
Let’s go through this guide together and see how you can recreate this Japanese icon!
.
Learn How To Draw Hello Kitty By Watching These Easy Steps
How to Draw Hello Kitty – Let’s get Started!
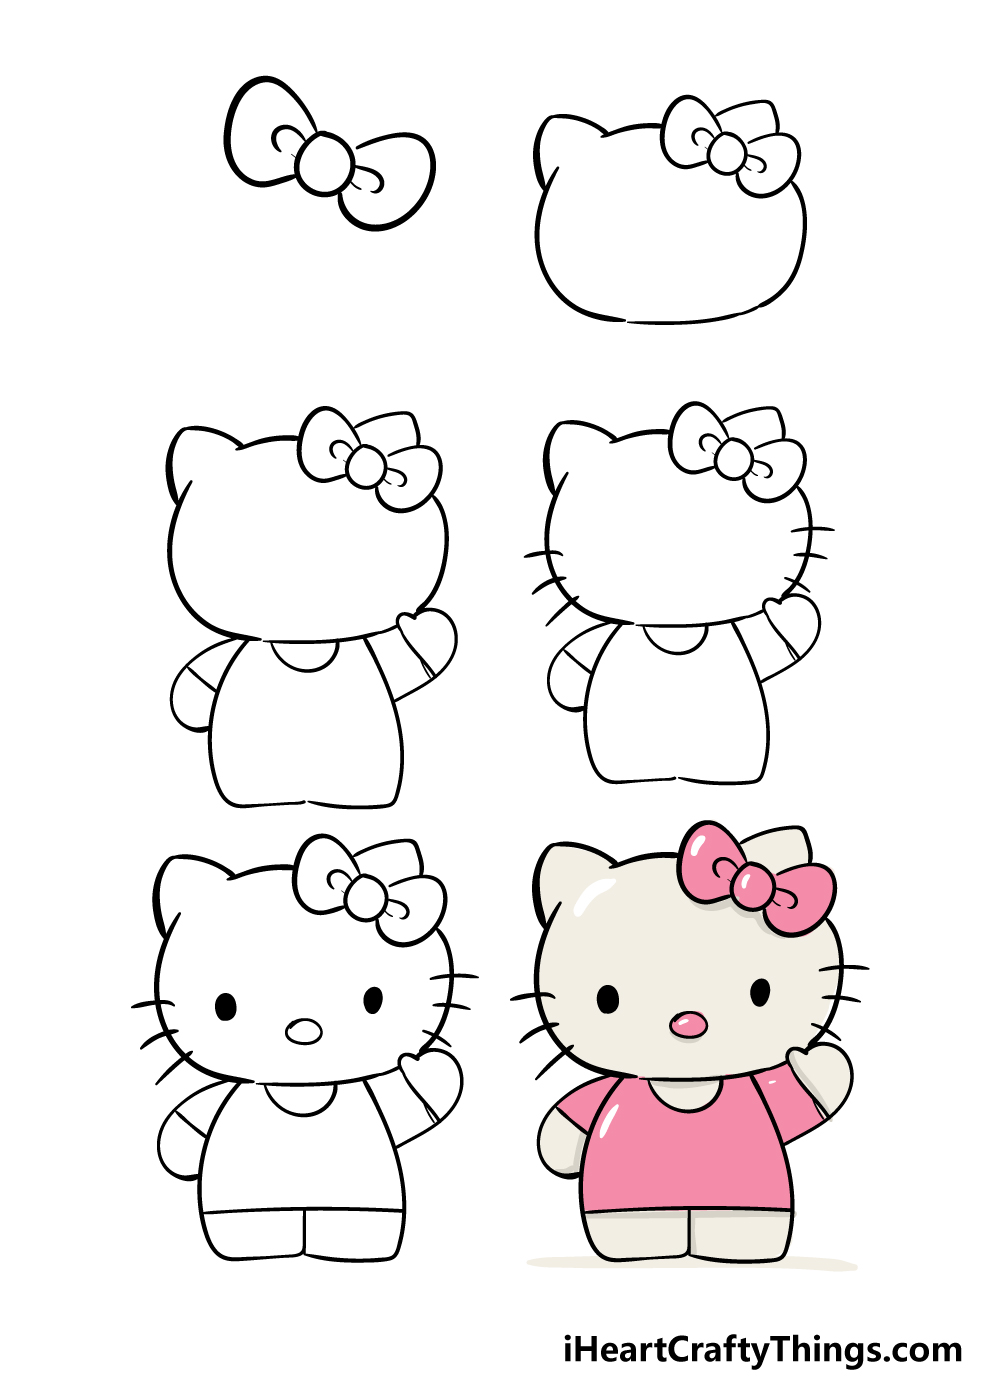
Step 1
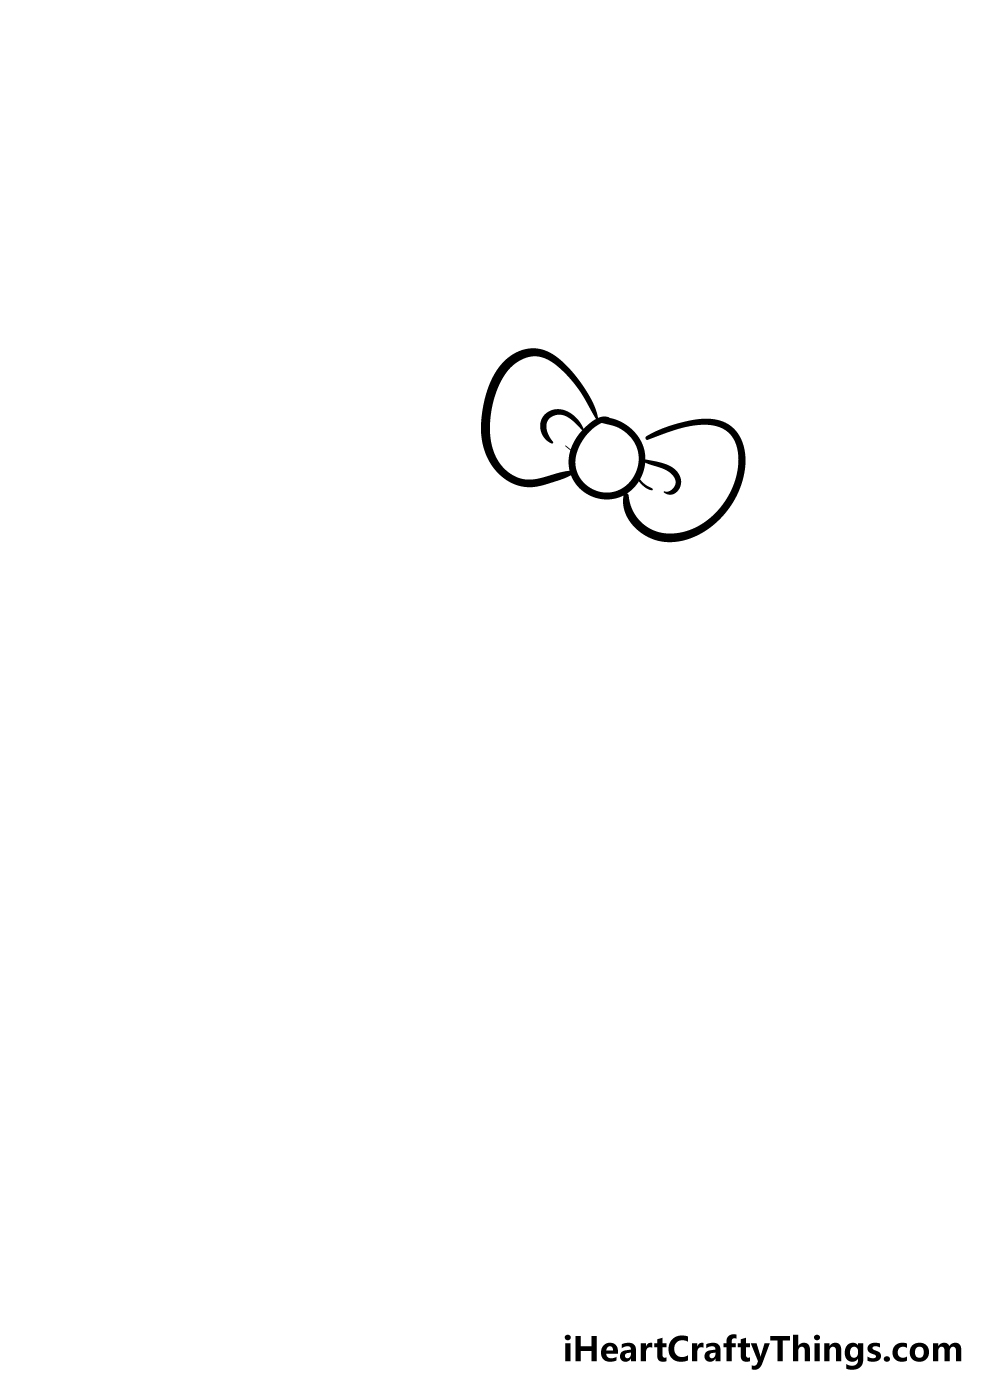
One of the iconic aspects of the Hello Kitty design is her little bow that sits atop her head. No guide on how to draw Hello Kitty would be complete without this bow, so we will draw it in this step.
For the center of the bow, you can draw a small circle. This doesn’t have to be a perfect circle, so drawing it free-hand will work well!
For each wing of the bow, you can draw a curved line coming out from the sides. Then, you can draw some more small lines inside these wings to show the folds of the bow.
Step 2 – Draw the head outline for Hello Kitty
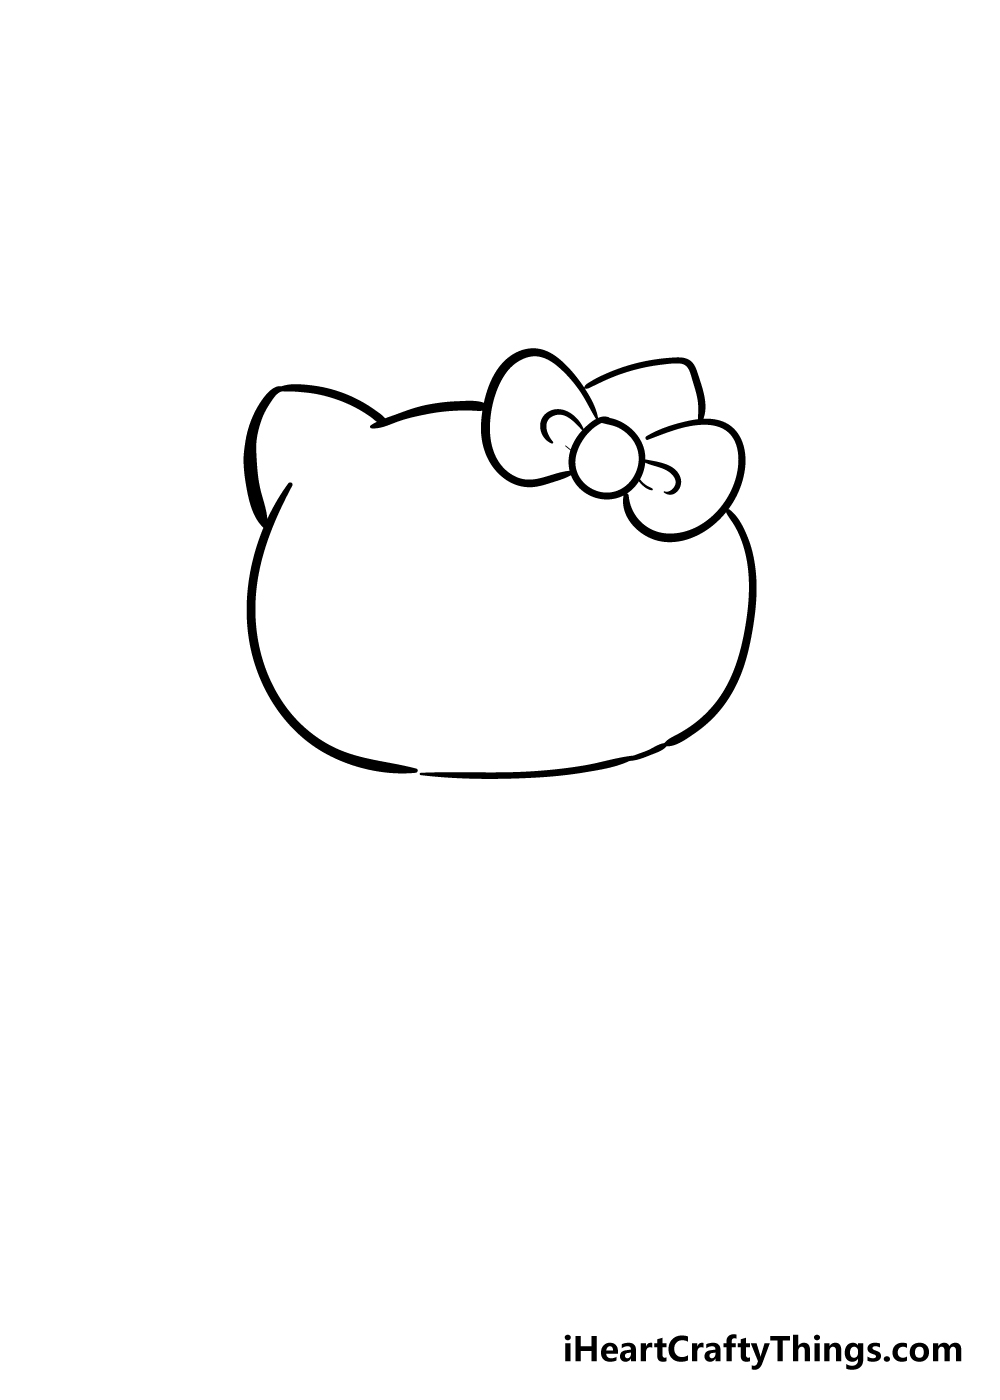
While the bow is an important element of the Hello Kitty design, it’s not the only iconic aspect of the character!
She is also well known for her big round head, and that is what we will be drawing in this step.
Be sure to keep the bow that you drew in the first step at the top right-hand side of the head as you draw.
The bulk of her head is drawn as a big, smooth oval shape. Then the ears will go on the upper sides of the head and will be fairly far apart from one another.
These will be drawn as some slightly rounded triangular shapes. The one on the right will also be behind the bow from the first step.
Step 3 – Now, draw a body for Hello Kitty
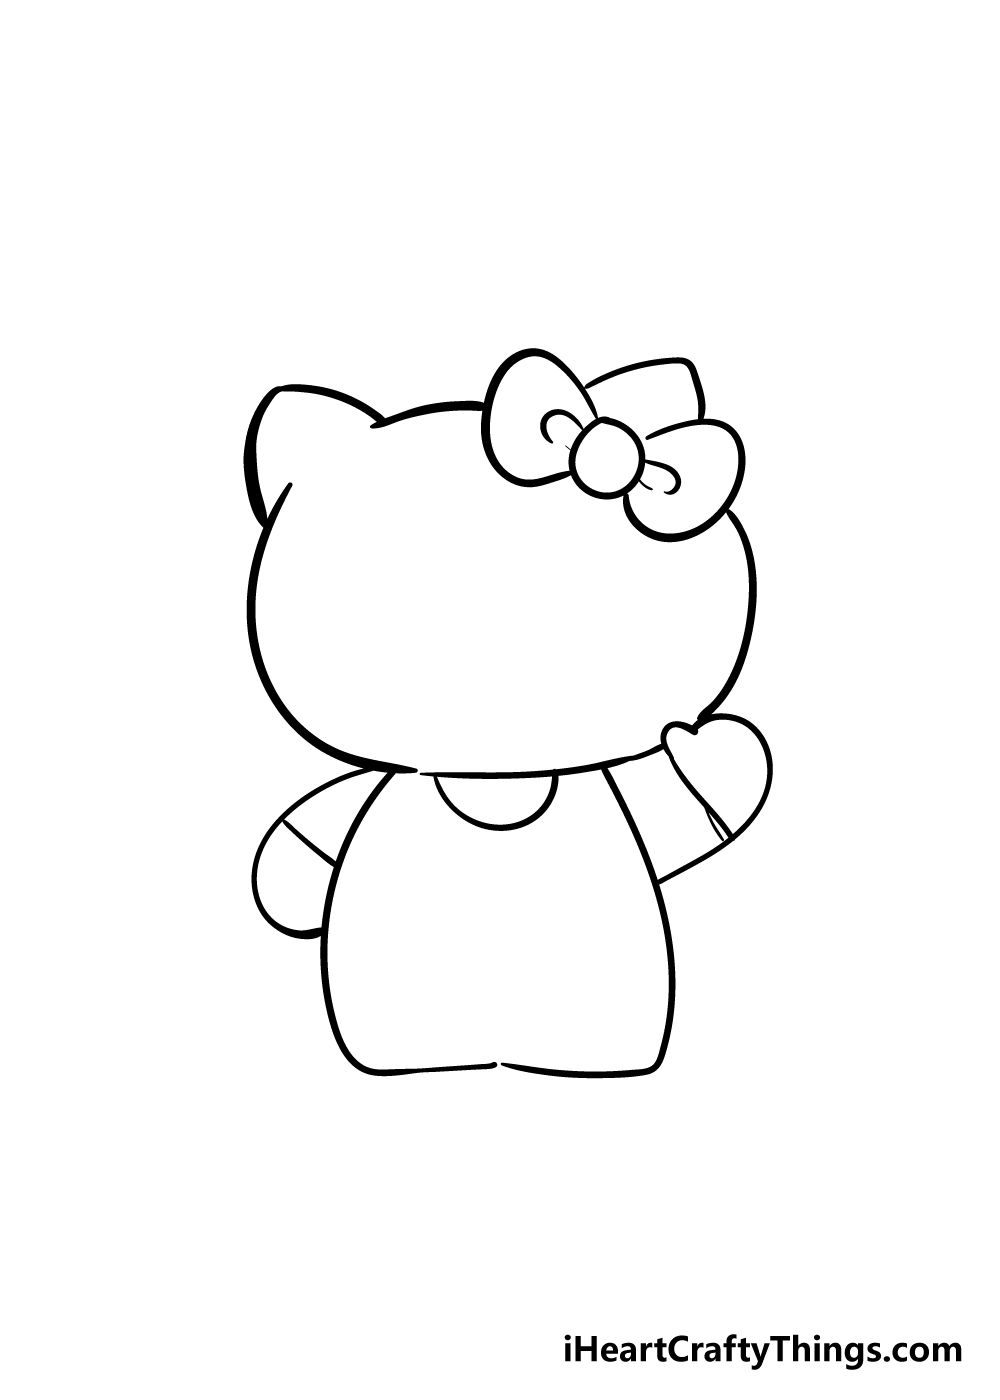
We will finish off the head later, but for now we will draw the body in this step of our guide on how to draw Hello Kitty.
Her body is a bit smaller than her head and is also made up of some fairly basic shapes. Using some curved likes extending down from the head, you can draw her small, round body.
Her arms are then drawn with simple curved lines as well, and the one on the right is raised in a wave.
Step 4 – Add the whiskers in this step
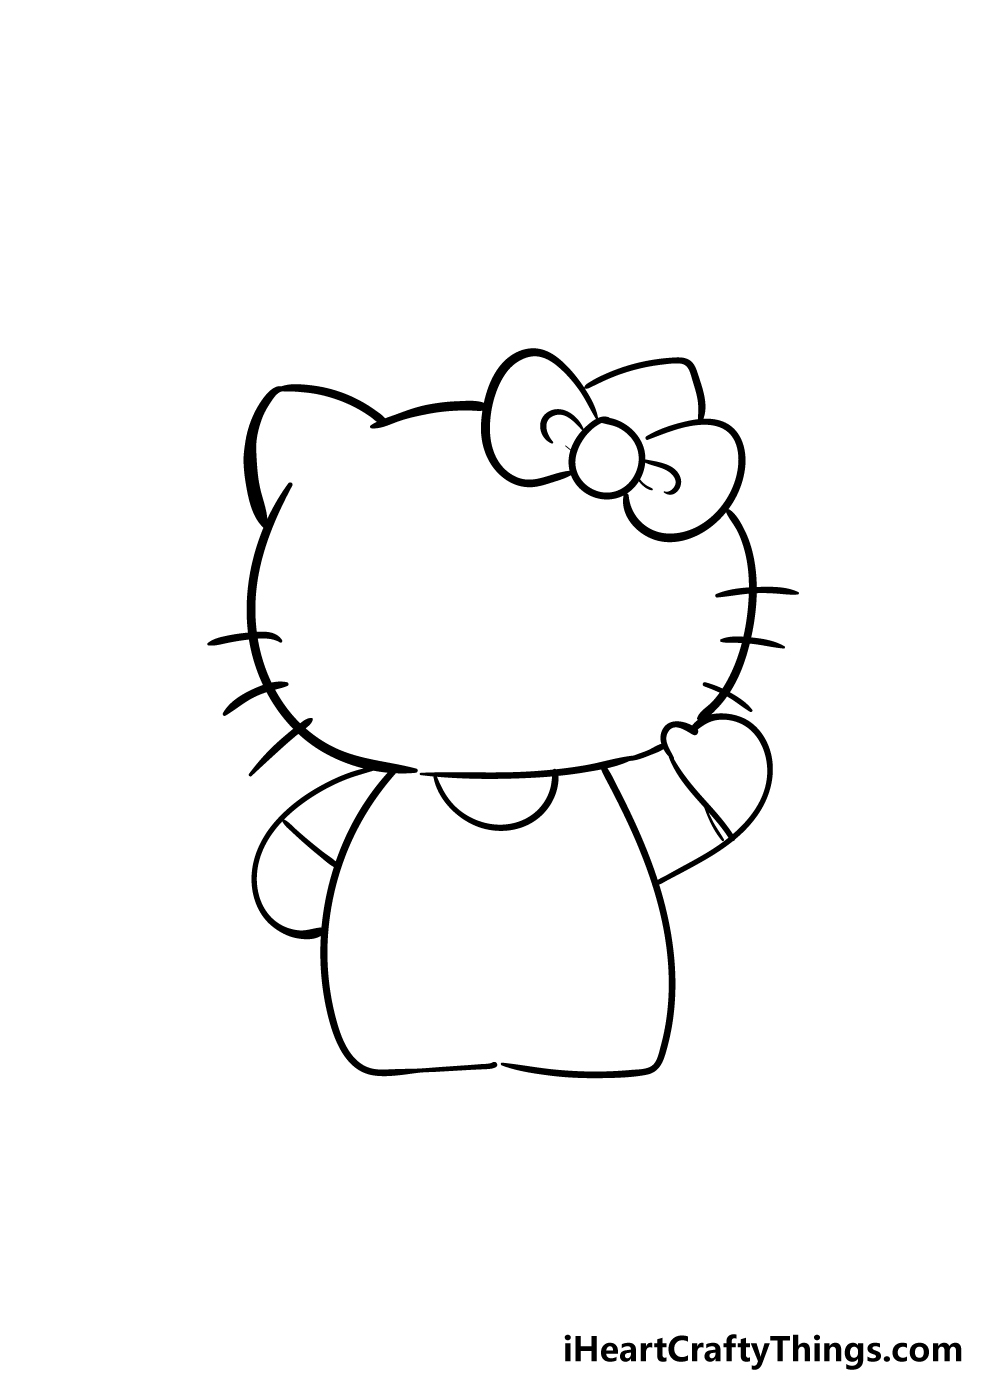
This fourth part of your Hello Kitty drawing will be a rather simple one! All you will be doing in this step is adding some whiskers to her face.
These are drawn very simply, and you can complete this step by adding three simple lines to each cheek of her face.
It’s as simple as that, and you’re ready to add some final details in the next step!
Step 5 – Now, you can add the final details of your Hello Kitty drawing
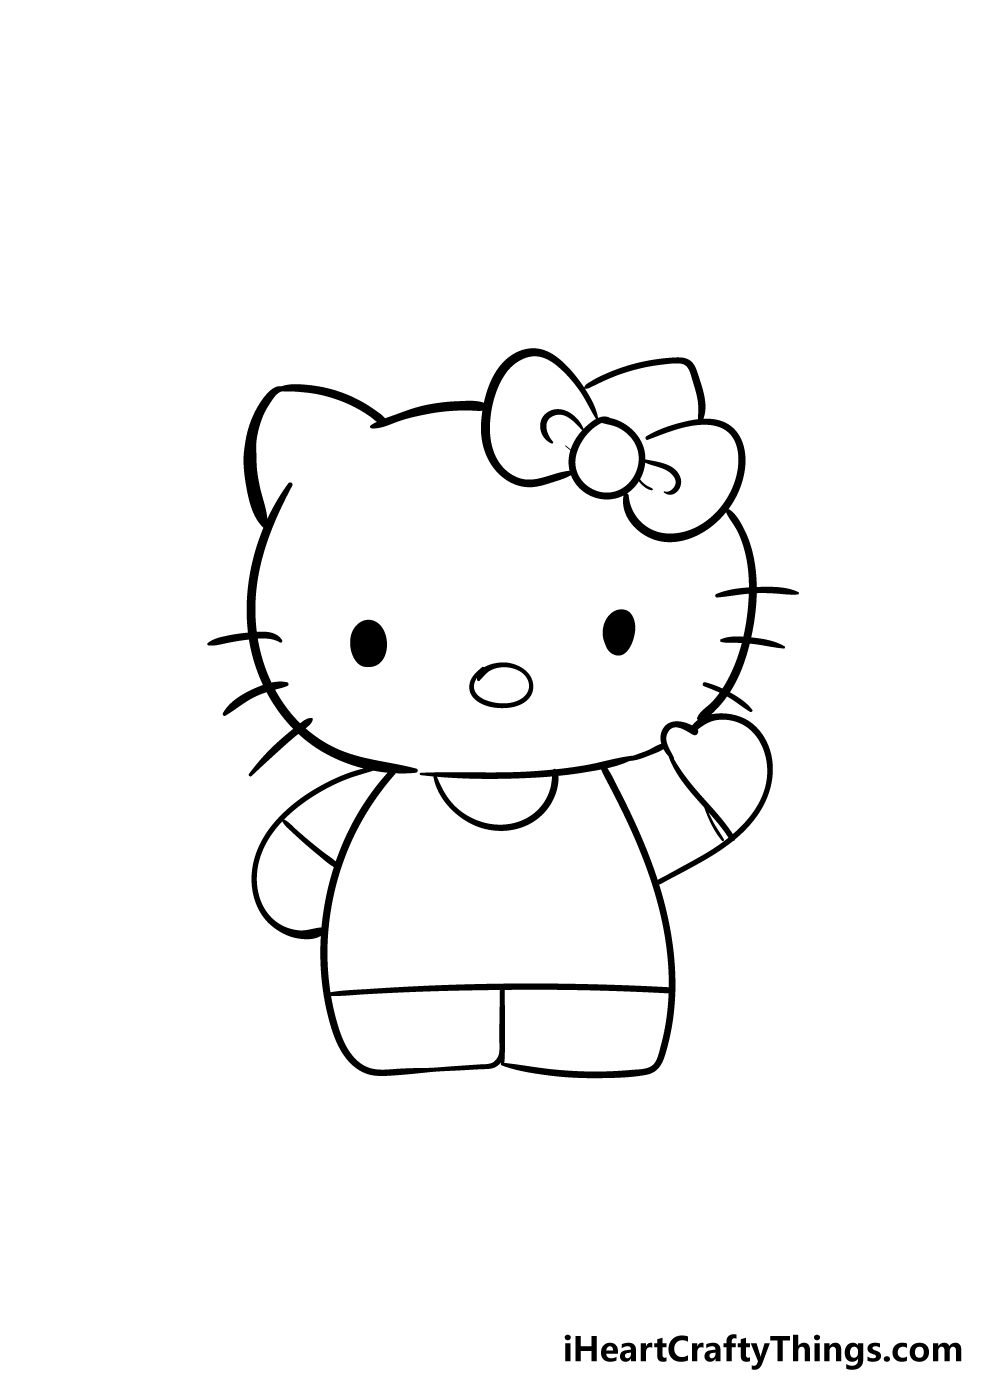
You’ll be able to color in your picture soon, but for now we still have some final details to add in this step of our guide on how to draw Hello Kitty.
First, we will need to finish off her face. This is a very simple task, however! Her eyes are drawn using two small, solid black ovals. These will be fairly far apart and close to the sides of her head.
Her nose is equally simple, and you can draw that with a simple oval shape between the eyes. That takes care of her face, so now you can draw her legs.
This will be very easy as well! All you have to do is draw a straight line across her body near the base of it.
Then, draw a vertical line down the center to create her legs. That takes care of the final details in this guide, but you can always add your own, too!
You could draw a fun background to really finish off this Hello Kitty drawing for one idea. You could also draw some cool accessories and extra details for her as well.
What fun extra touches can you think of to add to your Hello Kitty drawing?
Bonus: Get Creative With Colors, Crafts And Art Mediums!
How adorable is this Hello Kitty drawing that we created in this guide? The answer would be “incredibly adorable!”
Now that you are nearing the end of the guide where you will color in your picture, you could consider some unusual ways to color in your drawing.
Some of the ideas we have aren’t even technically coloring in your drawing but rather using some crafts to enhance your drawing. We will get to those soon, but for now we will focus on some regular coloring mediums.
Using some bright paints for the drawing and her clothing will make the colors really pop and stand out. Mixing different mediums on the same pictures can make certain colors and mediums really stand out.
Then you can use those crafts that we mentioned to add some magic to your image. Some simple crafts would include some glitter or glitter glue.
Can you imagine how much more magical this Hello Kitty drawing would be with some glitter sprinkles? Next, let’s think of some ways that you could portray the clothes she is wearing.
We think it would be amazing to use some actual material. This might be something you would need to get an adult to help you with, as cutting fabric can be tough.
If we were going to make this image, we would love to use some denim fabric cut out in the shape of her clothes. Then you could stick it down and then add some buttons, beads and other details.
These are just some suggestions, but you could go for any other ideas you like! Now that you have some ideas to go with, you probably have some of your own.
What are some unusual ways you could use to color this drawing?
Step 6 – Finish off your Hello Kitty drawing with some color
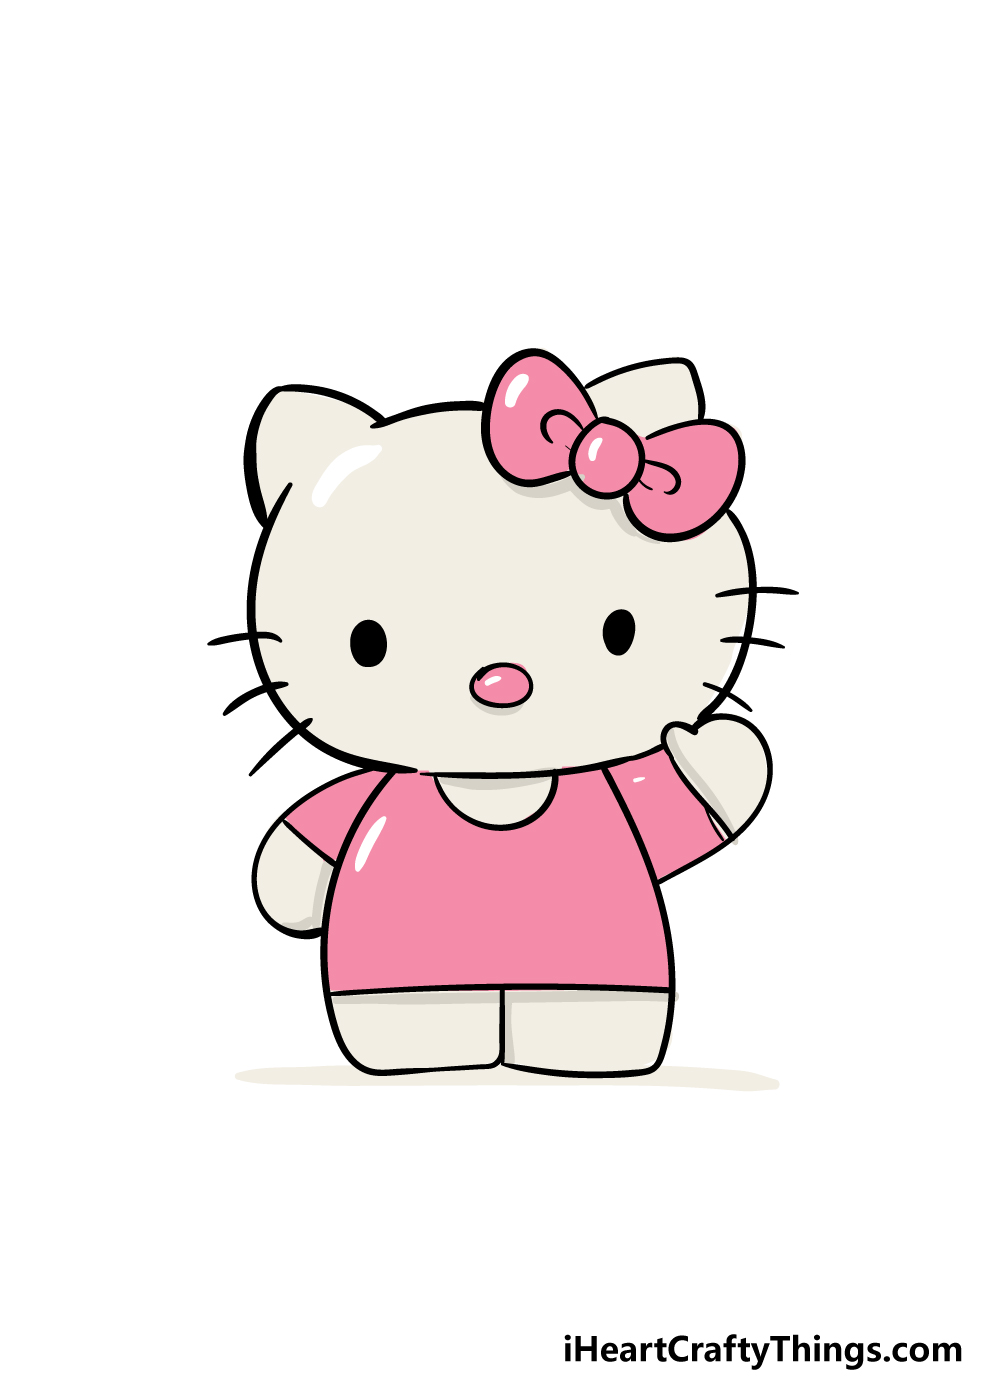
Now that you have finished your Hello Kitty drawing, it’s time to bring her to life with some color!
Hello Kitty has had a huge number of variations to her design, color schemes and style throughout the years, and this is your chase to make your own!
You can really get creative as you color in and make a cool new look for Hello Kitty. In our reference image, we used a pretty pink for her color scheme, as this color is often associated with Hello Kitty.
You could also go with this classic color scheme, but you could also use any of your favorite colors instead!
For an image like this, using mediums like colored pens, markers or paint can really create some funky colors that pop!
You could also go for a more vintage look by using some watercolors, colored pencils or crayons.
What color style will you choose for your Hello Kitty drawing?
Here’s how you can make your Hello Kitty drawing even better…
Make this adorable Hello Kitty sketch even greater with these fun and easy tips!
Hello Kitty is a character associated with style and fashion. We kept her style a bit simpler in this Hello Kitty drawing, but you could give her a bit of a makeover if you wanted!
This could be as simple as drawing a small picture or logo onto her outfit. It could also be as involved as giving her an entirely new outfit!
If you do this, will you base it on an existing look for her or give her a whole new look?
If you can’t decide on just one look for this drawing of Hello Kitty, you could add a few different versions of her in one image! She is known as a singular character, but that doesn’t mean you can’t have multiple versions of her.
You could even create a cute scene of the different kitties interacting and showing off their fashion items! How many Hello Kitties would you like to add here?
Another way that you can make this Hello Kitty sketch even more fashionable would be to add some accessories for her. There are so many fun pieces that you could outfit her with!
These could include handbags, purses, umbrellas or necklaces to name a small selection of items. You could give her any other items you can think of, though!
When you have chosen the items you would like her to have, you can then have fun with the colors and styling they come in.
Finally, why not bring it all together by creating a background for this Hello Kitty drawing? You could really create some wonderful settings for her!
For example, she could be walking down a glamorous runway showing off the fashion looks you have designed for her. Or she could be at a fun party with all of her friends.
There are so many ways to make this drawing even more interesting, and you can use a background along with all our other tips to make it even greater.
Your Hello Kitty Drawing is Complete!
That brings us to the end of this step-by-step guide on how to draw Hello Kitty! We hope that by following this guide you found drawing this iconic character to be easy and fun!
If you follow the steps and get creative for it then there’s no doubt that you will be able to easily create your own Hello Kitty variation.
You can also put your own spin on this drawing by adding a background, different clothing details or with the amazing colors and art mediums you choose. We can’t wait to see what you go for!
When you’re finished with this guide, be sure to check out our website for many more awesome guides! We upload new ones all the time, so be sure to visit us often!
We would love to see how you finish off your Hello Kitty drawing, so please share it on our Facebook and Pinterest pages once it’s done so we can admire it!
Here Is A Hello Kitty Cute Drawing To Inspire You!

Hello Kitty is one of the most recognizable characters in the world. She is known for her very simple yet cute design, and now you can replicate it with your own drawing.
This Hello Kitty cute drawing for kids was created by our artist Amanda to give you a guide for your own drawing. She gave Hello Kitty a lovely little outfit with some cute details as well.
Around her, there are also some pretty flowers that can be used for even more colors and other details. Hello Kitty is all about fashion and style.
For that reason, you could also customize and change her outfit a bit in order to make it suit your own preferences. If you wanted to change the background, then that would be awesome as well!
What kind of style would you choose for her?