Graveyards are a sad and solemn place, but they also serve as a lasting tribute to the lives of people buried there.
There’s also something inherently creepy about a graveyard, and for that reason they are often used as backgrounds for scary movies and Halloween setups.
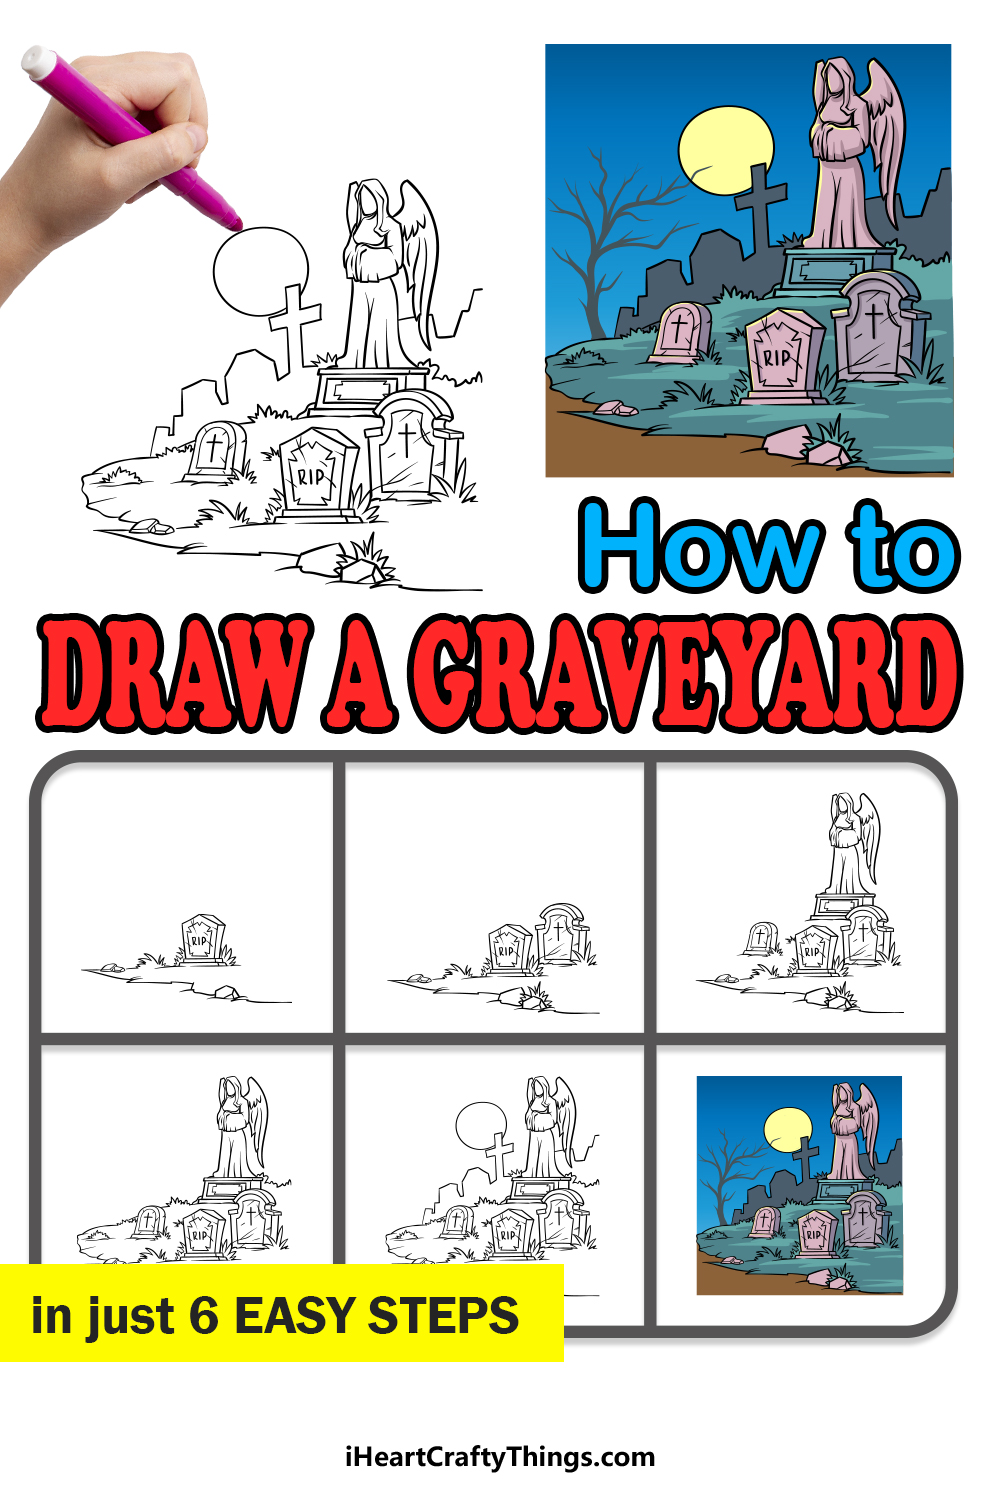
They can also be fun to use in artwork so that you can create your own scary scenes, and learning how to draw a graveyard is the best way to do this.
This is the tutorial you want to be on if you would like to create some spooky fun!
By using this step-by-step guide on how to draw a graveyard, you will find that the process of recreating one doesn’t have to be scary.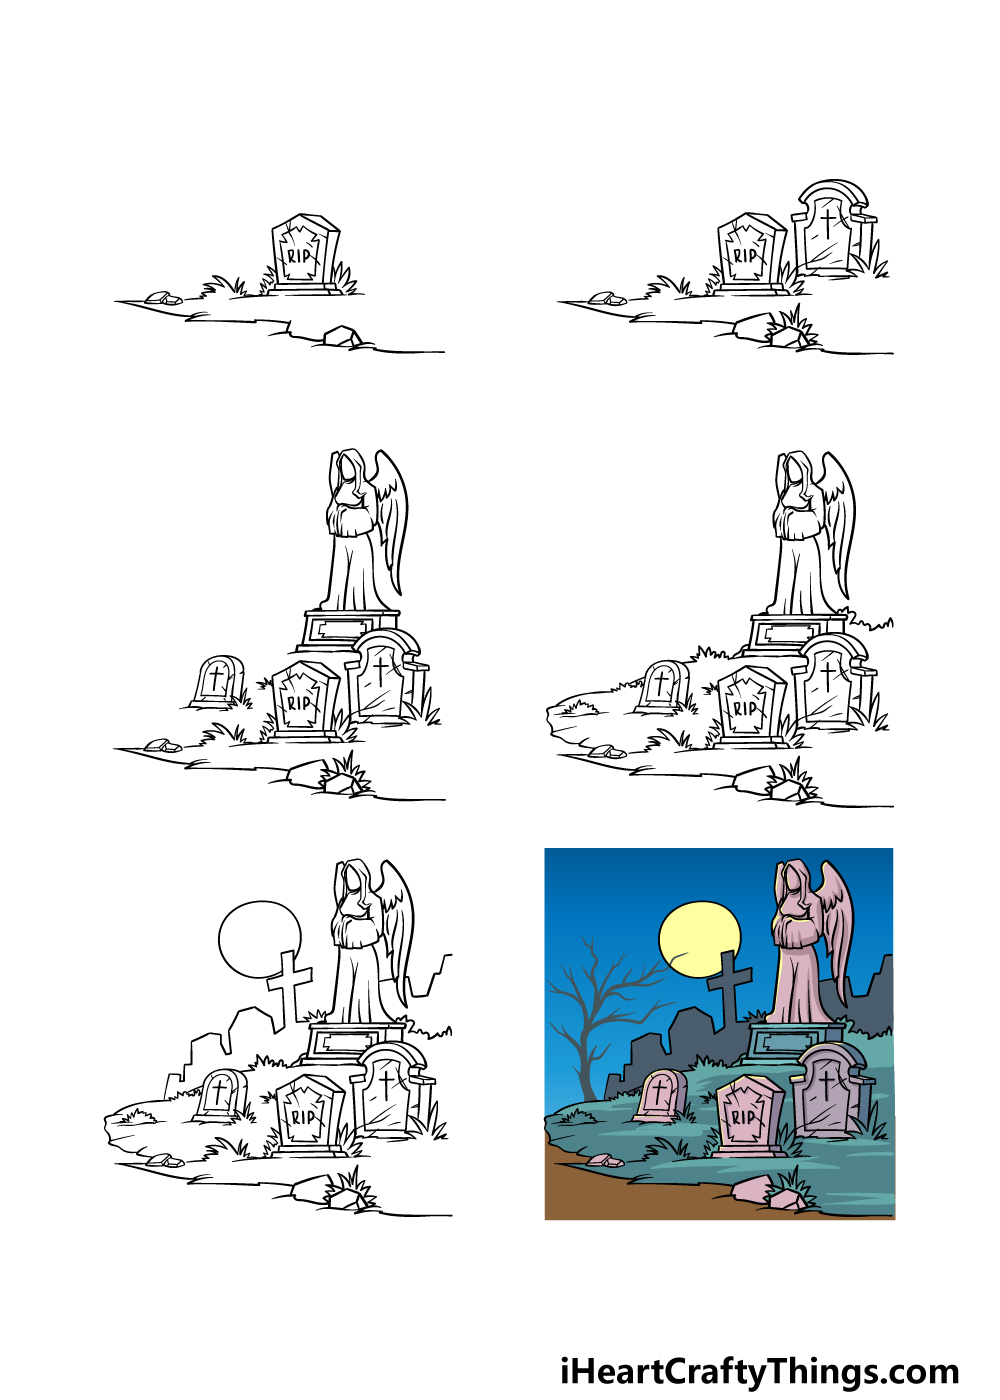
How to Draw A Graveyard – Let’s Get Started!
Step 1
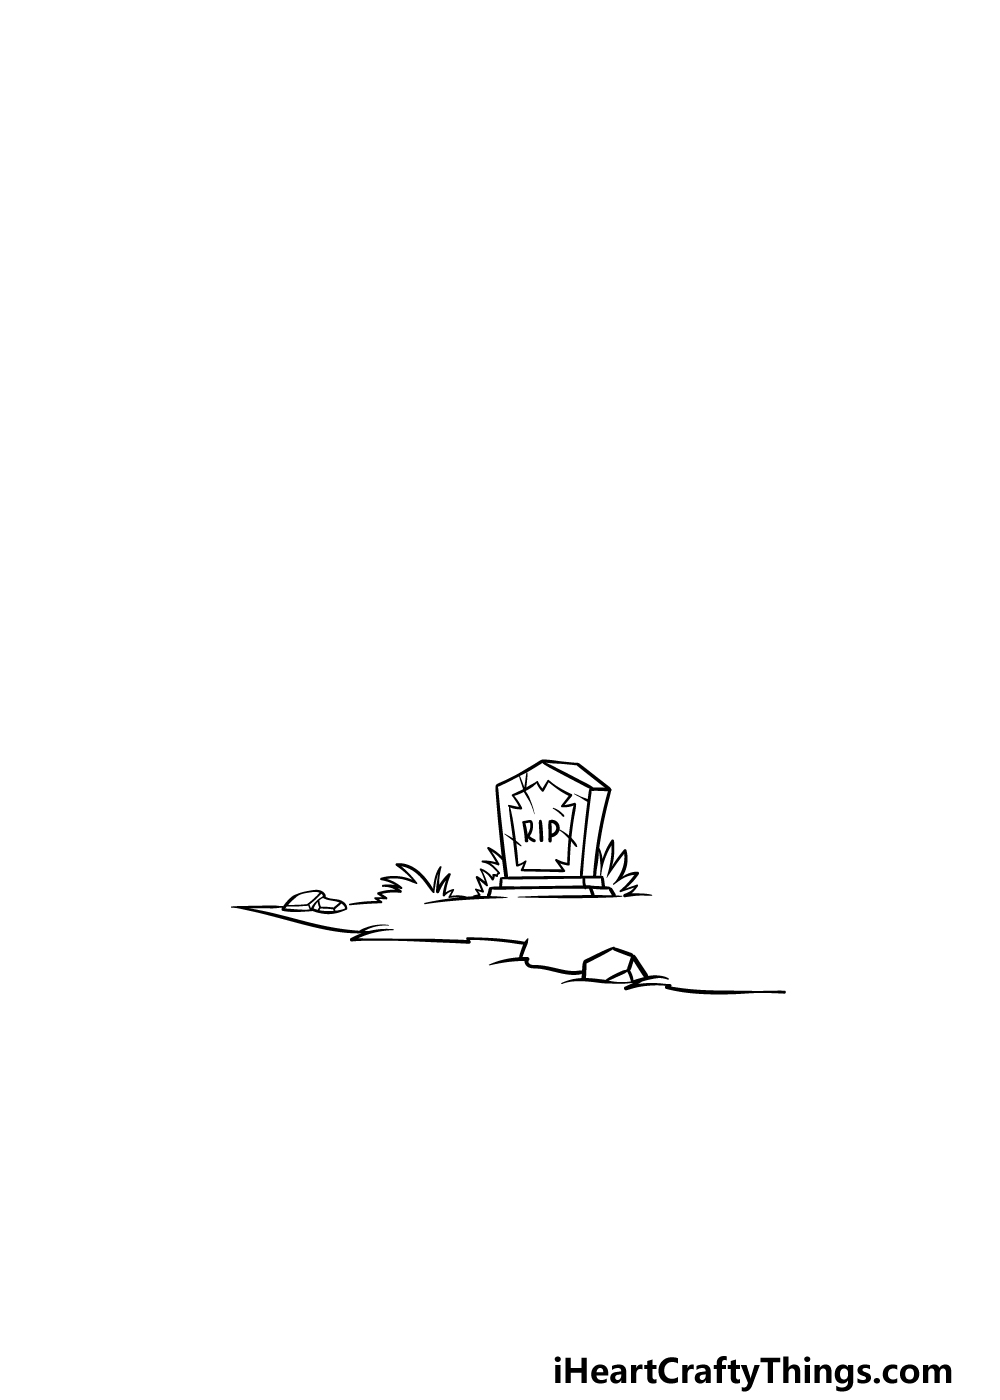
To get this guide on how to draw a graveyard started, we will begin by drawing something that every graveyard will have plenty of; a gravestone.
This gravestone will have straight edges and a pointy tip at the top of it. There will be another shape inside of it, and then it will of course have RIP inscribed on it.
Then we will be adding some details to the ground around the gravestone.
This will include some pointy line shapes for some grass surrounding it, and then there will also be some long, jagged lines for the ground as well.
You can then finish off this step by drawing some pointy rocks around it, and then it’s on to step 2.
Step 2 – Now, add another gravestone and add some smaller details
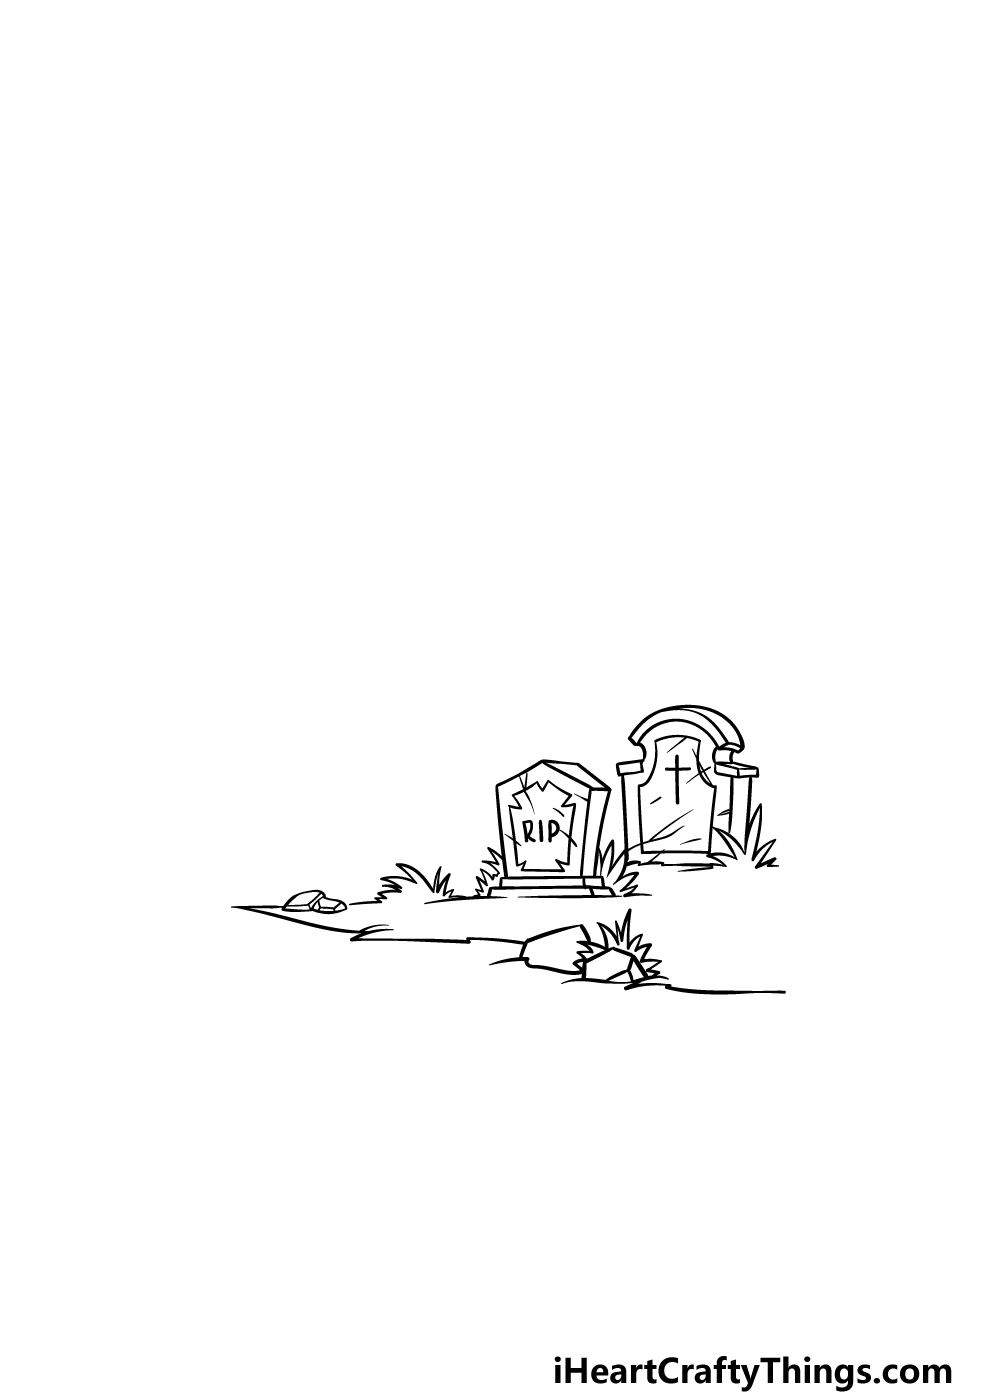
We will be adding another gravestone to your graveyard drawing in this second step. This gravestone will have a different design to the other one to give the image some variety.
The second gravestone will have a rounded top with two straight ridges on the sides, and this one will have a cross inscribed on it.
Once you have drawn this second gravestone, you can then finish off this step by drawing some more grassy details into the environment, and then it’s time for step 3!
Step 3 – Now, draw some more gravestones for the graveyard
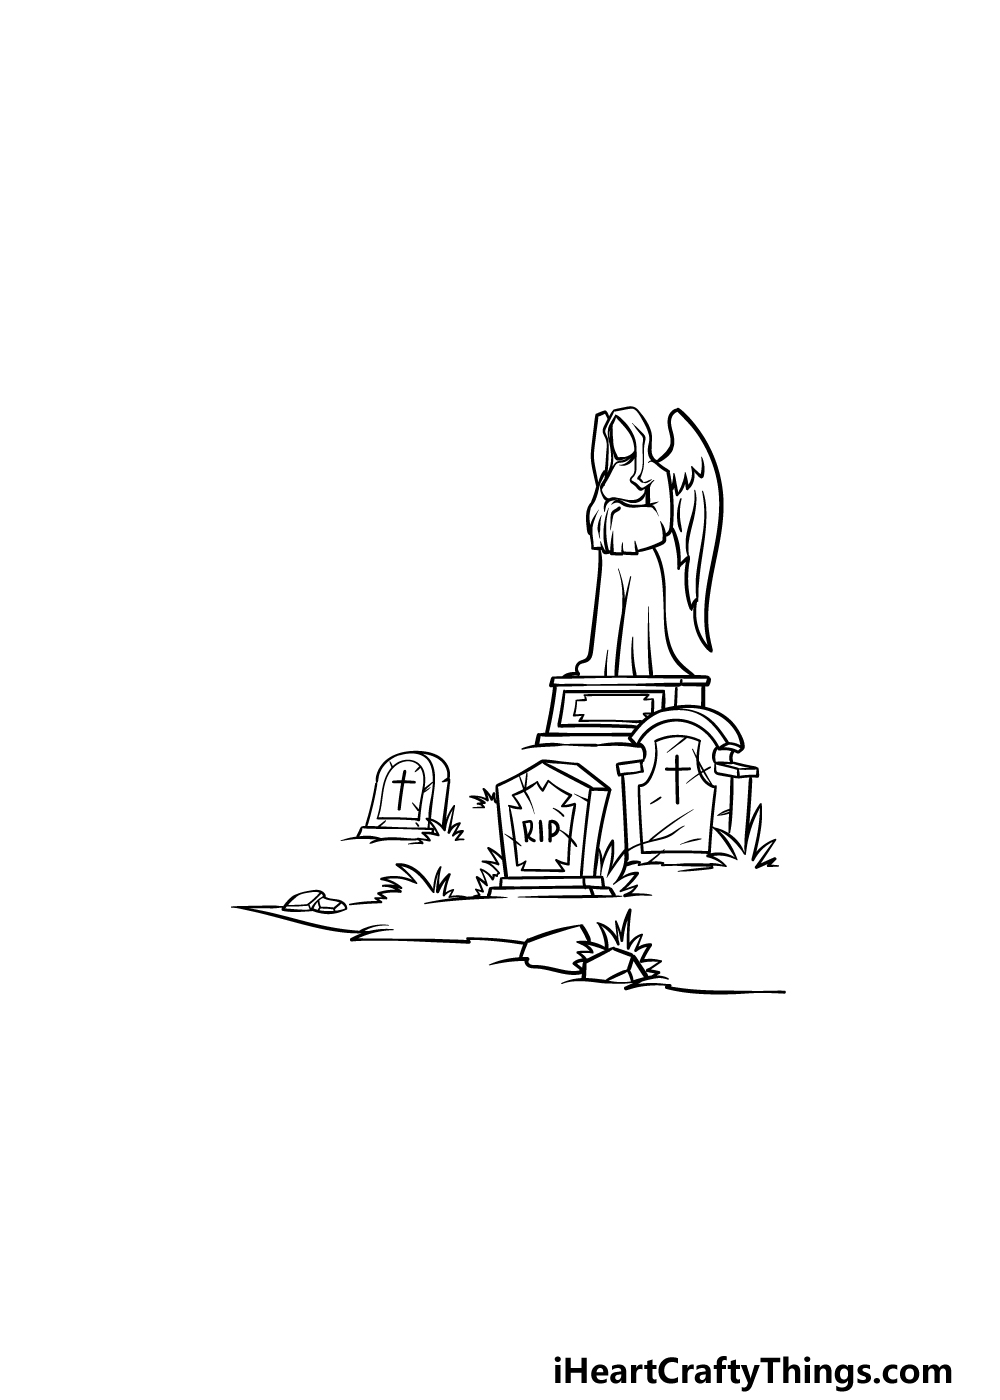
Continuing on with this guide on how to draw a graveyard, we will be adding some more graveyards to the picture. First, we will be drawing one more small one on the left-hand side of the picture.
This one will be simpler in shape and will take on the classic shape of a rounded gravestone. You can also add another cross engraved on this gravestone.
Then, we will be adding the biggest, grandest gravestone that we’ve drawn yet in this guide. This will be a big and fancy one that has an angel statue on top of it.
This solemn statue can be a bit tricky to draw, so try to copy it exactly as it appears in our example image.
It will be standing on a short, rectangle base, and then you’ll be ready for the next step.
Step 4 – Next, draw some more ground details for the graveyard
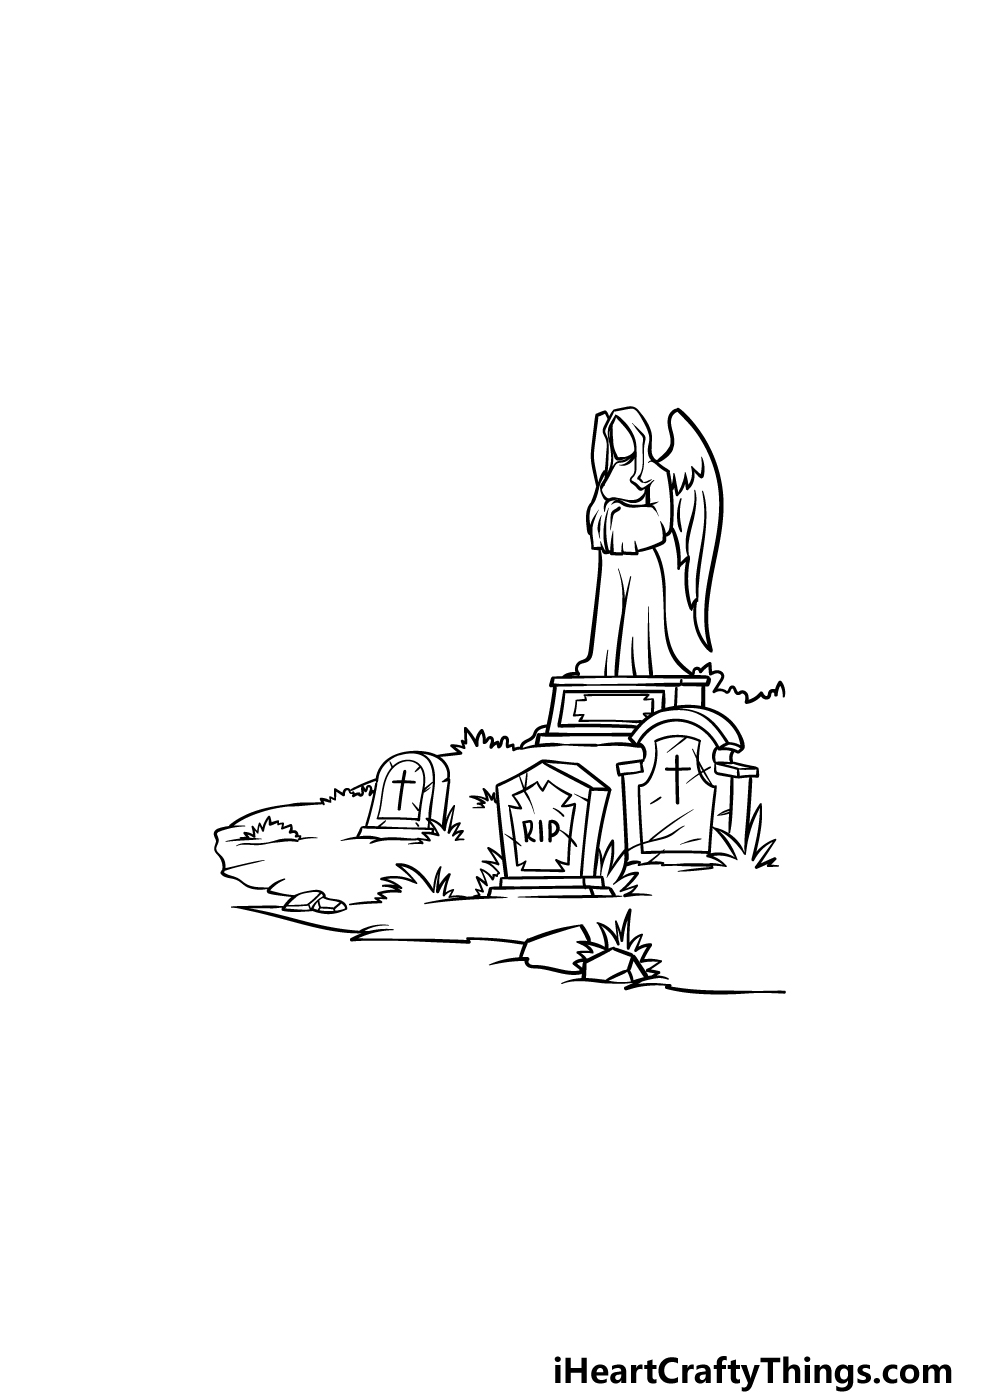
We will be finishing off the outline for the section of land that this part of your graveyard drawing occupies in this fourth step.
To draw this outline for the ground, we will be using some smooth lines combined with more jagged ones to create a greasy look.
As seen in the reference image, the way that it is drawn and angled will make it look like there is a bit of a hill moving upward.
When you have drawn this section, we can then proceed to step 5 where we will add the final details and touches to the drawing.
Step 5 – Add the final details to your graveyard drawing
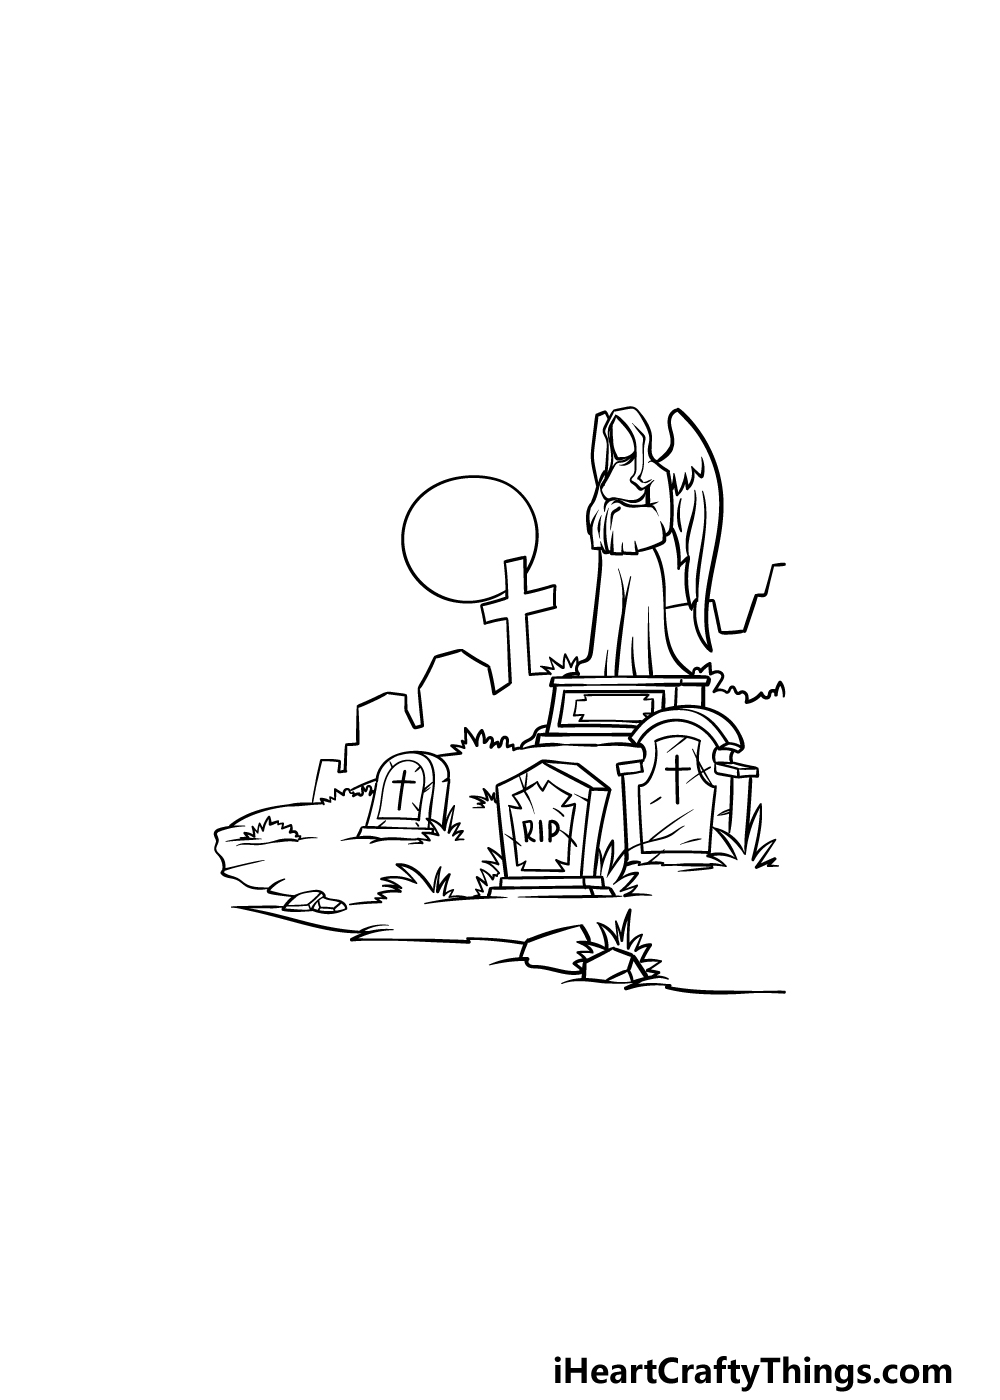
This step of our guide on how to draw a graveyard will see you adding some final background details and touches to finish it off before the final step.
To do this, we will be drawing a row of gravestones in the background over the hill that you just drew.
We will be doing a bit of a trick with perspective with this, as this row of gravestones will be one continual line.
We won’t be adding any details to it either, and this will be to further show some perspective by obscuring detail.
You will be able to finish off this effect when you color your picture in. the final thing to add will be a big round moon above the gravestones.
Once you have drawn that, you’re ready for the final step! You can also add your own spooky details to the drawing, so what do you think would best finish off this image?
Step 6 – Finish off your graveyard drawing with color
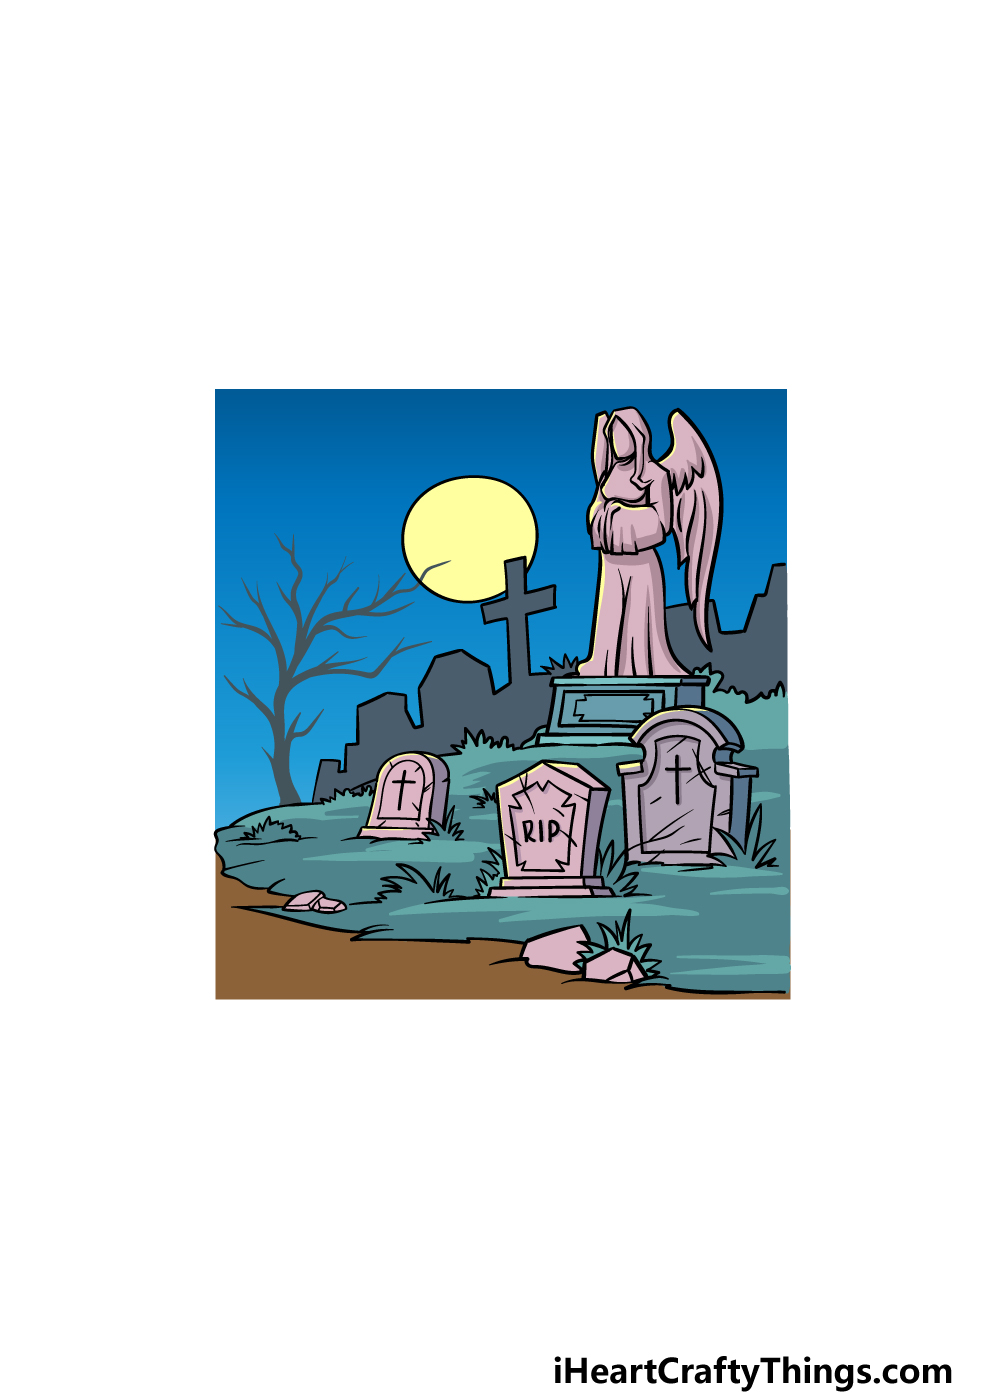
Color can contribute a great deal to the mood of an image, and that’s why we will finish off this graveyard drawing with some color!
Our reference image shows you one way that you can color your picture in, and you’ll notice that we kept the colors pretty dark and muted.
We used a gradient of blues for the sky, a dull yellow for the moon and then greens and browns for the grass and ground.
We then used some greys for the gravestones and then colored the gravestones in the background with a dark blue to finish off the effect.
What colors and art mediums will you choose for your own graveyard drawing?
5 Tips To Make Your Graveyard Drawing Even Better!
Make your spooky graveyard sketch even better with these fun tips!
When you see a graveyard in a movie, there will often be all sorts of creepy characters. You could add some of these to your graveyard drawing to make it even spookier!
Some examples could include some creepy ghosts, skeletons and other creatures of the night. A few zombies wouldn’t be out of place either!
What are some graveyard ghouls you could add to this scene?
While adding some creepy characters is one great idea, you can also add some spooky static elements to this drawing of a graveyard. For a few ideas, you could add a jack o lantern or maybe some scary bats flying through the sky!
If you need some inspiration, you could look up some Halloween decorations for some scary ideas.
Graveyards are sad places, but there is also a lot of beauty to behold. A lot of this beauty comes from the designs of the graveyards and statues contained within.
This is a way you can make your graveyard sketch even more unique! You can do this by adding some new gravestones or by altering some of the existing ones.
It’s another step where you could look up some pictures to help you out.
Next, we think this graveyard drawing could use some expansion! This is a tip that would be perfect for when you’ve mastered the image.
If you draw this on a large piece of paper, you could draw some more of the graveyard to show what it looks like. What are some additional details and sections you could add?
Finally, you can use your colors and art tools to great effect for a drawing like this. For instance, you could use a light wash of white paint over the image in order to create a spooky mist effect.
Or, you could make the moon bright and bold and then make the surroundings darker for emphasis. Which favorite art tools and techniques could you use to make this even better?
Your Graveyard Drawing is Complete!
You have done a great job working through this guide on how to draw a graveyard, and you have a spooky and awesome drawing to show for it!
This may have looked like a tricky drawing to take on, but if you take it step by step and do your best then you’ll get the hang of it in no time.
You can also keep it going by adding some details and ideas of your own. We mentioned just a few of these that you could go for, but what else will you add to it?
When you’re ready to try a new drawing challenge, you can find many more drawing guides on our website to enjoy. Be sure to keep checking in, as we have many more on the way soon!
You can show off your amazing graveyard drawing by sharing it on our Facebook and Pinterest pages when it’s done.