


Since humans have existed on earth, we have often entertained each other with stories and tales.
Often these tales can take the form of scary stories to make the shadows in the corner of the room seem that bit creepier.
Some of these scary stories have become household names, and Frankenstein has been terrifying people since his debut in the book by Mary Shelley all the way back in 1818.
By learning how to draw Frankenstein, you can recreate this icon of horror!
By the end of this guide, you will know exactly how to do that.
So dim the lights and get ready to draw this famous monster in our step-by-step guide on how to draw Frankenstein!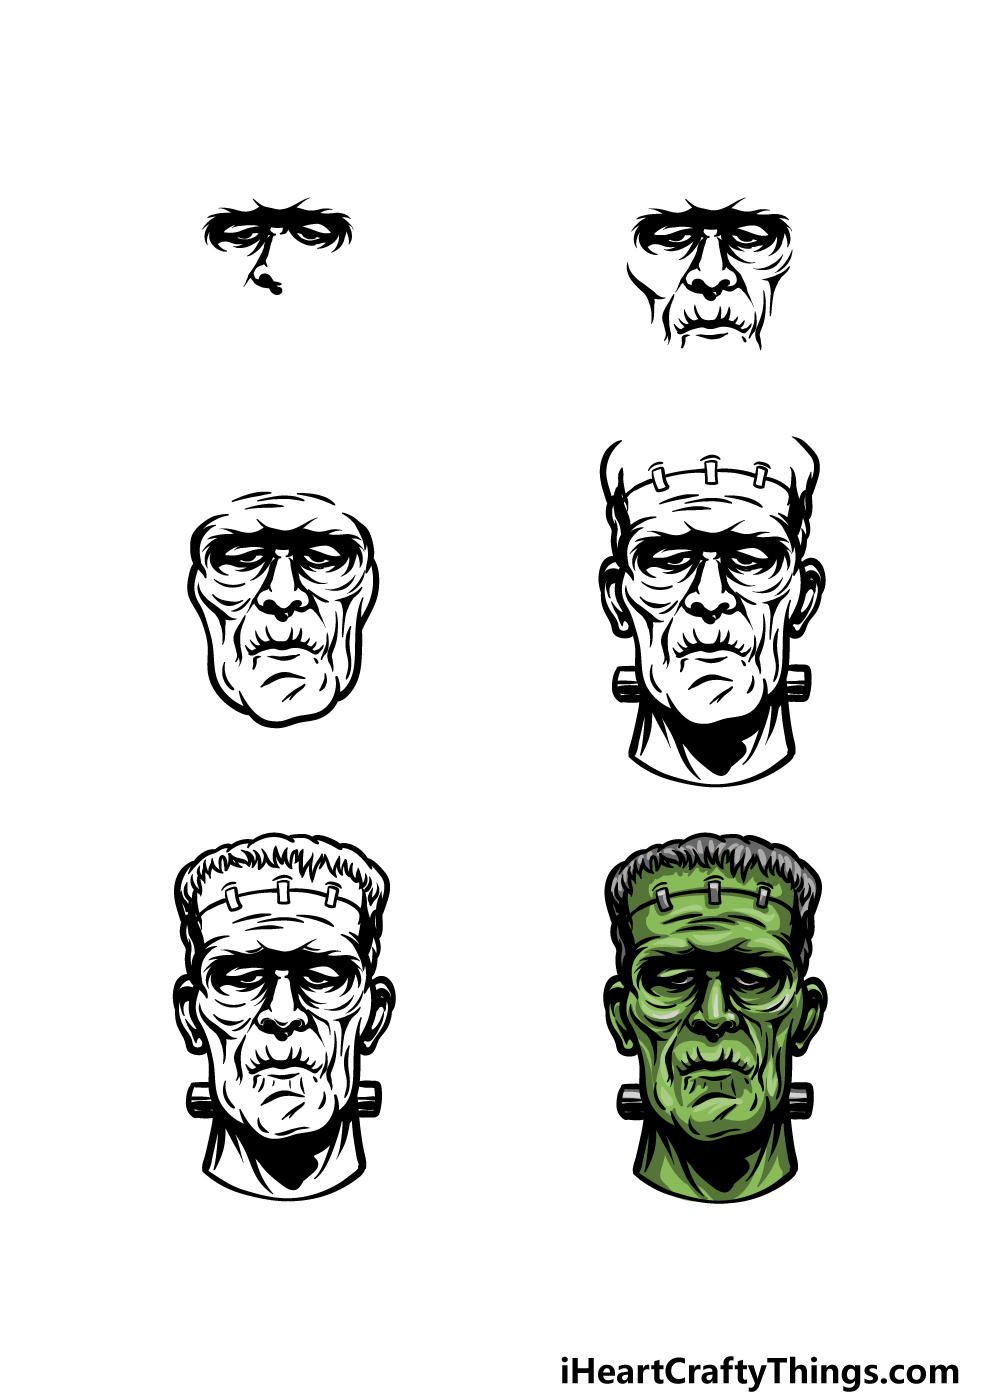
How to Draw Frankenstein – Let’s Get Started!
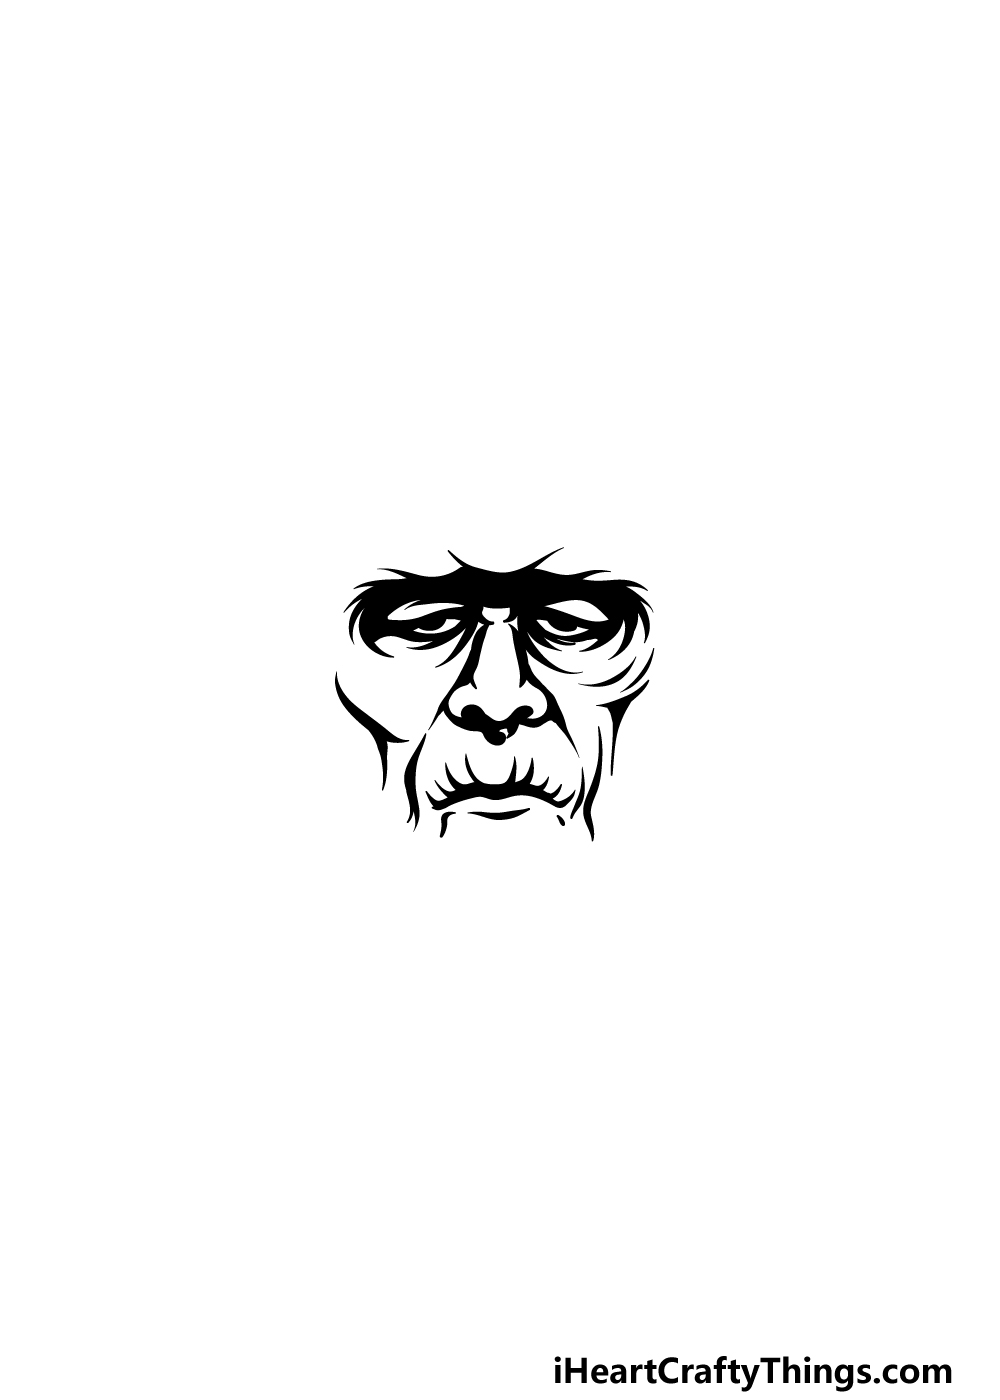
Step 1

We will be drawing the head of the monster himself in this guide on how to draw Frankenstein. First of all, we need to get it out the way that this is not technically Frankenstein but Frankenstein’s monster, as there’s always that one person that points it out.
While that may be accurate, we will still be referring to him as Frankenstein for simplicity’s sake in this guide. To get this guide started, we will be starting with the eyes and nose for him.
We will be using some very thick lines for the details of this drawing, as this will help to give a more stylized look to the picture.
With that in mind, we will use some slightly diagonal lines for the tops of his eyes to give him a mournful look.
We will be adding some thinner lines beneath them with a thick shape above connecting them.
Finally, we will be using a smoother straight line with some thick dots for his nose.
Step 2 – Next, draw some more of his facial details
In this second part of your Frankenstein drawing, we will be adding some details to the face.
First, start off by using some more lines and dots for a mirror image of the first half of the nose that you started in the previous step.
Then we will be using a thick, curved line for his mouth that will have lines extending up from it.
Finally, we can finish off by drawing his rounded cheekbones and some line details around the mouth. Then you’re ready for step 3 of this guide!
Step 3 – Start drawing his facial outline in this part
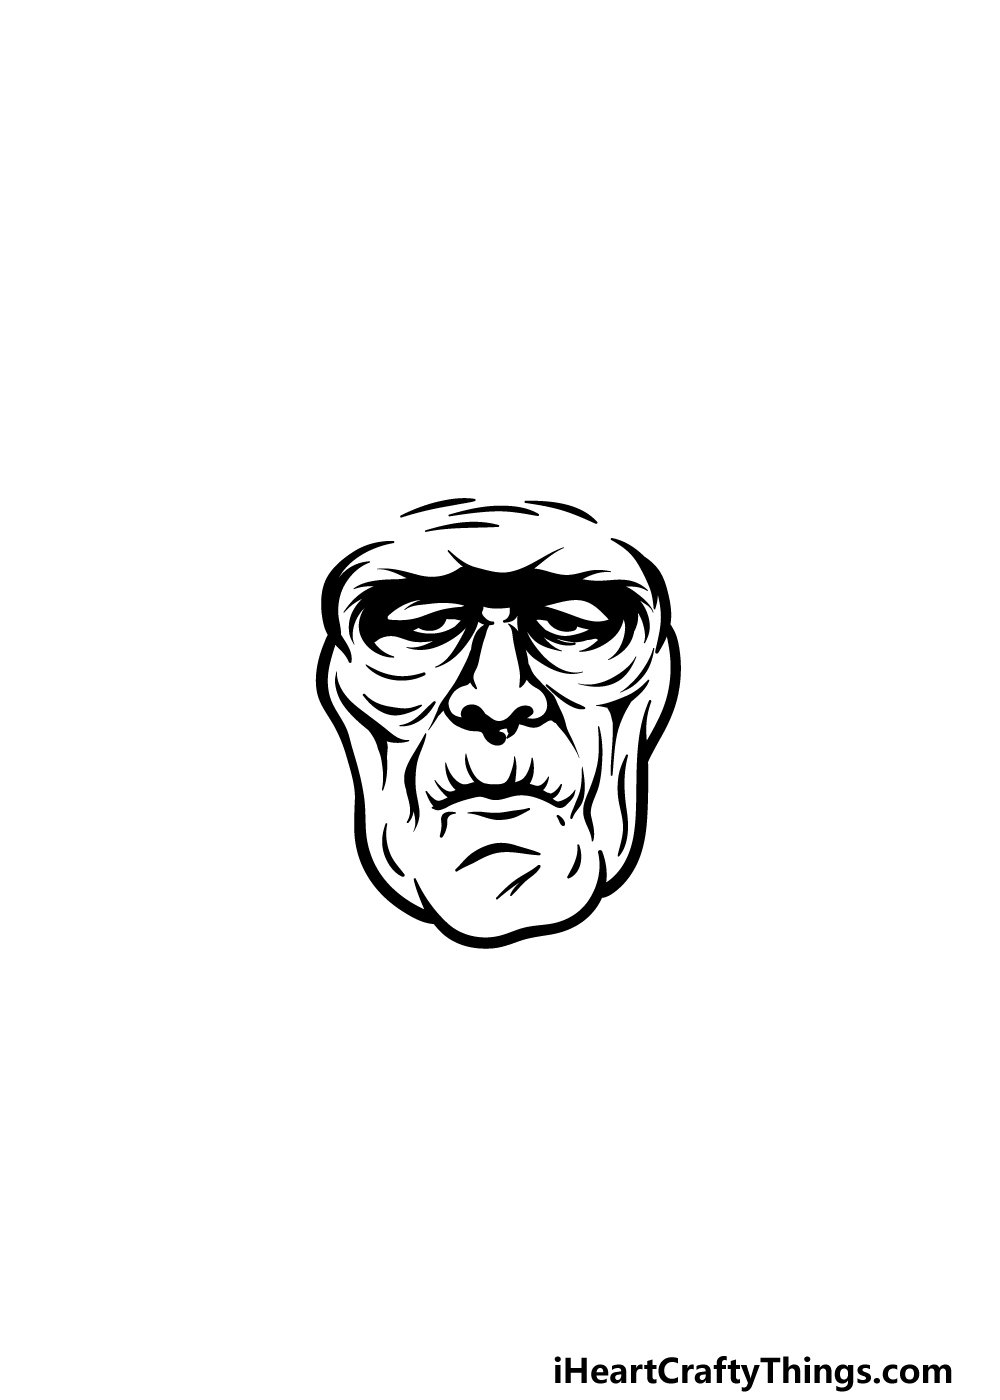
It will be time to start drawing his face outline in this step of our guide on how to draw Frankenstein. To do this, we will be using some more thick, rounded lines around the eyes and cheekbones.
Then you can extend some straighter lines down that turn into more rounded lines for the bottom of the face.
Then we will finish off with some more round lines for the chin at the bottom of the face. Before you move on, we can first add some minor line details throughout the face to finish it off.
Step 4 – Now, start drawing more parts of his face and neck

Two of the most recognizable aspects of Frankenstein are the stitches near the top of his head and the metal bolts embedded in his neck.
These are two aspects that we will be drawing in this step of your Frankenstein drawing. First, draw some wavy thick lines extending up from his cheekbones for the sides of the top of his head.
Then, we will draw a horizontal line with some vertical small rectangle shapes for the stitching in his head.
You can then use some more round lines for his ears, and then you can extend some curved lines down from the bottom of his head for his neck.
Finally, finish off by drawing some small square shapes at the sides of his neck for the bolts. Then we will just have a few final details to add in the next step!
Step 5 – Finish off your Frankenstein drawing

This part of our guide on how to draw Frankenstein will be about finish off the final details before you start to color him in.
The main thing we will be focusing on for this step will be his hair and the top of his head.
Frankenstein is also known for the fact that he has a flat top to his head, and we will be portraying him with this look.
First, use some bumpy lines for the top of his head, and then use some pointier lines underneath that for his short fringe poking down.
Once you have drawn this hairstyle you have finished the drawing! You could also draw some more parts and elements of your own to put your own spin on it.
Perhaps you could draw more of his neck and body, or create a background to show where he currently is.
Step 6 – Finish off your Frankenstein drawing with some color
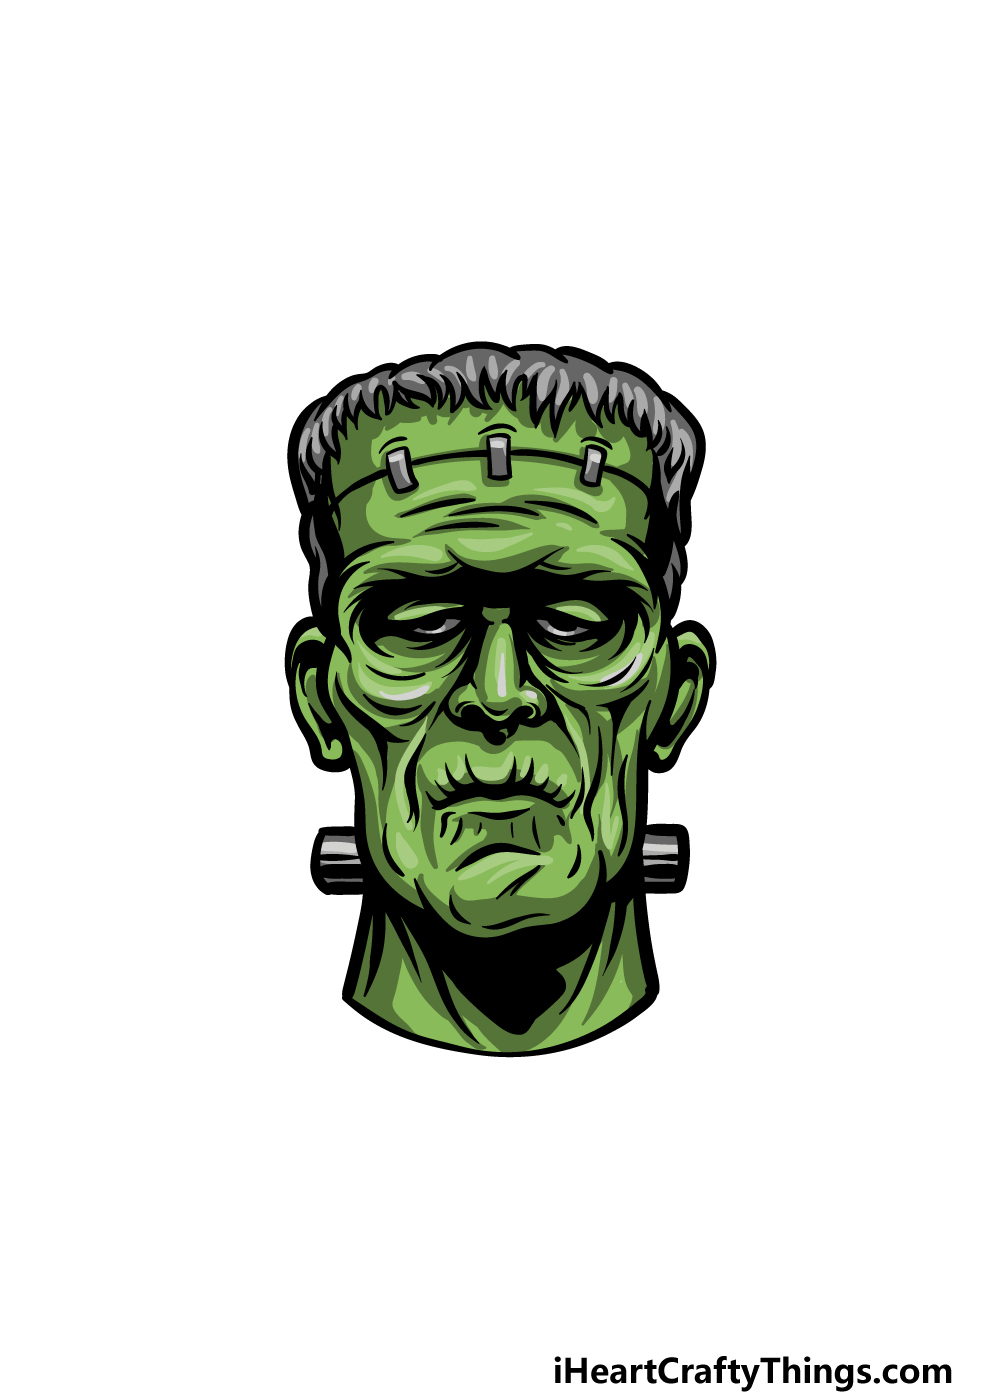
Now it’s time to have some fun coloring in for this final step of your Frankenstein drawing! We went with a green color scheme for his skin, which is a common color associated with the character.
This is just one interpretation, and you could use some other colors or color combinations to color him in.
Then you can decide which art mediums you think would be best to bring your colors to life. We can’t wait to see what colors and mediums you will choose for this image!
5 Tips To Make Your Frankenstein Drawing Even Better!
Make your Frankenstein sketch much easier with these fun tips!
This drawing of Frankenstein shows just his head and face. You could add more to this depiction of this famous movie monster by drawing some more of his body.
How much more of the character you draw would be up to you! Perhaps you would just like to draw his chest, or you could draw his entire body if you have the space on your page.
This character is not known for being particularly expressive, but you could still give him a different facial expression to make this drawing more unique.
If you want to try this, then you could make some faces in a mirror to get some inspiration for different expressions for Frankenstein. What kinds of emotions would you like to portray?
The character in this Frankenstein drawing is not actually Frankenstein, although most people call him that anyway. The real Frankenstein is Dr Frankenstein, and you could add him to this image.
He has had many actors portray him over the years, and he is the classic mad scientist. You could base Dr Frankenstein on one of his film portrayals or create a new version of your own design.
Adding a background would also be a great way to add to this artwork. There are a few classic locations we associate with Frankenstein thanks to his film appearances.
Some of these locations would include the lab he was created in and the village that he terrorizes. You could go for one of these classic locations or create a new setting of your own!
Frankenstein is one of many classic movie monsters, and you could add some of their faces to this Frankenstein sketch to make this a real monster mash up!
Some classic monsters you could use would include Dracula, the Wolfman or maybe the swamp thing. You could also add more generic monsters such as a zombie or a mummy.
What classic movie monsters would you like to add?
Your Frankenstein Drawing is Complete!
You have successfully completed this guide on how to draw Frankenstein! Hopefully this guide was fun and easy for you to work through in order to recreate this classic character of literature and film.
There were a lot of details, but when you break a drawing down into steps it can be made so much easier!
Now you can show us what you can think of to take this drawing even further. We mentioned how you could draw a background, add some details or change up the colors, but you should go for any ideas you can think of!
Our website has many more awesome drawing guides for you to enjoy, and you’ll want to keep checking in as we upload new ones often.
We would love to check out your spooky Frankenstein drawing when it’s complete, so please be sure to share it on our Facebook and Pinterest pages!