Fairies are some of the most beloved mythical creatures in myth and legend. They’re loved for their dainty wings and pixie-like appearance, and they really manage to capture the imagination.
Their wings are sometimes inspired by bird wings and flowers, but they’re often based on butterfly wings as well.
When imagining fairies, many people like to know how to draw fairy wings so they can make their own fairy friends!
That’s what this guide is here to help with, as we will show you how you can create beautiful fairy wings.
They will be based on butterfly wings, so you could also use the guide to draw some pretty butterflies.
But for the purposes of this guide, we will focus mainly on fairy wings. We will also go over a few ways that you can customize and add to the drawing with some ideas of your own.
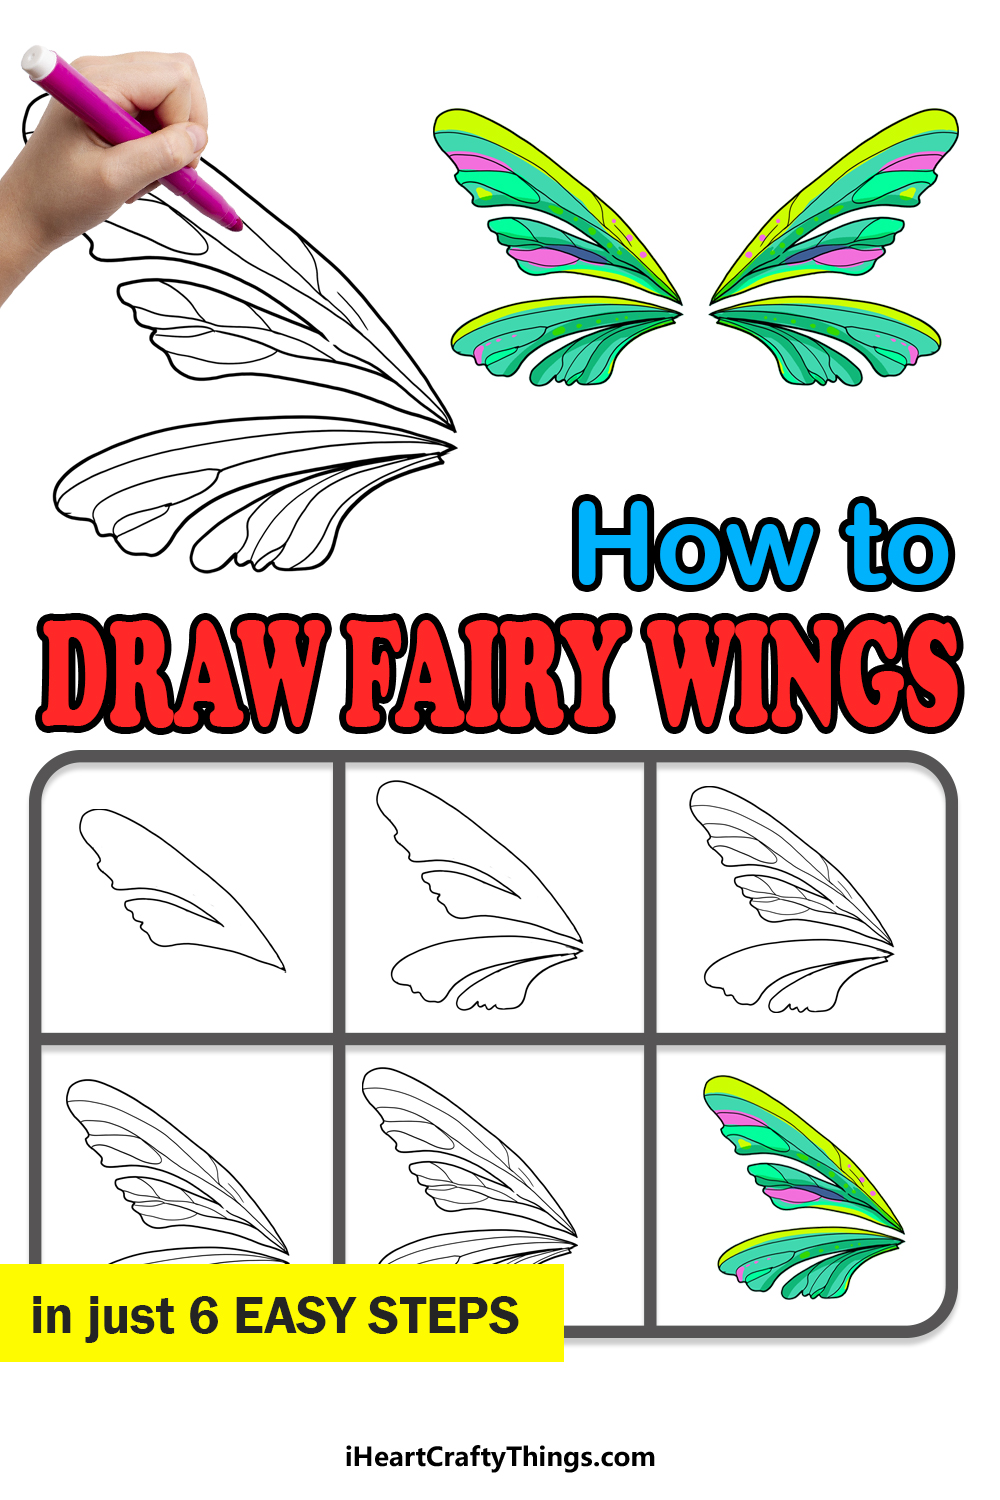
So let’s make your day a bit more magical as we dive into this collection of 6 fun and easy steps to creating your own fairy wings drawing!
How to Draw Fairy Wings – Let’s Get Started!
Step 1
As we mentioned in the intro to this guide, these fairy wings will be based on the wings of a butterfly. This is a classic design for fairy wings, and there are so many ways that you can make it pretty.
We will go over some of these ways later on in the guide, but for the first few steps we need to build up the outline of the fairy wings. When doing this, we will separate the wings into two sections.
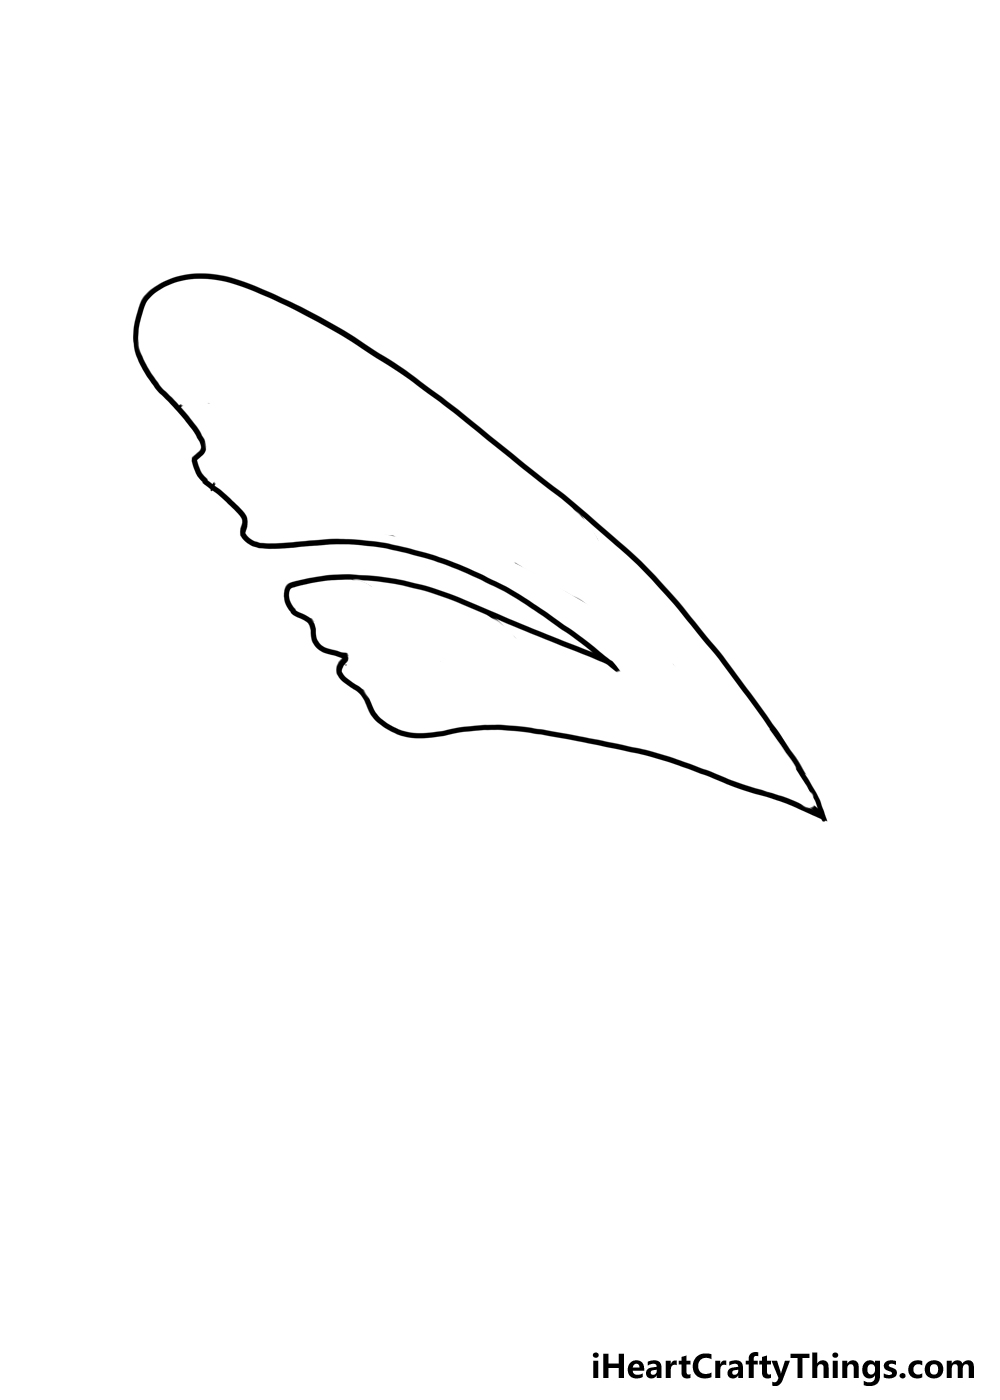
For this first step of the guide, we will focus on the upper section of the wings.
Even though this top portion is technically one single wing portion, it will itself be separated into two sections, as there will be a divide near the center.
Before you start drawing the first section of the wing, you can prepare by drawing out the rough shape of the different wing sections with your pencil first.
This would involve looking ahead to some of the later steps in the guide.
This way, you will be able to keep the proportions of the wing sections looking right. With that done, we can draw the first wing section.
There will be a sharp point at the right-hand side of the base. This is a good starting point for the other outlines. The upper line will be a gradual curve that ends in a rounded section.
This will then head down in a ruffled line until around the halfway point. At this point, it will cut sharply inside and then out into one more wavy section that will eventually connect to the sharp point.
With that, we will have the upper section of the wing drawn, and we can head to step 2.
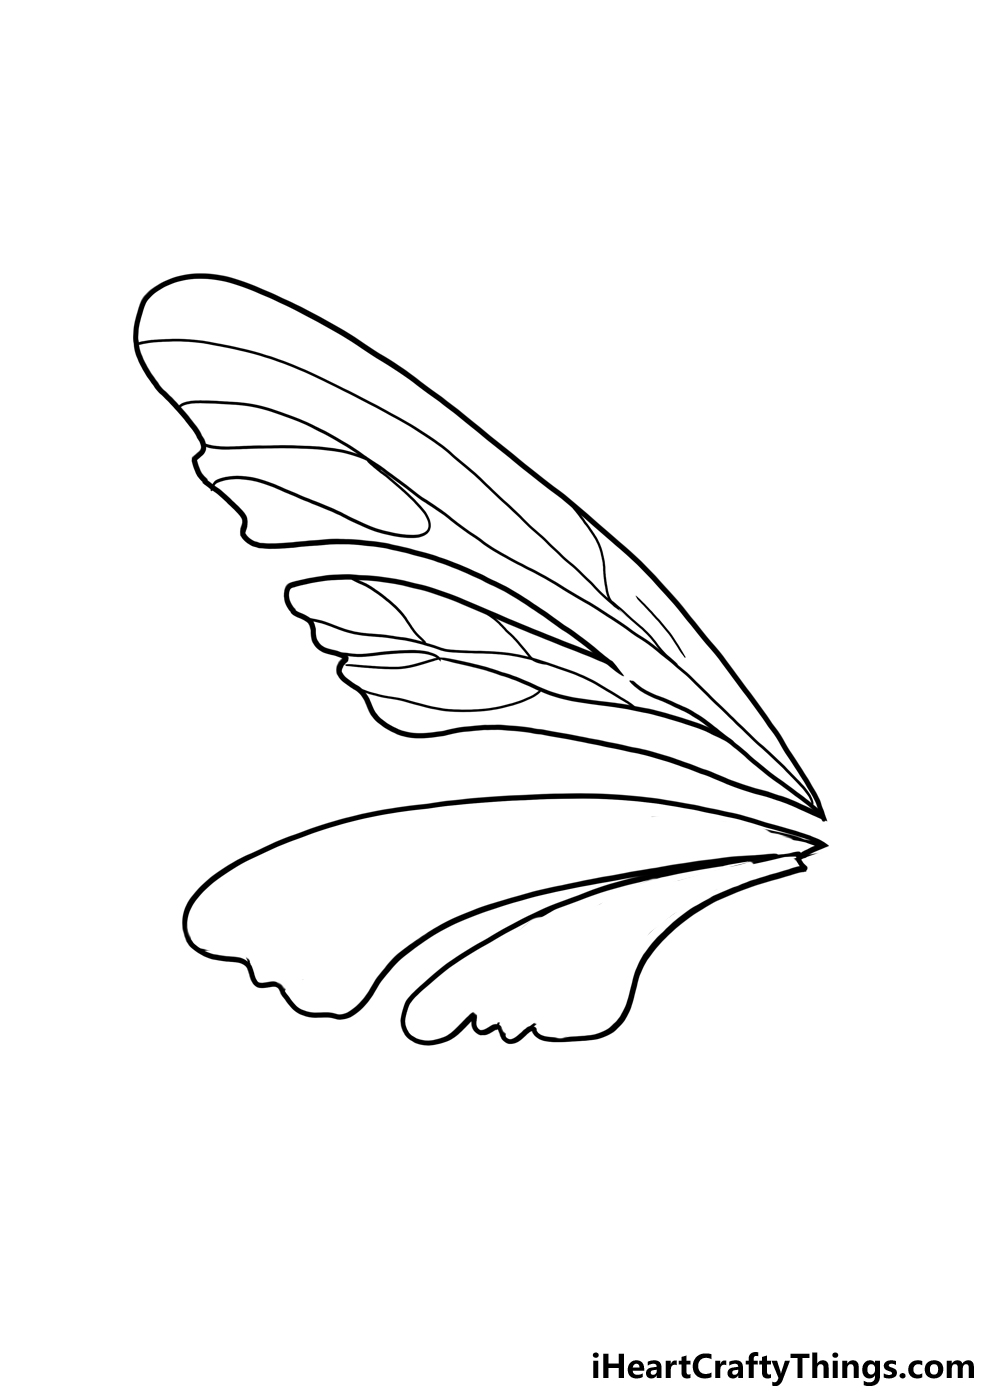
Step 2: Draw the next sections of the wings
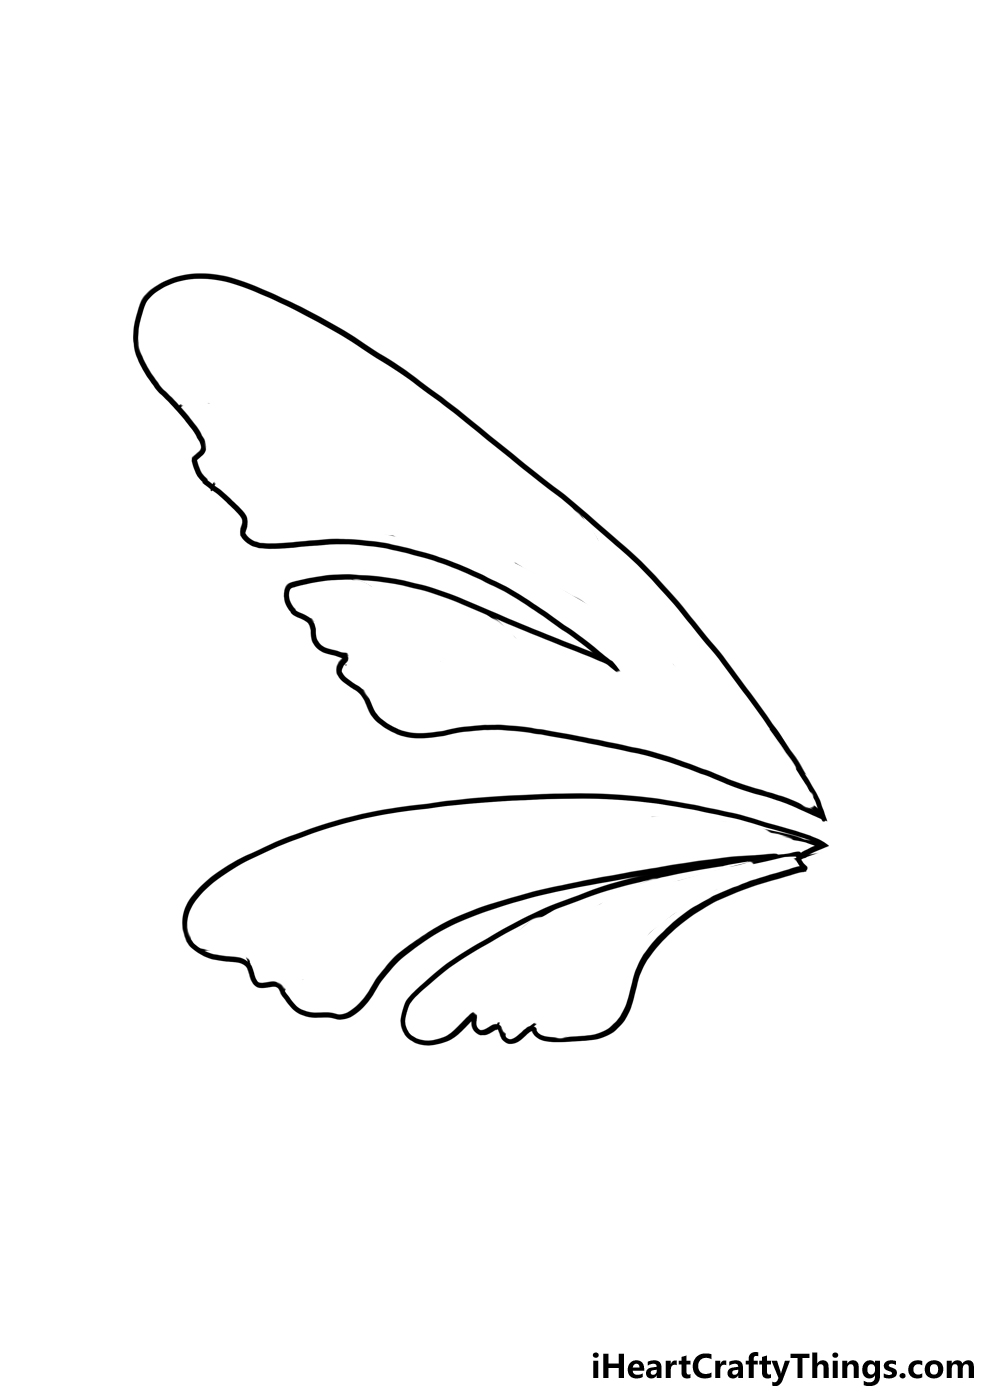
Now that we have the top section of these fairy wings, we can draw the lower section.
Or sections, as it would be more accurate to say, as we will be drawing two thin sections connected to one another
These will be shaped rather differently from the top section, but the outlines will look rather similar. Much like that first section, these two smaller ones will start at a single sharp point.
The upper section of these two will be the longest and the largest, but other than the size difference, they should look fairly similar.
Starting from that single point, extend a long, curved line to the left. This will end in a wavy vertical curved line.
Then, the base line of this shape will curve in the same way that the upper one did, and then end at that ponty tip.
Once you have drawn this first shape, we can draw the second one. This second one will look more or less the same but the angle and the wavy line on the left side will be a bit different.
If any of that sounds complicated, simply follow the reference image and it should all become clear.
Your version also doesn’t have to match ours exactly, but getting the shapes more or less the same size will be the way to go.
Then, we can move on to step 3.
Step 3: Add the veins of the first fairy wing section
As we’ve mentioned, these fairy wings are based on butterfly wings, and they will therefore share some of the same features and details.
In this step, we will be adding the first of these details, the veins on the wings.
If you look at a butterfly’s wings, you will see a fine network of fiddly veins, and these are what we will be adding in this step.
Drawing these can be surprisingly tricky, as if you go too far with it then it can look messy.
This is another step where it doesn’t need to match our example exactly and you can make your pattern unique.
Once again, we can make this easier by extending these vein pattern details up from the pointy tip on the lower right.
Some of these lines will extend all the way to the end of the wing section while others will branch off to the side. This is another step where you could use a pencil to help you out.
Using a light pencil, practice drawing this pattern so that you can make sure it looks exactly as you want it.
Then, when you like how it looks you can go over the lines with your pen or with a darker pencil.
Drawing with a pencil first takes away so much of the pressure, as you can erase if you make a mistake or aren’t happy with the results.
Now that we have the veins for the first section of these fairy wings, we can keep adding these details to the next sections.
Step 4: Now draw some more vein details
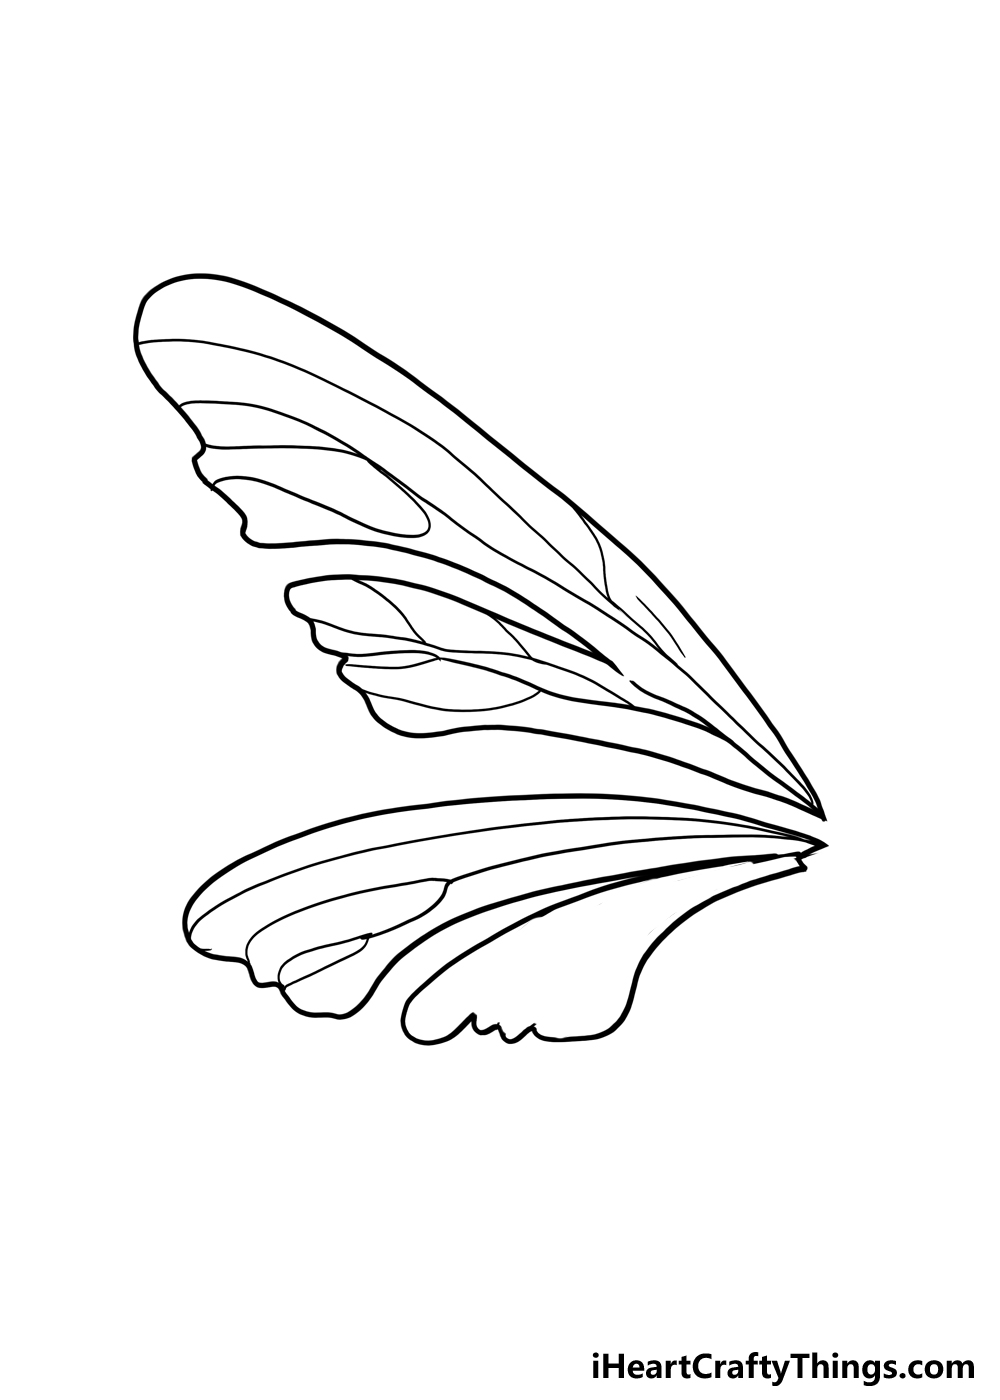
As you can see, this drawing of fairy wings is really starting to come together nicely! Adding details like these can make the end result seem so much closer and clearer.
We’re not quite at that end result yet, however, so we will now add some more vein details to the lower section of the wings. For now, we will stick to the upper section of these two lower ones.
You will see in the reference image which one we’re referring to! When you’re ready, let’s add some more of those vein details that you drew in the previous step.
These will be very similar to the veins that we drew in that first section, but they will be placed a little differently because it’s a smaller space.
Other than that difference, you can go about it the same way.
You could even go ahead and draw some more of those guiding pencil lines we recommended in the previous step.
If you want to make these details even more unique, you can try to look at different sources.
You could look up pictures of fairy wings or butterfly wings online to get some inspiration. You could even use pictures of bird wings and feathers or go for something unusual like fur textures.
These are just a few examples of how you could create variations on this design to make something completely unique.
When you’re happy with this section, we can finish off the final details in the next step of the guide.
Step 5: Draw the final details for your fairy wings drawing
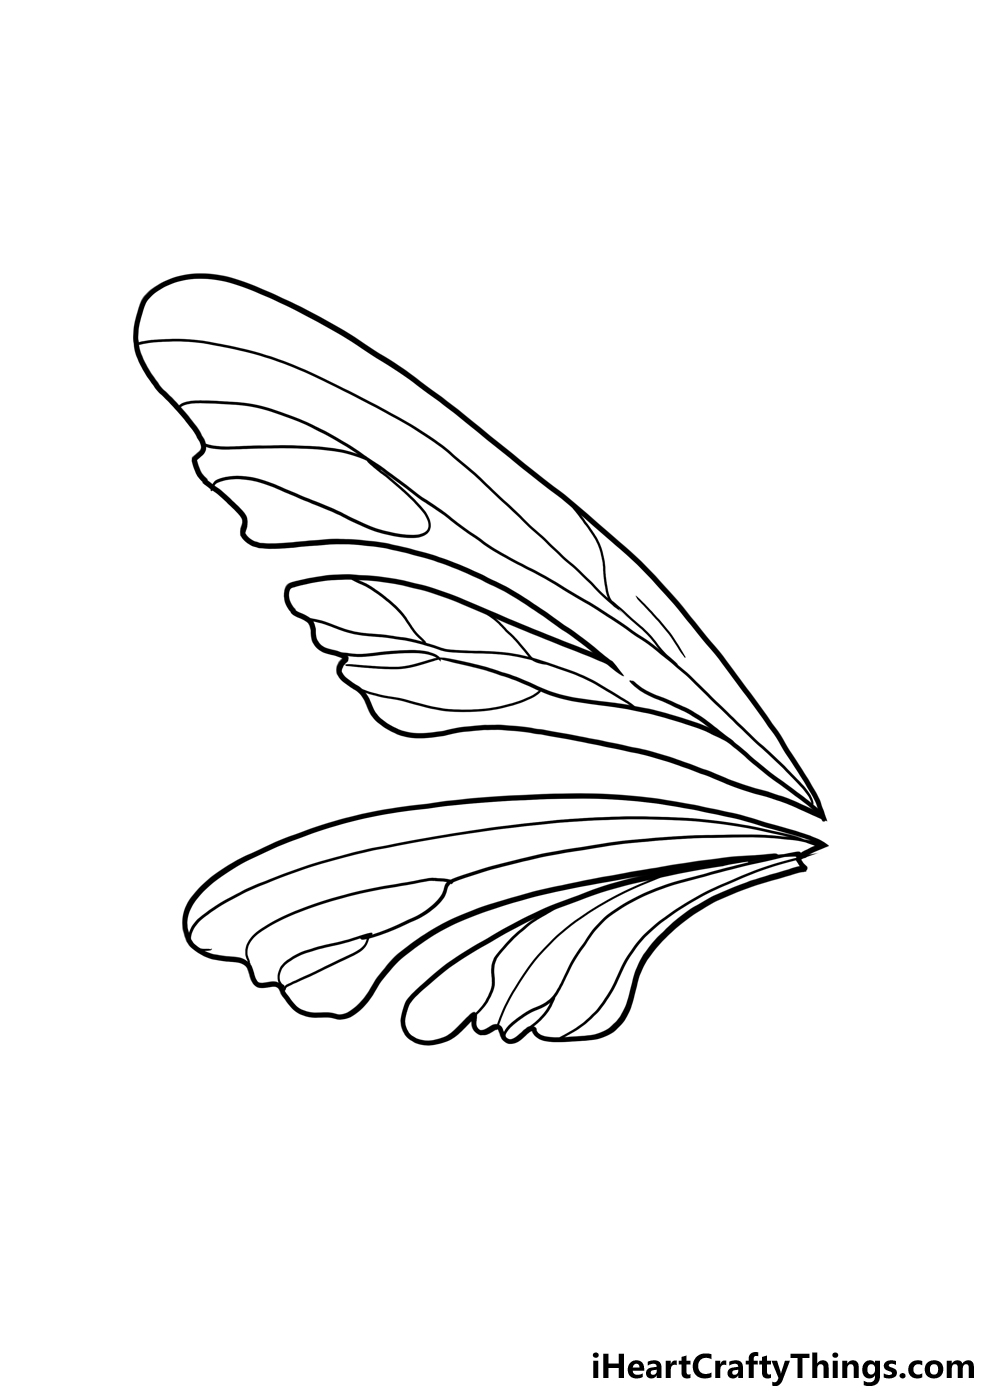
It’s almost time to add some amazing colors to this artwork, but we have a few final details to add in this fifth step of the guide.
We will go over the details you will need to add to finish off our design, and then you can add some of your own ideas!
For now, let’s focus on the final section of the fairy wings, and we think you will know what to do here. We will be adding some more of those vein details we have been drawing so far.
You should be well versed in drawing these details by now, and you know how you can prepare for these details.
When you have decorated this final section, we can then finish off with some unique details of your own.
This could be really fun, as you will get to add your own ideas to make something truly unique!
One of the most obvious details you could add would be to show the fairy that these wings are attached to.
You could use pictures of your favorite fairies or use pictures of ballerinas and dancers to create a fairy character. You could even use yourself or someone you know as a model!
Drawing a fairy body is one way of doing it, but you could just as easily draw the body of a butterfly connected to the wings if you want it to look more realistic.
Drawing a background can also be a great way to make your drawing have more of a sense of place. What other details could you add?
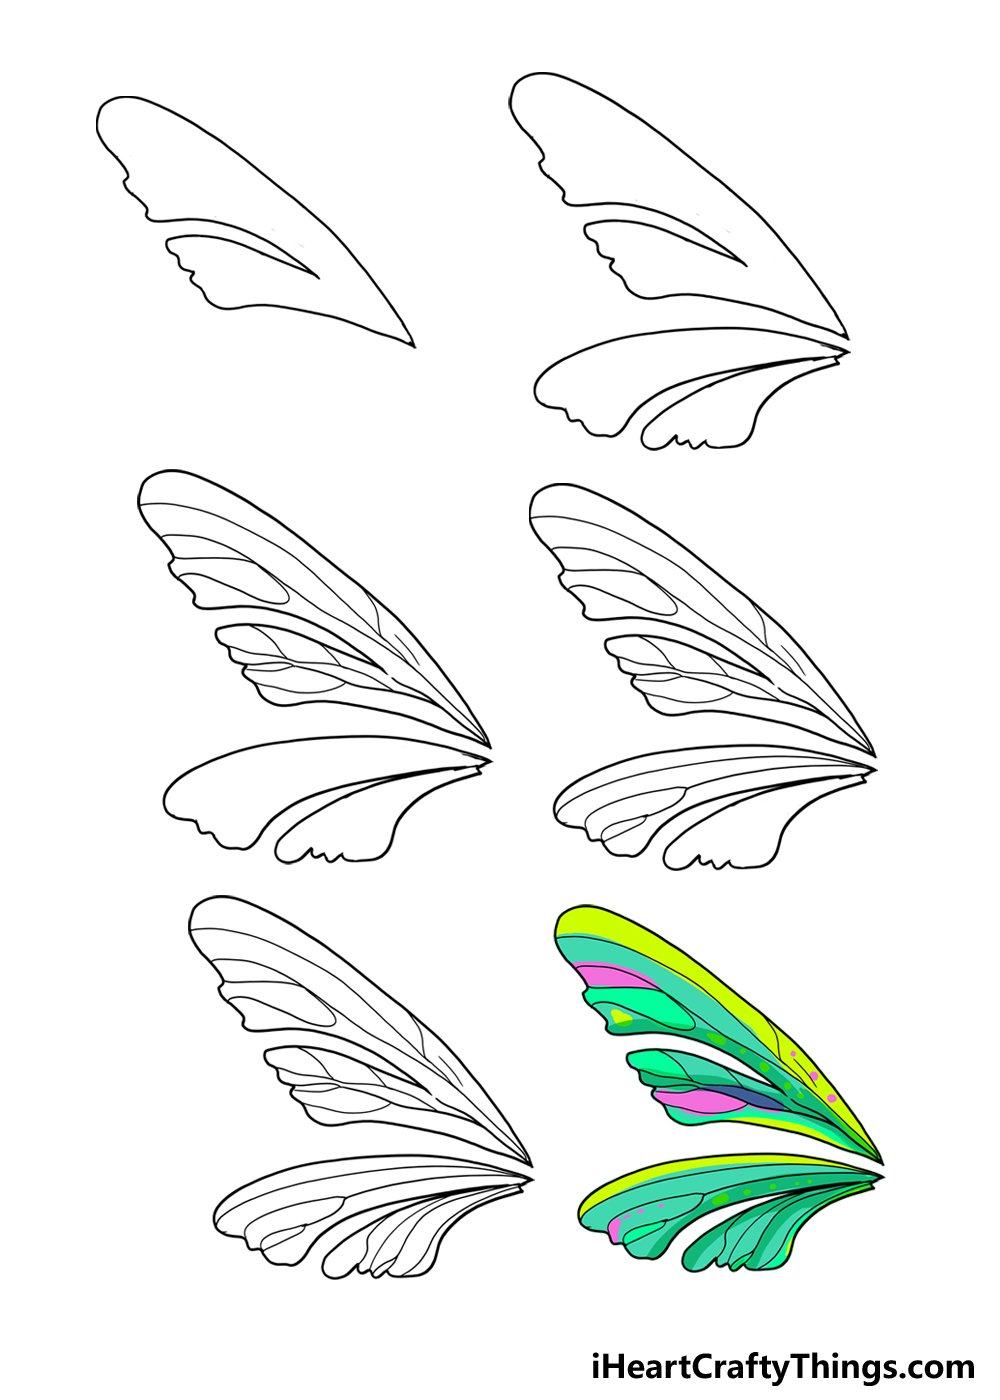
Step 6: Now, finish off with some color for these fairy wings
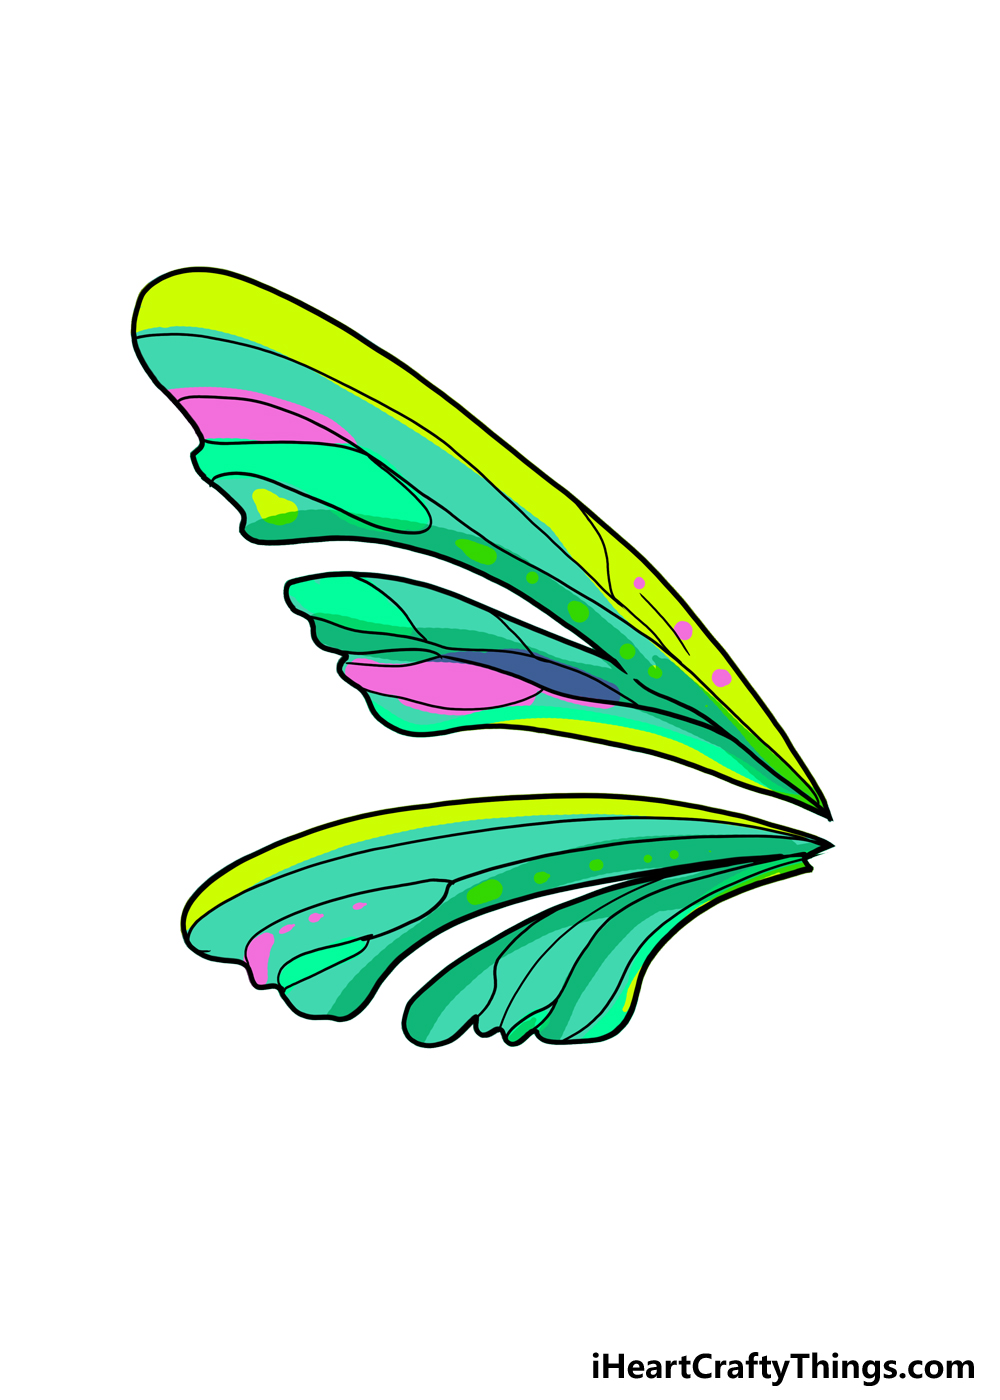
Now we will finish off this guide on how to draw fairy wings with some coloring fun. This should be a lot of fun, as there are so many possibilities to go for when coloring in.
In our example image, you will see that we went for all sorts of amazing colors, from yellows and pinks to blues and greens.
These colors make these fairy wings look even more vibrant and beautiful.
As great as these colors look, they are just a small selection of the colors you could go for.
You could use any colors you like for your own fairy wings, and anything you use will look amazing in its own way!
When you want to color in your fairy wings, you can consider more than just the colors you will use to fill in the wings.
You can also play around with different art tools and mediums to make the colors pop in different ways.
If you want to keep the colors bright and vibrant, then you can use colored pens, markers or thick acrylic paints to make the colors really pop.
If you want something lighter and more delicate, then you could use watercolor paints or colored pencils for nice soft colors.
It’s all up to you, and you can mix and match colors and mediums as well.
Colors can be used to make your artwork even more unique, so be sure to have fun experimenting with it to see what you can come up with!
Your Fairy Wings Drawing is Complete!
We set out to make a gorgeous drawing of fairy wings when we began this guide, and we think that you have achieved that goal with flying colors!
There were some tricky parts to this drawing, but hopefully the steps in the guide helped to make it more manageable. When creating this guide, we also wanted to leave room for your own creativity.
That means you can add your own details, ideas and inspirations. Then, you can show off your color creativity with the colors and art mediums you use to achieve the colors.
Whatever you go for, we know it will look amazing! Then, when it’s all done we are sure you will want to show off your creation.
You can do just that by sharing your artwork on our Facebook and Pinterest pages for us to check out. We would love to see how your fairy wings look when they’re done!