You’re about to discover the easiest way to learn how to draw a disco ball by following this guide for kids! The creative party is about to begin, so let’s see how it’s done.
Disco balls are most commonly associated with the 70s and 80s, but they actually appeared as early as the late 1800s. While that may be the case, the aforementioned decades are when they really came into prominence.
They’re a great way to add even more light and magic to a party and are an iconic aspect of the disco scene. Even though we are all familiar with them, learning to draw one isn’t as easy as you may think.
This guide will fix that, as I will show you the best way to do it. By the end, you could draw a background or even add some glitter to make this drawing sparkle!
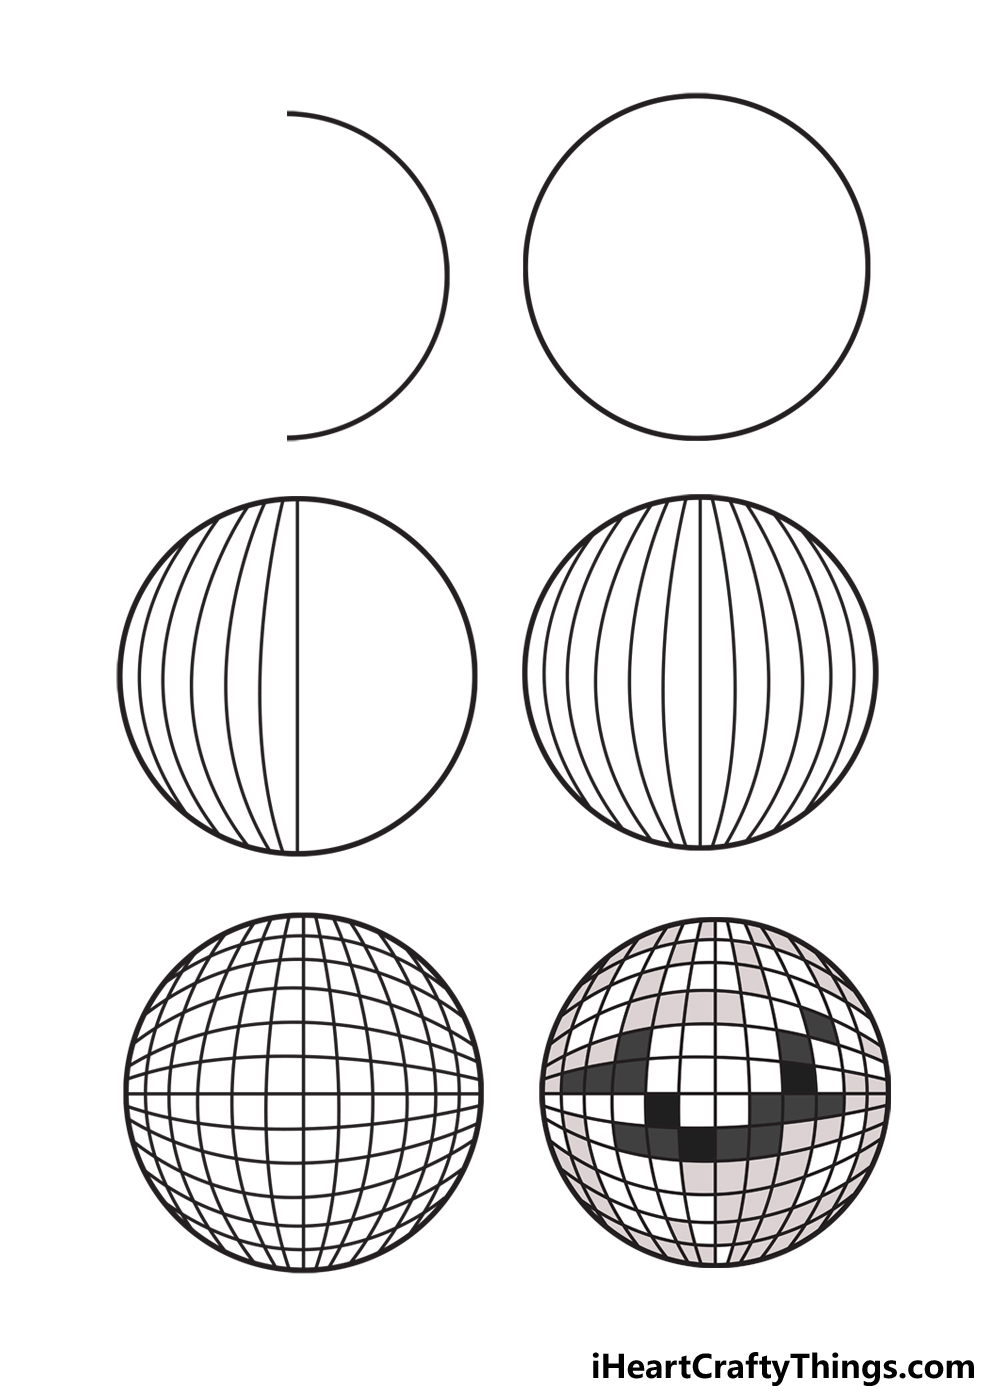
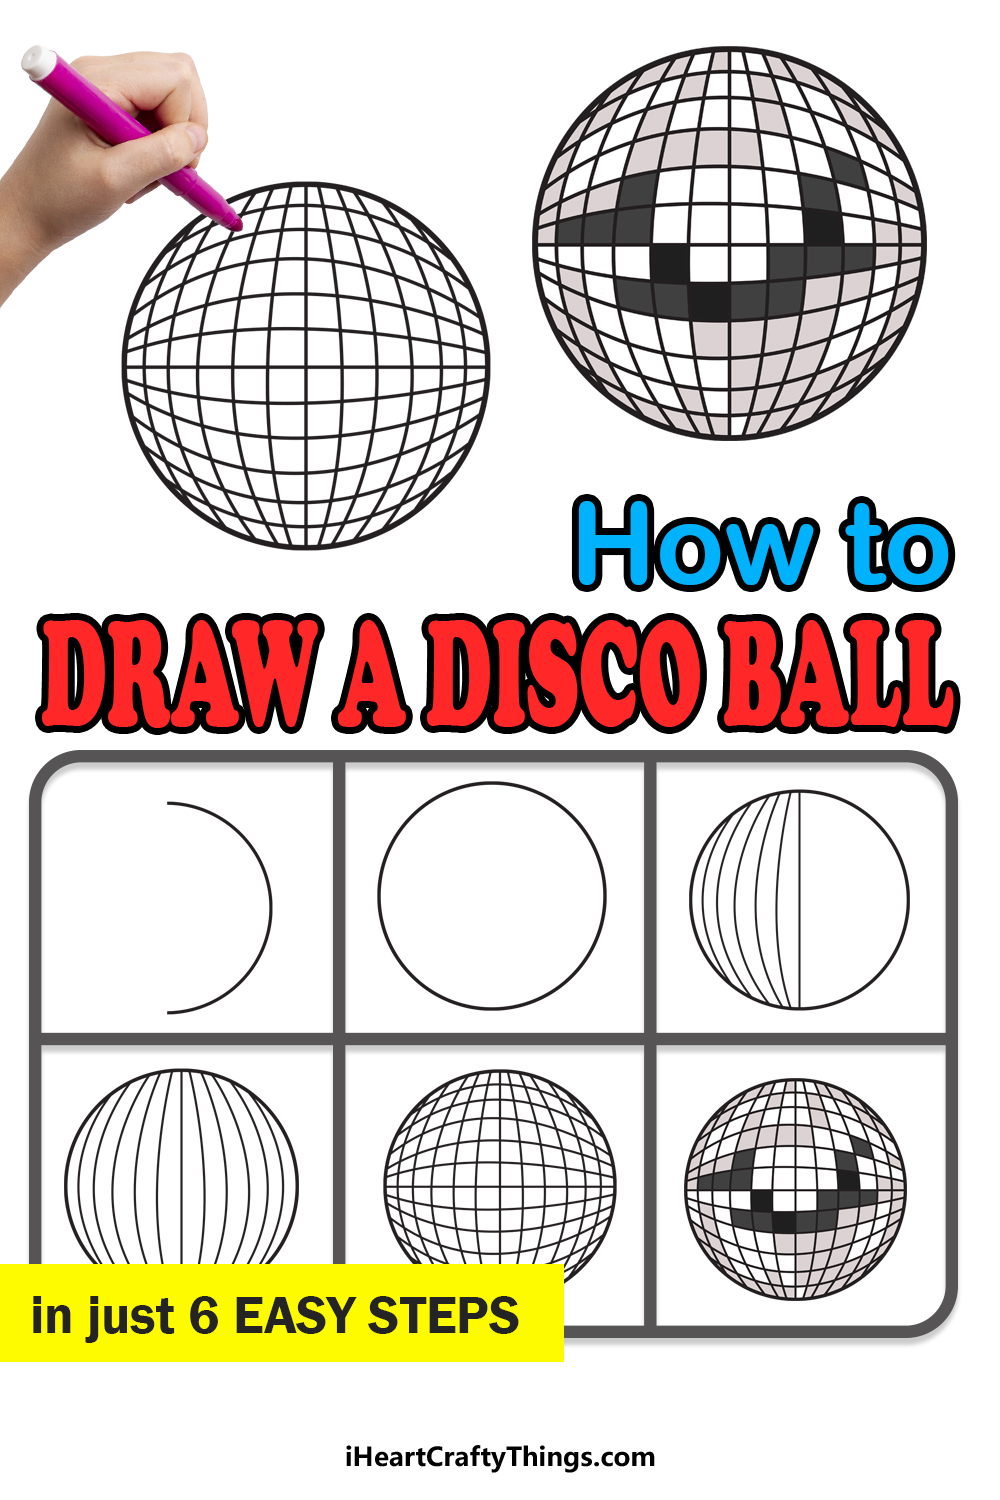
See How To Make Your Disco Ball Drawing
How to Draw A Disco Ball – Let’s Get Started!
Step 1
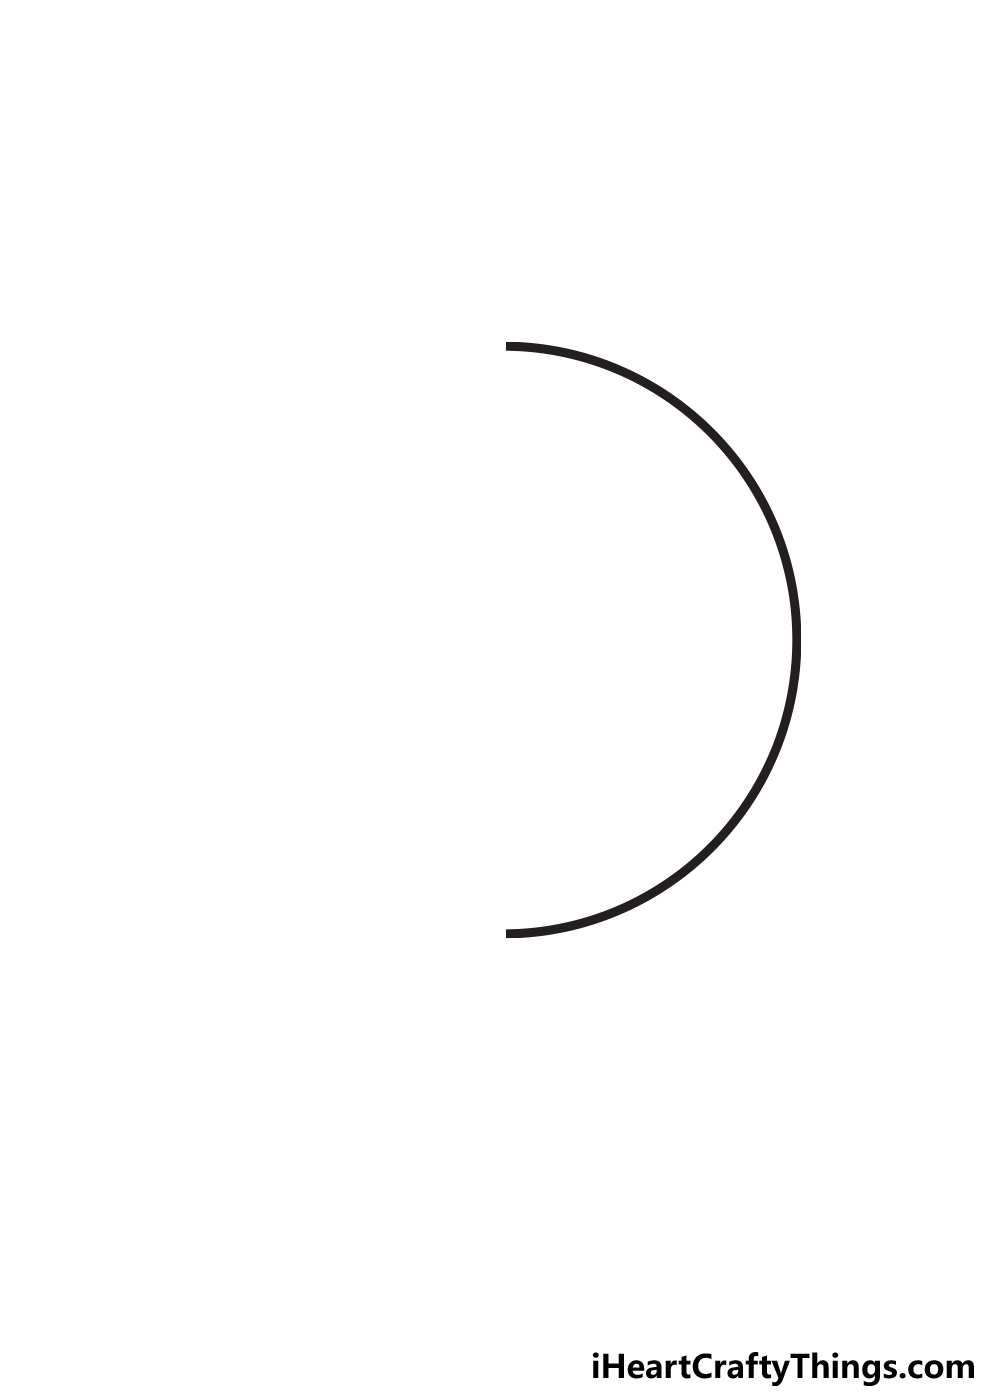
When it comes to drawing a disco ball, it will begin as you would probably assume: by drawing a circle. This is quite an oversimplification, however, as drawing a circle can be easier said than done.
In fact, drawing a perfect circle freehand is pretty much impossible, so you may want to use something to help you draw this circle.
Of course, if you want a more stylistic take on a disco ball, then you could draw it free-hand for a more imperfect look.
For now, we will be assuming that you do wish to draw a perfect circle as we did in our guide.
To do this, we have a few methods that can make it so much easier. The easiest way to draw a perfect circle is to use a drawing compass.
This is a tool often used in mathematics to draw circles, but it can be used generally to create art. A drawing compass is a simple tool that has two parts, a section to hold a pencil and a sharp point.
The sharp point is used to anchor the compass on the page, and then you can swivel the pencil around to create a circle. You can usually adjust it to create circles of different sizes, too.
If you don’t have one, drawing compasses can be purchased rather inexpensively at art and stationery shops. If you won’t be able to acquire one, there are other methods.
Try to find a flat, round object such as the cap or lid of a jar. You can place that on the page and then trace around it for a perfect circle!
For now, we will only draw the first half of the circle, and we will complete it in the second step, so let’s head there when you’re ready.
Step 2: Draw the rest of the circle
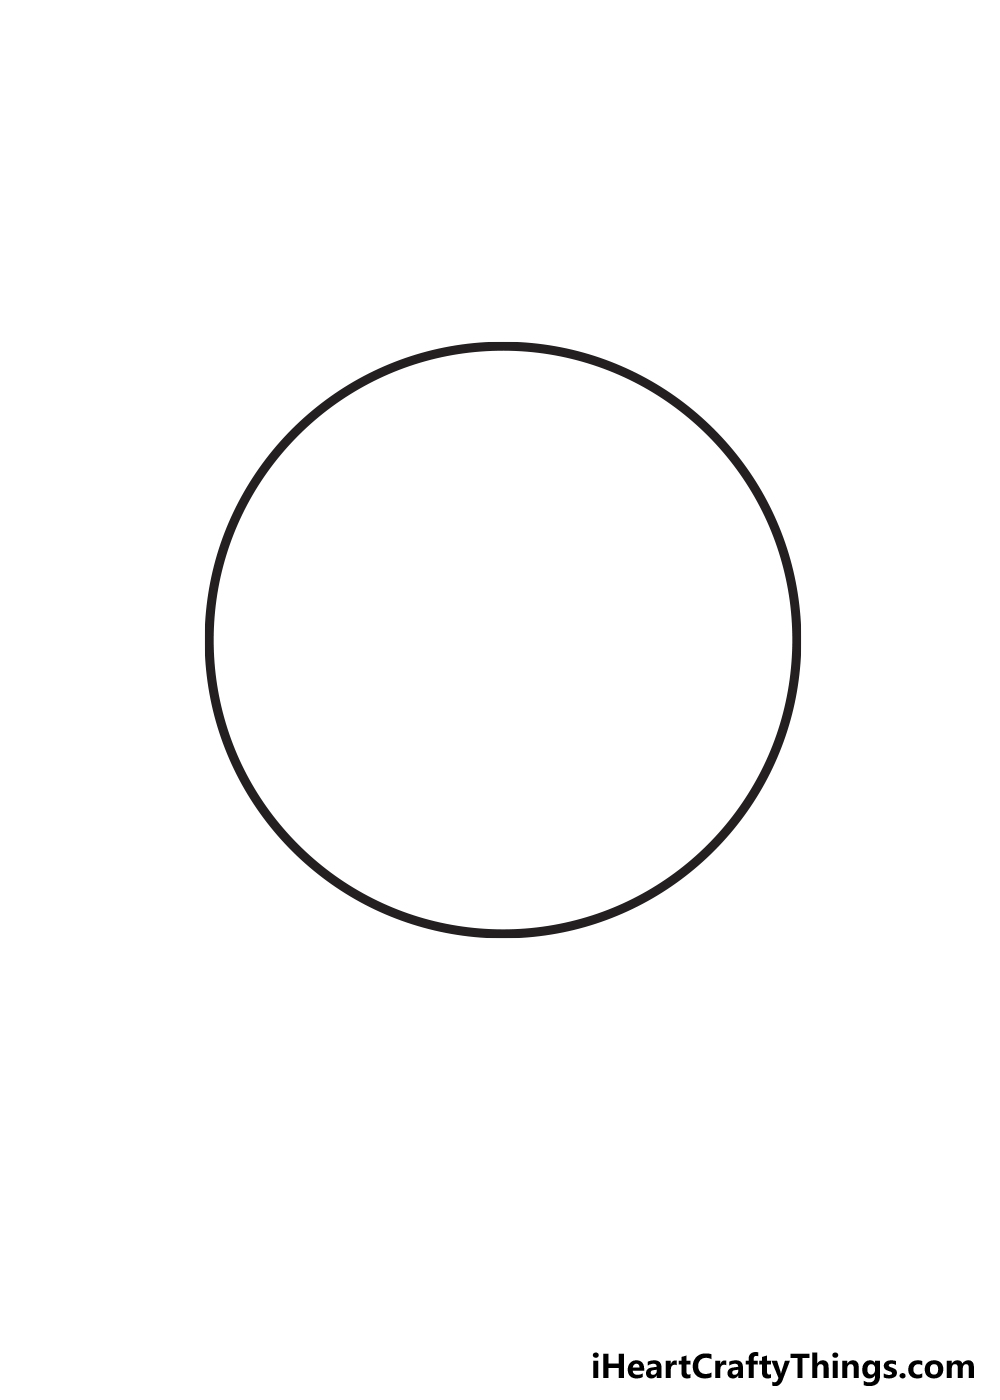
You began the circle in the first step, and in this one you can finish it off for a complete circle. It’s probably best to draw this circle in one complete motion, no matter which method you’re using.
The idea is to make the outline a smooth as possible, so if you stop and start as you draw then there may be imperfections in the outline.
If these have happened, then you can go over the outline a few more times.
We haven’t started adding details yet, so you can try a few different circles until you’re happy with how it looks. Also try to keep the rest of the drawing in mind.
We’ll cover this in more detail later, but you could add some more elements to the design.
You may want to have the disco ball be the focus of the drawing, or you may want to draw it over a dance floor.
These are just a few examples, but it’s just worth keeping in mind. If you do want to add elements around the disco ball, then you should be sure to leave enough space for what you’re envisioning.
For now, when you’re happy with the circle we can move on to step 3 and add some of the interior details.
Step 3: Add the first inner details
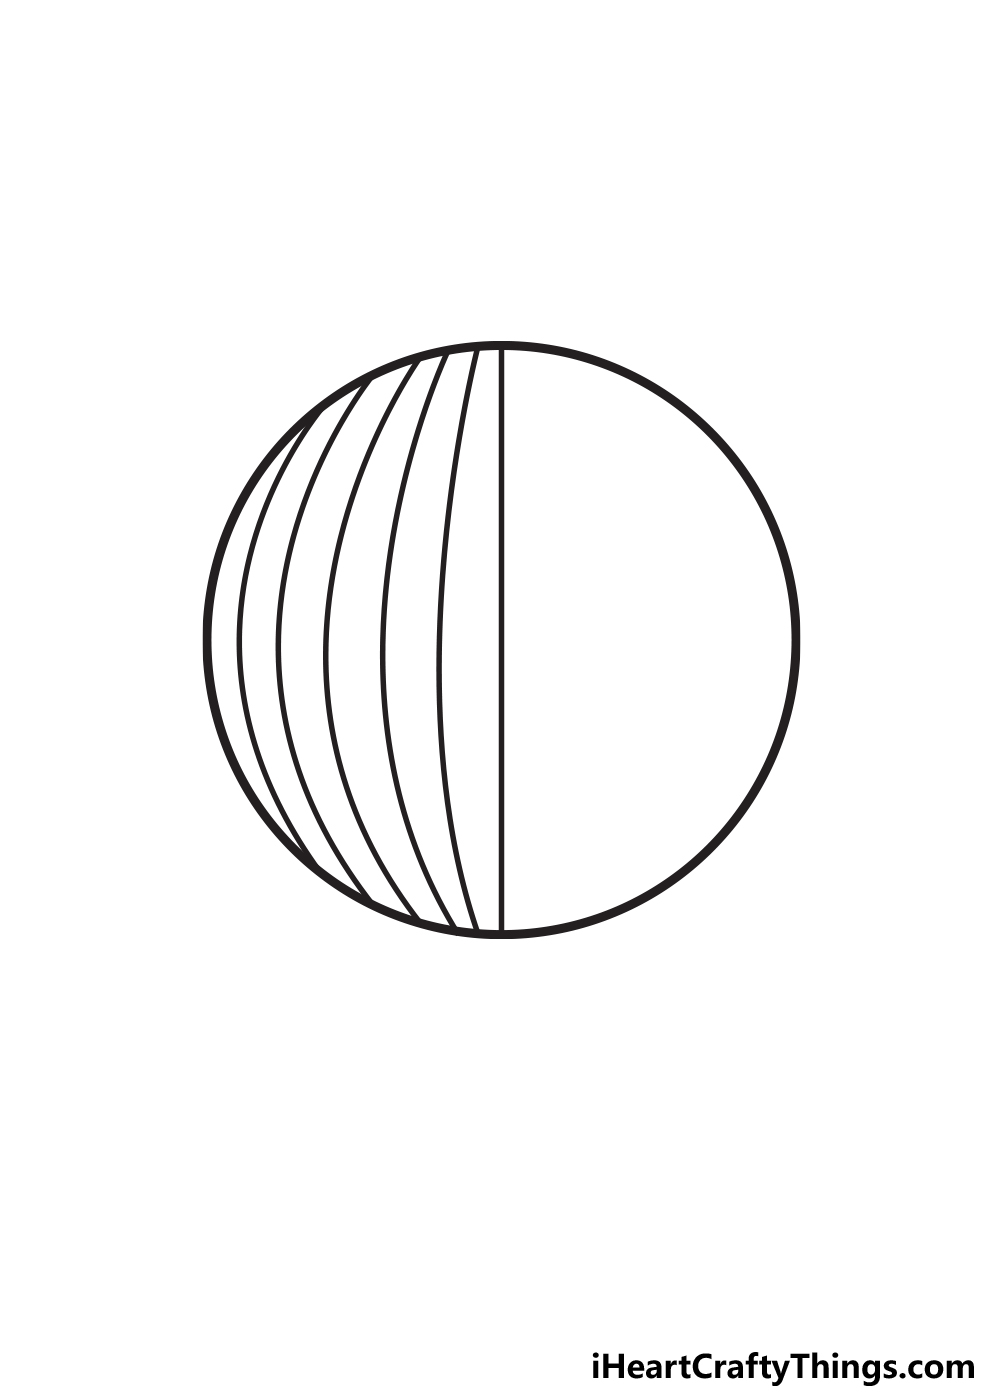
While drawing a perfect circle can be challenging, it’s still easier than the next few steps we will be adding. That’s because we will be adding the mirror details to the disco ball.
This may seem simple, after all, it’s just a bunch of small squares. However, you may find it’s a lot harder than you think, as it can get quite fiddly.
We have to account for the curve of the ball, and it can be easy to make it messy. The next few steps will take some patience, but there is no race to finish the drawing!
Be sure to take it slowly and take as much time as you need. To begin these details, we would highly recommend using a ruler.
Either that, or you can use a perfectly straight object and use it to trace. However you do it, we will begin with a line at the center that’s perfectly straight.
Try to get as close to the center of the ball as you possibly can. Then, we will draw a line to the left of this one.
This second line will begin and end very close to where the first line did, but it will curve slightly to the left. This is where you should definitely take it nice and slow.
Then, keep adding more lines that have a similar curve. The distance between these lines should be more or less equal, even though it may not seem it at first glance.
Keep going until the entire left half of the disco ball is covered. Then we can focus on the right side!
Step 4: Now draw the rest of the vertical lines
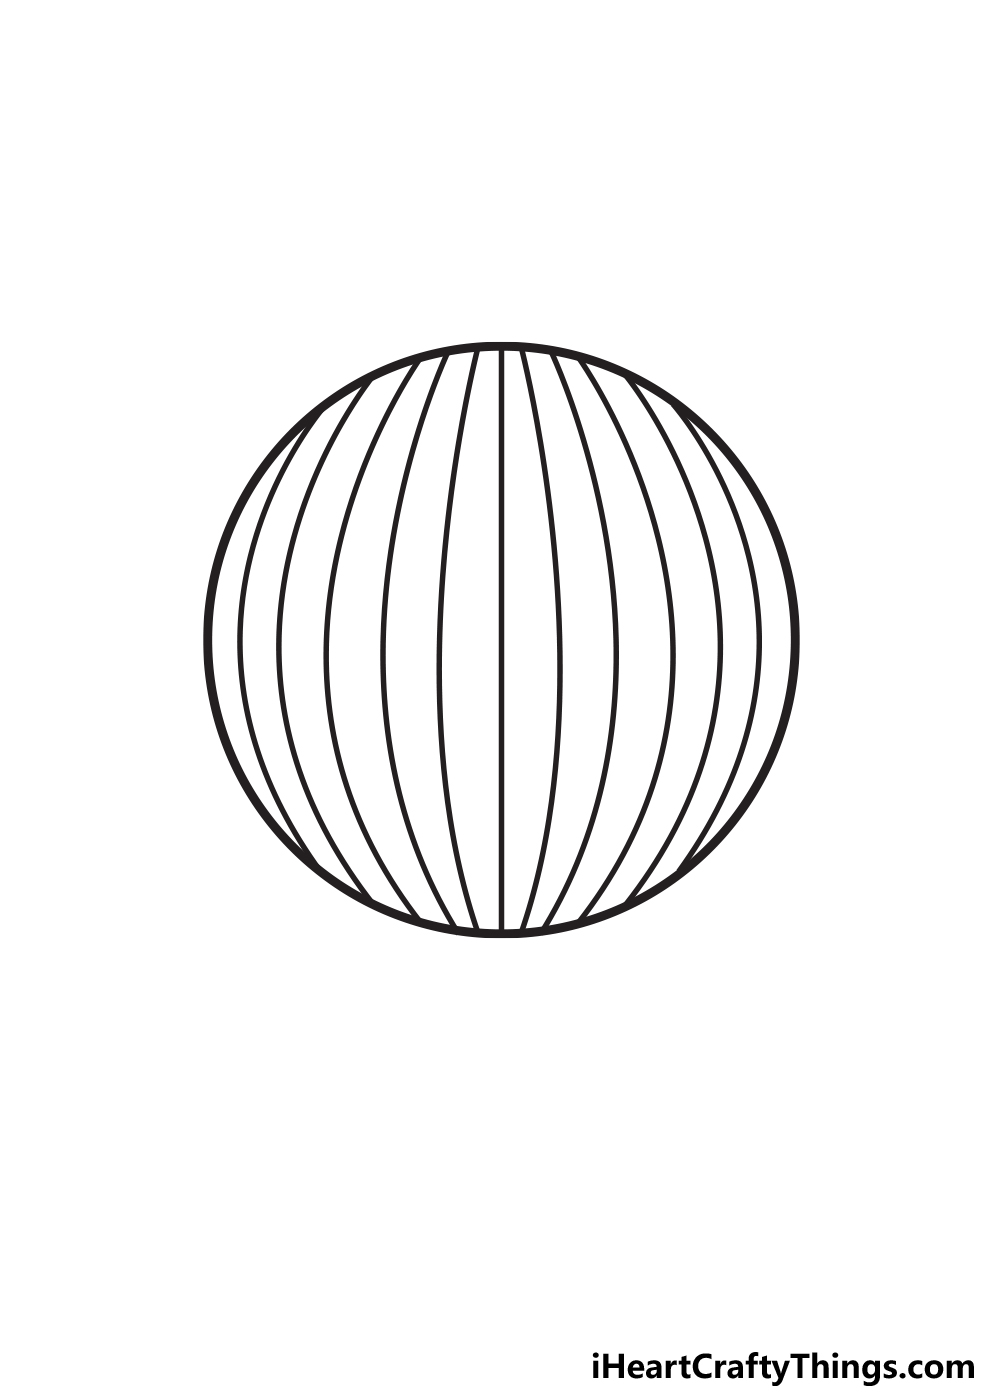
You did a great job in that previous step, and in this fourth one we will essentially be recreating what you did in step 3, just in reverse. Luckily, we have a starting point to begin with already.
This will be the same as before, starting from the center and moving outward. We already have the central straight line, so it’s just a matter of adding all of the curved lines.
This will again take a steady hand and a bit of patience. Even though you have essentially done this before, it will be challenging in a different way seeing as everything is in the opposite direction!
Just remember to keep the curves fairly slight, and each one will be in the opposite direction to the other side.
The distance between the starting and ending points will also be equal, just like in the last step.
We want this to be as symmetrical as possible, so if you really want to ensure that then you can count the vertical lines on the left side and make sure that the ones on the right match.
Once you have these lines drawn, we will already have a pretty cool-looking ball! We’re not quite done yet, though. This won’t be a true disco ball until we add the horizontal lines.
That is what we will add in the next step in the guide, and we will also add any final details and ideas in that step as well.
Step 5: Draw the final details for your disco ball drawing
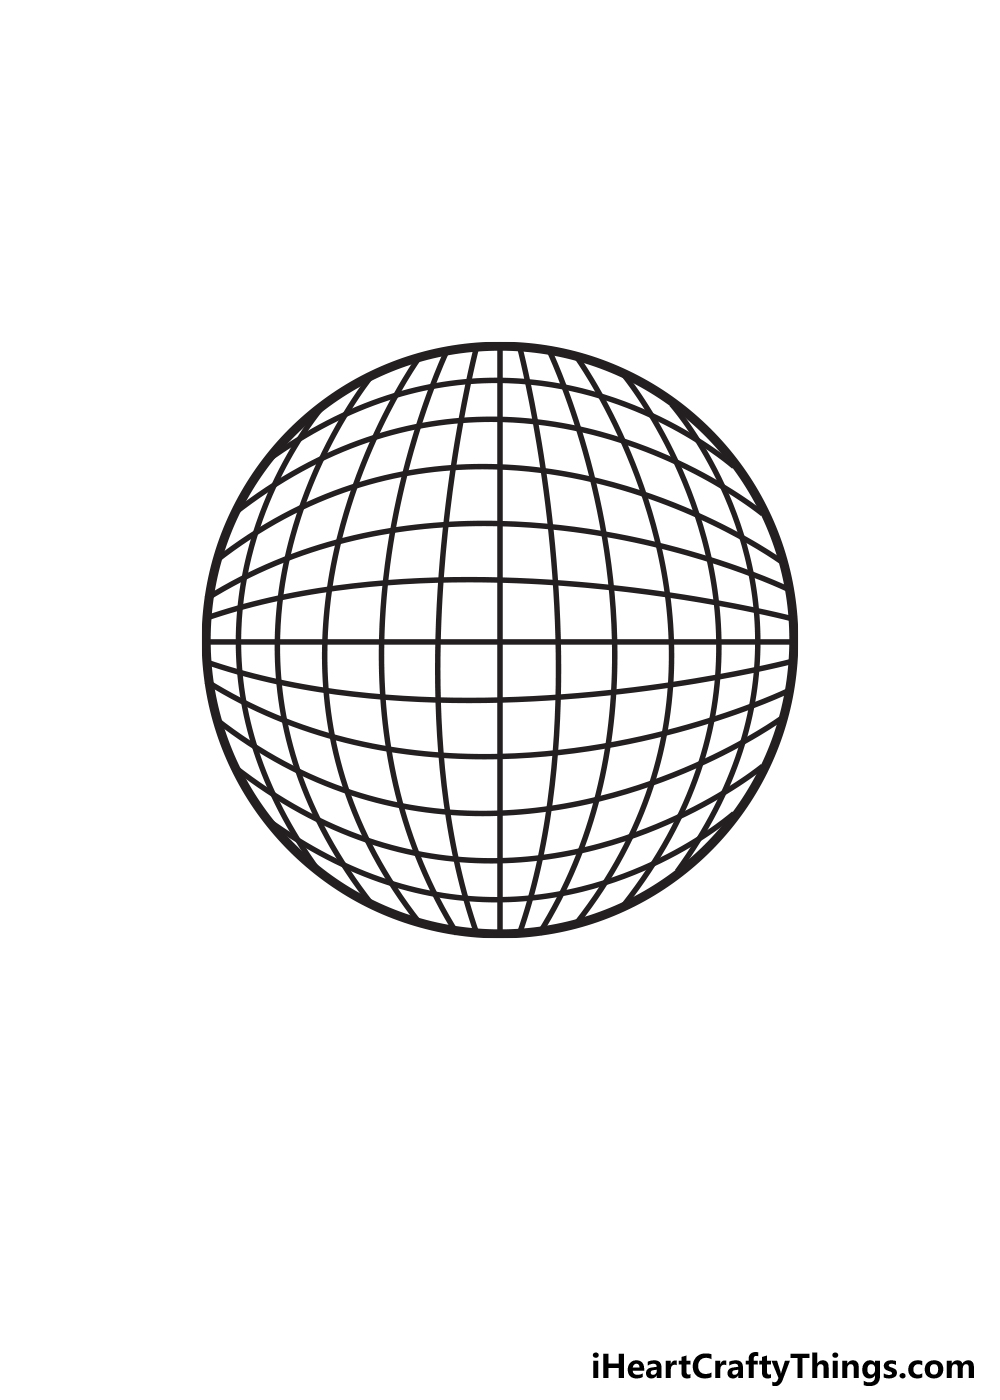
It’s time to finish off this disco ball so that we can color it in the next step. The bad news is that this step will be quite tricky and time-consuming again.
The good news, however, is that this is the final difficult part of the drawing and it’s all easy after this. For this step, we will essentially be replicating what we did in the previous two steps.
The catch here is that everything will be turned on its side. Start by drawing another perfectly straight line, only make sure it’s horizontal this time.
Then, we will add a series of horizontal lines above this straight line, and they will follow the same idea that we used for the vertical ones.
That means that there will be a slight curve to each line, and the beginning and ends of these lines will be pretty evenly spaced. Then, do the same for the bottom half of the disco ball.
Once done, you will have the grid pattern that disco balls are famous for! That required a lot of patience, but you’re ready for any final details now.
There are so many ways that you can finish off this disco ball drawing! One would be to draw a background.
You could do this by drawing a disco dance floor beneath the disco ball. Then, you could even draw some people dancing and partying beneath it!
You could also keep things simple and draw some sharp lines around the disco ball to make it look like it’s shining. Drawing little stars around the ball would also accomplish this effect.
These are a few of the ideas we had, but how else could you add to this drawing?
Step 6: Now, finish off with some color for this disco ball
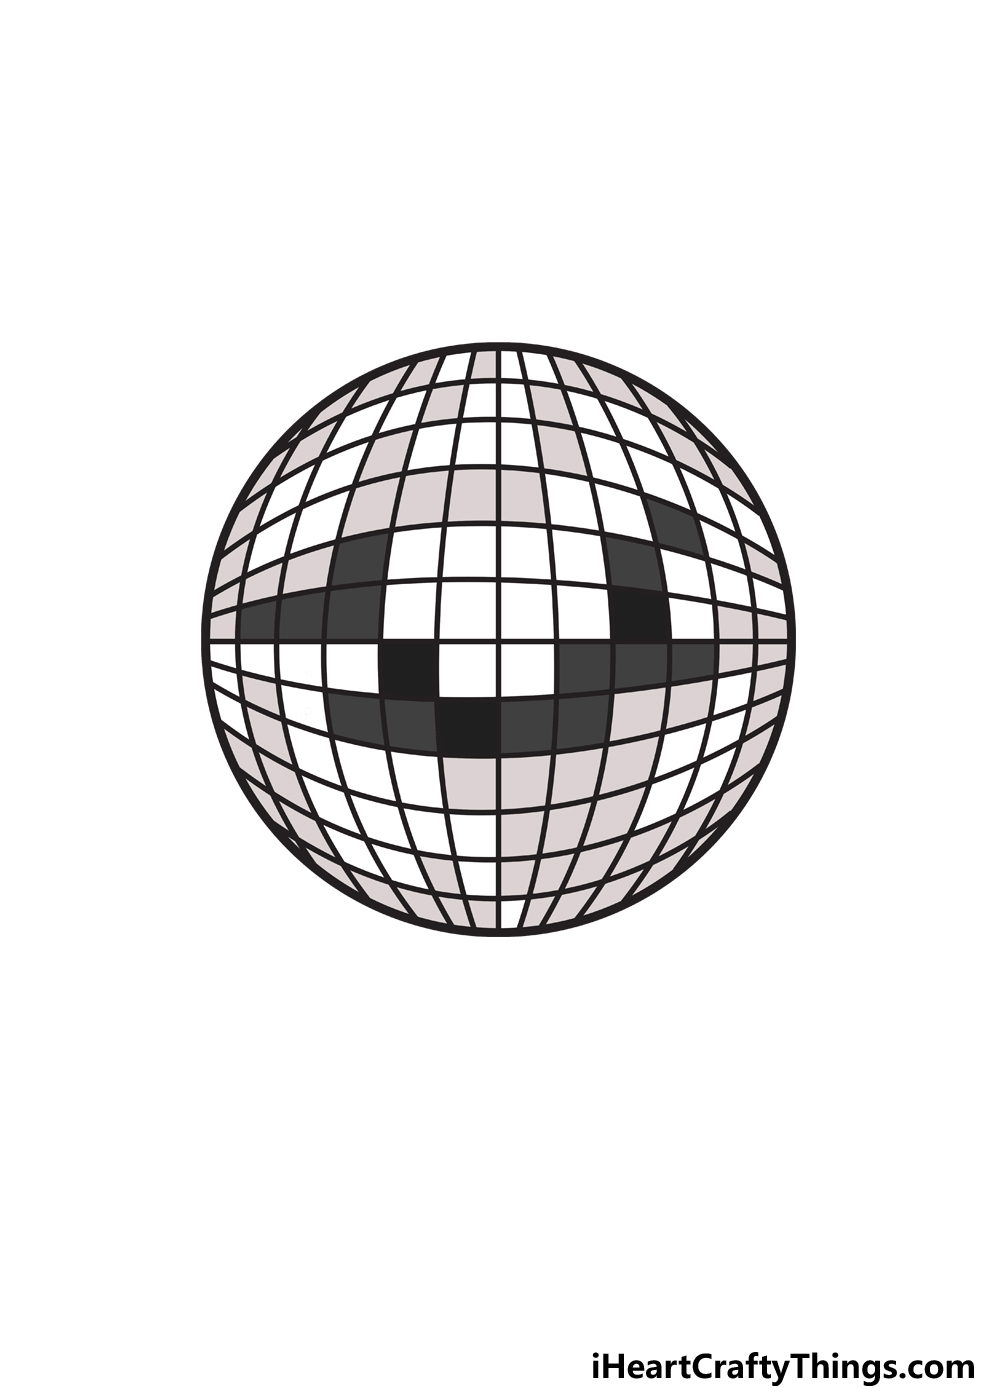
Now, it’s time to finish off with one final step for this drawing, and that is to color in your creation. There are so many ways that you could do this, and in our example we show you just one.
We used muted shades of greys and blacks for the disco ball to give it a more neutral feel. This shows you what the disco ball may look like under fairly minimal lighting conditions.
A disco ball is covered with little mirrors, however, so you could use any colors you like, as the disco ball would be illuminating whatever lights and colors are around it.
So if you wanted to have a mix of neon greens and reds, for example, you could do that! It’s a chance to use all of your favorite colors and tones.
However, choosing the colors you use is just a part of the fun. In fact, you can have tons more fun experimenting with different art tools and mediums as well.
Disco balls sparkle and shine in real life, so you could recreate this with your art tools. For instance, using glitter would be a great way to make this disco ball have some real sparkle.
Mixing different mediums would also allow you to replicate the look of multiple colored light sources on the disco ball.
It’s all up to you now, so what colors and mediums will you choose?
Your Disco Ball Drawing is Complete!
We hope you had a great time rocking out to this guide on how to draw a disco ball! As you have seen, drawing this disco ball was not as easy as you may have assumed.
As long as you slow it down and take it line by line, then you can definitely do it. There’s no need to rush, and you can take all the time you like.
Then, be sure to add any of your own ideas and extra elements to make it look even better! The final step is to share your disco artwork on our Facebook and Pinterest pages for us to see.
We would love to see how it turned out, so this is the best way to show off your awesome disco ball picture.