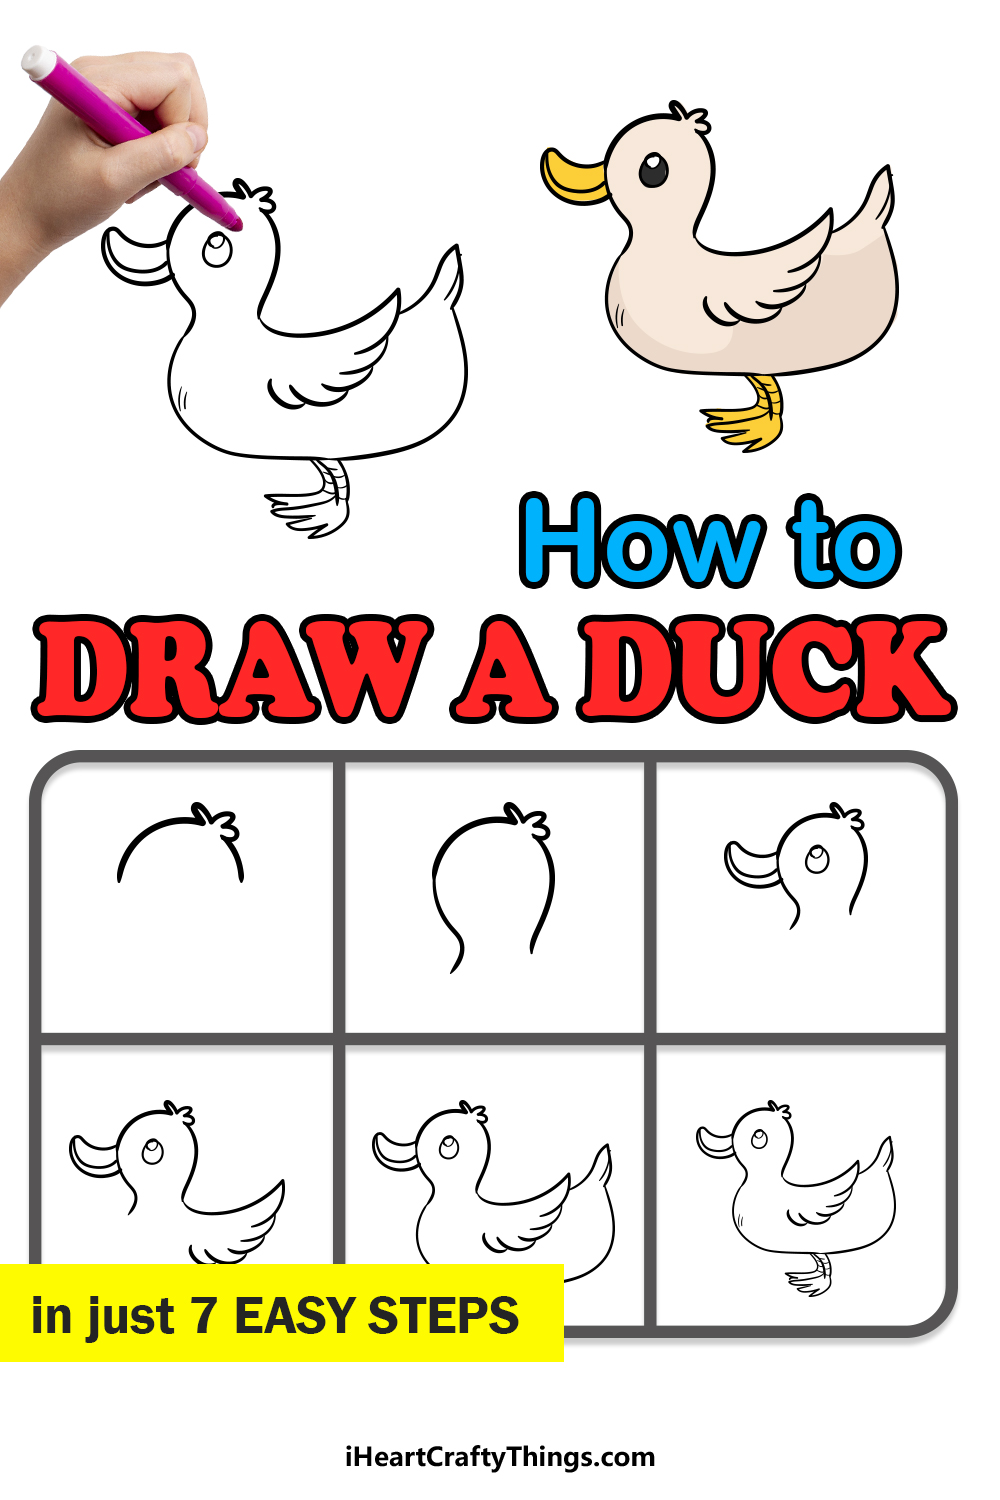
Kids of all ages will love this guide on how to draw a duck! Anyone can use this guide to quickly and easily make their own little duck character.
Ducks are always a lovely sight on a lake, and they manage to entertain with their antics and grouchy attitudes too! I love ducks, and that means that I love to draw and paint them.
It was tricky to learn how to do it, and I want to make it easier for anyone else with the same mission. This cute duck drawing may look complex, but my goal is to show you just how simple it is!
By following the steps, you will see how to easily replicate this duck, including details like the bill, webbed feet and feathers. Then, you could even design a pond or a lake for this duck to call its home if you want to challenge yourself even further!
All this and more awaits you in this guide, so let’s begin.
Watch How To Make A Duck Drawing With This Guide
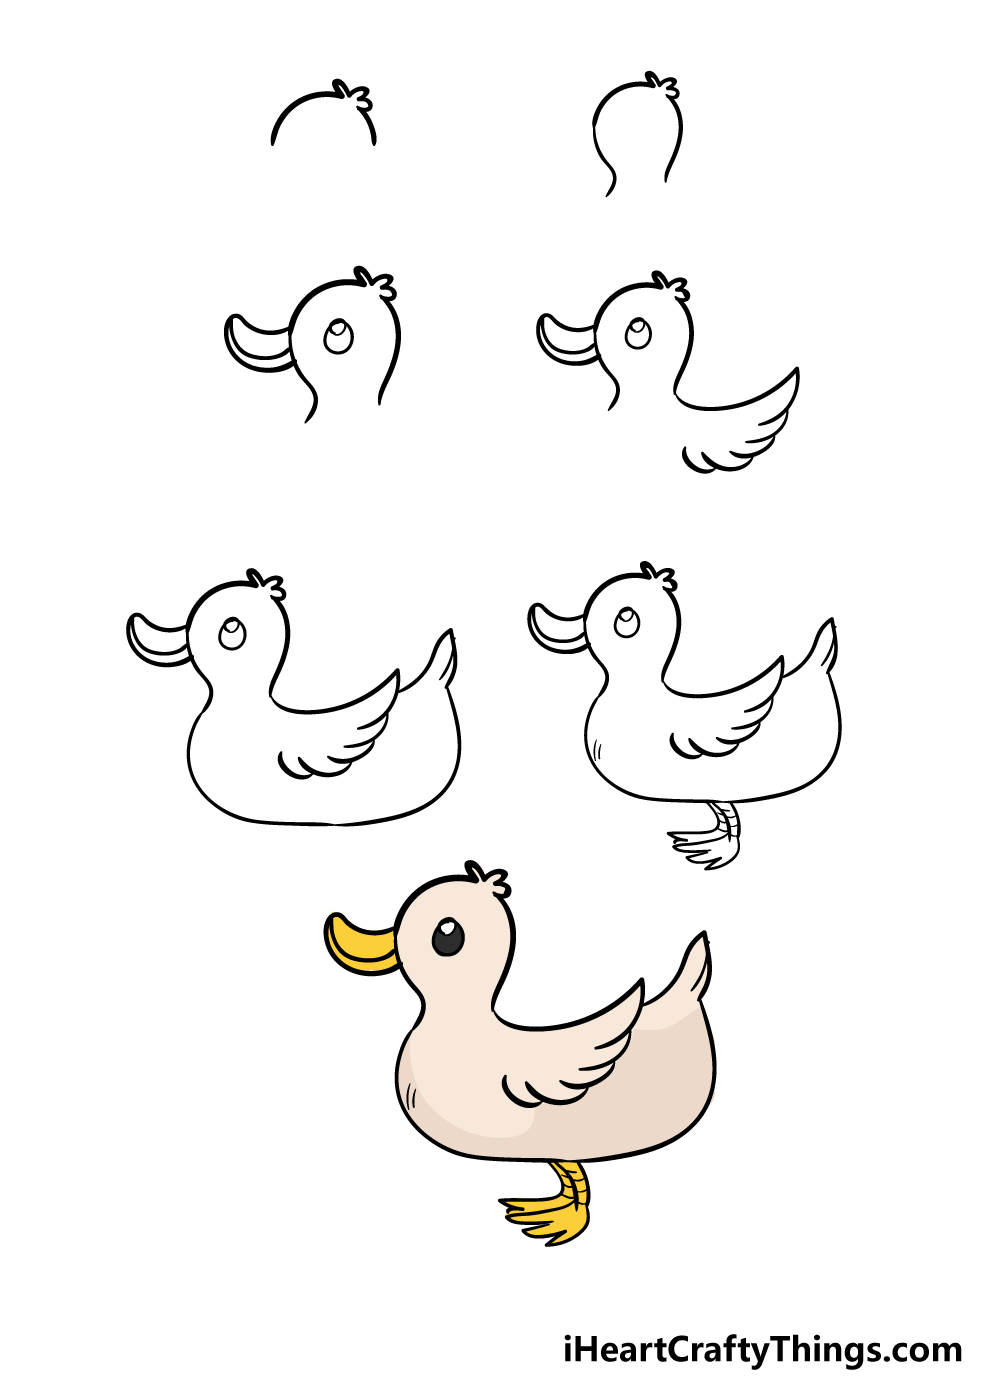
How to Draw A Duck – Let’s get Started!
Step 1
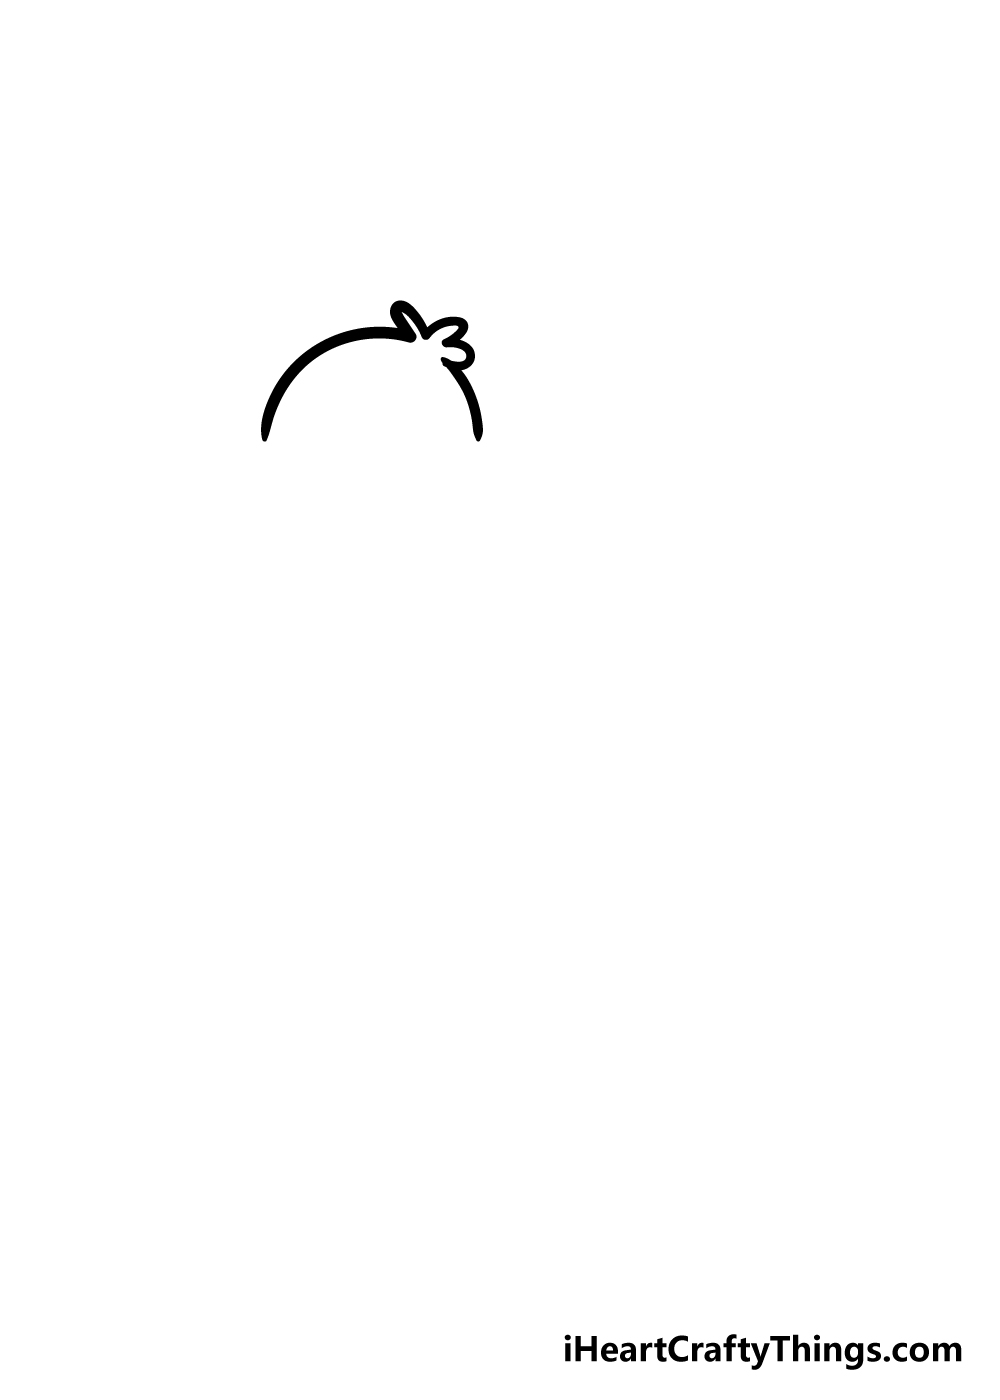
To begin this guide on how to draw a duck, we will start with the top of your duck’s head. The top of the head will be very rounded, almost like half of a circle.
Instead of a solid line, there will be three slightly curved lines on top to make it look like feathers on top of the head.
Step 2 – Keep drawing the head
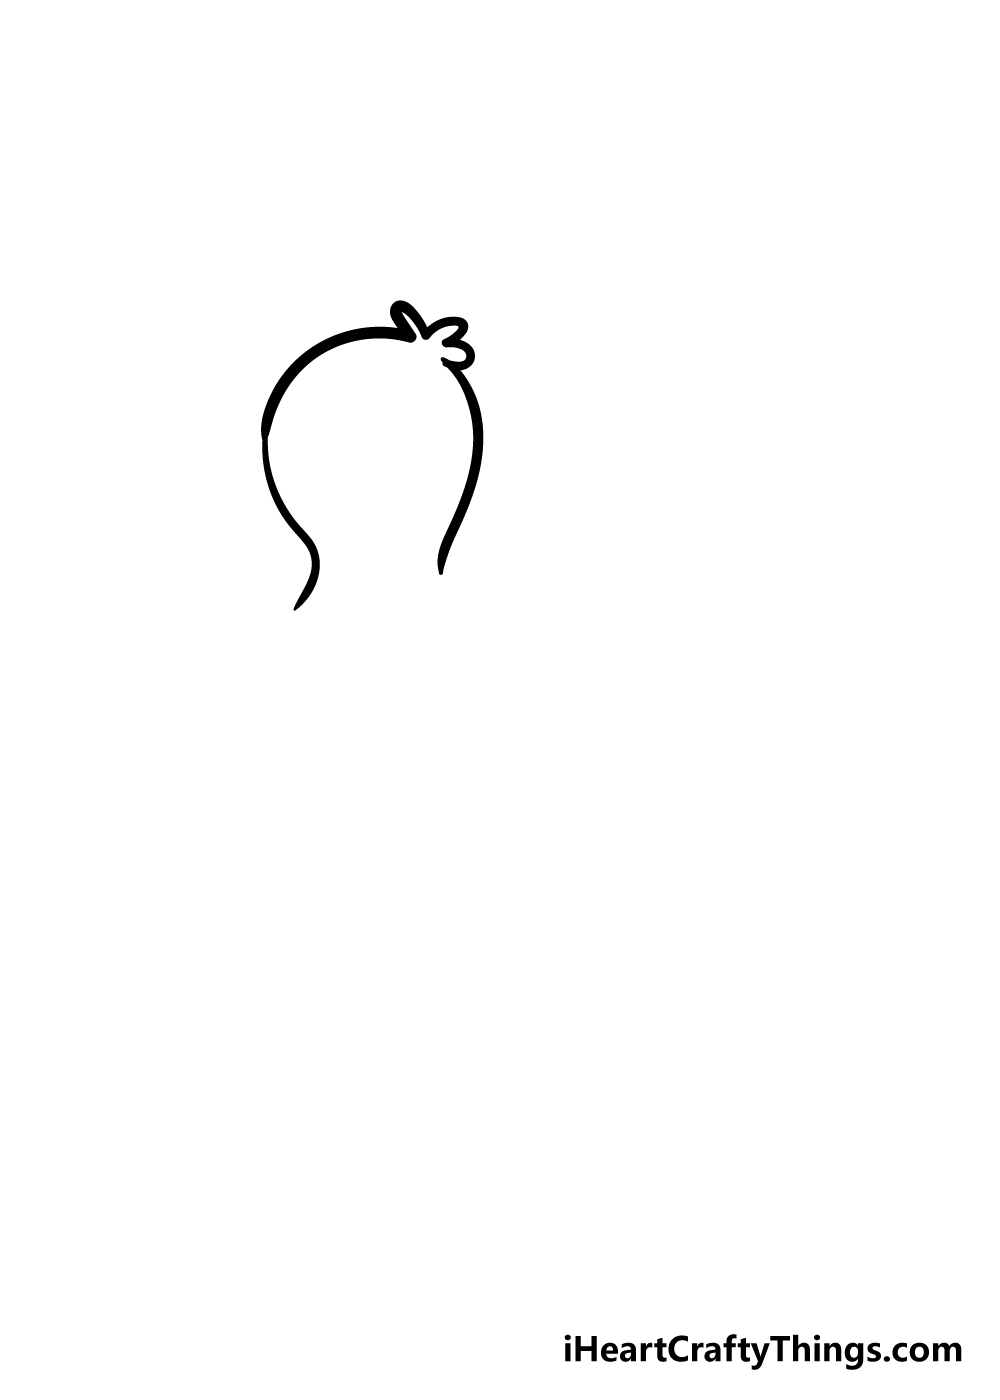
With the top of the head done, you can move on to extending the head of your duck drawing. Simply extend the lines making up the top of the head that you drew previously, curving them inwards as they go down.
Once you have it looking as it does in the reference image, we can move on to step 3.
Step 3 – Now, give your duck an eye and beak

It wouldn’t be much of a duck without the characteristic duck beak, so let’s add one in for this step of our guide on how to draw a duck!
The beak will be made with a curved line coming off the left-hand side of the head. Then, use a circle for the eye and then use a smaller circle inside of it to make an eye.
Don’t forget to draw a line inside the beak outline to give your duck a smiling face!
Step 4 – Next, add in a wing for your duck
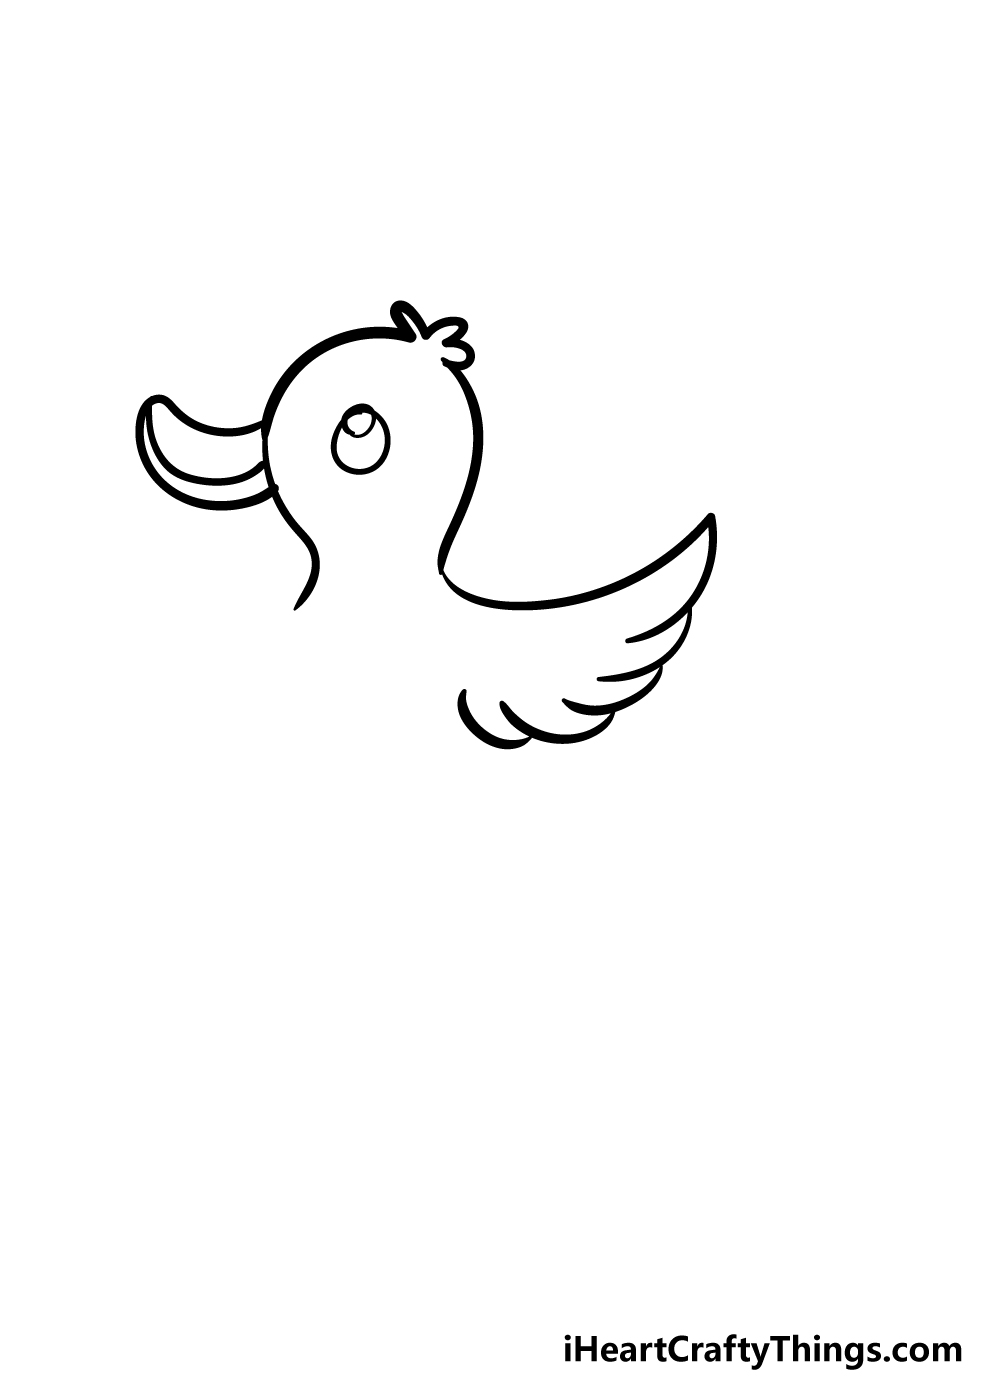
For the next part of your duck drawing, we shall add in a wing for your duck. The wing will extend out from the head of the duck, and then use some curved lines forming layers to draw it.
Once you have the wing drawn and looking as it does in the picture then you can move on to the next step.
Step 5 – Now, add in a body for the duck
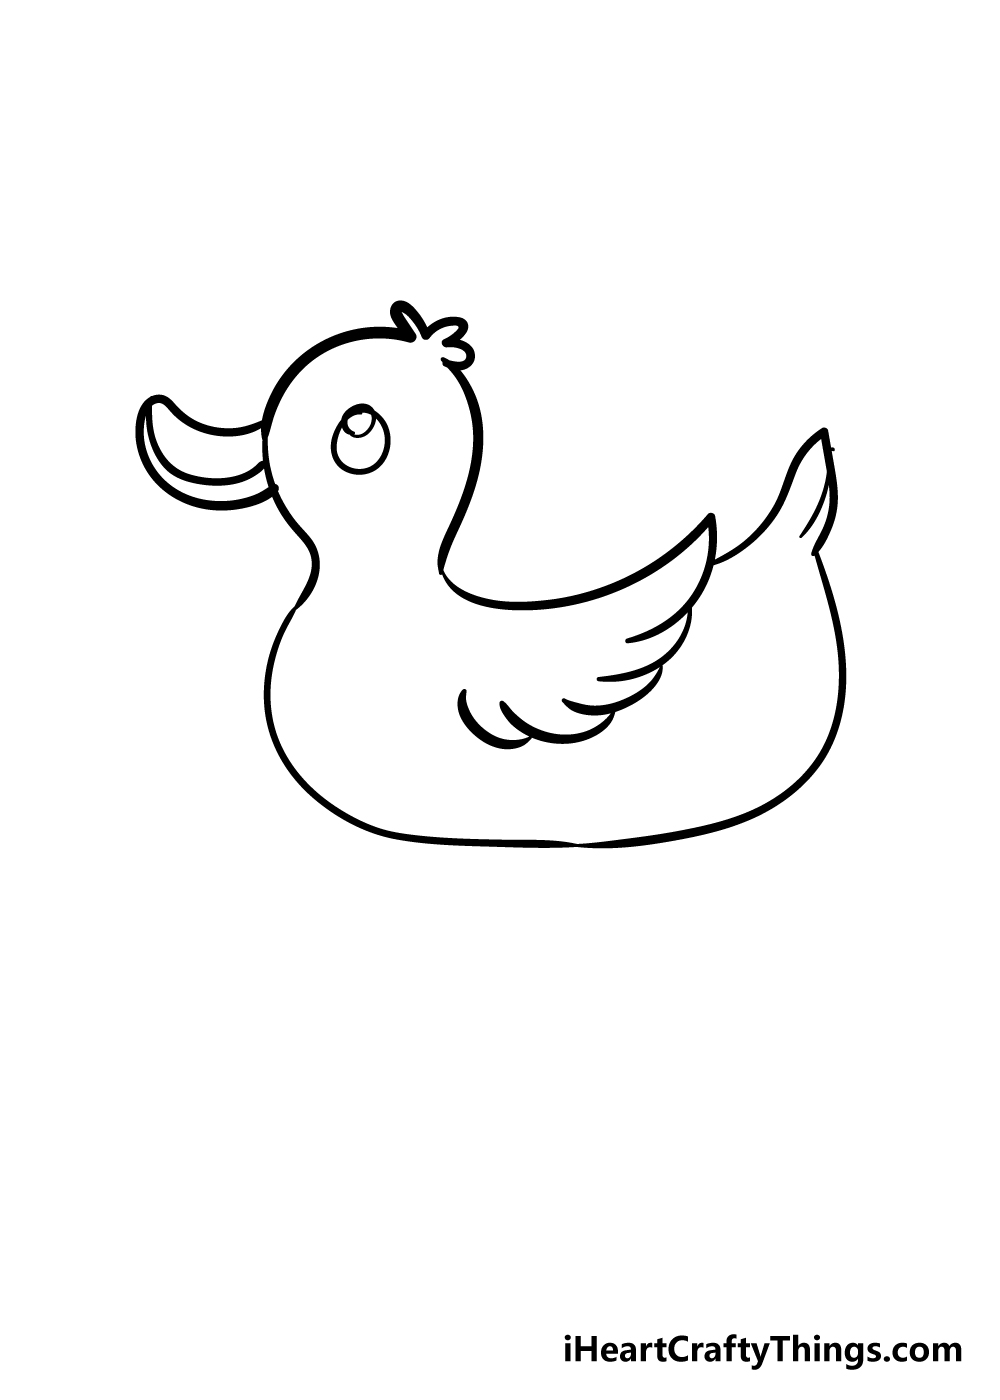
In step 5 of our guide on how to draw a duck, we will be giving the duck a body.
The body will be made up of a very rounded line extending from under the face and looping around to the back of the duck.
Right behind the wing, be sure to draw in a tail for your duck using some straighter lines as you can see in the reference picture. With that, your duck is really starting to look great!
Step 6 – Draw in the legs and final details
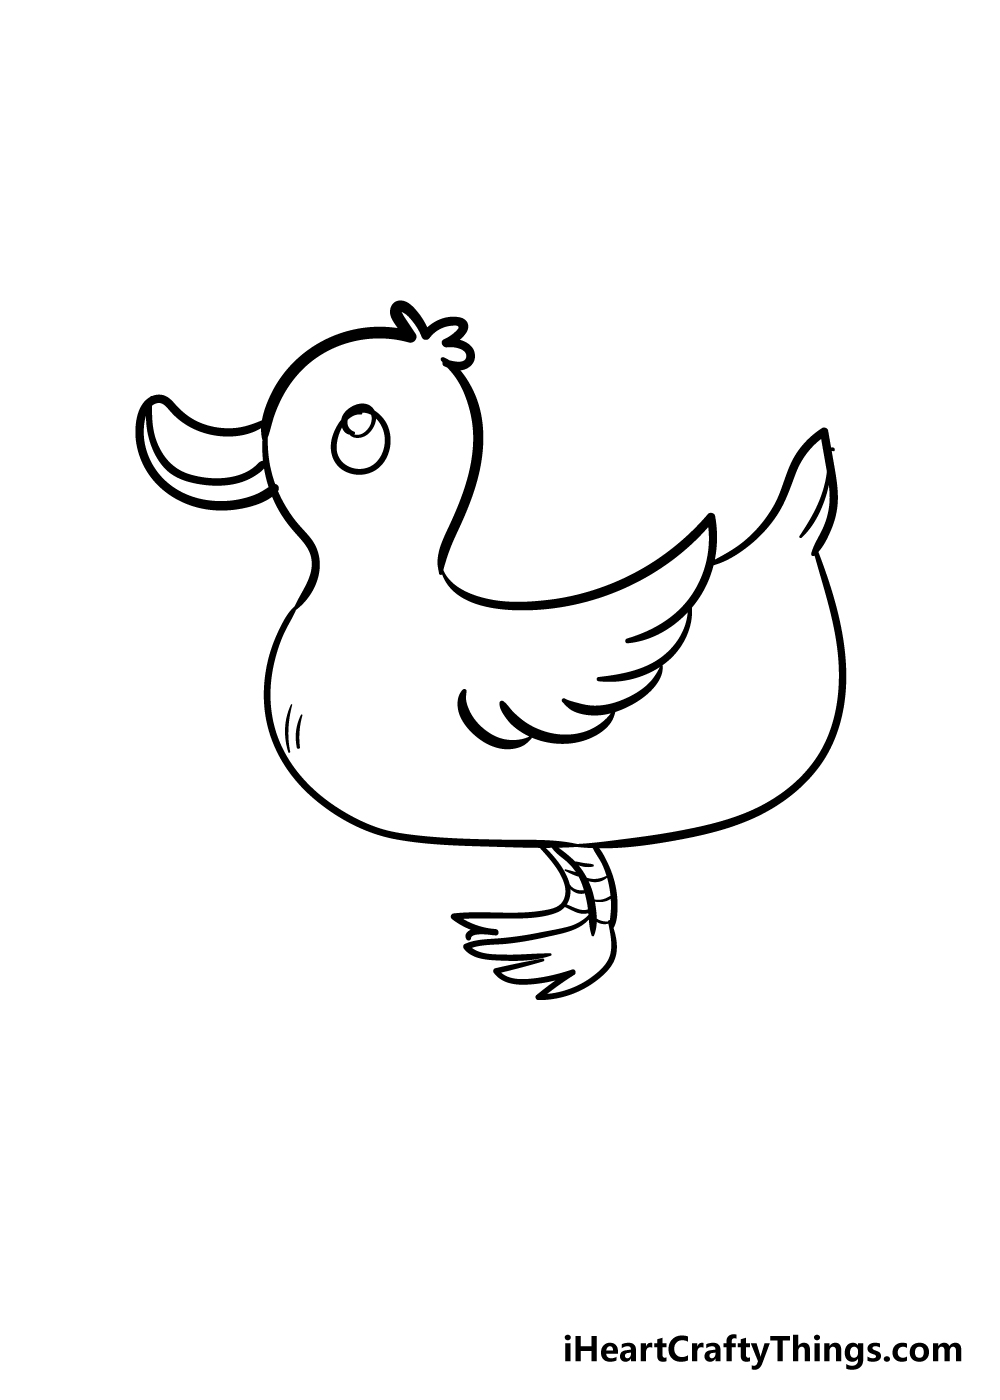
Your duck needs some legs, so in this step we shall draw in some legs and then add in the final details.
The legs will be made using some slightly curved lines, and then some straighter curved lines to make the webbed feet of the duck.
Some lines across the legs will finish them off by giving a more textured look to them.
Finally, use some lines on the duck’s chest for some final feathery details! You can also use some other lines to add even more texture to the body!
If you want to make it look like your duck is on the surface of a lake, you could also leave out the legs entirely to make it look like it’s floating with its legs beneath the surface.
What details will you use to finish off your duck drawing?
Step 7 – Finish off your duck with some color
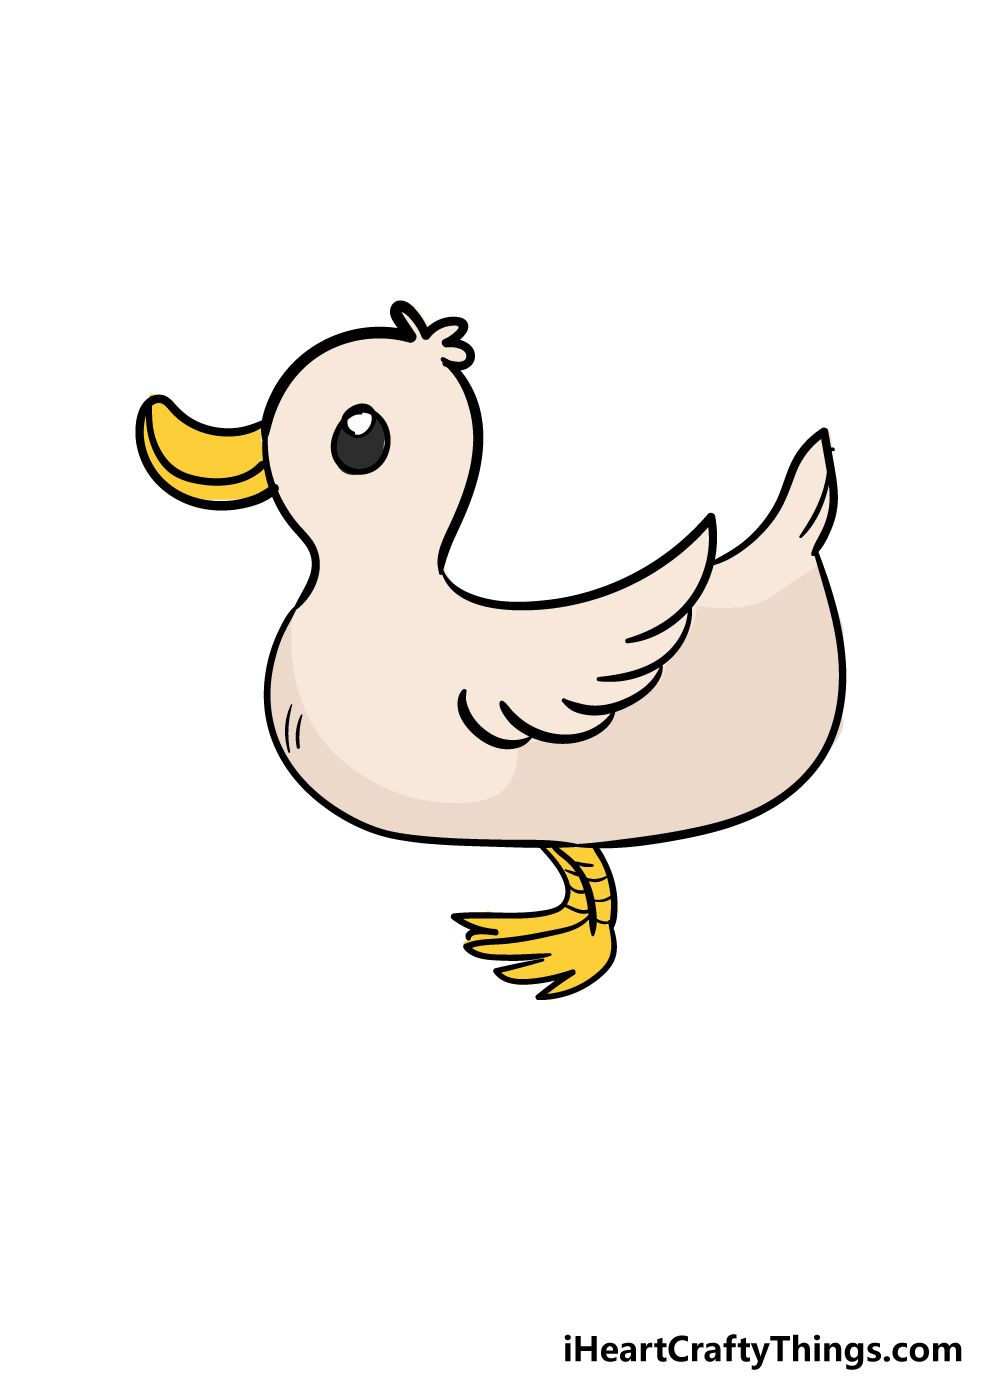
Now that you’ve finished drawing your duck, it’s time for the final step of this guide on how to draw a duck!
Before you’re finished though, there’s one more really fun thing to do and that’s color in your duck.
We have a completed and colored in duck for our reference image, so while you could replicate the one we created, this is also a chance for you to get really creative!
Ducks come in many variations and can come in many different colors, so you have lots of options for how to finish off this drawing.
You should really let your imagination run wild and choose your favorite colors to bring your duck drawing to life!
You can also have some fun creating a background for your drawing.
As we mentioned in the previous step, you could make it look like your duck is on a lake for one idea, but what other backgrounds do you imagine for your duck?
There are lots of fun art mediums that you can use as well, with everything from acrylic paints, watercolors and colored pens for some amazing color variations.
I would personally use some watercolors for a softer look, but what are you thinking to finish off your amazing drawing?
3 More tips to make your duck drawing easy!
Make this easy to draw duck even easier with these fun tips!
You may assume that adding details to a drawing would only make it more complex, but that does not have to be the case! In fact, if you’re struggling with a part of the drawing it can make it easier.
For this duck drawing, you may be having a hard time drawing the legs no matter how hard you try.
One way to get around this would be by putting the duck on a lake with its legs submerged.
This would be a great way to get around the difficulties you’re having! If there are other parts you’re struggling with, then adding these background elements can be a way around it.
Some people find drawing in a cartoon style easier while others prefer a more realistic approach. If you’re someone who finds realistic drawings easier, then you could change the style of this duck sketch.
If you were to do this, you may want to use some photos to help you. You can find plenty of pictures of ducks online, and these can come in any style you fancy.
Using these pictures along with the steps of the guide, you could recreate this drawing of a duck in any style you find easier.
Not only can it make the drawing simpler, but it can also make the picture more unique!
One of the best ways to make this duck drawing easy would be by using your pencil and some basic shapes. This can help you prepare for drawing the final lines!
For instance, you could draw a circle for the head near an oval shape for the body. This will help you when creating the proportions of the duck.
Once you have these shapes, use a darker pencil or press harder with your current one in order to slowly start adding layers of details. Then when you’re happy with it you can finish off with your pen to draw the final lines.
Simply erase the pencil and your drawing is complete!
Your Duck Drawing is Complete
You should be proud of your accomplishment because you have reached the end of this guide on how to draw a duck! By following the guide you have arrived at an awesome duck drawing.
Whenever taking on a new drawing, it can really help to use a guide like this that breaks it down into several easy steps.
Now that you have created a wonderful duck drawing, it’s up to you to get really creative with it!
Whether you do this with extra details, a pose for your duck or maybe drawing in another friend for it, the possibilities are endless!
We also can’t wait to see what colors and art mediums you decide on to really finish off your drawing, so be sure to use all of your favorite colors and art tools to bring it to life.
This guide you just finished is one of many, many more we have for you, so be sure to check in on our page frequently to join in the fun!
We would also love to see the creative ways you brought your duck drawing to life, so please do share it on our Facebook and Pinterest pages for us to appreciate!
We can’t wait to see what you’ve done!