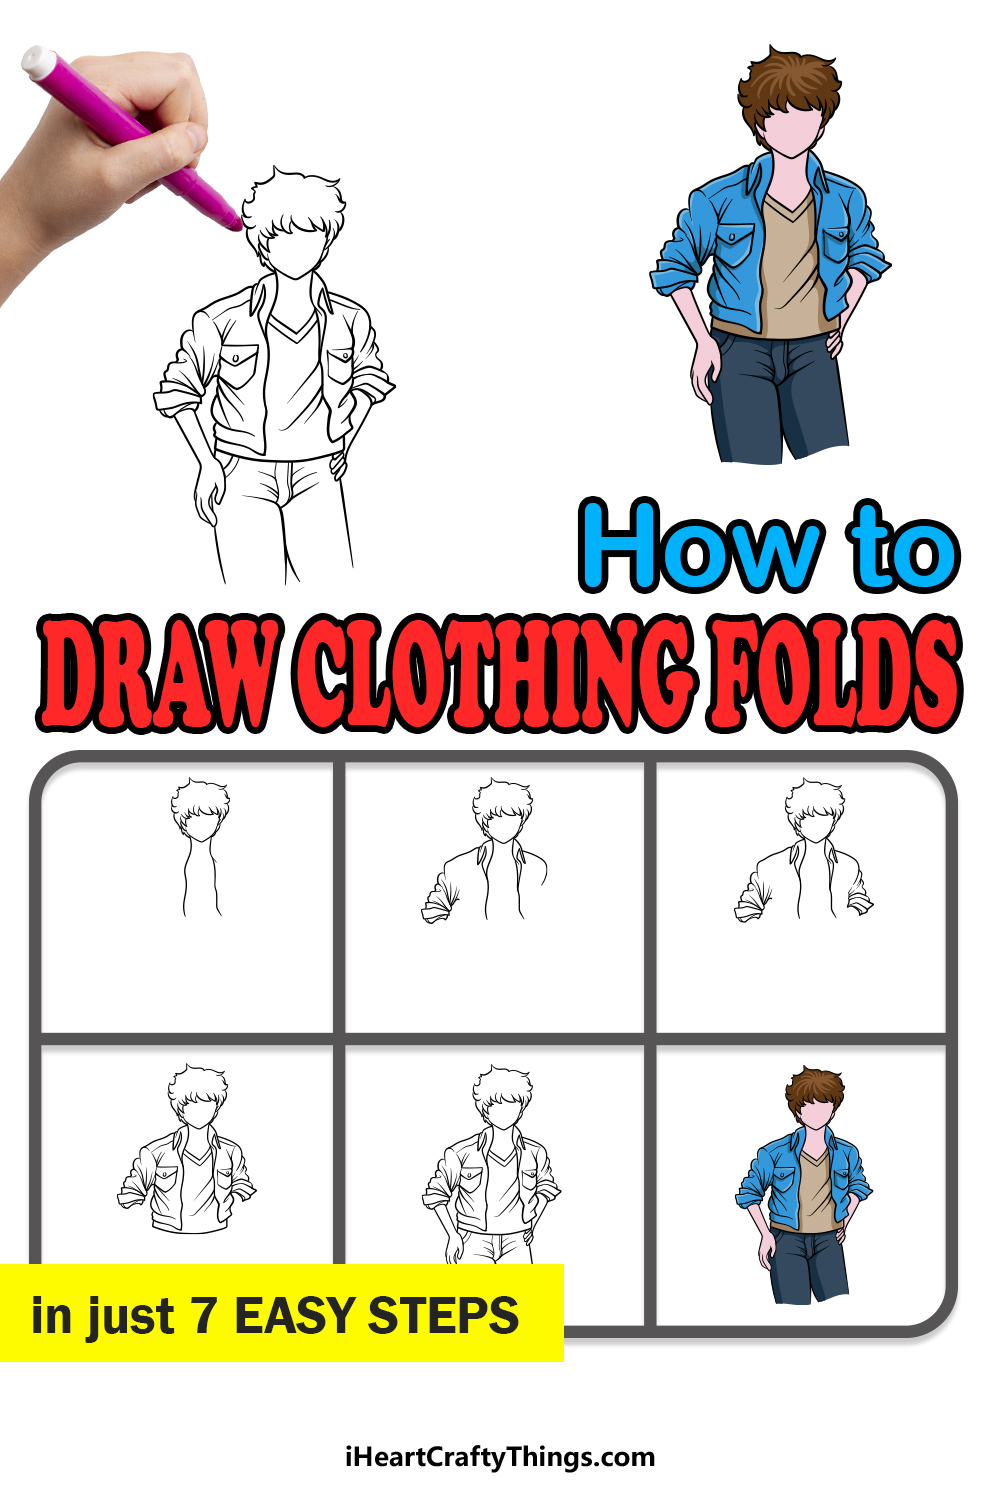
We all wear clothing every day, and there are many different kinds and variations of clothing out there.
Seeing as we all wear many different kinds of clothes in our lives, one may assume that it would be easy to draw, however because clothes are made of fabric that can make them finicky to draw. It can be especially frustrating to learn how to draw clothing folds for this reason.
It can be frustrating without the right guide, at least, but luckily you have the right one in front of you!
This step-by-step guide on how to draw clothing folds will show you how easy and fun it can be to draw.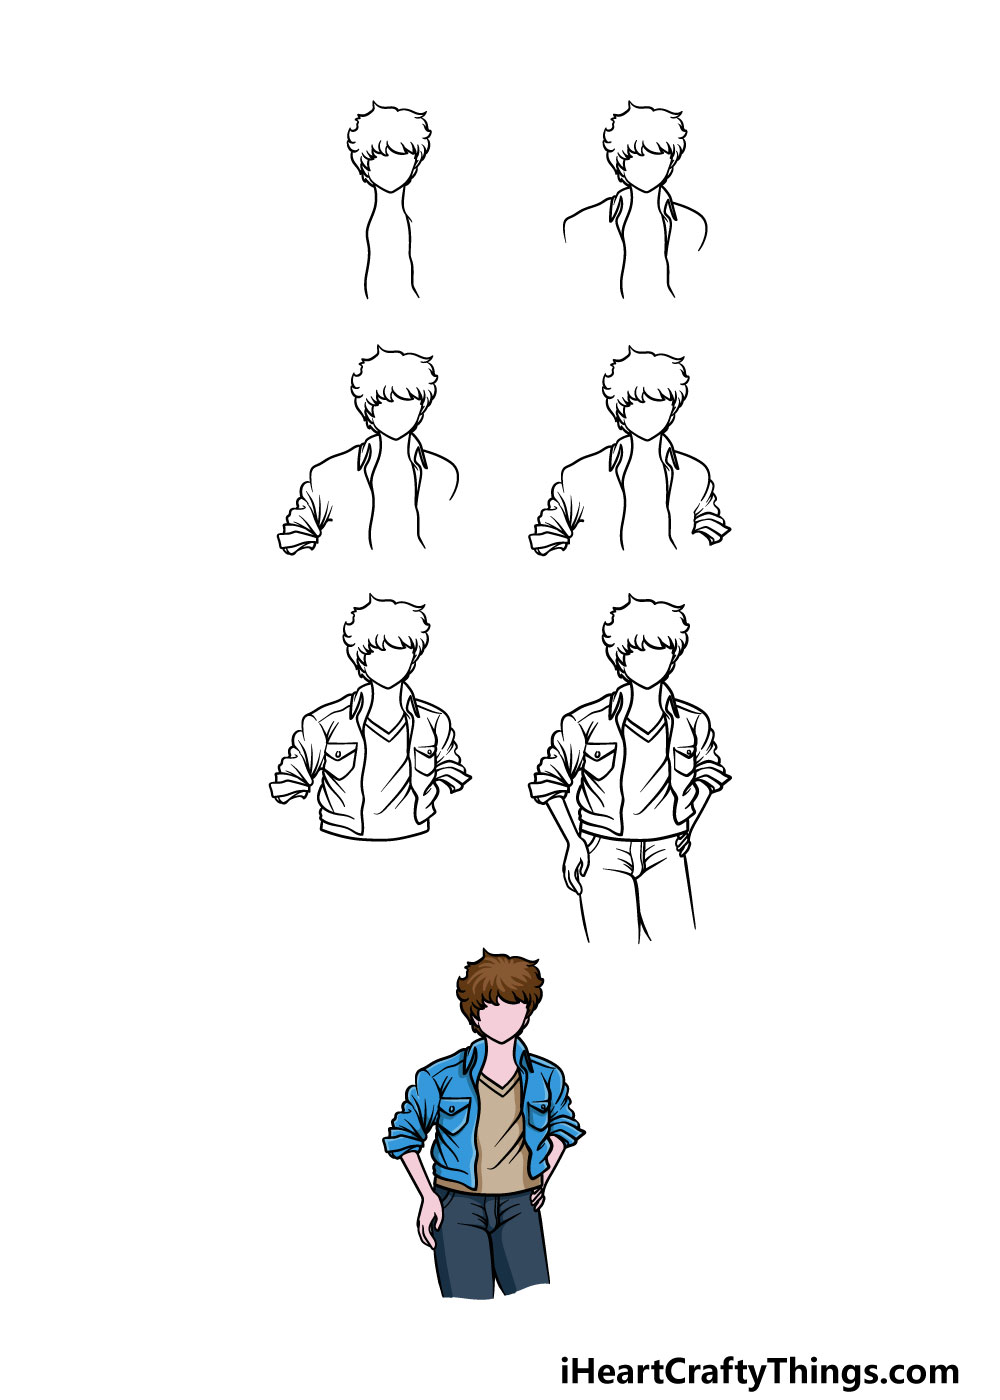
How to Draw Clothing Folds – Let’s Get Started!
Step 1
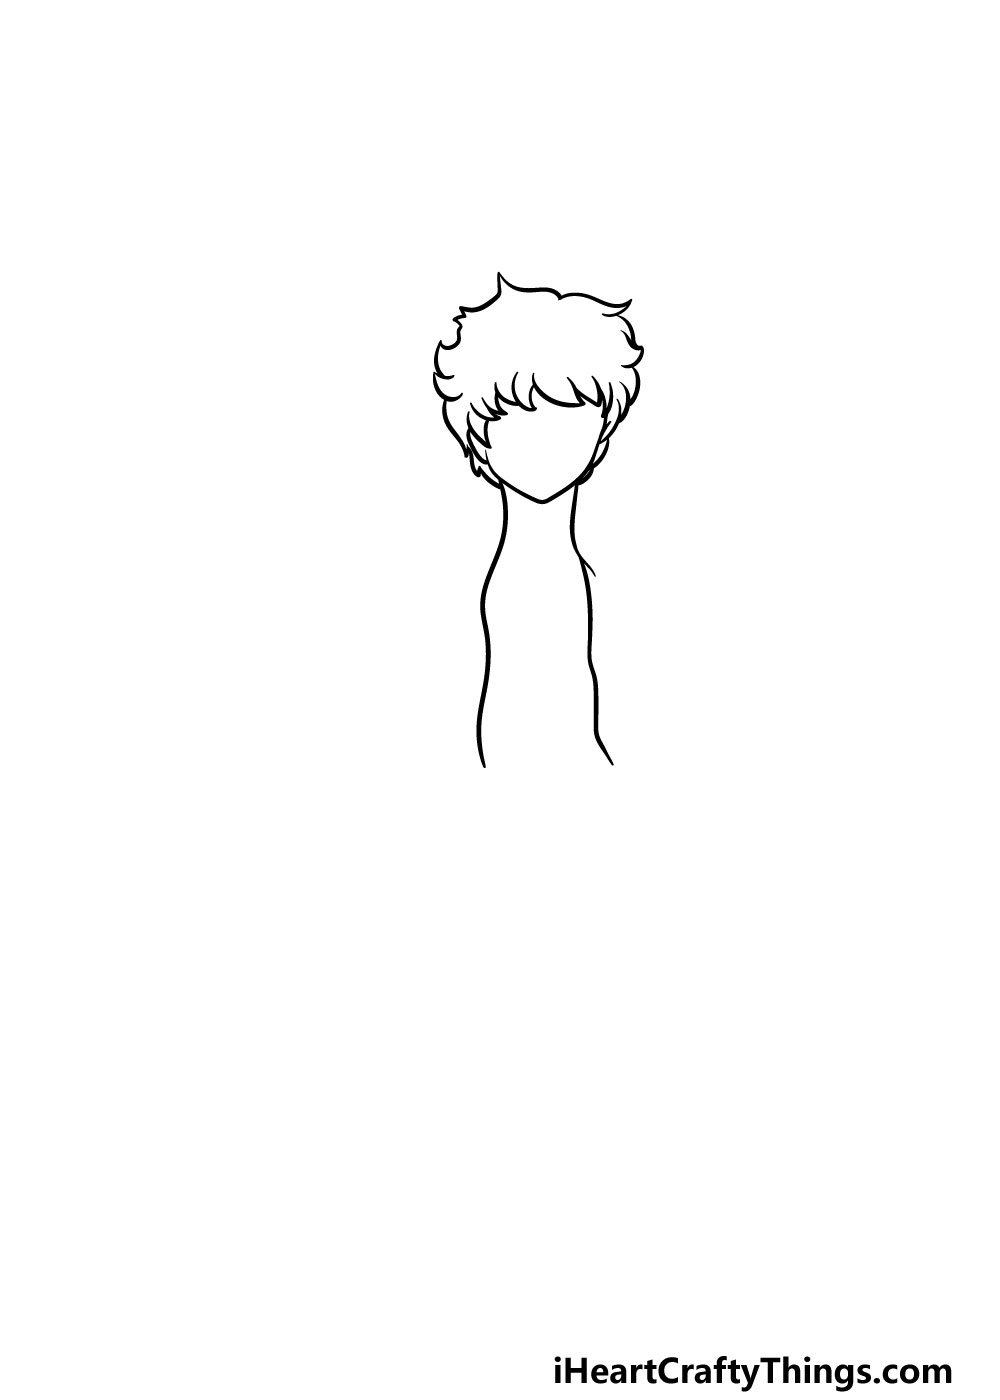
In this first step of our guide on how to draw clothing folds, we will start with the head of the person wearing the clothes. This is an element that you could also change up a bit if you wish!
You could draw your own face design or even change the details to make it look like it’s you who is wearing these clothes. If you follow our design, you can use some sharp lines for the hair and smoother round ones for the face.
Then, you can extend some smooth, wavy lines down from the face for the opening of the jacket this person will be wearing.
Step 2 – Draw the shoulders and collar next
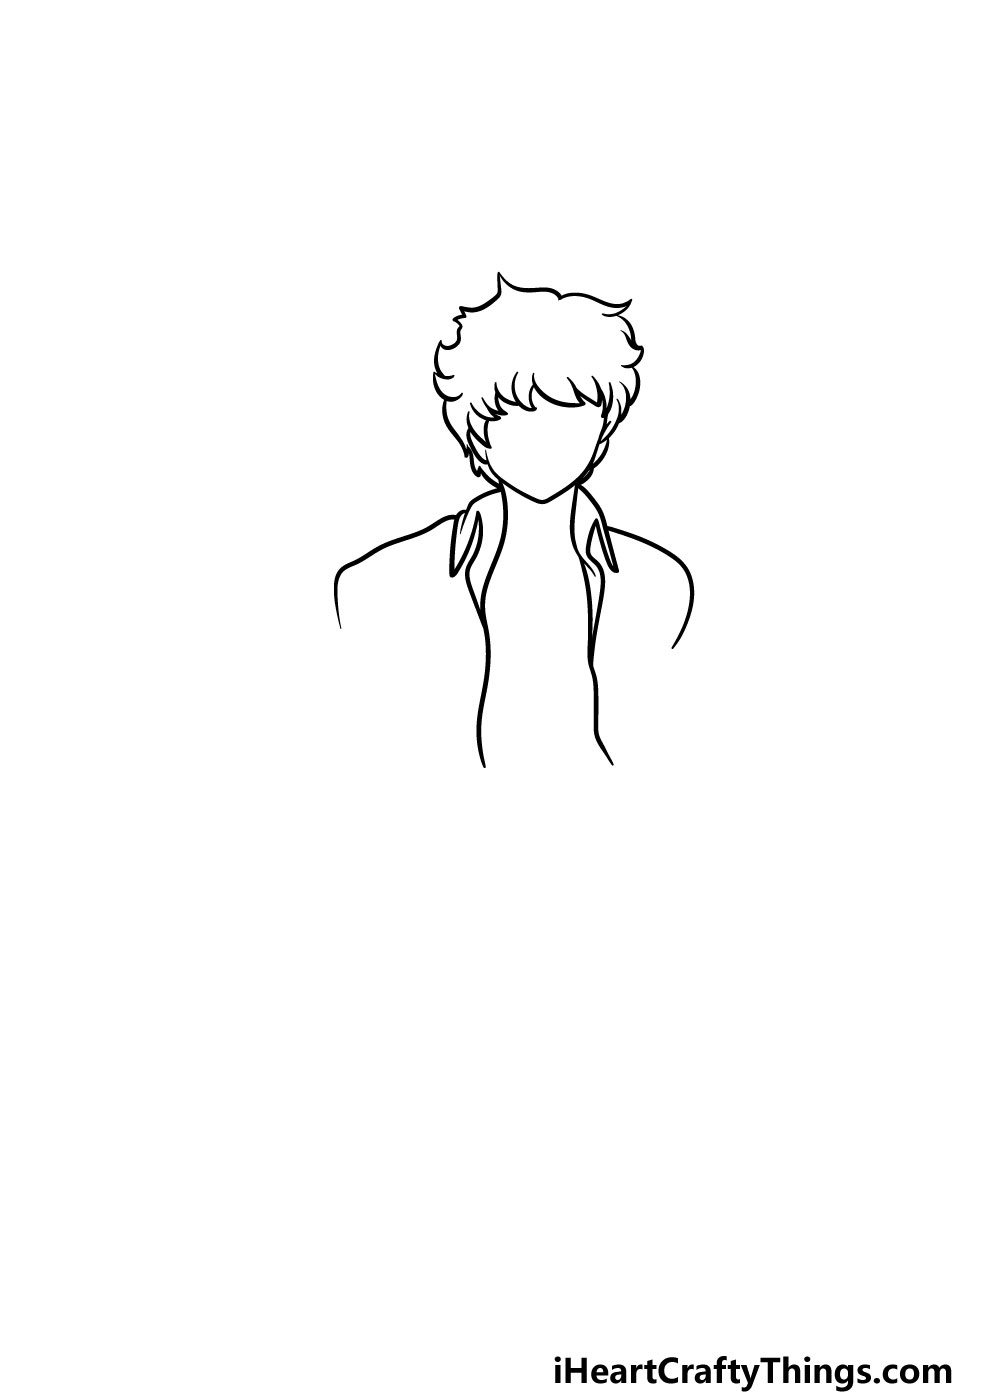
For this second step of your clothing folds drawing, we will be starting on the collar and shoulders of the outfit.
First, you can extend some more curved smooth lines down from the face for the collar of the shirt that is being worn beneath the jacket. Then you can use some more rounded lines extending down from the collar for the shoulders.
Once you have it looking as it does in our reference image you’ll be ready for step 3!
Step 3 – Next, you can start drawing the folds
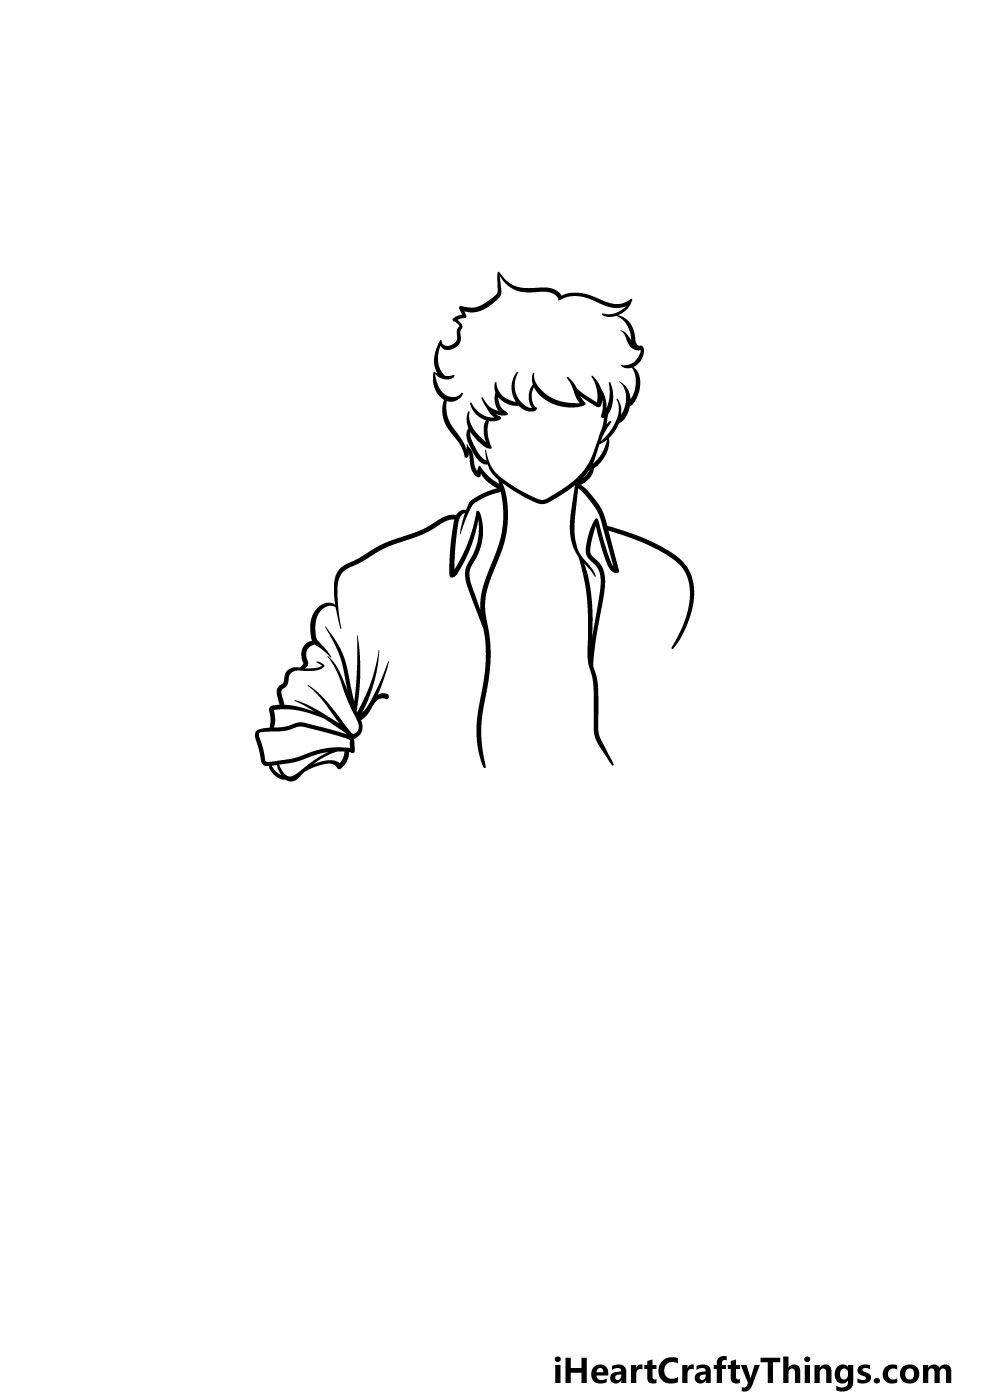
It’s time to start drawing the titular folds in this step of our guide on how to draw clothing folds. For now, we will be focusing on the arm of the jacket that this character is wearing.
The fact that clothes are made of fabric is what can make it so challenging to draw, as the less solid something is the trickier it can be to draw.
For this arm, we will be using lots of straight and curved lines bunched close to one another to create the fabric of the sleeve.
Be sure to follow the reference image that we provided closely as you draw this element, as it can be a bit tricky!
Step 4 – Draw the next sleeve of the jacket
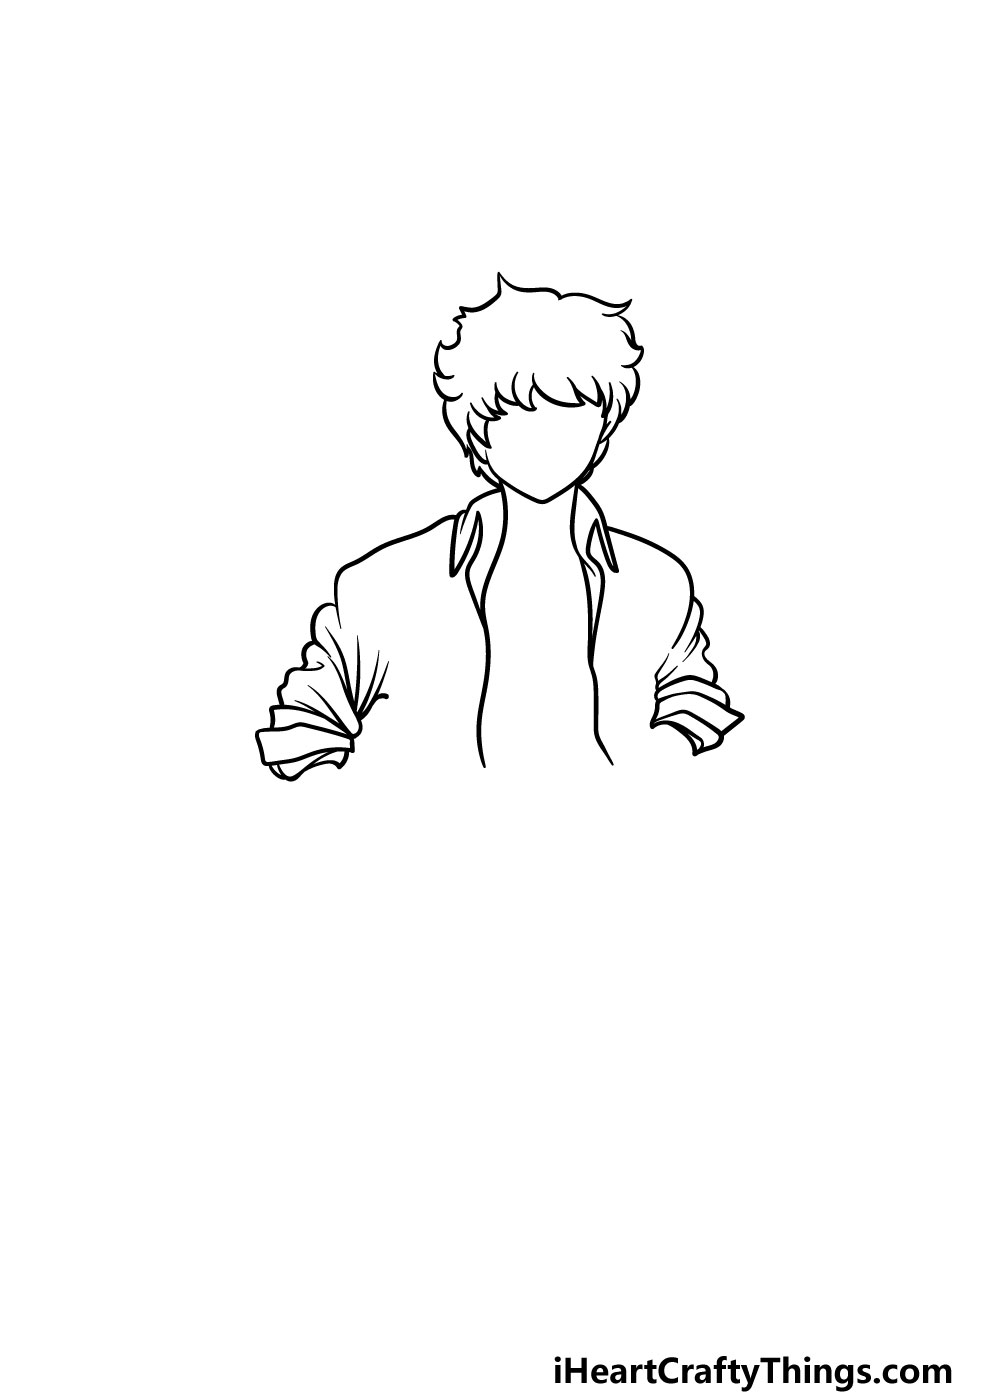
You’ve drawn one bunched-up sleeve of your clothing folds drawing so far, so seeing you’ve done it once it should be a bit easier to do a second time!
This sleeve will go on the right-hand side this time, but it will be quite similar to the other one that you drew. Once you have this sleeve done, you’re ready to move on!
Step 5 – Now, you can add the chest and waist
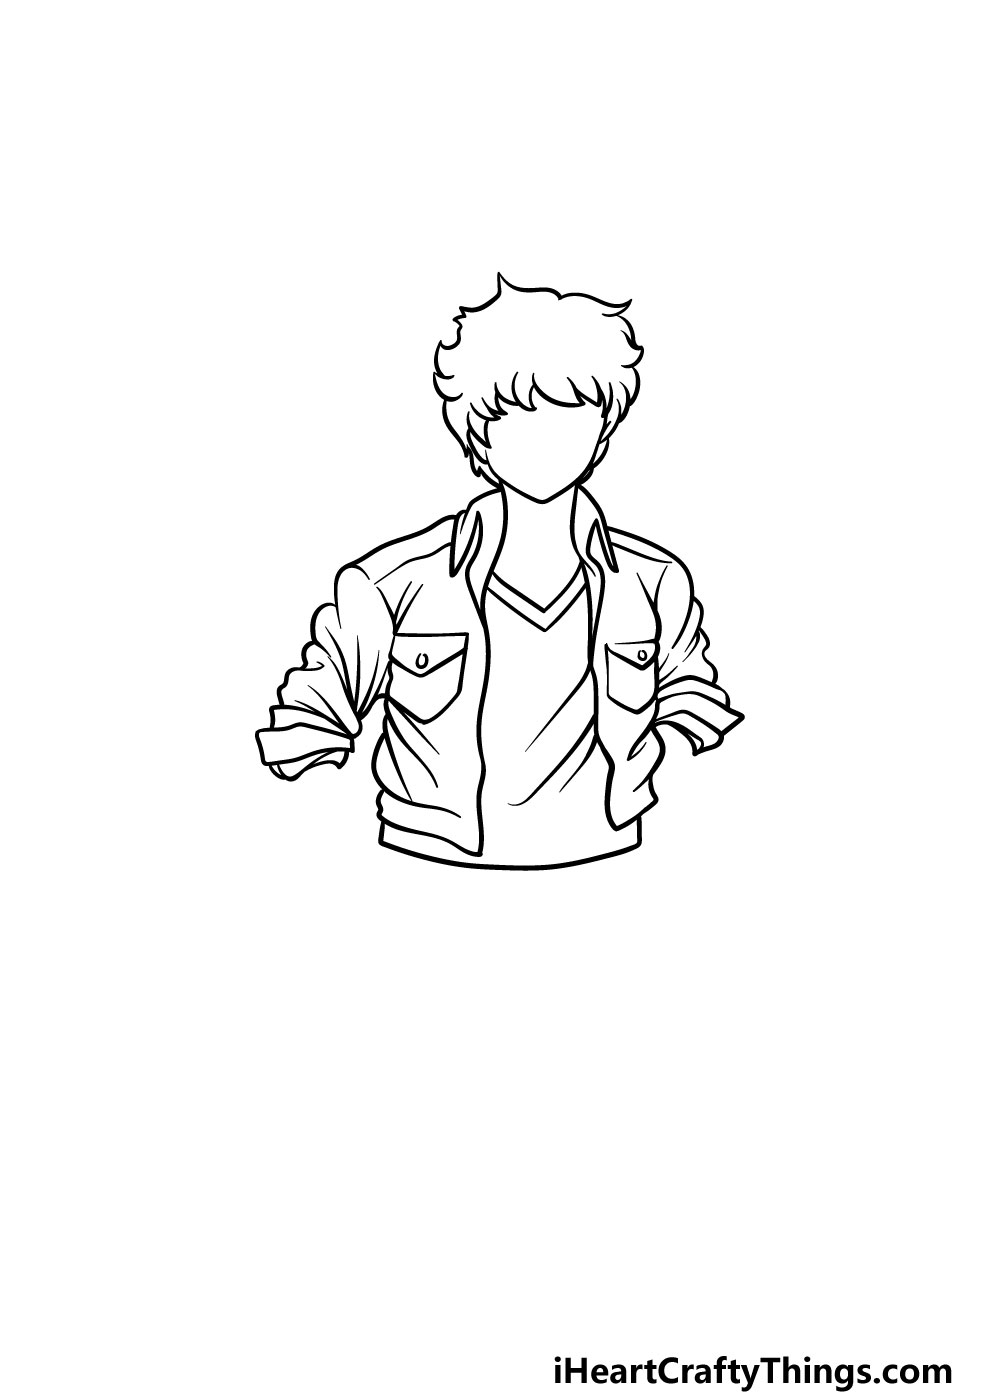
We will be adding a lot of details in this step of our guide on how to draw clothing folds! For that reason, this is definitely a step you may want to take slowly as you draw.
Using some more curved and straight lines, we will be adding the chest and waist of the person wearing these clothes.
We will also be drawing some pockets onto the jacket in this step. There will also be some lines drawn on the shirt underneath the jacket to show even more folds in the fabric.
Then, we will focus on some final details in the next step before bringing some color to this picture!
Step 6 – Next, you can add some final details for the drawing
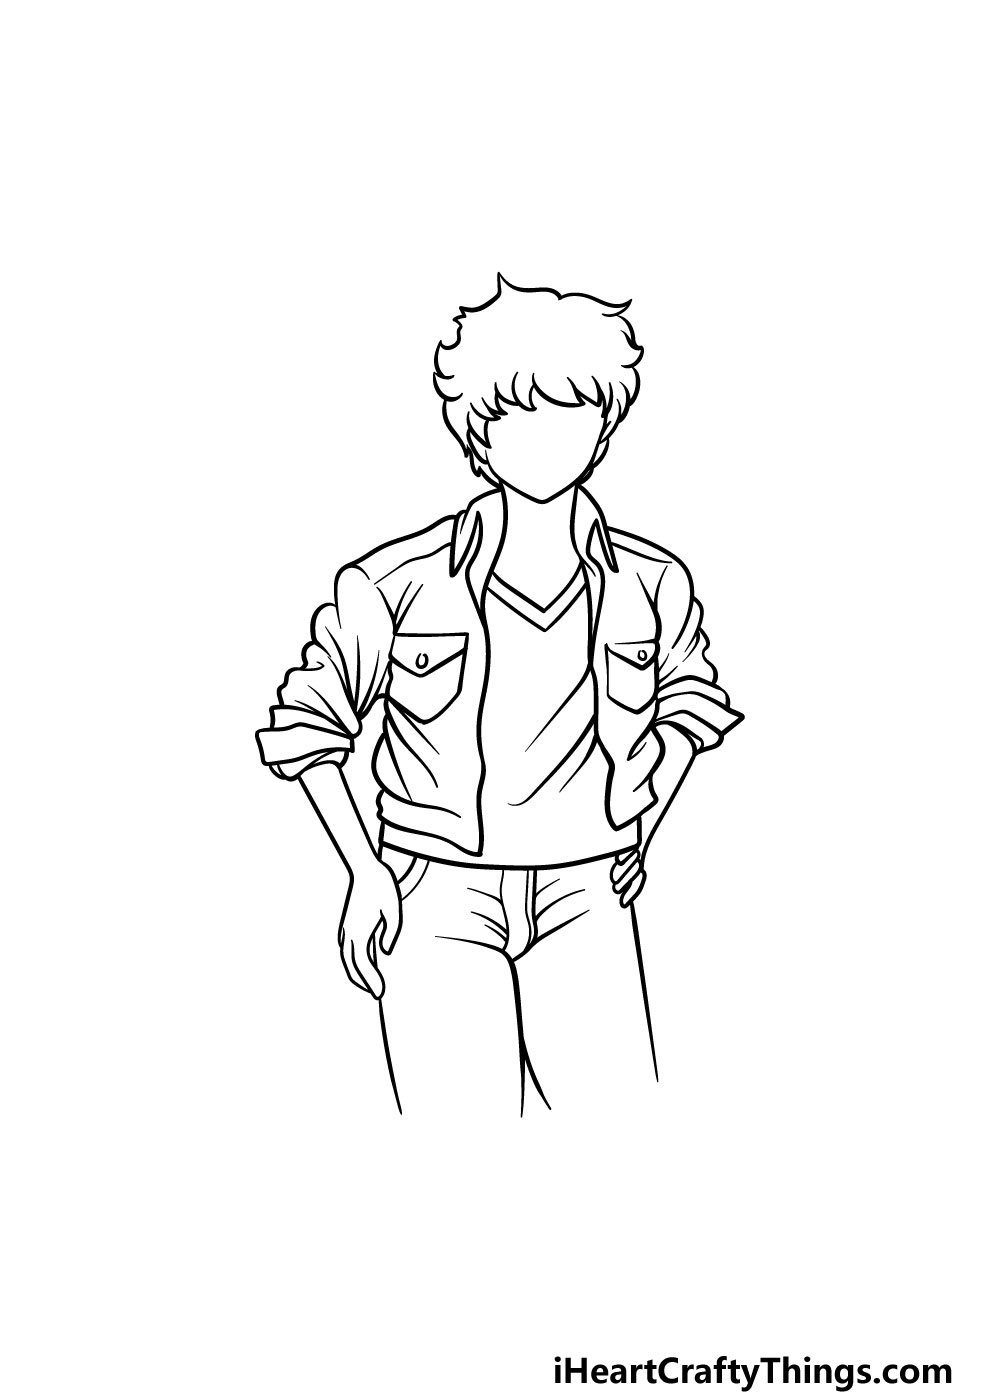
Before we move on to adding some color to your clothing folds drawing, we have a few final details and elements to add in this sixth step.
First, you can draw some arms extending out of the sleeves and at the hips of the person. Then, you can finish off by drawing the jeans they are wearing.
That will complete this outfit, but before you move on you should be sure to add any details of your own that you may want!
These could include drawing a background, changing up the details or adding some accessories for the person to be posed with. What else can you think of to finish off this amazing drawing?
Step 7 – Finish off your clothing folds drawing with some color

You’ve worked very hard on this guide on how to draw clothing folds, and now you can relax with some fun coloring!
We showed you some colors you could go for in the reference image that we provided, and you could replicate these colors if you like them. You could also use any colors you love for this image as well!
Fashion is all about expression, so this is a great way to express your own style using your colors and art tools.
You could also incorporate some crafts and art supplies to give this image even more depth!
How do you think you will finish off this picture with your coloring creativity?
Do this to take your clothing folds drawing to the next level
Unfold these tips for your clothing folds sketch to make it much better!
This drawing of clothing folds shows folds in three types of clothing. You could make it more comprehensive by adding a few more items of clothing that could show folds.
For instance, he could be wearing a hat or a scarf that would show some folds. You can look at some of your own clothing in a mirror to see how to realistically portray the folds.
What are some clothing items you could add to this character?
For this drawing, we kept the focus on the clothing and kept the details of the character vague. This was to make it easier, but you could still add some more features to the character.
A good place to start would be the face of the character, but then you could also draw some more of the body of the character.
For a fun twist, you could base the character on yourself or someone you know!
Once the character in your clothing folds drawing is finished to your liking, you could then add a second character to the image. This would be a great way to add more clothing folds, too.
For example, you could draw someone wearing a dress or a skirt. This would allow you to show some flowing fabrics for some contrast to the image.
This character could also be based on someone close to you for a personal touch!
If you’re having a great time creating this clothing folds sketch and want to draw more fabrics, you could do this by adding a background.
With this background, you could have many different types of fabric. For instance, there could be a bed with some blankets and sheets draping off of it.
Or, you could draw a flowy curtain behind the curtain to show all the kinds of fabrics that can be in an environment.
How else could you incorporate some fabrics to the image to make it more complete?
Your Clothing Folds Drawing is Complete!
You’ve drawn all the details and added your colors, and that means that you have completed this guide on how to draw clothing folds!
As we mentioned, drawing clothing can be a bit tricky, so we hope that this guide made it easy and fun for you to do.
You can also keep this drawing by using your own details, elements and creative color choices to really personalize it. Be sure to have fun with it and see what happens!
When you have finished this guide, there are many more amazing drawing guides for you to enjoy on our website.
Be sure to visit us there for your next drawing challenge, and we hope to see you often so that you never miss out!
We know that you will have done an incredible job on this picture, so please be sure to show us by sharing it on our Facebook and Pinterest pages once it’s done!