In real life, tigers can be a little scary. They are considered apex predators, and they rule over their environment with little to oppose them.
Tigers are also known for their stunning;y beautiful fur pattern. They have orange fur with black and white stripes, and it’s one of the most distinctive patterns in nature.
Tigers also appear as cartoon characters quite frequently, and it’s easy to see why with how distinctive they look.
Because of this popularity, you have probably wondered whether you can learn how to draw a cartoon tiger.
We’re here to tell you that you absolutely can! In this guide, we will take you through six fun and easy steps that will show you how simple it can be when you know what to do.
Not only will we show you how to draw this cute cartoon tiger, but we will also give you some pointers on how you can add your own tips and ideas to the drawing.
With all that said, it’s time to begin the guide! Grab your favorite art and coloring tools and let’s see how to create this adorable cartoon tiger drawing in just 6 easy steps.

How to Draw A Cartoon Tiger – Let’s get Started!
Step 1

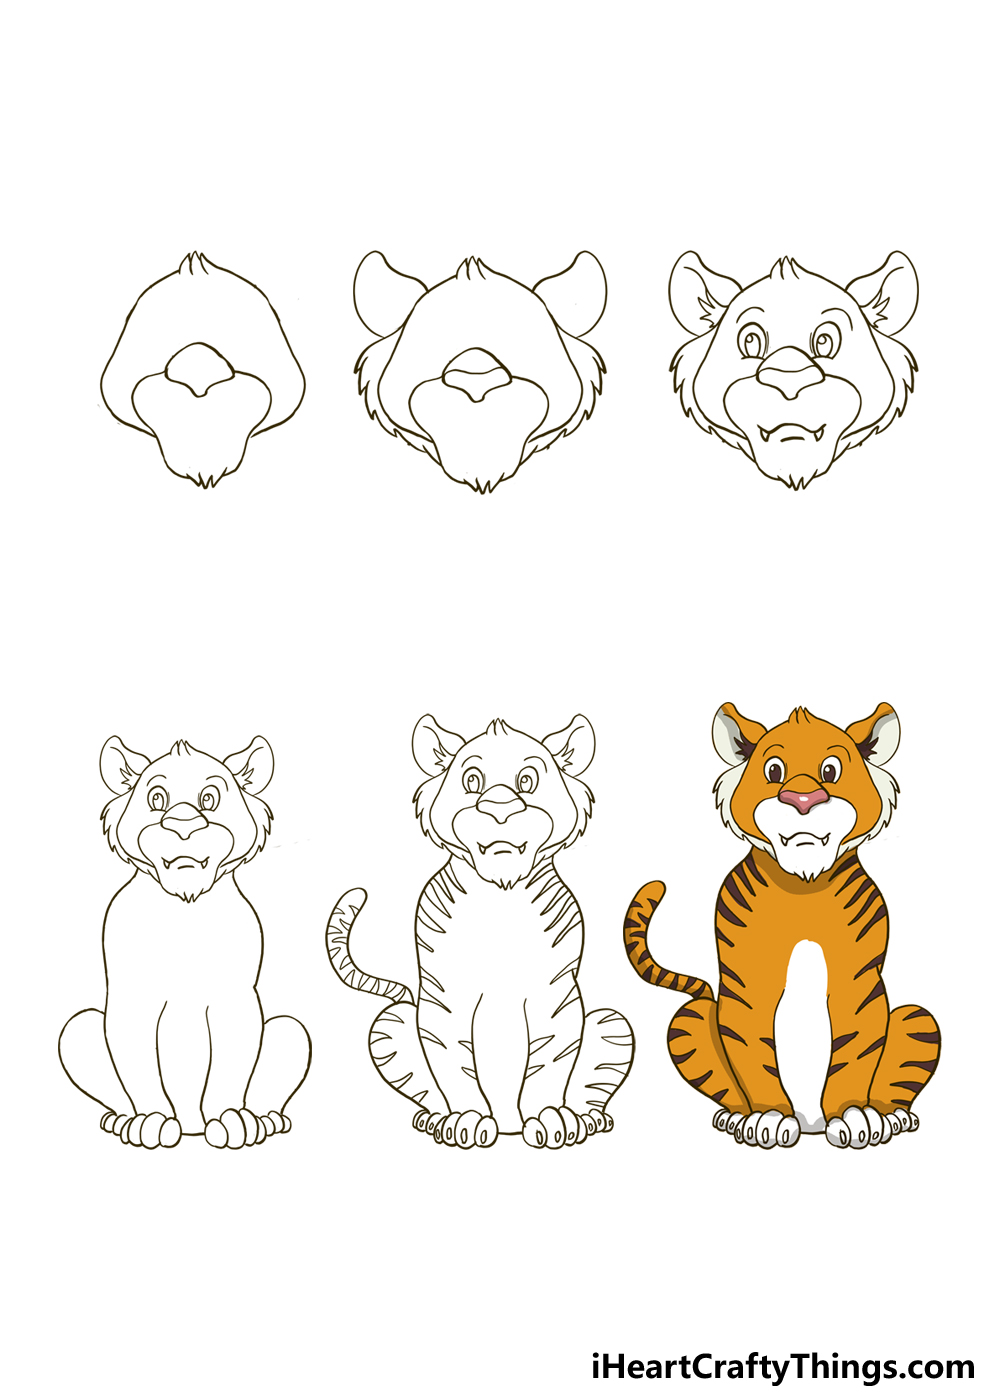
The cartoon tiger we will be creating in this guide is quite complex in its details. It may not seem like it at first glance, but a lot is going on with this drawing.
There’s no need to worry, however, as we will break it down into smaller elements to make it easier for you. Let’s start by drawing the nose of the tiger.
This has a rounded top line, and the base lines move inward to converge at a smaller point at the bottom of the nose. Once drawn, it will look a bit like a mushroom.
There will then be a portion surrounding the mouth of the tiger that looks a little like a beard, and this is what we will draw next. Curved lines will extend out from the sides of the nose.
Similarly to how the nose was drawn, these lines will move inward to become thinner at the base. At the bottom of this ‘beard’ portion, we will add some jagged lines to make it look furrier.
Finally, we will draw the outline for most of the head in this step as well. The head will be drawn with some wavy, curved lines, and the head will be a bit wider on the lower half than on the upper.
Finally, finish off with three small pointy shapes at the top of the head, once again to make it look furry. That’s all there is to it for now, and then we can move on to step 2!
Step 2: Draw some more portions of the face and head

We may have the basic shape of the head done, but we now need to add some more details to your cartoon tiger drawing. First, we will draw a line across the nose.
This line will go around the mid point, and it will be rather wavy with a dip at the center. That’s all we need to do on the nose for now, and next up we will add some fur to the sides of his head.
This fur can be drawn with a series of small, pointy lines all connected to one another. These sections will extend all the way down to the bottom of the ‘beard’ section which you drew in the first step of the guide.
Finally for this step, we will draw the ears of this tiger. The ears will be quite large on the head, as you will see in our example image.
The upper section of each ear will be drawn with a slightly curvy line, and this will extend into a smoother curved line for the lower side. The lower portion of the ears will touch the furry bits on the side.
Now we’re ready to move on to step three, where we will add some fun facial features to add some more personality to this cute tiger that we are creating!
Step 3: Draw the facial details of the tiger

The design of this tiger is looking a bit vague thus far, but we will fix that by adding some more defined facial features in this third step of the guide.
First, we will start with something easy by drawing the mouth of the tiger. The mouth will be drawn with a single wavy line that curves up at the center.
The reference image will show you how that should look, but it should be very simple to draw! Next, we will draw a small, pointy tooth at the far end of each side of the mouth.
Finish off the mouth section with a small curved line beneath the mouth. Once that is drawn, we will add the eyes.
Each eye is drawn with an oval shape that has a small curved line at the base of each one. Then, you can draw a smaller oval inside each eye, and then a small circle inside each of these.
For a little more personality, add a simple eyebrow above each eye with a curved line above each one. Finally, we need to add some details inside the ears to make them a little more realistic.
Draw a wavy line near the center of each ear, and then simply add some small jagged lines to these wavy lines for some fur details.
That was a lot to do, but next up we will start drawing the body of the tiger.
Step 4: Now add the legs and body of the cartoon tiger

In the previous few steps, we created the head and face of this cartoon tiger, and now we will begin drawing the body. This isn’t as intricate as the face and head were, but it can still be a bit tricky.
While it can be a bit tricky, you will find it easier if you break it down into smaller steps. If you want to make it easier to get the perspective right, then you could draw out the rough shape of the body with a light pencil first.
The shoulders will begin at the base of the head on either side, as we show in our reference image. The shoulders are drawn with some slightly wavy lines that form the outer edges of the legs.
Each leg will have some small oval shapes at the bottom for the toes of the tiger. Then, a shorter wavy line will extend up from the toes for the inner edges of the front legs.
Then, we will draw the back legs extending out to each side of the body. Each back leg will be drawn as a rounded shape, as shown in the example.
At the base of each back leg, we will then finish off with some more toes drawn similarly to the toes we did for the front legs. That will do it for the outline of the body and legs of the tiger.
In the next step of the guide, we will add some finer details to really bring this tiger to life!
Step 5: Draw the final details

The outlines for this cartoon tiger are mostly done now, and we will finish them off along with any final details in this step of the guide.
The final element of the outline to add will be the tail. You will see in our example that the tail will extend from the top of the back leg on the left-hand side of the image.
The tail is a simple thin, curving shape, and with that drawn we will have the entirety of the outline done and can focus on the finer details within.
Since we just drew the tail, let’s start the details by drawing the stripes on the tail. These will be some simple pointy shapes inside the tail outline.
We will then draw some similar pointy shapes all throughout the rest of the outline, except they will be much larger in the other areas, as we will have more space to work with.
These stripes will go along the shoulders, back and front legs. You can see where we chose to place these stripes in our example image, but you could place them in other areas for your own drawing if you wish.
Once these stripes are drawn, you are done with the details! Before you move on, you can add any additional details and ideas that you want for the drawing.
For example, you could draw some other cartoon animals for this tiger to hang out with. Or, you could show where this tiger is by adding a background setting.
Which background setting or additional characters would you like to add to this drawing?
Step 6: Now, finish off this cartoon tiger with some color

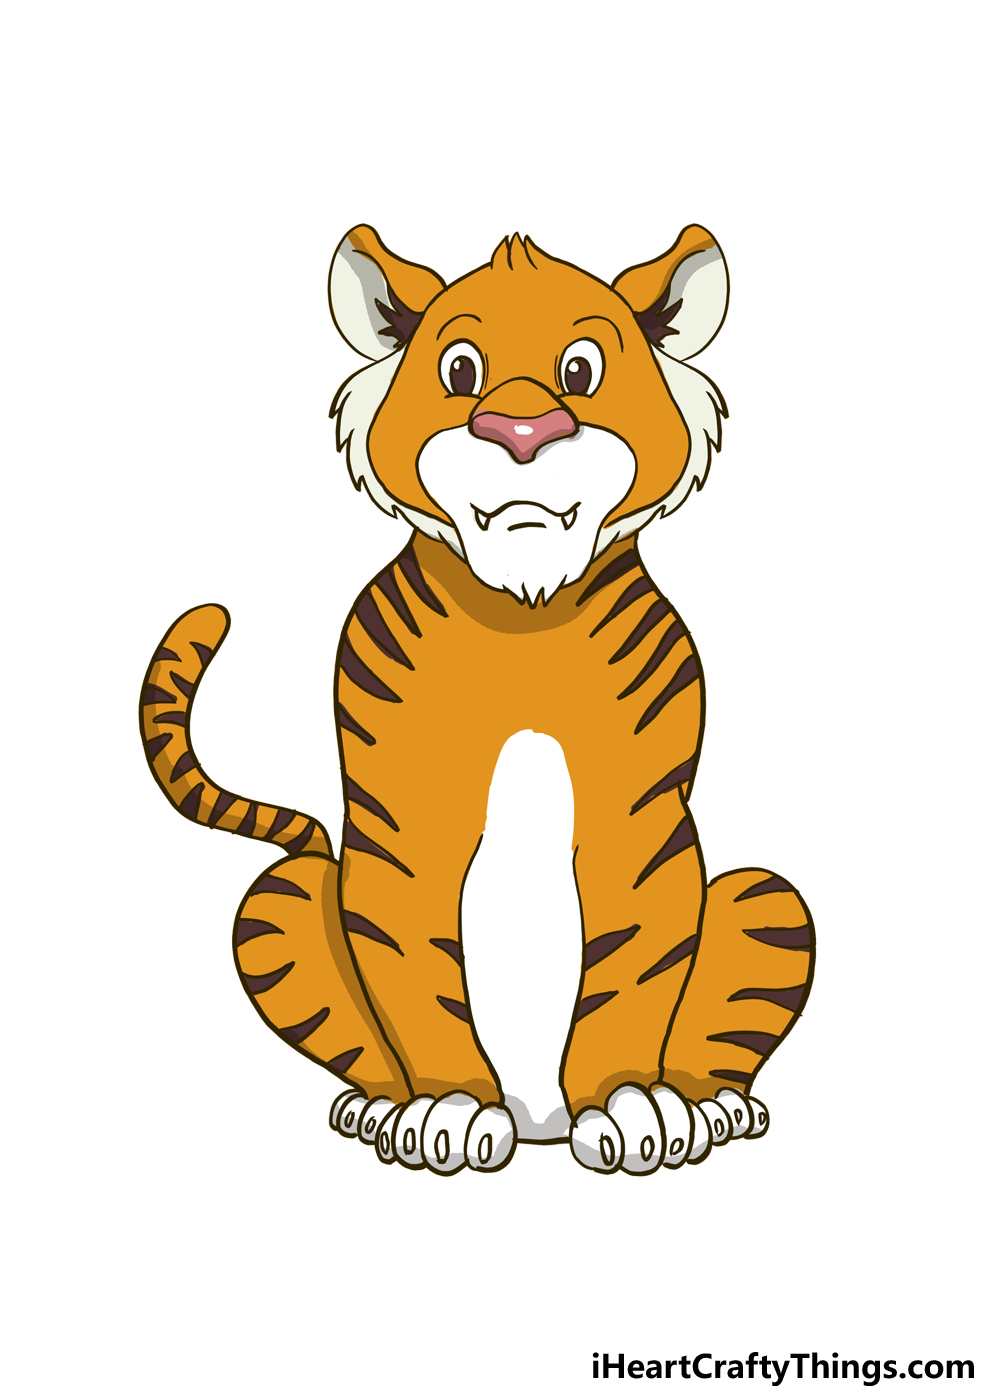
The drawing is complete, and now we can finish it off with some color. This is an important part of the drawing, as the colors on a tiger are so distinctive.
As we mentioned earlier in a guide, the prevalent colors on a tiger are orange, black and white. We reflected this in our example, as these are the main colors we used, with a dash of pink for the nose.
While this is the color palette we used, we used variations of each color to add shading and variety to the colors.
So for example, you will see we used a very dark orange under the head to add some shading.
The belly of the tiger has also been left white for some added realism. These are the colors we chose, and you can replicate them for your own drawing!
Of course, you could also go for some other shades and variations if you prefer, and you don’t even need to keep them realistic.
If you like the shades we used, watercolor paints or colored pencils would produce similar tones.
If you want brighter colors, then colored pens or certain kinds of paints would make the colors much brighter.
You could stick to one medium when adding the colors, but don’t be shy about trying out some combinations as well!
There are so many colors and mediums you can use, and they can all work to make your drawing so much more unique to you.
Don’t forget to color the background and any other characters and details you added!
Here Are A Few More Ideas To Try Out
You have completed this guide on how to draw a cartoon tiger, and you did an amazing job working through all of the steps! Now that you have finished the guide, you may think there is nothing more to be done.
However, there are always ways to keep having fun when it comes to creating pictures, and we have a few more ideas for you to try out. You know how to draw one cartoon tiger, so it could be fun to draw another one.
This one could be quite similar to the first one with a few minor differences. Perhaps it has a different facial expression, for example.
It could also be posed differently, but there are many other ways you could differentiate a second cartoon tiger. If you wanted to add some other animals, that would be possible too!
Perhaps you could add something like a lion, in order to show off one of the other big cats we see in nature. This could be easy to adapt to the drawing you have just done, too.
You could add a mane, remove the stripes and change the shape of the face a bit and you will have an awesome lion! If you have another favorite animal you would like to add to the drawing, then that could work too.
Adding a background is another way that you can really take a drawing to new levels. You could have the cartoon tiger in a natural setting, or maybe it could be in a zoo or a circus.
Drawing the tiger in different art styles can be a fun way to challenge yourself as well. These are some ideas, but how else could you add to this drawing of a cartoon tiger?
Your Cartoon Tiger Drawing is Complete!
Tigers may be fearsome creatures in real life, but we hope that this guide on how to draw a cartoon tiger made drawing one anything but scary.
We wanted to break it down into smaller elements to make it easier to learn. It’s also been designed to make it easy for you to customize and add your own ideas as well.
We covered a few ways that you could do this such as adding other characters or a background, but now you can show off any of your own ideas!
The colors you choose and how you add them can also make a big difference. The colors could be dark and muted, bright and vibrant or a mixture of the two.
There are so many ways to do it, and there are no wrong answers! We’ve given you a starting point, but now it’s your turn to take over and show us how it’s done.
When you’ve finished your artwork, you can share it on our Facebook and Pinterest pages for us to see and admire. We can’t wait to see how it turns out!


