In 1995, the animation industry was changed forever with the arrival of Pixar’s Toy Story. It was the first feature-length computer-animated film, but it certainly wouldn’t be the last!
The movie won over audiences with its humor, heart and great characters, and there have been countless sequels, TV shows, video games, books and more that followed the original.
At the heart of the series are the toy cowboy Woody and the spaceman Buzz Lightyear. These characters are incredibly popular around the world, and many fans like to learn how to draw Buzz Lightyear.
If you count yourself as one of them, then this is the guide for you!
Please enjoy this step-by-step guide on how to draw Buzz Lightyear that we have prepared for you.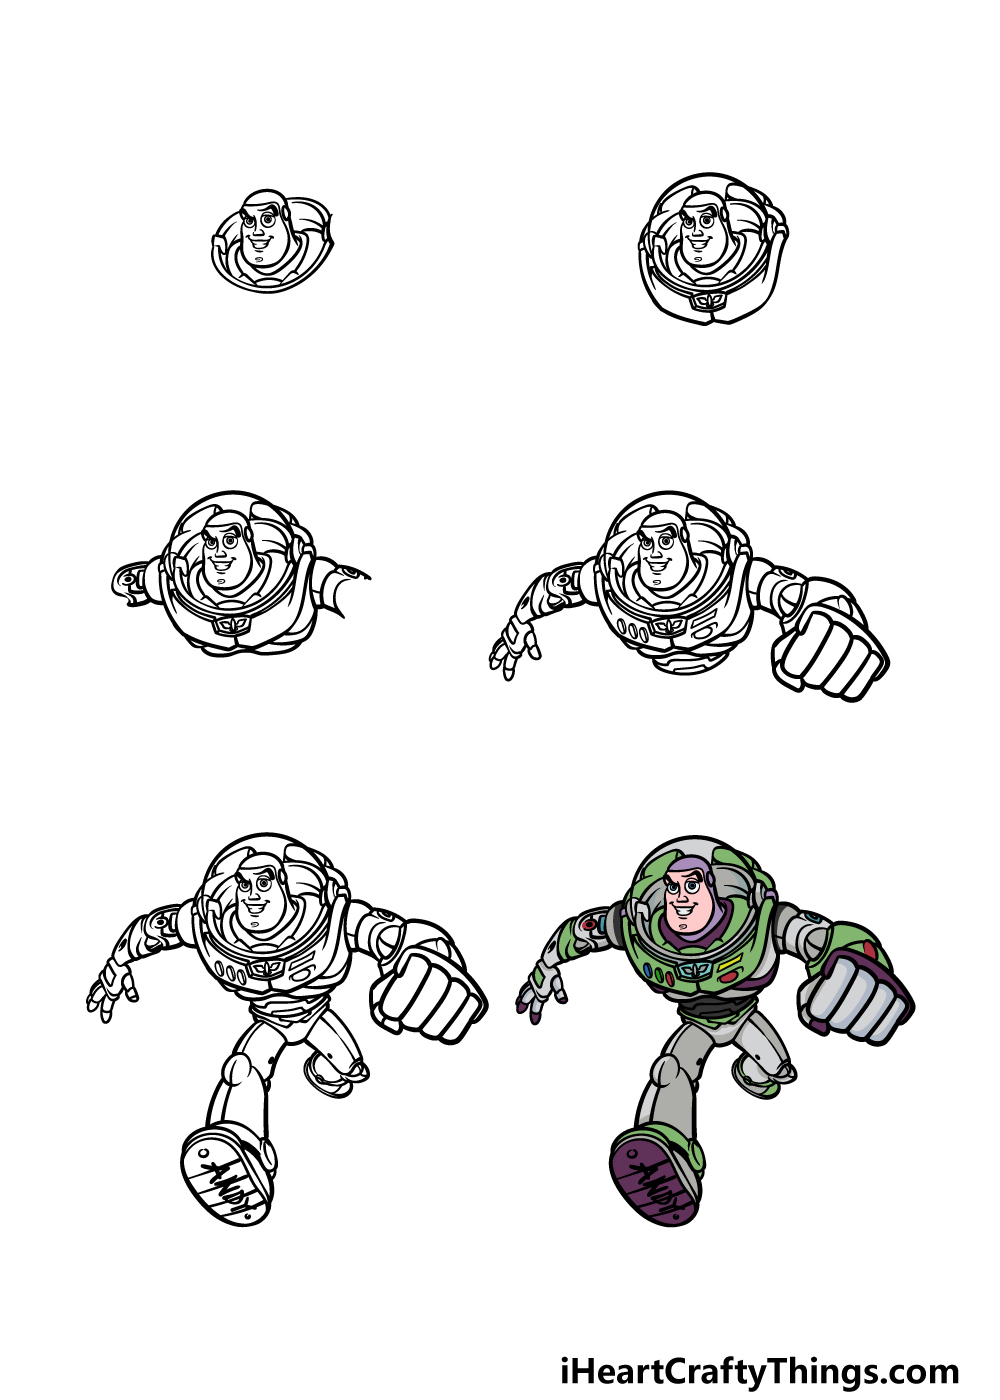
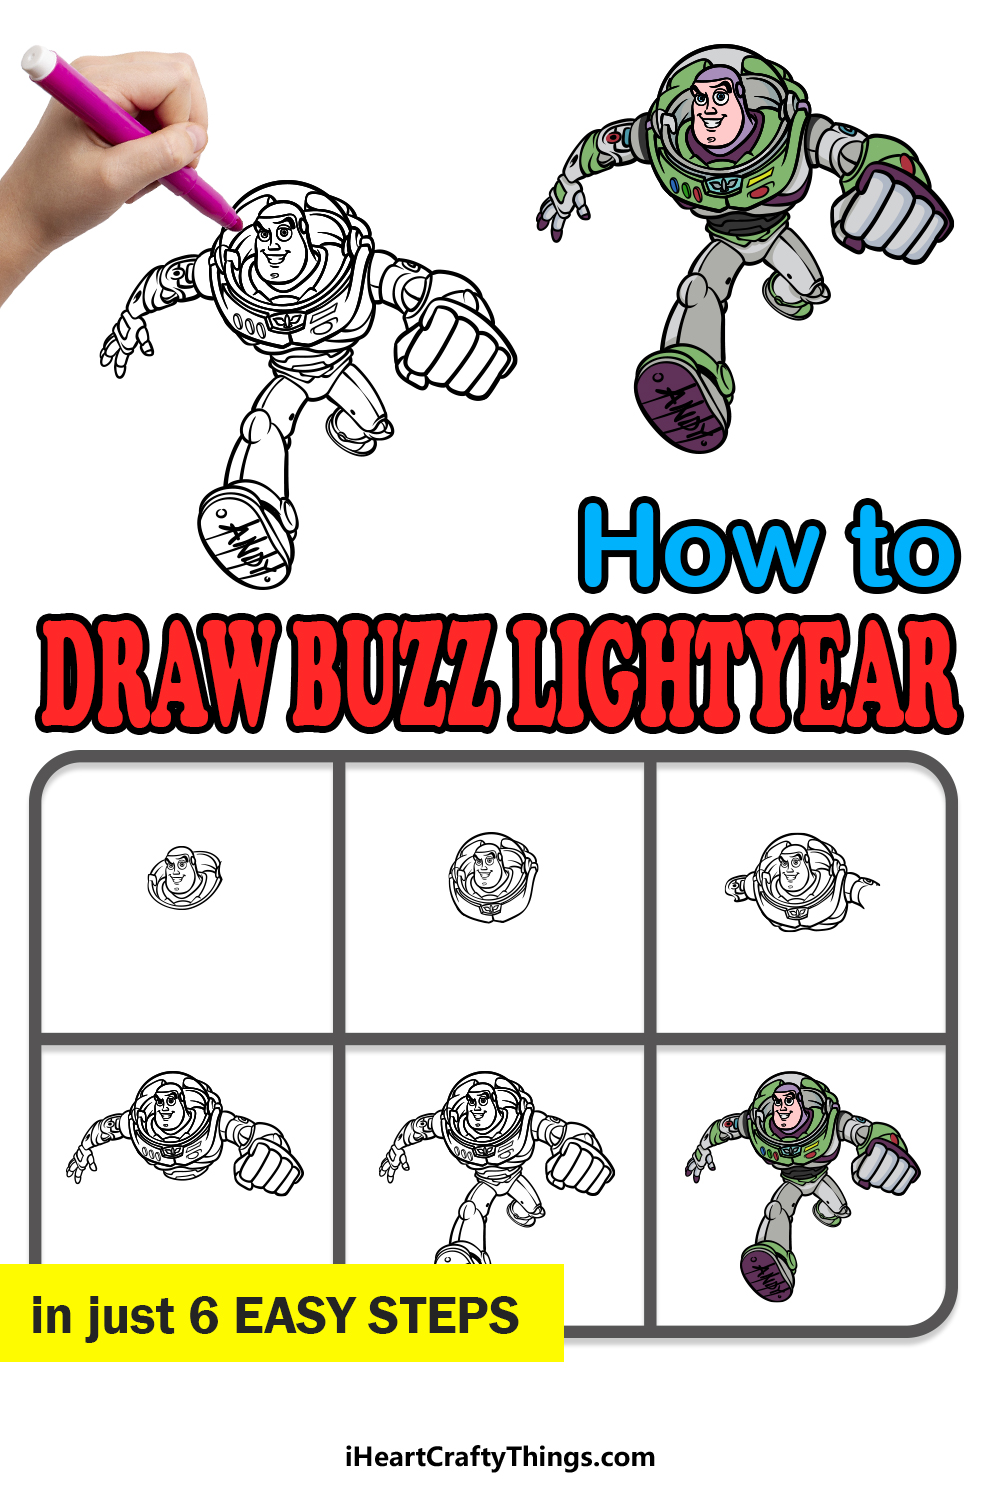
How to Draw Buzz Lightyear – Let’s Get Started!
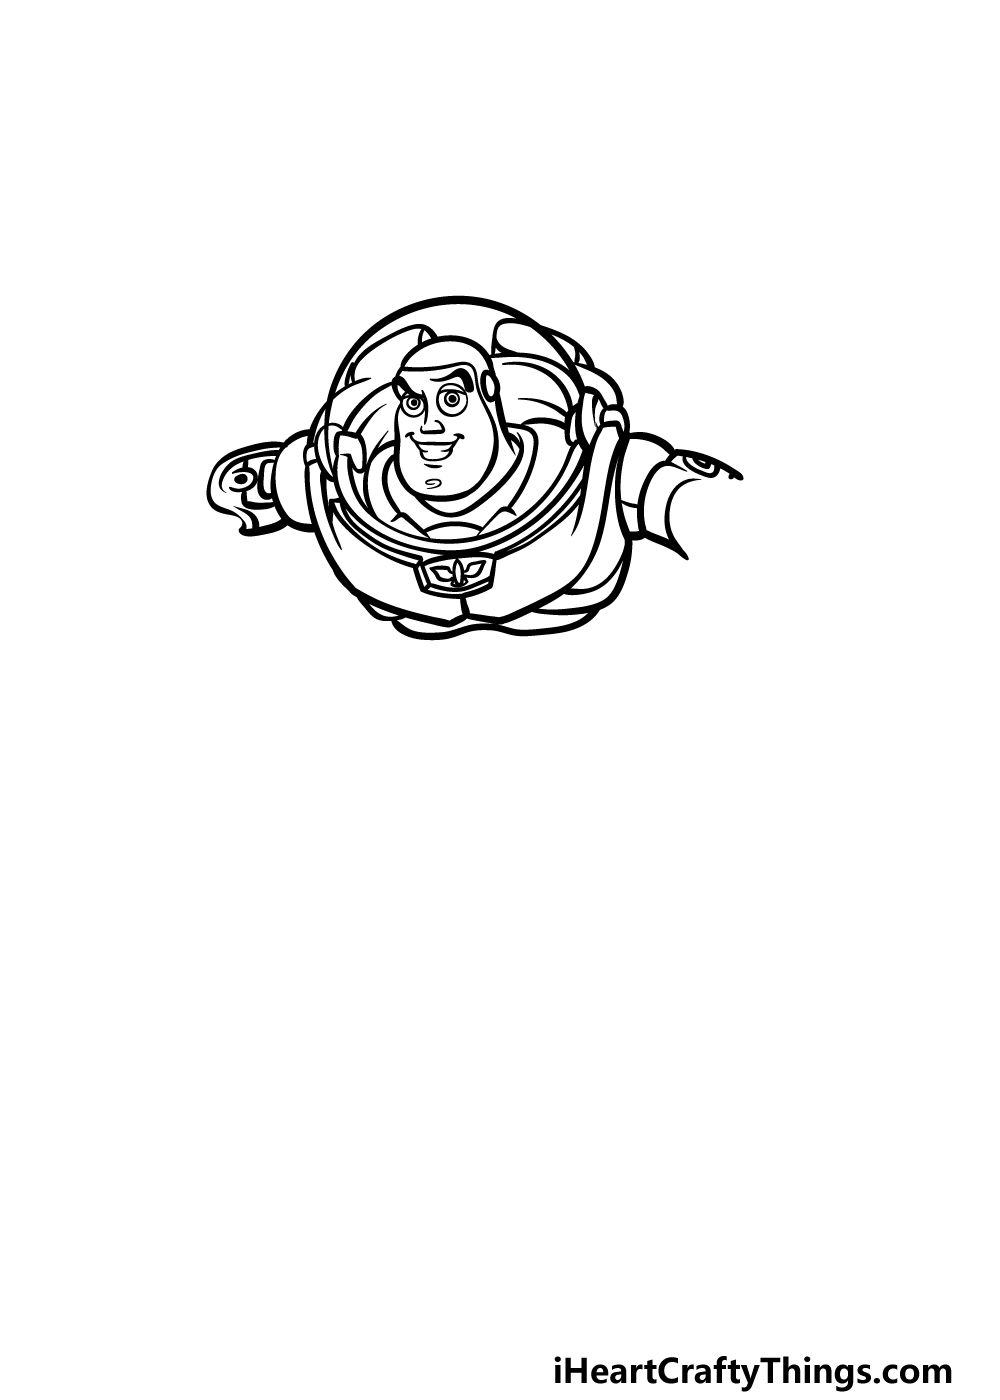
Step 1
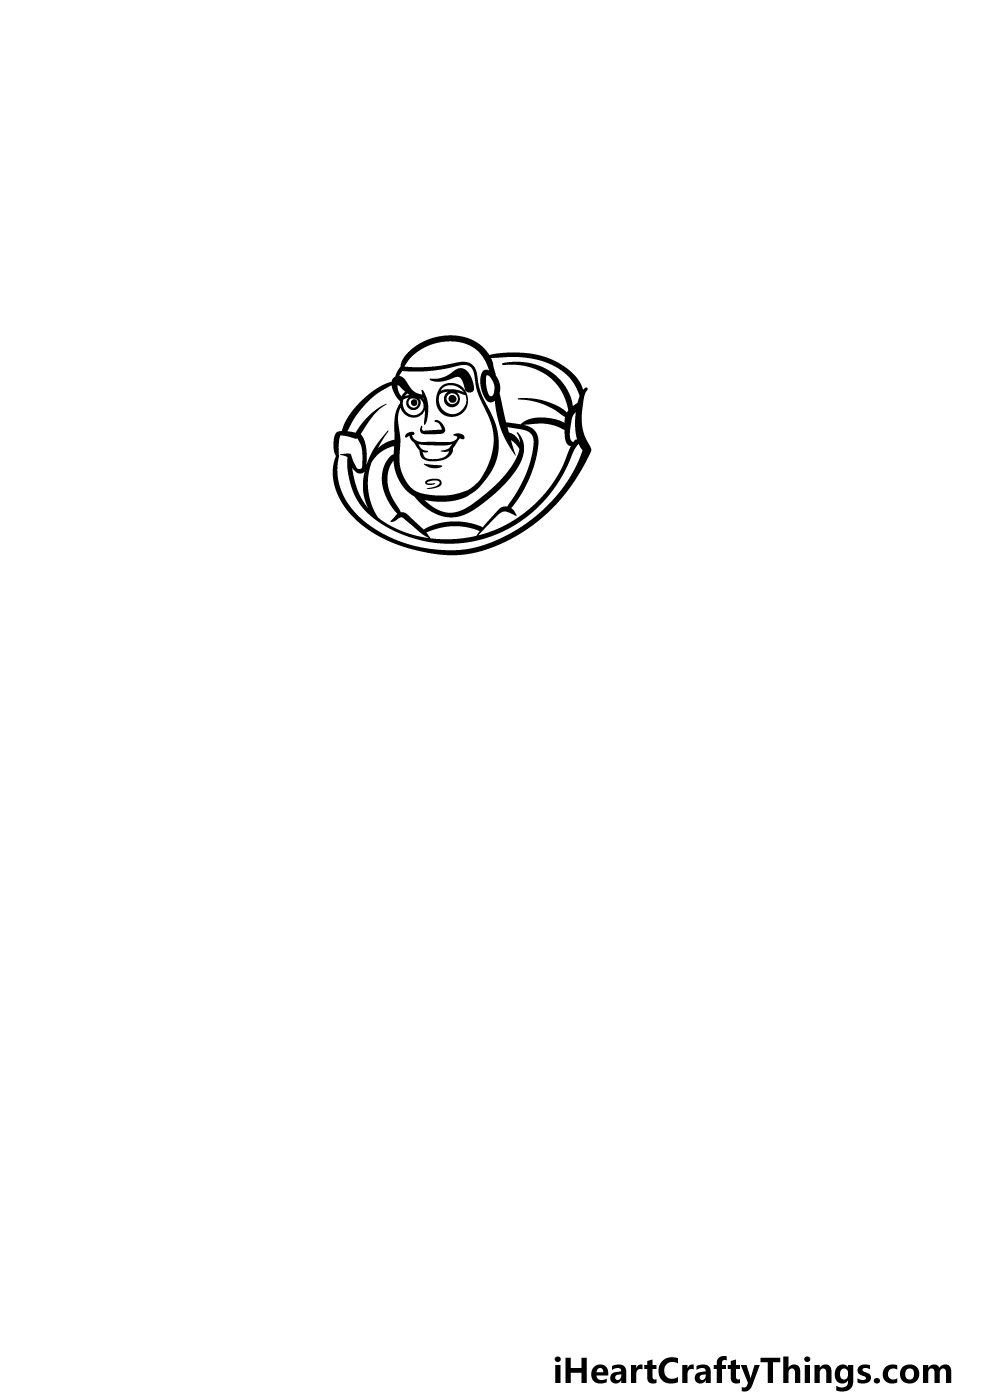
We will start with the head and face in this first step of our guide on how to draw Buzz Lightyear.
Buzz’s head is fairly small and rounded, so you can use some curved lines to draw the shape outline of his face.
He wears a covering over most of his head, so you can draw another line inside of this outline for this covering, and it will culminate in his chin poking out at the bottom.
As you draw this line, try your best to copy it as it appears in the reference image! Then you can draw his facial features.
We will be using some curved lines for his eyes, eyebrows, nose and mouth. His eyebrows and mouth will be drawn in such a way as to give him his brave and confident expression.
Step 2 – Draw his helmet and start of his chest piece
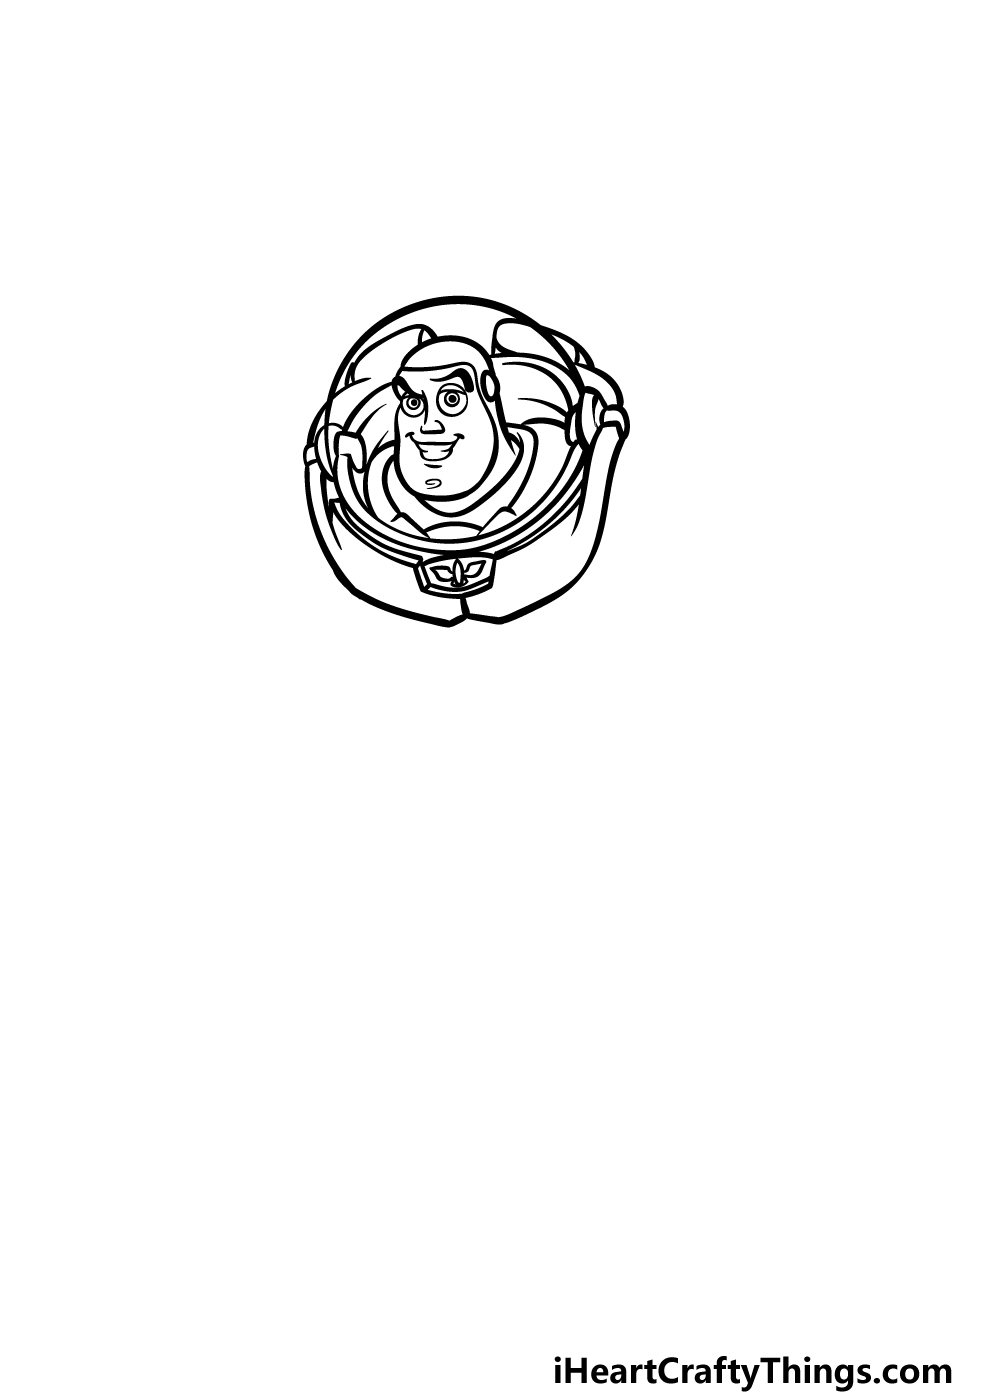
Now we shall add the rest of his helmet visor and some of his chest piece to your Buzz Lightyear drawing. Start by drawing a rounded line over his head for his see-through visor over it.
Then, we will add more details to the area of his suit that surrounds his neck, which you started in the last step.
Finally for this step, you can use some more rounded lines for the section of his suit surrounding his neck.
Then, use some more rounded lines for the two sections of his chest piece that meet at a central point under his neck. You can also draw his badge at the point where they meet to finish this step off.
Step 3 – Next, draw the start of his arms and add to his chest
In this third step of our guide on how to draw Buzz Lightyear, we will be drawing the starts of his arms while also adding to his chest.
Each shoulder is drawn with a rounded line for the ball joint that his arms are connected to.
Then you can draw the first sections of his arms that will be connected to those ball joints, and there will be some minor detail on them as well.
Finally, use some more rounded lines for the next section of his chest beneath what you drew already.
Step 4 – Now, draw the rest of his arms
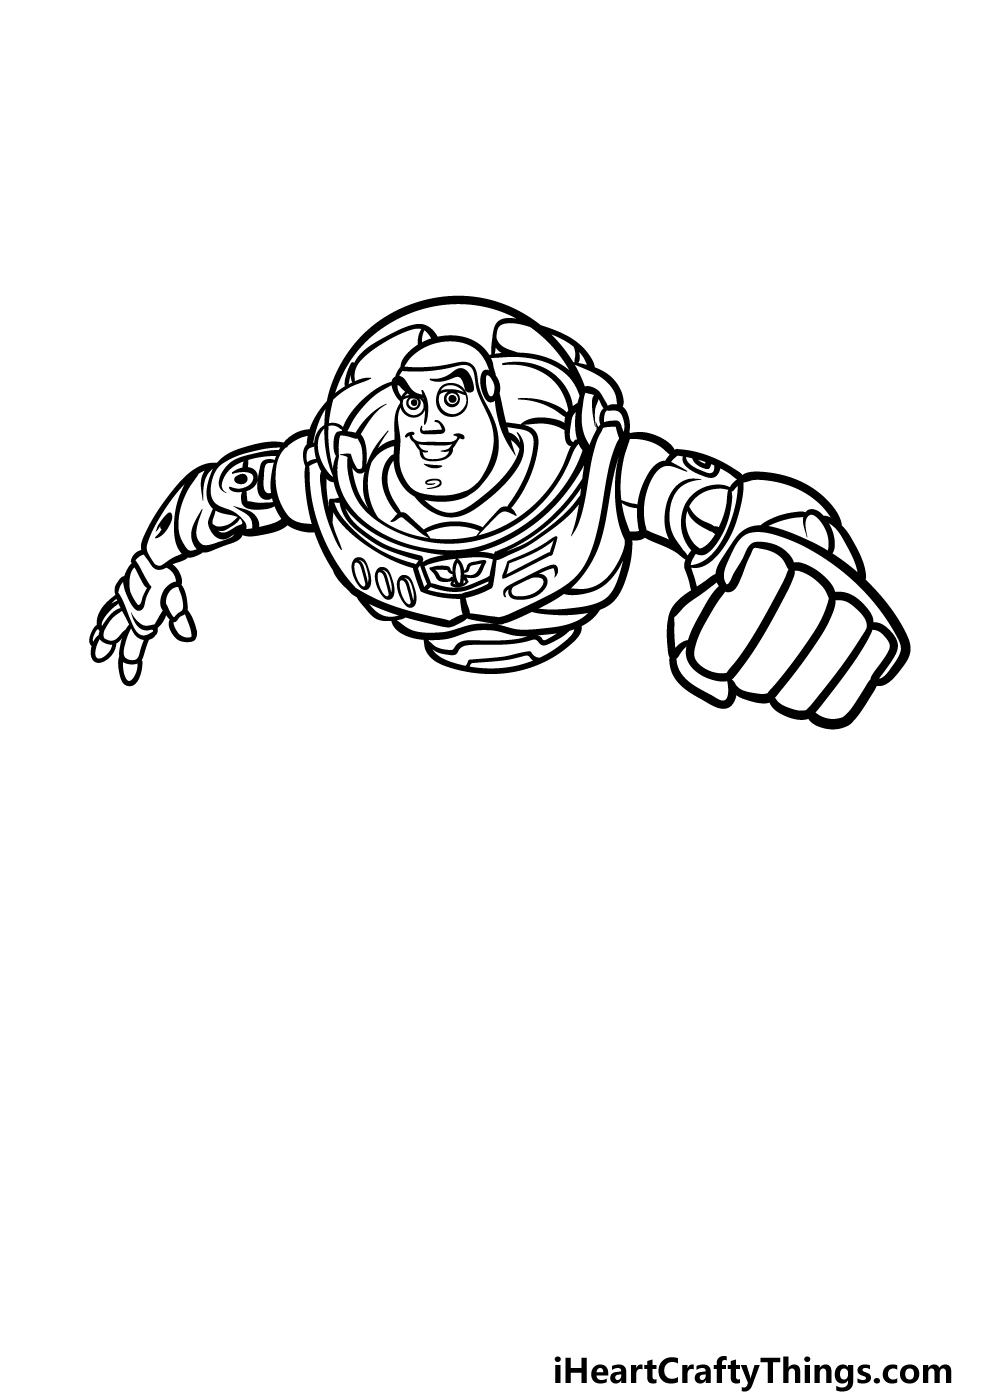
Now it’s time to add the rest of the arms to your Buzz Lightyear drawing. This may be a bit tricky, as we did some tricks with the proportions of the arms.
It will be worth it though, and we will go through it slowly! The first on the arm on the right will be really large, but this will be to show that the fist is closer to us as the viewer.
We also won’t see much of his forearm, as it will be obscured by the fist. Be sure to also draw the ball joint that functions as his elbow.
Then we shall draw the other arm, and this one will be significantly smaller to show that the arm on that side is further away.
It will be extended straight out, so we will see more of the forearm of this one. Finish off this step by drawing some buttons on his chest and then draw the start of his waist.
Step 5 – Add some final details to your Buzz Lightyear drawing
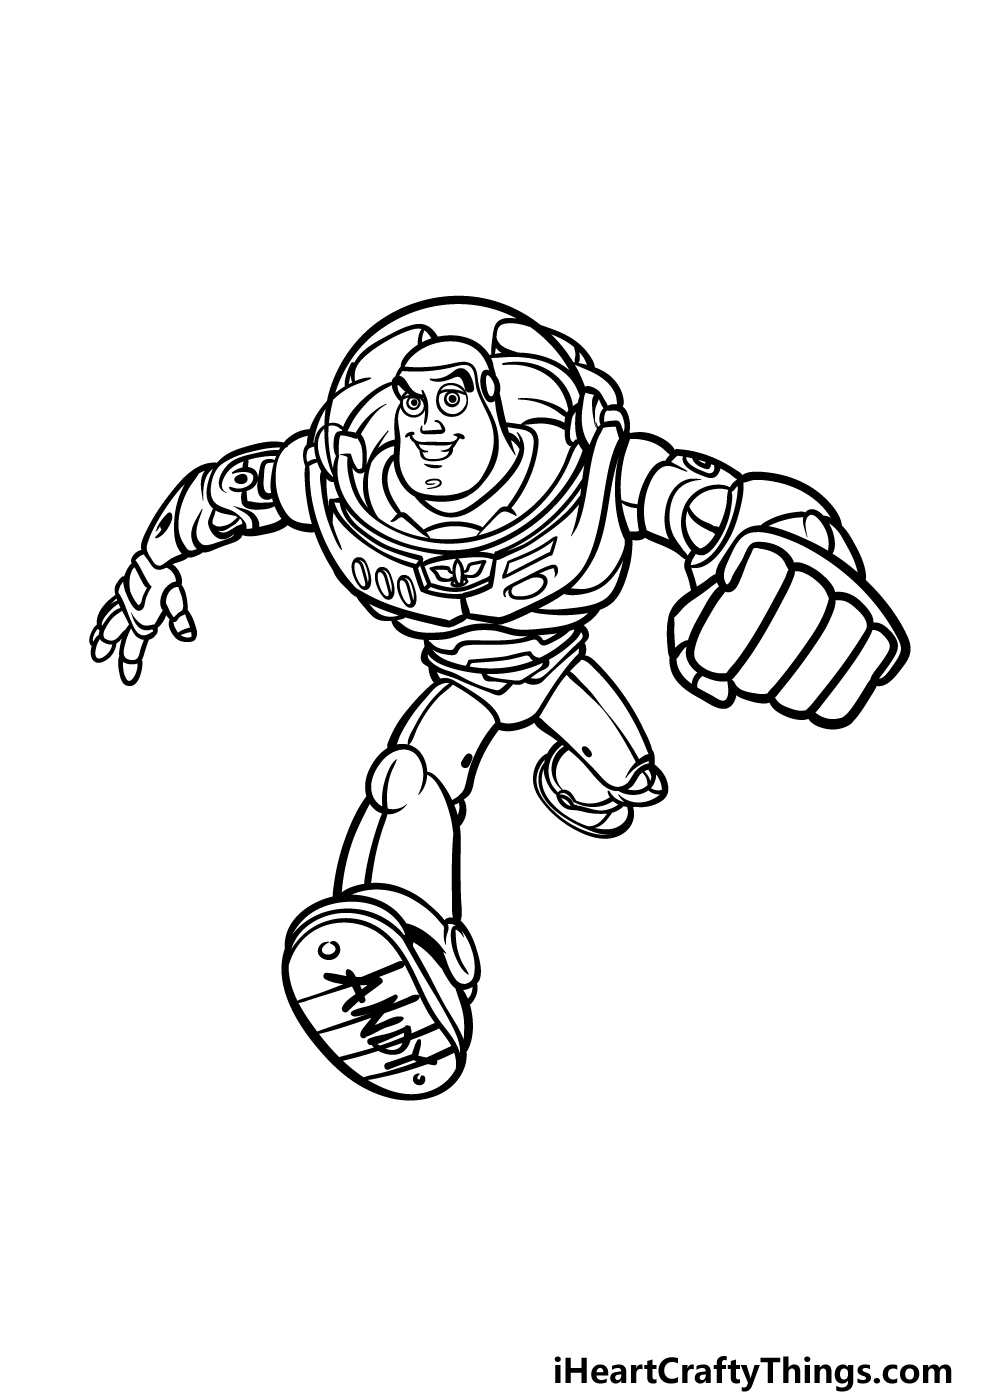
We will be finishing off all of the parts and aspects of this character for this step of our guide on how to draw Buzz Lightyear. Much like his arms, the legs will be separated into a few sections.
The leg on the left will also be larger for some more perspective, and we will see the base of his boot. As a nice detail from the film, you can draw ANDY underneath his boot as well.
The other leg will look smaller as it is also further away. Once you have added these legs, you’re ready for the final step!
You could also draw a background to show your favorite scene from the films or to add some more beloved characters.
Step 6 – Finish off your Buzz Lightyear drawing with some color
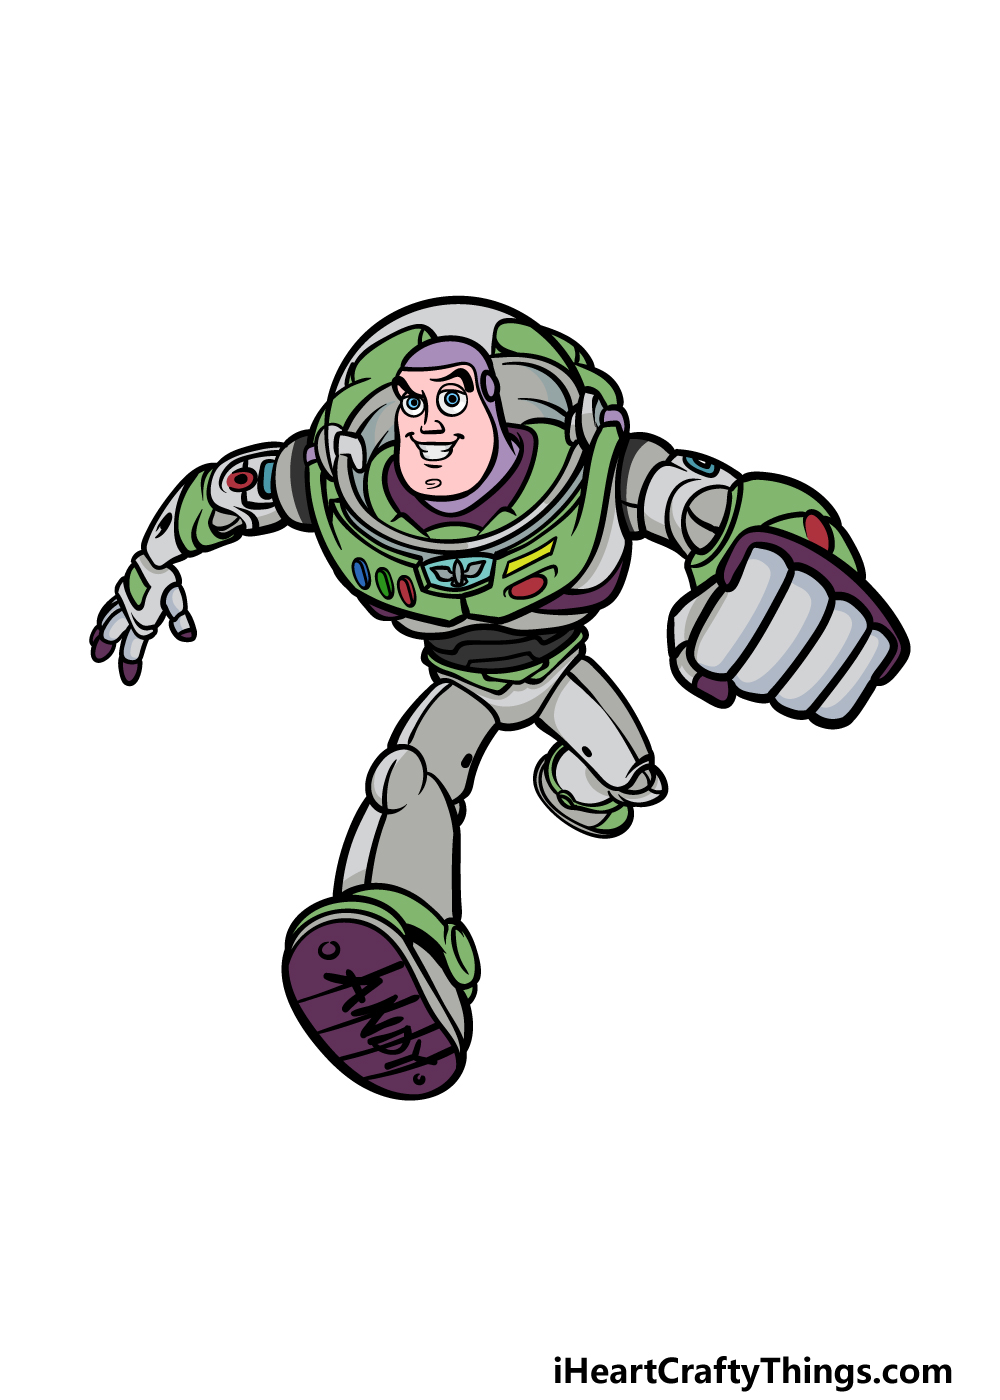
To close off this Buzz Lightyear drawing, we will finish by adding some colors. The primary colors for Buzz are green, purple and grey, and these are what we used in our reference image.
There are also touches of red and blue in his outfit, and if you would like the colors to be accurate to his film appearance then you can use our example to copy from.
You could also use some unique colors and experiment with some fun art mediums, so let your creativity run wild and see what happens!
Do this to take your Buzz Lightyear drawing to the next level
Take this Buzz Lightyear sketch to infinity and beyond with these 4 fun ideas!
This drawing of Buzz Lightyear shows him on the run, and that opens up some possibilities for a background setting. He may be a toy, but in Buzz’s mind he is a proper astronaut!
You could show where he imagines he is by drawing an imaginative background. This could be an alien world or maybe a hazardous space station.
Any background setting like this will allow you to add all sorts of amazing details and extra characters. Where do you imagine Buzz Lightyear could be imagining himself to be in this scene?
Of course, you could also go for a background that is more aligned with where the toy version of Buzz Lightyear would be.
There are a few ways you could go about drawing a more realistic background.
One would be to use a favorite scene from the Toy Story films and adapt it to a background. Or, you could pick a room in your own house and use that as a background!
Buzz is usually joined by many other toy characters as he embarks on his adventures. You could add one or more of these characters to your Buzz Lightyear drawing!
The best character to start with would be his best friend, Woody the cowboy. There are countless other characters that you could use for this though.
The character could even be based on a toy you own that did not appear in the movies!
The pose this Buzz Lightyear sketch shows off would be perfect for a poster for your room. You could start by drawing him on a big piece of paper or cardboard.
Then, add all of the extras you want from this guide or your own ideas. It could also be fun to add some text to the poster.
One example would be to write one of his many catchphrases above or below him. Then be sure to include lots of awesome colors and your poster will be complete!
Your Buzz Lightyear Drawing is Complete!
We hope that you had a great time working on this guide on how to draw Buzz Lightyear alongside us!
This wasn’t an easy picture, as there are lots of details and parts to draw for this character. That’s why you should be extra proud of doing such a great job on it!
Remember that there is a lot that you can add to this drawing, from background details to unique color choices. We look forward to seeing what you do!
When you’re finished with this drawing, we will be looking forward to seeing you on our website! We have tons of drawing guides for you to enjoy, and more are on the way soon.
Please also remember to share your Buzz Lightyear drawing on our Facebook and Pinterest pages for us to enjoy!