Sometimes when you’re sitting down to draw something that we see every day, you can find yourself running into a metaphorical brick wall.
This can be true when drawing something like a literal brick wall.
Most of us will see a brick wall every day, but then when we try to draw one find that it is harder than expected.
You may find yourself getting frustrated and wondering why it’s so difficult to draw something so simple.
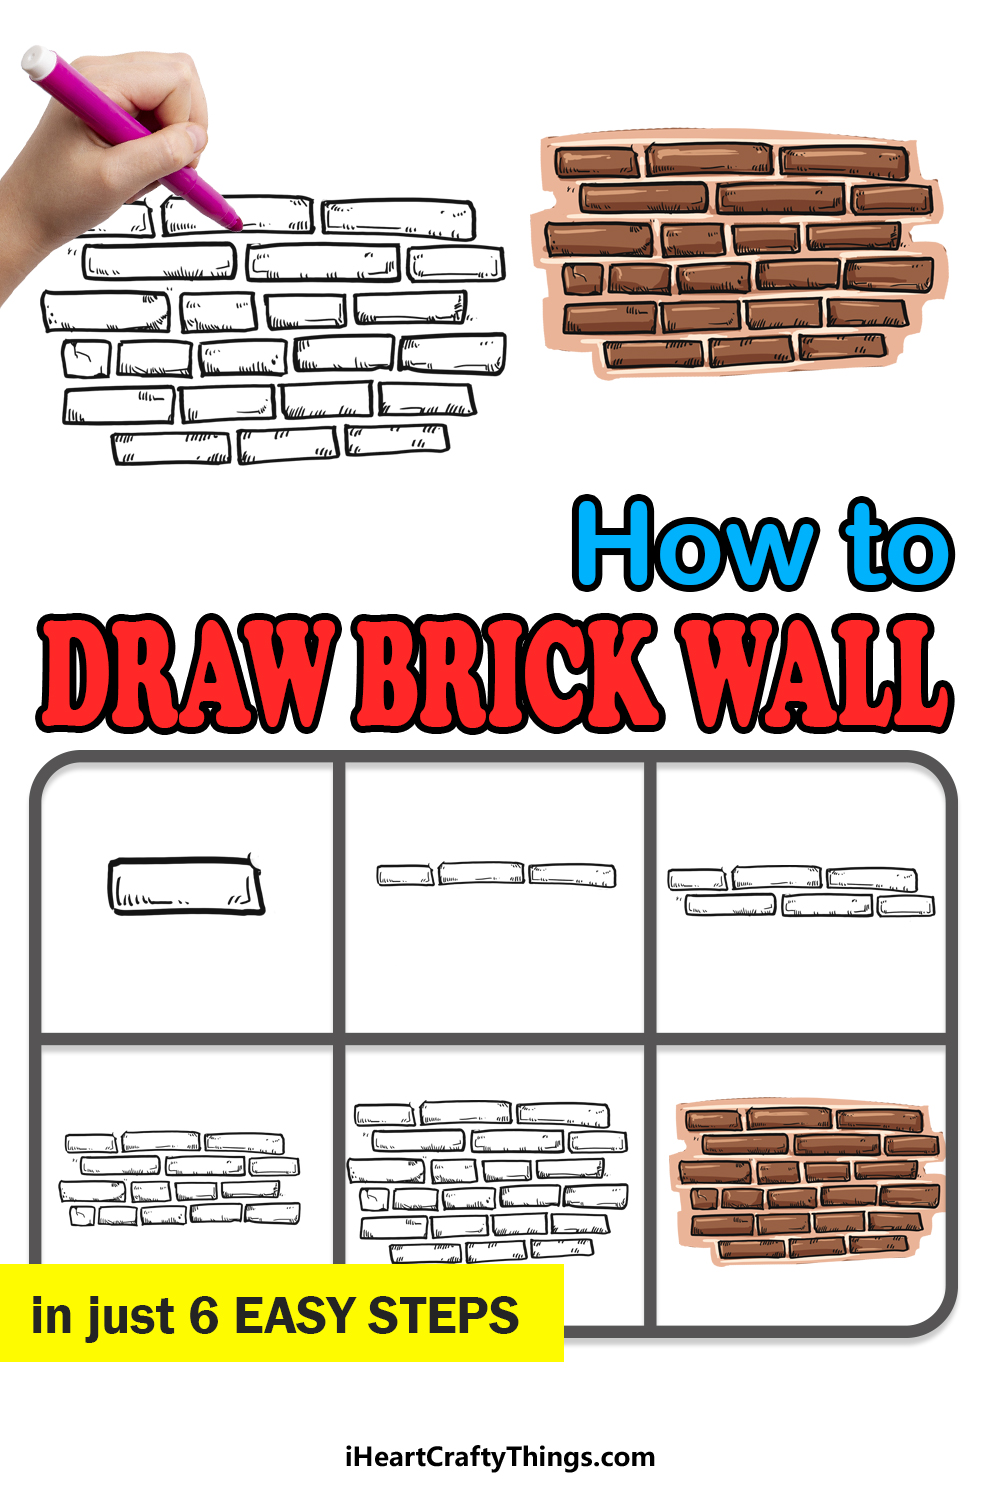
That’s why we have created this guide on how to draw a brick wall. As with anything in life, it can be made so much easier when you know what to do and when you break it down.
We will break it down step by step, almost like building a real wall brick by brick. In doing this, we will not only show you how to draw one but also some ways that you can make the drawing even cooler.
These tips will include everything from adding people to the image to drawing some graffiti on the wall. So get ready to create your very own brick wall drawing, brick by brick.
How to Draw A Brick Wall – Let’s Get Started!
Step 1
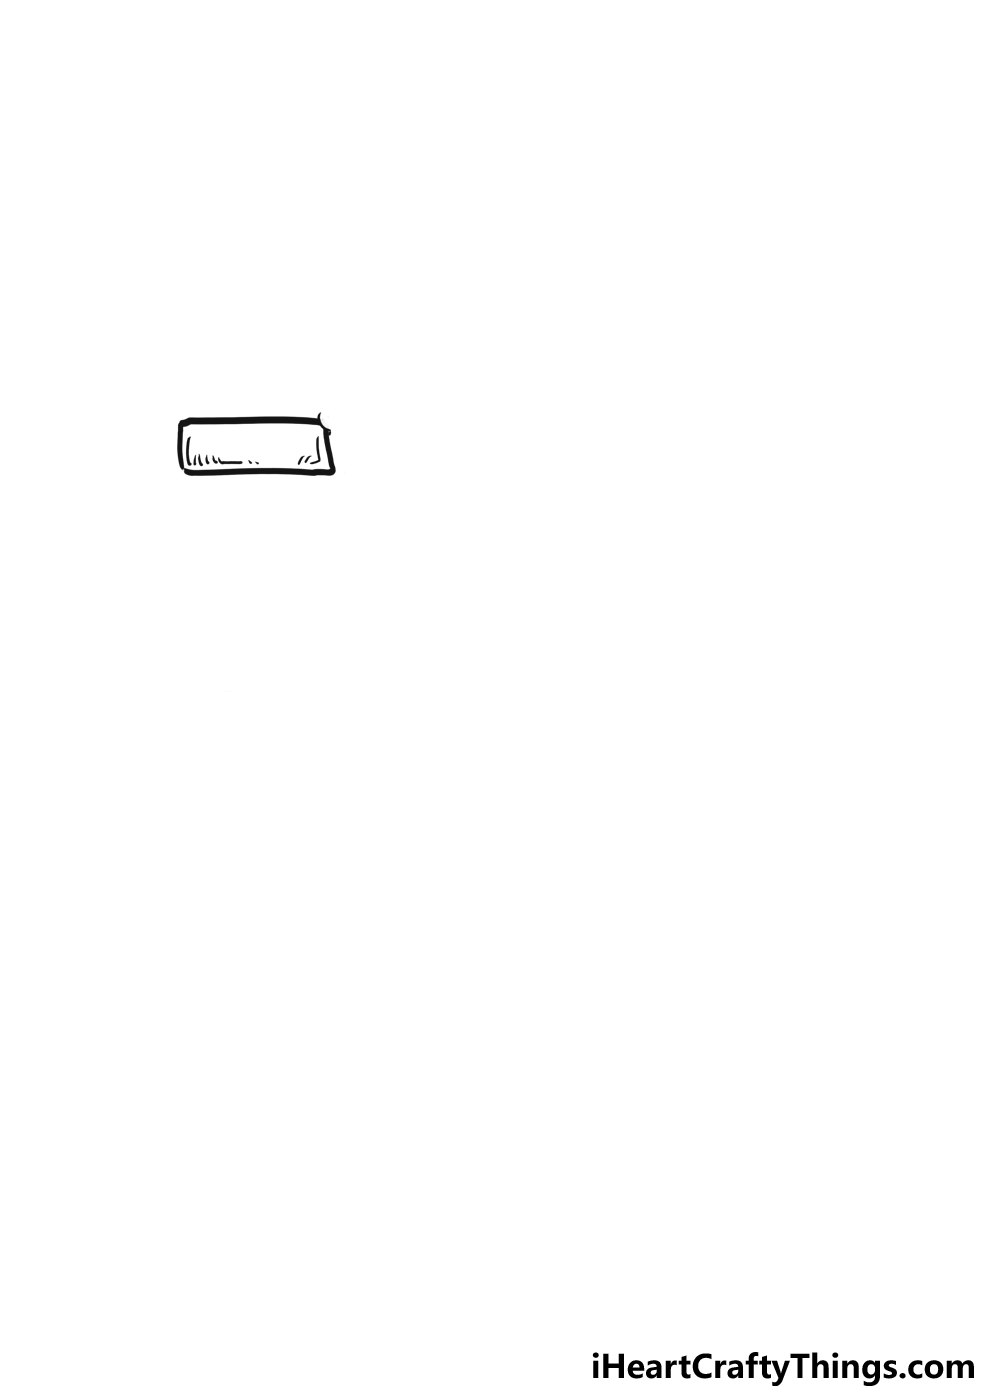
We weren’t kidding when we said we would be building this brick wall brick by brick, as we will begin with a single brick.
You may think that once you can draw one brick you can draw them all, but it’s not as simple as that.
Not every brick will be identical, and we will be aiming to make the structure of the brick wall imperfect. This gives it a bit more personality and makes the brick wall seem like it’s a bit older.
If you would like to create a more pristine brick wall, then you can make the bricks more even and neat. For now, we will stick to the design in this guide.
This first brick looks simple when you first look at it, but there are some things to consider here.
You may be tempted to use a ruler to make the outlines of the brick nice and straight, but that’s not the approach we’re taking here.
Instead, we will be drawing the bricks freehand to again give it a more stylized appearance with some more personality.
Despite this, you will notice that we still aimed to make the outlines fairly straight.
There is a slight curve to the outlines of this first brick, but it is very slight. We do still want these to look like regular bricks, after all.
Once again, you can draw these bricks with a ruler if you prefer a neater look.
Once the brick is drawn, we will also add a few small line details inside the brick for some texture.
Now that we have the first brick of this brick wall, we can keep adding more to the wall in the next steps of the guide.
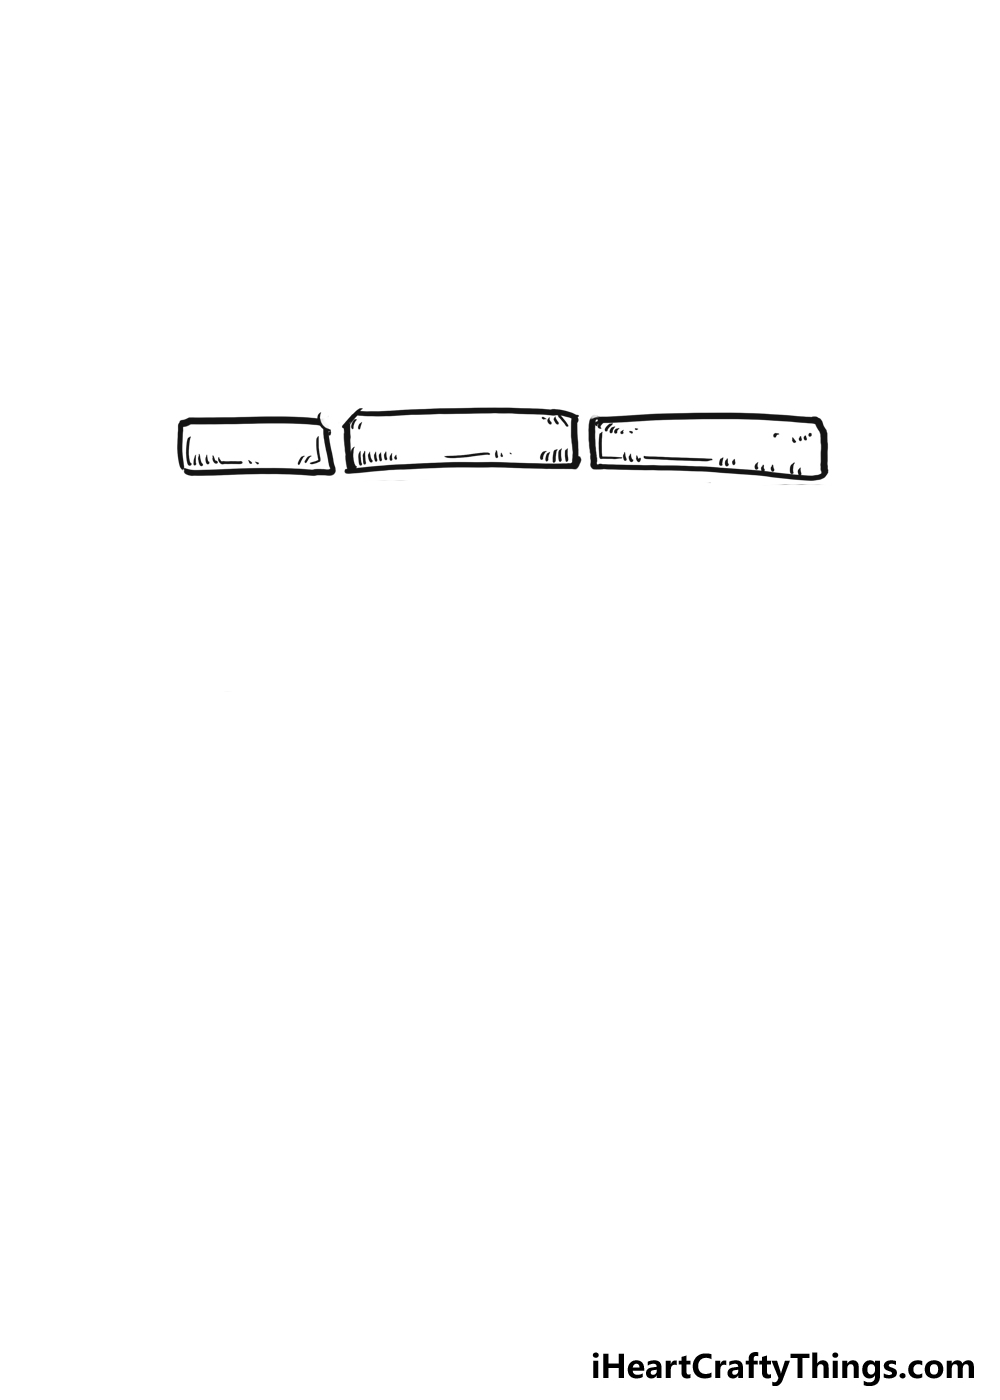
Step 2: Draw the next two bricks
We have one brick for this brick wall, but as we mentioned earlier that doesn’t necessarily mean it’s going to be a breeze from here on out.
As you will see from a quick glance at the next two bricks, they are not identical to the first one.
In fact, the next brick is roughly twice the length of the first one. That being said, it should still be the same height.
Before you draw these next bricks, we would recommend planning out the wall. Even though we want the brick wall to look a bit rough, it should still more or less be in a row.
You can take a light pencil and draw rows of lines using a ruler. This will help you to position the bricks in rows that are fairly consistent.
Even though the rows of bricks may not be as straight as these lines, they will still be a bit more ordered. We will then add a third brick after the second one.
This one will also be longer than the first one, and it is drawn in a similarly rough, hand-drawn style.
Once you have drawn both of these bricks, you can then decorate them with the same little line details you used for the first one.
That’s all there is to it for this step, and we can keep building this brick wall in the next step.
Step 3: Add the next layer of bricks
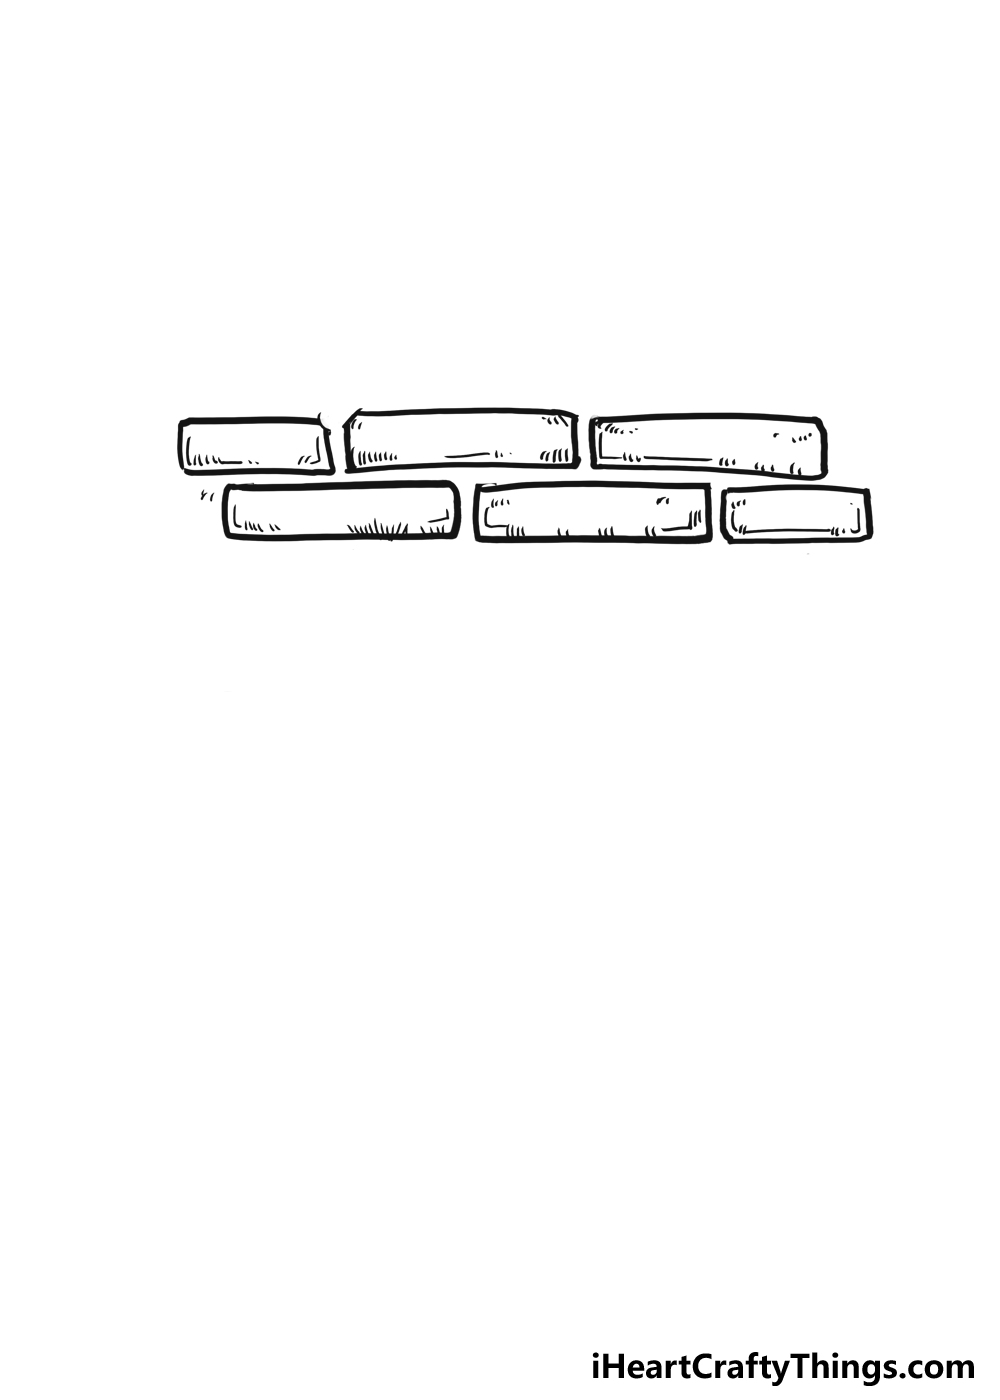
You’ve done a great job with the first few bricks of this brick wall drawing. By now you have seen that drawing these bricks is a bit more complicated than one may have initially thought.
That being said, you’re getting the hang of it now, and you can take that forward as we add some more bricks. At first we did one, then two, and now we’re adding three.
These will form the second row of bricks, and they will be drawn in largely the same way that we drew the first three. However, there will be some changes, for example, the size of the bricks.
In the first row, the first brick was the smallest with the second two being equal in size, more or less.
For the second row, we will instead make the first two long and equal with the final brick being the smallest.
Doing this will help to create the distinctive pattern you will see on a real brick wall. We will also portray this pattern in the way that we position the bricks.
The vertical gaps will not line up, for example. They will be offset a bit, as shown in our reference image.
Other than these changes, everything else will be more or less the same. We will also add the same texture details to these next three bricks that we used for the first ones.
Now, we can move on to the third row and keep this flow going as we continue drawing this brick wall.
Step 4: Now draw the next two rows of bricks
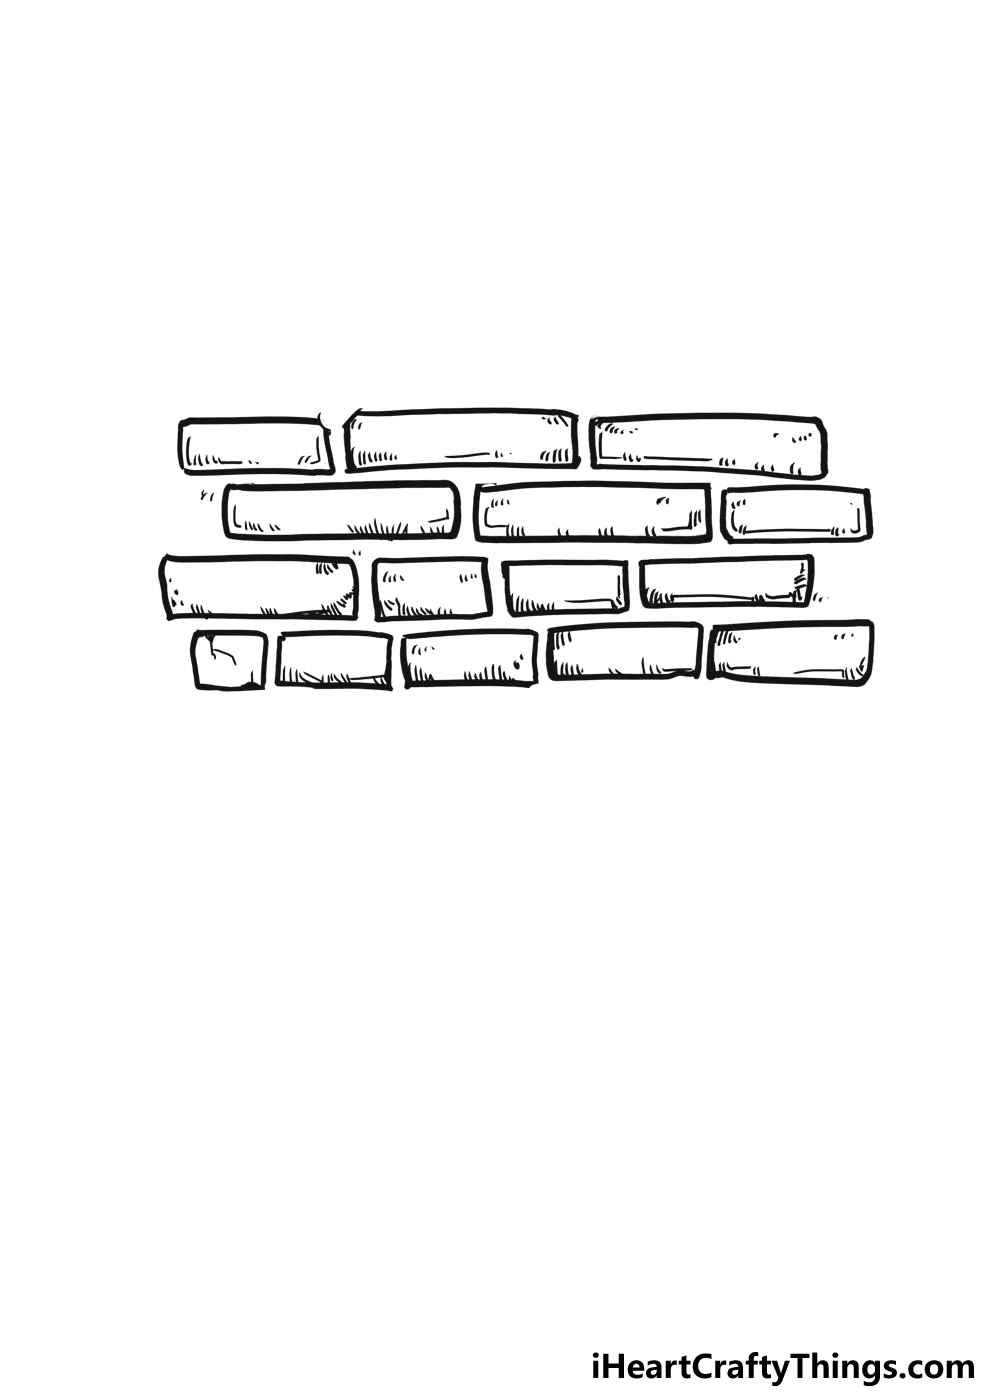
We’re really getting into the swing of things now! Seeing as we’re on such a roll, we can easily add the next two rows of bricks using what we’ve learned so far.
However, we will be changing things up again a bit here with these next two rows in order to further make this brick wall look a bit more interesting.
For the first time in this drawing, we will be adding not three but four bricks in the next row. Once again, we will make sure that none of the vertical gaps will line up with one another.
In order to make these bricks fit even though there is one more, we will make them smaller than most of the previous ones we’ve drawn. This will be especially true for the two central ones.
If you were thrown off by drawing one more brick than we’re used to, then wait until you see the fourth row! In this one, we will be drawing 5 bricks, a new record for this brick wall.
The first brick of this row is very small, almost a square, and the remaining four are roughly the same size as the very first one that we drew.
We will also add the same details we’ve been drawing so far, and this time we will also add extra little details such as cracks in some of the bricks.
With these done, we can now move on to step 5 where we will draw the final layers of bricks for this brick wall and add some extra details.
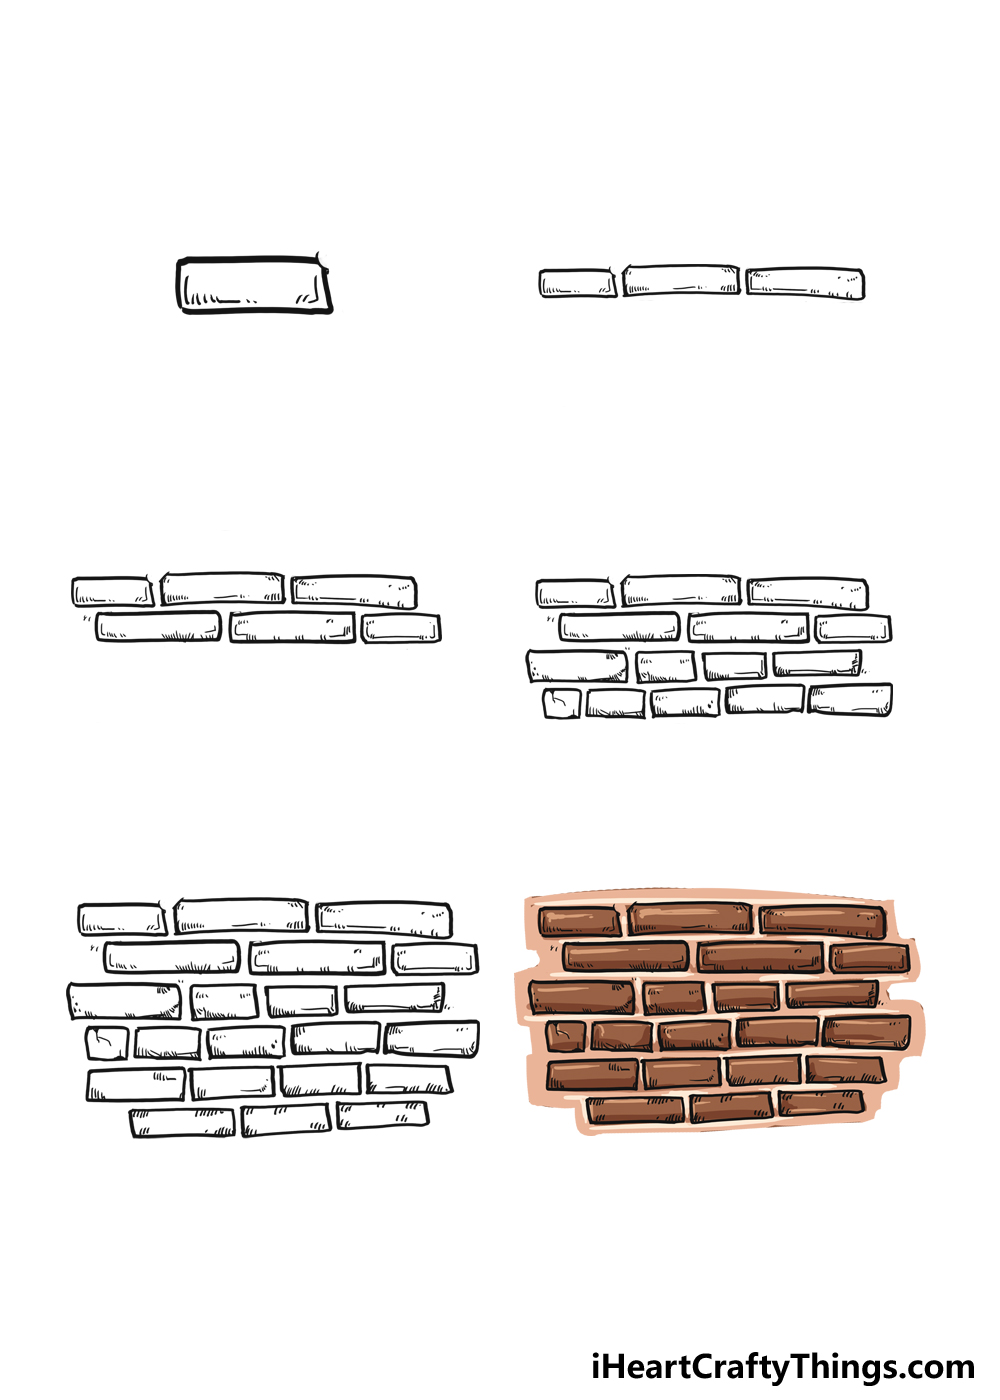
Step 5: Draw the final details for your brick wall drawing
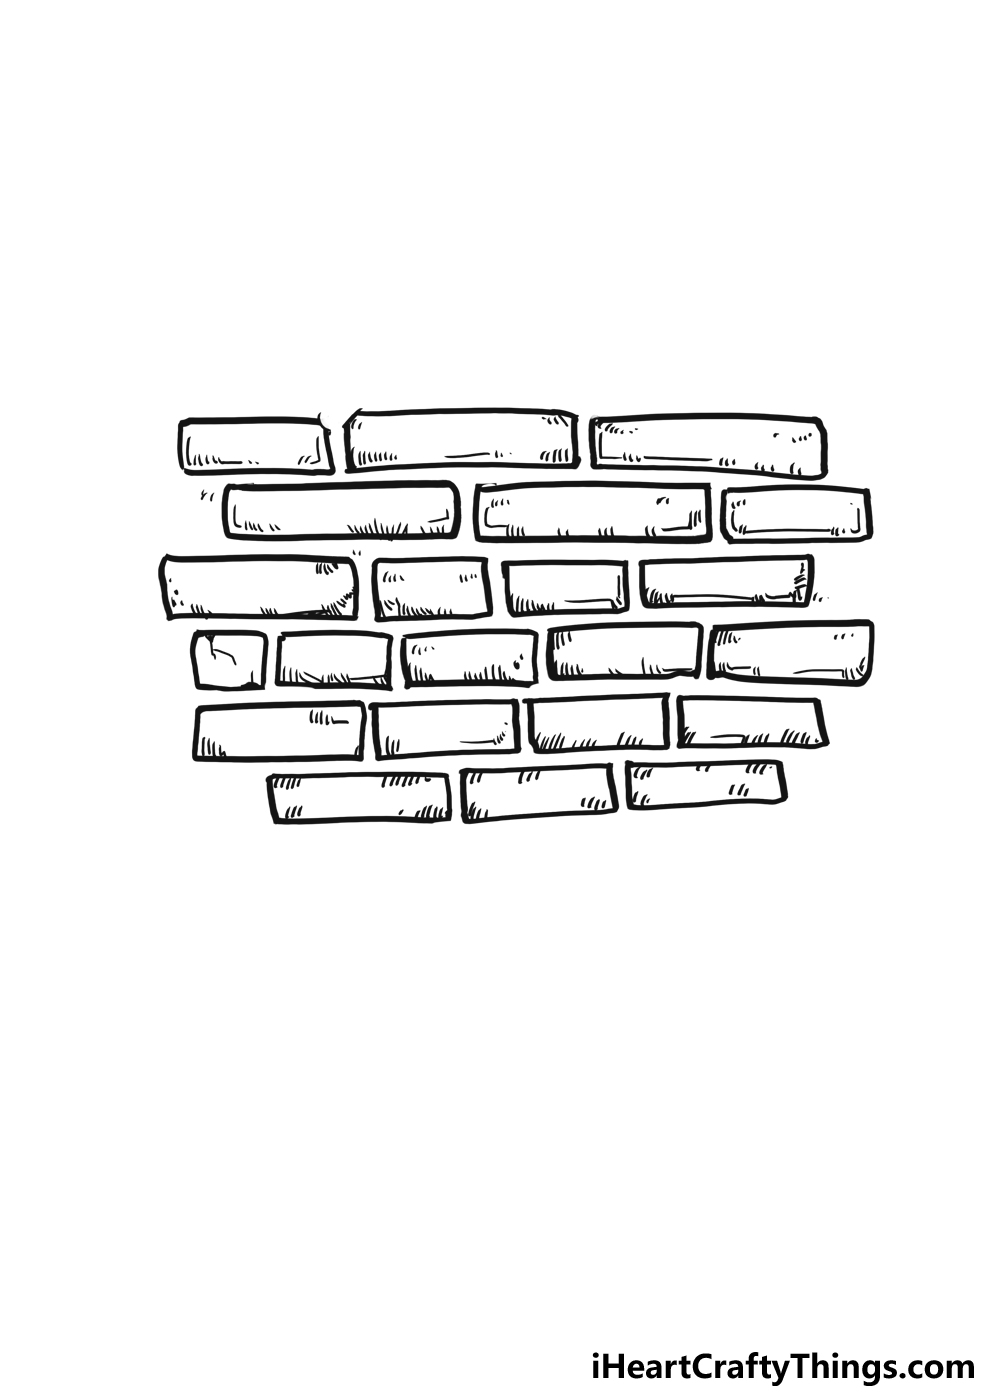
Now we’re ready to lay the final bricks of this brick wall. The previous step threw us a bit of a curve ball, but we’re back to familiar territory with these final two rows.
The next row will have four bricks in it, and they will all roughly be the same size. They will also have those same details we’ve been using so far, in order to keep things consistent.
For the final row, we will take things back to where it all began by drawing just three bricks. Once you have drawn these final bricks, it’s time to add some extra details.
There are so many ways that you can make this drawing more unique. One would be to show what is over this brick wall and beyond.
You could also add some details to the brick wall itself. This could include adding some degradation to the bricks, or you could draw a cool graffiti design on the brick wall.
Another way you could add some life to this drawing would be to add a character to the image. This could be a cartoon person or maybe an animal.
These are just a few ways that you could make this drawing more unique! You could also add more layers or extend the existing ones to make the wall even bigger.
We have given you a few ways to customize this brick wall, but now you can show off some of your own ideas!
We will also be able to make the brick wall more unique when we add some color in the next and final step.
When you’re ready, let’s head to that final step.
Step 6: Now, finish off with some color for this brick wall
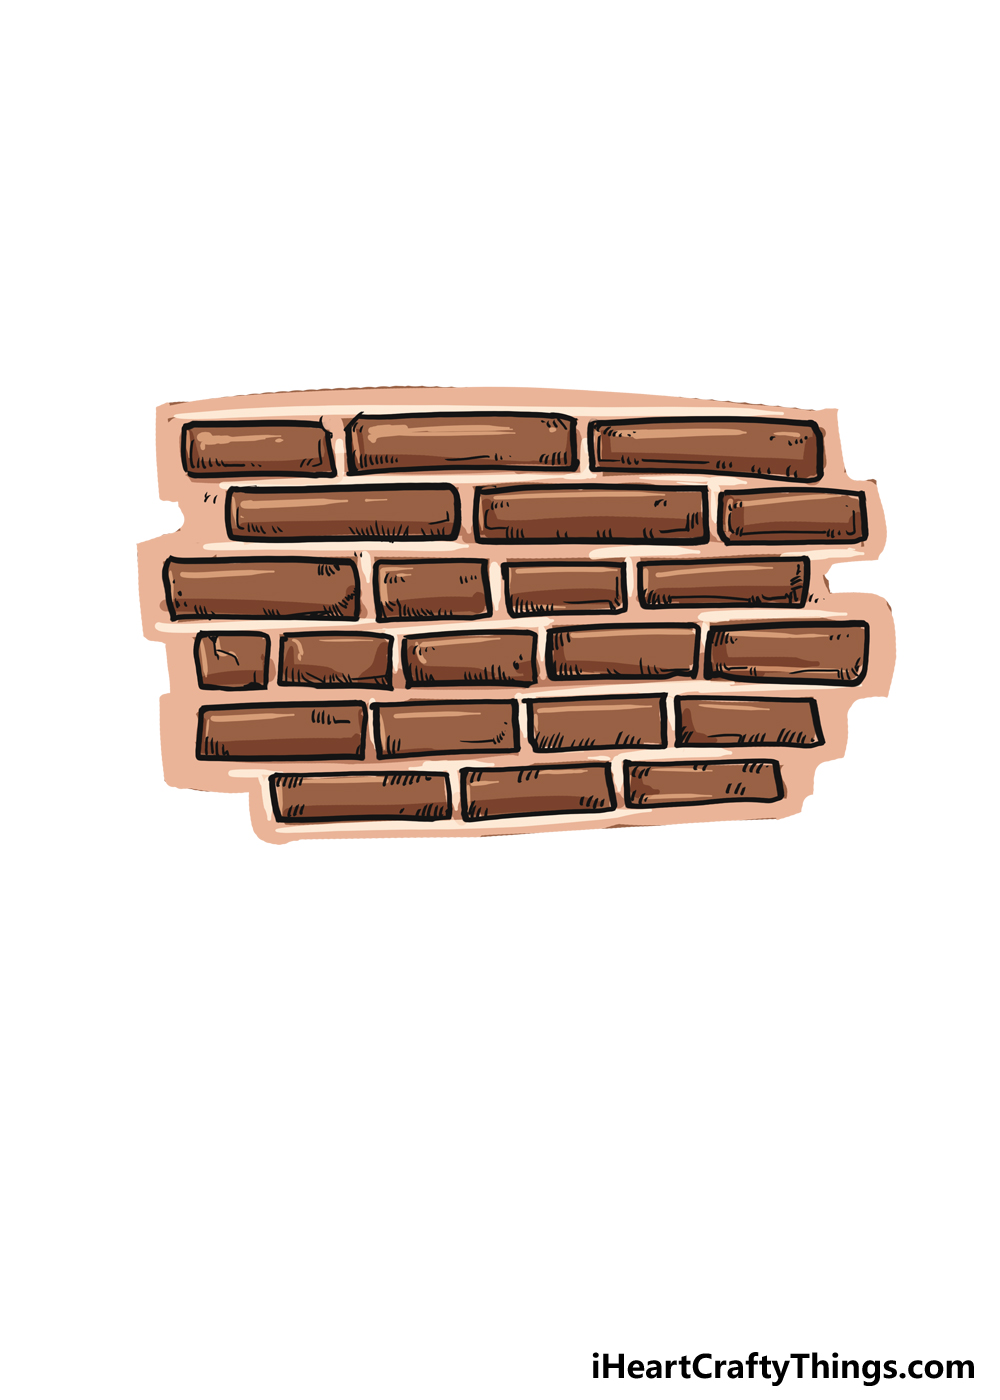
It’s time to finish off this drawing of a brick wall with some colors! As we have seen a few times in this guide, this could be more complicated than you may think.
While there are various color tones used in our design, we’re essentially using two shades of brown. But, when you look closer you will see light and dark tone details used for shading and texture.
Then, there is the matter of coloring in the concrete between the bricks. This is a rather fiddly process that can get a bit tricky.
The art tools and mediums that you use to color in details like these can make all the difference. For example, you can use colored pens, pencils or thin-tipped paintbrushes to color in these tight areas.
When coloring your own version of this brick wall, you also don’t have to stick to our color choices. You could use all sorts of colors for your own one, as bricks can come in all manner of colors.
For example, many bricks come in a dark red, or they may be painted over with some color of paint.
You have lots of options, especially if you decided to add some extra details that you can color as well.
Once you’ve chosen your colors, you can also have fun with the tools you use to apply the colors. What color scheme will you choose for this drawing?
Your Brick Wall Drawing is Complete!
You have finished all of the steps in this guide on how to draw a brick wall, and now you have a really cool wall drawing to show for it!
In this guide, we saw that drawing something as simple as a brick wall can still be challenging. In these steps, we aimed to make it easier and more fun for you by breaking it down.
We also wanted to make sure that you would be able to customize your drawing and add to it in any ways that you like. It would be really fun to see how you chose to finish off this drawing.
You can show off what your drawing looks like by sharing it to our Facebook and Pinterest pages. We hope to see your brick wall artwork on those pages soon to see how they look!