A bicycle is something we are all pretty familiar with, but it can sometimes be taken for granted.
It is a design that is really intricate and deliberate, and it allows for more efficient transportation, fun rides and even high octane tricks.
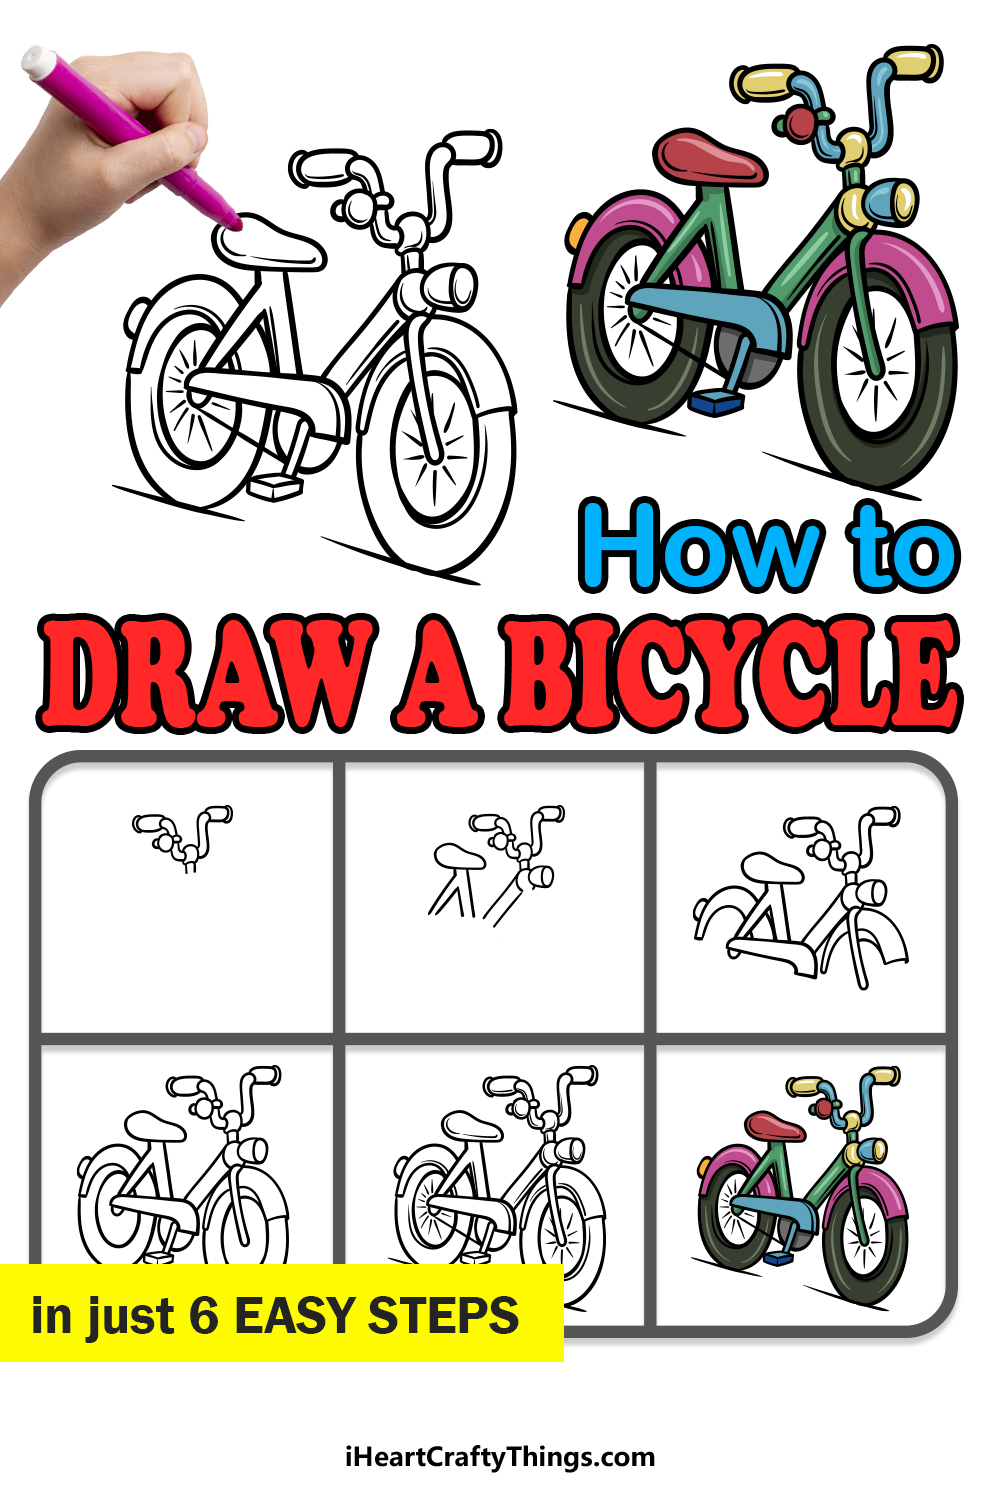
There are bicycles for pretty much every need and skill level, and it can be a lot of fun to master one! Sometimes riding one isn’t feasible, and learning how to draw a bicycle can be the next best thing.
This can be quite challenging thanks to that complex design we mentioned earlier, but that’s what this tutorial is here for.
Once you have completed this step-by-step guide on how to draw a bicycle in 6 steps, drawing one will be as easy as riding a bike!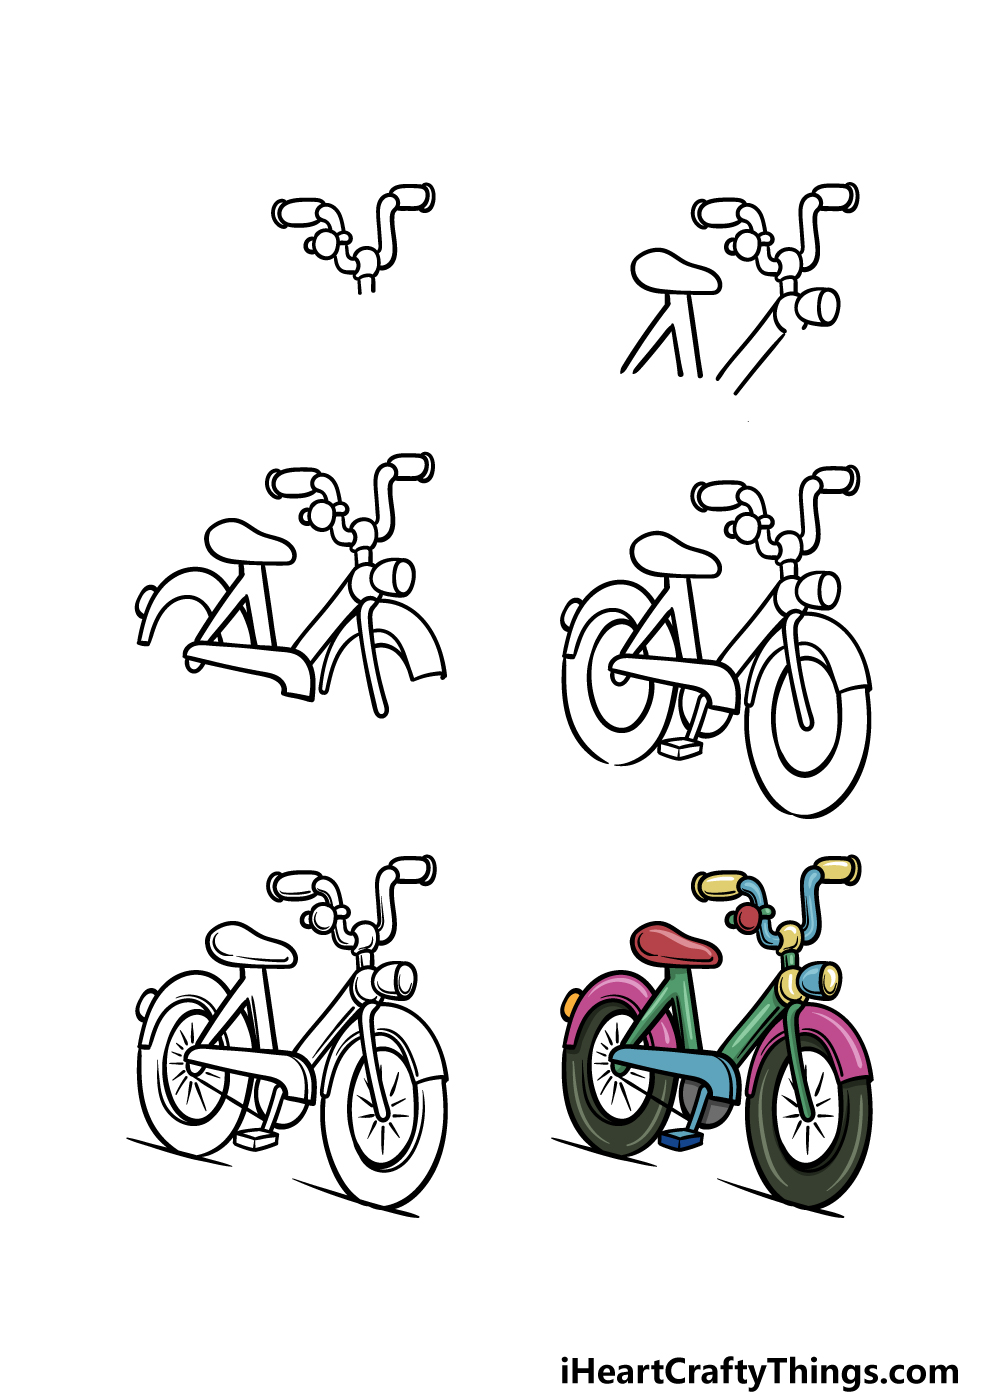
How to Draw A Bicycle – Let’s Get Started!
Step 1
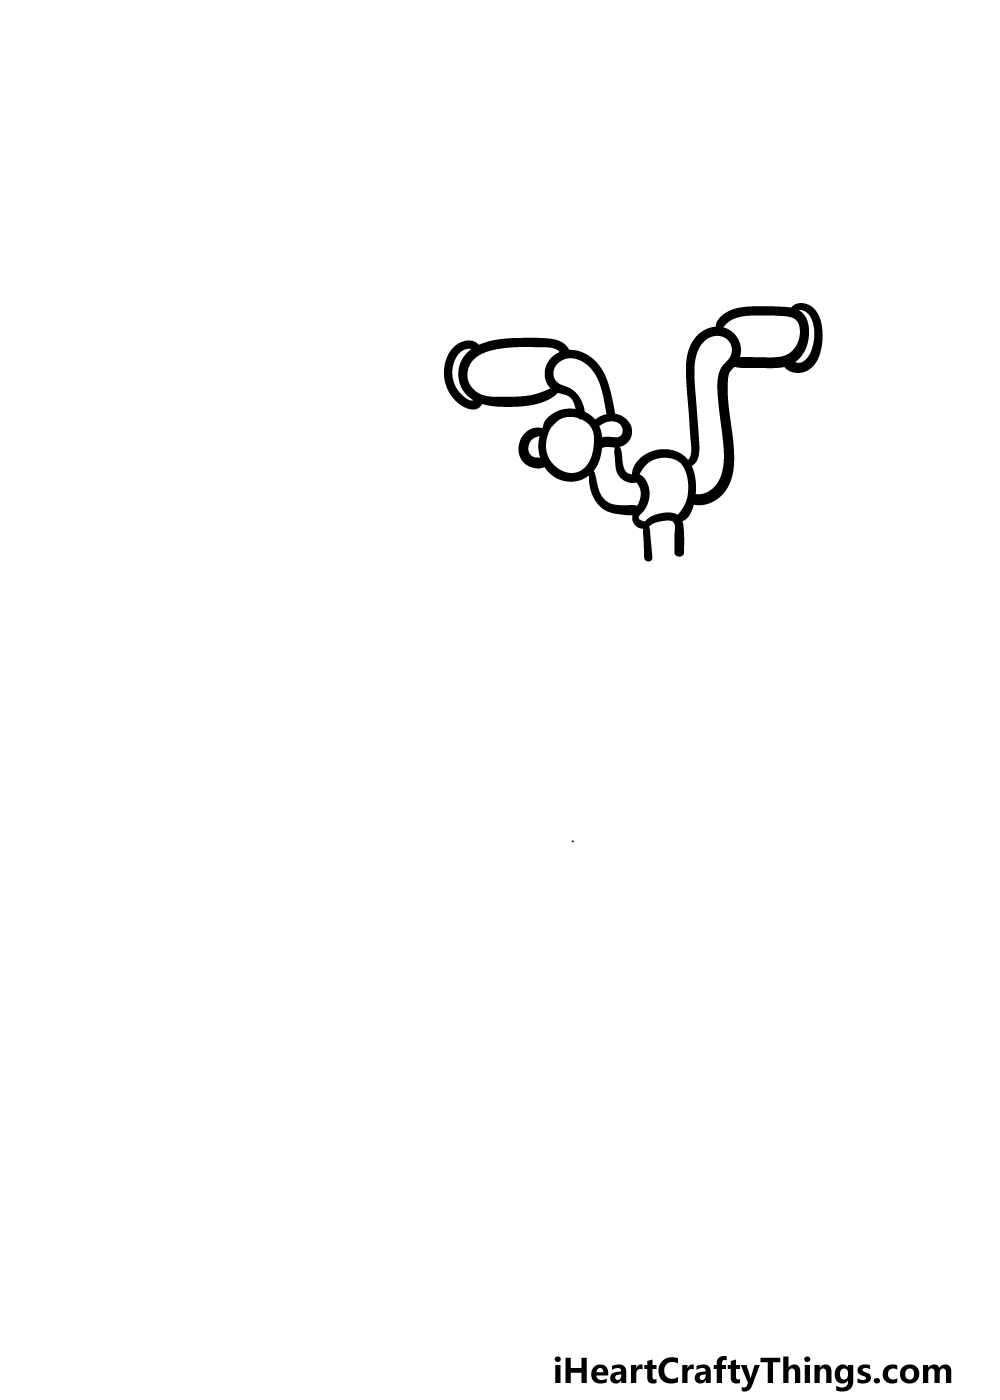
This guide on how to draw a bicycle will begin with the handlebars of the bike. Draw a rounded shape for the section that both sides of the handlebars will come out of.
Then, you can use some curved lines for the bars extending up. On the left, draw a small circular shape clipped onto the bar for a bicycle bell.
Then, we will be drawing the handle grips. These can be drawn using some long, flat rounded shapes at the ends of the bars.
Finally, extend some small lines down from the section holding the handlebars, and then you will be ready for the second step of the guide!
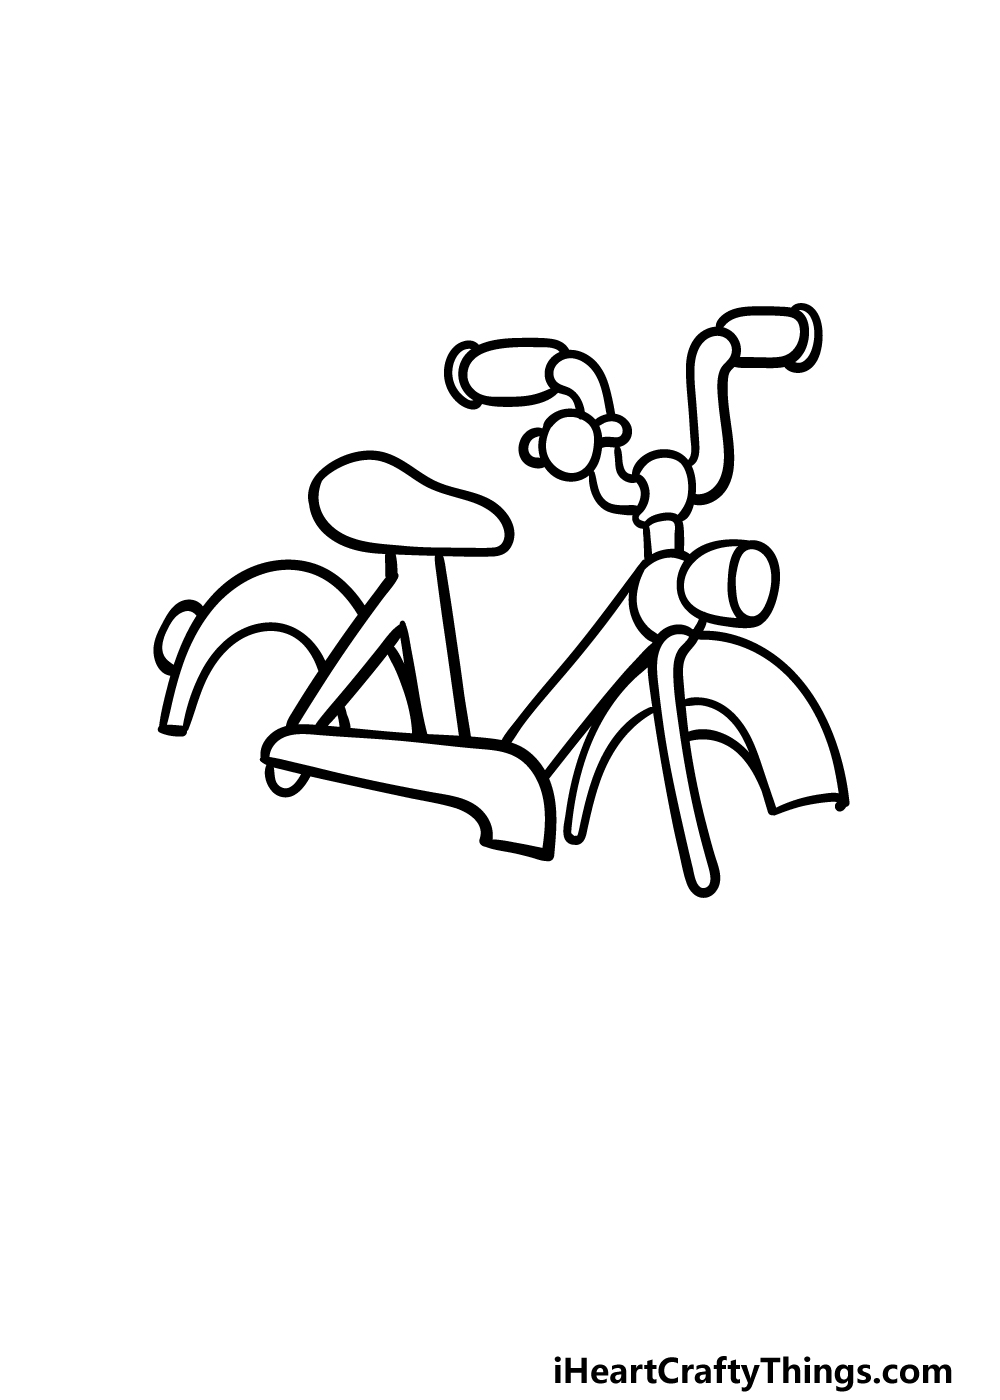
Step 2 – Now, start drawing the body of the bicycle
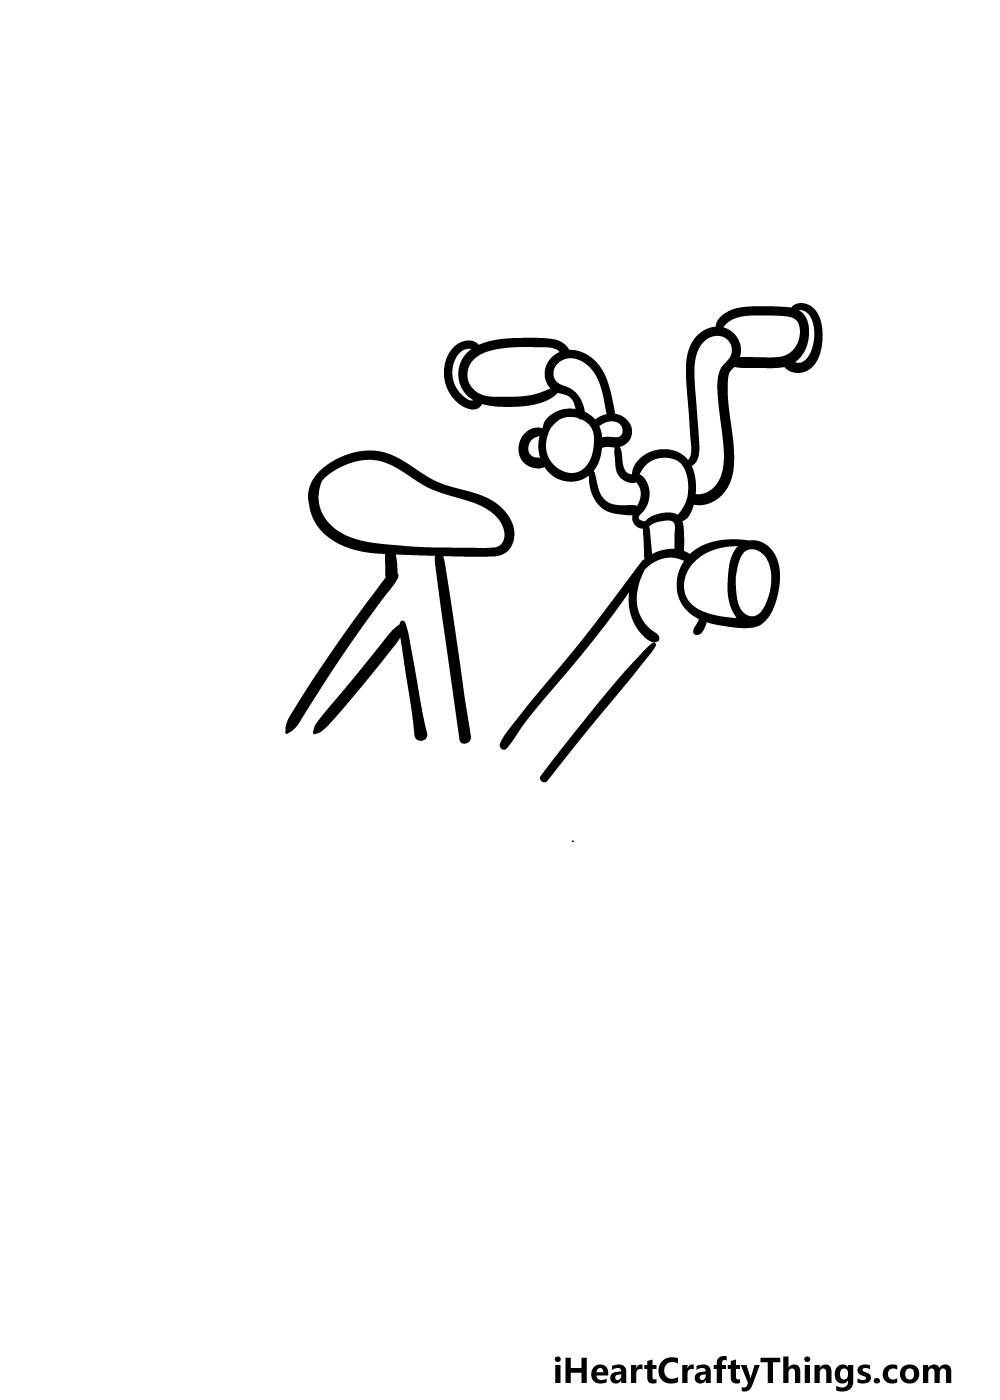
You have the handlebars done, and in this second part of your bicycle drawing we shall start working on the body of the bike.
First, draw a small rounded shape with an oval at the front of it beneath where the handlebars ended.
This will function as a small light at the front of the bike. This light will be attached to a small rounded shape, and then two straight diagonal lines will attach to that.
Then, you will be drawing the seat of the bike. The placement of this will be fairly important later, so try your best to position it as we did in our reference image.
We will finish off this step by drawing some more straight lines extending from the seat for some more bars. Then it will be time for step 3 of the guide!
Step 3 – Draw the covers for the wheels in this step
This third step of our guide on how to draw a bicycle will be about drawing some more sections of the bicycle.
First, use some curved lines to create the thin, rounded shapes that will serve as the covers over the tops of the wheels. Then, there will be another flat shape over where the chain of the bicycle will be.
Finish off by drawing another long, thin curved shape extending down from underneath the bell that will connect to the center of the front wheel.
Once you have it looking as it does in our reference picture, we will be moving on to step 4.
Step 4 – Next, draw the wheels and pedals
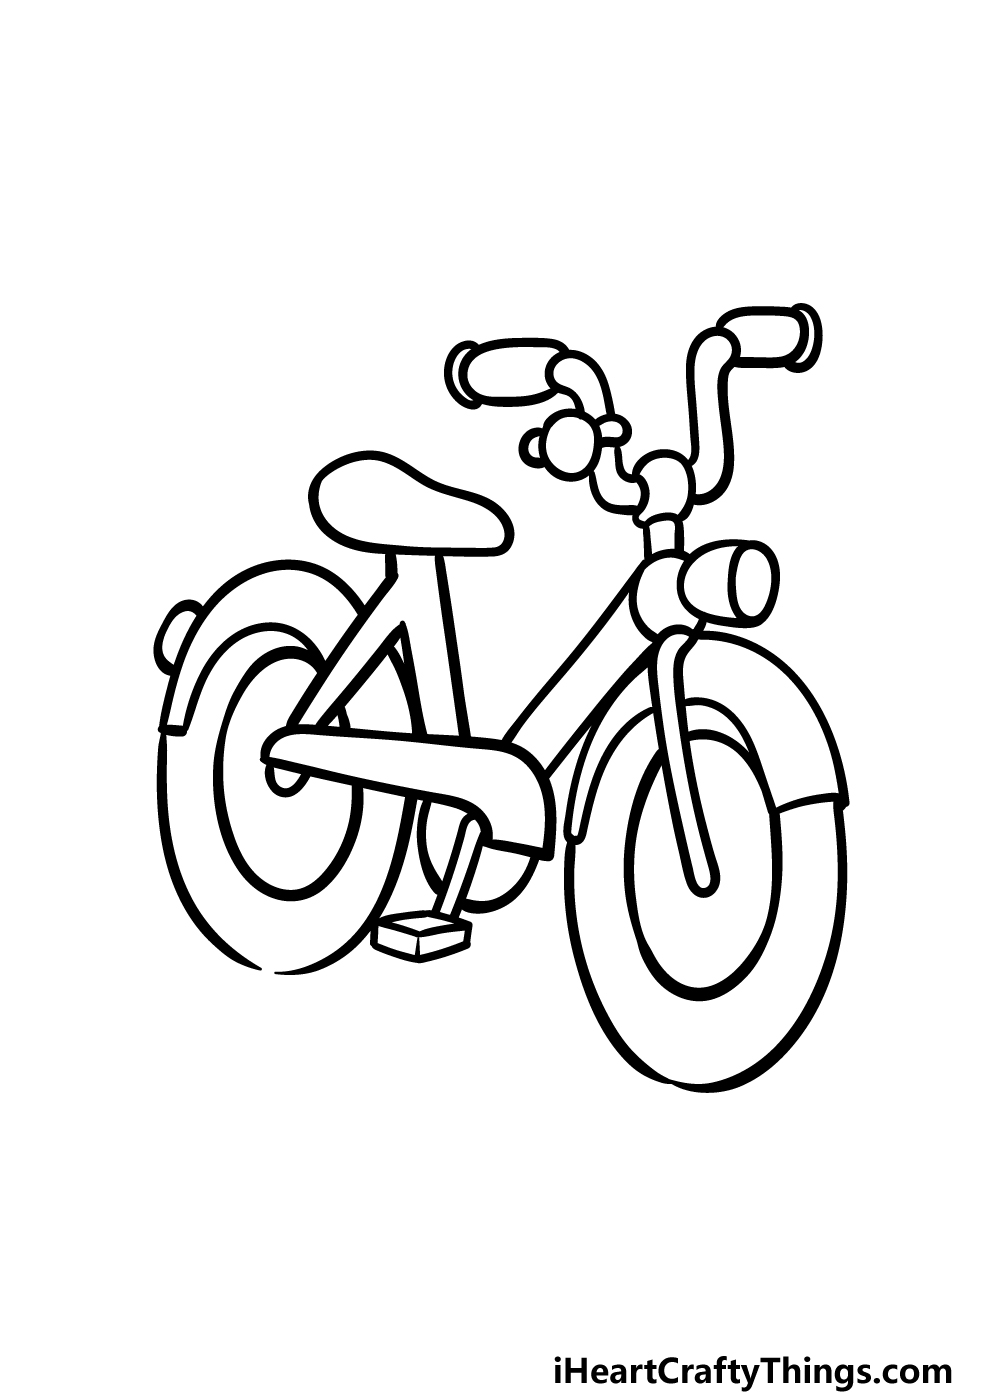
It’s almost time to start adding the final details and elements of this bicycle drawing, but first we have a few important parts to add.
It wouldn’t be much of a bike without some wheels, so we had better add some of those now!
You can draw these by adding two circles to the front and back of the bike and then by drawing a smaller circle inside each one.
Finish off by drawing the pedals of the bike attached to a circular shape, and then you can proceed to those final details in the next step.
Step 5 – Add the final details to your bicycle drawing
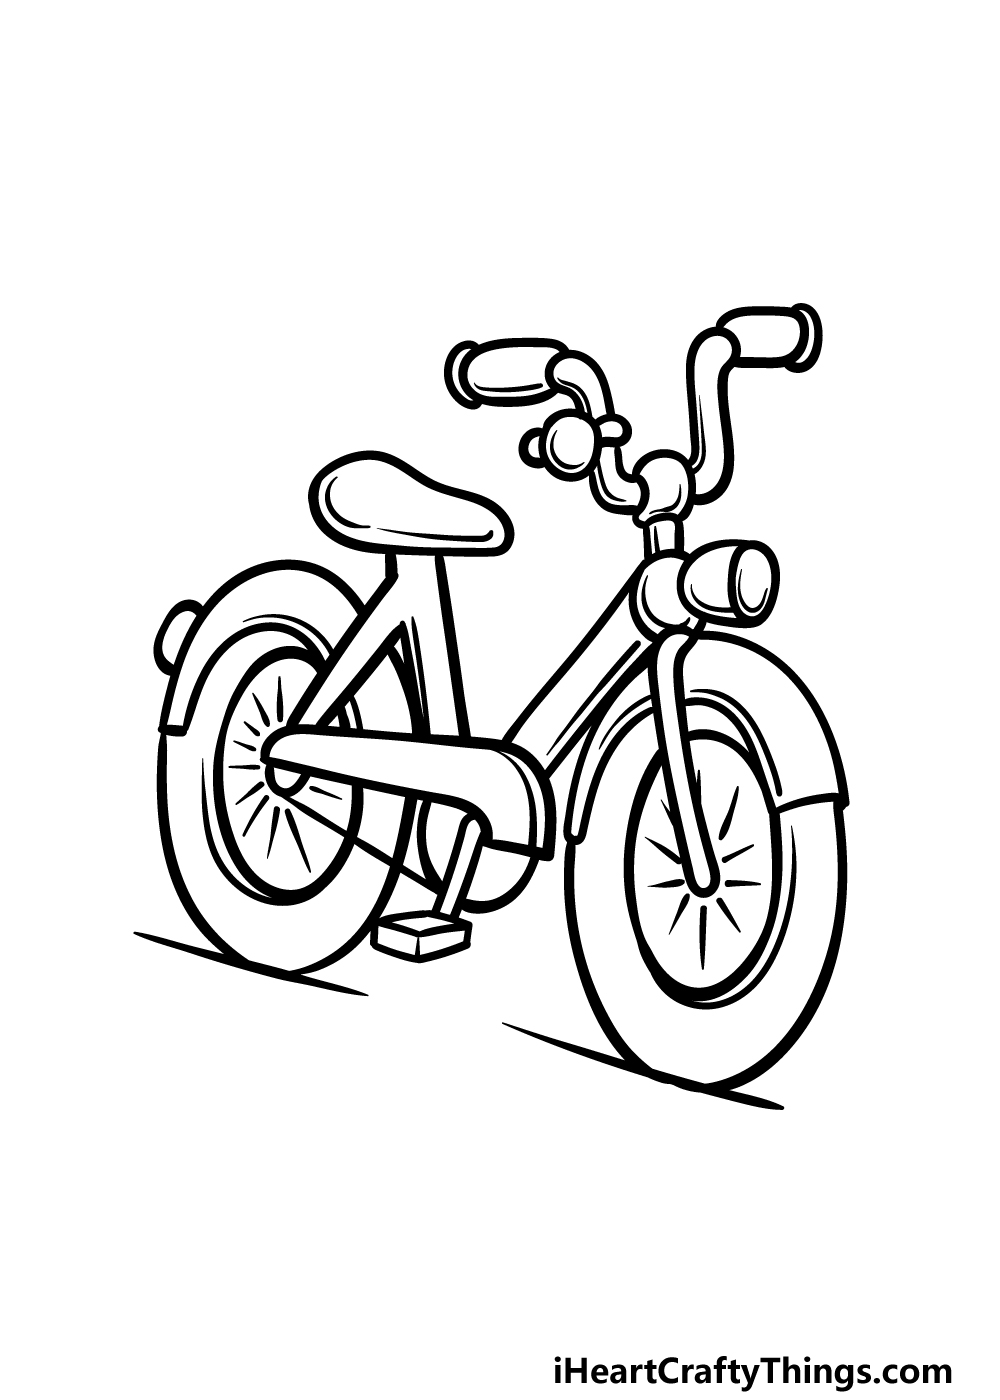
You’ve finished the outline for this picture, and now you can make it look even better by adding some final details and elements!
As shown in our reference image, we added some line details all throughout the image.
These help to show off the metallic textures of the bike body, and by adding lines into the wheel interiors you can portray the spokes of the wheels.
Finish off by drawing some horizontal straight lines for the ground this bike is on, and then you’re ready for the final step!
Before you proceed, you could also add any other ideas you may have. These could include a creative background, some fun accessories for the bike or even someone riding it!
These are a few ideas, but what else can you think of to finish it off?
Step 6 – Finish off your bicycle drawing with color
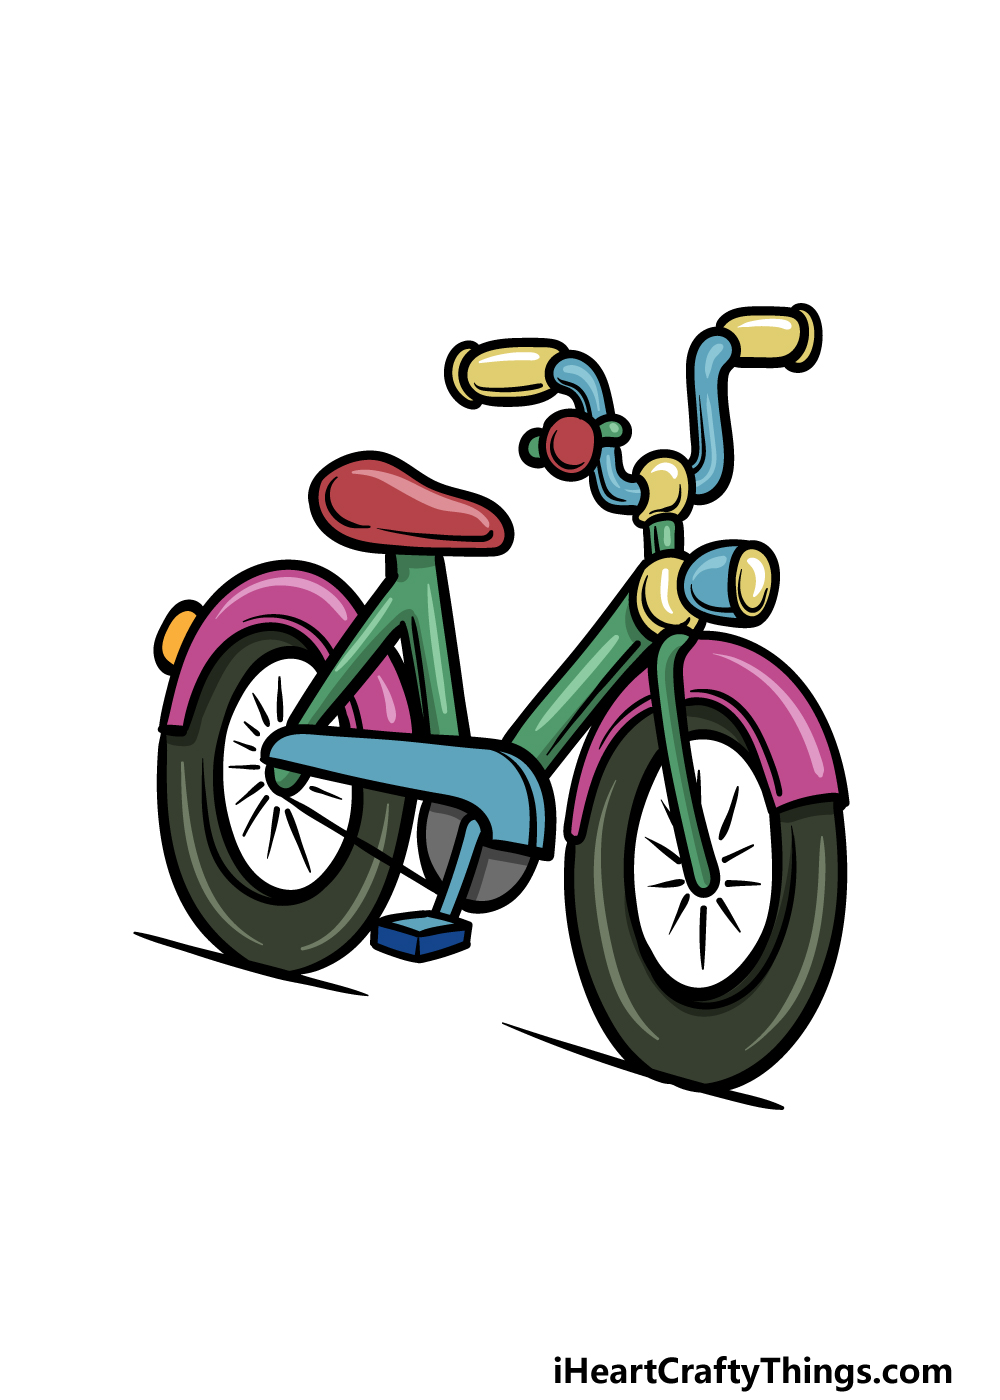
You’ve done an incredible job working on this bicycle drawing, and now you can have some fun finishing it off with some colors!
When it comes to colors, you’ll find that bicycles can come in pretty much any colors you can imagine.
This gives you a lot of freedom with how you could go about coloring it in. In our reference image, we wanted the bicycle to be bright and colorful, so we used different cheerful shades for the various sections of the bike.
This is an approach that you could take as well, but you should definitely feel free to use any colors you like.
When finishing this drawing, you have the perfect opportunity to experiment with your favorite colors and art mediums, so have fun getting creative and see what happens!
Here’s how you can make your bicycle drawing even better…
Take a ride to drawing fun with these ideas for your bicycle sketch!
This drawing of a bicycle has lots of colors on the various parts of the bike. These look great, but you could also customize the colors a bit depending on your own preferences.
You might prefer a smaller range of colors or a limit to one or two. This would depend on what you like, and you could try out any colors and combinations you like.
Which colors would you like to use?
Some people like to hang various accessories on their bicycles, and you could do the same for this one. There are a few classic accessories you could have on this bicycle.
You could have a bell on the bike, some streamers or maybe even a card clipped to the wheel.
These are just a few examples you could go for, but this is your chance to design your very own custom bike!
What are some accessories you could add to this bike to personalize it?
A bicycle can be ridden through many environments and conditions, and these could be used as a background for your bicycle drawing.
If you have some locations you like to ride your real bike, then these could be used as inspiration.
If there are some places you would love to ride a bike, then you could use your imagination for these backgrounds instead. It could be hard to choose a location, so you may wish to make a few variations!
To really finish off the feeling of you riding this bicycle through your favorite places, you could add a character to this bicycle sketch. The obvious choice would be to use yourself as the model for this character.
You could also go for a different character drawn in any style you like, however. This would be a great step to pair with our previous one.
Whether you have a bike you love or hope to get one some day, this is your chance to show what a perfect day with your bicycle would look like!
Your Bicycle Drawing is Complete!
The bicycle has such a specific design, and that can sometimes make drawing one a frustrating and unpleasant experience.
Hopefully with the help of this guide on how to draw a bicycle you found it to be easy and fun to master!
Making this drawing easier was just part of our goal, as we also wanted to make sure that there would be plenty of room for your own creativity.
Now that you have finished the guide, you can finish it off with your own ideas and extras!
This guide you have just completed is one of many that we have waiting for you on our website!
You can visit us there to sample more amazing guides, and you’ll want to keep checking in as we have many more coming out soon!
When your bicycle drawing is all done, you can share your artwork on our Facebook and Pinterest pages to show it off!