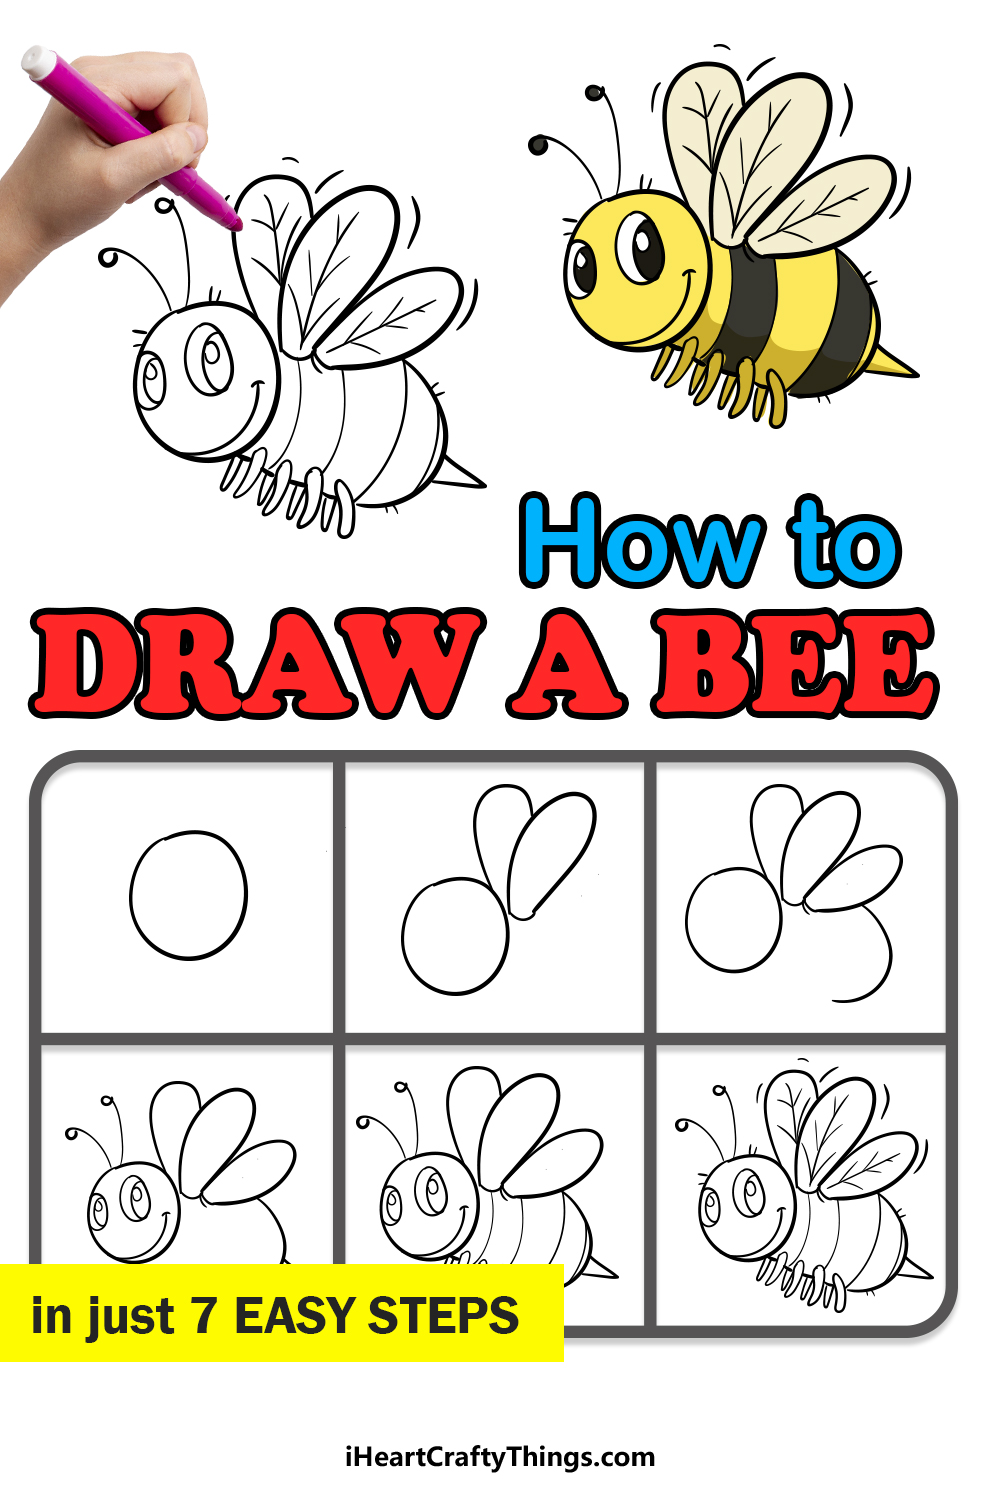
Anyone wanting to know how to draw a bee won’t want to miss this guide! You’ll have everything you need to create and customize your very own cartoon bee by the end.
There is a lot of buzz around bees, as they not only are important for our environment but also produce delicious honey for us to enjoy.
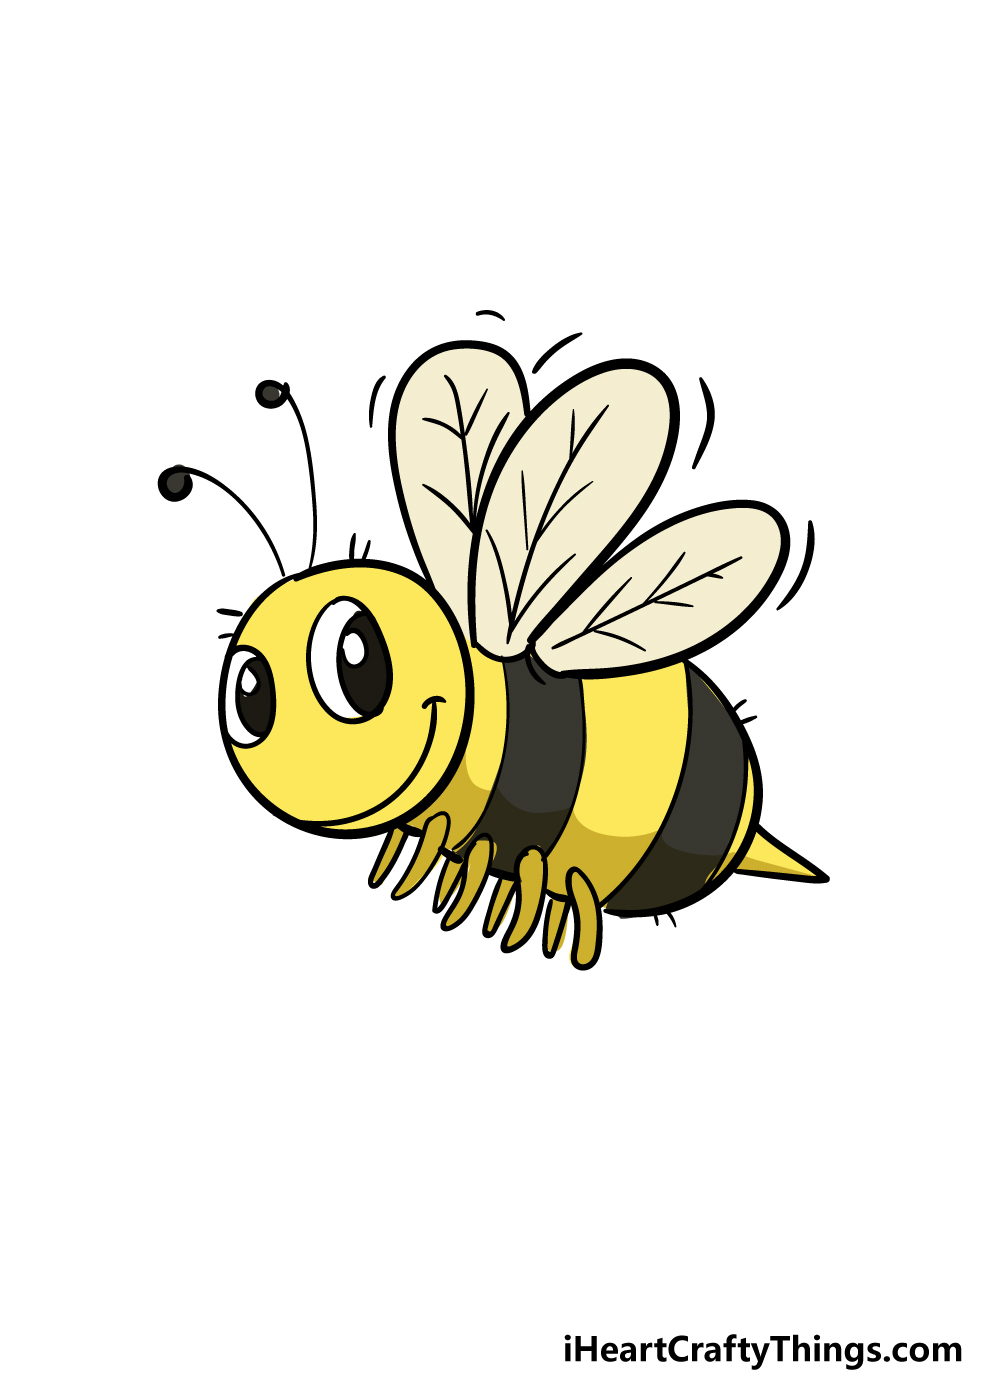
They also look beautiful with their little yellow and black stripes, and that’s why they look so good when featured in art. If you love bees as much as I do, then this guide is for you.
You will see how to draw this cartoon version of a bee, including the stripes, feelers and stinger of the insect. It’s all done in a whimsical cartoon style, and it would make it easy for you to add a hive or similar background for your creation.
It’s simpler than you think, so allow me to show you how it’s done!
Watch This Guide On How To Make A Cartoon Bee Drawing!
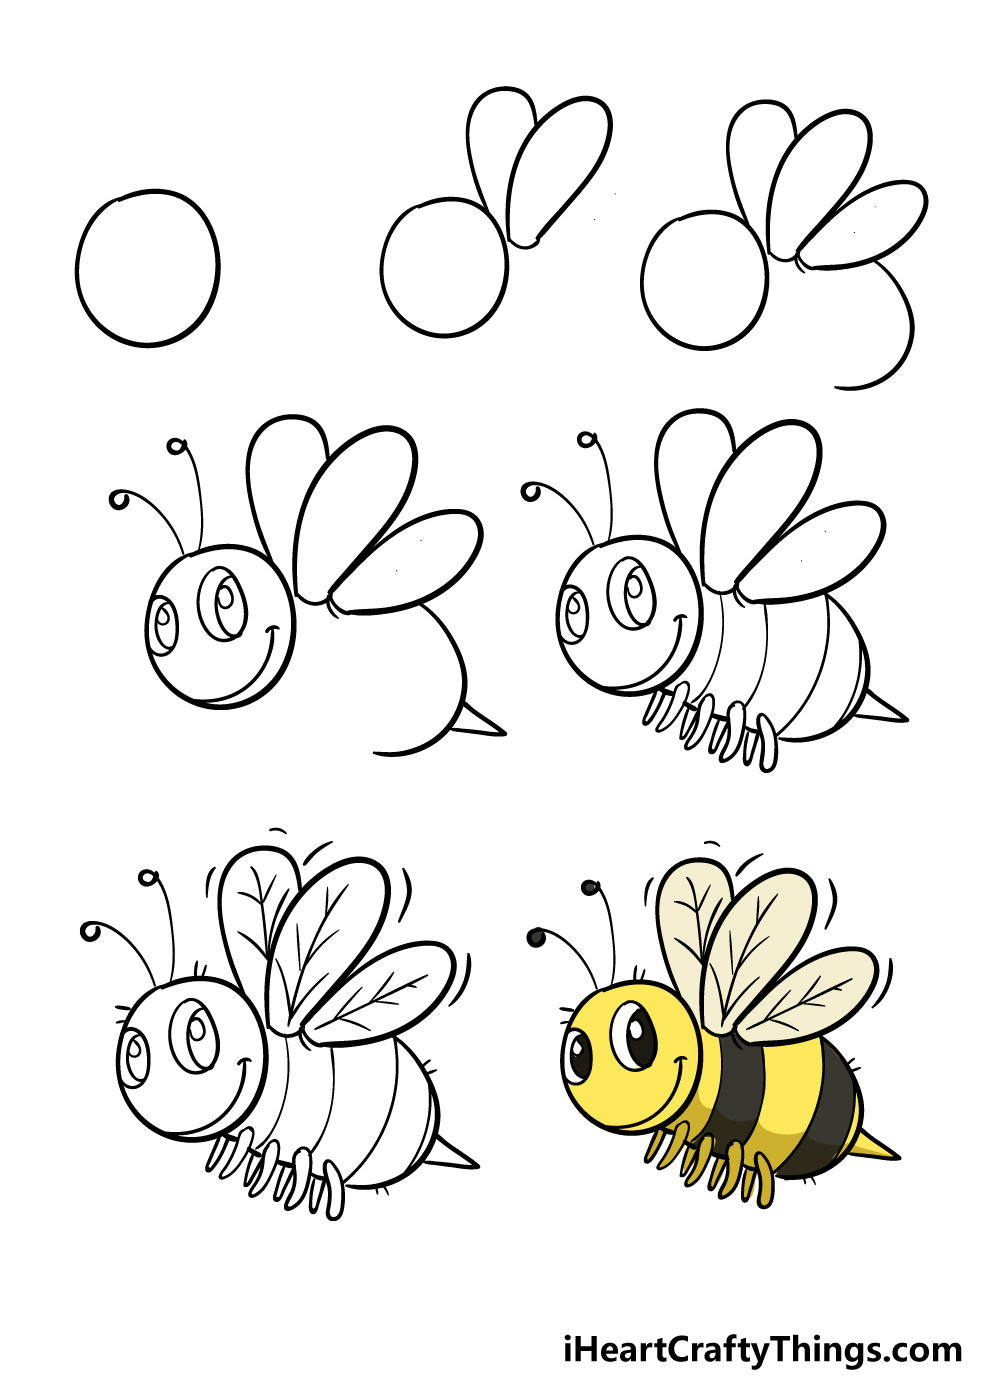
How to Draw A Bee – Let’s get Started!
Step 1
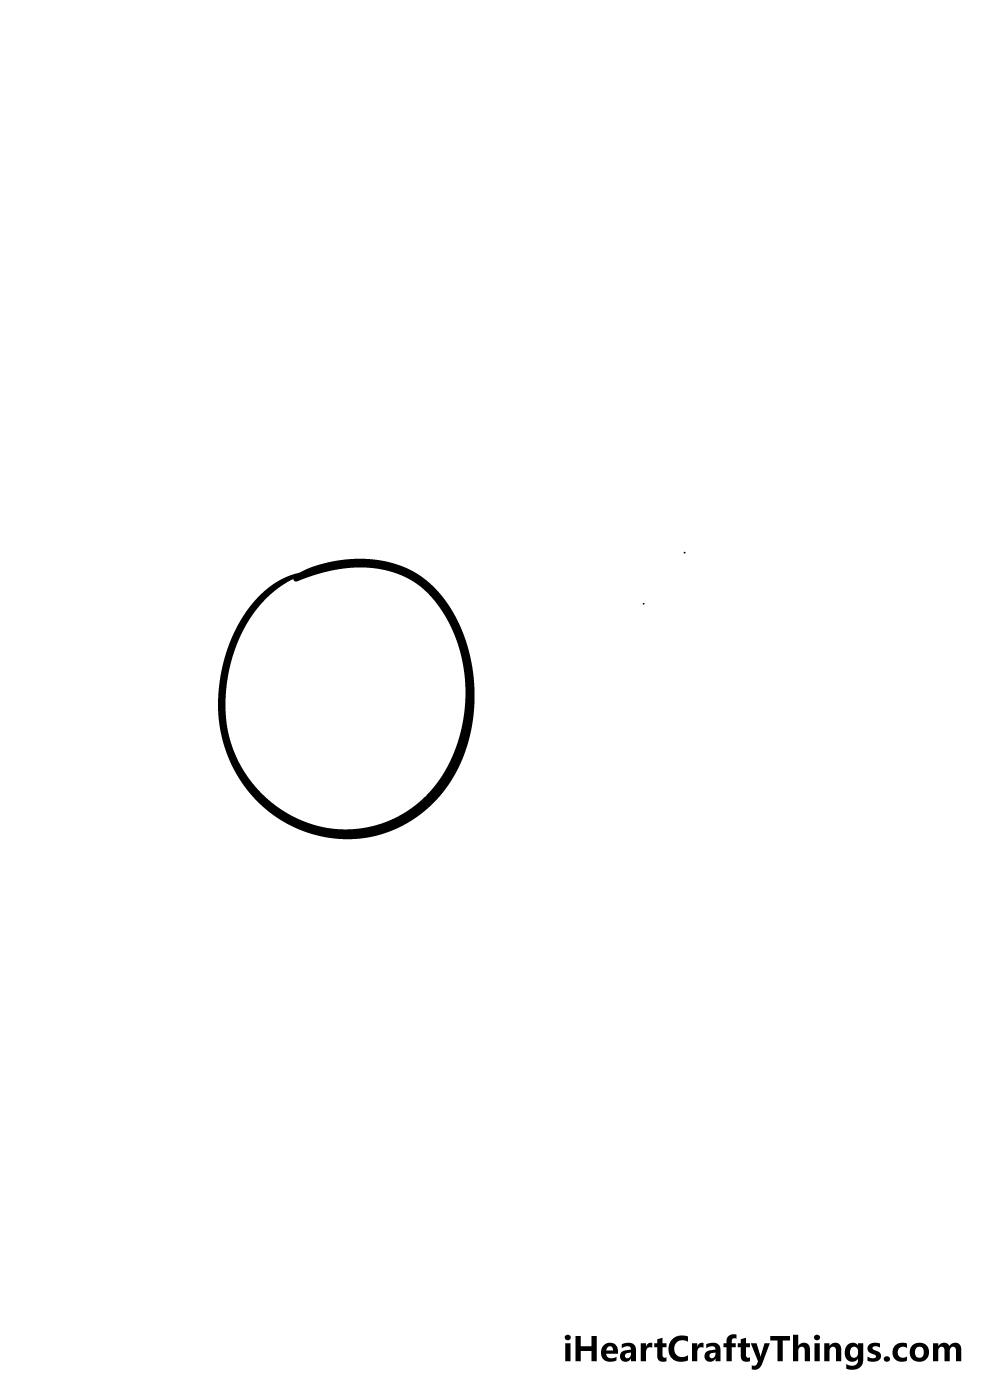
In this guide on how to draw a bee, we will be starting with the head of your bee. To get this started, you should start with a circle.
Sometimes when a circle is needed for a drawing, I would recommend using a drawing compass for a perfect circle, but in this case, the circle doesn’t need to be perfect.
This is one circle that you should do freehand to give it a personal touch.
Step 2 – Add in the first bee wings
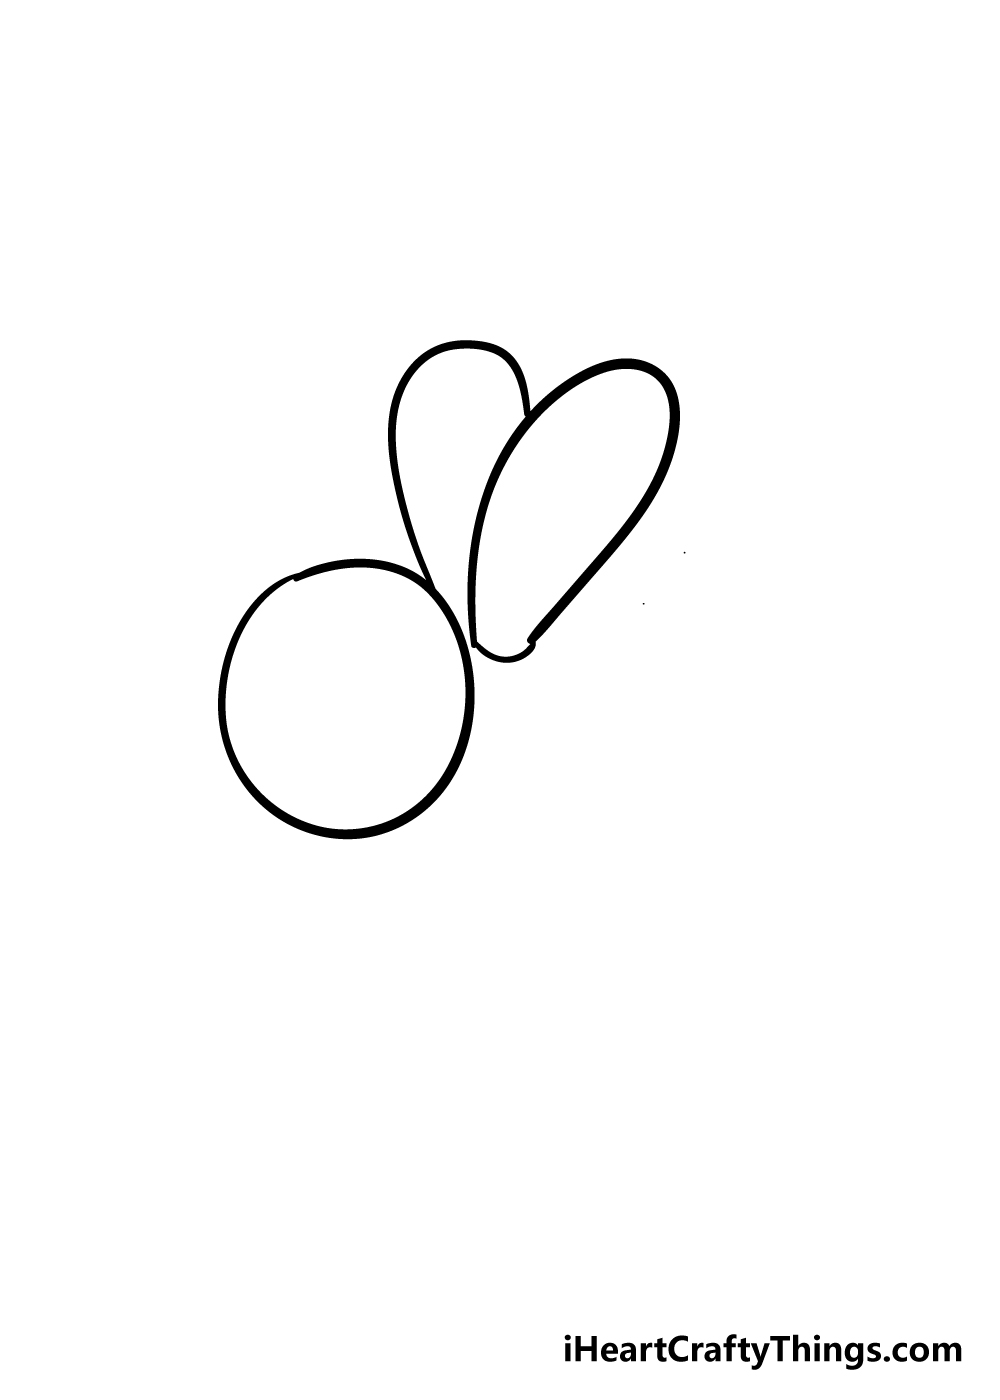
Now that we have the head of your bee drawing, we shall start with the wings of your bee. In this step, we shall be adding in two of the wings.
These wings will have a long, rounded shape, with the other one coming from the other wing that’s closer to our view. Once you have these wings drawn in, you can move on to the next step.
Step 3 – Draw in another wing and the start of the body
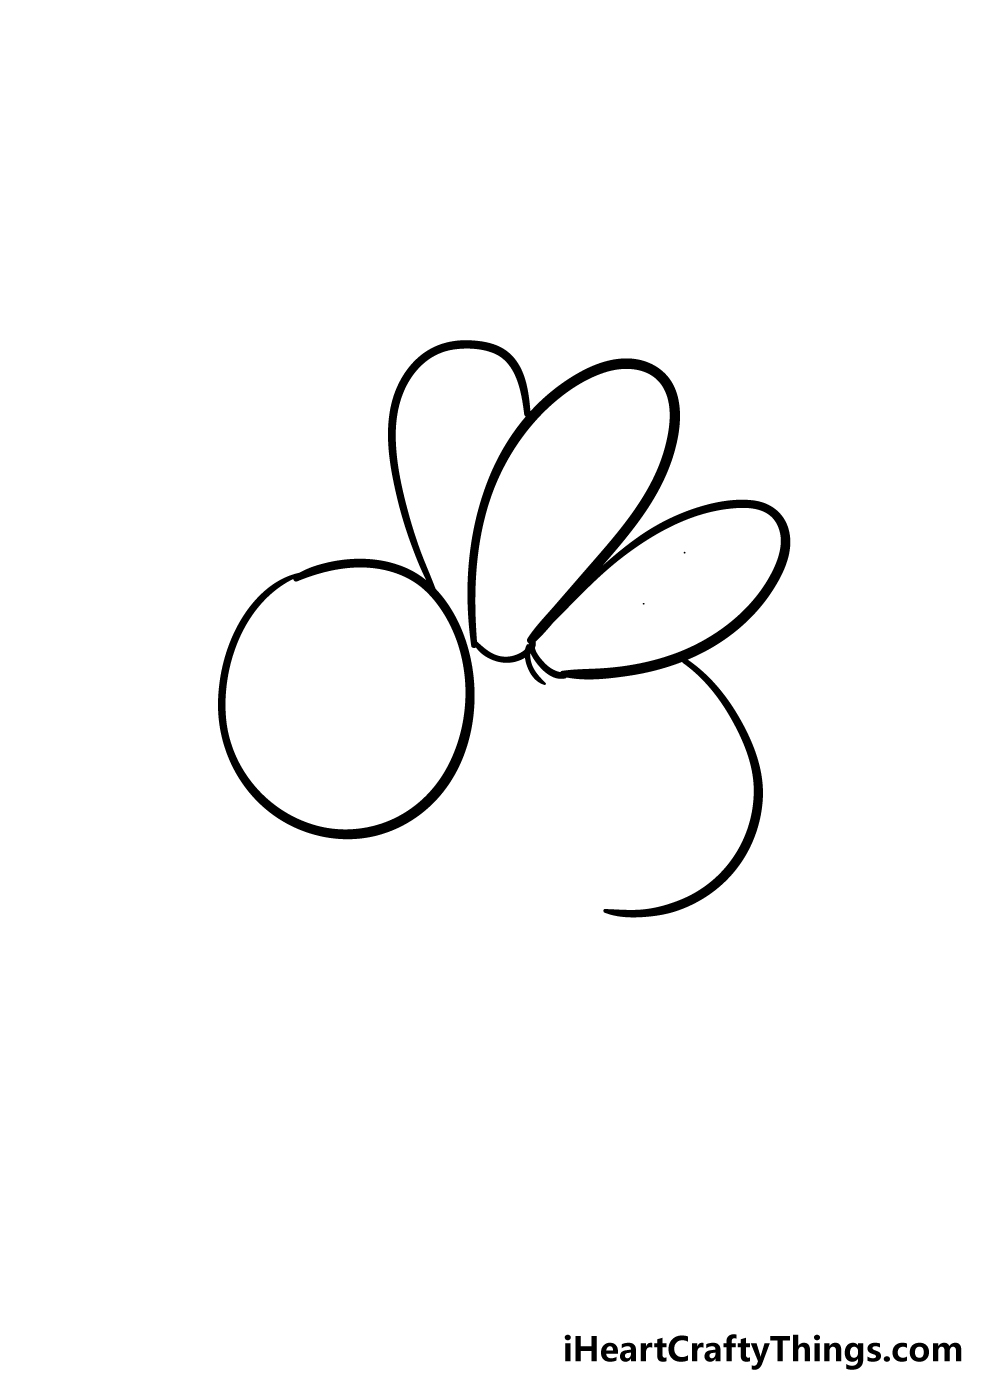
For this step of our guide on how to draw a bee, the first thing you should do is draw in one more wing behind the other ones.
Once you have the last wing drawn in, you can use a rounded line to create the body of the bee.
Step 4 – Add in a face and stinger
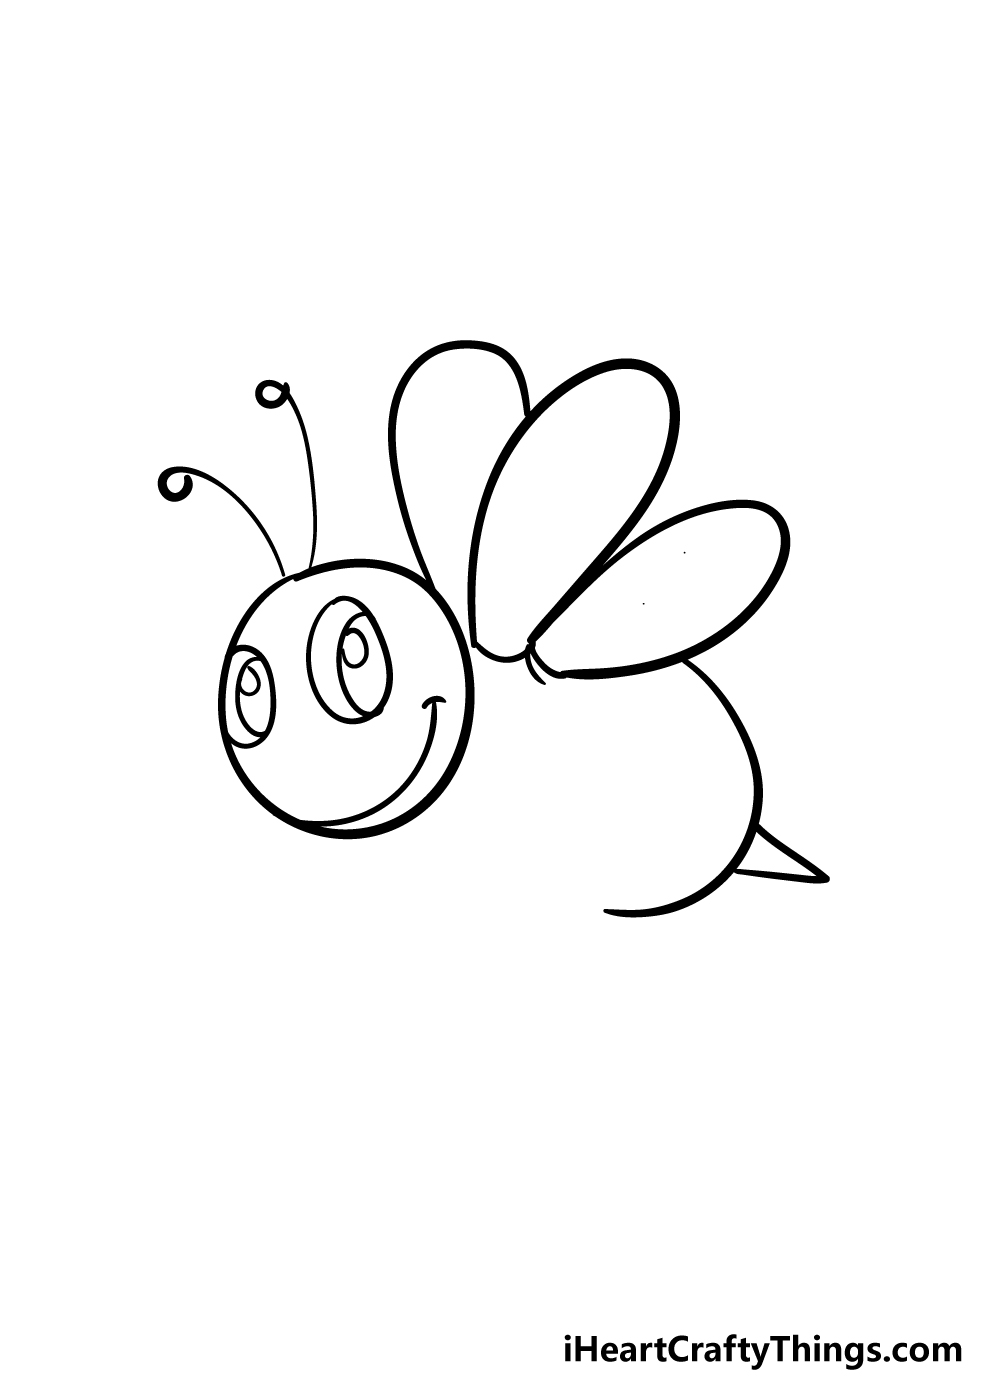
Your bee has wings and a body, so now it needs a face and some more details! To start with, let’s draw in some eyes for your bee drawing.
The eyes are made up of two long, oval shapes with more ovals within them to form some big eyes.
Once you have the eyes in, you can use curved lines to create a smiling mouth and then also to add two antennae to the head.
For the final bit of this step, you can add two straight lines to the back to form a stinger for your bee.
Step 5 – Give your bee some stripes and legs
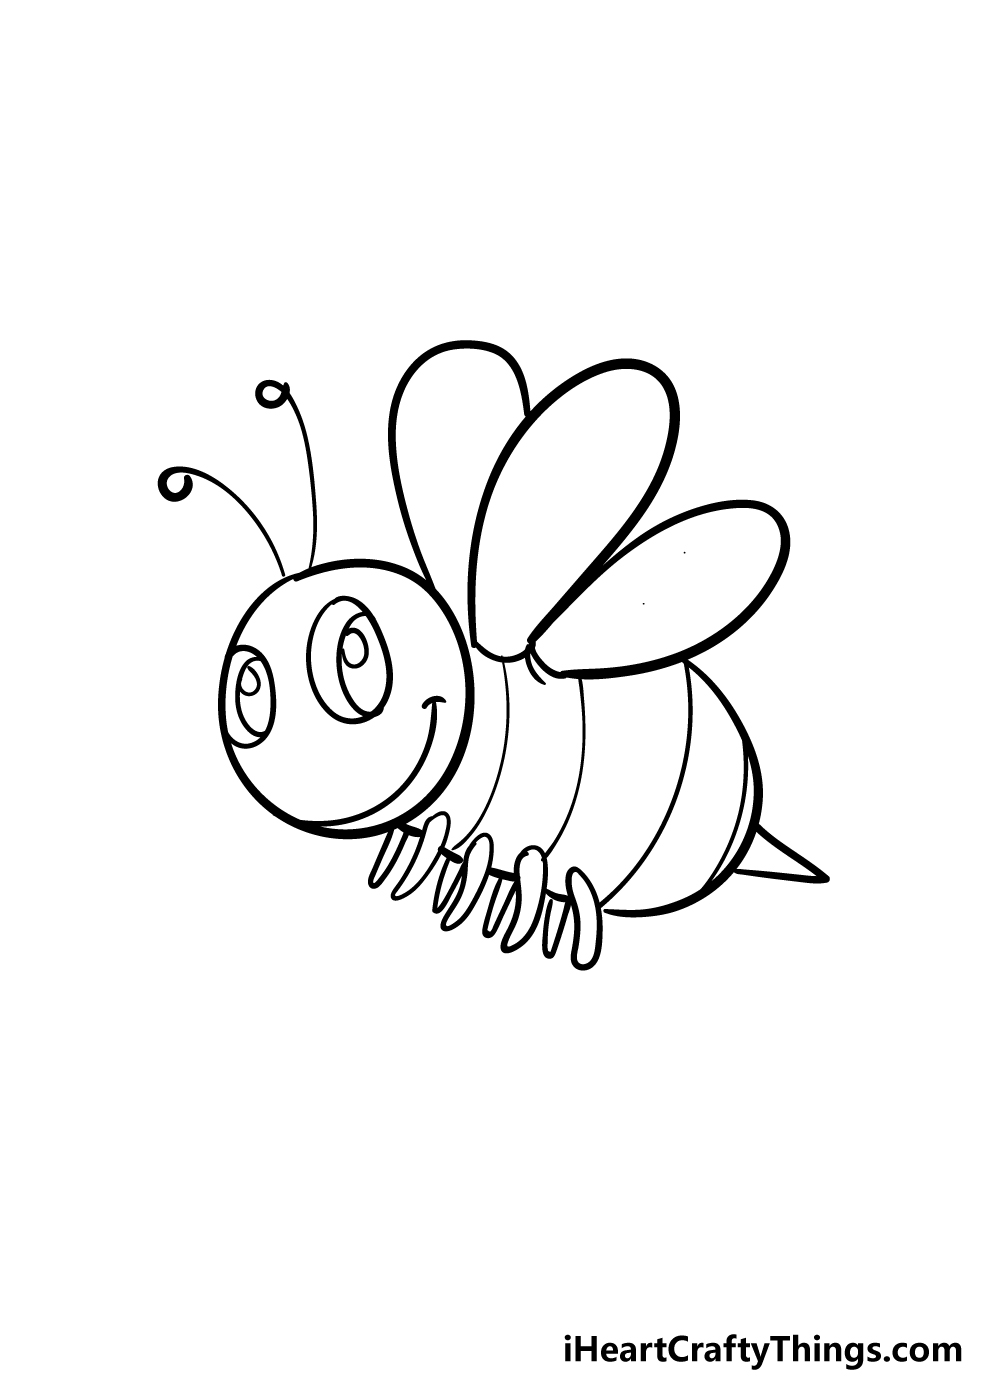
This bee drawing of yours is starting to look really great! For these next couple of steps, we shall be adding in some final details.
For this step, we will be adding in some stripes first for your bee. Every bee needs some stripes, so that’s why we need them for your drawing! These thin lines will extend along the width of the bee’s body.
Next, you can use some long, rounded shapes to the belly of your bee to make some legs. Once you’ve added in these legs and stripes, then you can move on to the final details!
Step 6 – Finish off the final details of your bee
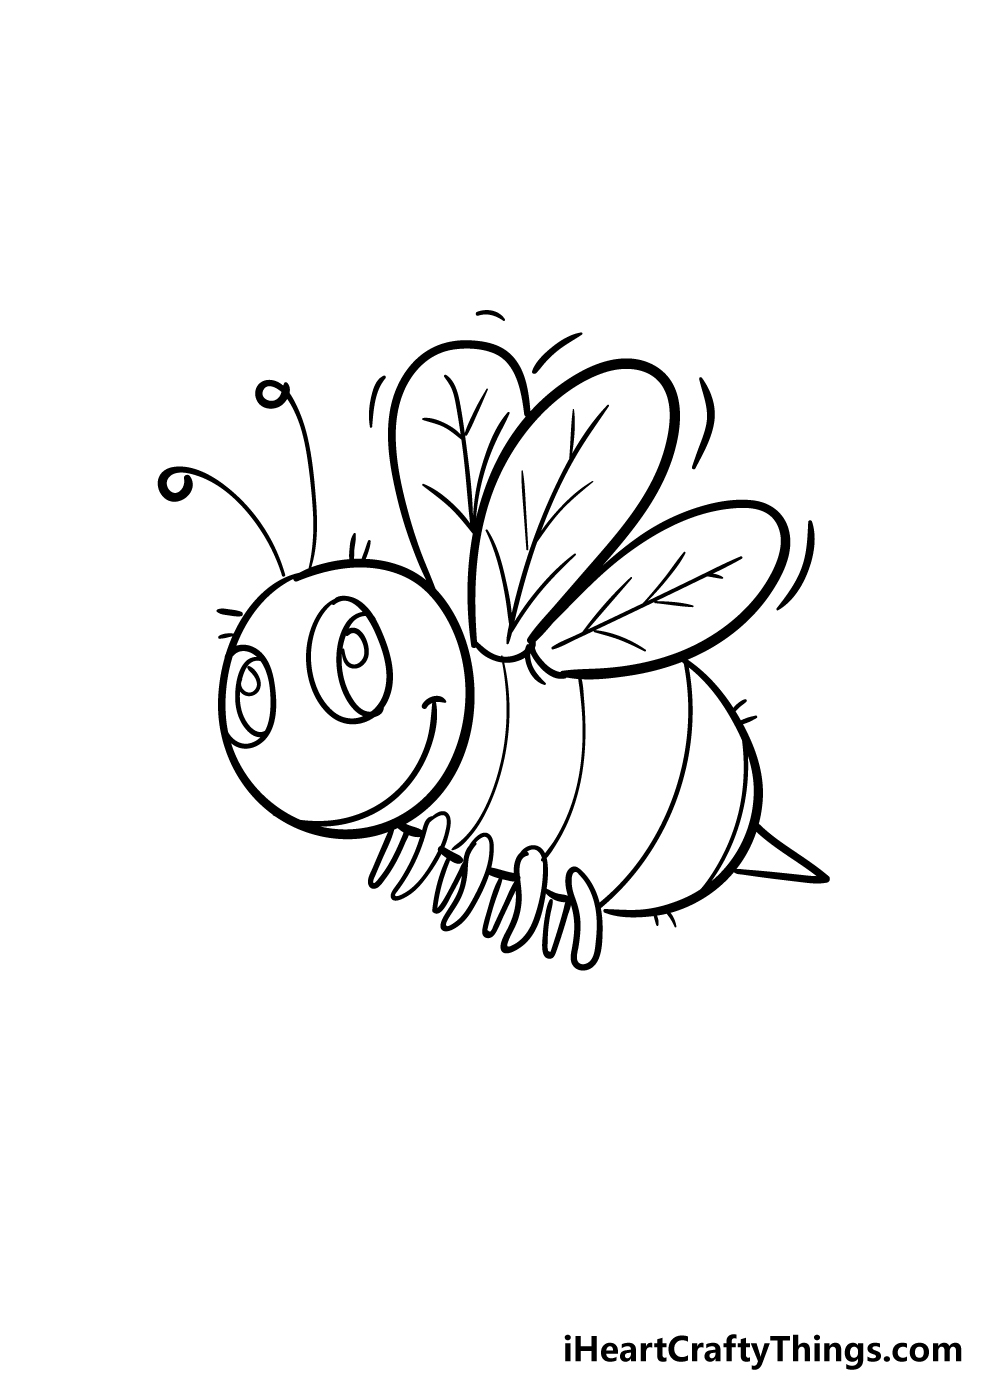
You’ve almost completely finished your bee drawing now! Before you can move on to the coloring stage, we will just add in some final details.
First, you can add some thin lines to the wings of your bee. These will form the veiny patterns of your bee’s wings. The last few details are ones you can be a bit creative with!
We’ve shown a few that you can add, such as little hairs poking off the bee and lines to show movement around the wings, but you should add in details that you think would look good!
This is a chance for you to show off your creative skills and flair by adding some fun details to your bee drawing. How will you finish off your awesome drawing?
Bonus: Create Some Cute Cartoon Insect Friends For This Bee!
We focused on just the bee in this guide, but we think it would be even better with some friends! Later on when we look at some additional ideas, we speak about adding more bees to create a colony.
That’s a fine idea, but it would also be fun to add some other insects! There are thousands to choose from, so you could adapt any of your favorite insects to this style.
Let’s say that you choose an ant, for example. You could start by looking up some pictures of ants.
Try to pinpoint the main aspects of the ant and then follow through the guide with this picture to help you. Simply change all of the details that are specific to the bee and make them look like the ant
This could apply to any insects, and you could even make cute versions of other creatures to join this drawing of a bee. It could be a spider or even a small rodent like a mouse.
Once you have chosen your favorite creatures to add to this artwork, you could also make a background setting to have them hanging out in.
It could be a location where you could imagine insects spending time, or it could be something more creative! There are so many ways to finish off this drawing, and you could use colors and special details to emphasize the fun.
If you want to try different art styles for each new character, that would work as well. There are so many ways to do it, so now it’s up to you!
Be sure to try out any cool ideas you have before moving on to the next step of this guide on how to draw a bee.
Step 7 – Finish off your bee drawing with some color
Now that your bee is drawn and you’ve added in the final details, the last step is to have some fun with colors!
The previous step left room for you to be creative with details, and this step is another one where you can let your creativity flow!
We’ve shown how we would color in our picture, but you should choose any colors or variations that you love! You can also have some fun with the different art tools and mediums at your disposal!
Some options include acrylic paints, watercolors, colored pens, pencils and crayons to name a few. Maybe you could try out some new mediums that you haven’t used before!
You could also have some fun being creative by drawing and coloring in a great background for your bee drawing. What kind of setting do you think you would draw in for your bee?
Here’s how you can make your bee drawing even better…
These tips we have will show you how to make your bee drawing look even more amazing!
This bee sketch looks great already, but we think it would look even better with a cool background!
Bees can turn up in some unusual places, so you could pick any setting. It could be in a beehive, at a picnic or inside a house.
These are a few typical locations, but you could also go for something a bit weirder if you prefer! Maybe it could be at a party for insects for one fun idea.
Bees will often be in a group, so we think you could make this bee drawing better by adding some bee friends!
You could do this by following the steps of the guide to add more bees to the scene. If you were to do this, you could differentiate the bees by adding a unique facial expression for each one.
That would be a fun challenge that would make the picture even more unique. How many bees would you add to the scene?
We showed you a few ways you could color this drawing of a bee in the guide, but you can have lots of fun experimenting!
Bees are famous for their yellow and black color scheme, and making the yellow nice and bright would make it look great.
If you were to do this, you could use some markers or colored pens to create colors that pop on the page. If you have any other art tools and mediums you can use, then be sure to try them out!
This picture would be perfect to turn into a card for someone! You could draw this bee on some hard cardboard, color in the background and then fold it over.
By adding a phrase or a longer message, then it would make for a great gift. Or, you could get someone to help you frame the picture once it’s done to present it that way.
Artwork is a perfect gift that shows someone you really care!
Your Bee Drawing is Complete!
With that, you have reached the end of this guide on how to draw a bee, and do you know what that means? It means you have succeeded in learning how to draw one!
You should be proud of getting to the end of this guide, and we hope you had a lot of fun with it! We tried to make this guide in a way that would be helpful in showing you how to draw a bee as well as making it a guide that would provide you with lots of fun.
Finishing the details and the colors of your bee drawing is just part of the fun, though. Now you can show us what skills you have by personalizing your bee drawing in a few ways!
Some we mentioned are using different art mediums or adding in a fun and colorful background for your drawing. These are some ideas we had, but what do you think you’ll add to this drawing?
This step-by-step guide is going to be followed by many more awesome drawing guides for you to enjoy!
We hope that you’ll keep checking out our site to make sure that you catch all of our new guides!
We would be thrilled to see how you finished off your bee drawing, so we hope that you will share it on our Facebook and Pinterest pages for us to admire!