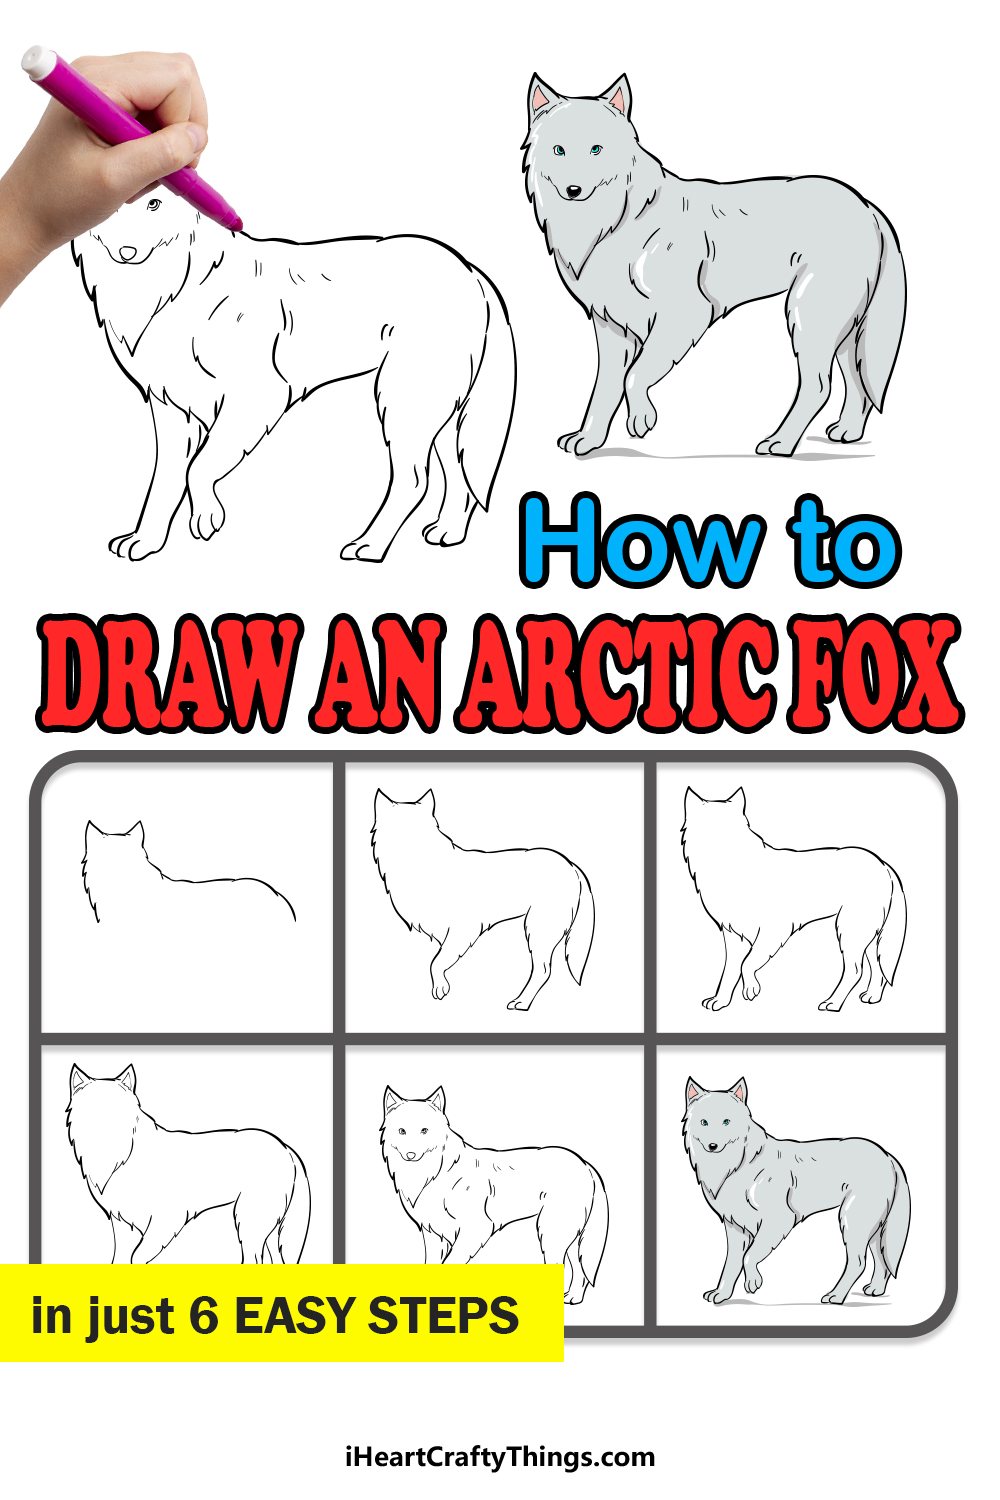
The arctic fox is one of the cutest little predators in the world! These arctic dwelling foxes may look like fluffy cuties, but they are also efficient hunters perfectly adapted to their environment.
It is probably most well known for its cute appearance, and many fans of this animal would like to learn how to draw an arctic fox.
By the end of this guide, you will know exactly how it’s done, so be sure to read until the end!
Our step-by-step guide on how to draw an arctic fox in just 6 steps will have you drawing one of these cute foxes in no time!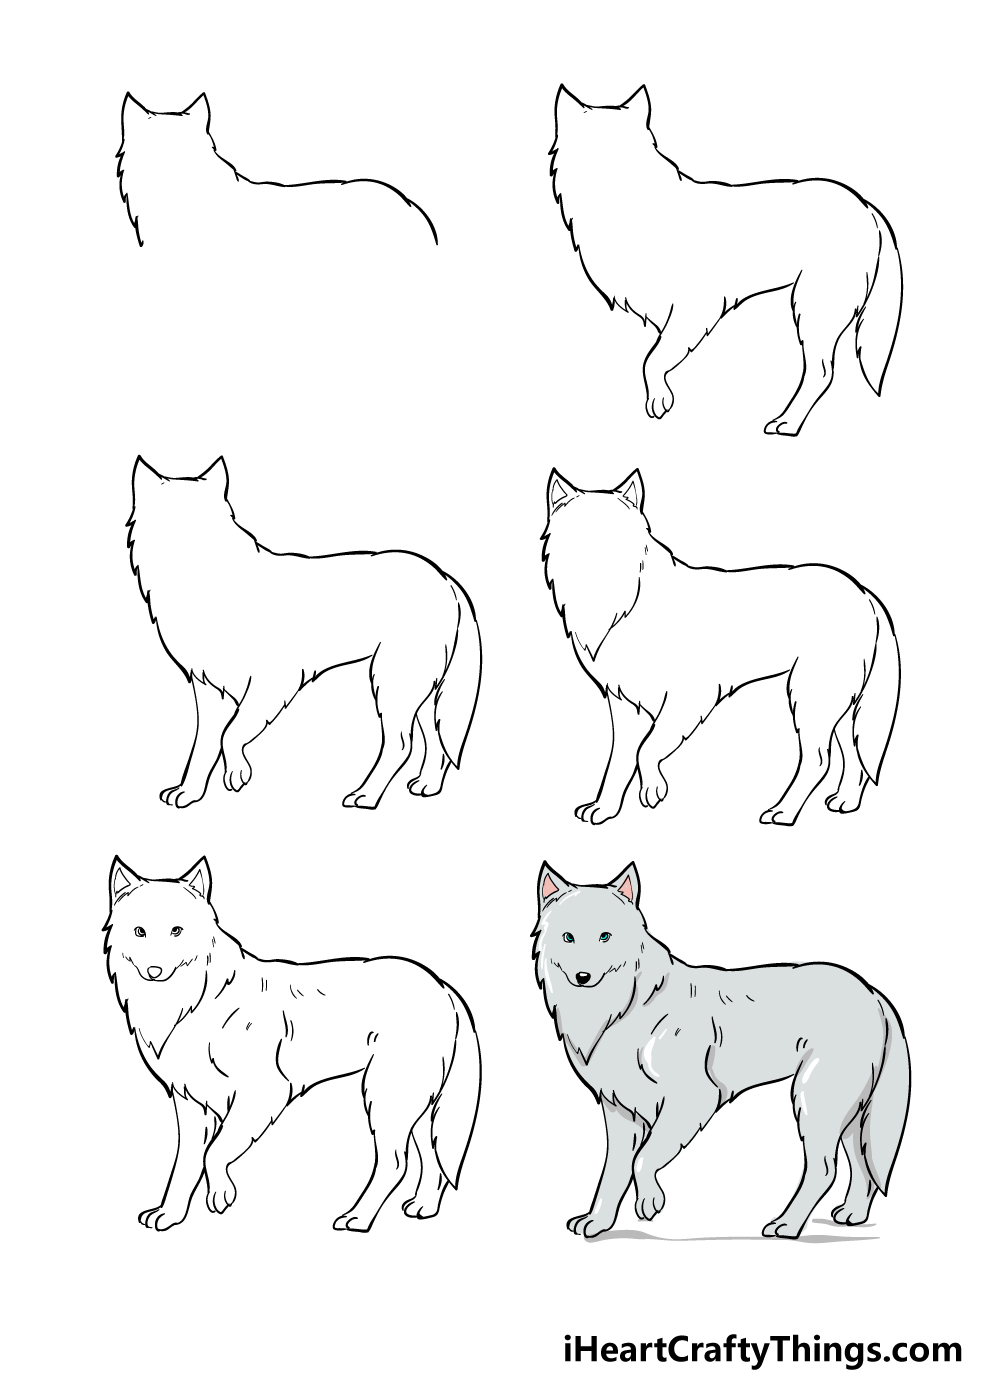
How to Draw An Arctic Fox – Let’s Get Started!
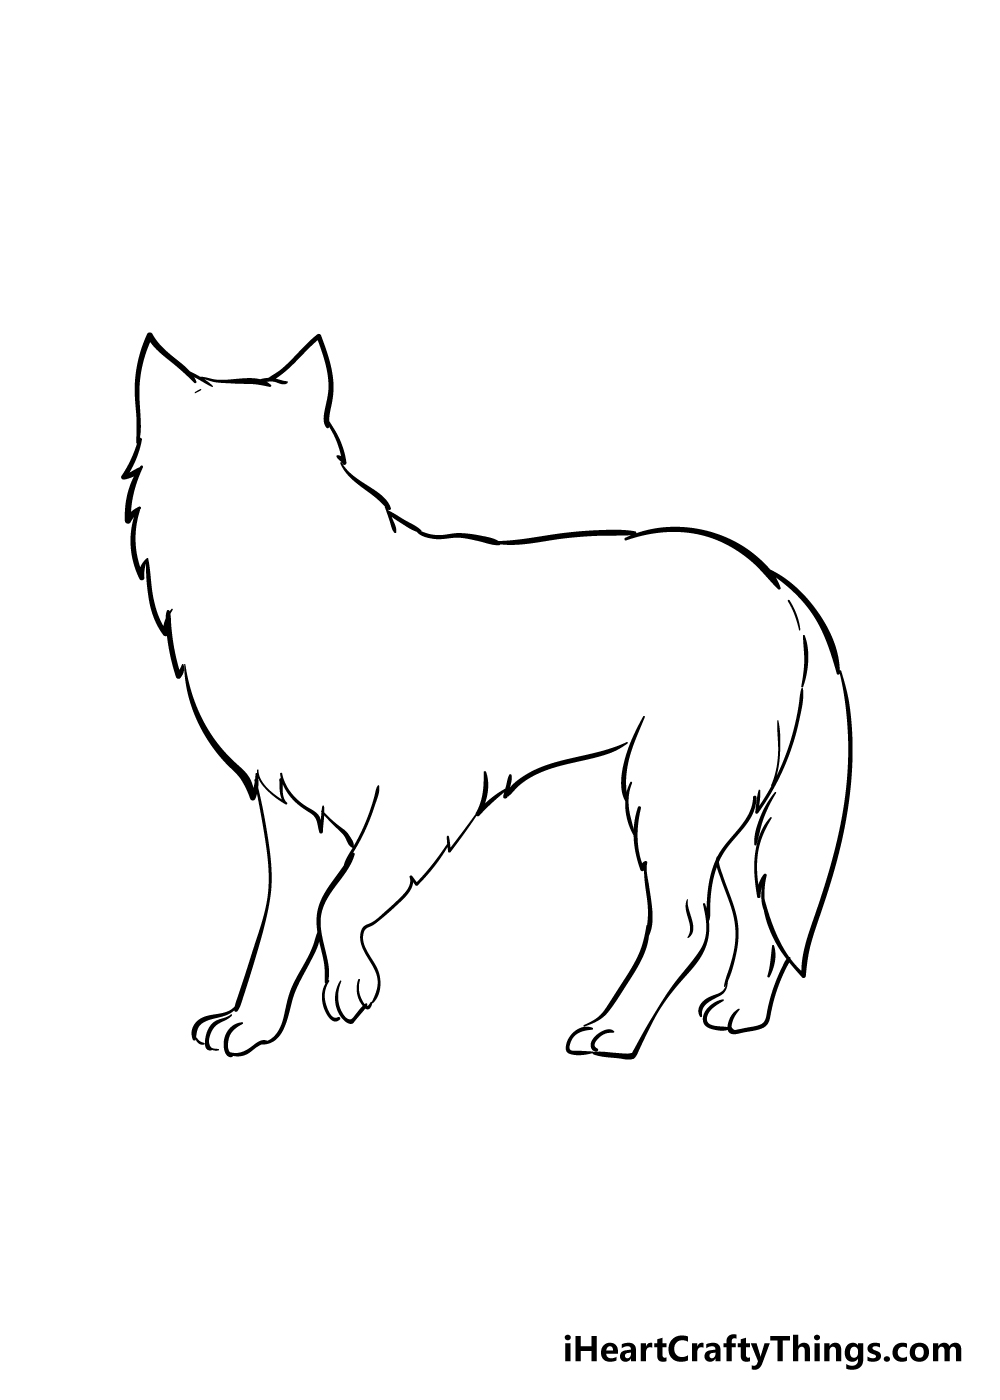
Step 1
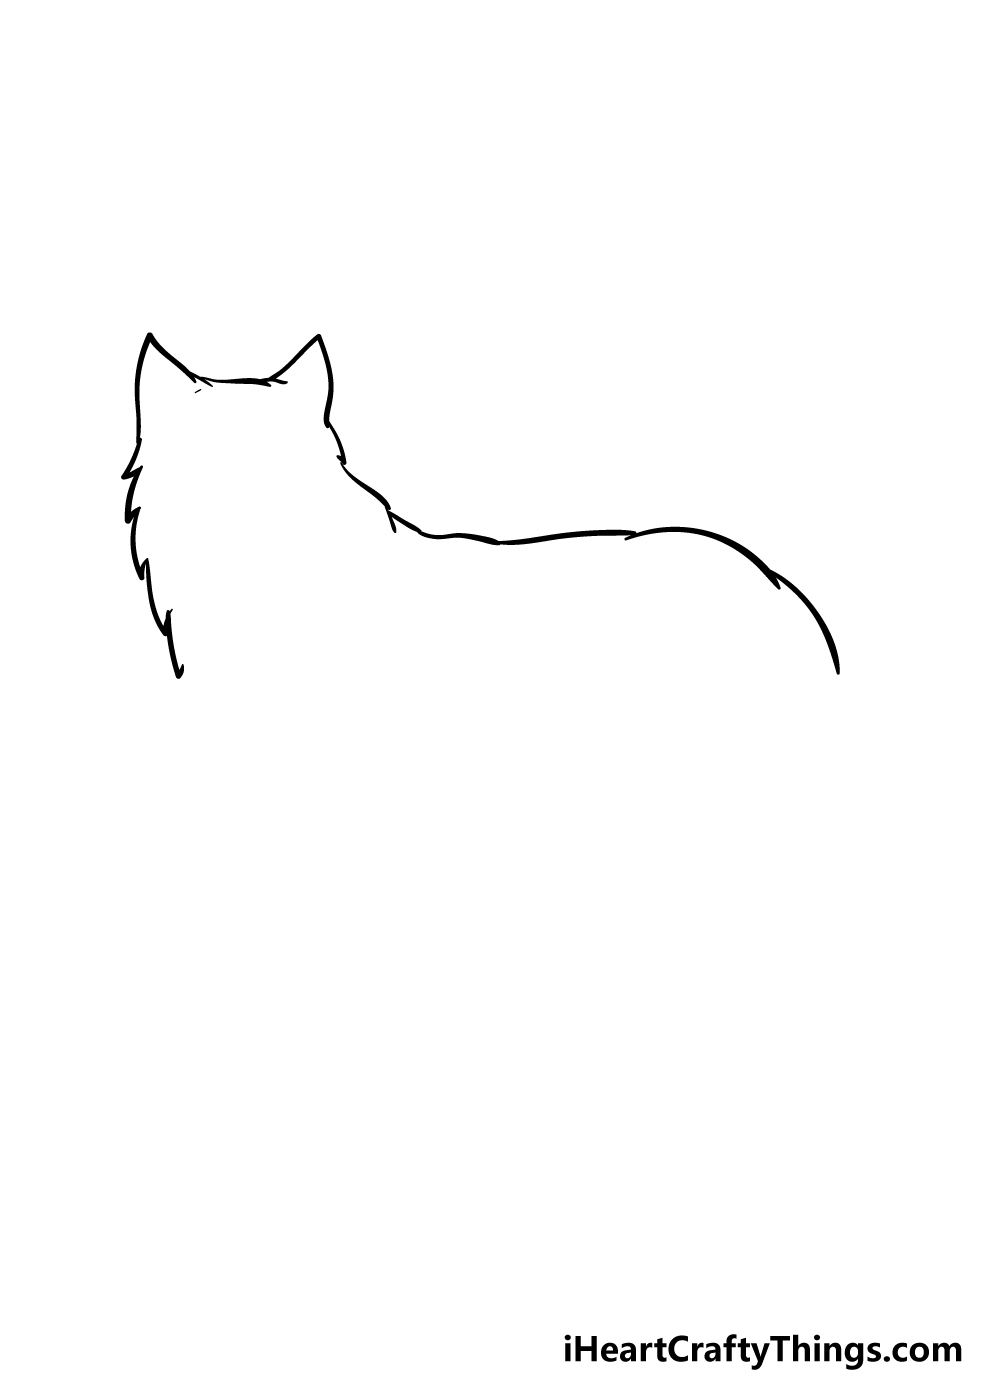
For the first step of our guide on how to draw an arctic fox, we will be starting with the head and back outline of the fox.
First, you can draw the top of the head and then add two pointy ears on top of it. Then, use a jagged line coming down from the left-hand side of the fox for the furry chest.
Finally, use a similarly uneven line for the back of the fox to finish off this step.
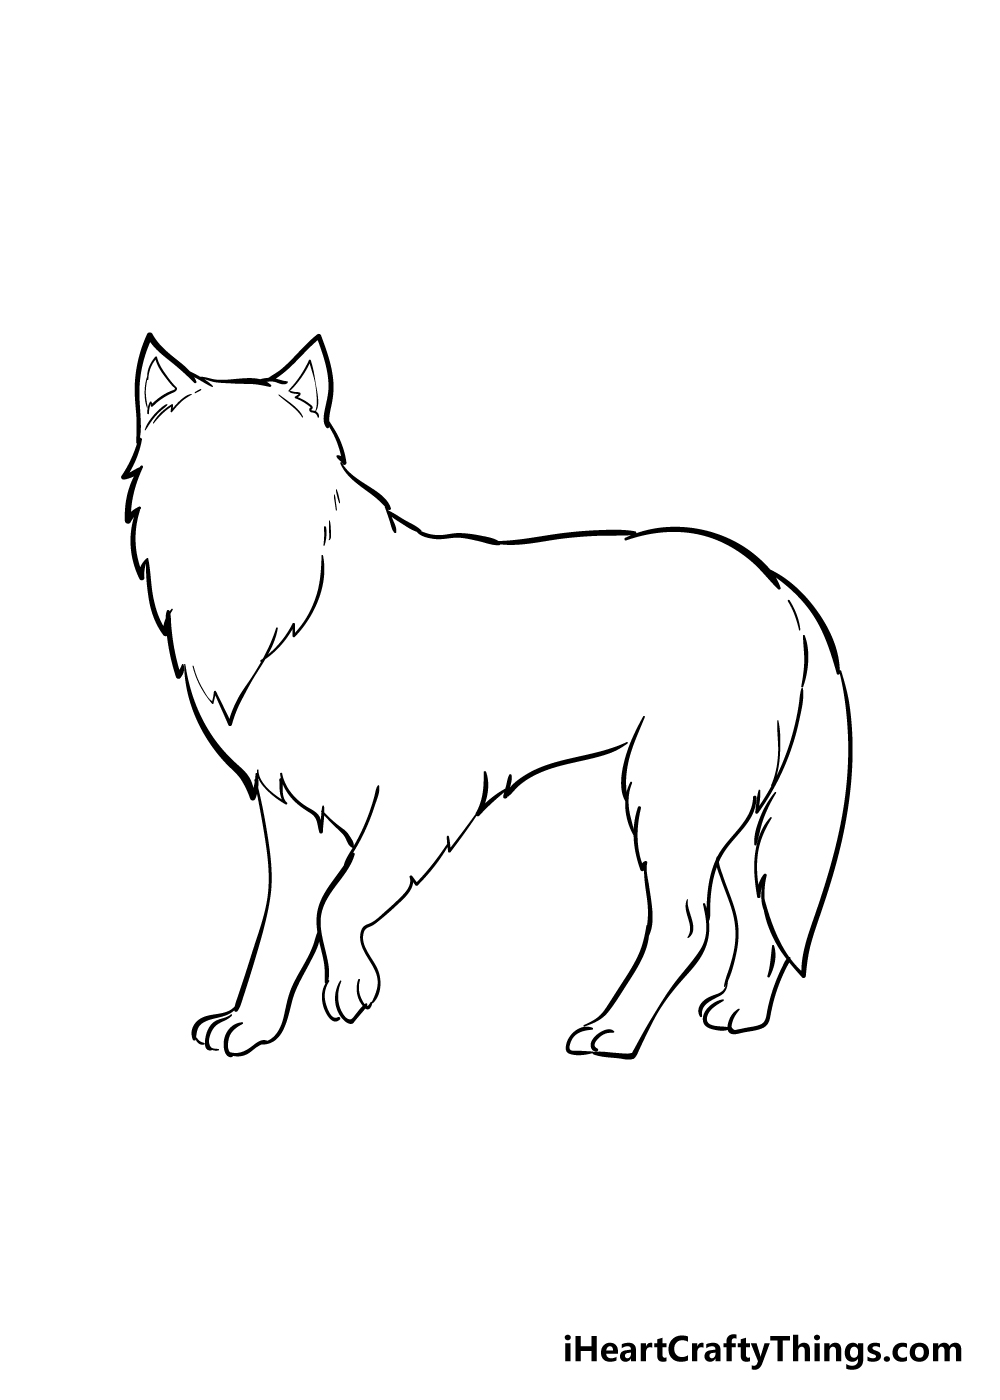
Step 2 – Draw the legs and tail of your arctic fox
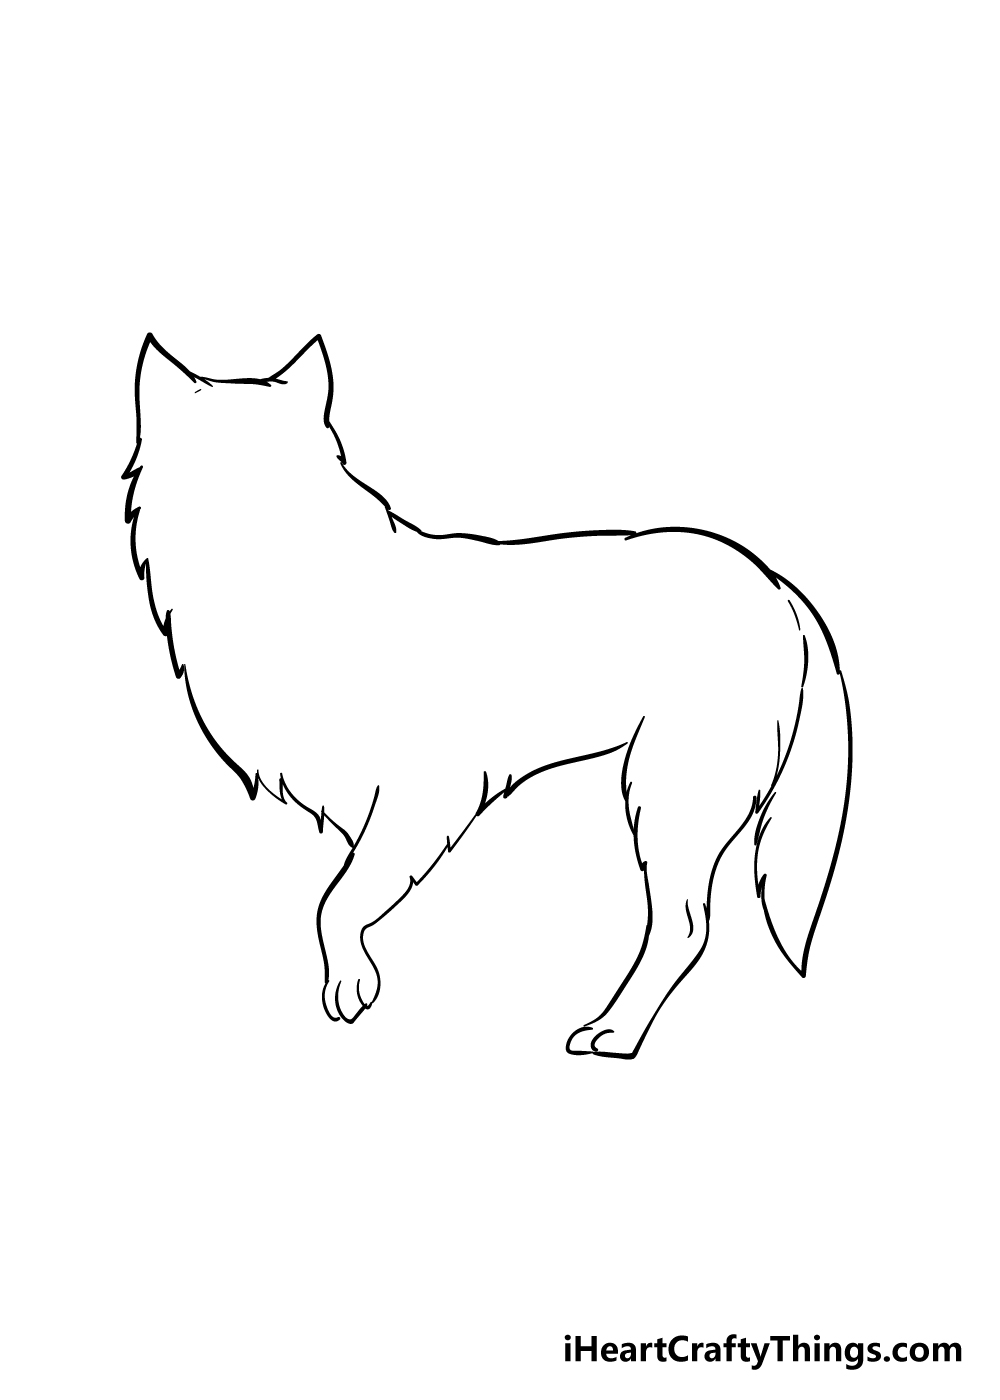
For this second part of your arctic fox drawing, you will be adding the legs and tail of your fox.
The legs will be relatively short compared to the rest of the fox, and you can use a similarly jagged line to draw them as you did for the back and chest.
As you can see in the reference image, the back leg will be a bit longer and thicker than the front one. Finally for this step, add a furry tail to the back of the fox.
Step 3 – Now, draw the next two legs
Now that you’ve drawn two legs for your arctic fox drawing already, these next two should not prove a challenge for you!
Simply draw these other two legs on the other side of the fox’s body. The reference picture will show you how these legs should be positioned.
Once you have all four legs drawn, you’re ready for the next step!
Step 4 – Start drawing the face details of the fox
We will be adding some ear and face details in this fourth part of our arctic fox drawing. First, draw some small triangular shapes inside of the ears for the inner ear of the fox.
Then, you can use some more jagged lines in the chest of the fox to create the appearance of fur hanging down.
You can also add some smaller lines to these areas to further create the look of fur. Arctic foxes are very furry creatures, so you can never add too many fur details!
Step 5 – Now, you can add some face details and your own details
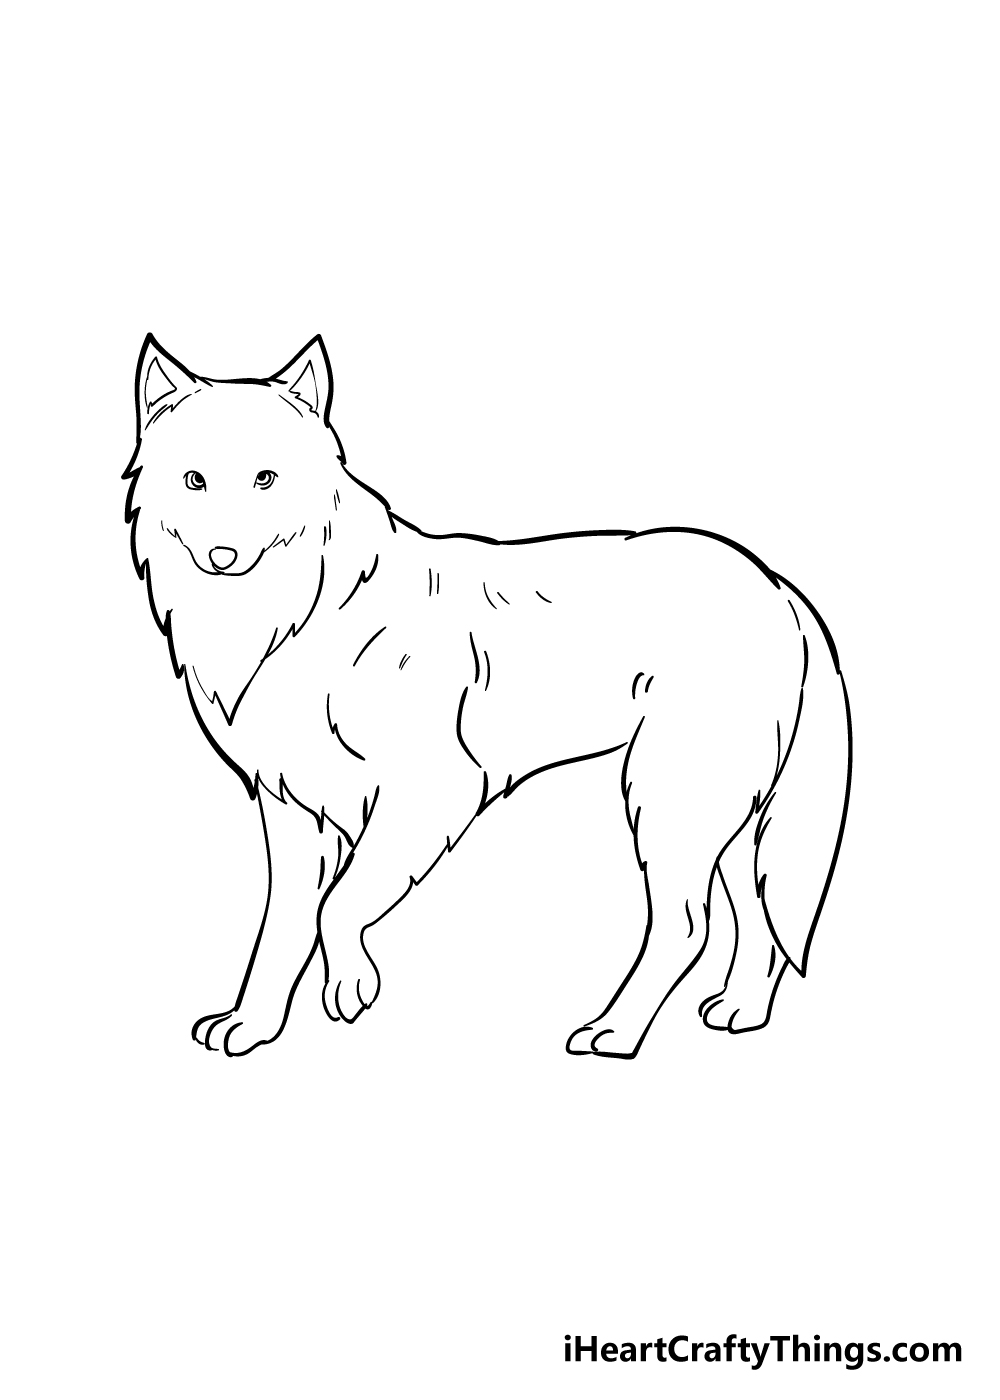
Before you add some colors to your arctic fox drawing, we have just a few more details to add to finish it off. First, arctic foxes have very small eyes and you can add them in this step.
Then, you can use a smooth line for the muzzle before adding a small little nose to the center of it.
Then, as you can see in our reference image, we added a series of smaller lines throughout the fox to add even more fur detail.
These can go throughout the body and near the limbs, and while you can replicate what we’ve done you can also add some details of your own to really finish it off!
One idea for how you can put your own spin on this picture would be to draw a background. You could look up some pictures of the kinds of environments these foxes live in for some inspiration and then draw it for your fox!
You could also change up the pose of the fox or add some other arctic animals alongside it. What details can you think of to finish off your arctic fox drawing?
Step 6 – Finish off your arctic fox drawing with some color
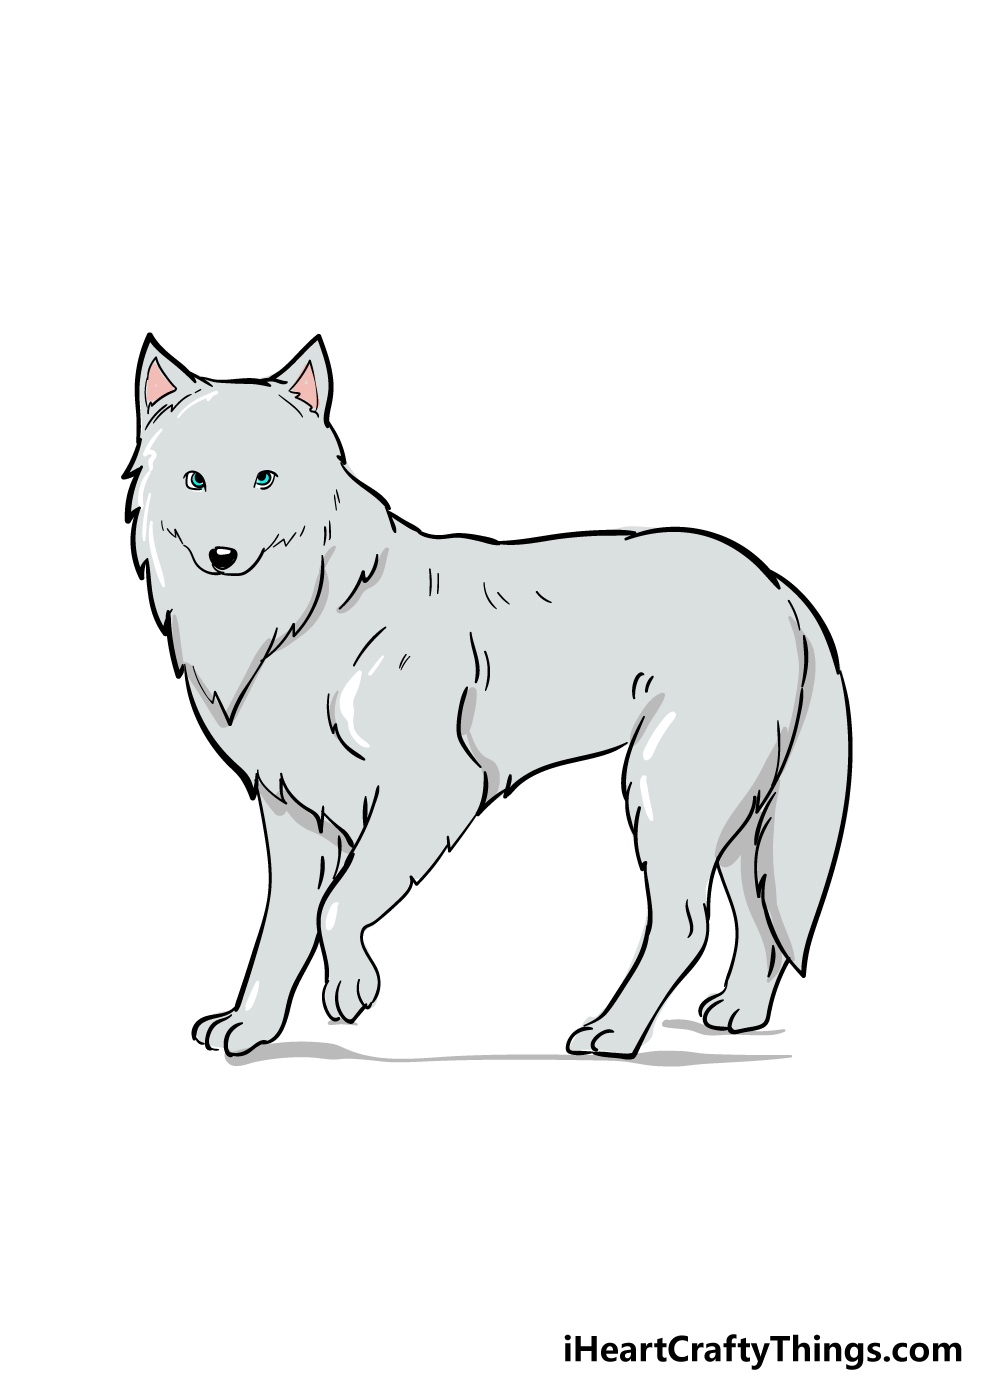
In this final step of our guide on how to draw an arctic fox, you can finish off your awesome drawing with some colors!
The arctic fox isn’t exactly the most vibrantly colored creature in the animal kingdom, but even if you keep the colors more realistic there are ways to incorporate some beautiful colors to your picture!
An arctic fox generally has a white or grey coat to help it blend into its environment, and we went with the grey option for our image.
If you want to incorporate some splashes of color to this image, you could either color in the background that you may have drawn or simply color some pattern details for the background.
If you draw and color a background, then you could incorporate blue for the sky and greens and browns for trees!
Then, once you know which colors you would like to use you can have some fun choosing which art mediums to use!
Whether you use paints and colored pens for a brighter color set or watercolors and colored pencils for a more muted look, we know it will look great!
5 Tips To Make Your Arctic Fox Drawing Even Better!
Create a super cool artwork with these tips for your Arctic Fox sketch!
The Arctic Fox is not a super social animal, but that doesn’t mean that you can’t add some friends for it! Now that you can create your own Arctic Fox drawing, you could add some more.
By changing some of the details of these additional Arctic Foxes, you could make each one unique. What sorts of poses would you like to create?
You could also populate this drawing of an Arctic Fox with other animals. You may want to use animals that live in similarly cold environments.
These could include regular foxes, or you could go for wolves and maybe even a polar bear. That is just a small selection of animals you could use, but what others would suit this image?
The Arctic Fox is not a particularly colorful creature, but you can still have fun with how you color it in. You can create some interesting looks with the art tools and mediums you pick.
For example, you can make it look furrier using some small brush or pen strokes. What colors and mediums will you choose for this cute Arctic Fox?
Another great way to add to this Arctic Fox sketch would be by drawing a background. This animal is found in cold, snowy environments, so that would be a good place to start.
Even though it will be very snowy, you can still add lots of details. There could be trees, streams and details in the sky for a few suggestions.
What sort of background setting would you like to create for this Arctic Fox?
Once your Arctic Fox drawing is done, you could take it even further with how you present it. It could be drawn on a big piece of paper for a cool poster.
Or, you could incorporate it into a greeting card for a loved one. These are just a few cool ways to present it, but what are some others that you can think of?
Your Arctic Fox Drawing is Complete!
That brings us to the end of our step-by-step guide on how to draw an arctic fox!
This drawing looks quite detailed and complicated when you first see it, but our hope with this guide is that you not only found it easier than expected but that you also had lots of fun doing it!
When you break down a drawing into lots of smaller steps it can really make it much easier to grasp, so if you follow this guide you’ll have the hang of it in no time!
Now that you have drawn and colored your arctic fox, you could keep the fun going by adding even more details to your drawing or by creating some variations on this image.
Whether you change up the background, do a new pose or incorporate some fun art mediums, we can’t wait to see what you do!
We hope to see you on our website, as we have many amazing drawing guides for you to enjoy! We upload new ones all the time as well, so be sure to visit often!
Once your arctic fox drawing is complete, we would love to see it! You can let us see your amazing artwork by sharing it on our Facebook and Pinterest pages.