Whenever you draw a human head and face, no matter the style, there are always challenges.
Every angle that you draw the face from will present its own unique challenges, and that is true of a side profile.
When drawing a side profile, you have to get the proportions and shape of the face just right or it won’t look recognizable.
Whether it’s a realistic drawing, a simple cartoon or an anime character, the ideas will be the same, more or less.
In this guide on how to draw an anime side profile, we will show you how to draw a character at this angle. It will be in a typical anime style, and you will see how easy and fun it can be!
While we will be drawing one specific character in this guide, you can take what you have learned and translate it into other characters and designs.
We will even go over a few ways you can do that in this very guide, so there is a lot to cover and a lot of fun to be had!
One thing is for sure, if you’ve ever wanted to learn how to make your own anime side profile drawing then you’re in the right place.
Now, let’s begin breaking down this drawing so that you can start creating your very own awesome anime characters!
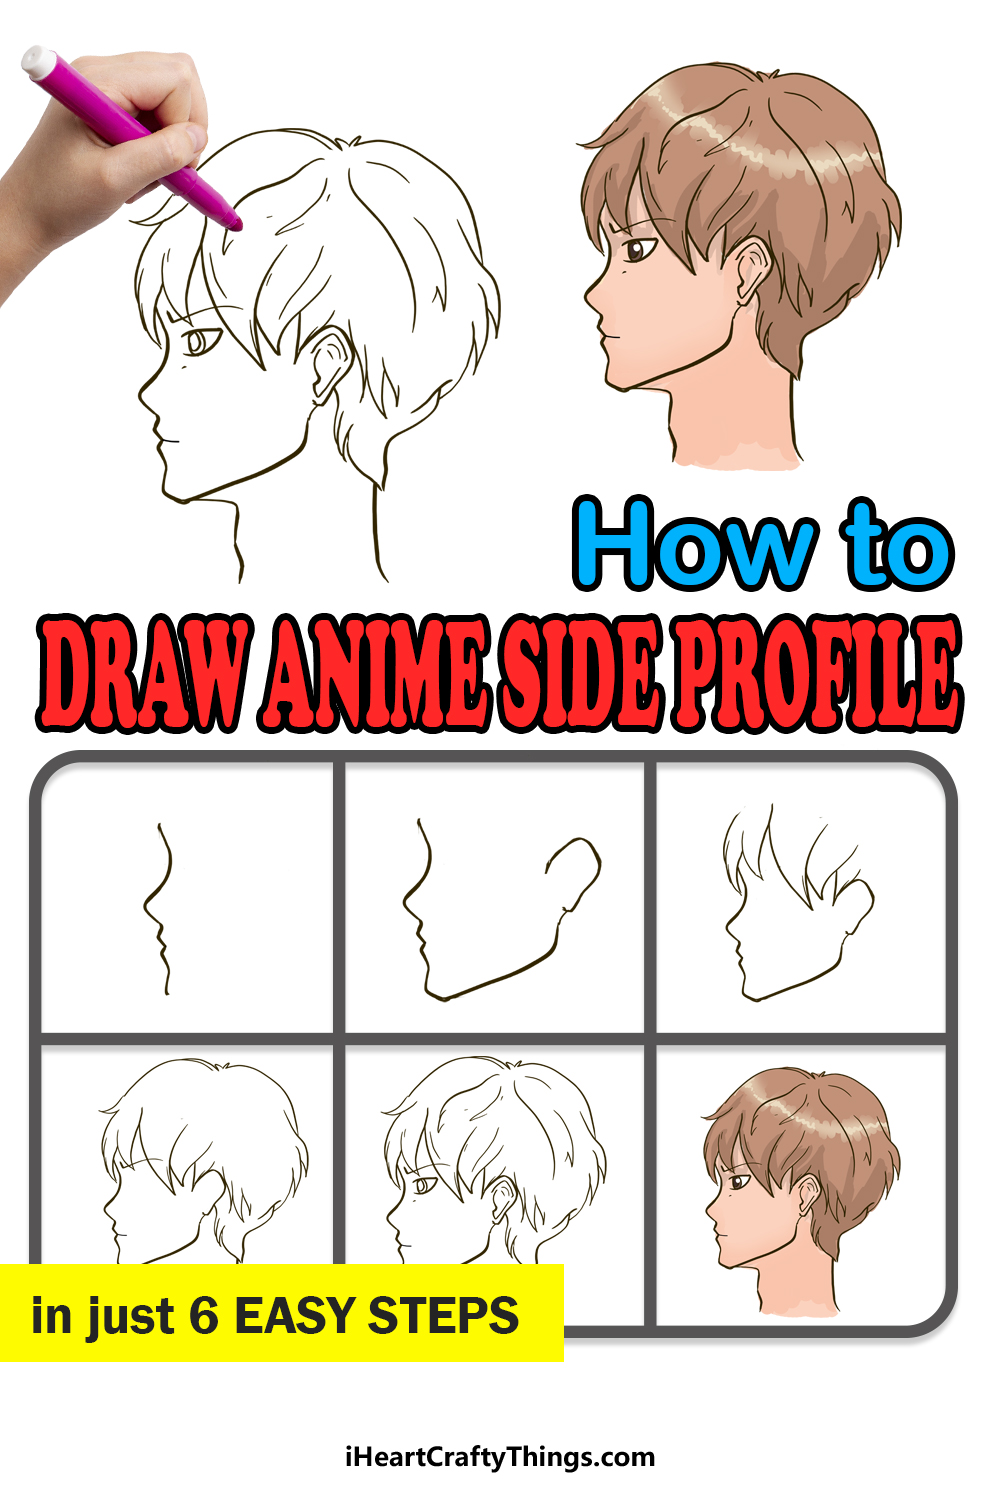
How to Draw An Anime Side Profile – Let’s Get Started!
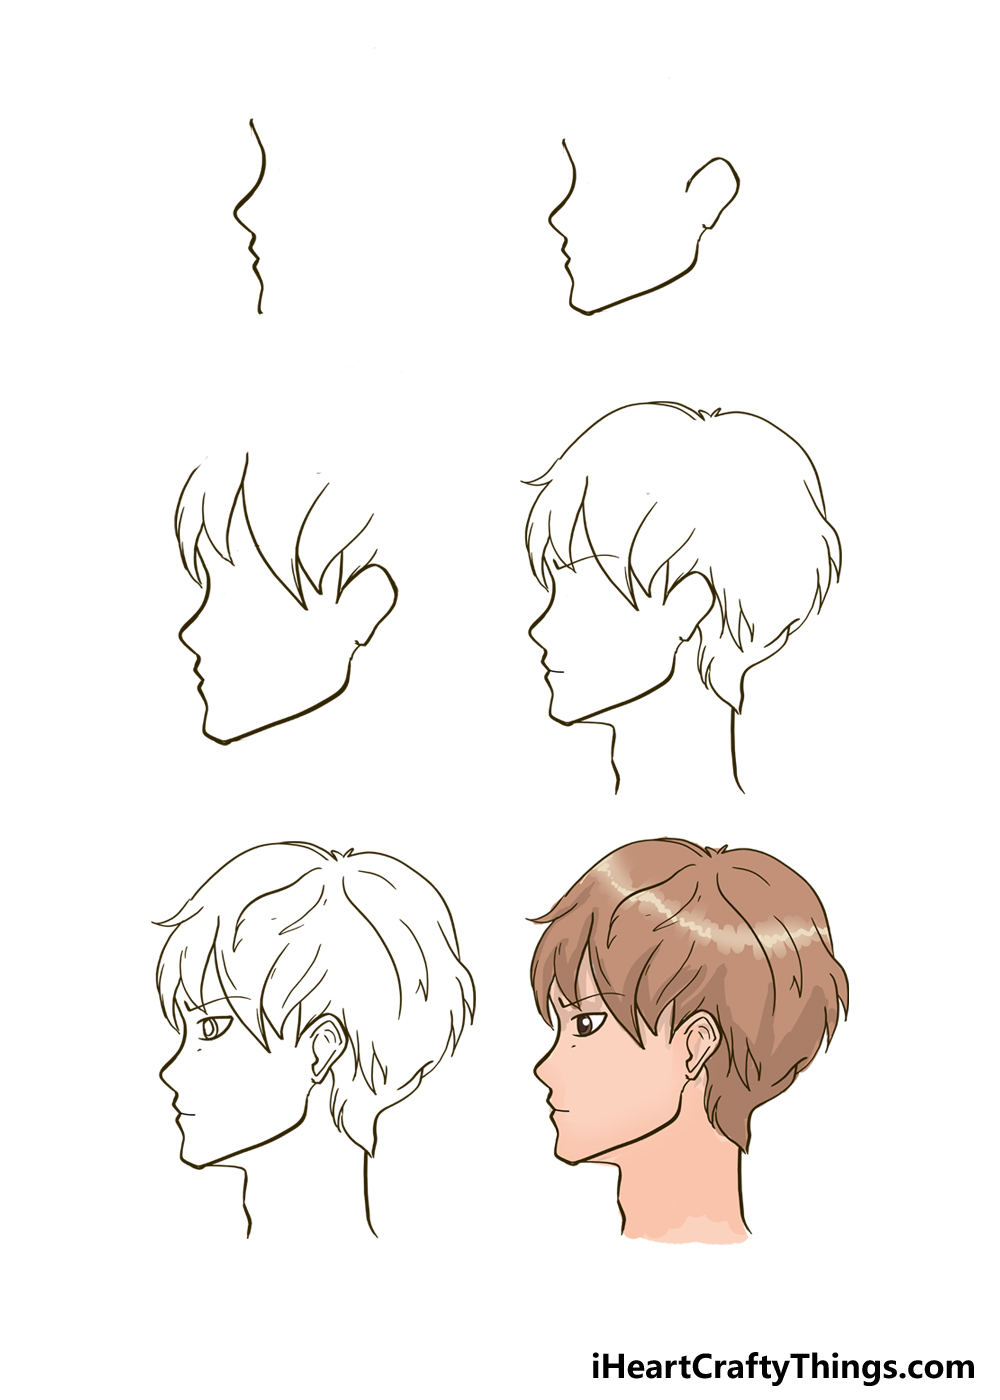
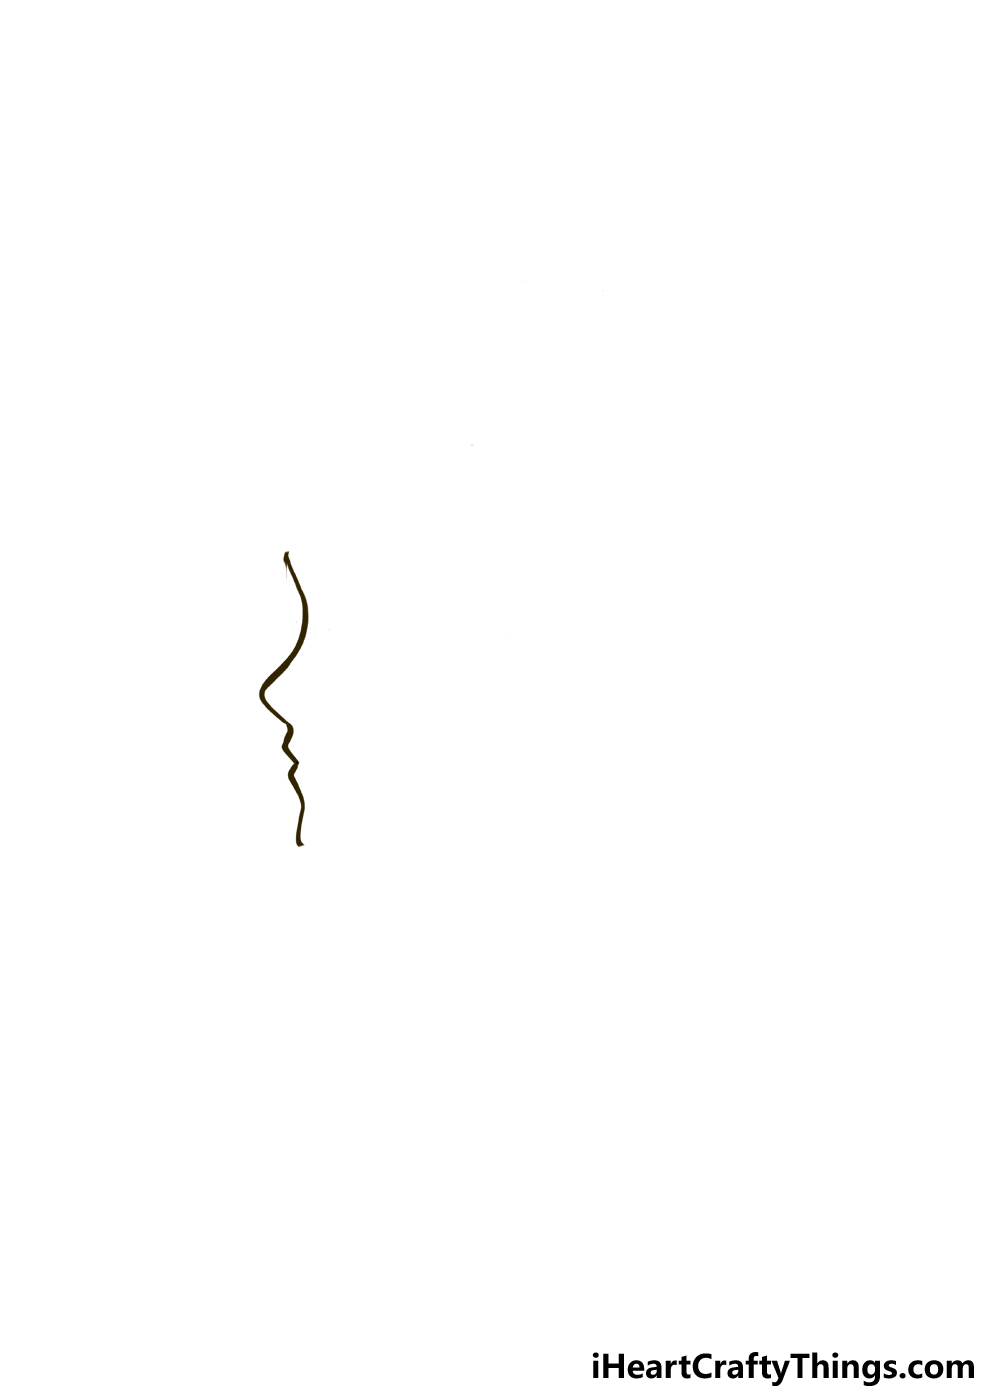
Step 1
There are some tricky aspects with this drawing, so before we begin we will slow things down a bit and prepare for the drawing.
One of the trickiest things will be to get the proportions and smaller elements of the face right.
For that reason, we would highly recommend that you draw a rough version of a head with your pencil. It doesn’t need to match the final head shape exactly or anything like that.
If you do this trick, you should ideally try and at least capture the size and general shape of the side profile that we will be drawing. Once you have that, we can draw the first line of the design.
This will be the front of the face, which will include a view of the nose, mouth and the start of the chin. When drawing this line, try to match it as close to the one in our example as possible.
If you drew a rough head shape as we suggested, then this portion will go on the left-hand side of this rough shape. As you will see, the longest, biggest curve will be the portion above the nose.
The nose will then jut out a little with a rounded tip sticking out. The lips will be much smaller points, and we will draw the chin later on.
That’s all there is to it for this particular step, and we can move on to the next one! The next step will involve drawing the chin and jaw, which will help start bringing this design together.
Step 2: Draw the chin and the jaw

The line that we drew in the first step isn’t looking like much just yet.
We can tell what it is because we know what it’s building up to, but if someone were to look at it as it is, they may not know what it is yet.
After this step, it will be pretty easy to see what it’s supposed to be! In this step, we will be drawing the chin and the jaw of the character, and this part could be a bit trickier than you may expect.
The chin can be drawn as a rounded squared shape, as shown in the example. This may not be realistic to real life, as our chins tend to be a lot more rounded, but it all works to create the kind of anime style we’re aiming for.
This chin will angle up in a very slight slope with a slightly wavy line. The back of the jaw will also be quite rounded, as you can replicate from the example image.
The jaw will connect directly to the ear, and that is what we will close out this step with. Once again, we’re not aiming for realism to real life when it comes to drawing this ear.
The ear is quite large on the head, and it has a rounded yet also squared feel to it. It may sound confusing to read it like that, but the image will show you how it should look.
That’s all there is to it for now, so let’s move on when you’re ready.
Step 3: Draw the start of the hair
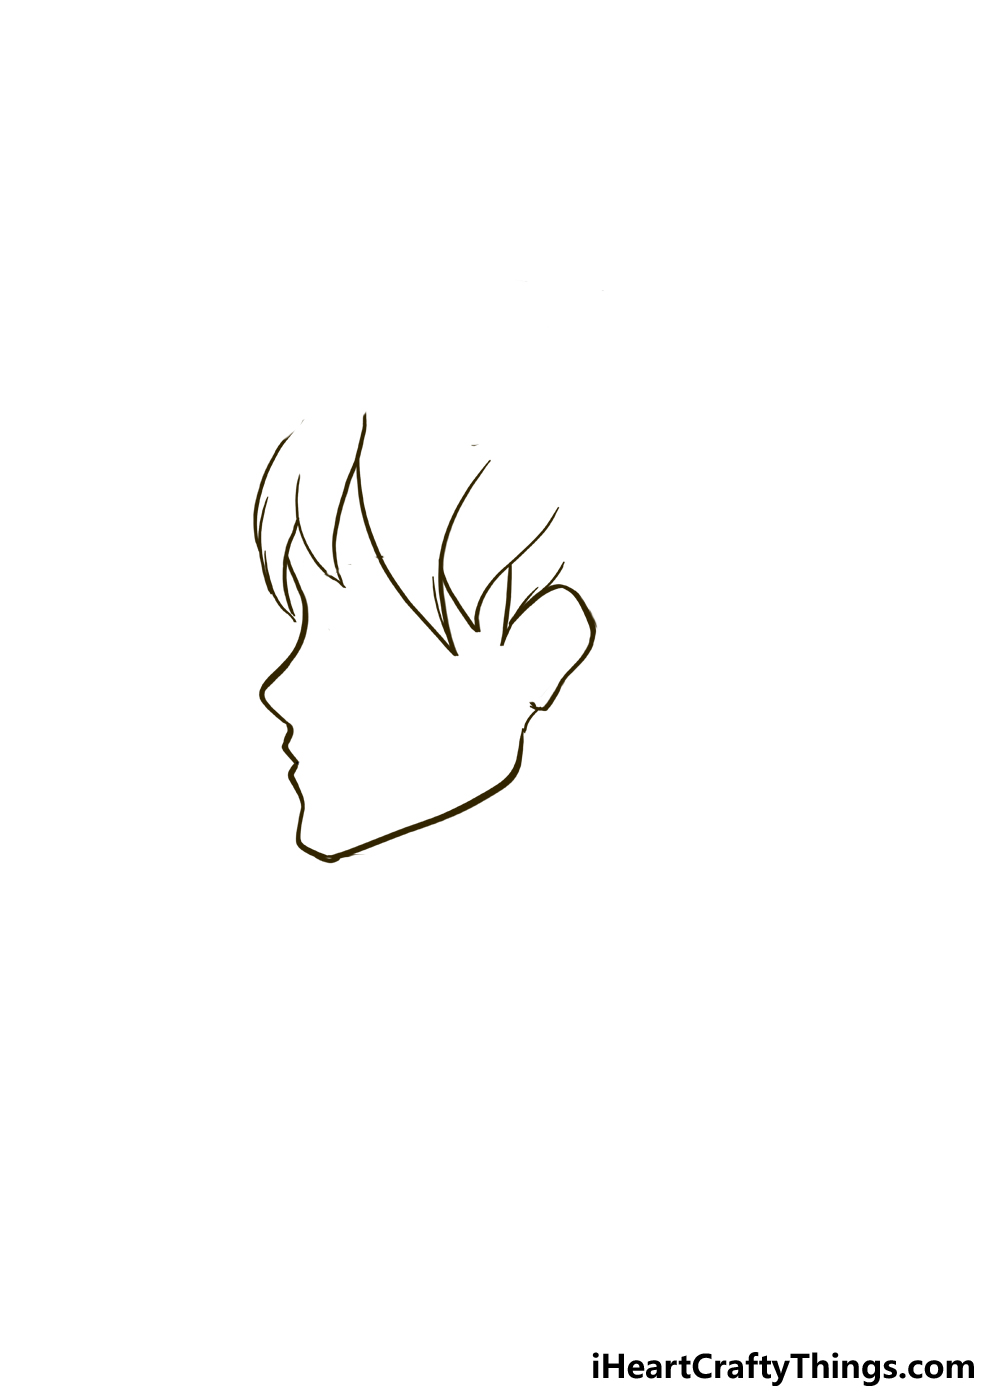
We won’t be working on the face for a bit. Instead, this and the next steps of this guide on how to draw an anime side profile will mainly focus on the hair of this character.
We will just draw a small portion of the hair for now, focusing on the fringe and the hair close to the ear.
While there are many interesting hairstyles in anime, many of the hairstyles we see are quite pointy and jagged.
This particular hairstyle we are drawing is a little more subdued and realistic compared to some of the crazier anime hairstyles out there, but it still has that distinctive anime feel.
There won’t be any straight lines for these portions of hair. Each portion will be drawn with a curved line, and each one will converge at a pointy tip at the end.
When drawing this part, you don’t have to have it look exactly like ours, but we would recommend keeping it fairly close.
If you want to, you could make these portions of hair longer or shorter depending on your preference.
If you do make the hair longer and would like to see the eyes of the character later, just be sure to leave enough room for them!
We will finish off the outline for the hairstyle in the next step, so let’s head to that part when you’re happy with how it’s looking so far.
Step 4: Now add the rest of the hair outline and the neck

As promised, this step will see us adding the rest of the hair outline. We will also draw the neck and a few other details, so there is a lot to cover in this step!
As always, we will take it slowly, so let’s first focus on the hair outline. The sections of hair that we drew in the previous step were quite spiky and pointy, and the rest of the outline will be smoother.
There will be a few pointy sections here and there, but overall we will be using mostly fairly smooth curved lines.
Add a curl above the top of the section where we ended earlier, and then add the rounded outline extending back.
There will be a bit of a dip at the center of the top of the head of hair, and there will be some very small little pointy bits there to show where the parting is.
The back of the head will have a few more pointy bits than the front did, and that will close off the outline of the hairstyle. Next, we will draw the neck.
The neck at the back will be drawn with a very slightly curved line coming down from the back of the base of the hairstyle. At the front of the neck, we will be using much more angular curved lines, as shown in the reference image.
Finally, we will add a curved line with a sharp kick at the left-hand side above where the eye will go.
This eyebrow will give the character some attitude, and you can change it a bit if you prefer a different facial expression.
Step 5: Draw the final details of this anime side profile
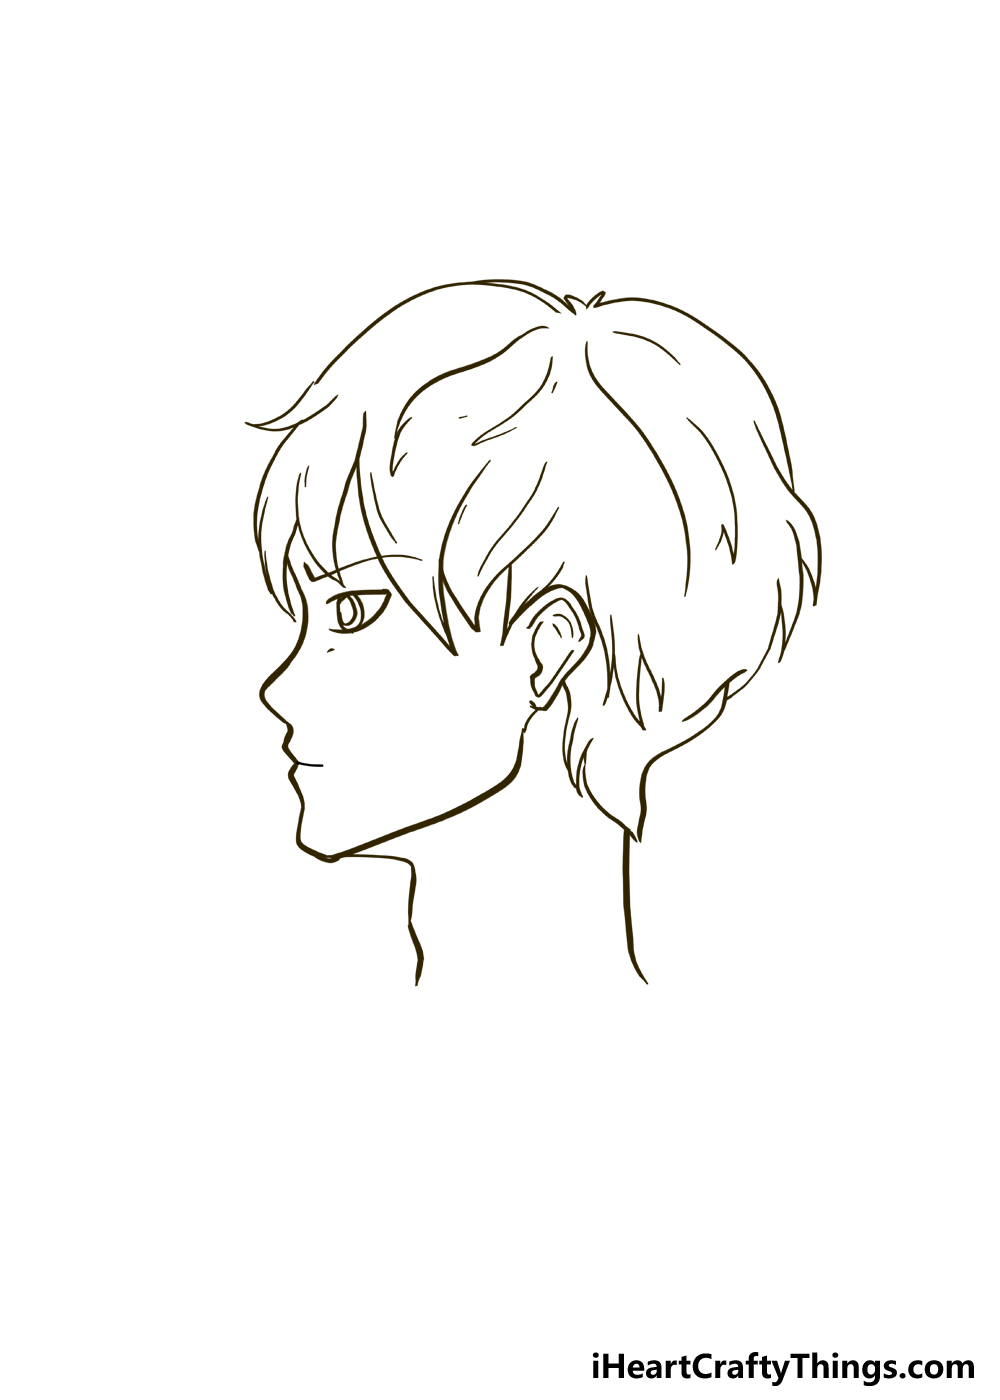
Now, we will finish off this anime side profile drawing outline so that you can focus on some coloring fun.
Before we add some of these final details, be sure to erase any leftover pencil lines you won’t be needing.
Then, we will draw the eye. The outline of the eye will be drawn with two small curved lines connecting at a sharp point.
Then, draw some small round oval shapes for the iris and pupil of the eye. Now its time for some smaller details, and these will really help to bring this character to life!
First, add some intricate lines inside the ear to make it look a little more true to life. Then, we will add some lines throughout the hairstyle to give it some more volume and texture.
Now that these final details have been added, you can take over and show off what you can do! This drawing was always about creating the character that you wanted to create, so we encourage you to bring some of your own ideas to the drawing.
You could do this by adding more of the character by drawing their body and a pose. Then, adding a background would also help to give this drawing even more of a sense of place.
Adding accessories like glasses, hats or cool clothing items can also help to personalize it further. Then, we will head to the final step where we will have some fun with colors!
Step 6: Now, finish off this anime side profile with some color
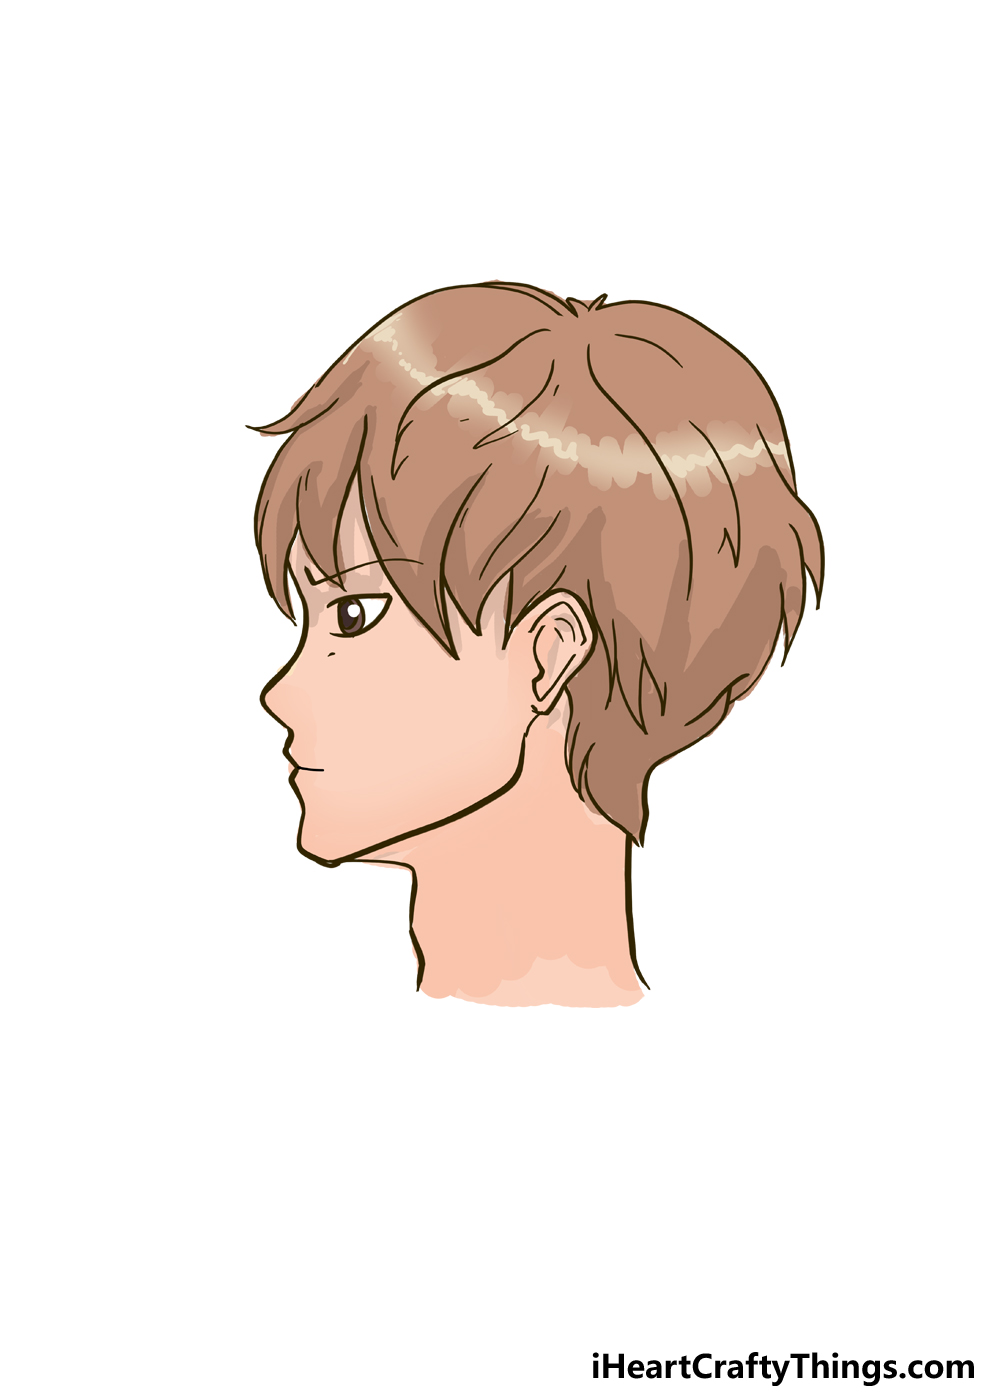
For this final step, we have shown you one of the infinite possibilities you could go for when coloring in your creation!
Anime characters can come in all kinds of amazing colors and designs, so you can have a lot of fun.
We kept things more subdued for our example, just to give you an idea of how it can be done. We used a lighter skin tone for the character and then used some simple brown shades for the hair.
This more subdued look certainly works, but you don’t have to stick to it! If you wanted to, this character could have colorful highlights that glow with a neon sheen.
You could even use glitter or stickers to add some sparkle to the hair. These are just a few ideas, but you can also use your favorite mediums to great effect.
Mixing mediums can also help to add some amazing highlights and effects to the colors, and there are no wrong ways to go about it.
The best thing you can do is have fun and let your inspiration take over!
Which colors and art mediums will you choose to finish off this anime side profile?
Bonus: Customize Your Anime Side Profile Drawing With These Ideas
When it comes to the history of anime characters, there are so many different looks and styles that it would be impossible to cover them all. Anime covers many different types of stories and genres, and fans all have their favorites.
In this guide, we kept this anime side profile rather simple, and that made it easier to learn to draw. Once you have come to grips with the drawing, you could change it in all sorts of ways!
You could make a few variations that all build on the base we laid out in this guide. One of the main aspects you could work on would be the hairstyle of the character.
Hairstyles are almost always quite large and stylized on anime characters, so it would be something you could really experiment with. Not only could the shape and details be changed, but also the colors.
You certainly don’t need to stick to realistic hair colors either, as hair in anime can be any color you can imagine. Then, you could change the face as well.
This could include the facial expressions of the character, or you could entirely change the facial structure. It could even be interesting to make this a female character instead.
Changing the clothing is another way to change the look of this character, and it’s also something you could get quite expressive with. When changing the look of the character, you could come up with your own designs.
It would also be fun to base the changes on an existing anime character you’re a fan of. Now it’s up to you, and we would be interested to see what kinds of unique designs you can come up with!
Your Anime Side Profile Drawing is Complete!
That brings us to the end of this guide on how to draw an anime side profile! We hope that these six steps were helpful and fun for you to work through.
We wanted to show you how to draw this standard character, but now you can bring some of your own ideas to it. This could be done by changing a few details or by changing it drastically.
Creating your own characters can be lots of fun, and there are a few ways to do it. You could choose some of your favorite existing anime characters and then try to change this one into that character.
Or you could blaze your own trail and make an entirely unique character! It’s totally up to you, and it will be interesting to see how you put your own spin on this design.
When your artwork is complete, we hope that you will go ahead and share it on our Facebook And Pinterest pages. It will be a lot of fun to see how it turned out!