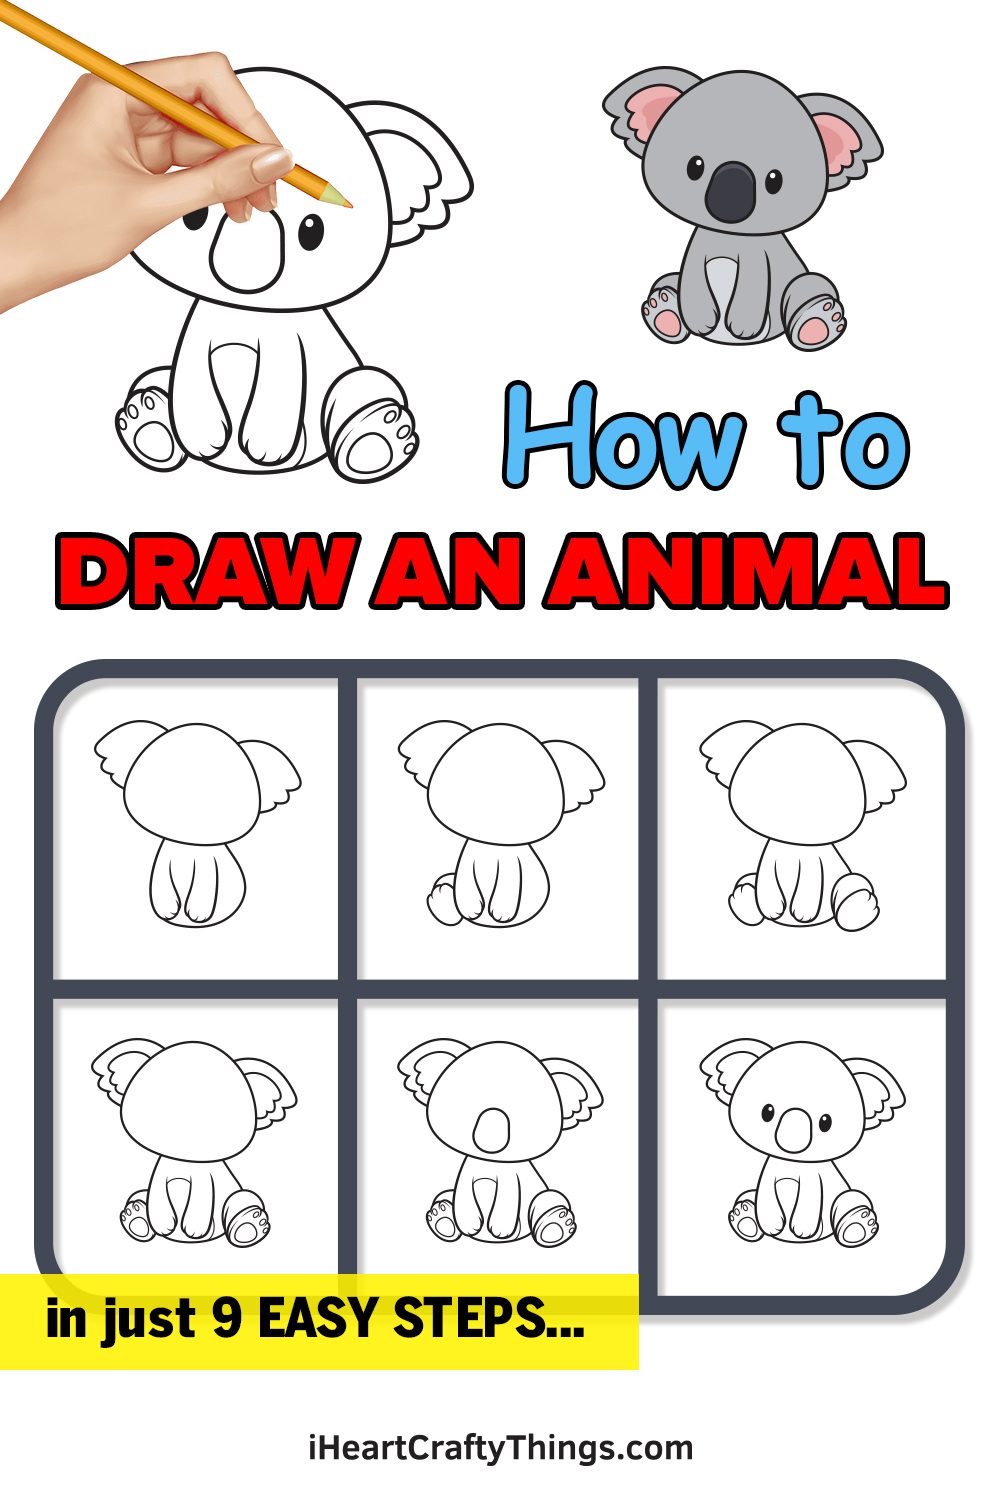
If you have wanted to know an easy way to learn how to draw animals, you will find it here! It’s all about breaking it down into smaller steps which is what I will do in this tutorial for kids.
In this guide, we will be drawing a cute koala, but you can apply what you learn to any kind of animal you want to draw. You’ll see that we will use simple circular shapes to map out the general shape of the koala.
Then, you can slowly add some details like the ears, eyes and nose to build up the distinctive look of the animal. Once you see how to build this drawing, you could use photos of other animals and use the same steps to draw them in this style.
So follow along with me and let’s see how you can recreate this little koala for yourself!
Watch This Guide On How To Make An Animal Drawing!
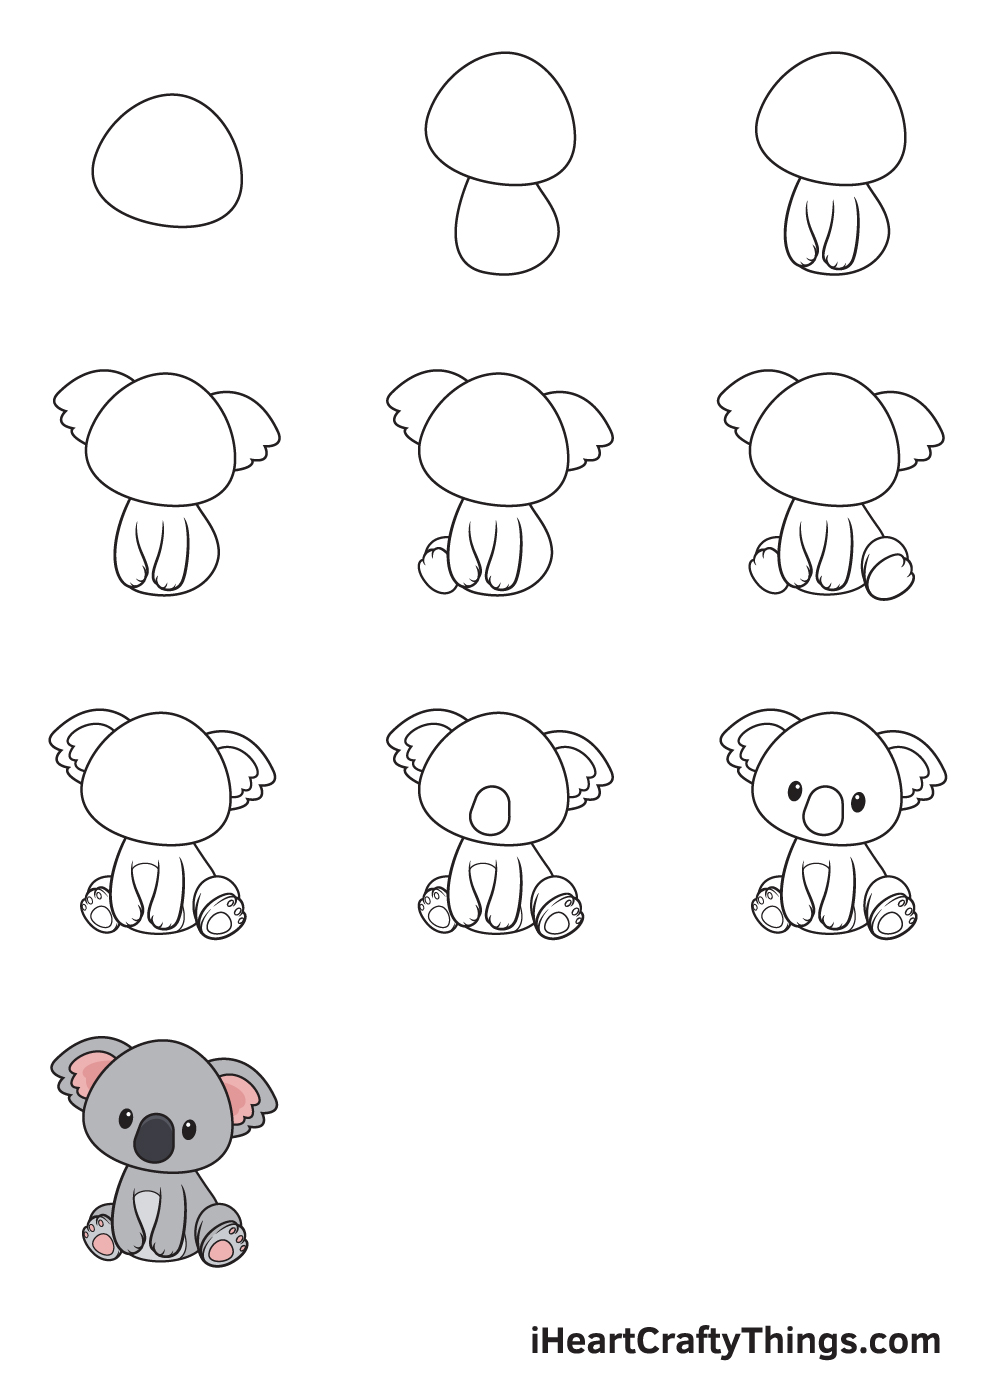
How to Draw Animals – Let’s get started!
Step 1
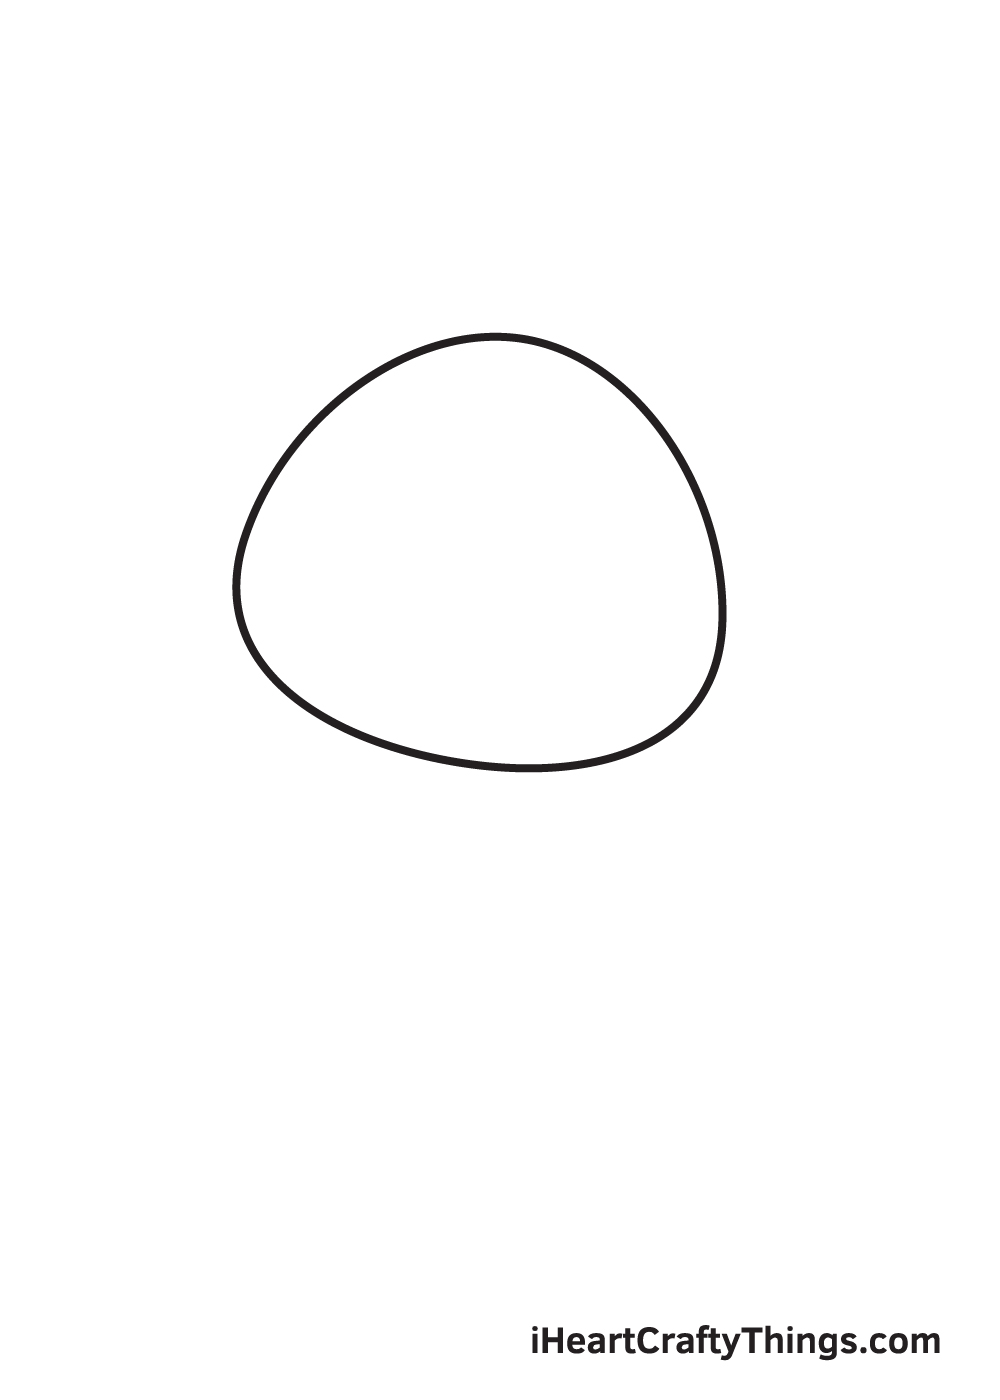
Start by drawing an uneven circle shape with a narrow top and a wider bottom. This forms the shape of the koala’s head.
Remember, use light strokes when drawing an outline. Avoid pressing down too hard with your pencil so you can easily remove some lines you may no longer need later on.
This also keeps your artwork neat and tidy, and most importantly, polished.
Step 2 – Outline of the Koala’s Head and Body
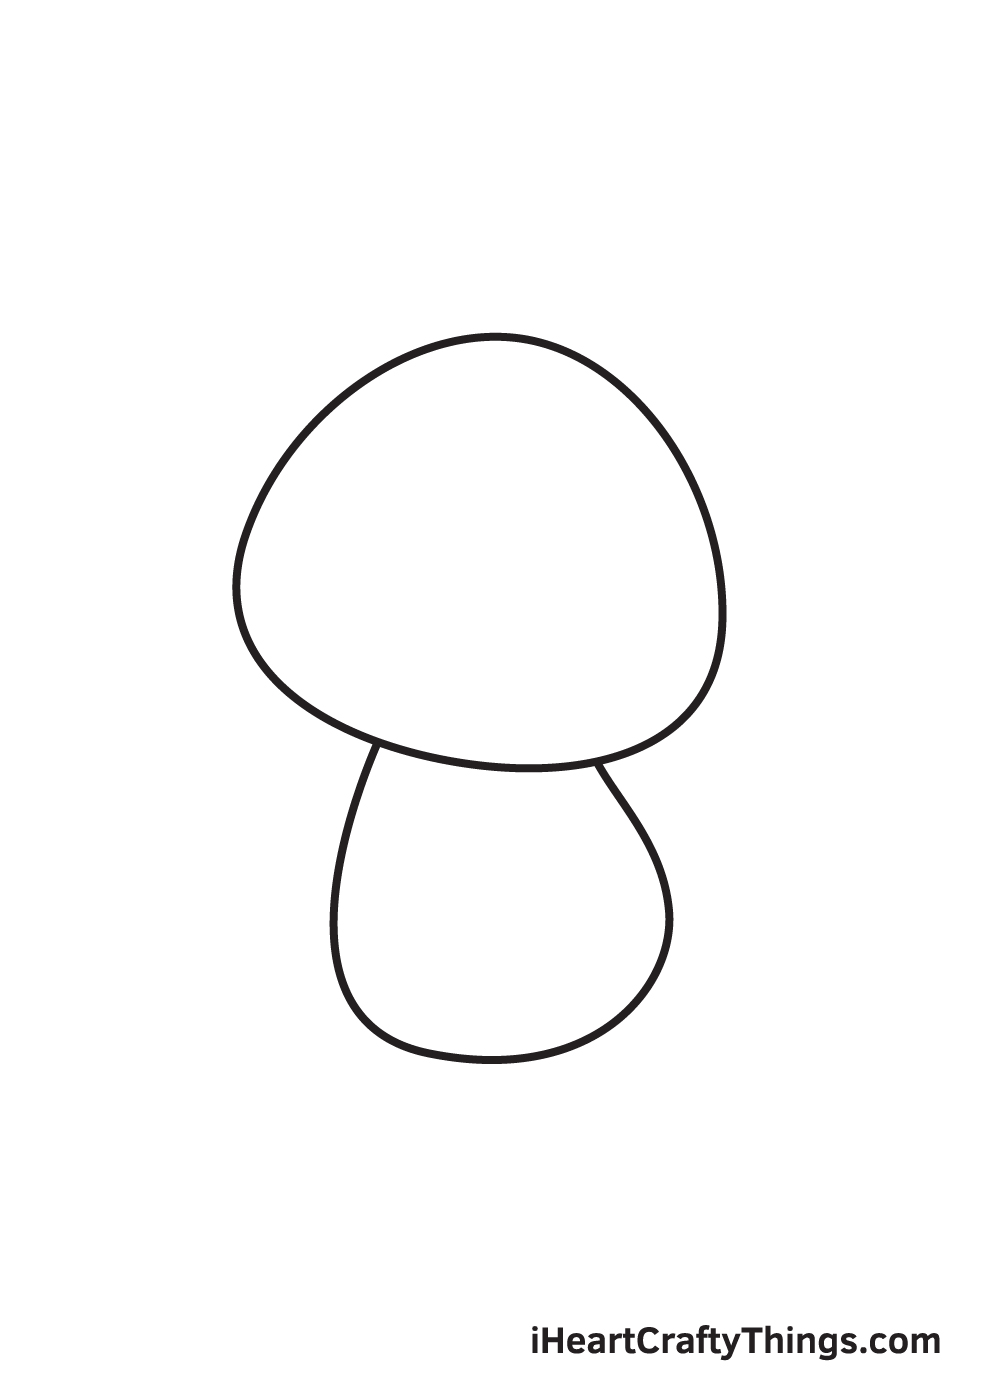
Proceed by drawing an uneven U-shaped curve right underneath the koala’s head. The figure should be wider at the bottom. This creates the body of the koala, which is directly connected to its head.
Bear in mind that the head of the koala should be a bit bigger than its body, as shown in the illustration.
Step 3 – Draw the Left and Right Arm of the Koala
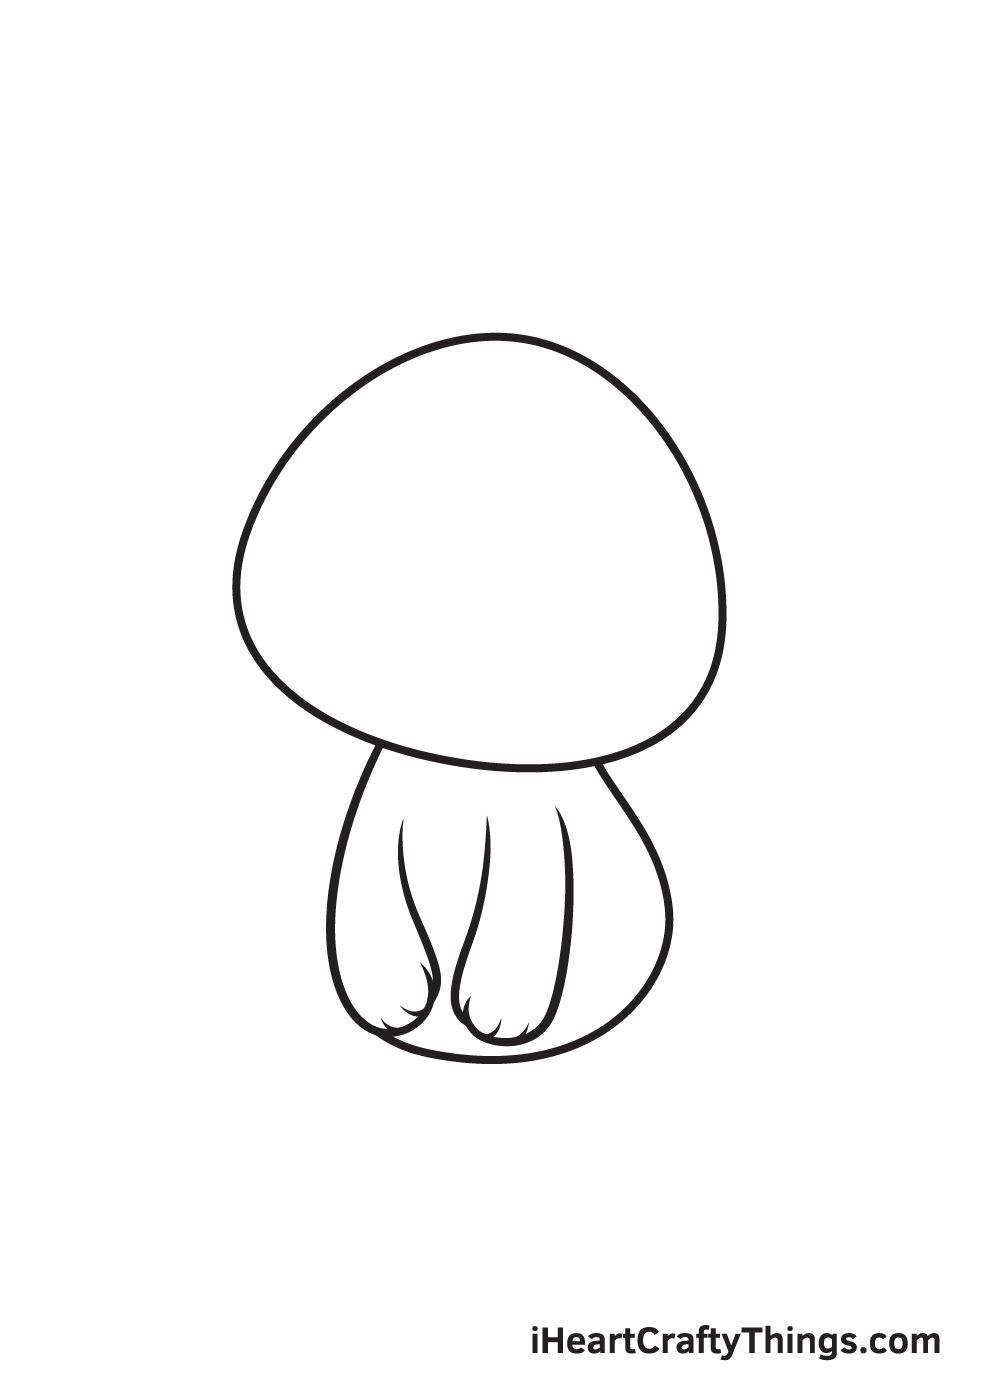
Draw two elongated U-shaped curved lines side by side within the outline of the koala’s body. This forms both arms of the koala.
Afterwards, draw multiple small curved lines at the bottom of each arm to create a distinction between the paws.
Should there be any lines from the outline of the body that overlaps inside the arm, carefully remove it using an eraser.
Step 4 – Next, Draw the Koala’s Pair of Ears
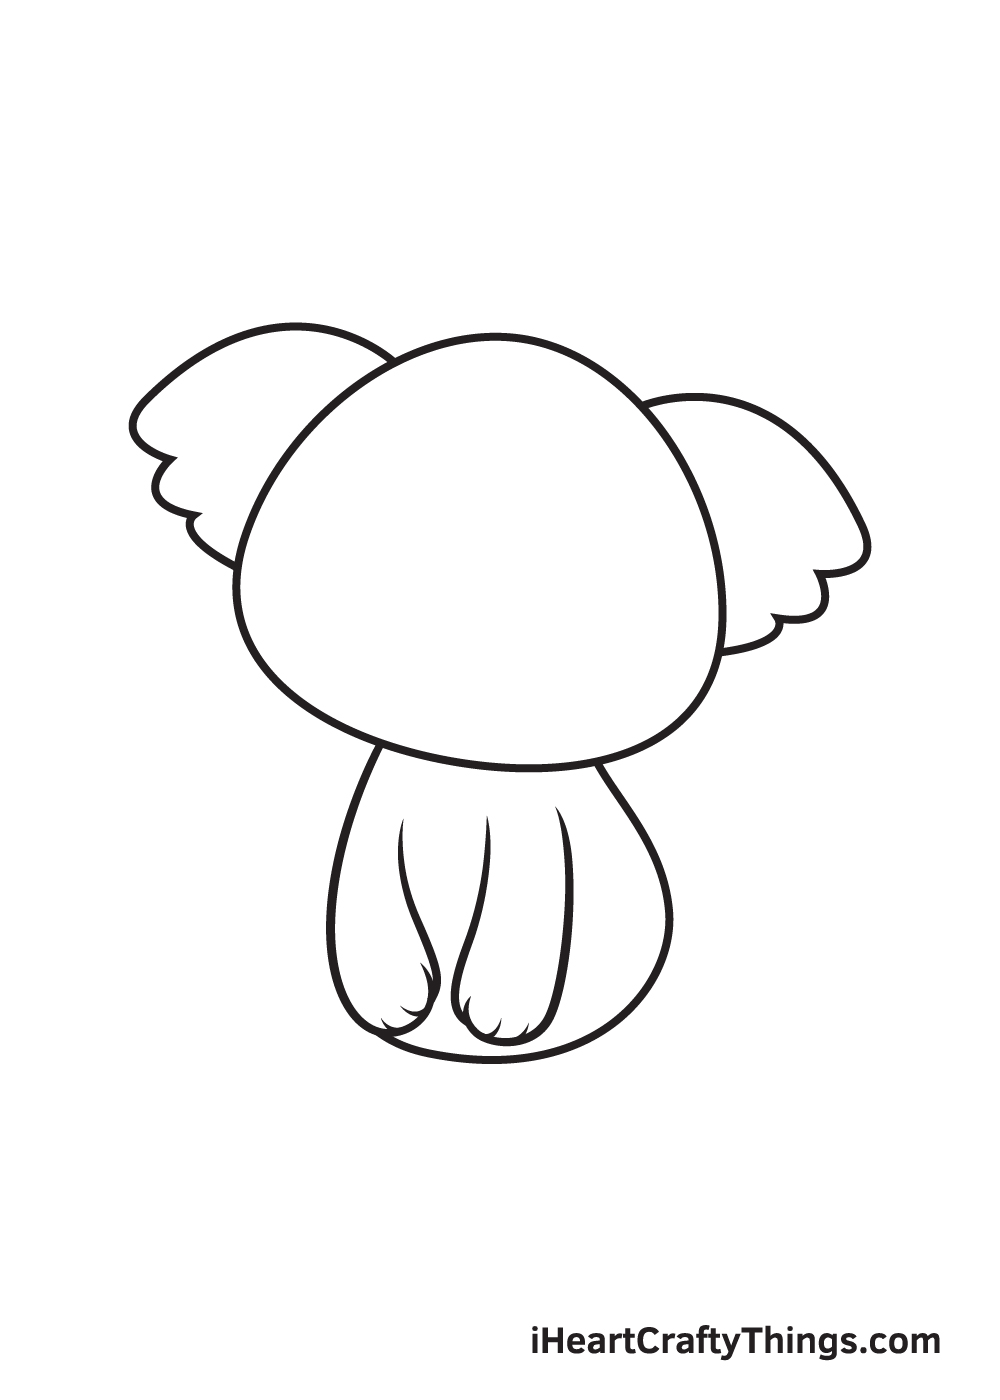
Koalas are particularly known for having enormous shaggy ears, so that’s exactly what we’ll be drawing in this step.
Continue by drawing a downward slope curved line on each side of the koala’s head. Then, close off the figure by drawing a scalloped line at the bottom.
This connects the endpoint of the curve to the side of the koala’s head, finalizing the form of its ears.
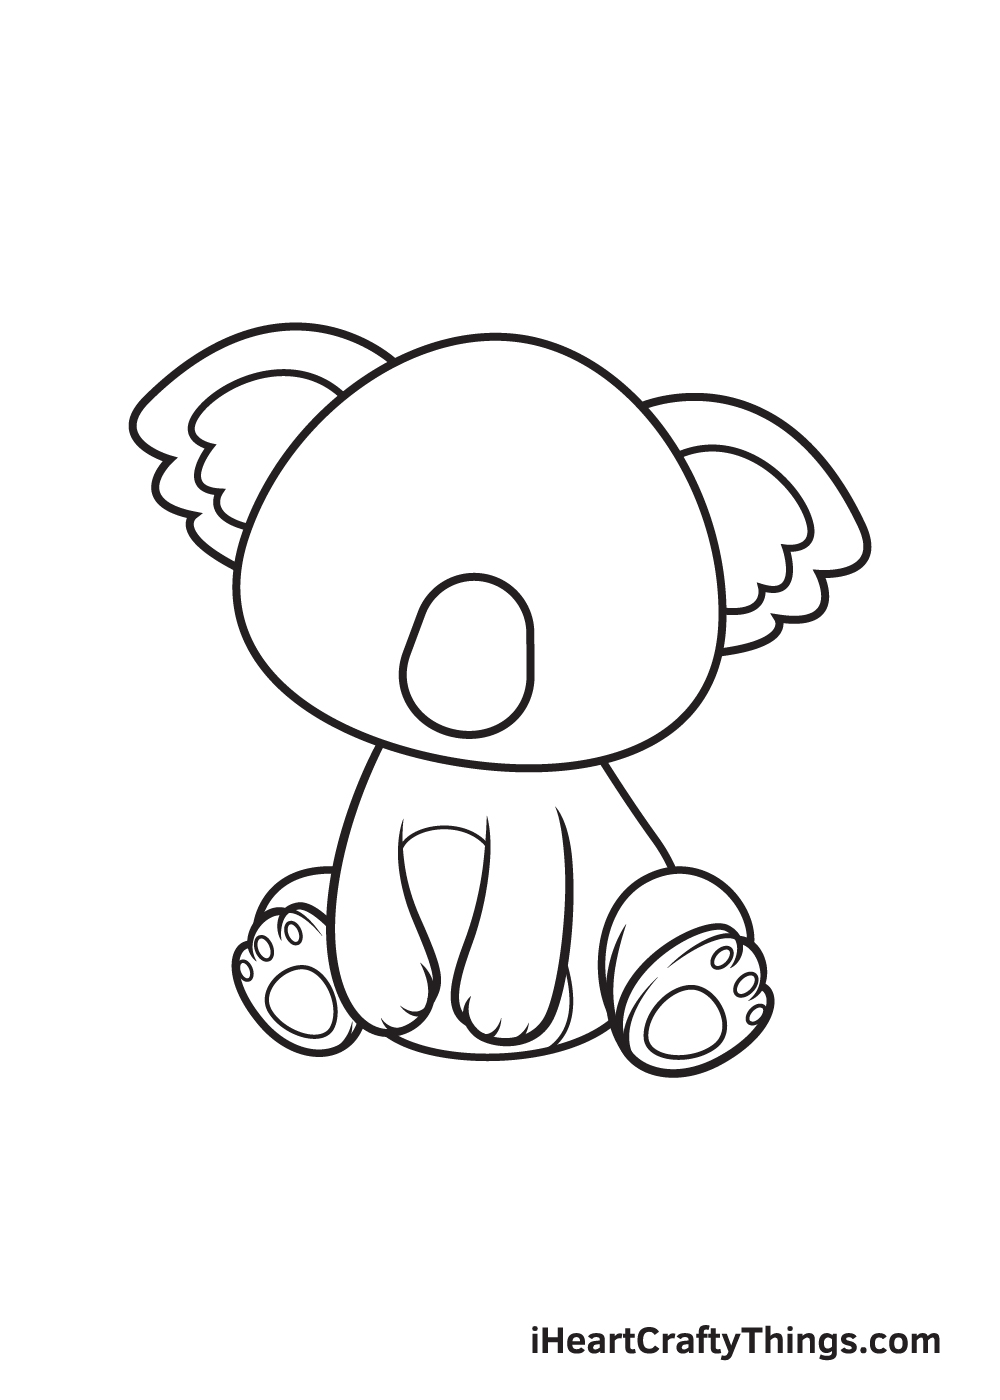
Step 5 – Then, Draw the Left Foot of the Koala
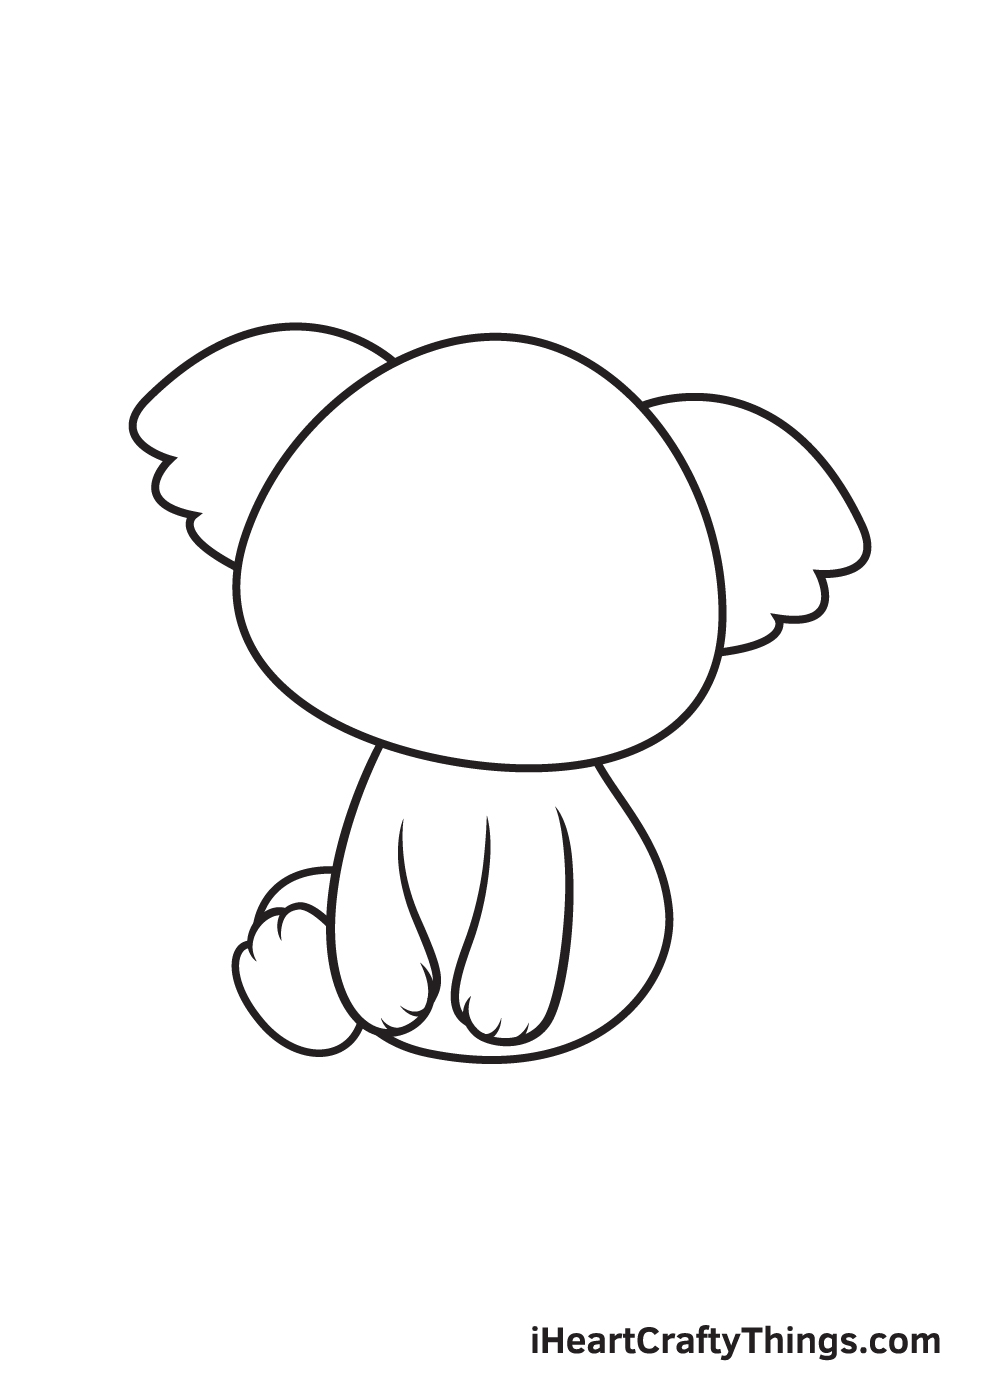
Draw a curve on the left side of the koala’s lower body to form its leg. Then, draw a diagonal oval shape with three curves at the top to create the left foot with three paws.
Since the koala is slightly facing towards the left, the left foot isn’t going to be fully visible, as shown in the illustration above.
Step 6 – Now, Complete the Koala’s Both Feet
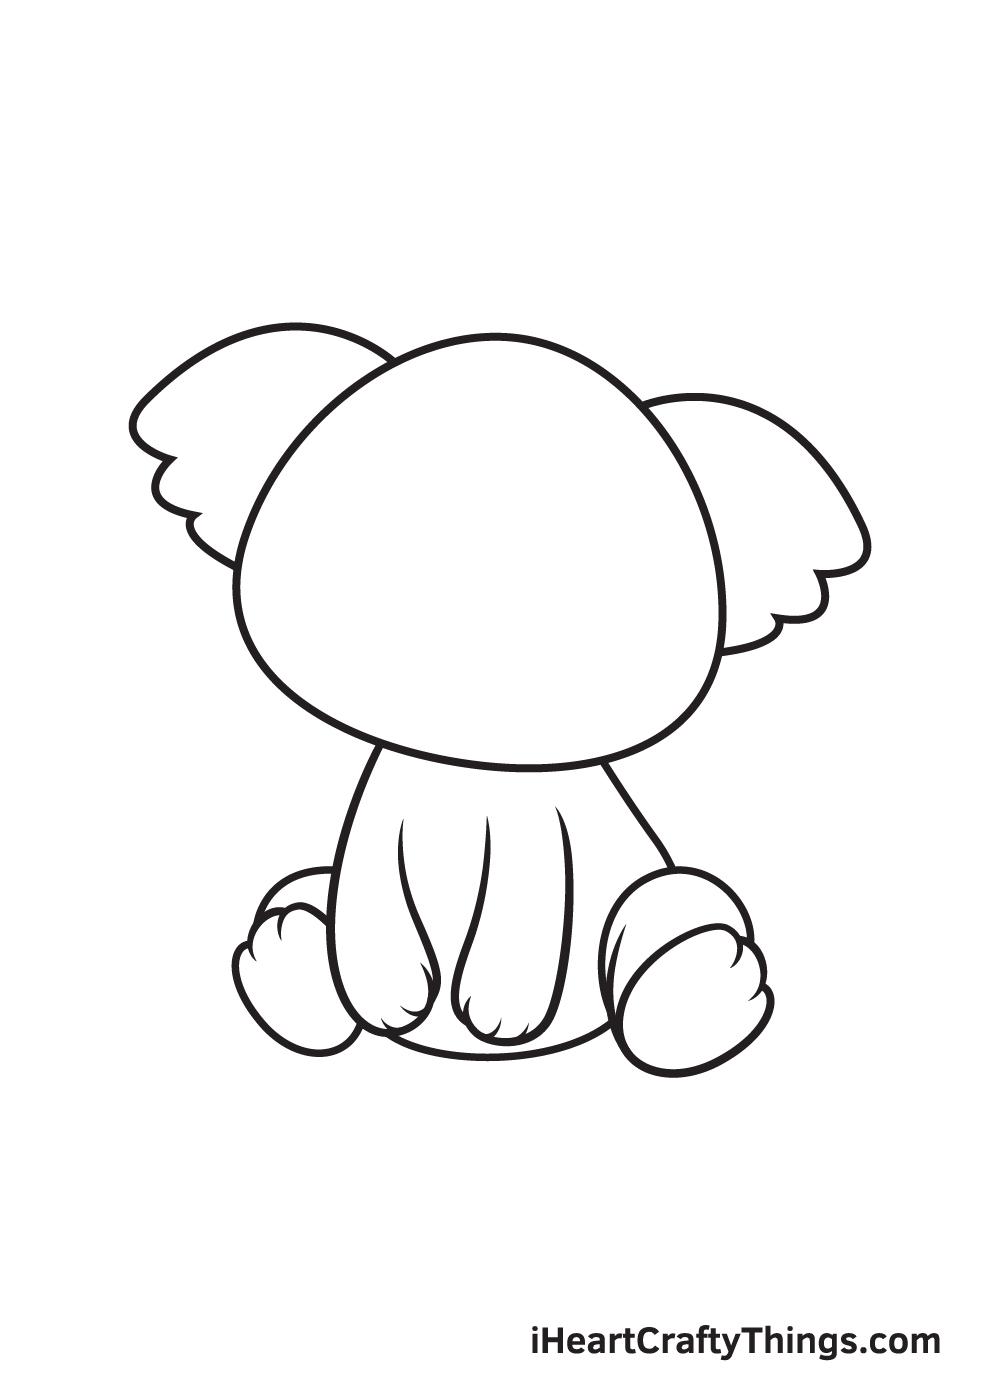
Draw a semicircle on the right side of the koala’s lower body. This forms the right leg of the koala.
Then, on the bottom of the leg, draw another diagonal oval shape with three connected curves at the top. At this point, both legs and feet of the koala are now complete.
Remember, the koala’s right leg and foot should be relatively bigger than the one on the left.
Step 7 – Add Patterns and Details on the Koala

When drawing the patterns and details of any kind of animal, it’s important to start at the top then work your way downwards. So, in this step, that’s exactly what we’ll be doing.
Proceed by drawing a figure inside both ears following its outline. This forms the inside or inner ear of the koala.
Then, moving on to the koala’s body, draw a circular outline across its chest forming its underside. Lastly, draw an irregular circle shape with three smaller circles at the top on the soles of the koala’s both feet.
Step 8 – Afterwards, Draw the Nose of the Koala
Moving forward to the facial features of the koala, we’ll be drawing the koala’s nose in this step. Continue by drawing an irregular standing oval shape to form the nose.
Keep in mind that the bottom part of the oval should be a bit wider than the top. A big black nose is one of the koala’s most distinct physical features!
Step 9 – Now, Draw the Koala’s Pair of Eyes
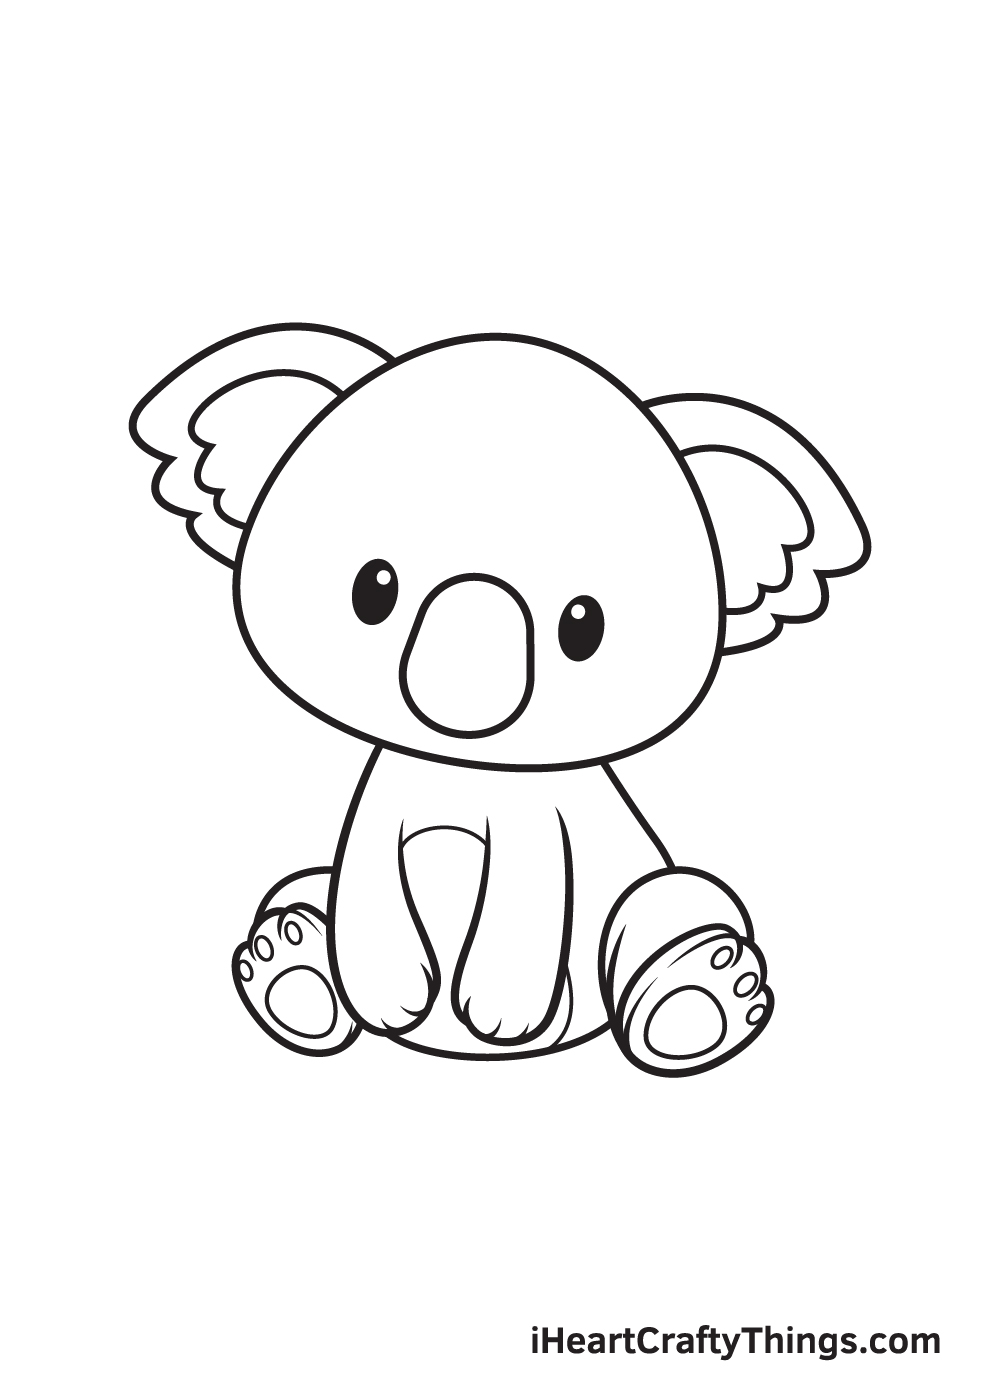
Complete the look by adding a pair of eyes on the koala’s face. Simply draw two upright oval shapes with a small circle inside to form the eyes.
Afterwards, shade the entire space within the eyes except for the tiny circle. This creates a dramatic “sparkling eyes” effect, making the koala look even more charming!
Now, it’s finally time for the most exciting part, which is coloring your drawing!
Though koalas typically have grey-brown fur and white undersides, feel free to color the koala using any colors you like!
Take this opportunity to showcase your artistic skills, especially your ability to mix and match various colors.
Have fun playing with colors and watch as the koala ultimately comes to life!
Bonus: Make This Animals Drawing A Bit Easier With These Tips
In this guide on how to draw animals, we focused on a koala to use as an example. In this bonus step, we wanted to go over a few ways you could make not only this koala but any animals you want to draw much easier.
The easiest way to make any animal you would like to draw easier would be to simplify it down into some simpler shapes. Using a pencil would be the best way to do this.
The reason for that would be that you can erase these lines later once you have added your final lines. Looking at this koala, you can see how you could simplify it into simpler shapes.
It could be a large oval for the head, a much smaller one for the body and then some thinner shapes for the limbs. Then, in subsequent layers you could add some more refined shapes and details.
Soon, you will be able to add the more detailed outlines and details to finish off the picture. Now, you can do this with any other animal you would like to draw in this style.
For example, let’s say you wanted to draw a tiger, an animal that we chose because it’s so different from a koala. Using pictures of a tiger, you can simplify it to those simpler shapes we spoke of.
Then, add details that are similar to the ones we used for the koala, but make sure to account for the tiger’s specific features. If you take it slowly and break it down into simpler shapes, you will be able to create any animals drawing you like.
What are some other animals you would like to create in this cartoon style?
5 Tips To Make Your Animals Drawing Even Better!
This animals sketch is looking really great, but we have 5 ways for you to make it even greater!
- This koala we have worked on in this guide is looking so cute, but there has been lots of room left for you to add some of your own extra touches. One way of doing this is by adding some extra objects and accessories. These could include some eucalyptus leaves for it to munch or maybe something fun like a bow in its hair!
- Adding a background scene to an image can really take a drawing to the next level. You could do the same thing for this animals drawing! Koalas often live in forest environments with plenty of eucalyptus leaves, so that would be a great place to start. You could even look up some pictures of forests to give you inspiration!
- Small details can make a big difference, and you could add some to this drawing of an animal. These could be small tufts of fur, and you could even add this kind of detail with small strokes of a paintbrush. Or you could add some extra facial features such as a mouth or some different eyelashes!
- Drawing is all about being creative, so when you have mastered this one you could create new ones using what you have learned. You could draw this koala in different poses and positions, or you could even change it entirely to be a different kind of animal! For example, it would be easy to turn it into a different kind of bear just by changing a few elements.
- When coloring your picture, you have so many options for how you could do it. In our guide, we went with whites and greys in order to make the koala look a bit more realistic. You could use any colors you like, however! You could even use pink with purple spots for this animals drawing if you want to, it just depends on what kind of look you want. Don’t be shy to use different art mediums, too!
Your Animals Drawing is Complete!
Hopefully, you enjoy this step-by-step animals drawing tutorial. Now that you can draw a koala, perhaps you can draw a koala clinging onto a branch of a tree next?
If you’re up for the challenge, then you should check out our tutorial on how to draw a tree!
What kind of animal would you like to draw next? Let us know and we’ll do our best to curate a drawing tutorial for it.
In the meantime, go ahead and check out our “How to Draw” catalog to explore many more fun drawing tutorials like this!
Once you’re done drawing and coloring animals, don’t forget to show off your artwork. Take a photo of your colored koala drawing and post it on our Facebook page and Pinterest.
Don’t be shy—you should be proud of yourself for finishing an impressive masterpiece!
We would love to see your adorable animals drawing!