There is a huge amount of diversity present in the animal kingdom. Some animals may be small and scary looking while others are big and majestic.
Then you get those animals that just look a bit weird, and the alpaca is certainly an example of this.
Originating from South America, these wooly creatures are sometimes confused with their cousins the llamas, but they are in fact smaller in size.
Their unique appearance has made them popular around the world, and many people like to learn how to draw an alpaca to represent this unusual creature.
If you love this quirky animal and have wondered how you can create some artwork featuring it, then this will be the tutorial for you!
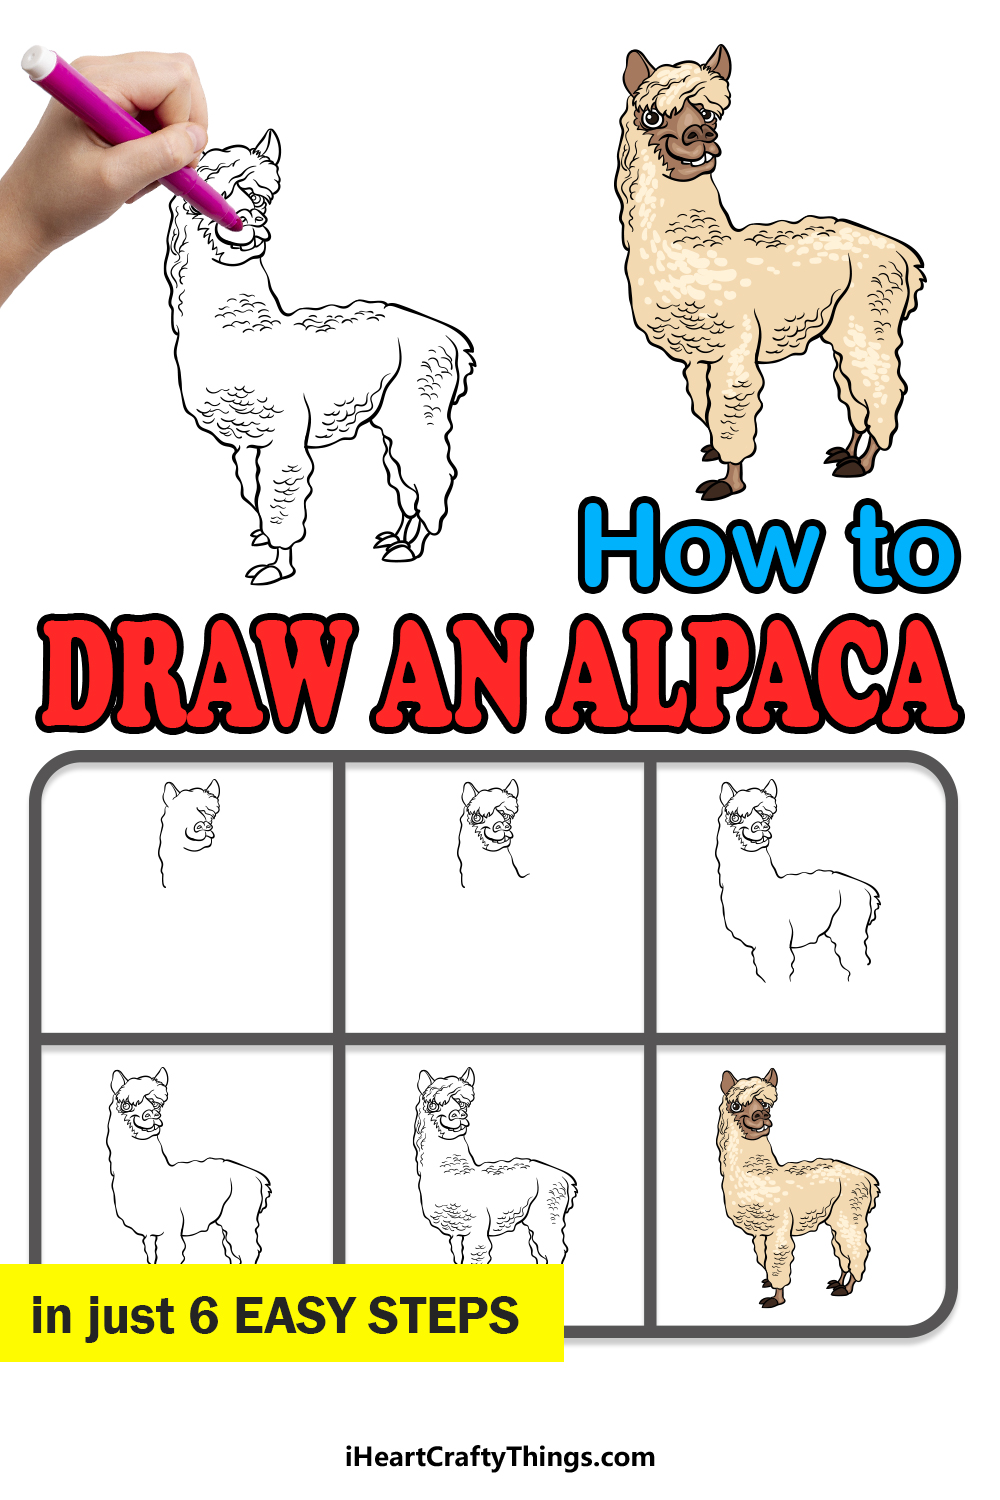
Our step-by-step guide on how to draw an alpaca in just 6 steps will show you how to create a wonderful interpretation of the animal.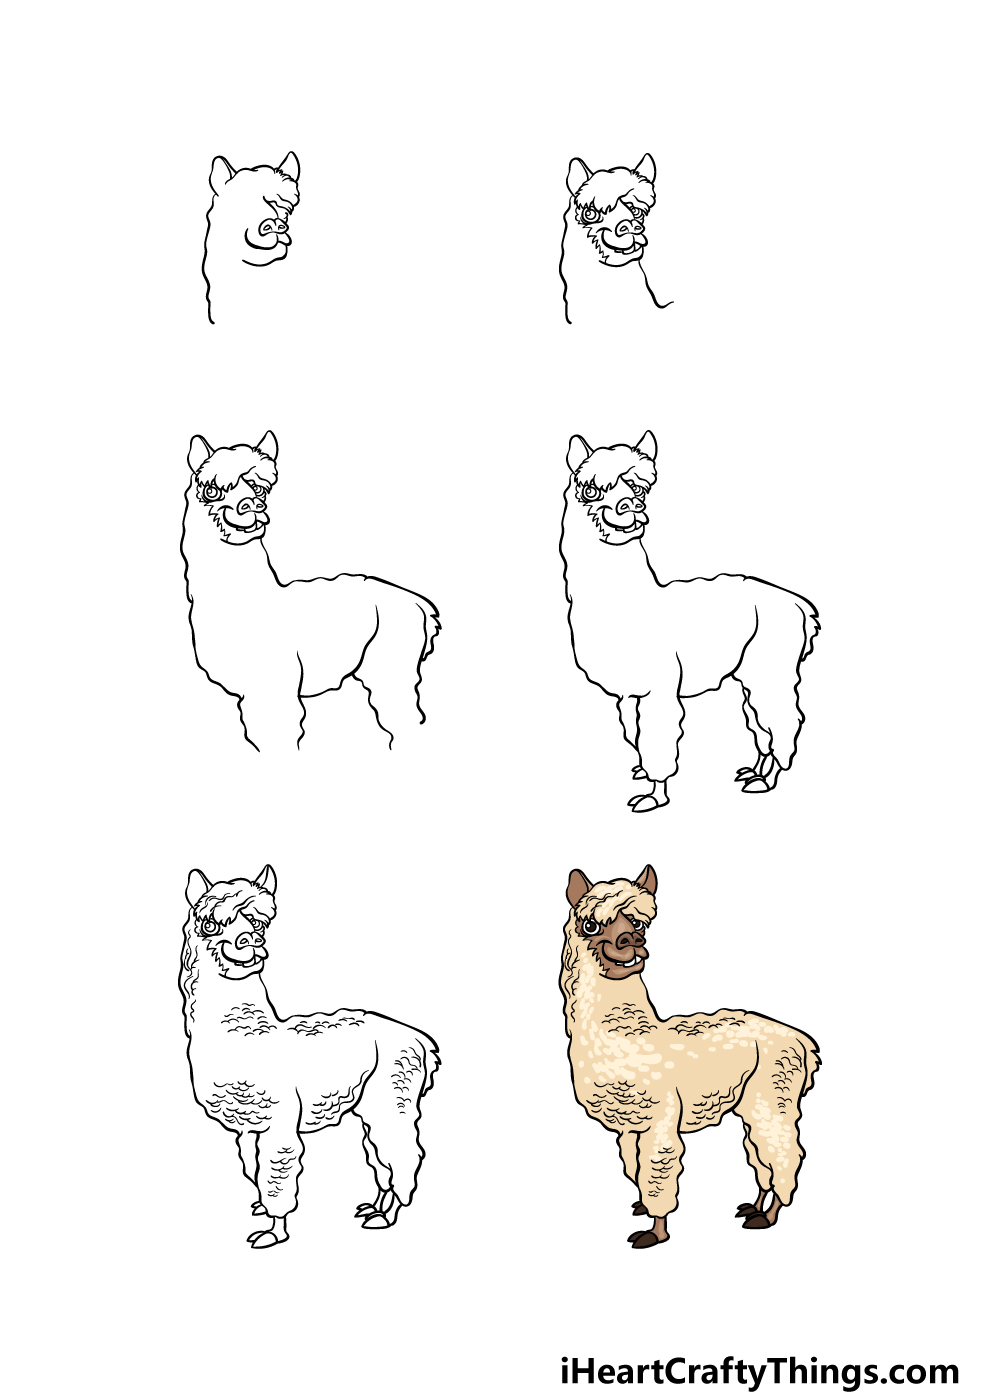
How to Draw An Alpaca – Let’s Get Started!
Step 1
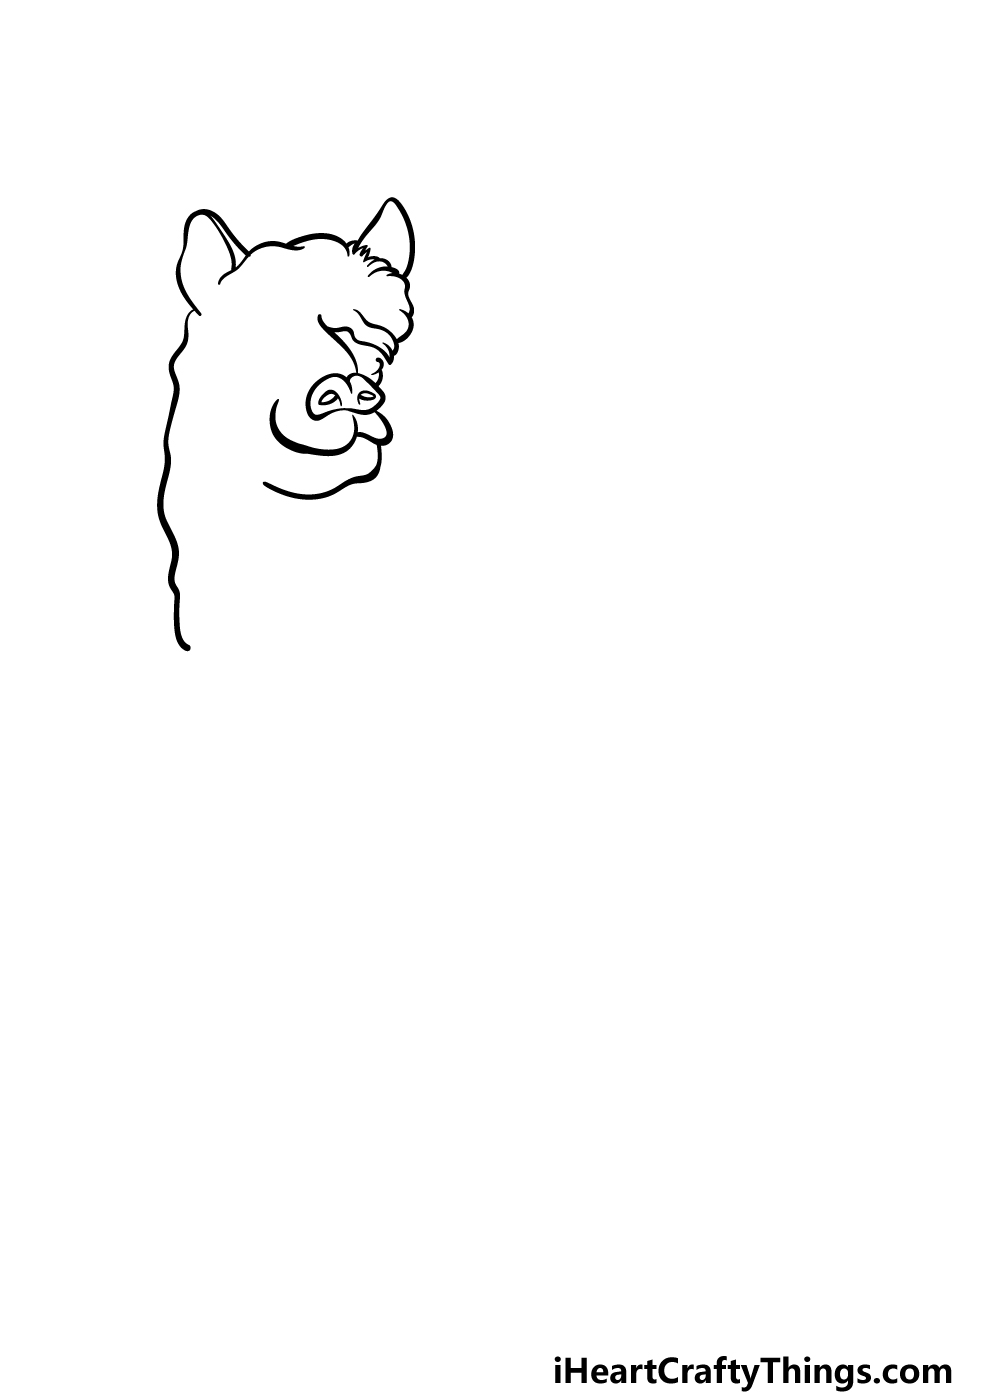
During this guide on how to draw an alpaca, we will be creating a cute and cartoony version of this adorable animal.
To do this, we will begin with the head and face outlines. First, use some bumpy lines for the back of the neck and the top of the head.
These will be drawn like this so that the alpaca will look nice and fluffy.
We will then be adding two rounded yet pointy ears onto the top of the head. Once these outlines are drawn, you can then start drawing the facial details.
Start with a flat, rounded nose, and then use some curved lines for the muzzle and chin of the alpaca.
Finish off with the fringe over the face, and then we can proceed to the second step of the guide!
Step 2 – Now, draw some more of the facial details
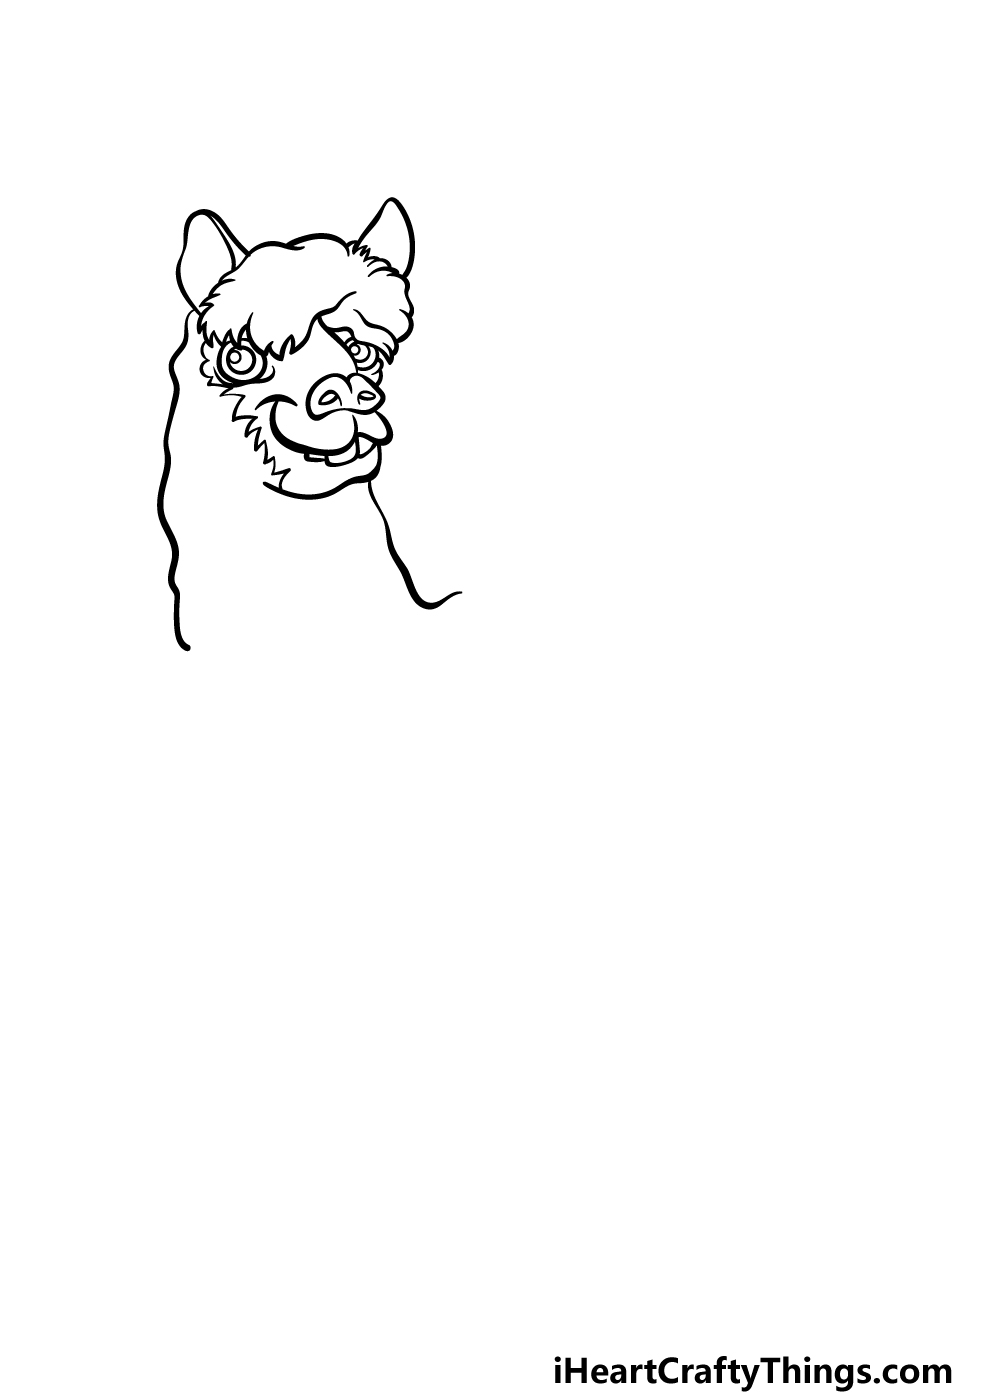
Now that you have the outline of this alpaca’s face drawn, you can now start adding some more specific facial details.
First, we will begin with the eyes. These can be drawn using some small circle shapes with smaller circles within them for the pupils.
We will then draw more of the fringe and face outlines using some jagged lines to make them look hairier.
Finally, draw some small, rounded square shapes coming from the mouth for the big teeth of the alpaca.
Step 3 – Draw the start of the body outlines
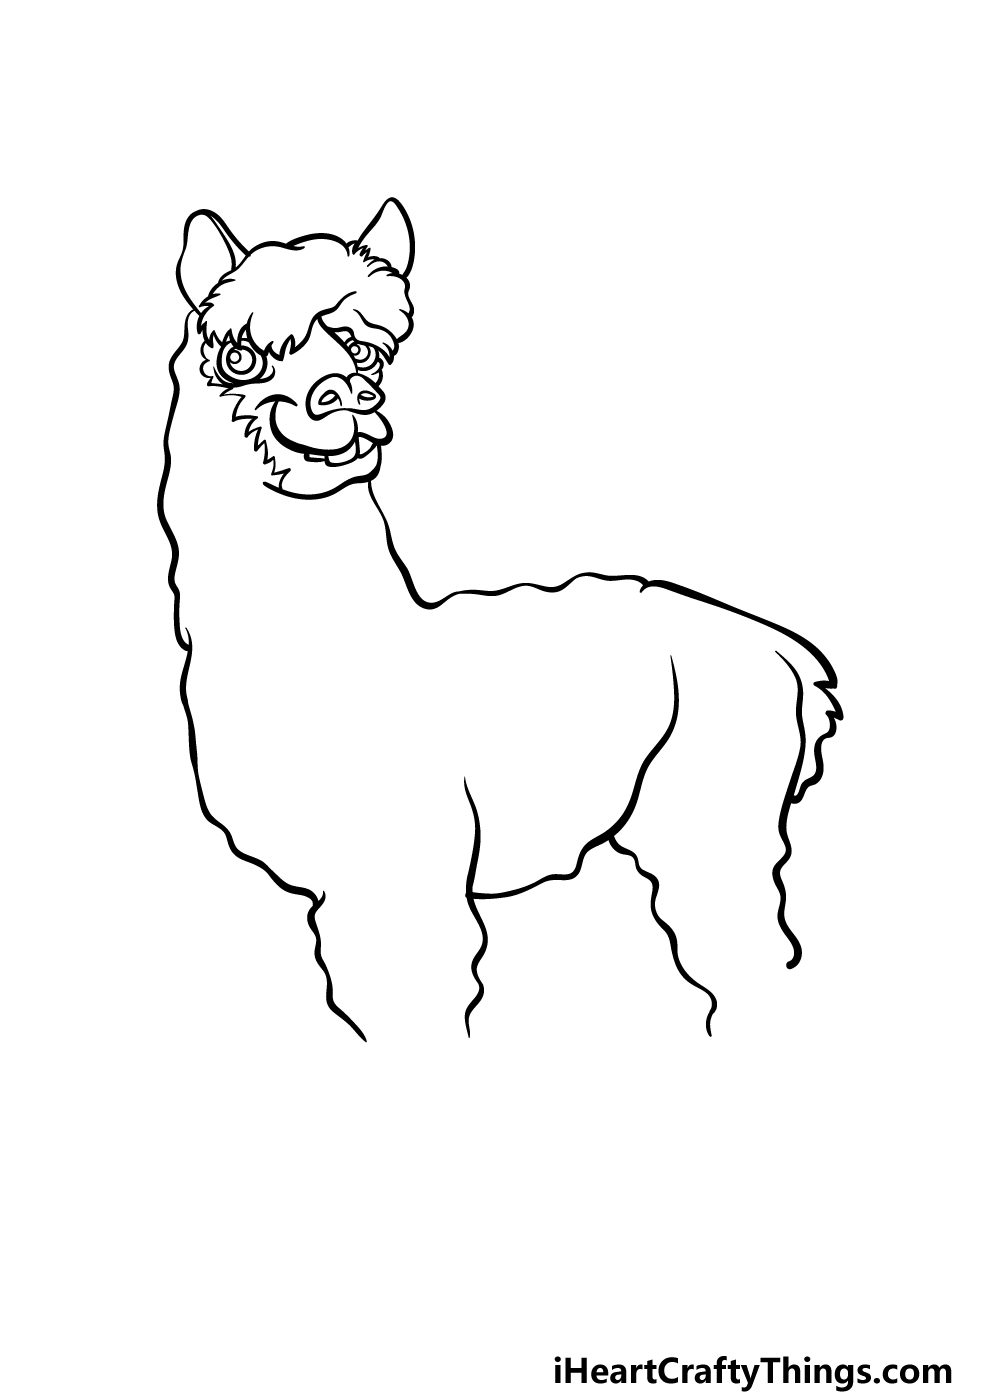
The head of this alpaca is complete, so for this third step of our guide on how to draw an alpaca we will be drawing the start of the body.
Much as you did with previous steps of the design, we will be using some bumpy lines for these outlines in order to make the alpaca look fluffier and woolier.
For now, we will be drawing the back, tail and first two legs of the body.
The bottom halves of the legs will be blank for now, but you will be filling those spaces in soon enough as we proceed to the next steps!
Step 4 – Next, draw the rest of the alpaca’s legs
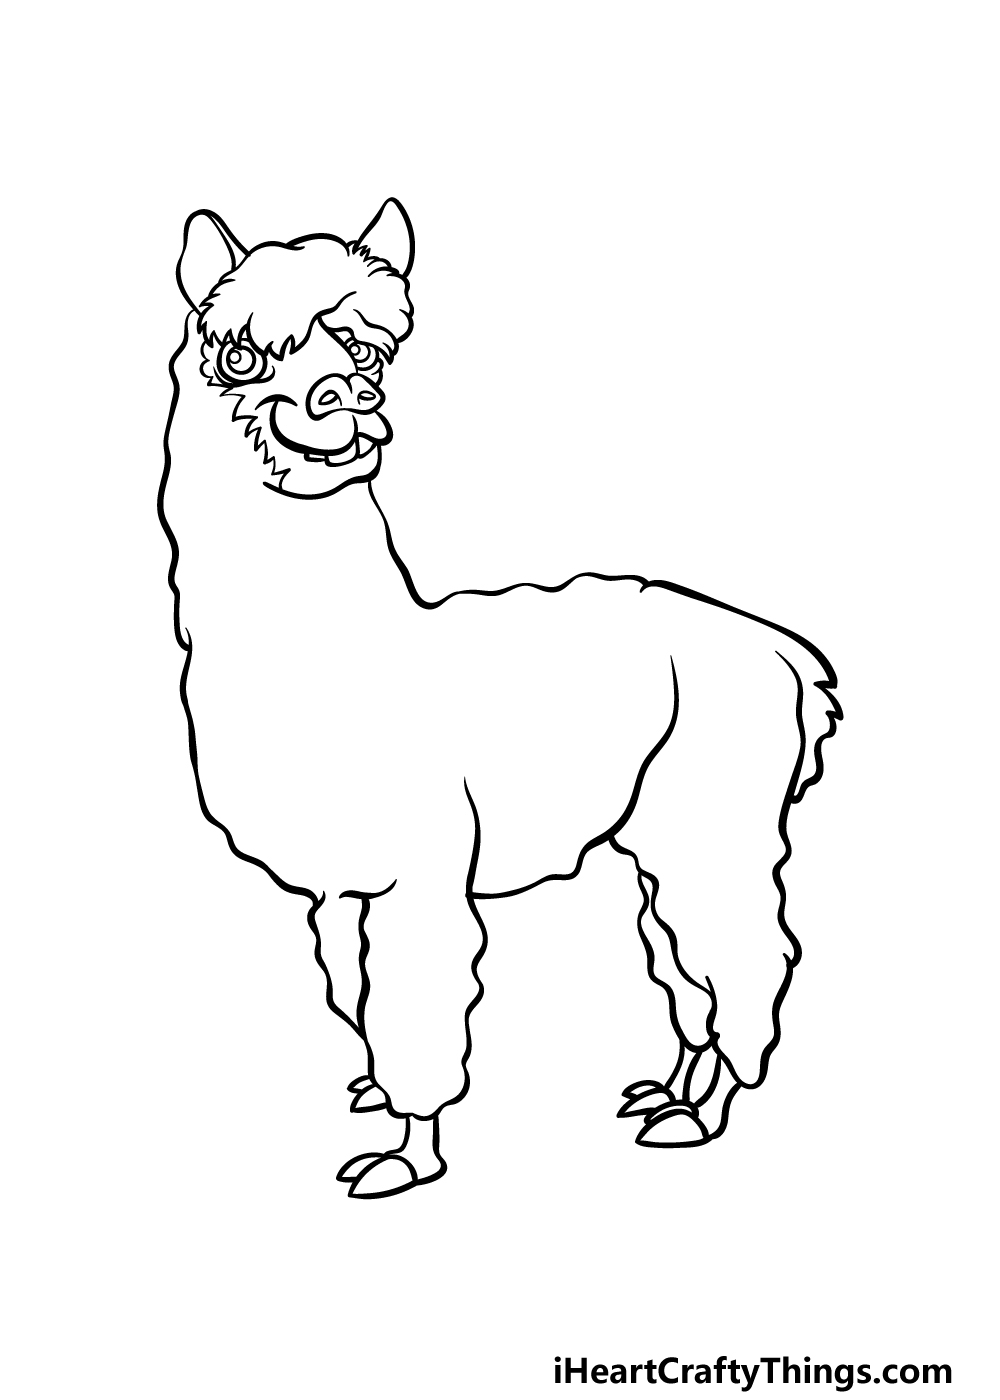
Now you can focus on finishing the outlines for this alpaca drawing before we add some final details and elements in the next step of the guide.
First, use a bumpy line at each pair of legs to separate them and show that the legs are up against each other.
Then, you can finish off by drawing the thin bottom halves of the legs. These will not be covered in wool, so there will be a much smoother line used for them.
With the legs complete, you will be ready for those final details in the next step of the guide!
Step 5 – Add the final details to your alpaca drawing
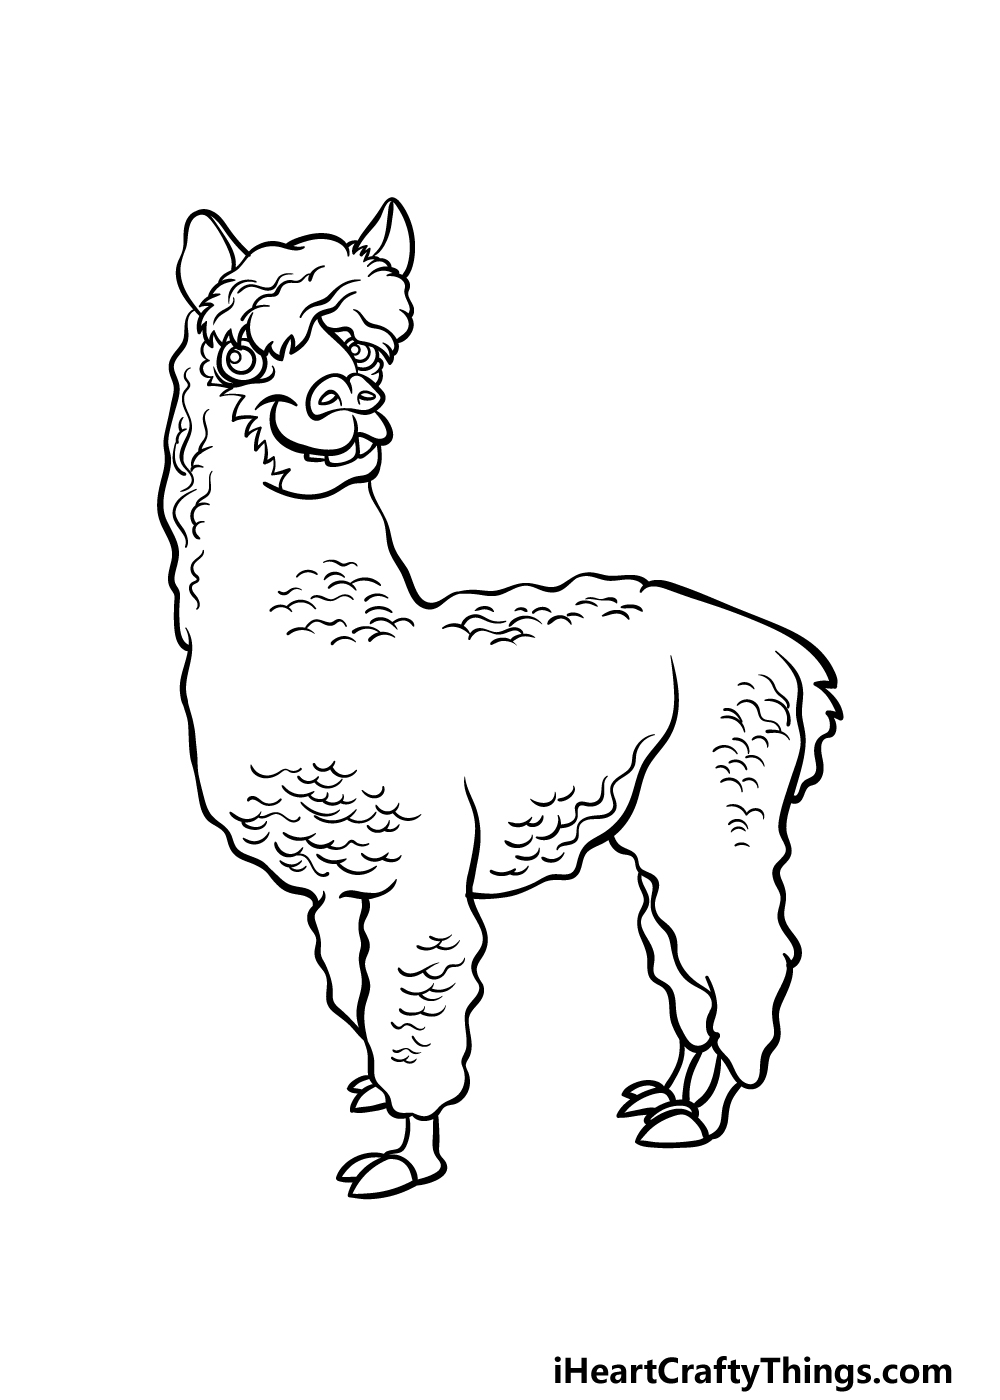
This fifth step of our guide on how to draw an alpaca will be all about finishing up some final touches to have you ready for the final step.
These details will go all throughout the body of the animal, and you can add them using some bumpy lines all over the furry parts. These lines will help to make the alpaca look even woolier!
When all of these details have been added, you will be ready for the final step! Before proceeding, be sure to also add any of your own details to further personalize this adorable picture.
What kind of backgrounds or extra details do you think would suit this image? We can’t wait to see what you add before we move on!
Step 6 – Finish off your alpaca drawing with color
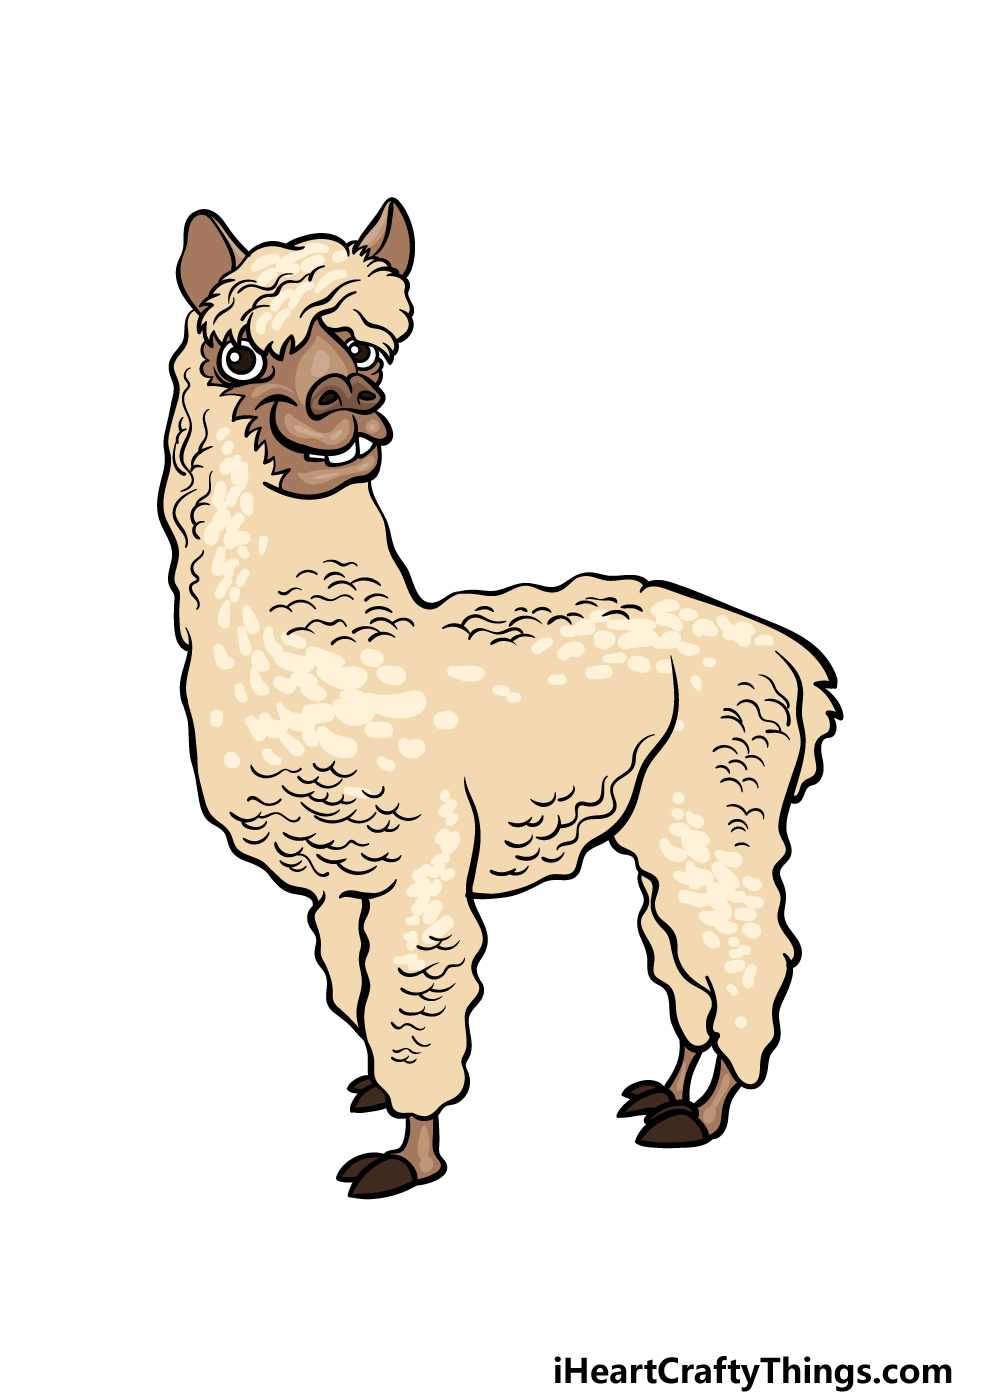
That brings you to the final step of this alpaca drawing, and although it already looks great we will be making it look even better as we fill it in with color!
In our reference image, we showed you how we would color it in, as we used some light beige colors with darker brown elements included as well.
These are some color suggestions that you could use for your own alpaca, but you could also add any other color choices of your own that you may prefer!
For an extra fun touch, you could glue cotton wool onto the furry parts of the alpaca to give it a cool 3D look. What colors, mediums and craft supplies will you use to finish up this cute alpaca?
4 More Ways To Make Your Alpaca Drawing Unique
Unpack these fun tips we have for making your alpaca sketch look even better!
This drawing of an alpaca that we created in this guide shows one with a funny expression. One way that you could personalize this alpaca would be to draw a new facial expression.
This facial expression could be as exaggerated, cartoony or subdued as you like!
You could create all kinds of emotions for this alpaca, and it will be a great way for you to express yourself and make this picture even funner.
What are some facial expressions you could create?
If you can’t get enough of alpacas, then you could add an alpaca pal to this drawing! This could be done by following through the steps of the guide again and changing a few details.
The second alpaca could have different colored fur or maybe a unique hairstyle to differentiate it.
You don’t need to stop at just one additional alpaca, and you could add as many as you like and have the patience to draw!
Once you have enough alpacas, you could add a background to give this alpaca drawing more of a sense of place. There are a few ways that you could create a background for the image.
One would be to draw the alpaca in an environment where you could expect to find them in real life. Or, you could go for something more abstract such as an alpaca party complete with cake and decorations.
These are just a few ideas, but there are so many cool backgrounds you could add!
Another way of making this alpaca sketch more unique would be by incorporating some interesting art tools, crafts and mediums.
For example, you could show how fluffy this alpaca is by using some cotton wool.
Or you could create the blanket over its back by using some real strips of fabric.
These are two ways you could think outside the box, but you should feel free to use any mediums and crafts at your disposal!
Your Alpaca Drawing is Complete!
When you first saw what you would be drawing in this guide on how to draw an alpaca, you may have thought it would be a difficult challenge to take on.
Hopefully with the help of the steps we provided you found it to be a fun and easy experience to take on!
Breaking down a drawing into smaller steps is a great way to make it easier, so we aimed to do just that for you in this guide.
Now that you have finished the guide, it’s up to you to go for some extra details and ideas.
We mentioned adding backgrounds, changing up colors and adding crafts as a few ideas to try, but there is a lot you can do to make this drawing your own!
If you had fun working on this guide, you will find many more to enjoy on our website!
There is a huge selection to choose from, and we upload new ones often, meaning you’ll want to check in often to never miss out.
When your alpaca drawing is finished, you can show off your art skills by sharing the finished drawing on our Facebook and Pinterest pages!