The history of the presidency of the United States is a long and storied one. Many of the various presidents have stood out in the history books for both good and bad reasons.
Abraham Lincoln is one of the most famous and revered presidents in the history of the country, serving as the 16th president of the United States.
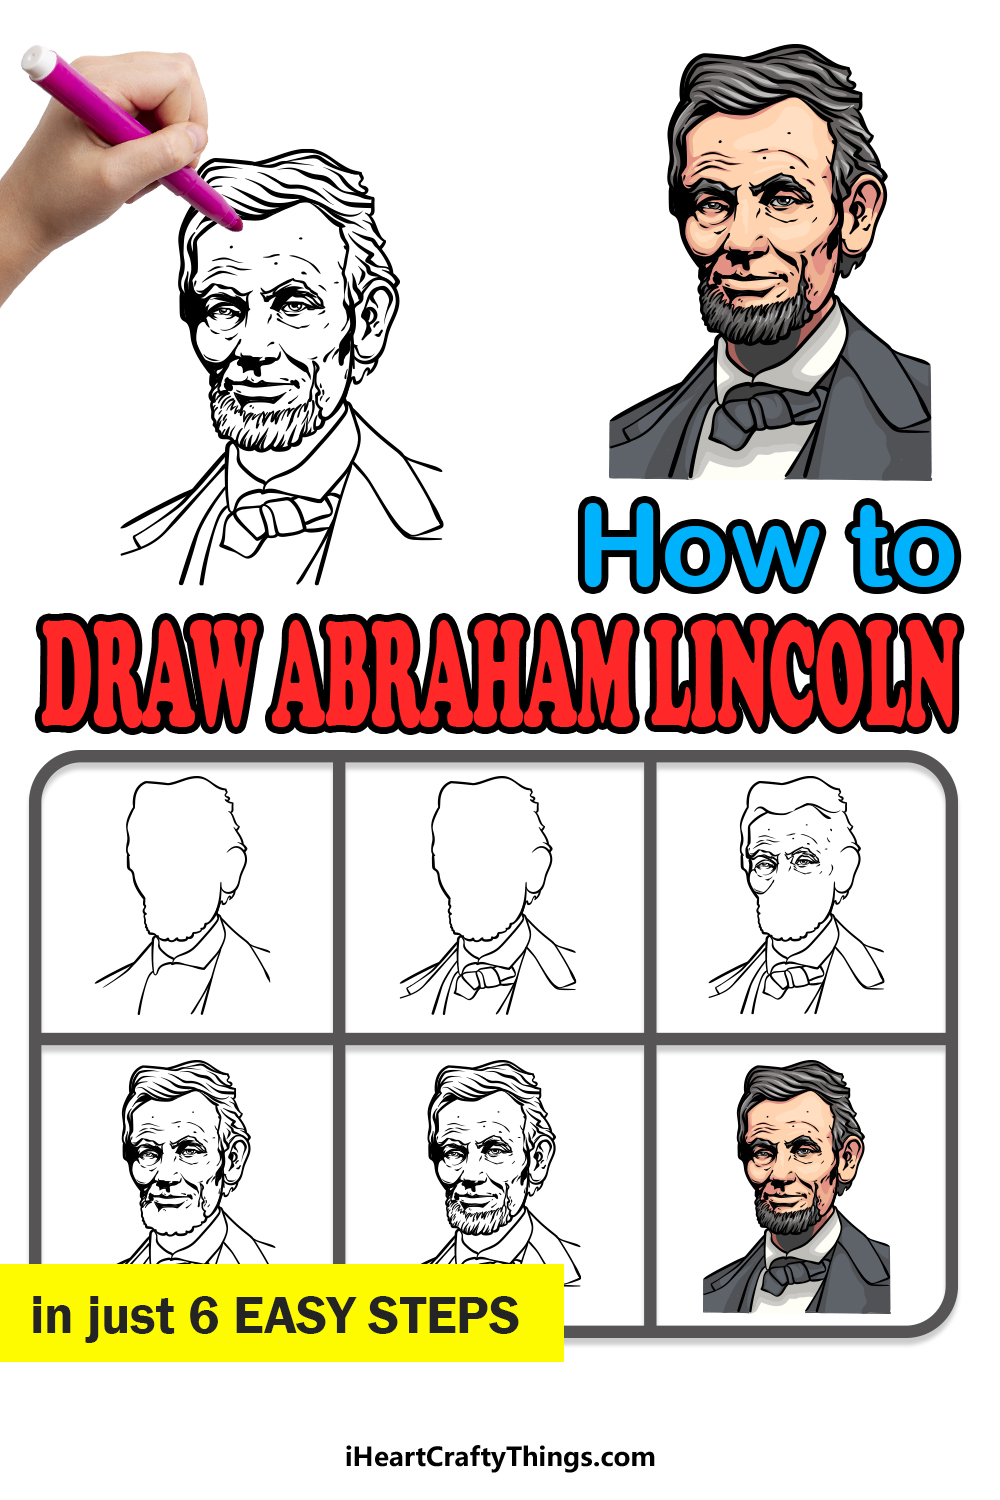
Known for his eloquence and many accomplishments, he is fondly remembered, and learning how to draw Abraham Lincoln is the perfect way to honor this great man.
Drawing real people isn’t always easy, but that’s what this tutorial is here for!
Our step-by-step guide on how to draw Abraham Lincoln in just 6 steps will show you how you can draw this incredible president.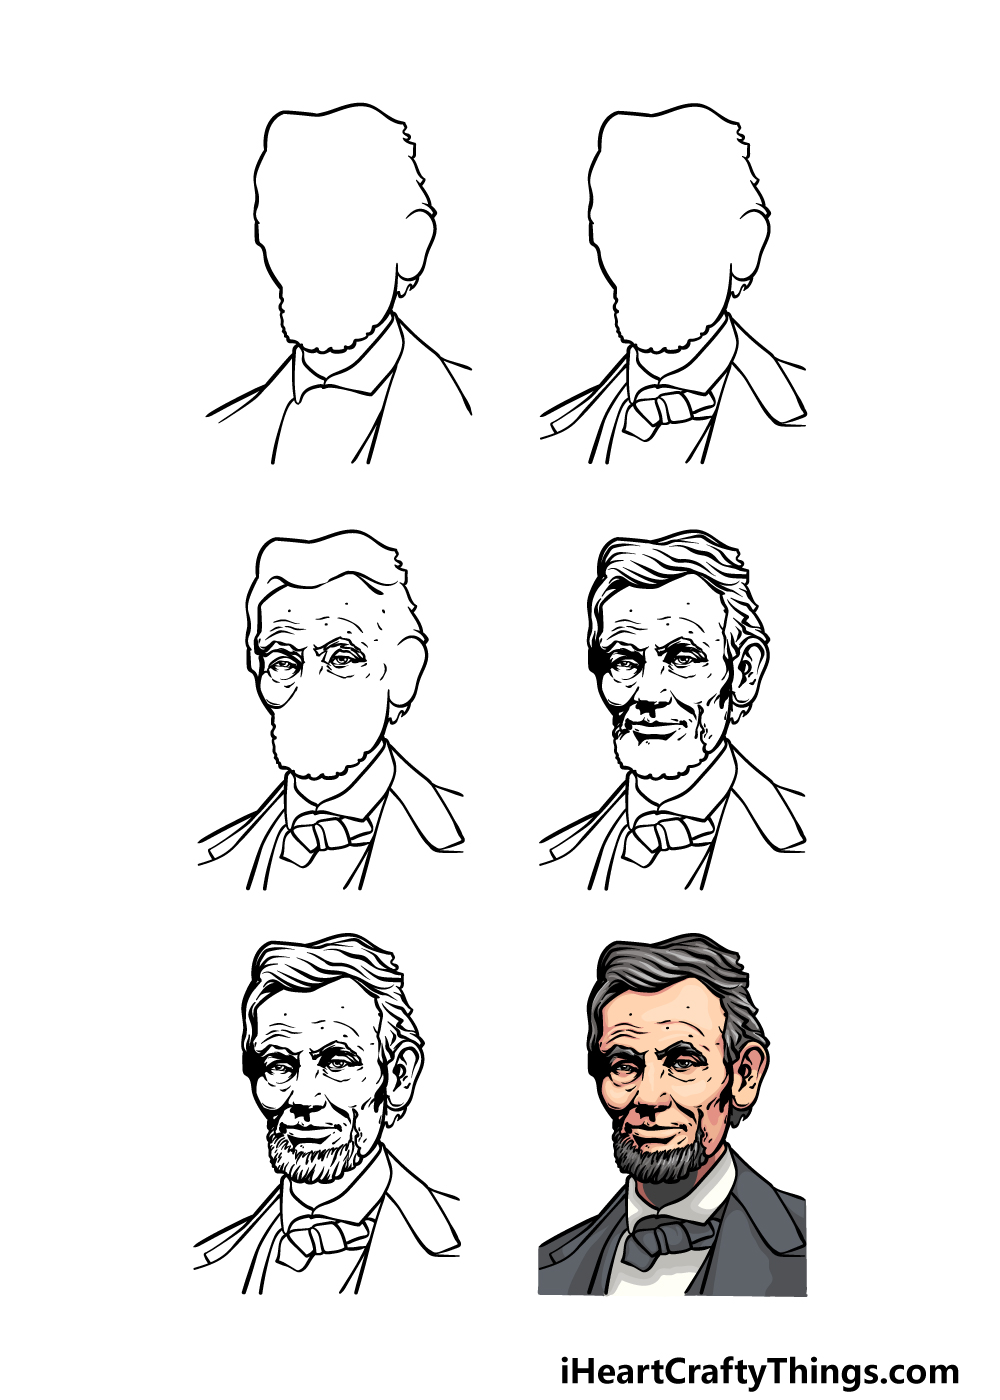
How to Draw Abraham Lincoln – Let’s Get Started!
Step 1
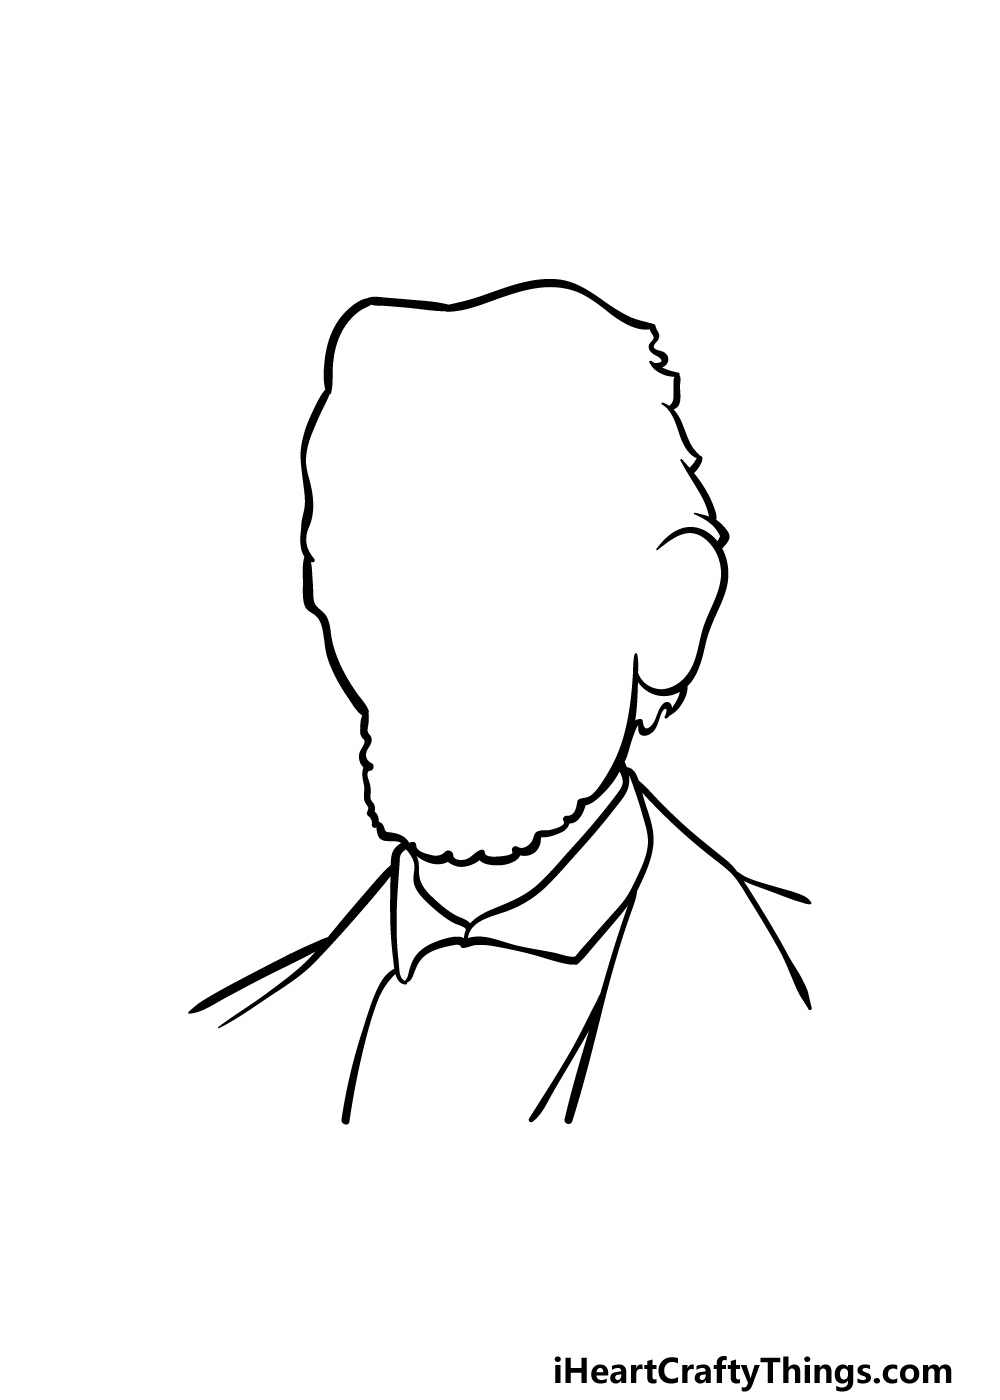
When drawing a picture of a real person, it can often be made much easier when you start with the outline of the face and head.
That’s just what we will be doing in this first step of our guide on how to draw Abraham Lincoln. To do this, try your best to replicate the outline that we have displayed in our reference image.
This will include some bumpy lines for the base of his beard as well as his hair on top of his head. You can also add his ear on the right-hand side.
Finally, before we move on to the second step you can also start drawing his shirt and jacket. For now, we will begin the outlines for his collar and jacket lapels. Once these are drawn, you will be ready for step 2!
Step 2 – Now, draw some more details for his clothing
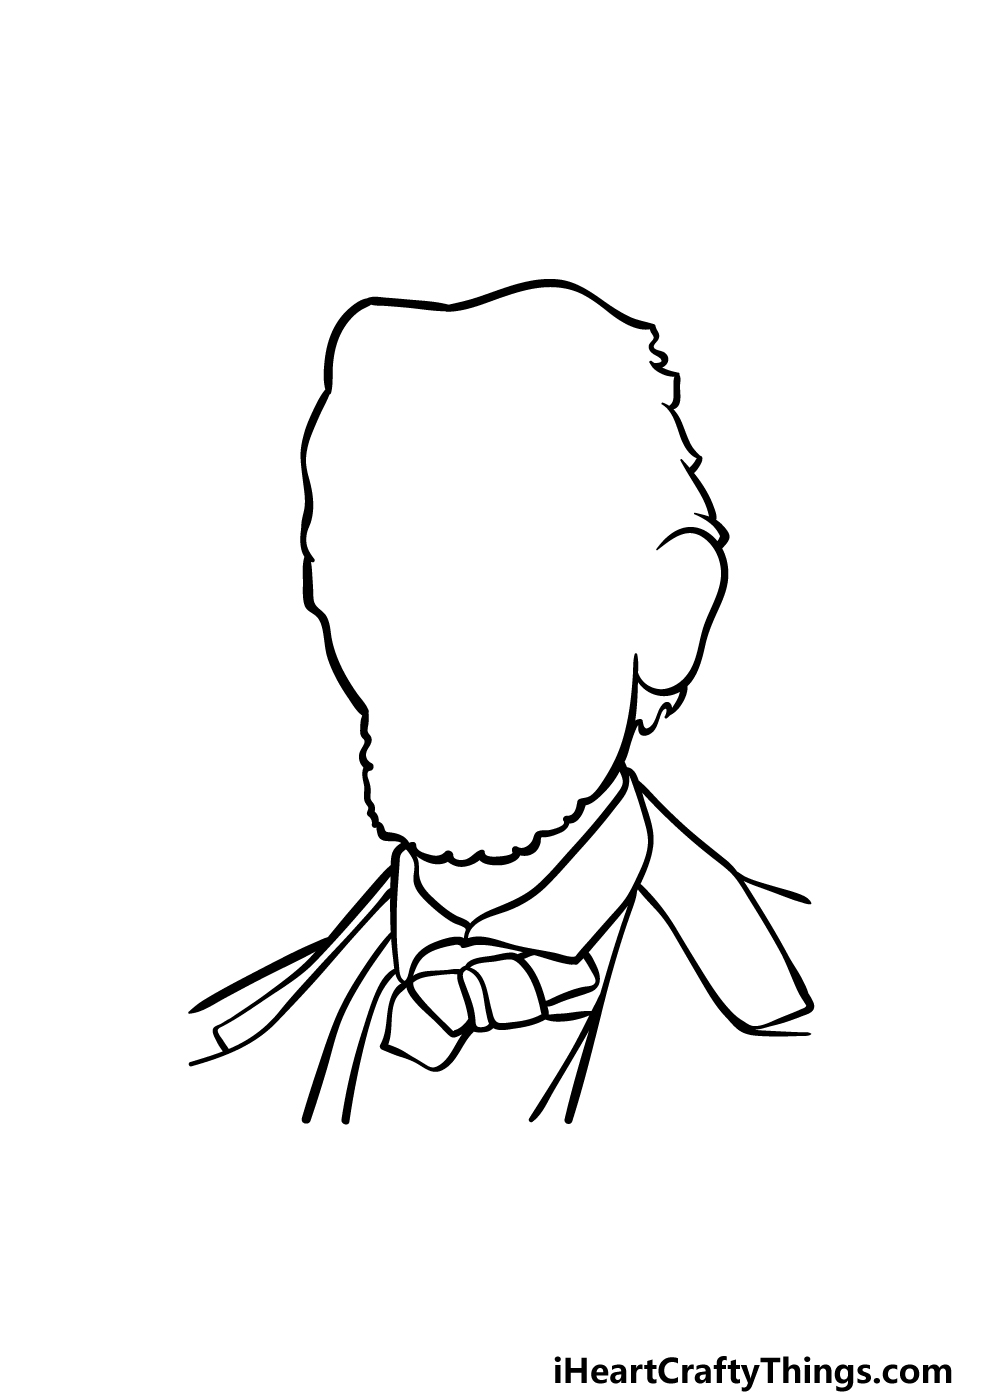
In this second step of your Abraham Lincoln drawing, we shall be adding some more elements and details for his clothing before we draw more of his face.
First, we shall start by drawing the tie that he is wearing. This will be sitting at a bit of a crooked angle and will be made up of some small square shapes.
Finally for this step, you can also add some more lines to his collar and lapel before we proceed on to step 3 of the guide.
Step 3 – Next, draw his eyes and some facial details
We will be working on what is possibly the trickiest part of this guide on how to draw Abraham Lincoln. This part will focus on the eyes and the areas surrounding them.
The reason that this could be tricky is that eyes are one of the biggest contributing factors in making a face recognizable, so it’s important to get them right.
To make things easier for yourself, you could start by drawing with a light pencil and then try your best to replicate the eyes exactly as they appear in our example.
By doing this, you don’t have to worry about making mistakes! Then you can draw over the pencil lines with your pen before moving on.
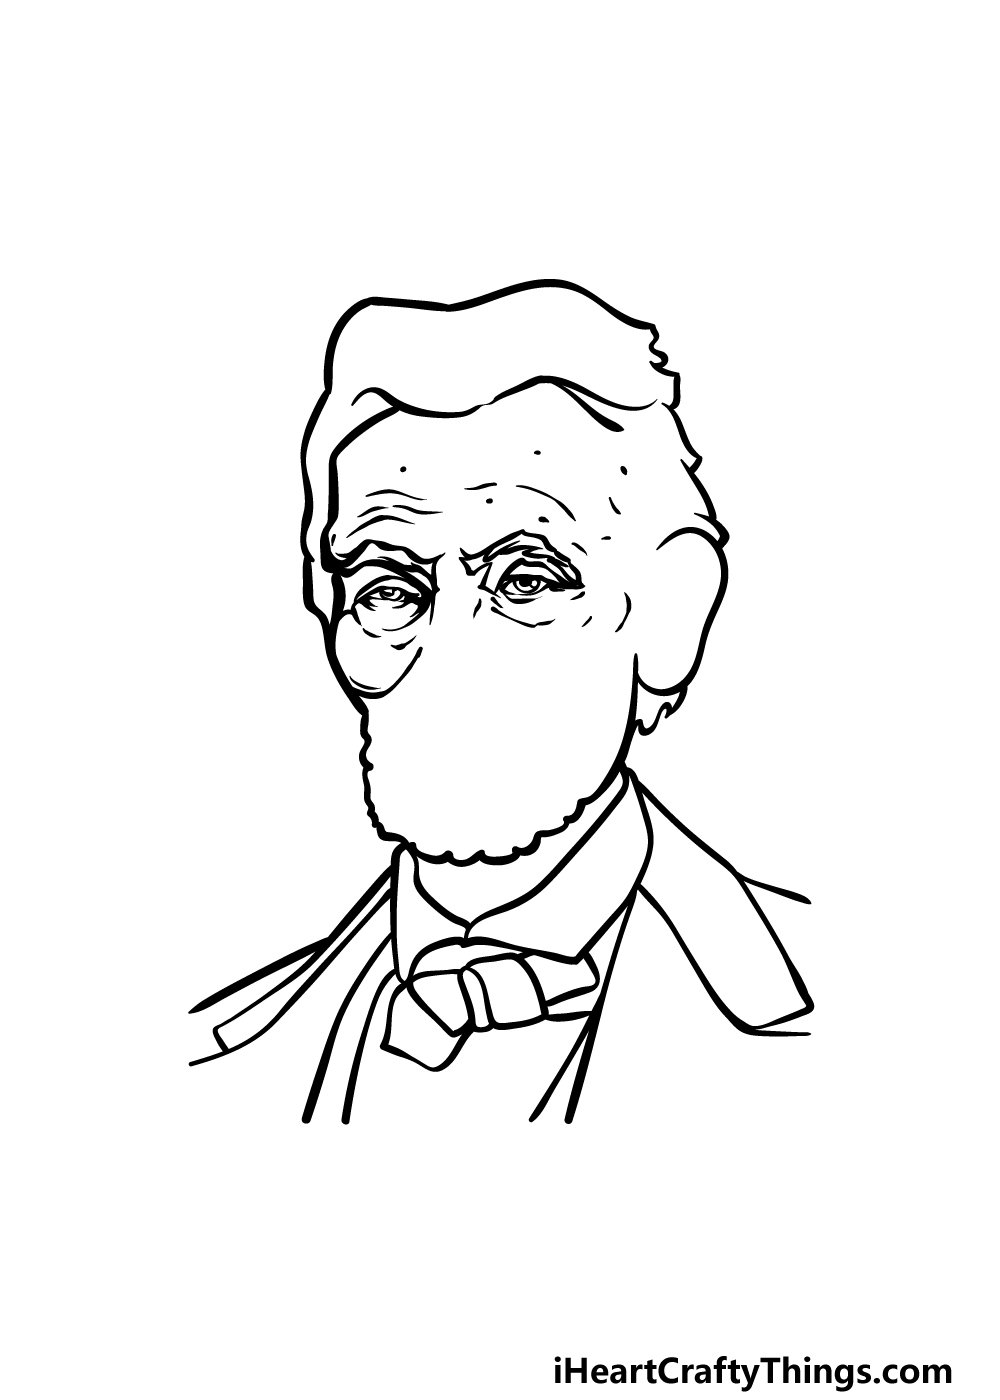
Step 4 – Now, draw some face and hair details
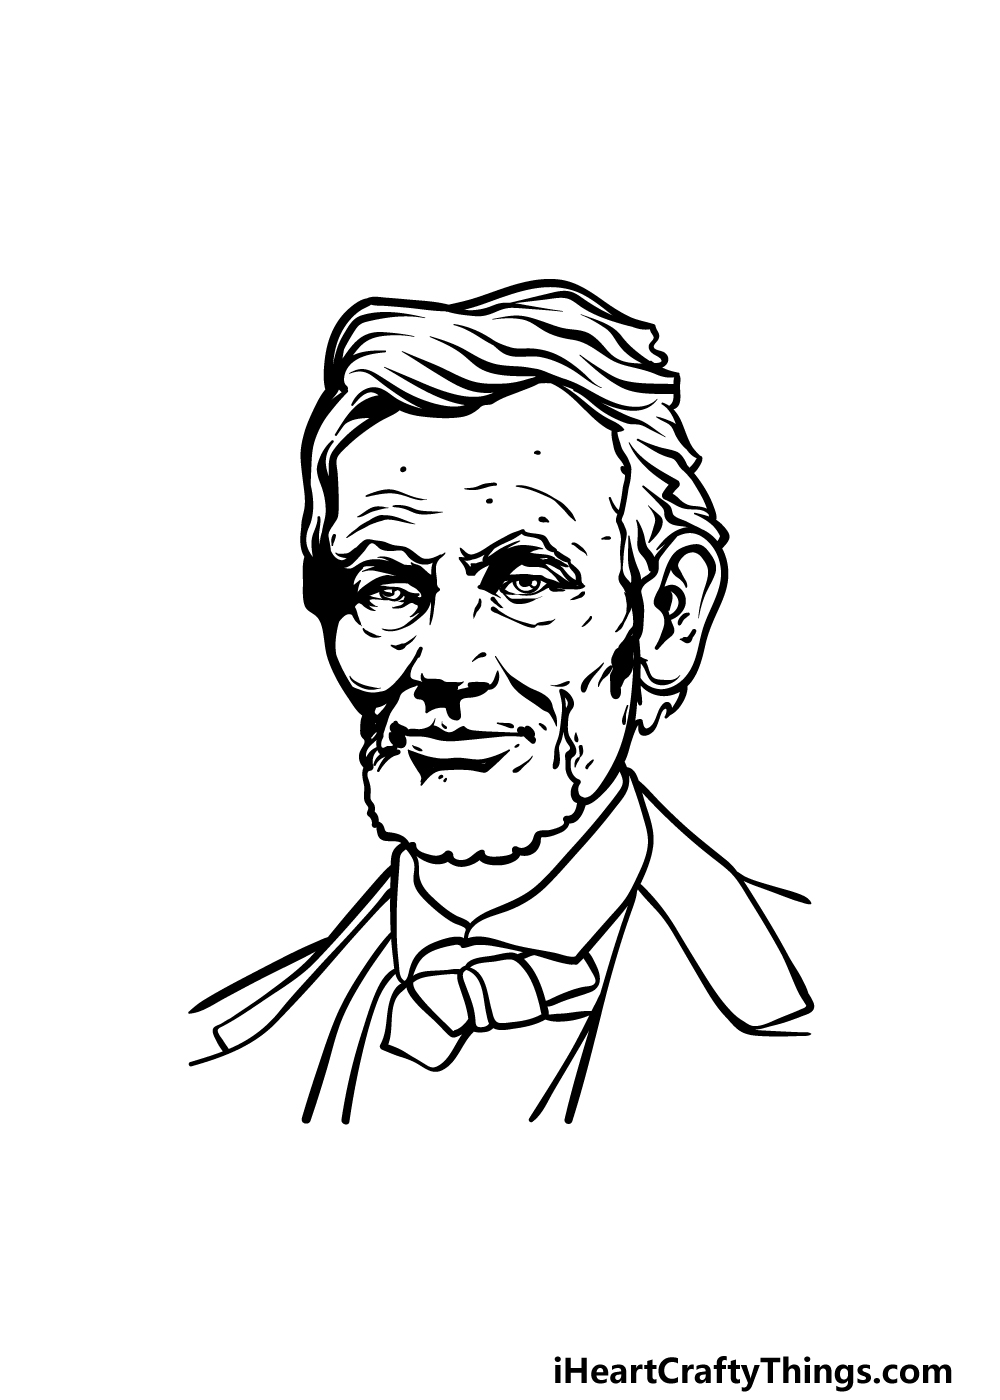
Continuing on with your Abraham Lincoln drawing, we will add some more details to his face and hair.
First, you can draw some lines for his nose, mouth and cheekbones. Once again, you may want to draw these parts with a pencil first and then go over when you’re happy with how they look.
Then, to finish off this step we will then add some thick, wavy lines throughout his hairstyle to give it a fuller, more textured look.
Once all of these details have been drawn, you can then move on to the final details in the next step of the guide!
Step 5 – Add the final details to your Abraham Lincoln drawing
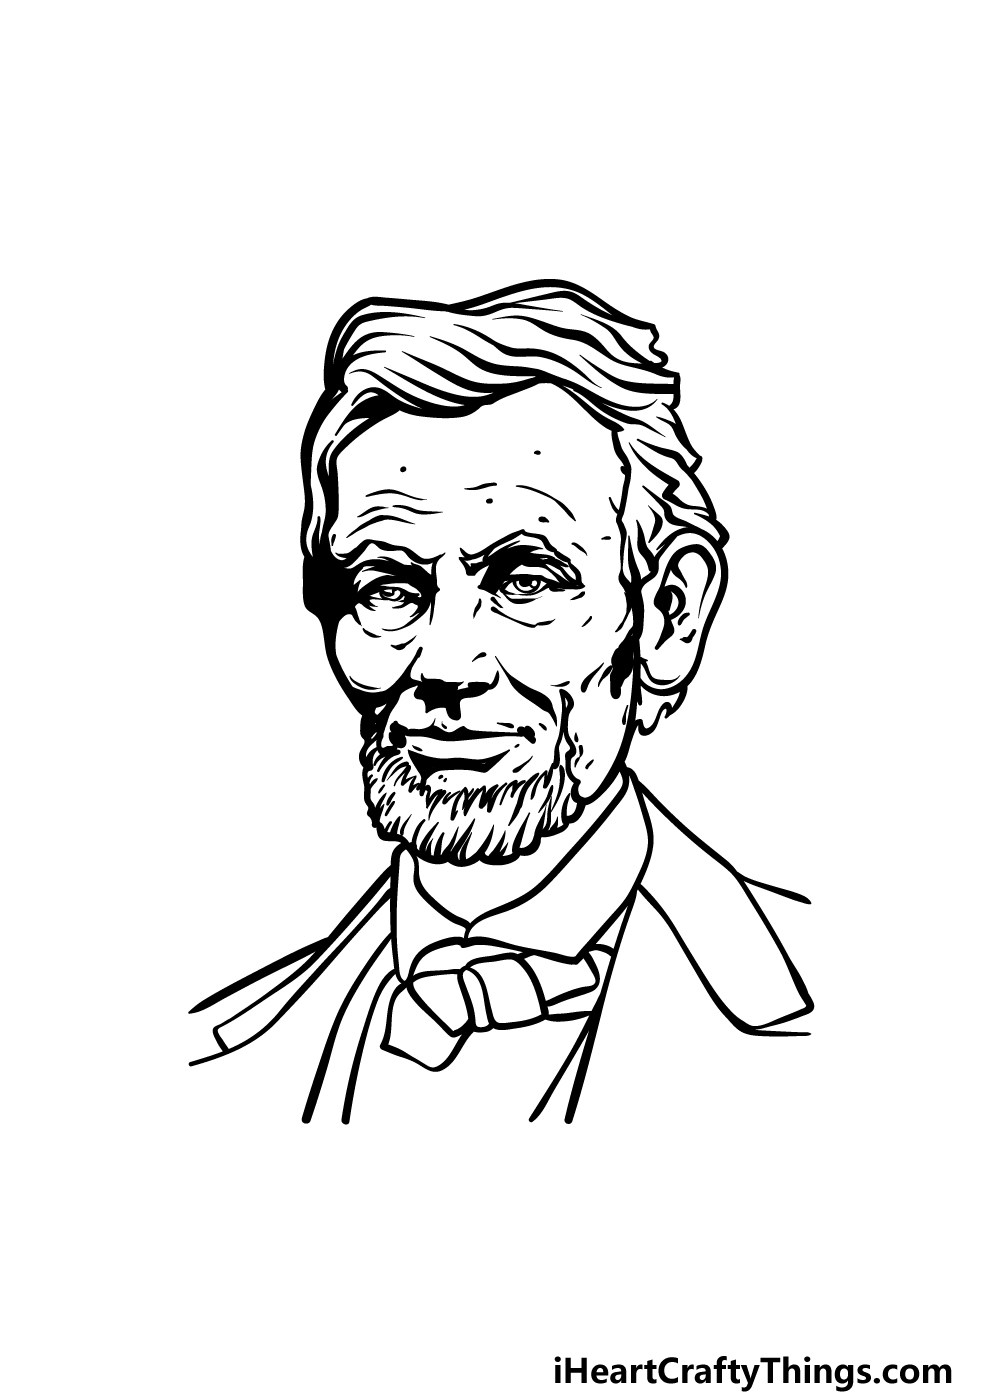
Now you’re ready to add the final details in this step of our guide on how to draw Abraham Lincoln!
The main aspect that we will be focusing on for this step will be finishing off his beard. You can do this by drawing lots of curved lines that have sharp points to them connecting to one another at the base of his face.
This will again help to create a more textured look for this beard. Then, you can finish off by drawing some smaller details throughout his clothing.
This will also be where you can finish it off with your own details and elements. Will you draw a background or maybe change up some of the details? Be sure to have fun with it and see what happens.
Step 6 – Finish off your Abraham Lincoln drawing with color
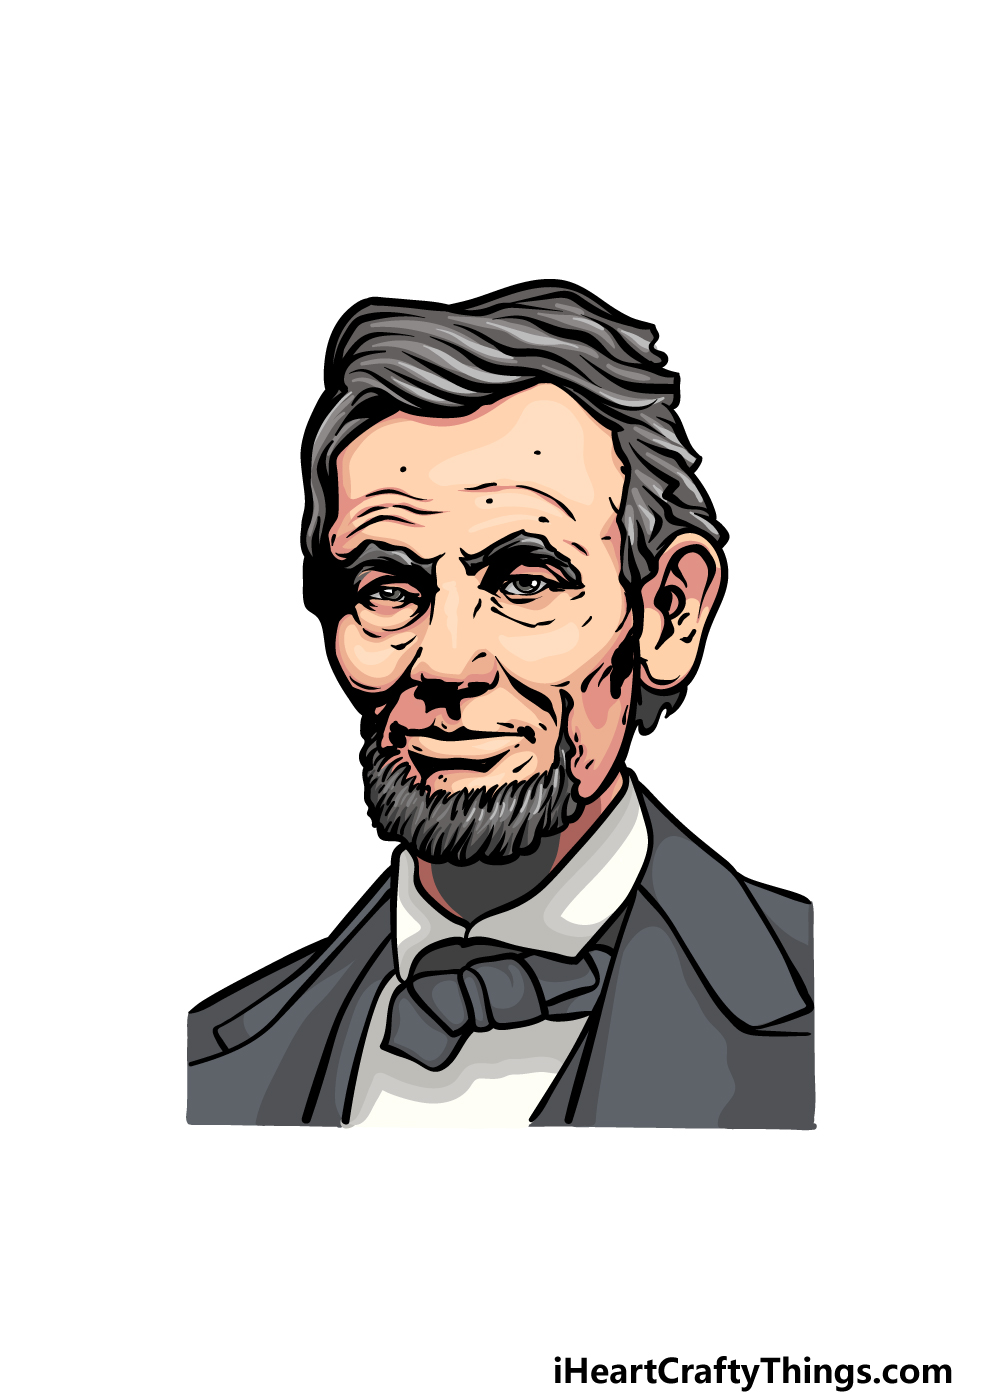
To finish off your Abraham Lincoln drawing, you can now add some color to him. In our reference image, we went with some pretty realistic colors.
We used some dark browns for his hair and suit, and you could use similar ones for a similar look.
If you’re feeling creative, then there are some other ways that you could color it in! One example would be to use some watercolors and use some lighter tones of brown and beige.
This would help to create the look of an old photograph to finish off the image.
This is just one idea that you could go for, but what else can you think of to finish off this picture?
Do this to take your Abraham Lincoln drawing to the next level
Celebrate this great man with these tips for your Abraham Lincoln sketch!
This drawing of Abraham Lincoln focuses on his head and shoulders. You could make it more complete by adding to the drawing to show more of him!
How much of him you show is up to you. It could just be his arms and his waist, or you could draw his entire body as you show him standing.
You could look up any pictures of a man with similar proportions to him if you can’t find pictures of Abraham Lincoln in the pose you have in mind.
When one thinks of Abraham Lincoln, one typically pictures him with his famous hat. He isn’t wearing it in our design, but you could change that in your version!
You probably know what his hat looks like, but you could also research some images in order to refresh your memory. He could either be wearing it or you could have him holding it.
These are a few ideas, but how else could you incorporate his iconic hat?
Another way you could make this Abraham Lincoln drawing more complete would be by adding a background. There are so many places you could use!
For instance, he could be visiting a battleground or giving a speech at the White House. These are just a few ideas, but you could use any setting you like.
What are some background ideas you have for this artwork that would finish it off?
Abraham Lincoln was famous for his amazing speeches and quotes. You could use some of these speeches to elevate your Abraham Lincoln sketch!
For example, you could draw his head and leave some space around him. Then, you could pick a famous line or quote from him and write it around him.
You could even find a fancy font that would make it look really cool. You would certainly have many different options to choose from!
Do you have any quotes from Abraham Lincoln that you know off the top of your head that you could use?
Your Abraham Lincoln Drawing is Complete!
That will finish off this guide on how to draw Abraham Lincoln! We mentioned earlier in this tutorial that drawing real people can be quite a challenge.
While this can be true, we aimed to make sure that drawing this great man would be much easier to work on by breaking it down into smaller steps.
By doing this, you can focus on the fun of drawing instead of the frustration!
Once you have completed the guide, don’t forget that you can also add some of your own creative ideas to the picture.
We mentioned a few ideas that you could go for, but this is your chance to show us what great ideas you can also come up with!
When you are done with this guide, please also feel free to visit our website for even more drawing guides to enjoy. There are more on the way, so be sure to keep checking in!
Please also be sure to share your Abraham Lincoln drawing on our Facebook and Pinterest pages, as we would love to see how it turned out!