


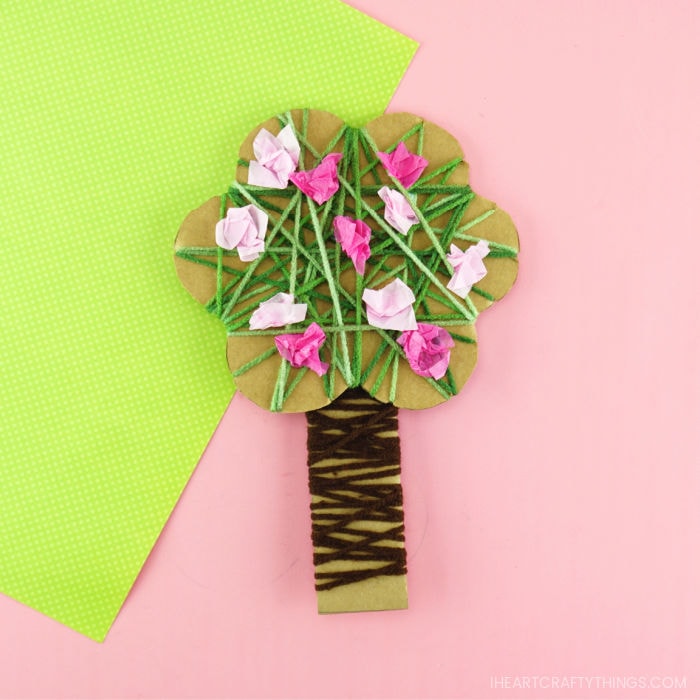
Oh how I love spring time and watching mother nature spring to life! One of my favorites is seeing trees start throwing out pretty pink and white blossoms. To celebrate the beautiful season of spring we made this pretty yarn wrapped blossoming spring tree craft.
It is perfect for spring time and the yarn wrapping and crunching tissue paper squares works those important fine motor muscles. Did I mention how pretty it is?!
This post contains affiliate links to the products mentioned. Read our disclosure policy for more information.

What initially inspired this pretty spring tree craft was coming across this green tones Super Saver yarn at the store. I don’t know if you can tell from the pictures but there is about four different hues of green in the yarn. It’s absolutely gorgeous so I definitely recommend getting some to add some vibrant hues to your craft.
Read our easy instructions below for how to make this fun spring tree craft with your kids. We also have a how-to video inside this post you can watch before getting started.
Supplies needed for this spring tree craft:
- tree craft template <—– Get the Template Here
- cardboard
- green and brown yarn
- pink tissue paper
- scissors
- tacky glue
- hot glue gun
- tape
Instructions for creating this yarn wrapped spring tree
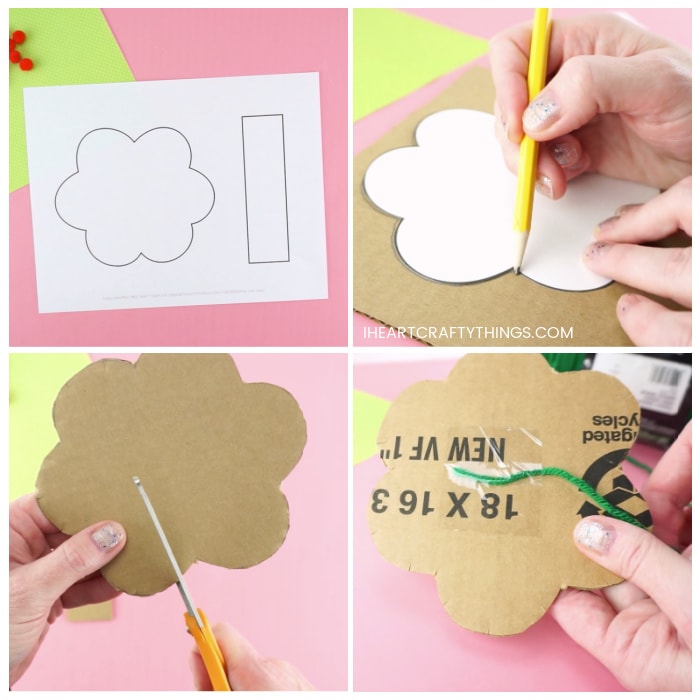
1. Cut out tree parts
Download and print out our tree template. Trace the treetop and trunk piece from the template onto cardstock with a pencil. Then cut them out.
2. Cut small slits around the scallop shapes of the tree top
Go along the tree top shape with your scissors and cut small slits around the scallop shapes of the cardboard to create additional places to help hold the yarn in place when wrapping.
3. Cut yarn strands
Cut a long strand of green yarn and brown yarn to wrap around your cardboard pieces.
4. Wrap the yarn around tree parts
Tape one end of the green yarn onto the back of the treetop and one end of the brown yarn onto the back of the tree trunk. Now wrap the yarn around the pieces in every direction. When you reach the end of the yarn, tape it onto the back of the cardboard.
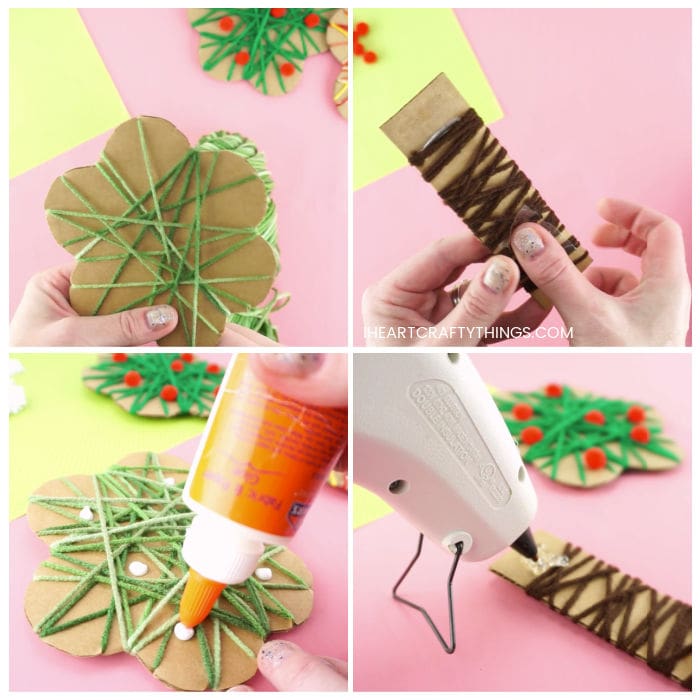
5. Glue on blossoms
Crinkle up pink tissue paper squares and glue them onto your tree with tacky glue to make your pretty blossoms. It is so vibrant and pretty!
6. Glue tree top onto the trunk
Finish your yarn wrapped spring tree craft by using a hot glue gun to glue the tree top onto the tree trunk to make your tree. Adult supervision is always required when using a hot glue gun.
