


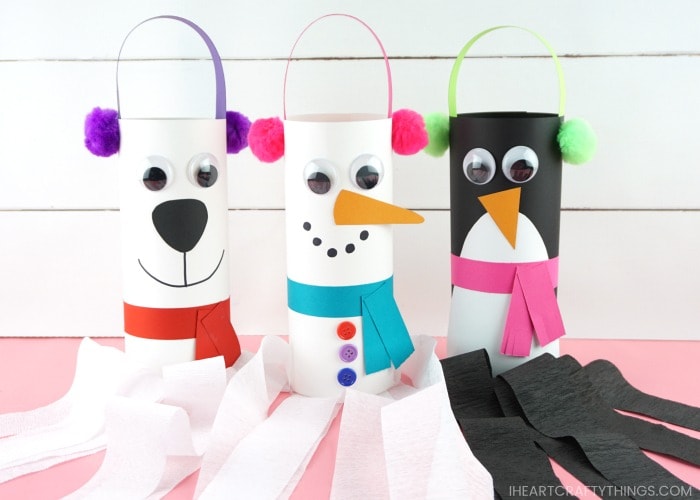
January is a fun month for wintery themed crafts like these winter windsocks we are sharing with you today. Our handy craft template will make creating your adorable snowman, penguin and polar bear windsock crafts a breeze!
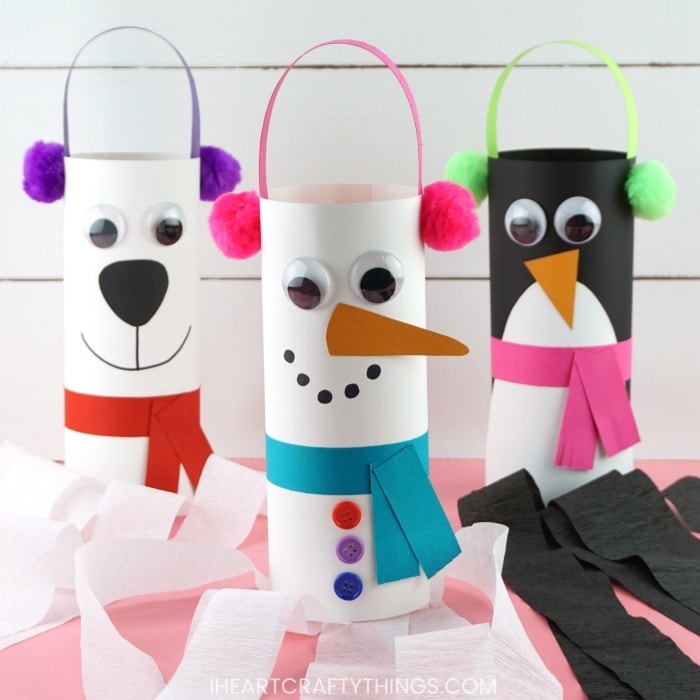
Celebrate the winter season with kids by making some festive windsocks. Toddlers and preschoolers will love watching the different characters twirl and dance around in the wind after making their craft.
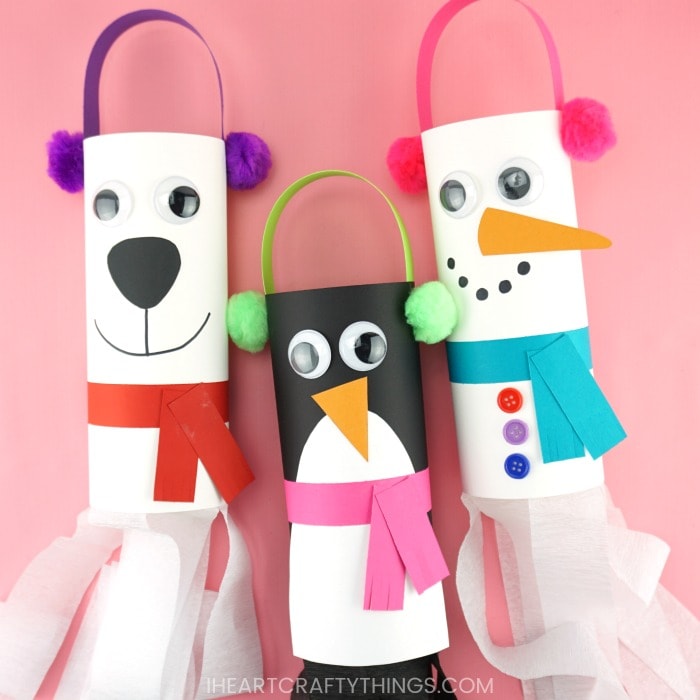
These fun and easy windsocks look super cute hung under a covered front porch to blow around in the winter wind, or hung anywhere inside the home. They would also look fantastic hung up on display in a classroom for winter themed decorations too.
I Heart Crafty Things is a participant in the Amazon Services LLC Associates Program, an affiliate advertising program designed to provide a means for sites to earn advertising fees by advertising and linking to amazon.com.
Supplies Needed:
- Winter windsock craft template <—– Get theTemplate HERE
- large pom-poms
- buttons
- glue stick
- black marker
- scissors
- pencil for tracing
- white, black and orange cardstock
- colored cardstock (colors of your choice)
- large googly eyes
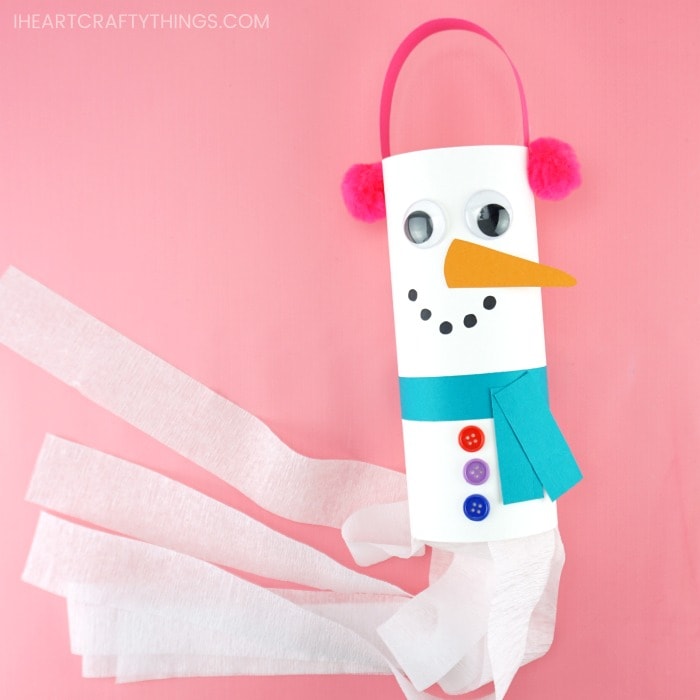
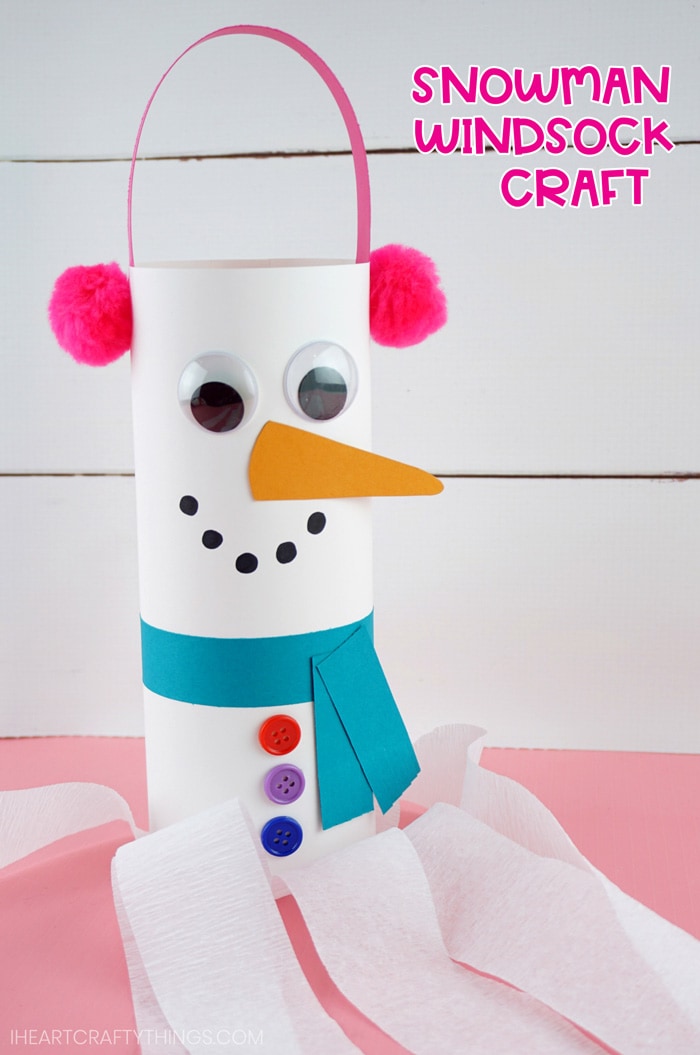
Nothing screams winter more than building a snowman! Bring the winter fun indoors by creating a cute snowman windsock. Kids can use different colors for each of their snowmen to customize them and make each look perfectly unique.
Tutorial:
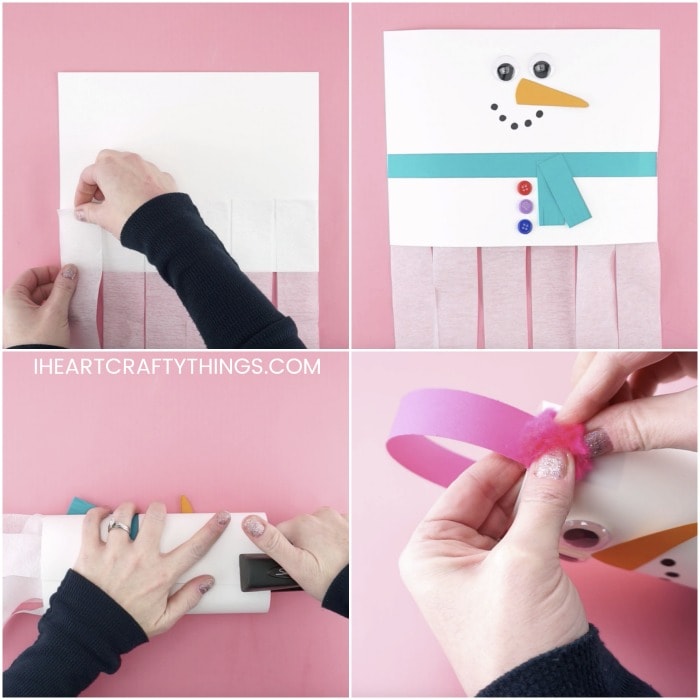
1. Cut & glue paper strips
Cut out six strips of 18-inch white crepe paper strips. Add glue along the bottom one-third of the back of a white piece of cardstock paper and glue the six strips of white crepe paper onto it.
2. Cut out template
Use our printable template to trace and cut out the snowman windsock craft pieces. Cut the carrot nose out of orange cardstock or construction paper and the scarf pieces on the colors of your choice.
3. Make a scarf
Turn your snowman windsock face up. Glue the long scarf strip about 2/3 down from the top of your paper. Use scissors to cut small strips along the bottom of both smaller scarf strips. Then glue them onto your scarf.
4. Glue face details to the card
Add a line of buttons underneath the snowman scarf. Glue the snowman carrot nose and googly eyes onto your snowman. Then use a black marker to color in circles for the snowman smile.
5. Connect snowman ends together
Bend your snowman into a circle, connecting the ends together. Place two staples at the top and bottom of the windsock to join the ends together.
6. Make a handle
Use the scarf pattern template again to cut a length of cardstock 1-inch by 11-inches for a handle. Add a generous amount of extra strength glue stick on one end of the paper strip and attach it inside the top of the windsock. Add glue on the opposite end of the paper strip and attach it to the opposite end of the windsock to create your handle.
7. Glue on pom-pom
Add a generous amount of extra strength glue stick on each side of the handle and attach a large pom-pom to it to make ear muffs for your snowman windsock.
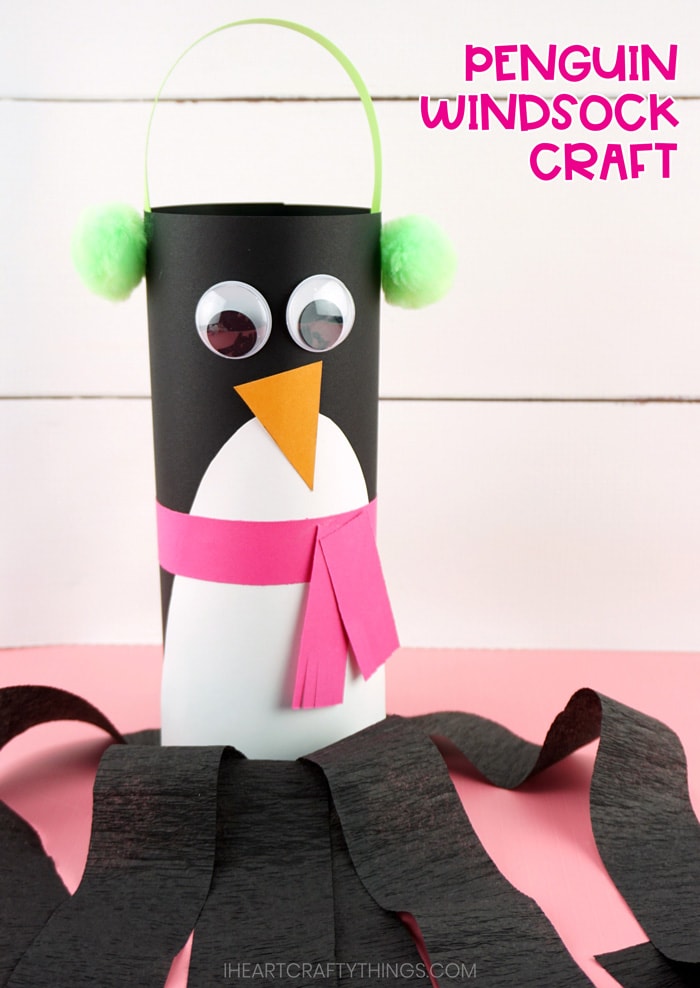
How to Make an adorable Penguin Windsock
Penguins are a favorite antarctic animal for children to learn about in the winter. Include making these adorable penguin windsocks in your winter animal unit at school or home for loads of fun!
1. Cut & glue paper strips
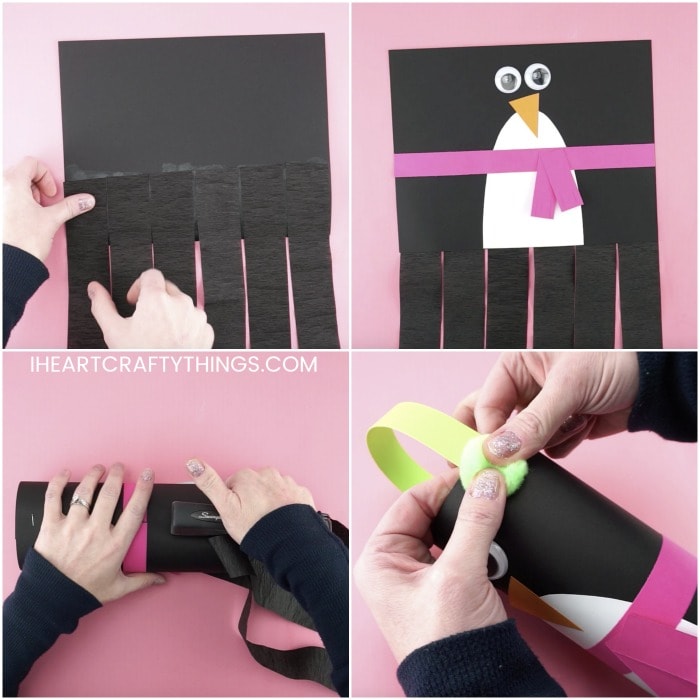
Cut out six strips of 18-inch black crepe paper strips. Add glue along the bottom one-third of the back of a black piece of cardstock paper and glue the six strips of black crepe paper onto it.
2. Cut out template
Use our printable template to trace and cut out the penguin windsock craft pieces. Cut the penguin beak out of orange cardstock or construction paper, the penguin belly out of white cardstock paper and the scarf pieces on the colors of your choice.
3. Glue face details to the card
Turn your penguin windsock face up. Glue the penguin belly at the bottom and center of your black cardstock. Then glue your beak and googly eyes at the top of your windsock.
4. Make a scarf
Glue the long scarf strip in the center of your paper. Use scissors to cut small strips along the bottom of both smaller scarf strips. Then glue them onto your scarf.
5. Connect penguin ends together
Bend your penguin into a circle, connecting the ends together. Place two staples at the top and bottom of the windsock to join the ends together.
6. Make a handle
Use the scarf pattern template again to cut a length of cardstock 1-inch by 11-inches for a handle. Add a generous amount of extra strength glue stick on one end of the paper strip and attach it inside the top of the windsock. Add glue on the opposite end of the paper strip and attach it to the opposite end of the windsock to create your handle.
7. Glue on pom-pom
Add a generous amount of extra strength glue stick on each side of the handle and attach a large pom-pom to it to make ear muffs for your penguin windsock.
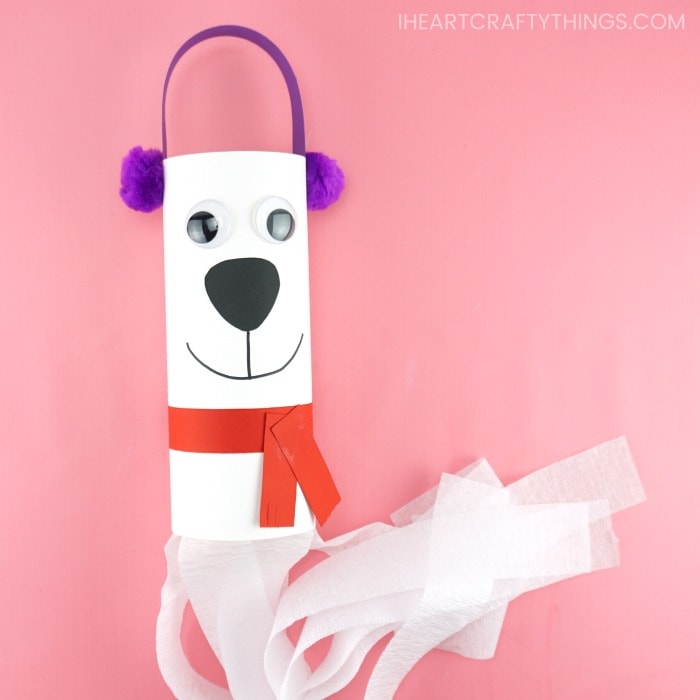
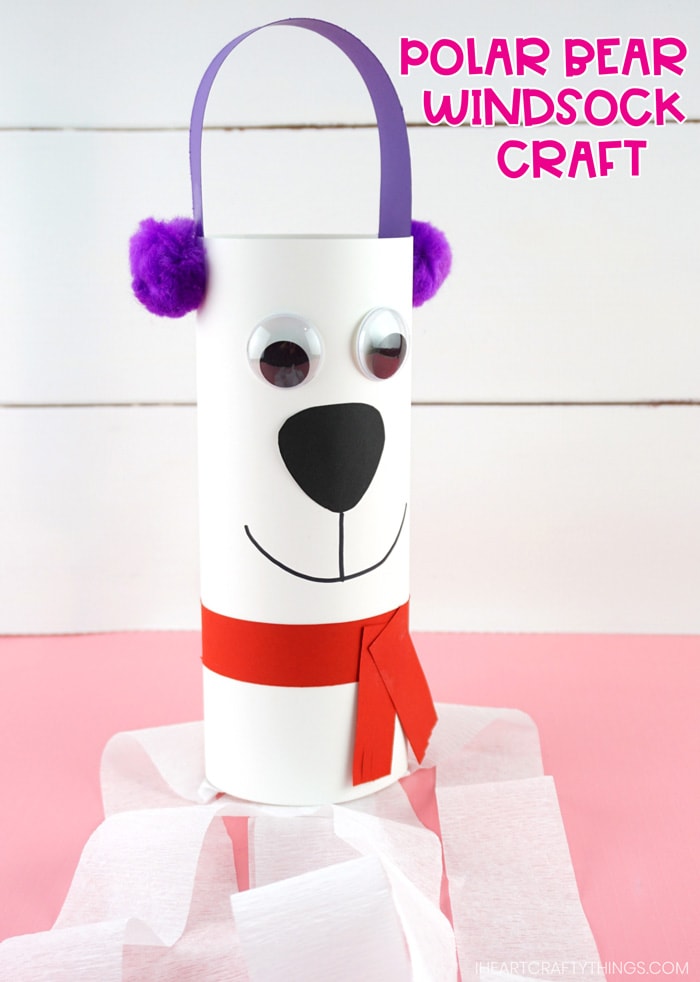
How to Make a Cute Polar Bear Windsock
We couldn’t forget about our favorite arctic animal now could we?! These handsome polar bear windsocks are going to look fabulous hanging up on display for the winter months at home or in the classroom.
1. Cut & glue paper strips
Cut out six strips of 18-inch white crepe paper strips. Add glue along the bottom one-third of the back of a white piece of cardstock paper and glue the six strips of white crepe paper onto it.
2. Cut out template
Use our printable template to trace and cut out the polar bear windsock craft pieces. Cut the polar bear nose out of black cardstock or construction paper and the scarf pieces on the color of your choice.
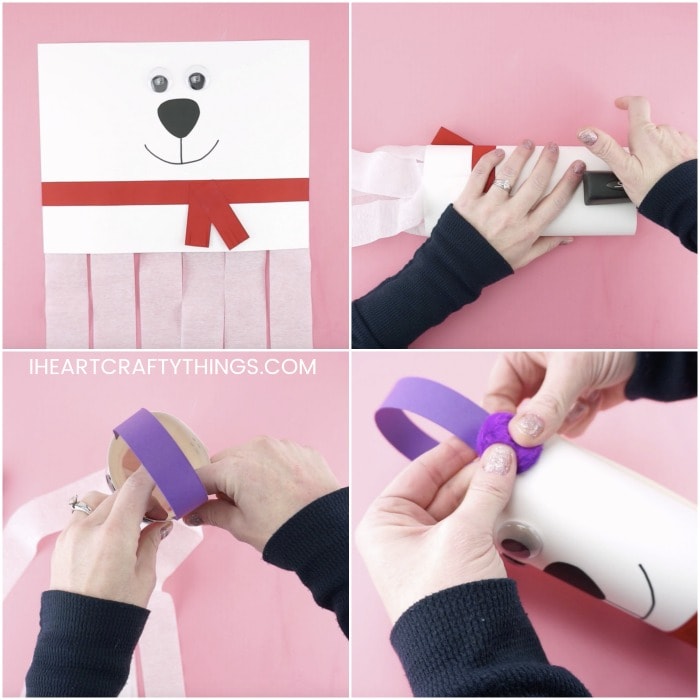
3. Make a scarf
Turn your polar bear windsock face up. Glue the long scarf strip about 2/3 down from the top of your paper. Use scissors to cut small strips along the bottom of both smaller scarf strips. Then glue them onto your scarf.
4. Glue face details
Glue your black polar bear nose and googly eyes onto your windsock. Then use a black marker to draw a smile on your polar bear.
5. Connect bear ends together
Bend your polar bear into a circle, connecting the ends together. Place two staples at the top and bottom of the windsock to join the ends together.
6. Make a handle
Use the scarf pattern template again to cut a length of cardstock 1-inch by 11-inches for a handle. Add a generous amount of extra strength glue stick on one end of the paper strip and attach it inside the top of the windsock. Add glue on the opposite end of the paper strip and attach it to the opposite end of the windsock to create your handle.
7. Glue on pom-pom
Add a generous amount of extra strength glue stick on each side of the handle and attach a large pom-pom to it to make ear muffs for your polar bear windsock.
