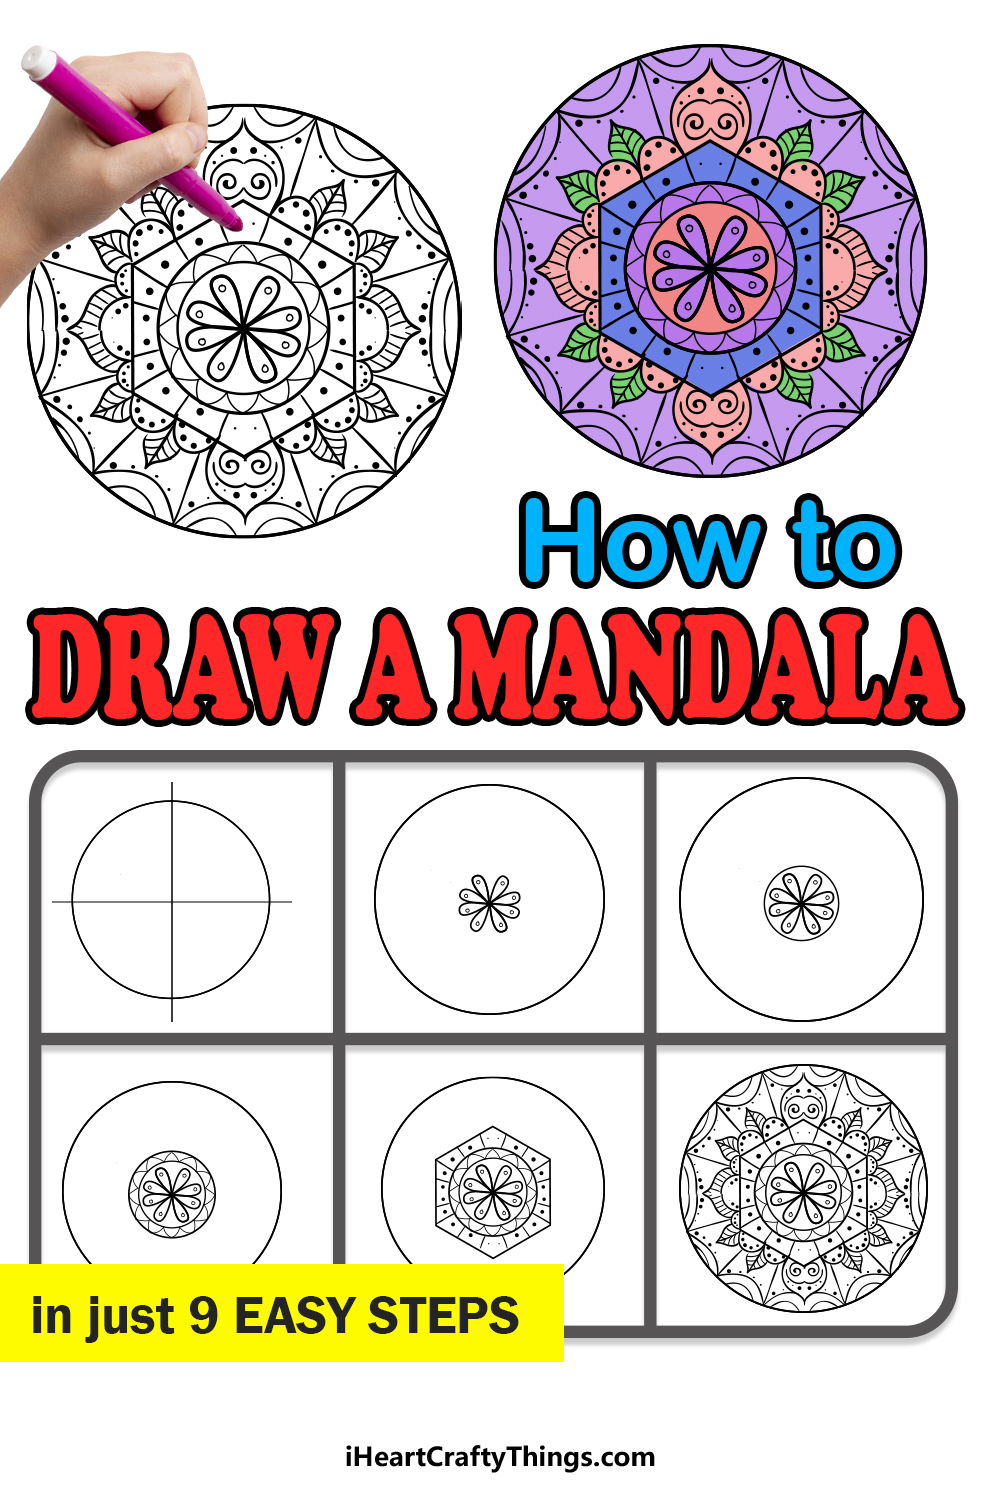
Learning how to draw a mandala is a great way to express your creativity in a relaxing way. If you think it’s too difficult to do, then this guide will change your mind!
A mandala is a pattern that is made up of lots of patterns converging to form a larger whole. It’s popular to create and color these mandalas, and many people like to do so as a form of relaxation and meditation.
You may think it would be impossible for you to make one of your own, but this guide will show you everything you need to know to make a mandala of your very own.
I’ll work you through every step and show you how to get the hang of it. Then, you can even make your own unique designs and add some of your own color choices as well.
Watch These Steps To Make Your Mandala Drawing
How to Draw A Mandala – Let’s get Started!
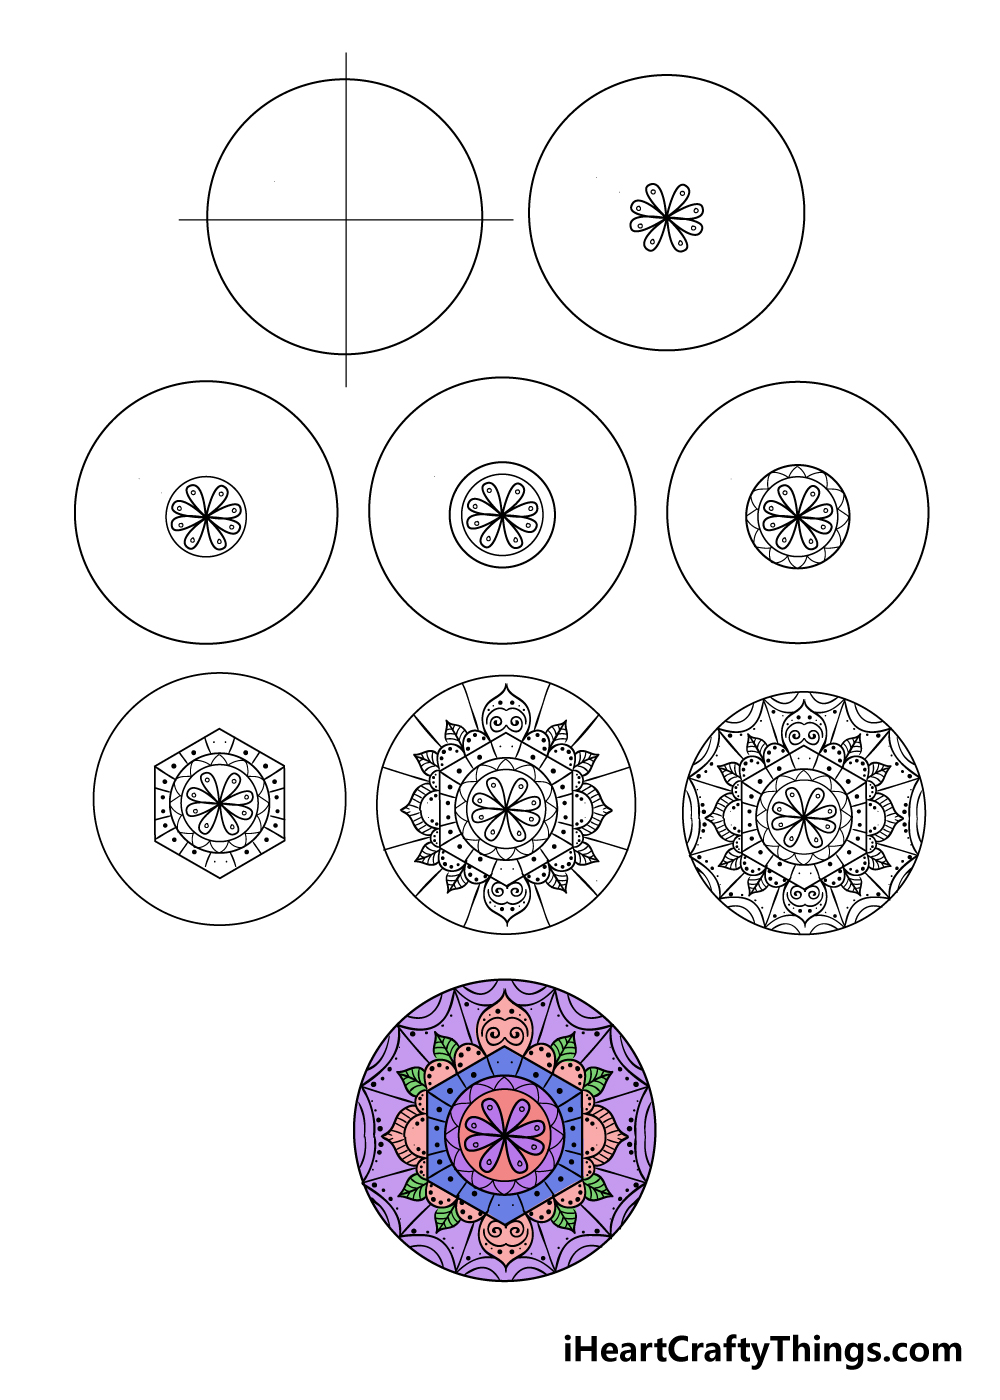
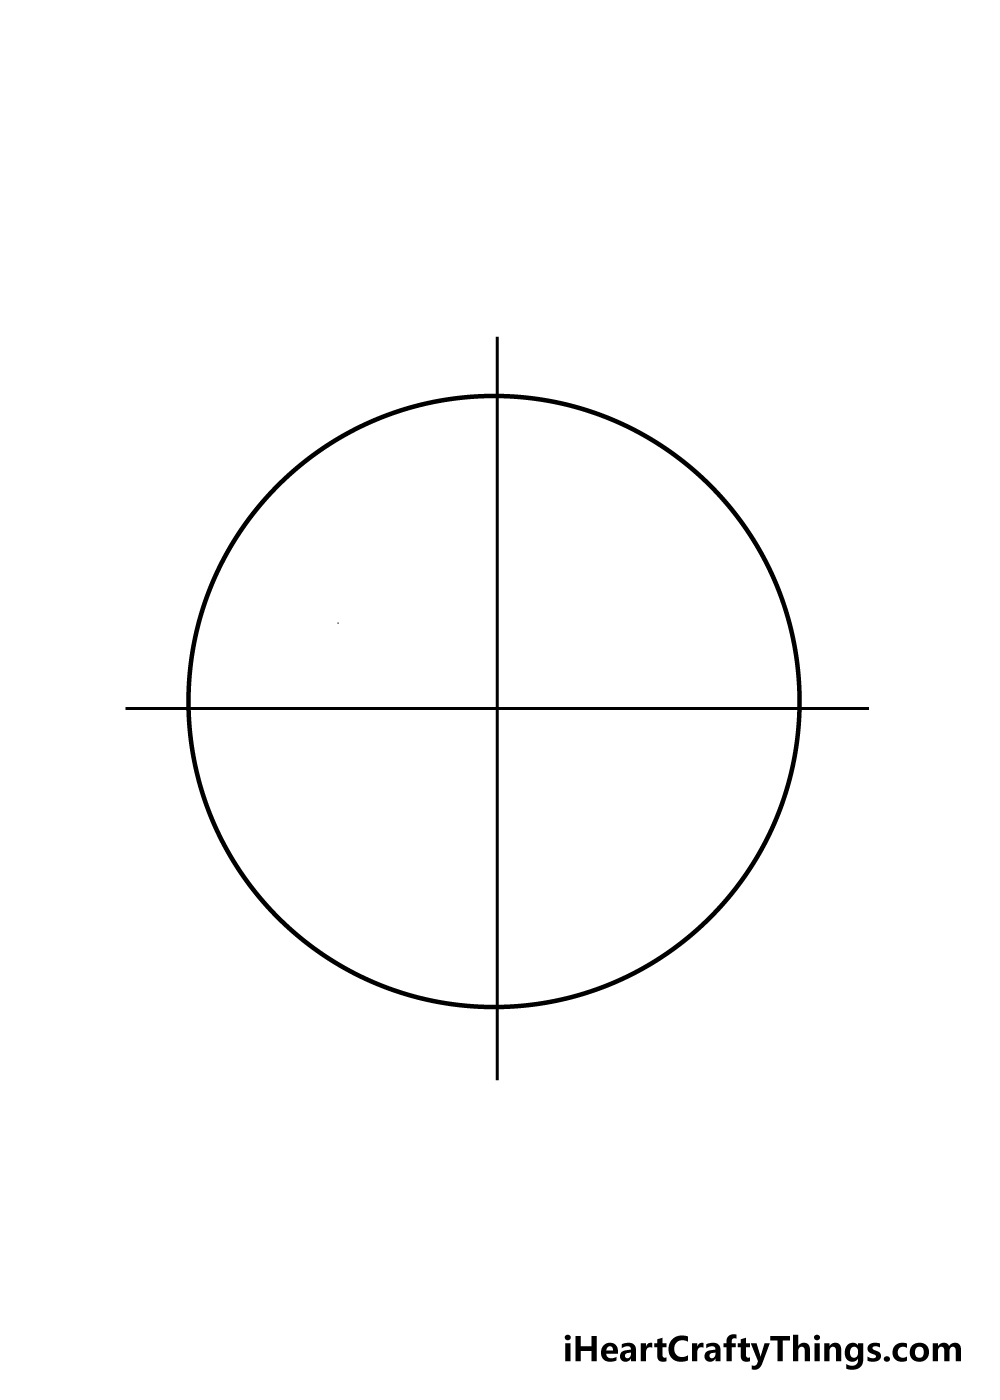
Step 1
When looking at a mandala, it can seem like drawing one would be impossible to do freehand.
This guide on how to draw a mandala will show you that not only can it be possible, but it’s also easy and fun to do when you know what to do!
Once you’ve completed this guide, you could even use it as a base to design your own original mandalas.
To start with, you should draw a large circle. Drawing a perfect circle freehand can be difficult, so using a tool like a drawing compass would be very helpful for this step.
Once you have your circle, use a light pencil to draw a line down the vertical and horizontal axis of the circle to create a target shape.
We will use pencil for these lines as they are there to guide you and won’t be in the final image.
Step 2 – Next, start drawing the pattern
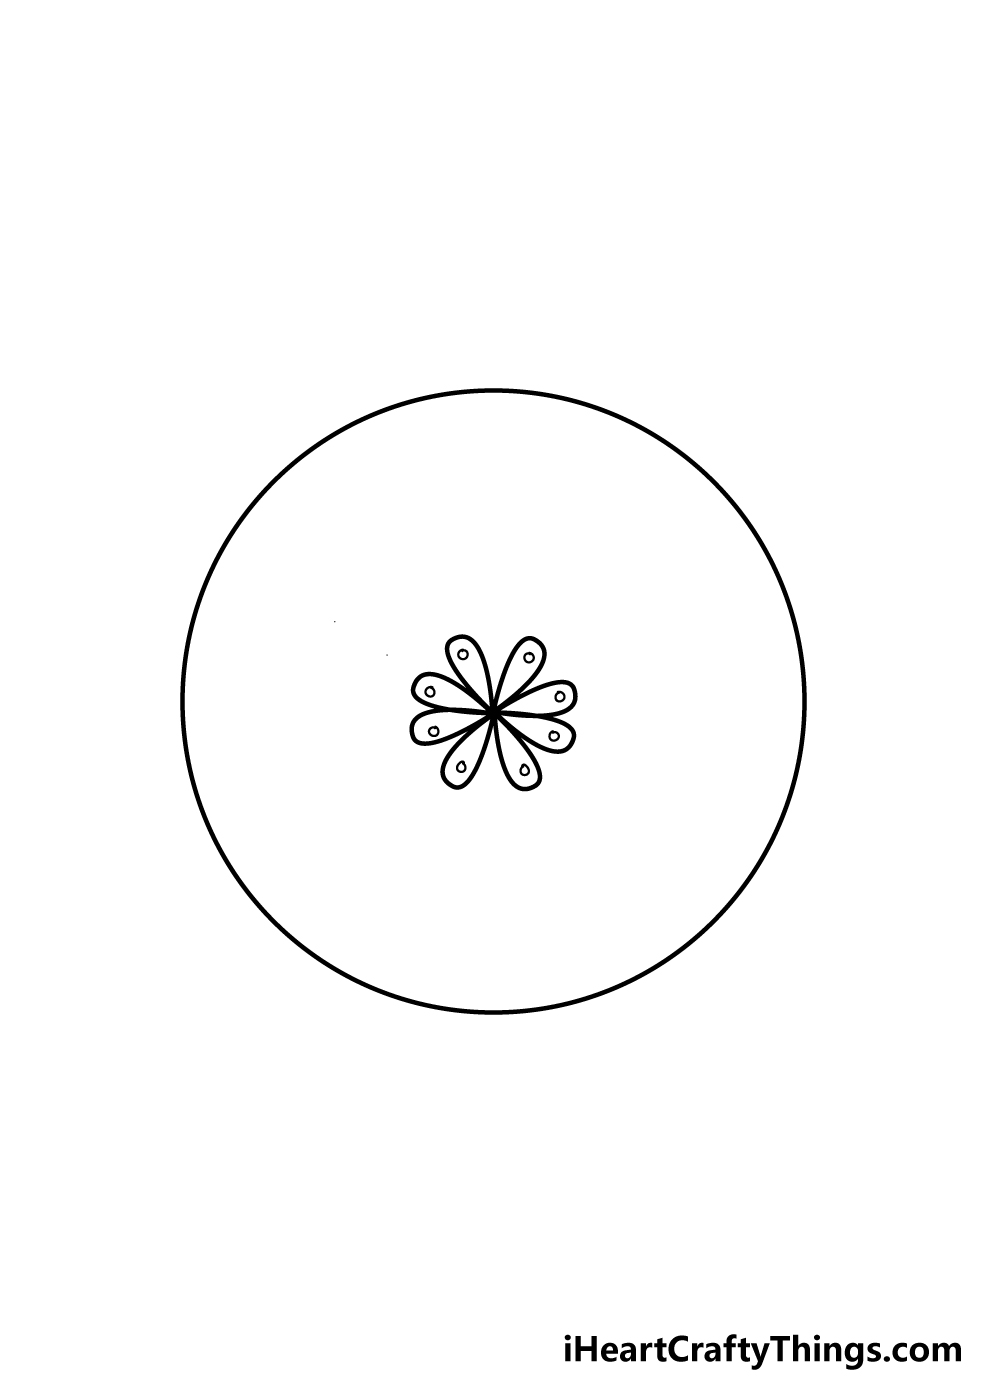
Using the center of the cross that you drew in the previous step, you can start to draw the pattern of your mandala drawing.
To do this, draw some curved shapes out from the center of the mandala. This will create a circle of teardrop shapes that you can then draw small circles inside of.
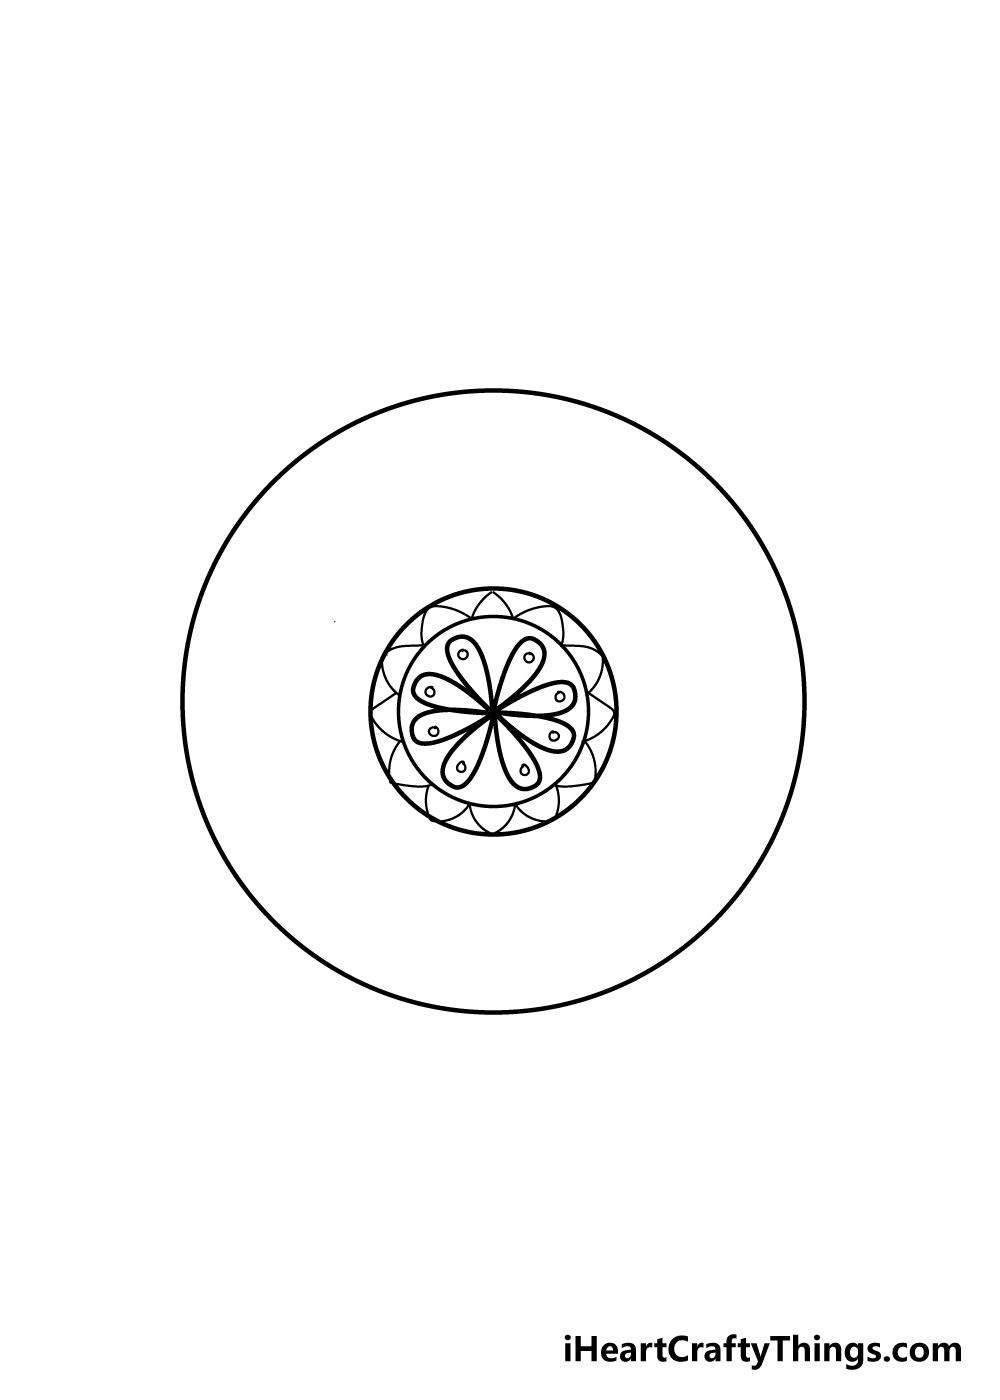
Step 3 – Now, draw a circle around the center

If you used a drawing compass for step 1 of our guide on how to draw a mandala, it will come in handy for this step.
Simply draw a small circle around the perimeter of the teardrop shapes from the previous steps.
Step 4 – Draw another circle around the previous one

Using that handy drawing compass, for this step of your mandala drawing you can simply draw another circle around the one in the previous step.
It’s as easy as that!
Step 5 – Start drawing a pattern inside the circles
Inside the ring formed by your two circles, you can draw a pattern between them for this step of our guide on how to draw a mandala.
To do this, simply draw a jagged, triangular shape between the circles to form the pattern that you can see in our reference image.
Step 6 – Next, draw an angular shape around the circles
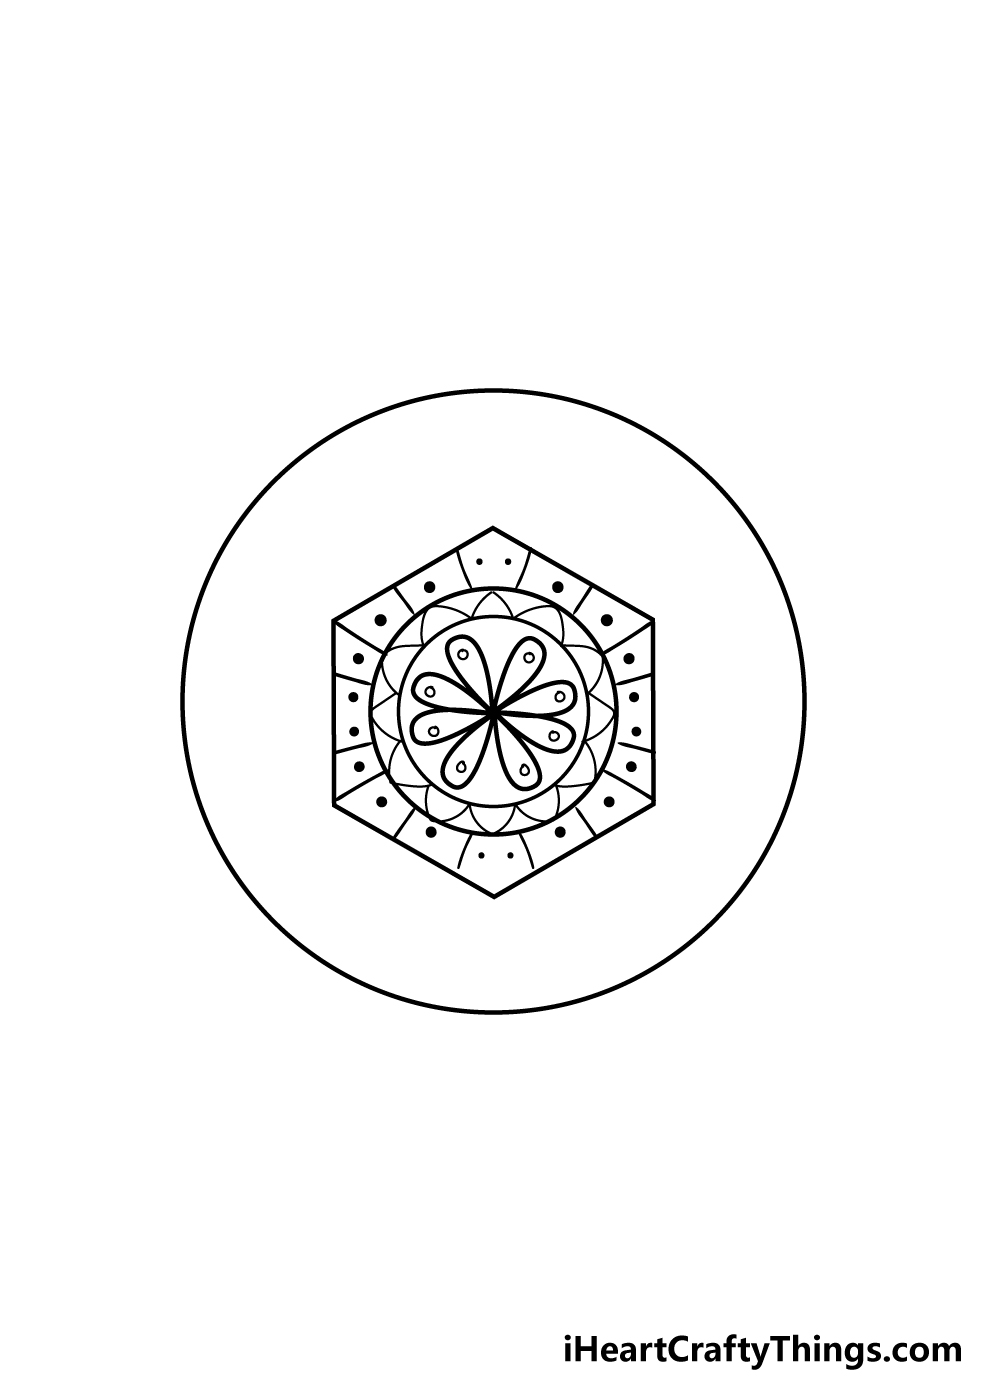
You will need a ruler for this part of your mandala drawing. For this step, use your ruler to draw a six-sided hexagon around the two circles that you drew previously.
Then, separate the shape into segments before drawing a dot in each segment.
Step 7 – Draw the more complex parts of the pattern
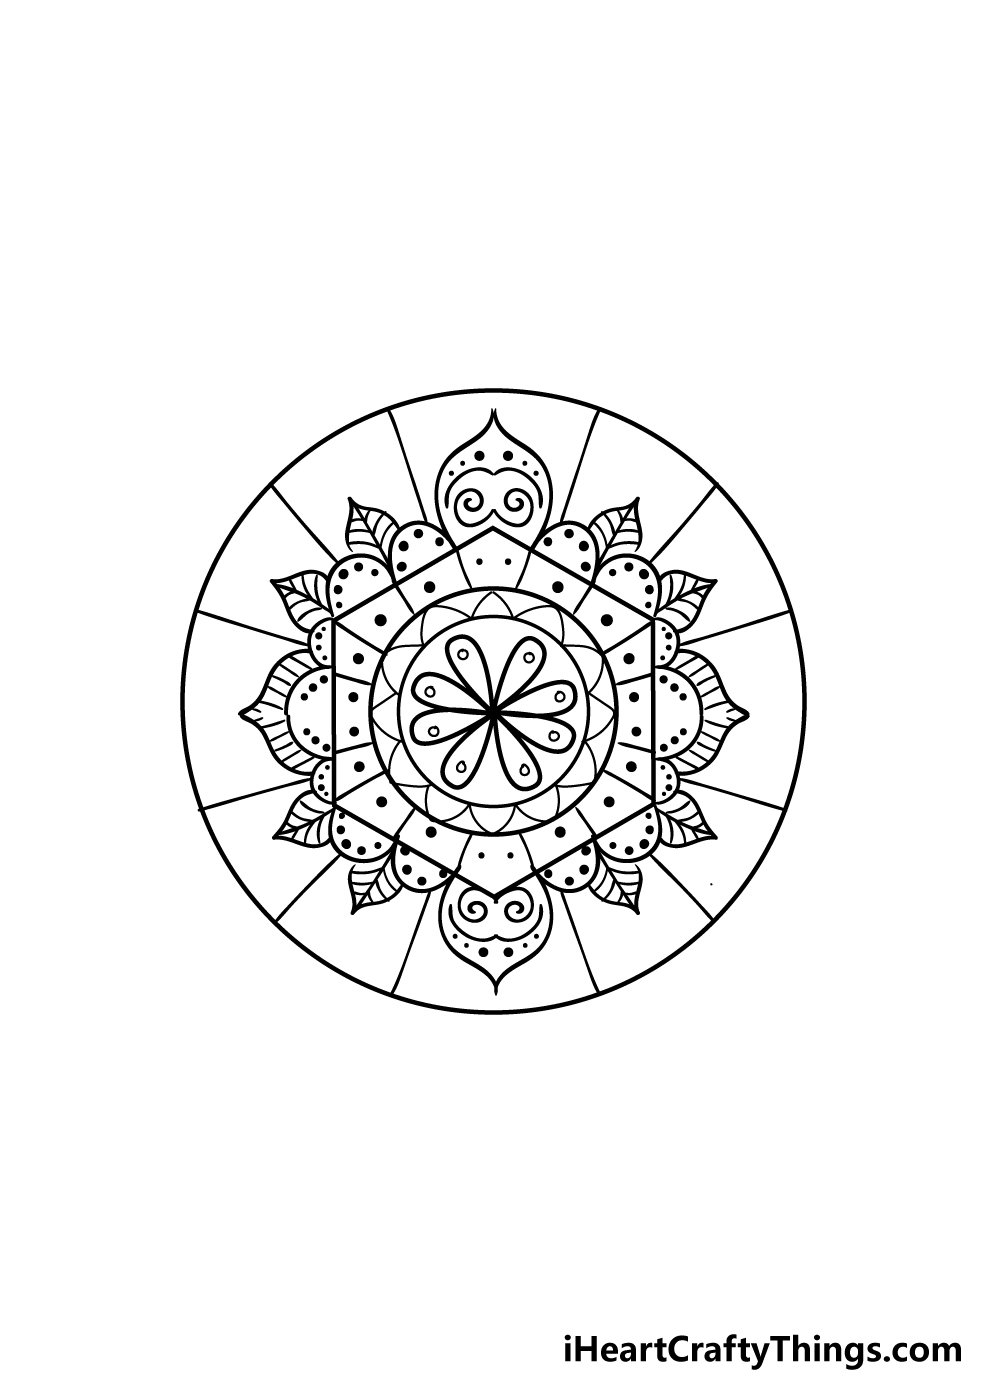
Step 7 of our guide on how to draw a mandala looks a lot more complicated than it is! However, you may want to refer closely to the reference image for this part.
You will be drawing some rounded and angular shapes around the hexagon from the previous step, and then you can add some elements such as leaf shapes before drawing lines out to the perimeter of the edge of your mandala.
If you take it slow, follow the guide and keep all sides symmetrical you should have no problems with this part!
Step 8 – Finish off the final pattern details
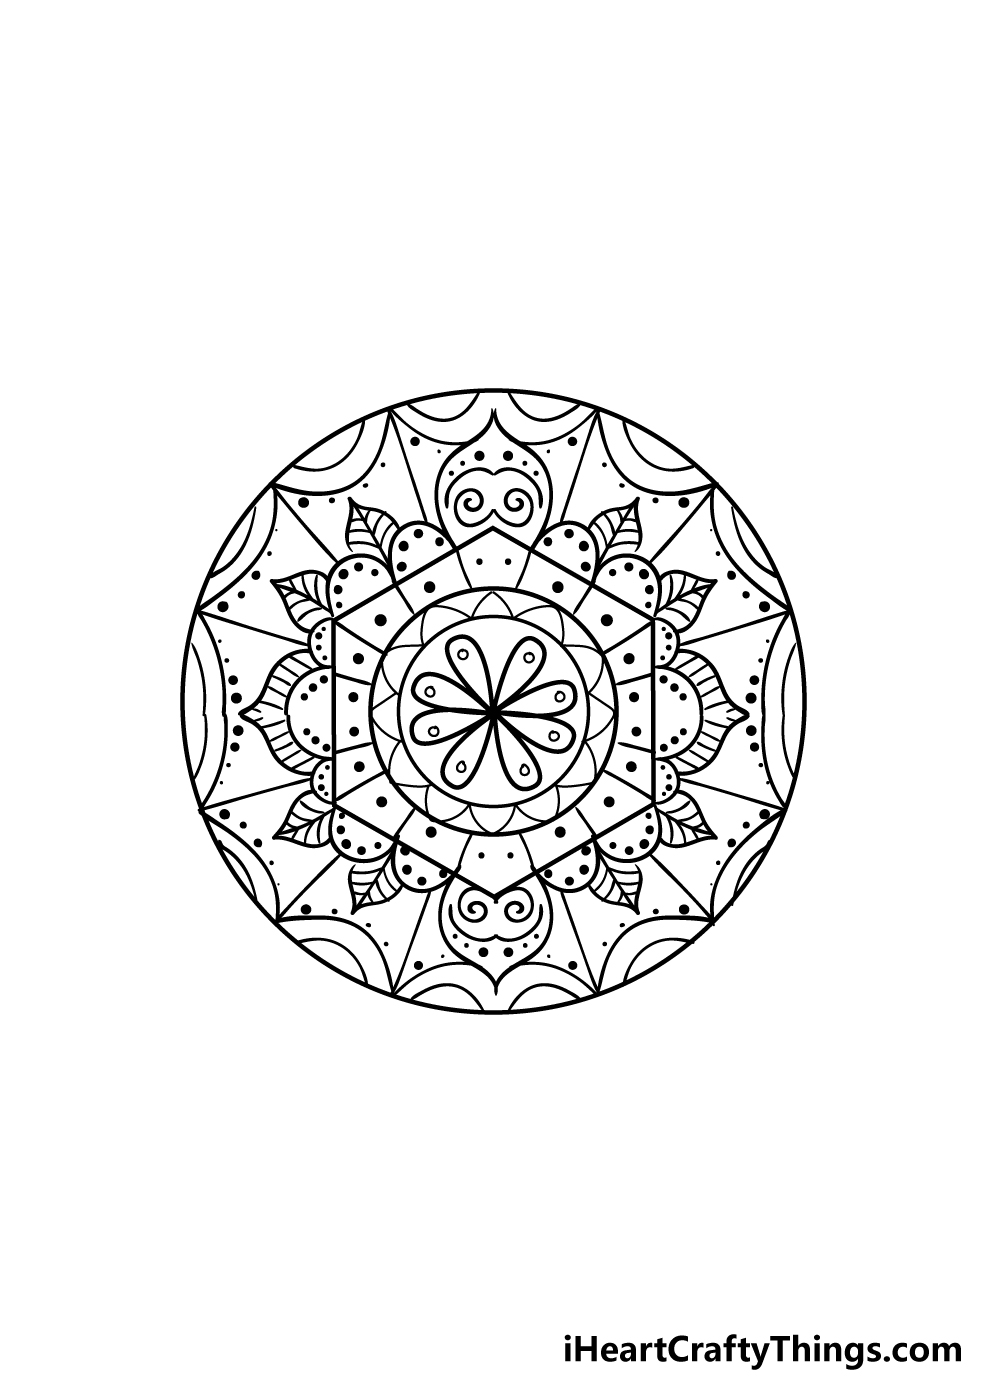
Before you move on to coloring your beautiful mandala drawing, you can finish off the pattern in this step.
Much like step 7, these pattern elements look more complicated than they actually are.
To finish off this drawing, simply draw some curved lines coming in from the edge of the mandala, and add some dotted patterns for some extra depth. Once again, keeping it symmetrical is the key to this step.
Step 9 – Now finish off your mandala with some color

Finishing this guide on how to draw a mandala was no small feat, and now you can take it easy with some coloring in!
When coloring in a mandala, the point is to express yourself using colors. You should let yourself relax and pick whichever colors feel natural to you in the moment.
Whether your colors are bright and bold or colder and more muted, your finished drawing should illustrate how you feel! With this approach, no two mandalas will be identical.
There are a lot of intricate spaces in this mandala, so for that reason I would recommend a more precise color medium such as colored pens, pencils or a thin-tipped paintbrush.
How will you complete your beautiful mandala drawing?
Here’s how you can make your mandala drawing even better…
Make this stunning mandala sketch even more incredible with these ideas!
For this drawing of a mandala, we made the design fairly small and contained in order to make it more manageable to draw.
You could make the circular outline of the mandala a lot larger if you wanted to make a more complicated design!
The outer circle of the mandala could be as big as you want or as big as your page would allow. Then, you could make the designs inside of this mandala as intricate and involved as you like.
In this guide, we showed you how to create a relatively simple yet still stunning mandala design.
Once you have the hang of this particular design, you could then customize it with your own designs!
The insides of the mandala could be as complex or as simple as you like, and you can even incorporate shapes.
The point of a mandala is to let your feelings take over, so try not to think too hard as you draw.
That way, you never know what you could end up with!
Once you have your mandala drawing on the page, you may have some empty space around the outer circle. This could be filled in many interesting ways.
If you went for a theme inside the mandala, you could fill this empty space with an extension of that theme. Or, maybe you could use some simpler shapes to add even more to look at.
How else could you fill these empty spaces around the mandala? Finally, colors will be one of the most important aspects of this mandala sketch.
Colors can be used to express yourself, and as we suggested earlier we think you should let your inspiration take over and not think about it too much.
Not only can you try out various colors, but you could also experiment with different art tools and mediums to make the colors really pop.
What are some colors and mediums you could use to make this mandala even more amazing?
Your Mandala Drawing is Complete!
This was one of our trickier tutorials, so you should be very proud of completing this guide on how to draw a mandala!
While it is a bit trickier, we hope that this guide showed you that it is not only possible but also easy and fun to draw your own amazing mandala!
Now that you have mastered this design, it’s up to you to take it even further! You could do this by incorporating some lovely color choices or even by creating your own mandala designs!
There is no limit to how you can create your own mandala drawing, so let your creativity flow!
This step-by-step guide is one of many more that we have for you to enjoy!
There’s something for everyone with all the guides we have on our website and we bring out more all the time, so check in often for more drawing fun!
We would really be interested to see your wondrous mandala drawing once it’s done, so please be sure to share it on our Facebook and Pinterest pages for us to enjoy.
We can’t wait to see how you brought your creativity to this drawing!