Flower fans will love this guide on how to draw a lily! You can make your very own pretty flower and create some stunning floral art.
Lilies are incredibly popular among people who love flowers. They are known for their mild yet elegant colors and beautiful petals.
Lilies are also used for a lot of important ceremonies, functions and anniversaries. It can be really rewarding to create your own drawings of lilies, but getting the look right isn’t always that easy.
That’s why I have this guide for you, as it will take you through all the steps you need to recreate this iconic flower. You could then make many more of these lilies and maybe even add other flowers you love.
It will be up to you, and it all begins with the first step of the guide! Let’s take that step together and get you on the way to making your drawing.

Watch And See How To Make Your Lily Drawing
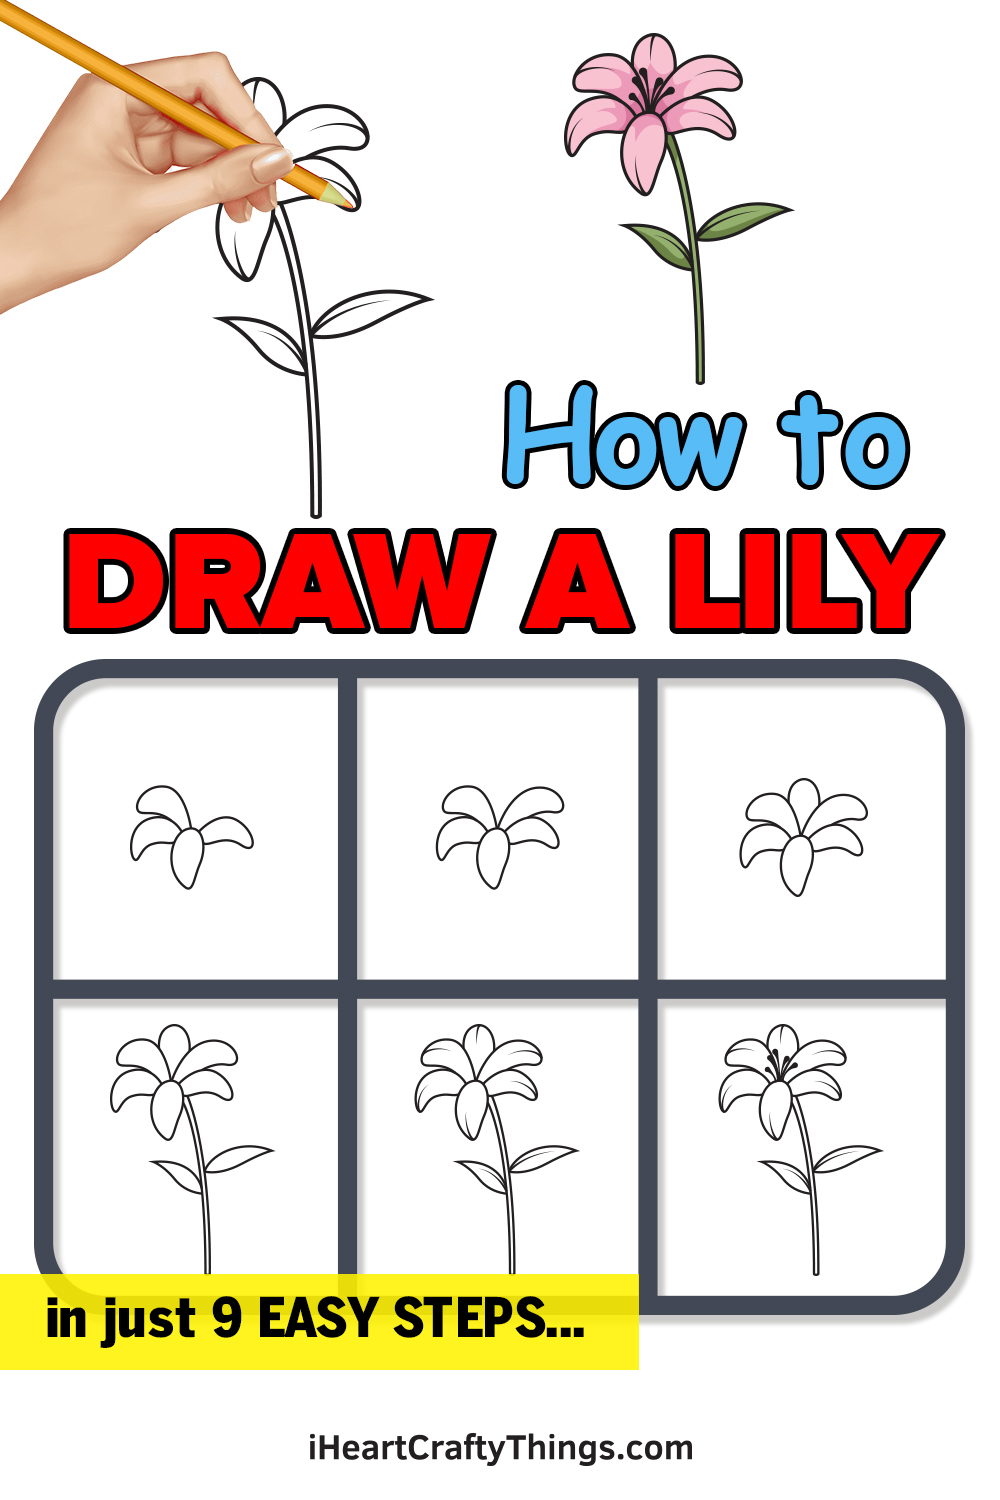
How to Draw a Lily – Let’s get started!
Step 1

Start by drawing an irregular standing oval shape with a slightly pointed bottom end.
This forms the first petal of the lily flower.
Step 2 – Draw the First Two Petals of the Lily

Draw a curved shape on the left side of the first petal we drew in the previous step. This forms the second petal of the lily.
Keep in mind that the upper portion of this petal should be touching the first petal we drew in the previous step.
Step 3 – Afterwards, Draw the Third Petal

Repeat the previous step on the opposite side to form the lily’s third petal. While this petal should have the same form as the previous one, don’t worry if they don’t look completely identical.
As long as it follows the same structure, there shouldn’t be a problem.
At this point, the three petals of the lily should now be complete.
Step 4 – Now, Draw the Fourth Petal of the Lily

Draw another petal right beside the one on the left side.
This forms the fourth petal of the lily flower.
Step 5 – Next, Create the Lily’s Fifth Petal

Repeat the previous step on the opposite side to form the fifth petal.
Though this petal and the previous one should have a similar structure, they don’t necessarily have to look completely identical.
Step 6 – Complete All Six Petals of the Lily

Draw a curve on the remaining blank space in the middle back portion of the flower. This forms the sixth—and the last—petal of the lily flower.
As you can see, all six petals of the lily are now complete.
Step 7 – Then, Draw the Stem and the Leaves

Moving forward to the other parts of the lily, proceed by drawing two parallel slightly curved lines underneath the petals. This forms the long, thin stem of the lily flower.
Afterwards, draw an irregular oval shape that is wide in the middle and tapers towards both ends on each side of the stem. This creates the leaves on the left and the right side of the stem.
Step 8 – Add Details and Patterns on the Lily

Draw a thin line stroke at the tip of each petal and on each leaf.
This adds texture on your flower, making it appear more realistic!
Step 9 – Now, Create the Stamen of the Lily

Draw five lines with round tips in the middle of the patels. This forms the stamen, which is the male structure of a lily flower. Don’t forget to add pitch-black shade on the stamen!
There you have it—you have successfully drawn a lily! Now, we’re finally in the most exciting step, which is choosing the colors and coloring the lily.
Lily flowers come in a wide range of vibrant colors, including but not limited to, white, yellow, pink, red, and orange. There are also some multi-colored lilies with more than one color.
You can choose to color the lily using its original colors or opt for a unique set of colors. We recommend doing the latter so you can customize the colors of your artwork and make the most out of your experience.
However you choose to color the lily, we’re sure the colors will turn out beautifully! Have fun playing with colors and watch as the lily ultimately comes to life!
4 More Ways To Make Your Lily Drawing Unique
Make your pretty lily sketch even more stunning with these 4 tips!
The only thing prettier than a lily would be a bunch of lilies, and that would be one idea for this lily drawing.
Once you have the hang of drawing the individual flower, you will be able to create a beautiful bunch!
Simply follow the steps of the guide again and change a few details to create the new flowers. These could include some of the flowers bending in the breeze or some slight variations in the petals and leaves.
Alternatively, you could surround this drawing of a lily with even more kinds of flowers for another idea. These could include a few more lilies but also some other flower species you love.
Whether it’s some roses, chrysanthemums or any other flower, you can create a stunning bunch of beautiful flowers. If you have a yard with some flowers growing in it, you can use those to help you out.
Otherwise, you could visit a park, botanical garden or maybe just look up flowers online for a few ideas. What flowers would you like to add?
There are other ways that you can make an awesome background for this lily sketch. Once you have added any flowers you may like, you can focus on the rest of the background.
This could include a garden setting with other plants, maybe a bench or even some pets relaxing. It’s up to you, and you can create your very own perfect garden setting using your imagination!
Finally, you can use colors and art tools to make this lily drawing look even more incredible. We covered a few ways to color it in the guide, but you can try out all sorts of materials and techniques.
We think that watercolor paints are perfect for a delicate flower such as the lily, but there are so many mediums you can mix and match.
You can also stick to typical lily colors, but also feel free to use any other colors you like!
Your Lily Drawing is Complete!
Hopefully, you enjoy this step-by-step lily drawing tutorial. If you had fun drawing a lily, then you might also be interested in drawing other kinds of flowers.
What kind of flower would you like to draw next? Let us know and we’ll do our best to curate our drawing tutorial for it.
Remember, all of our drawing tutorials are 100% free for you to use as learning materials during your drawing activities.
We are regularly updating our “How to Draw” catalog, so don’t forget to keep checking back to continuously enjoy brand-new drawing tutorials.
Drawing a beautiful lily flower is an achievement, so you should be proud of yourself for completing a masterpiece.
Take a photo of your artwork and share it on our Facebook page and Pinterest. While you’re at it, make sure to like our Facebook page too!
We can’t wait to see your colorful lily drawing!