Drawing any part of the human body can be a challenge for artists of all skill levels. The reason for this is you have to account for proportions, joints, muscles and other aspects that can make it tricky to get right.
Legs are no exception, and it’s easy to give up in frustration as you try to learn how to draw legs. Luckily, as with any drawing challenge it can be made much easier when you have some steps to follow.
This is the guide to be on if you would like to know how it’s done!
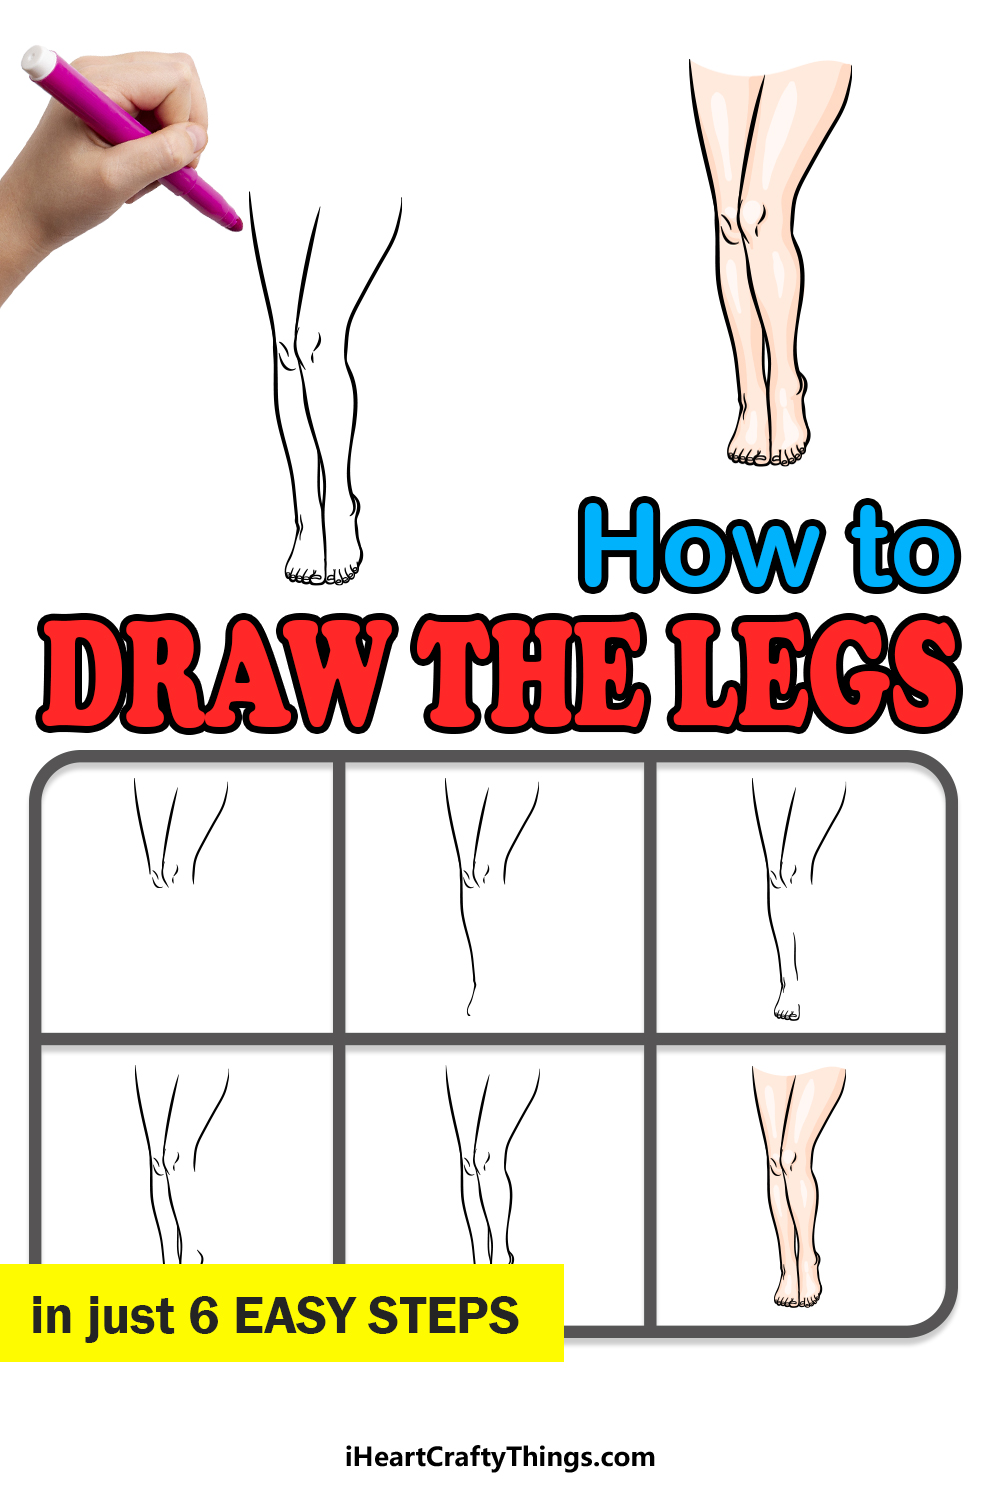
Join us on this step-by-step guide on how to draw legs in just 6 easy steps to learn how it’s done.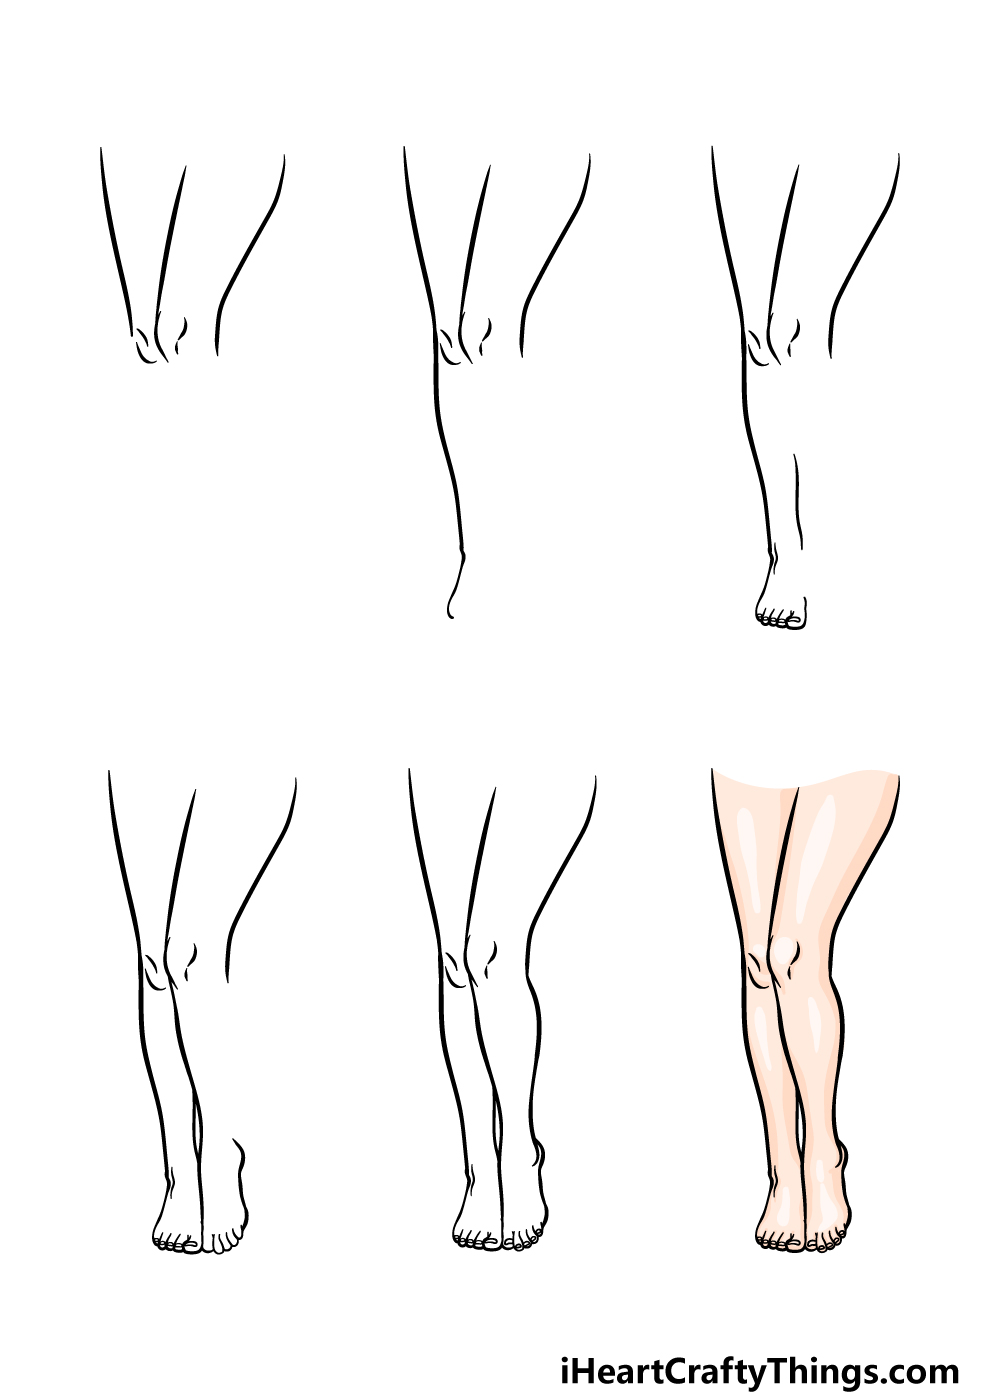
How to Draw Legs – Let’s Get Started!
Step 1
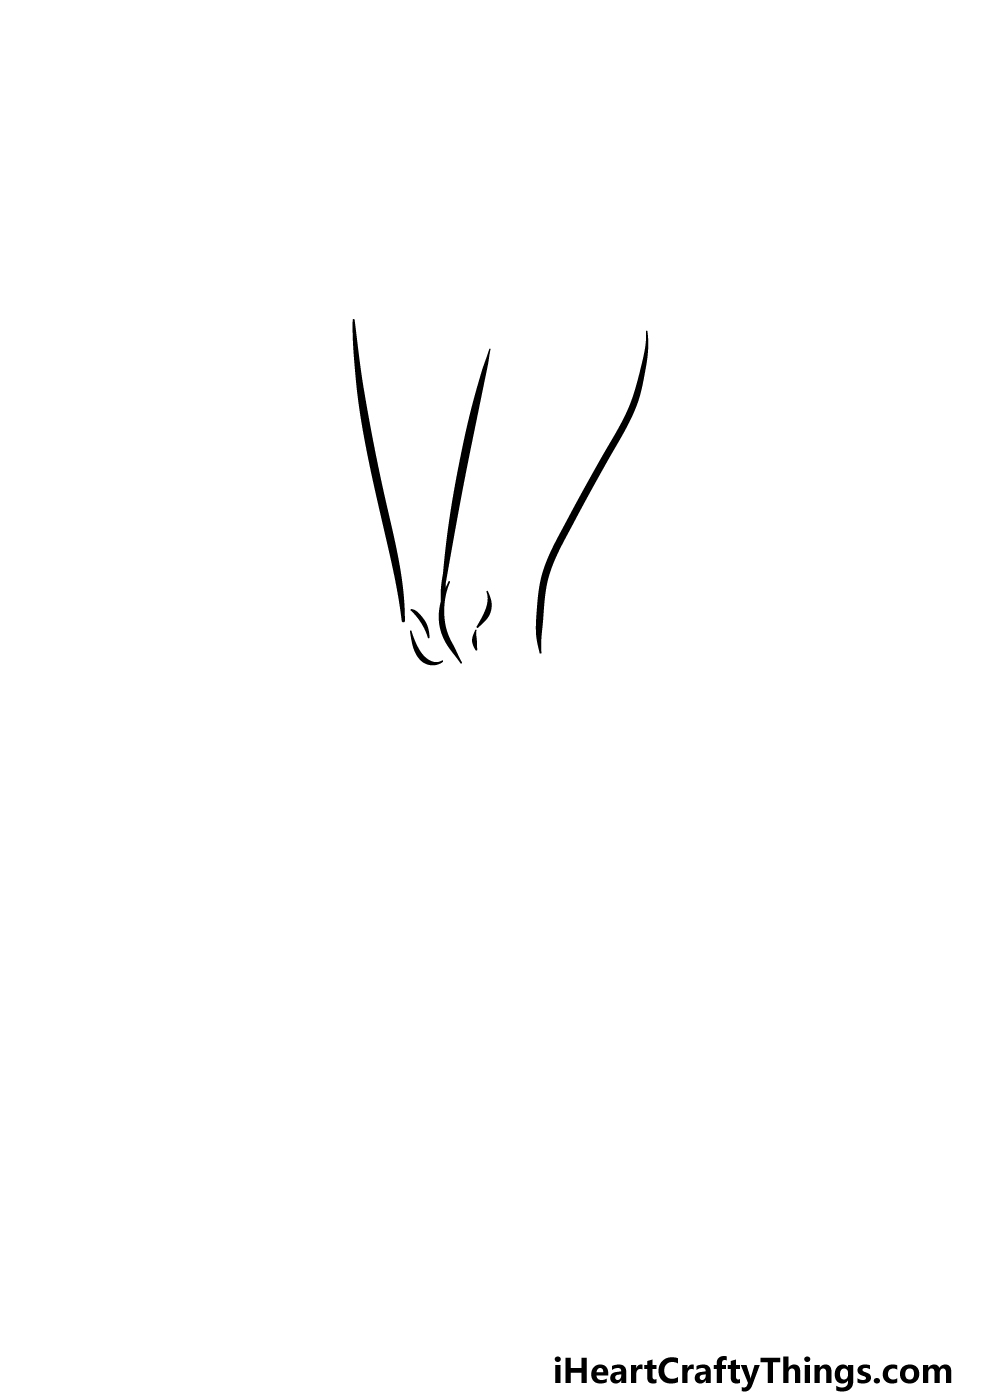
As we mentioned in the intro to this guide on how to draw legs, when taking on a new drawing it can be made so much easier when you break it down into smaller, more manageable steps.
For this first part, we will be drawing some fairly simple curved lines for the top halves of the legs.
We will be drawing 3 lines as we do this, and you should try to get these lines looking as close to our reference image as possible.
The lines in the reference image will show you not only how the lines should be shaped but also how long they should be in relation to one another.
Finally, add some lines near the bottom of these lines for the knee detailing. Then we can move on to step 2!
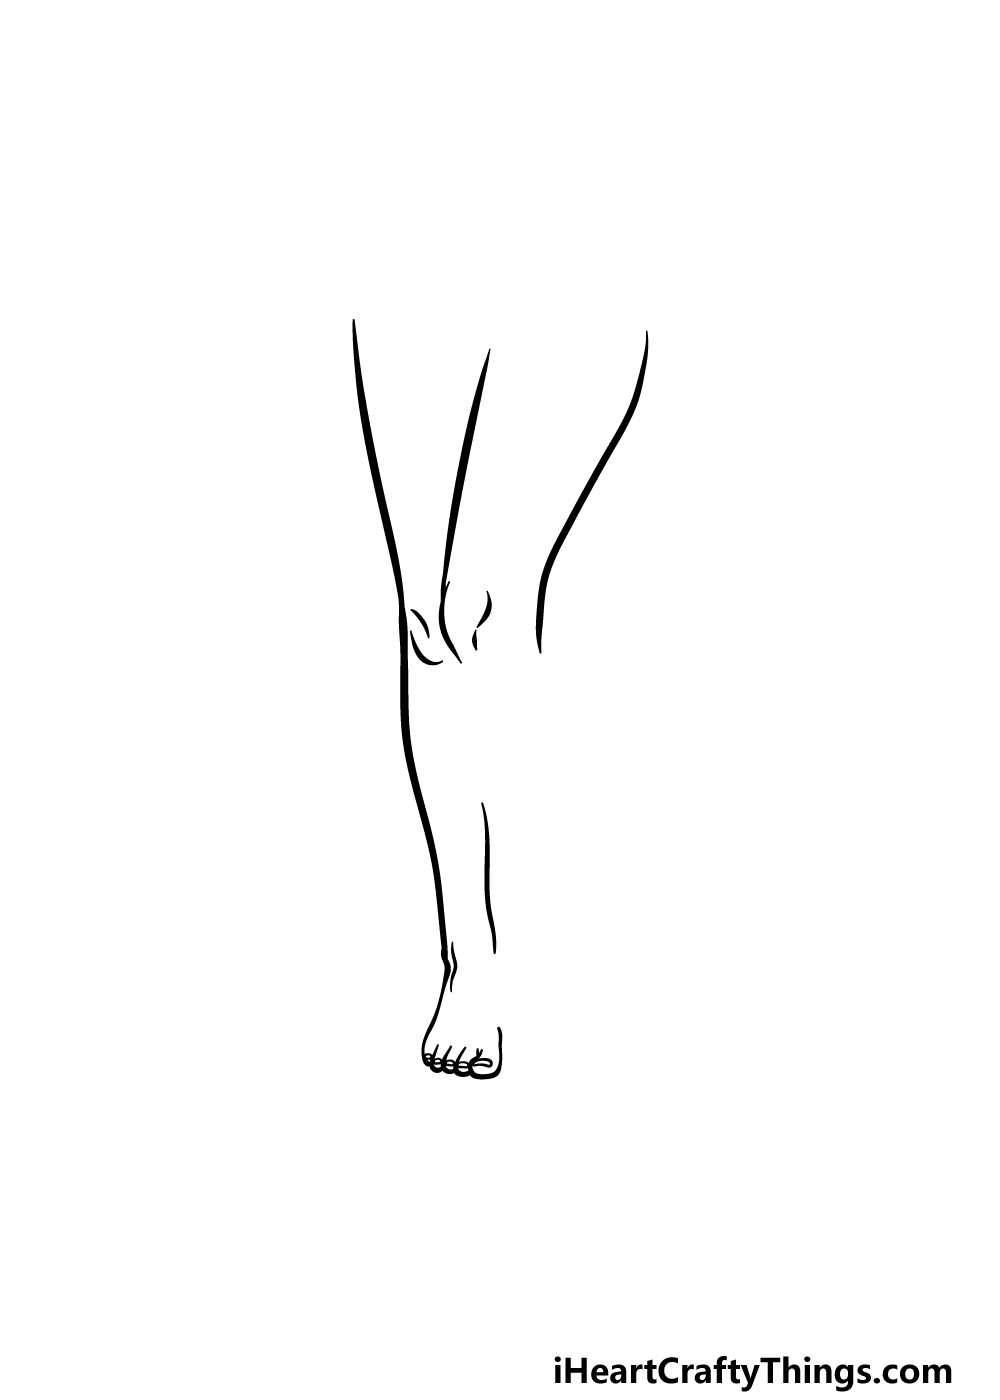
Step 2 – Next, draw the shin for the leg on the left
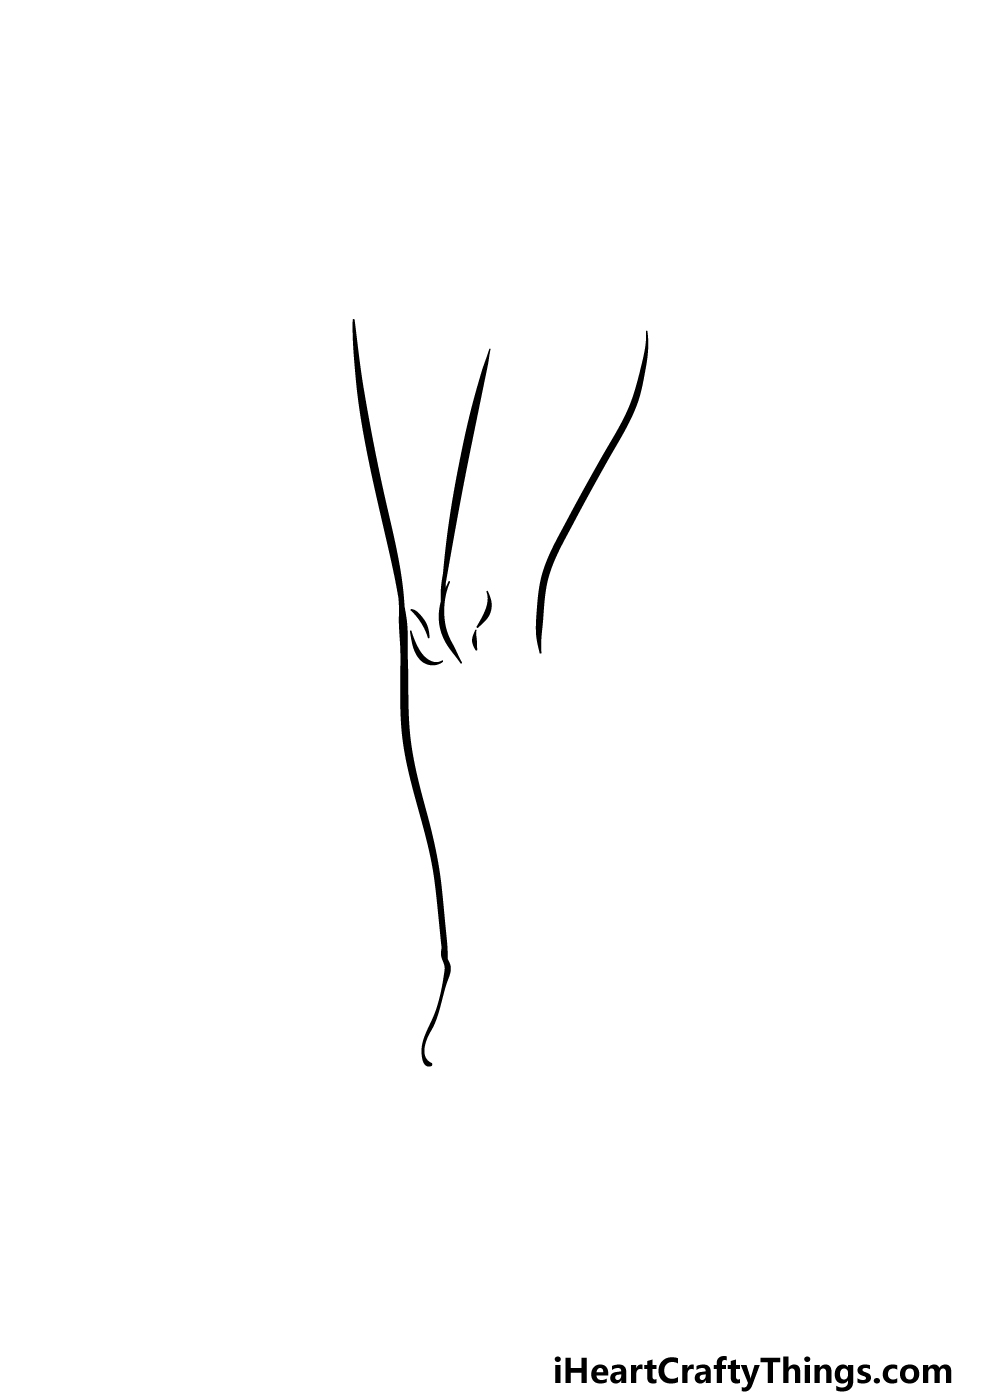
Now that you have the top of your legs drawing done, we can start to draw the lower halves in this part.
We will focus on the leg on the left for now, and you can draw it using another curved line extending from the top of the leg on the left.
It will curve outward near the top, inward lower down and then out a bit at the bottom for the start of the foot.
Step 3 – Draw the foot and shin detail in this part
In this step of our guide on how to draw legs, we will be adding some more to the leg on the left.
Use some smaller curved lines for the five toes connecting to the start of the foot that you started in the previous step.
Then, don’t forget to add some toenail details with some small shapes on the tips of the toes!
Then, draw a thin vertical line for the start of the shin on the right-hand side of this left leg. There will just be some small line details to add to finish off this step and then we can proceed to step 4.
Step 4 – Now, draw the second foot and more of the shin
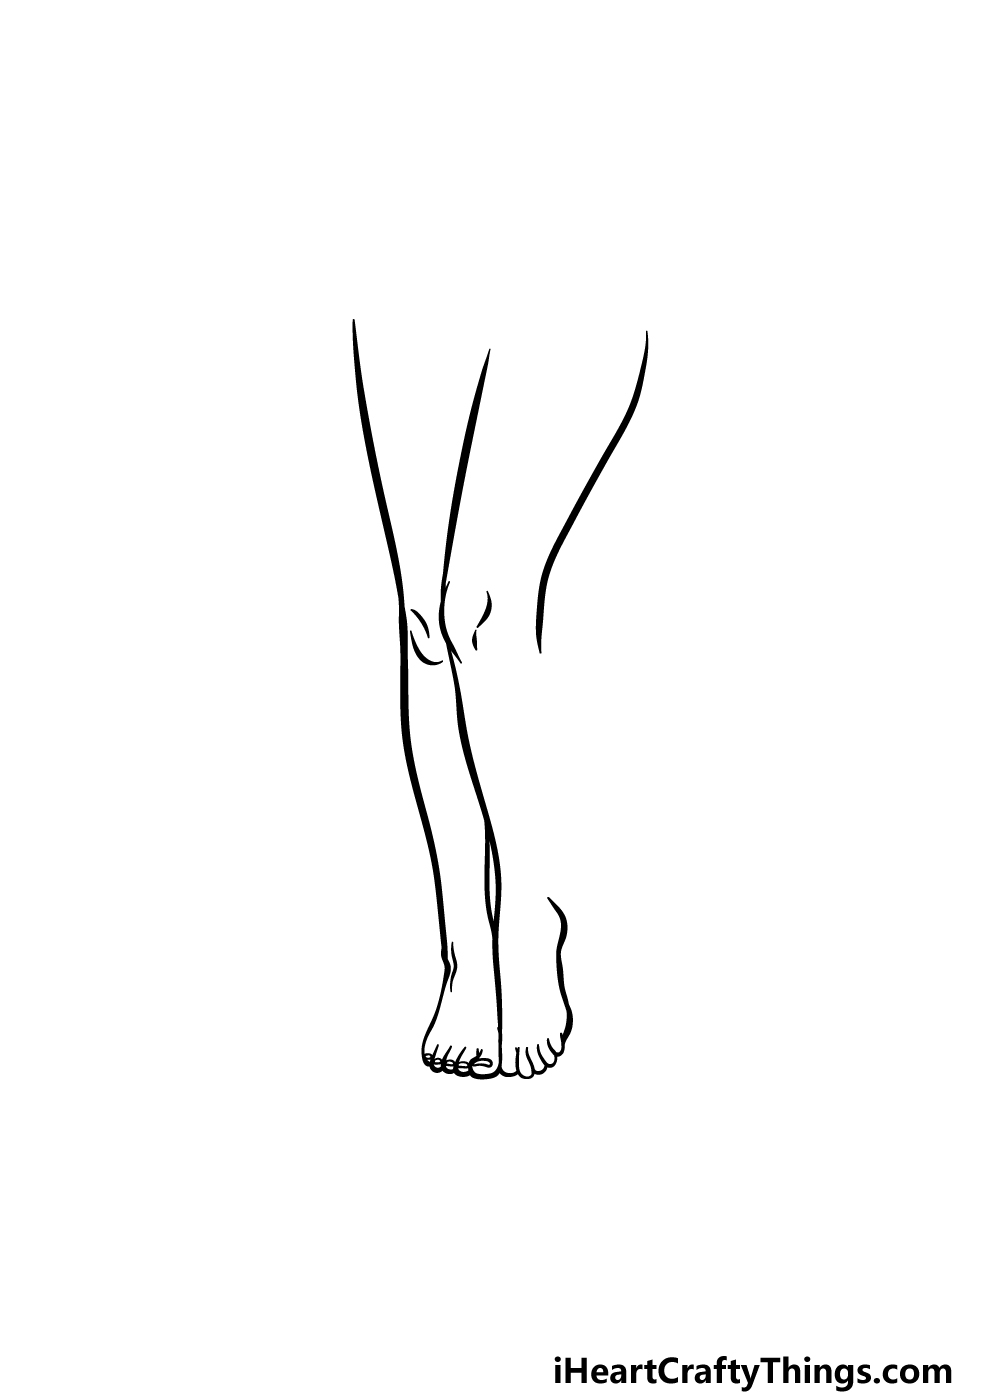
With the way that the legs are angled, the second foot of your legs drawing will be at a different perspective to the other one.
You can draw this second foot against the foot that you drew in the prior step. The toes will look a bit longer due to this change in perspective, and you can see in the reference image how these should look.
Then, draw the shin attaching to the foot and ankles, and by the end of this step there will be one empty space to add, which we will take care of in the next part!
Step 5 – Next, draw the final details of the legs
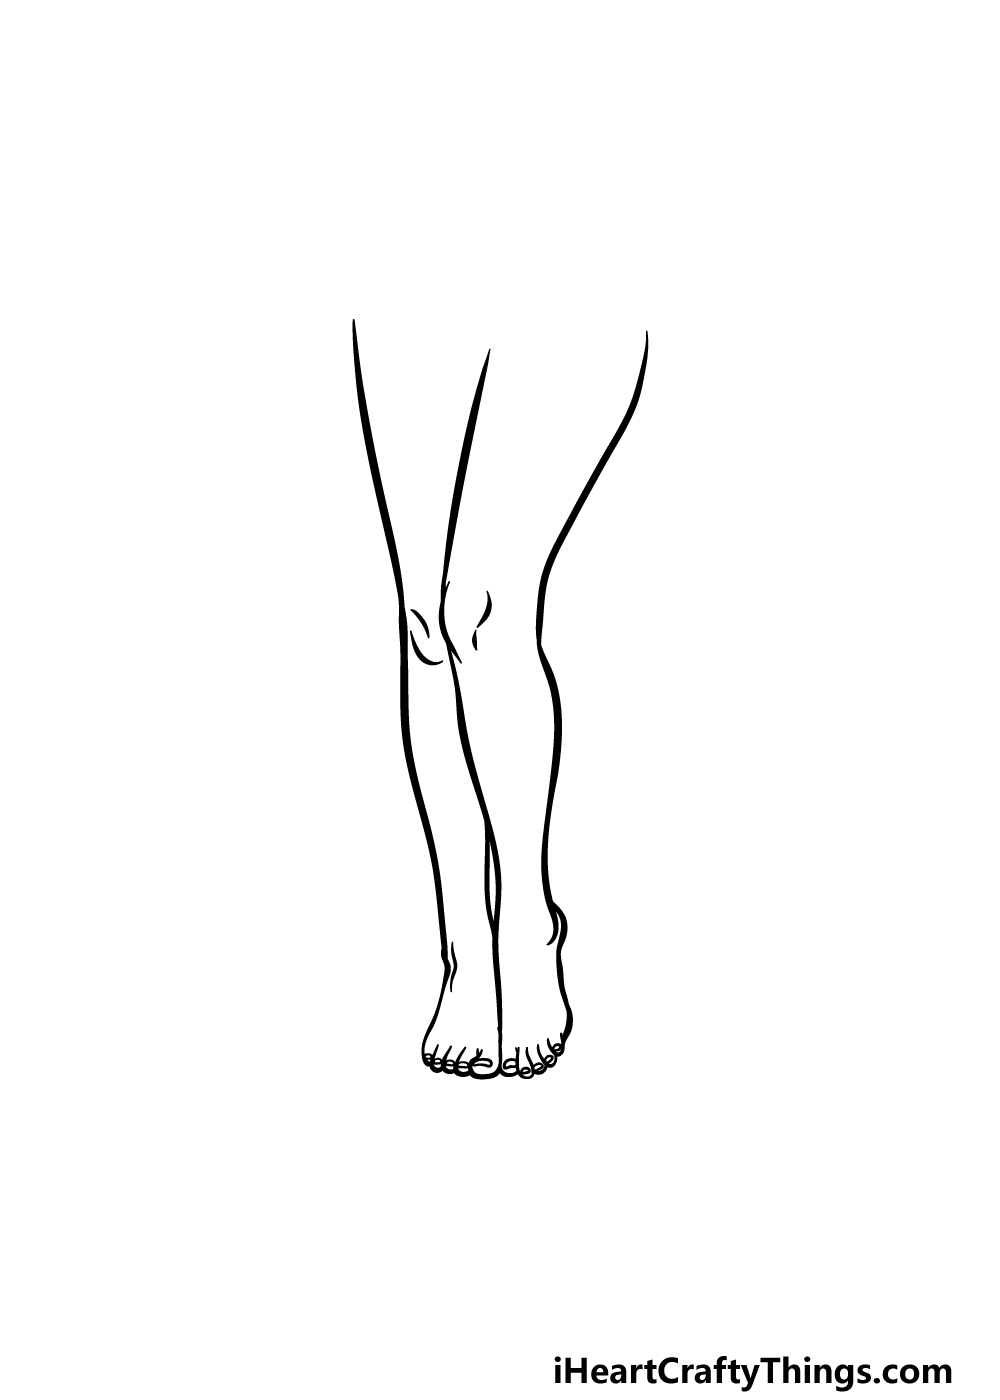
This step of our guide on how to draw legs will be all about finishing off the final details and elements before the final step. You will also be able to add some details of your own in a bit, but we will get to that!
For now, we will be finishing off by closing off that empty space that we mentioned earlier. You can fill in this part by drawing another line curving outwards a bit, as seen in the reference picture. Then your legs drawing is complete!
Before you move to the final step, you can also add your own details. There are many ideas that you could go for, and we can go through a few of them now!
You could draw some pants or other attire on the legs, or you could draw more of the body that these legs are attached to.
You could also add a background and other elements, but there are more details that you could go for too! What can you think of to finish off this picture?
Step 6 – Finish off your legs drawing with some color
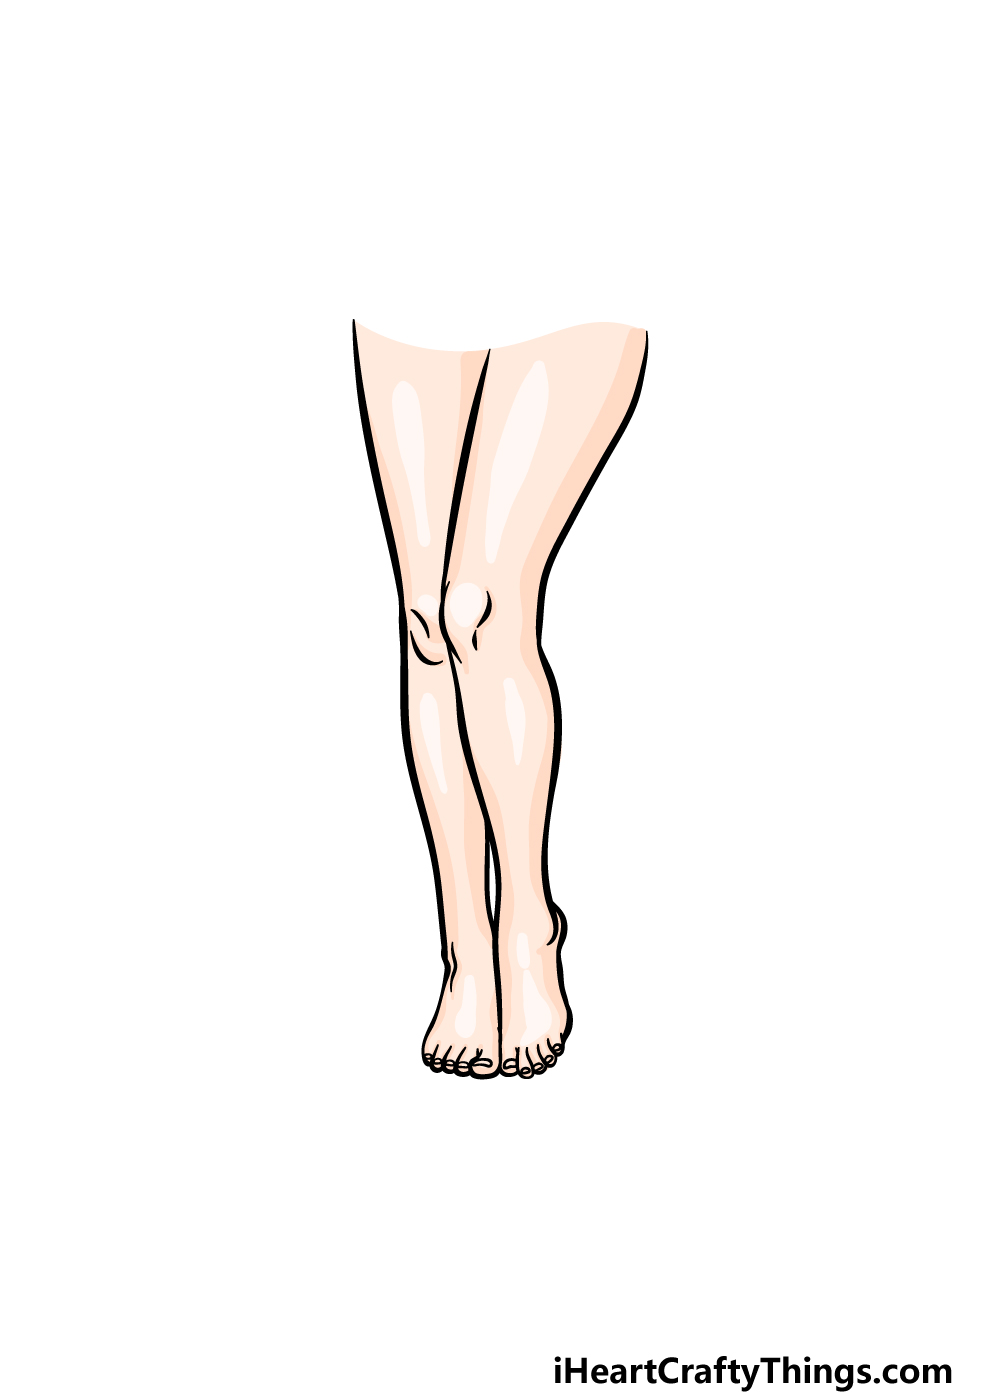
In the final part of your legs drawing, we will be finishing off with some colors. We showed you just one way that you could color in your picture, but this is where you get to take over and express your creativity!
There are tons of options for different skin tones you could go for, and if you drew any extra details or a background then those are great for adding even more color variation as well.
Then you can decide on the art mediums and tools you will use! Will you go for paint mediums, colored pens and pencils or a combination of your favorite mediums?
Do this to take your legs drawing to the next level
Put your best foot forward as we make this legs sketch even better!
When creating this drawing of legs, we focused on just the legs themselves. Now that they are drawn, you could try to add some clothing items on them.
There are many forms that this could take. You could simply add some jeans, pants or maybe a skirt for the character to wear.
Then, you could add some shoes, socks and other footwear to the legs. These are a few items of clothing you could add, but anything you add will help to personalize the legs,
Another way that you could customize this artwork would be to draw the legs in other positions.
This could be simple, like having the ankles crossed over one another or one leg could be kicking forward.
If you wish to try and portray these legs in another pose or position, then you may want to get a friend or a family member to make the pose you have in mind and then use that as a reference point.
Once this legs drawing looks as you want it, the next way that you could take it even further would be by drawing more of the character they are attached to.
The length you go to when drawing more of the character would depend on you. You could stick to the waist of the character or you could draw the entirety of the human character.
Once again, it would be advisable to get someone to pose for you so that you have a reference to work from.
Finally, it would be fun to show where this legs sketch is taking place by drawing a background setting. The setting would be limited only by your imagination, and you could portray any setting you like.
The legs could be at a beach, a party or in a simpler home setting for just a few ideas. What sorts of cool locations can you think of that you could use for the background?
Your Legs Drawing is Complete!
We mentioned at the start of this guide on how to draw legs that drawing any part of the human body can be quite a challenge.
We hope that this guide made it easy and fun for you to recreate this pair of legs! We aimed to make it simpler and less frustrating by breaking it down into smaller steps, so hopefully we succeeded in this goal for you!
Now we will look forward to seeing how you take this drawing even further with your own details and elements. Be sure to have fun and get creative as you finish off this drawing in style!
Then, when you’re ready for more you can visit our website to enjoy our many awesome free drawing guides. This list of guides grows constantly, so be sure to keep checking in!
Once your legs drawing is all finished, please remember to share it on our Facebook and Pinterest pages so we can enjoy your creativity!