The furry fandom has become more and more popular as the years have gone by, and that popularity doesn’t seem to be slowing down!
Fans of this subculture enjoy creating and portraying animal identities called ‘fursonas.’
There is a strong culture of living out these animal personalities at conventions and by creating detailed costumes, artworks and lifestyles based on them.
If you are a member of the furry community yourself or find yourself intrigued by it, then perhaps you have wanted to create your own furry artwork.
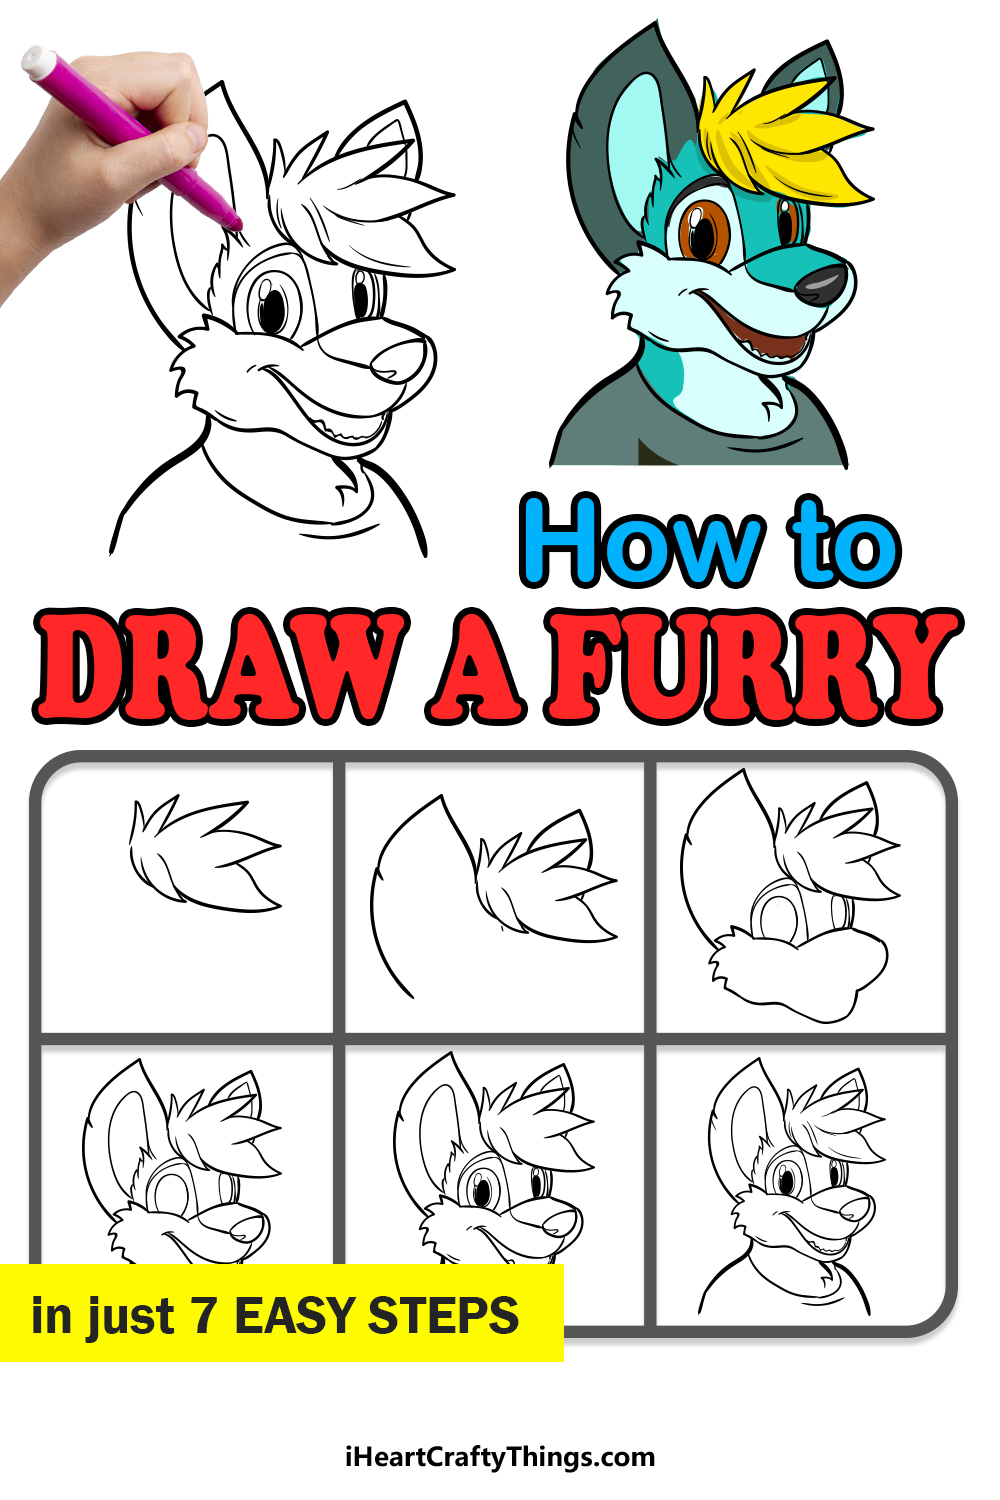
This step-by-step guide on how to draw a furry will have you designing your own furry character with ease!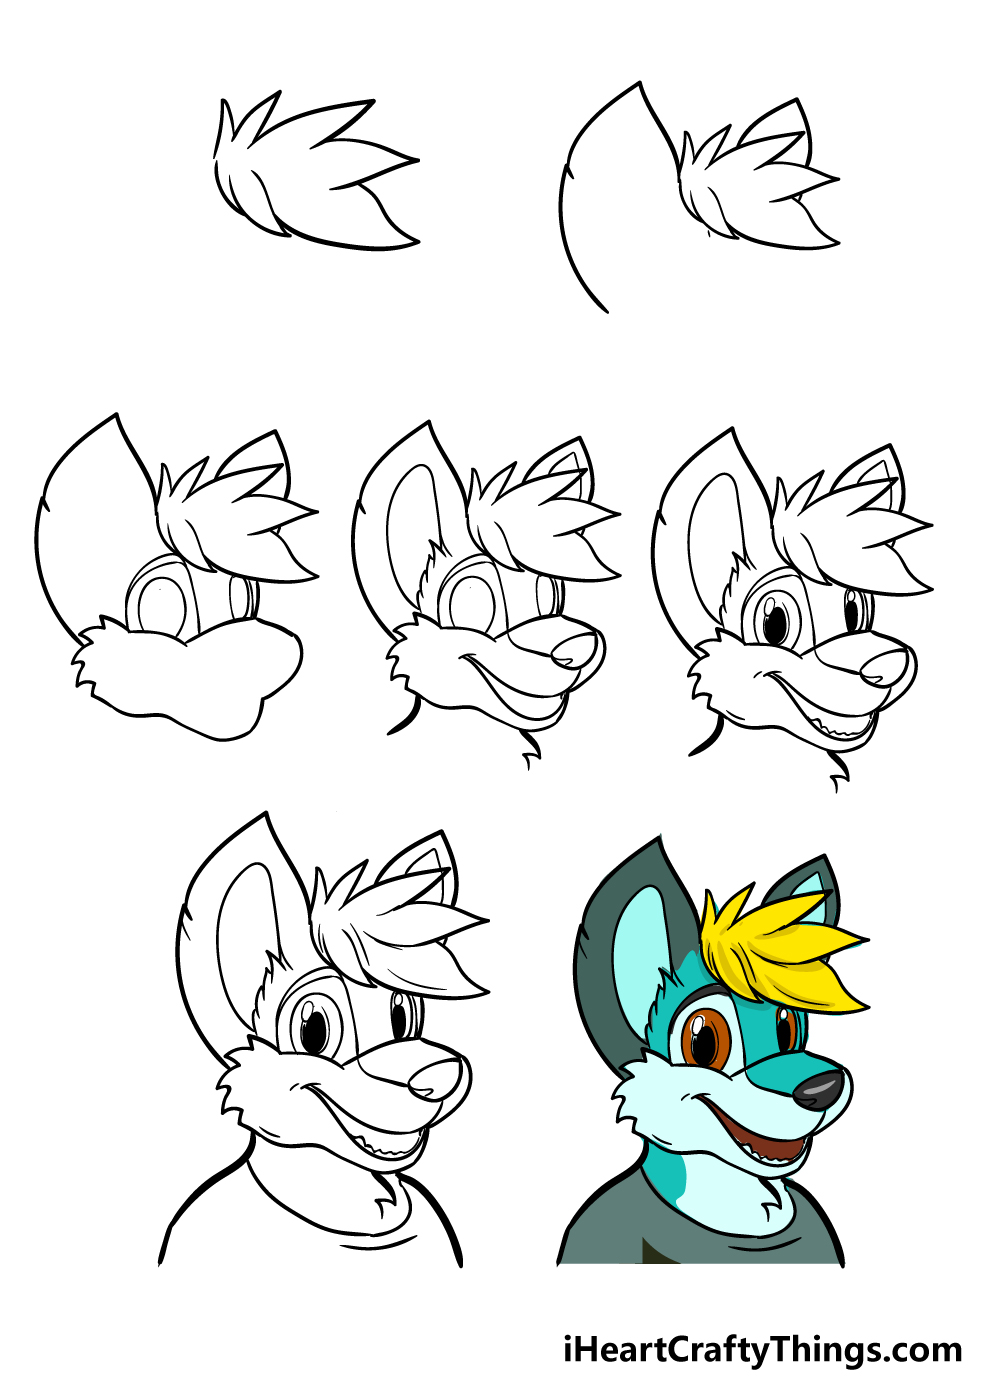
How to Draw A Furry – Let’s get Started!
Step 1
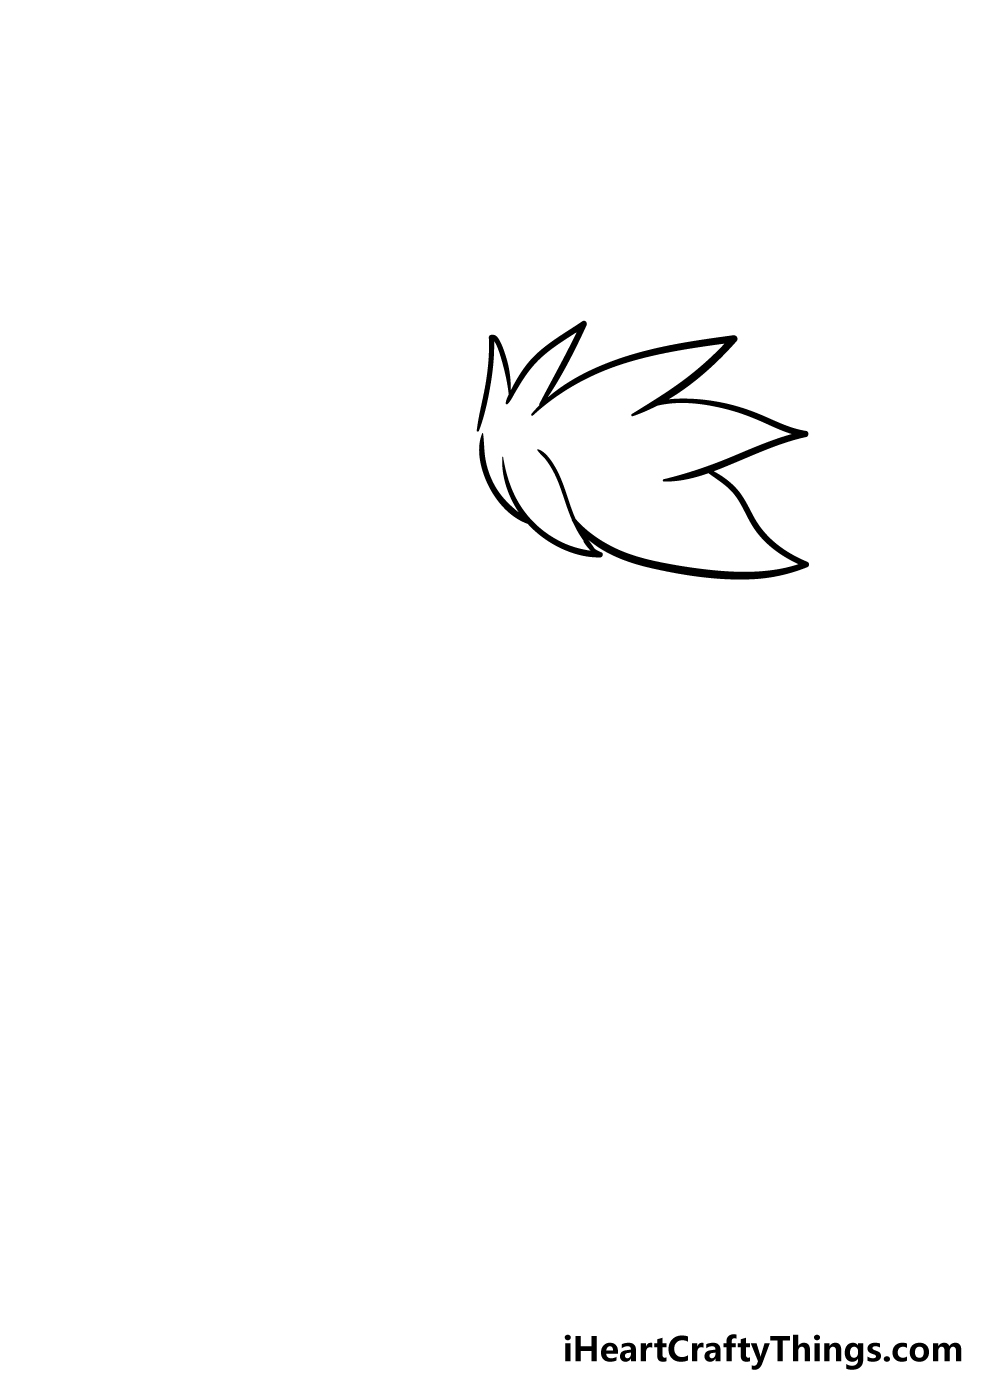
In this guide on how to draw a furry, we will be learning how to draw a furry character that we have designed.
Once you have the hang of it, you could change certain elements to portray your own furry personality or design a new one!
To start with, we will be drawing some spiky hair for your furry drawing. To do this, we will be using a series of curved and sharp lines to create the spiky hair as it appears in the reference image.
You could make it wavier or even more spiky if you prefer, too!
Step 2 – Draw some ears for your character
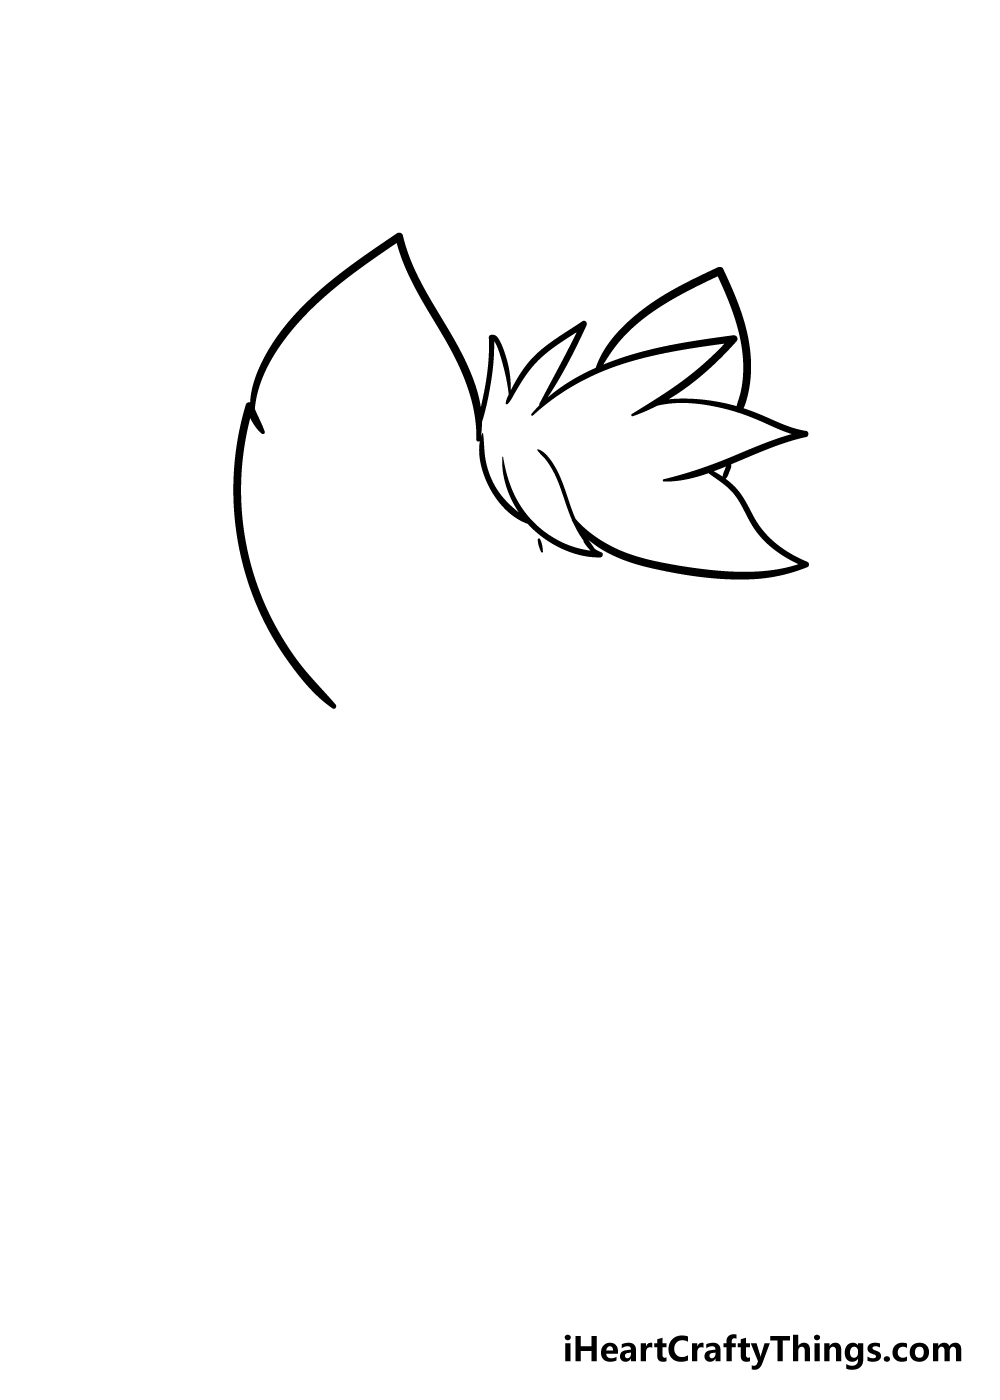
We shall be adding some big ears for your furry drawing in this next step.
Furry characters often have highly exaggerated features, and that’s why we shall be drawing some large ears for this character.
The one on our left will be made of some sharply curved lines. Be sure to refer to both the reference image and what you’ll be drawing in the next step to determine where the ear should end.
You could draw it in pencil for now and then go over it in pen later if that helps you! Once you draw the ear on the other side of the head, you’re ready for the next step.
Step 3 – Next, draw a face for your furry character

Step 3 of our guide on how to draw a furry will show you how to start the face of your drawing. You can start by drawing the face outline of the head.
Using the reference picture and what you’ve drawn already to guide you, carefully draw in the outline that will connect to the hair on the right and the ear on the left.
Once you have the head outline, you can draw in some large, oval-shaped eyes with another shape around them
This can be a tricky step, so be sure to follow the guide closely while taking it slow!
Step 4 – Draw some facial details
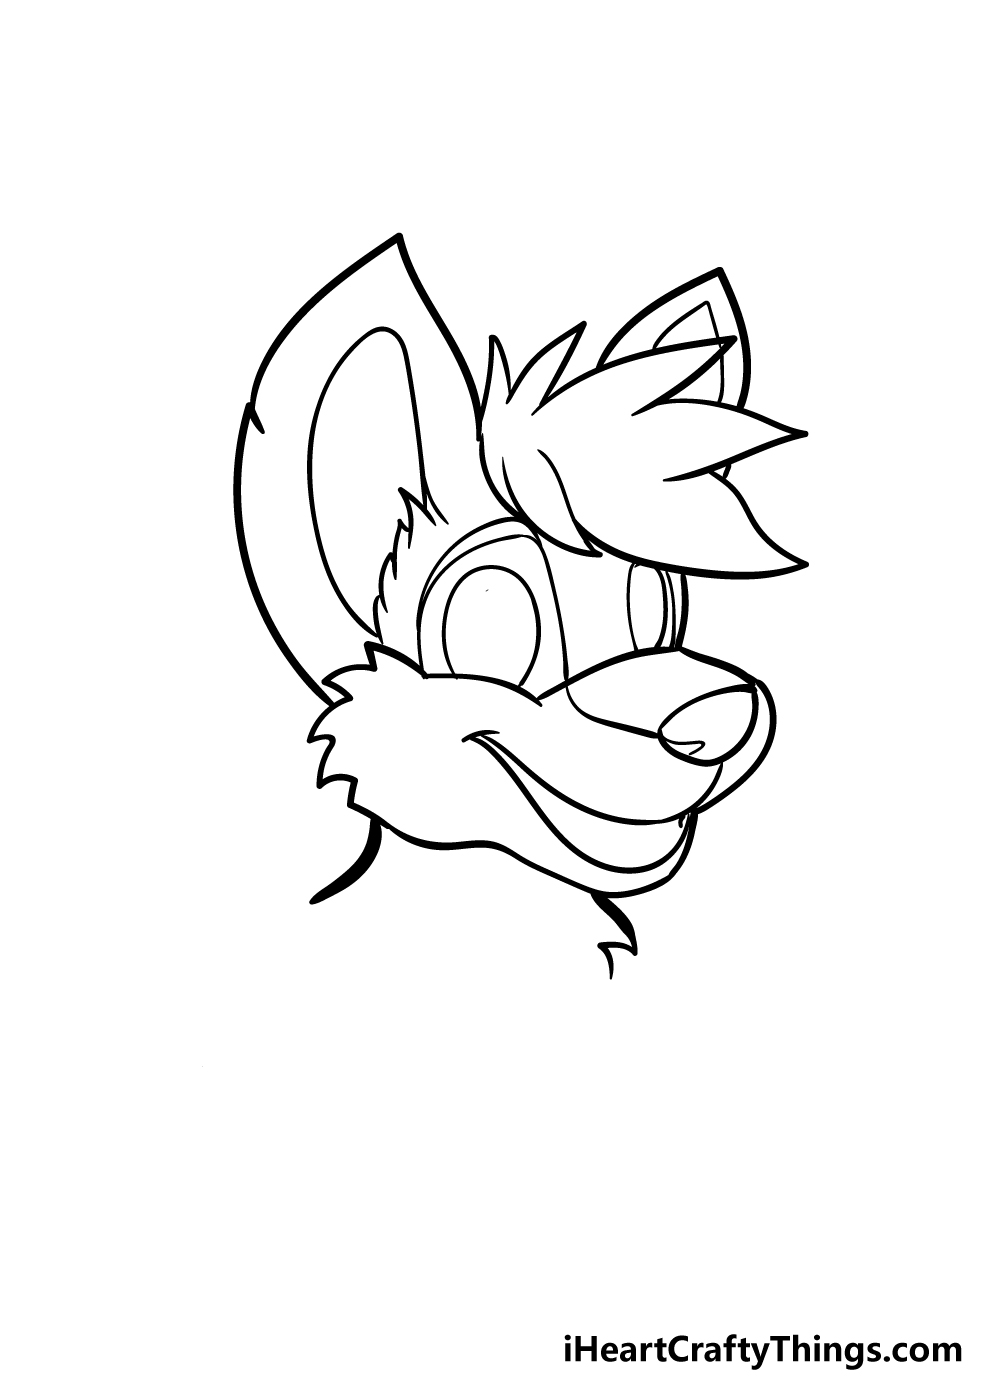
Your drawing is really starting to take shape now! For this step of our guide on how to draw a furry, we shall draw some facial details.
You can start by drawing the nose as it appears in the reference image. Then, you can add a nice smiling mouth to your drawing.
The one in our image is open slightly, but you could also draw a closed smile if you prefer!
Drawing the inner ear shapes and the neck will finish off this step of your furry drawing.
Step 5 – Next, draw some pupils and teeth
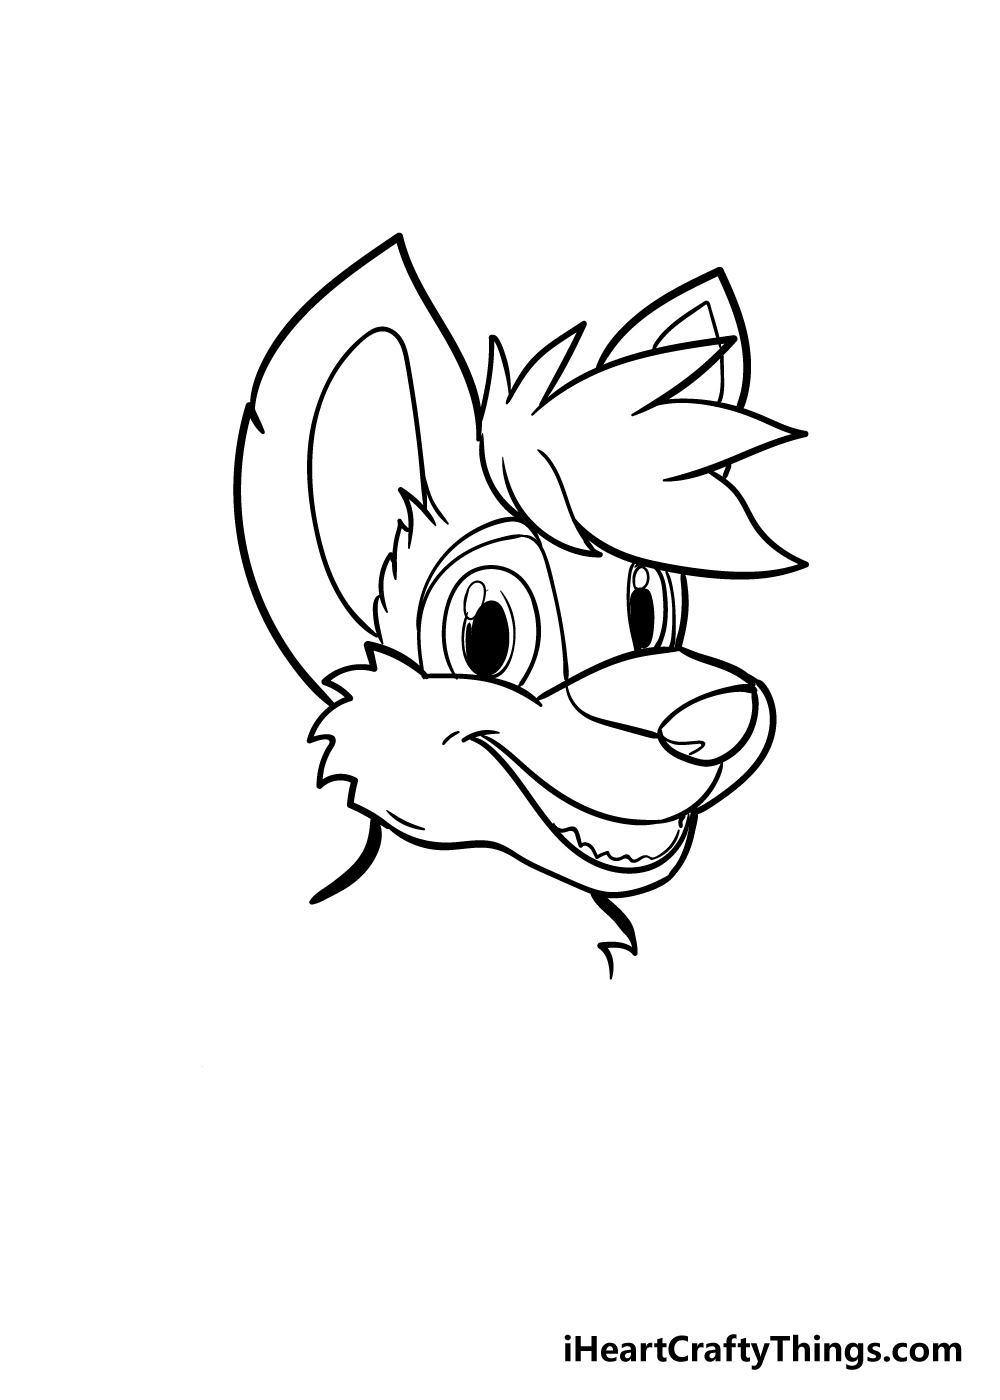
We will focus on the eyes and teeth for this part of your furry drawing. We will be using some almost solid black ovals inside of the eyes to give them a nice cartoony look.
Then, draw in two small, white ovals over them to create a glint in the eye.
Finally, draw in some jagged lines inside the mouth to create some teeth.
Step 6 – Now, draw the final details and shoulders
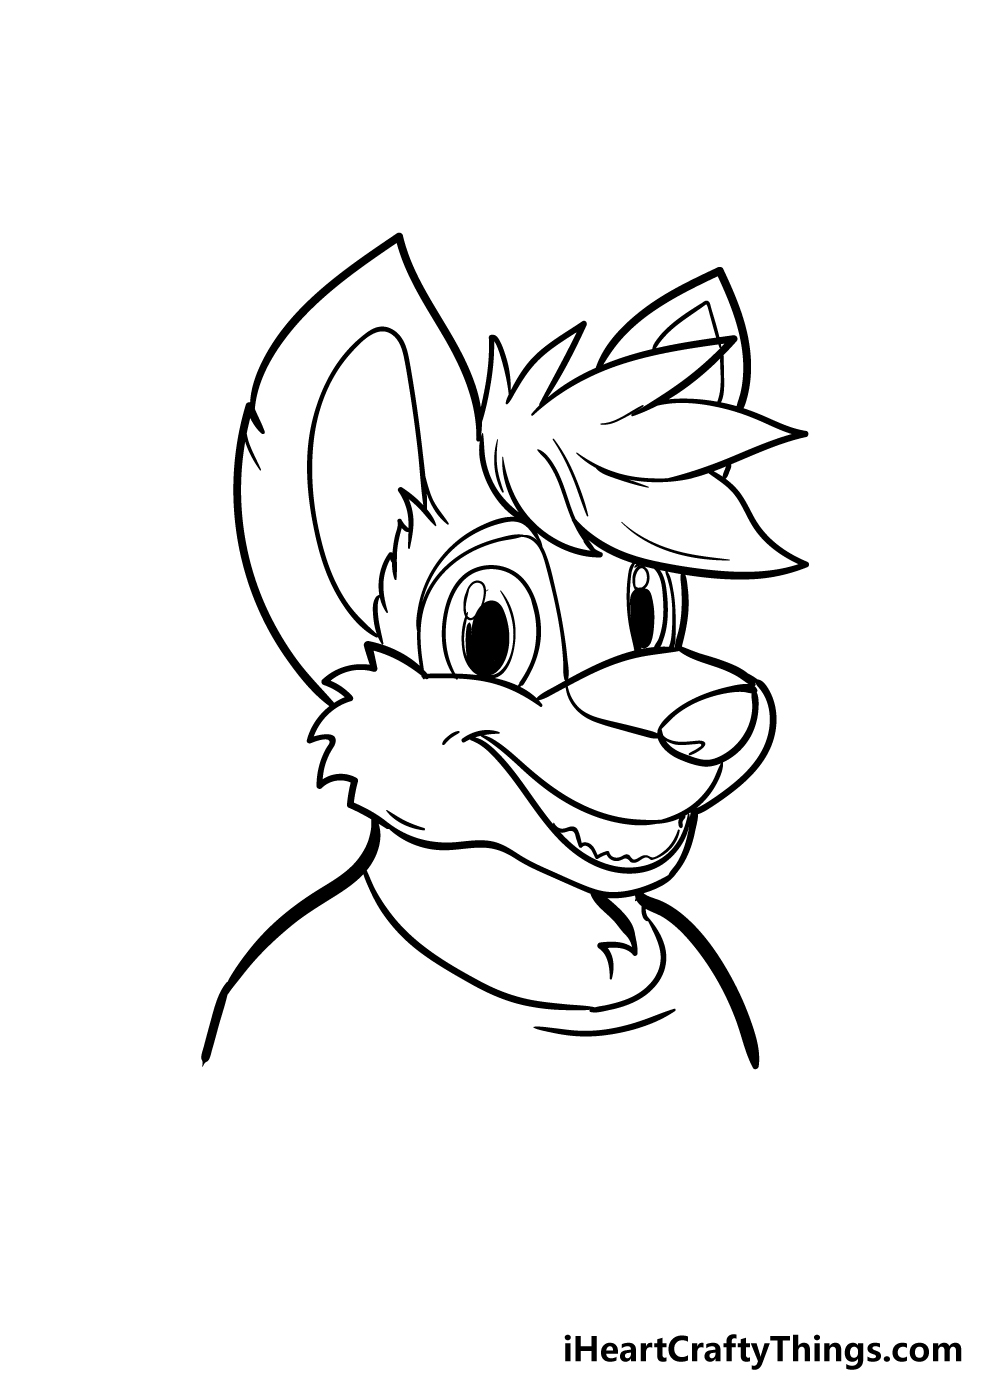
Your drawing is already looking great, and we shall finish it off with some final details before moving on to the coloring stage of our guide on how to draw a furry.
Firstly, draw in some lines to areas like the hair and ears to give it a little more texture and flow to it.
You could also draw in more lines to other areas or add details if you would like to!
Finally, use some thicker lines coming down from the shoulders, and draw a line under the neck for the neck-hole of the shirt.
With that, your furry drawing is pretty much done! Before you move on to the final step, you could change some elements or maybe draw some accessories for your character!
Step 7 – Finish off your furry drawing with some color
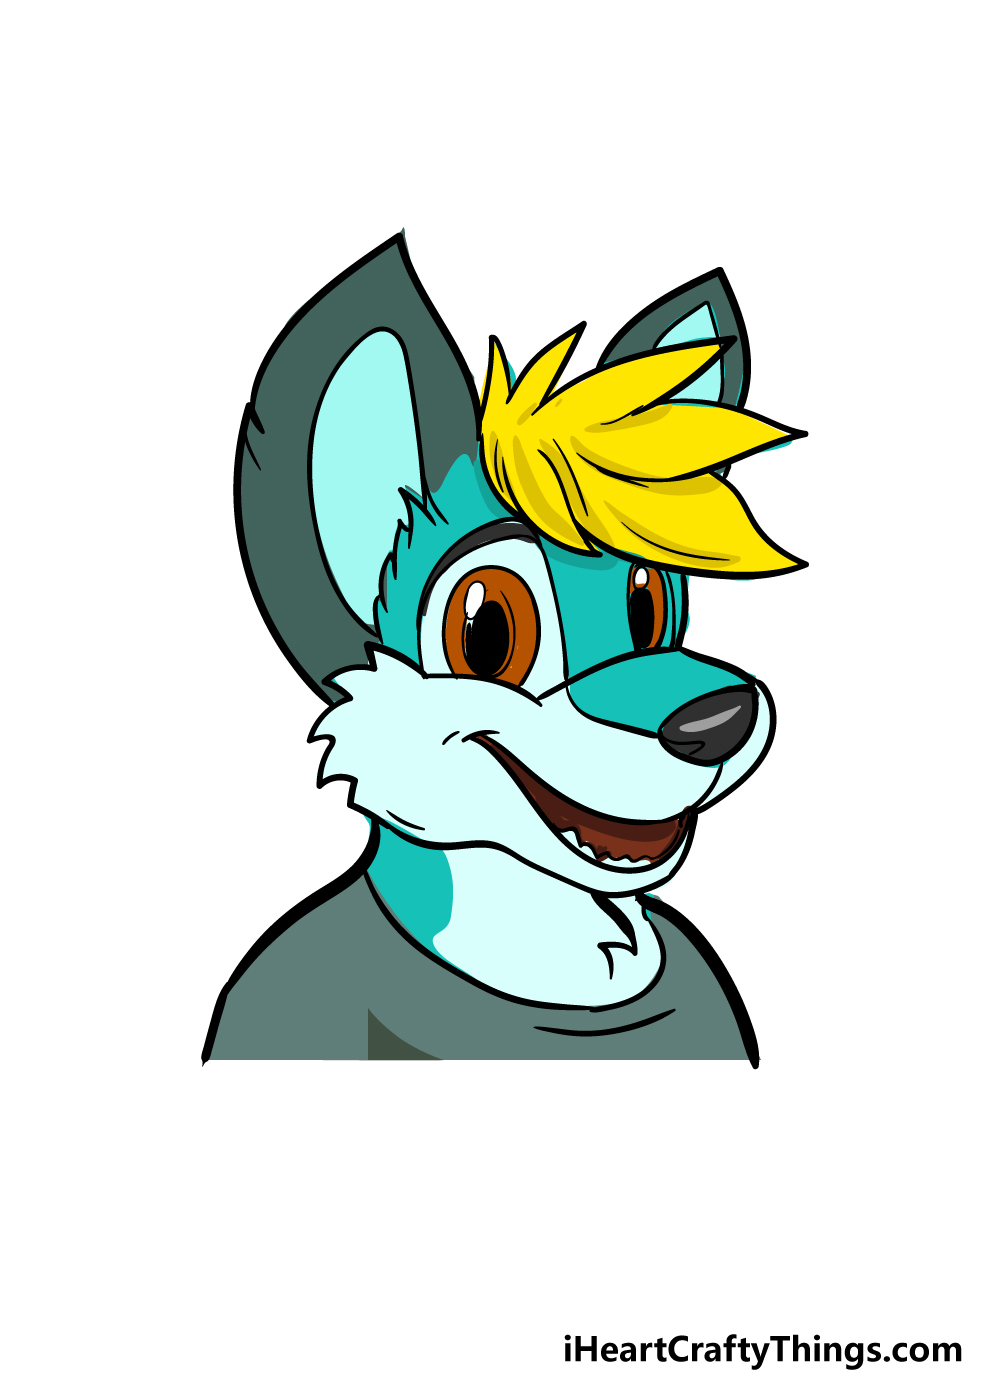
Step 7 is possibly the most fun of all the steps, as now you get to bring your character to life with some beautiful colors!
We’ve shown you just one way of coloring in this drawing, but this is a step where you should let your creativity shine!
This guide has been about giving you a template that you could use to design your own furry characters, so you should any colors that you feel best express and represent yourself!
For this drawing, I would use some acrylic paints and colored pens for a vibrant look to the character, but any art mediums that you use would look amazing too!
How will you finish off your furry character?
5 Tips To Make Your Furry Drawing Even Better!
Find out how to make this furry drawing even better with these 5 tips!
When it comes to furry designs, the whole point is to be expressive and creative. There are so many animals to take inspiration from, and you could use a different one for this furry sketch.
This one is based on a dog design, but you could change subtle details like the eyes, nose and muzzle. Doing this would allow you to portray a different dog or maybe a different species entirely!
For this drawing of a furry, we only portrayed the face and neck of the character. If you wanted to add more to the body, you could draw the design on a big piece of paper or make it small.
That way you could finish off the design. You could look up existing furry outfits to help you out or get some inspiration.
Another way to make this even better is by using pictures of real animals to help with your design. This is especially helpful if you decide to create your own design or modify this one.
Using real animals will help you to create the cartoony proportions for the facial details. What kinds of animals would you choose for this furry design?
In the guide, we briefly touched on adding some accessories for this furry drawing. We think this would be a great way to add your own spin to the design!
You could draw a hat, some sunglasses or maybe some big earrings for a few ideas. If you add more of the body, you could also add other accessories for the character to hold or interact with.
Lastly, you can finish off the creative design with some colors! This is another aspect we touched on in the guide, but we really encourage you to use as many colors as you like.
We think that bright colors done with some colored pens or pencils would be perfect for this design. But you can also go for a more muted color scheme if you prefer!
Your Furry Drawing is Complete!
You have reached the end of this guide on how to draw a furry, and that means that you have completed an amazing drawing!
We really hope that this guide was fun and helpful for you to use. Our hope with this guide is that once you have drawn the character we have designed, you could use this guide even further to design new furry characters.
Whether it’s a character that you enjoy portraying in real life or a design for a future fursona, you can have lots of fun personalizing it!
Furry characters come in all manner of designs and colors, so you should really let your creativity flow when finishing up your drawing!
There is no limit to the colors, art mediums and extra elements you can incorporate, so we’re sure to see many wonderful designs.
This guide is one of many more that we will be bringing out soon, so checking our site frequently is the best way to make sure you never miss out on the fun.
We would love to see your finished furry drawing, so please be sure to share your creation on our Facebook and Pinterest pages! We can’t wait to see your wonderful artwork.