The cube is a shape that we see in one form or another pretty much every day of our lives. This six-sided, 3D shape can make up everything from ice cubes and bricks to bars of soap and woodblocks.
Because we see cubes in one way or another almost every day, you might think it would be really easy to draw one from memory.
It can be harder than it looks, however, due to having to create a 3D shape on a 2D surface. It can be easier than you think if you know what to do, though!
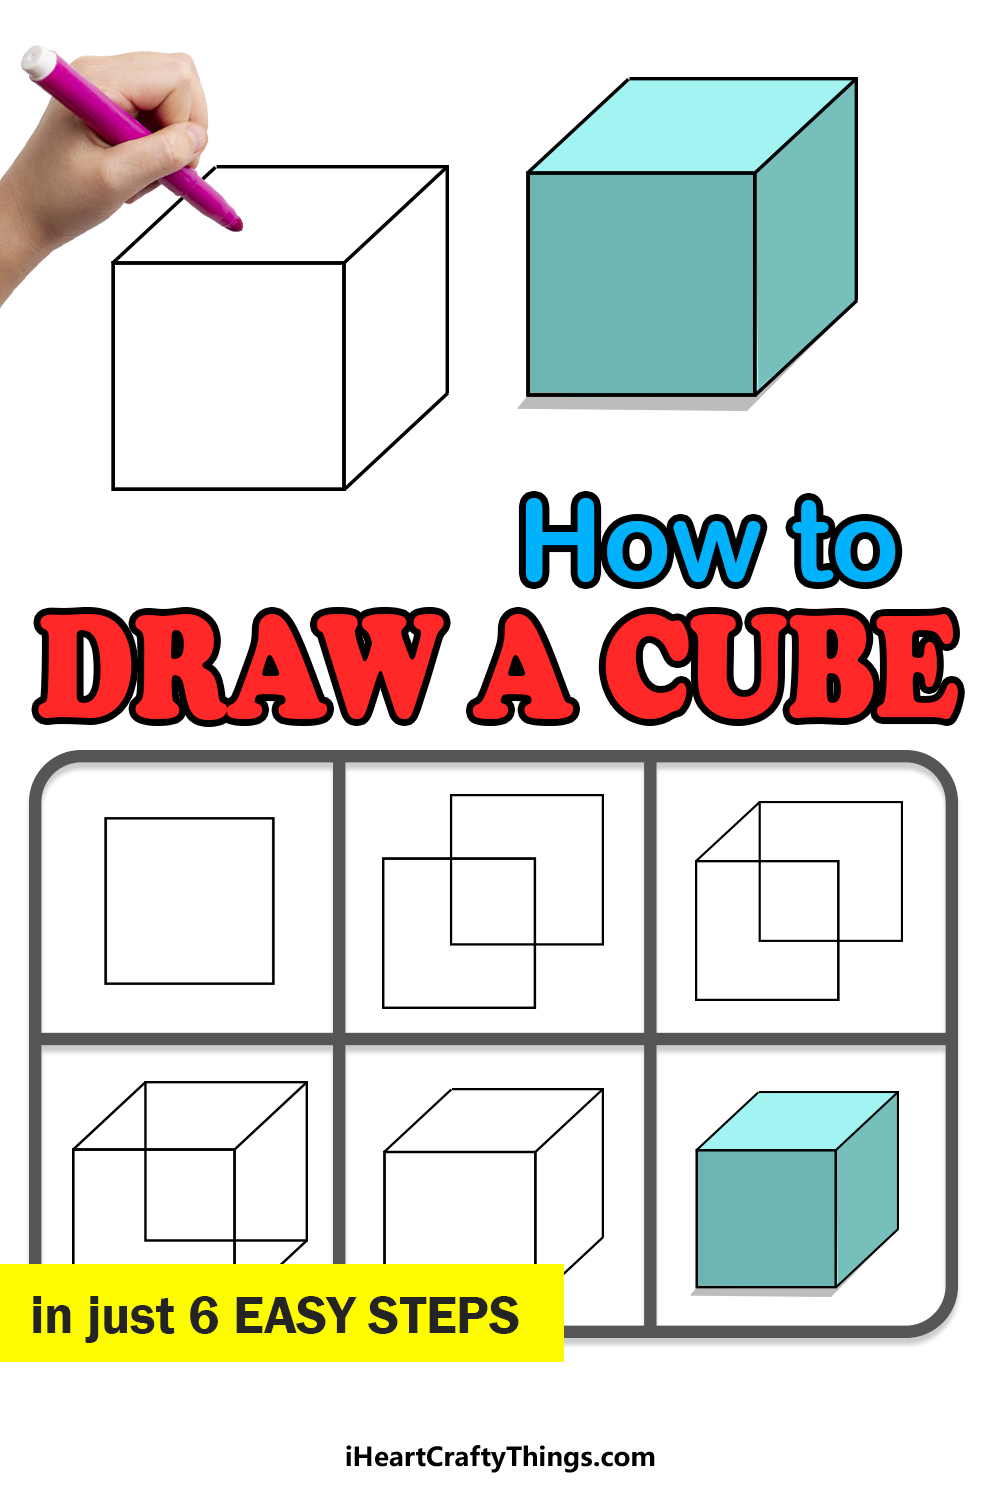
We created this guide on how to draw a cube in 6 easy steps to make it easier than ever for you to do!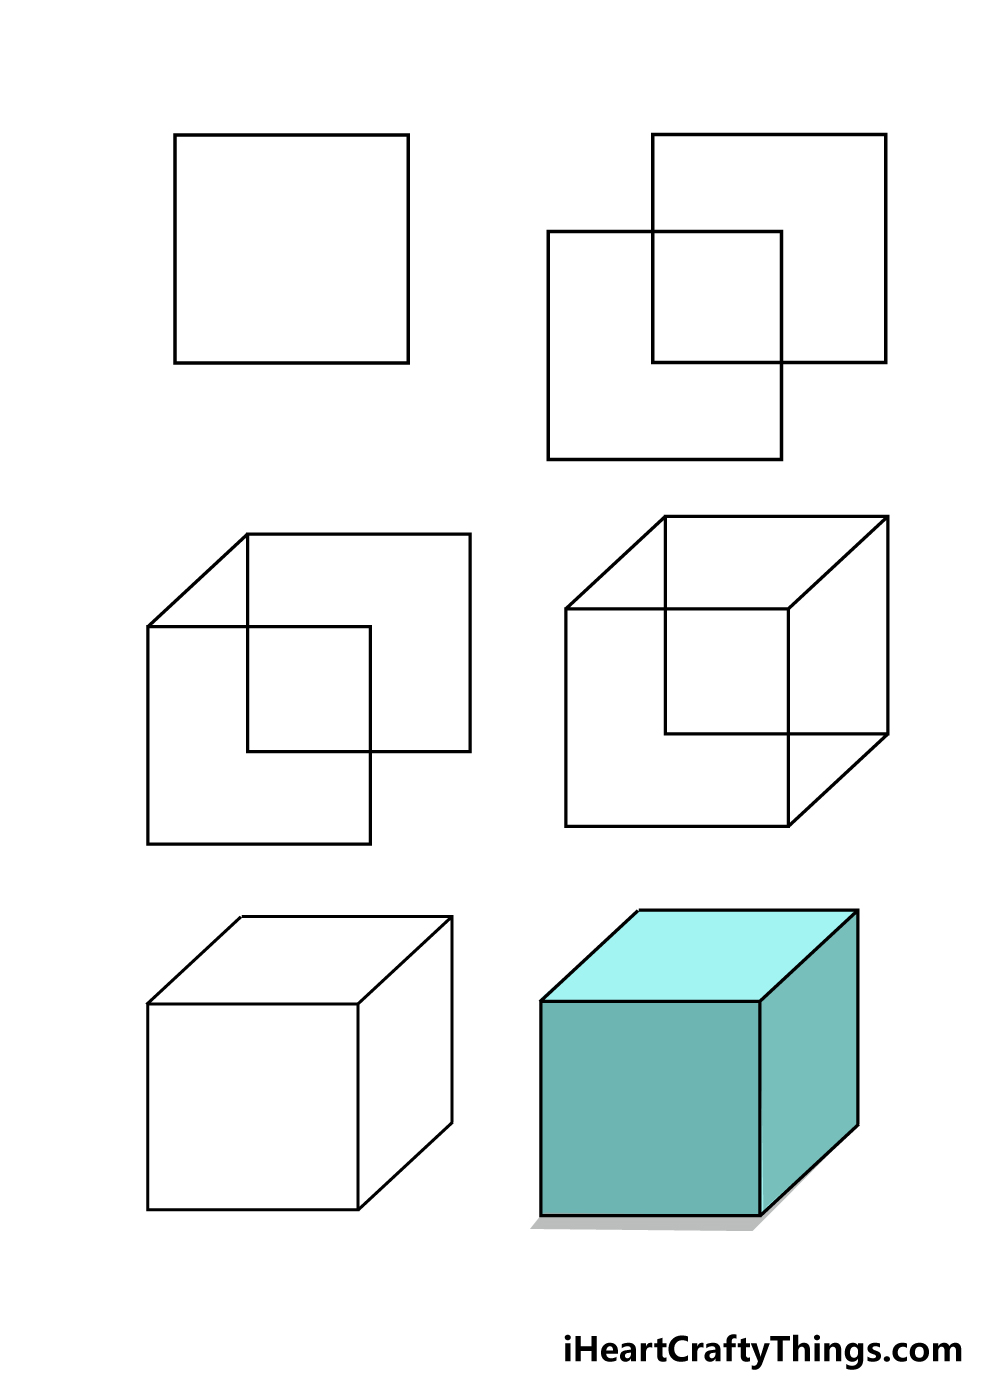
How to Draw A Cube – Let’s get Started!
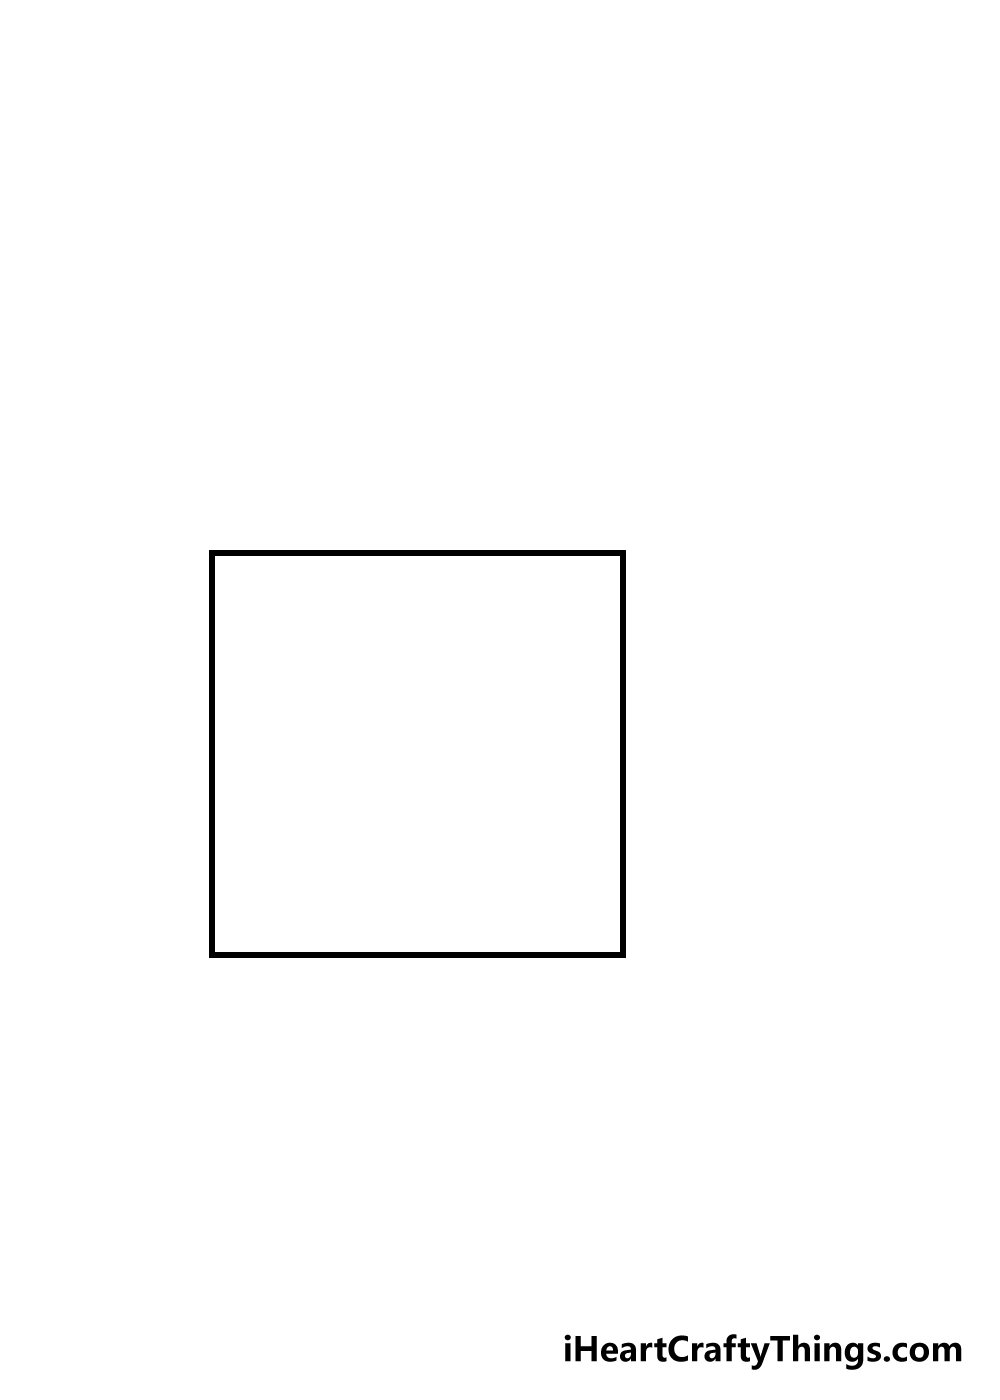
Step 1
For this guide on how to draw a cube, we will be building up the 3D shape using some 2D squares and rectangles.
Because of how we’ll be drawing this cube, for the first few steps you should try to use a lighter pencil to draw, as there will be a lot of erasing needed before you draw the final shape.
We’ll be sure to point out when would be a good time to start using a pen or darker pencil later on in the guide!
For this guide, you’ll have a much easier time if you have a ruler to use. To kick start the process off, simply draw a square that has sides of equal length.
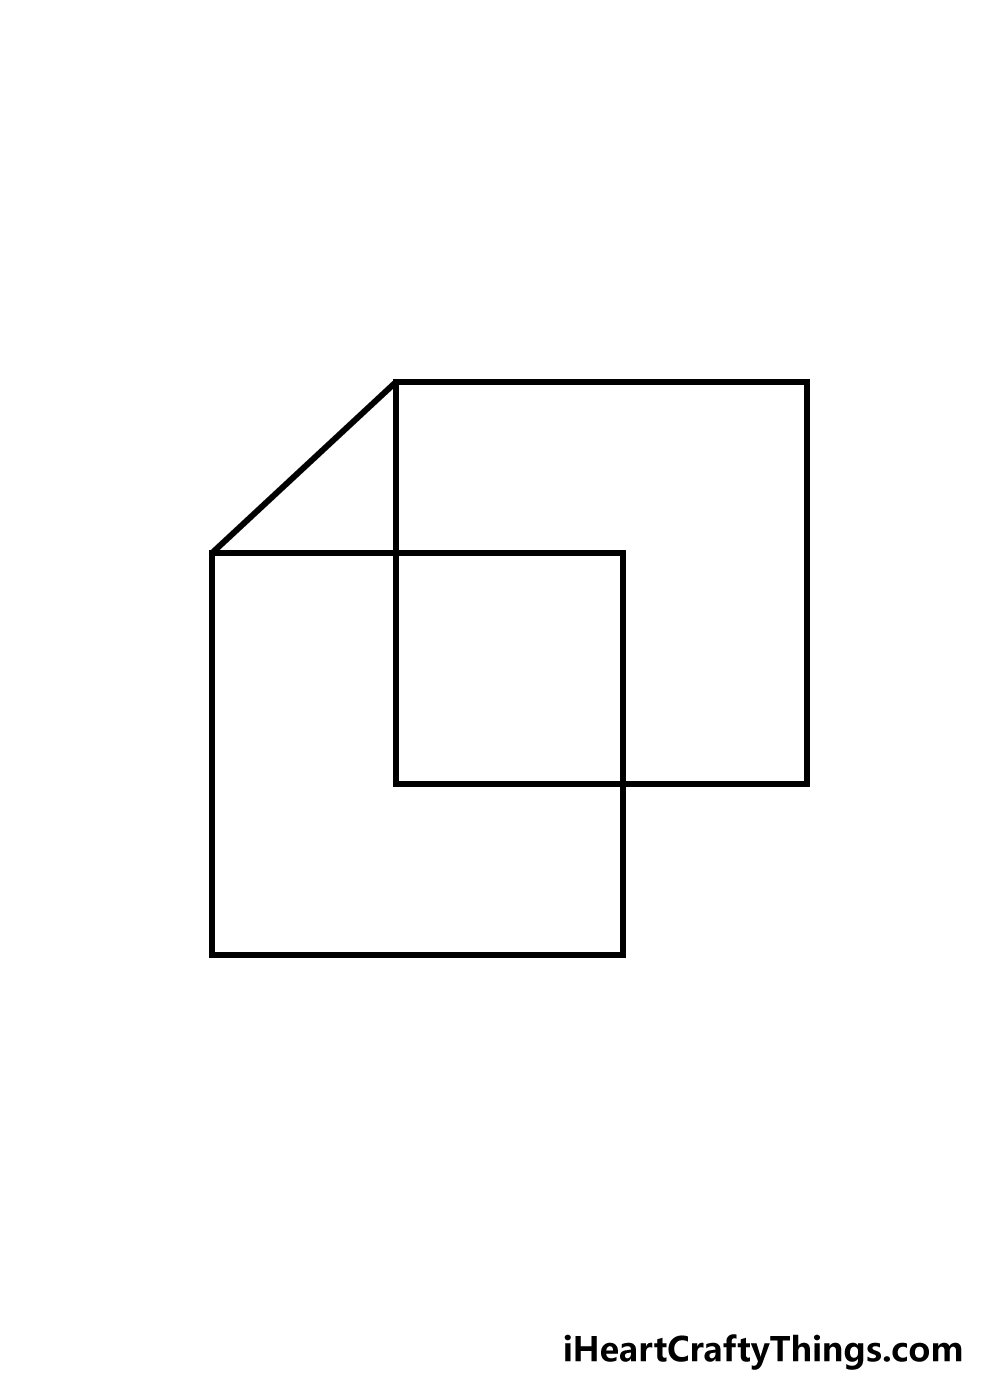
Step 2 – Draw in another square to build up your cube
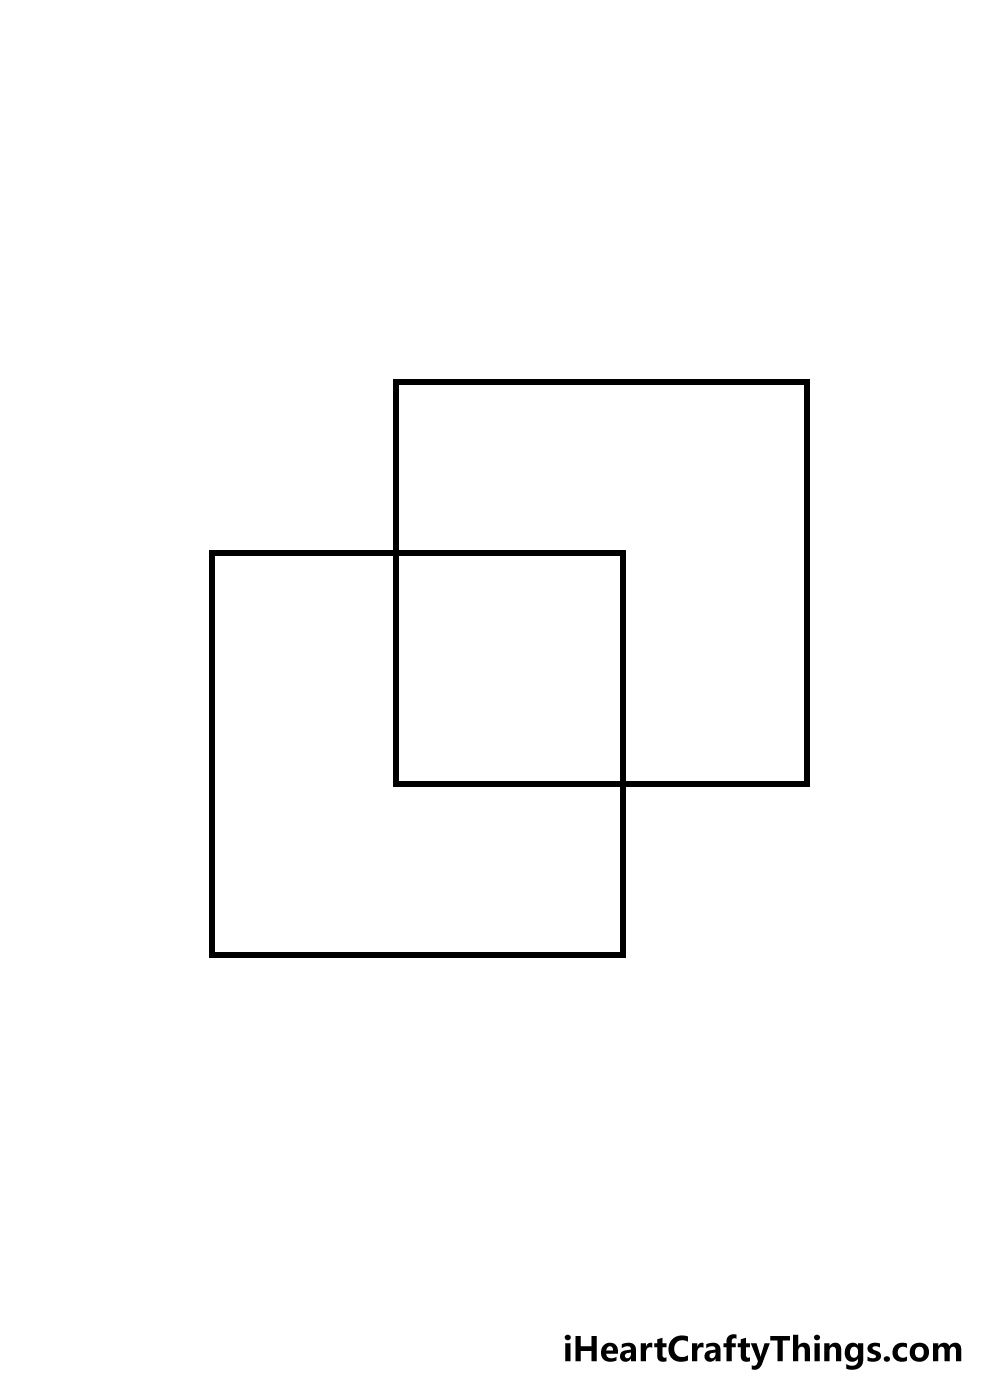
To keep building up your cube drawing, we will be drawing another square.
This square should be the exact same size as the previous one that you drew, so this is another step where using a ruler to measure the sides of the first square would be very helpful.
The reference image will give you a good idea of where to place this second square behind the first one. You’ll know you have the positioning right if a perfect smaller square is formed where the two intersect.
Getting the positioning right can be a bit tricky, but that’s why we’re using a pencil for now!
Step 3 – Now, we shall draw a line for your cube
We have a much simpler step for this part of our guide on how to draw a cube.
Using your ruler, simply draw a line between the top two corners of the two squares.
That’s all there is to it for this step, so let’s move on to step 4!
Step 4 – Draw some more lines for your cube
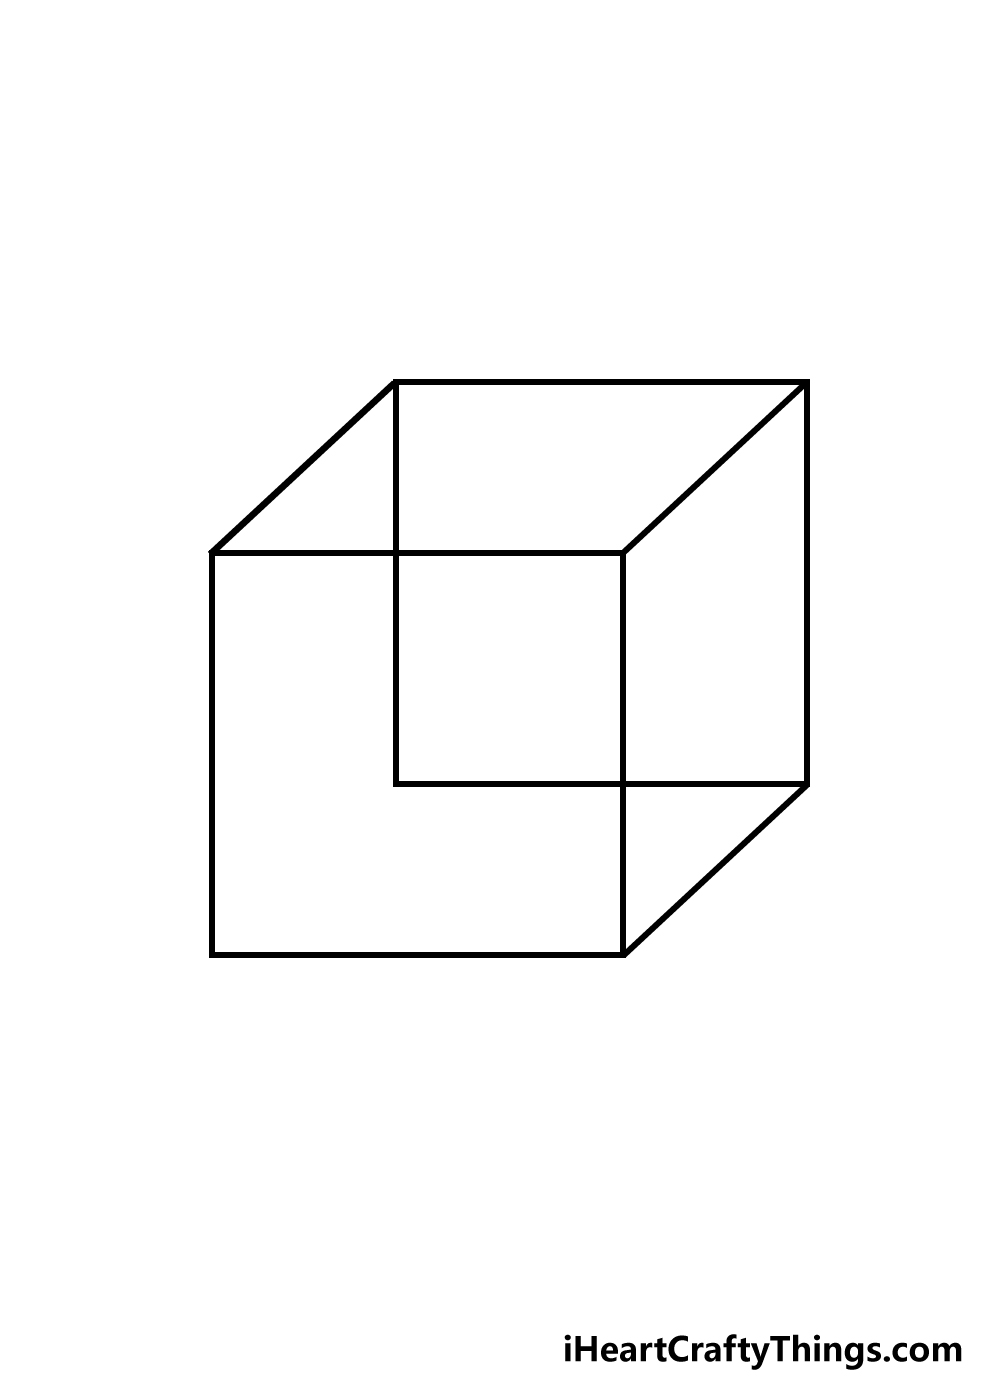
Continuing on from the previous step of your cube drawing, we will be adding more lines to connect the sides of the cube.
For this step, simply connect the sides on the right of the shape, and make sure that it looks as it does in the reference image.
Once you have these lines drawn, the skeleton of your cube is now in place, and in the next step we will focus on finishing off the final shape.
Step 5 – Now, you can erase unnecessary lines
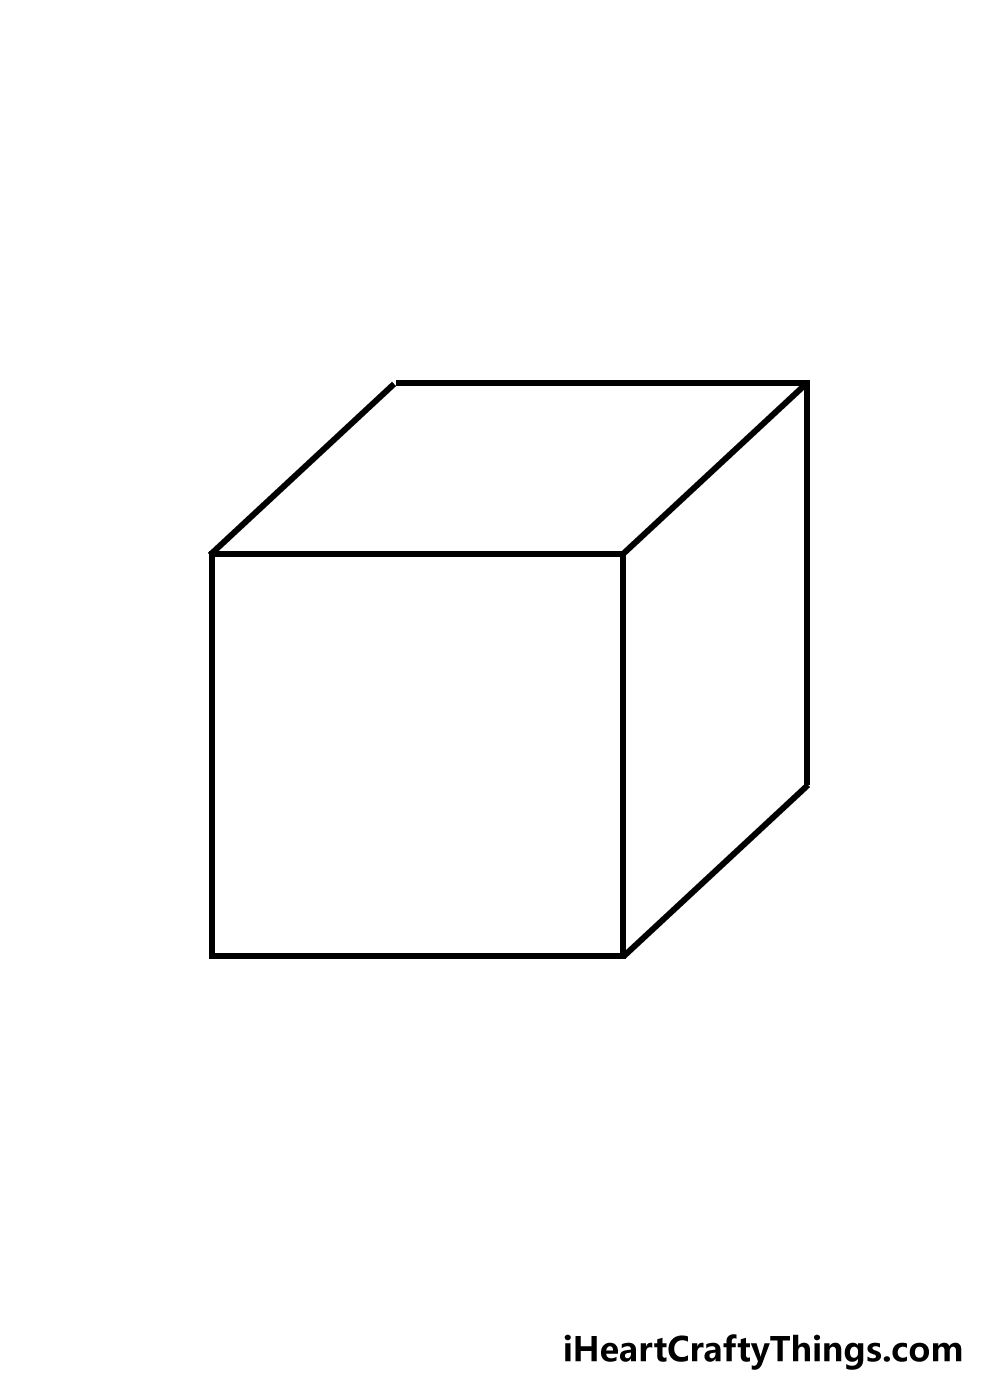
In this fifth step of our guide on how to draw a cube, we will be focusing on erasing any unnecessary lines and going over the final lines in pen.
To do this, simply erase the inner two lines of the square that will be at the back of your cube, leaving the two outer ones intact.
Once again, the reference image will help to ensure you erase the correct lines! With those lines erased, you are left with a cube!
You’re not quite ready to start coloring it in yet, though, as you should go over your rough pencil lines with a pen or a darker pencil.
If you use a pen to go over it, you should give it a few moments for the ink to dry before you erase any leftover pencil lines. Once you’ve drawn the final lines and erased the pencil, you’re ready to proceed!
Step 6 – Finish off your cube drawing with some color
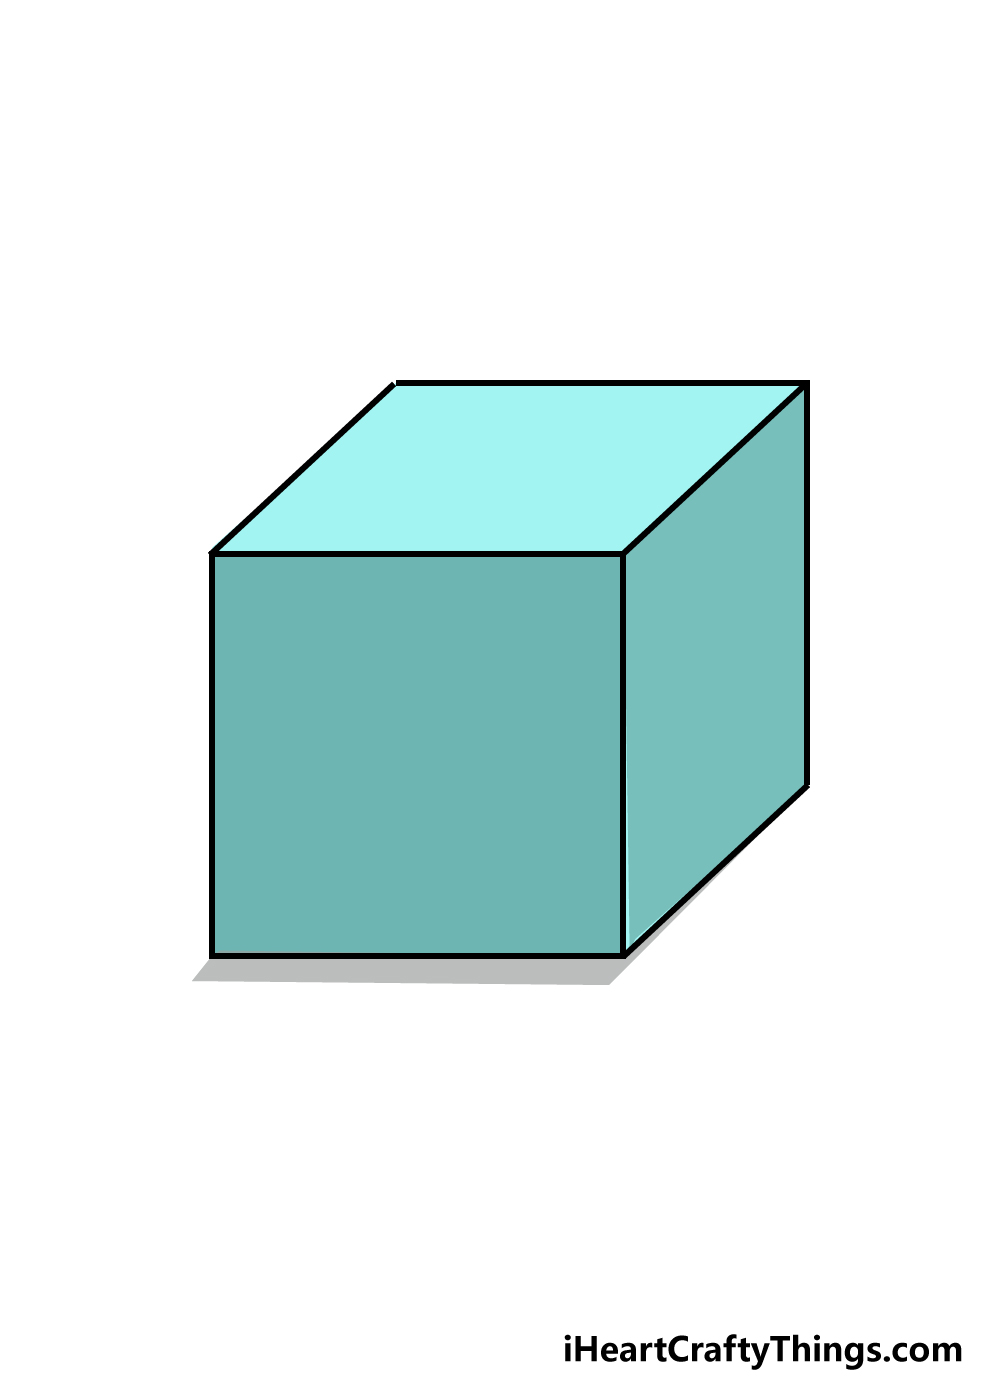
Now that you have arrived at the final step, that means that you have already got a great cube drawing in front of you! While that’s already something to be proud of, you can take it a step further with some beautiful colors.
You actually have a lot of options to consider when it comes to coloring in this cube. You could try to draw in a textured surface for your cube.
For example, you could use some lines and shades of brown to give it the appearance of wood. Maybe you could even try to make it look like a melting ice cube!
By erasing and adding a few lines, you could even make it look like a box, perhaps one that a cite cat is playing in!
If you color it in as a regular cube, the reference image we have provided will help you with how to shade the shape with your colors.
What will you choose for your cube drawing?
3 More tips to make your cube drawing easy!
See how you can make your cube drawing even easier to draw with these tips!
It would be easy to assume that making a cube sketch should be easy, but it can be really difficult. Even with the tips in this guide, it can be a challenge!
One of the best ways to make it much easier is to have a cube to use as a model. There are many different objects that you could use for this purpose.
You could buy a block of wood from a store, but there are many household objects you could find too. Even if it’s more of a rectangular shape, it can still help you get the dimensions looking good!
You don’t need to go in alone when trying to make this cube drawing easy! You can also use many different drawing tools to help you.
Rulers are an obvious tool, but you can also get set squares and other tools that can help you draw the correct angles.
These can often be bought really cheaply, and they will make a huge difference. If you use a few of these tools together, then it will be even easier!
Some of them may take a bit of getting used to if it’s your first time, but you’ll soon get the hang of it. You can also get creative with tools and objects you may already have on hand.
The final tip that we have for you may seem simple, but it will help you get this drawing of a cube off to a good start.
The trick is to use some kind of square object to trace around for the front of your cube. You could use a similar object to the one we recommended in the first step, and then simply place it on the page.
Trace around it carefully and then you have your front side of the cube. Once that side is drawn, adding the other sides will be much easier for you to do.
Your Cube Drawing is Complete
That brings us to the end of this guide on how to draw a cube!
When drawing 3D shapes, it can be easy to assume that it will be a walk in the park, but adding another dimension to the image can make things a lot trickier than expected.
We really hope that this guide helped to show you that when you know what to do it can be easy and fun to learn how to do it!
Drawing a cube is just part of the fun, as now you can decide on how you’re going to personalize this cube! There are so many colors and art mediums that you could use to make your drawing pop!
From acrylic paints and watercolors to crayons and colored pencils, you have many options for yourself! You could even make the cube into a Rubix cube or some other object for some extra fun.
This guide isn’t the end of your drawing fun, though! We are bringing out new drawing guides constantly, so remember to check in to our site frequently to never miss out on the arty fun!
We would love to see the creative ways you finish up your cube drawing, so we hope that you will share your artwork on our Facebook and Pinterest pages for us to enjoy!