Cats have been beloved companions to humans for thousands of years. People love how cats have so much character, personality and independence.
They have also featured in art going thousands of years back. They even feature in Egyptian hieroglyphics! Many cat fans love to draw their furry pals, but it can be a challenge to learn how to draw cat eyes due to their unique nature.
When you know what to do, however, it can become much easier!
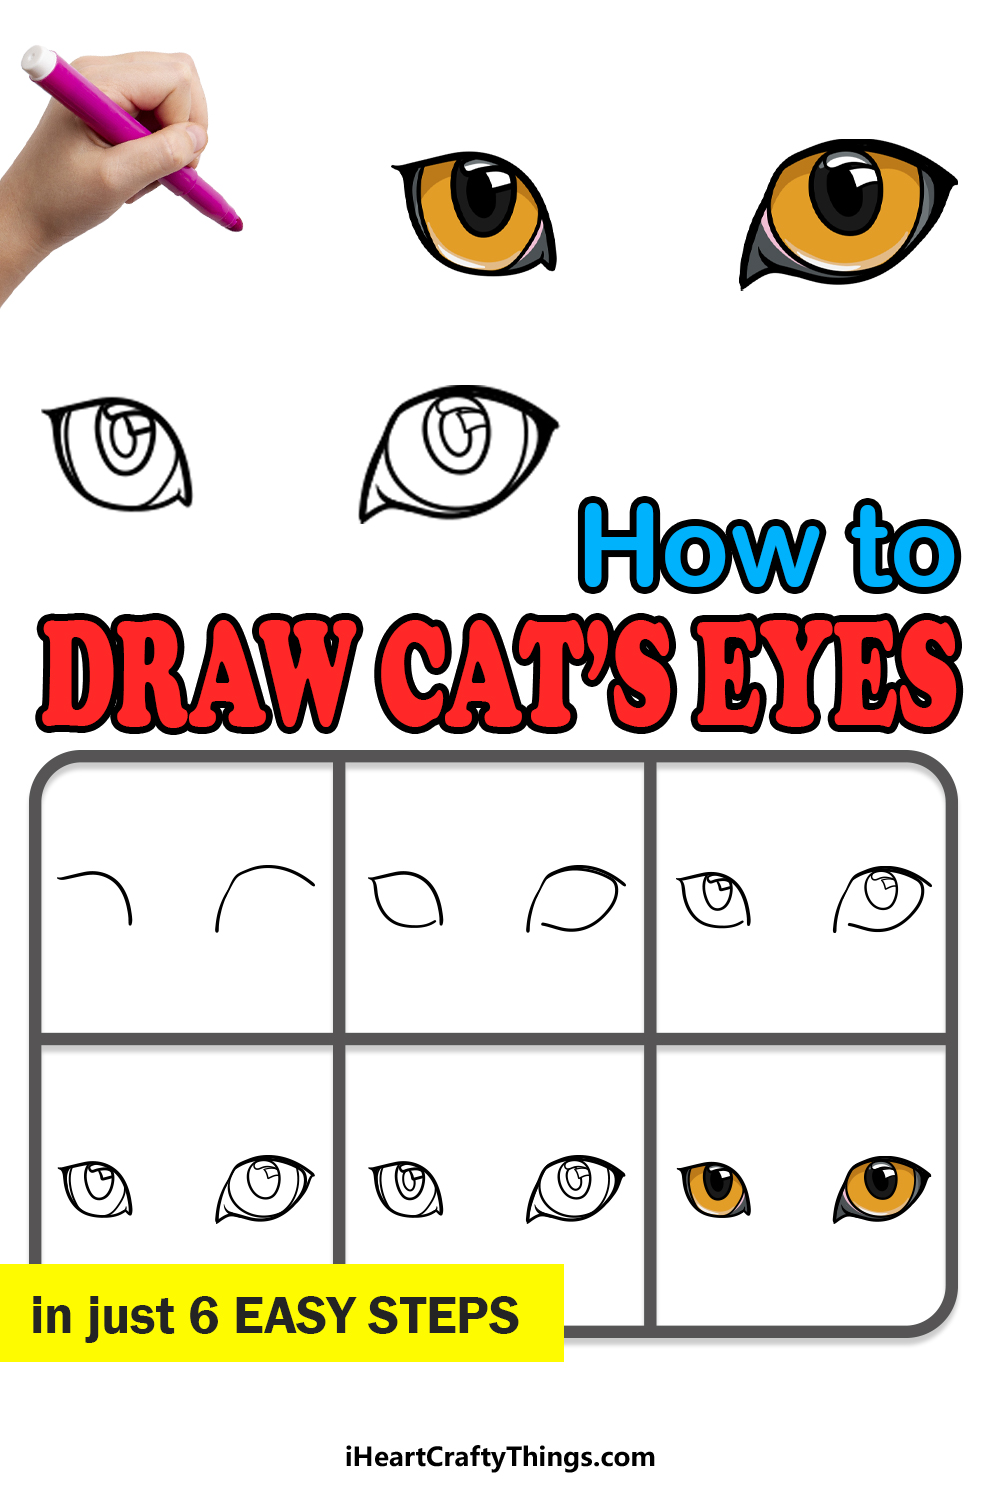
This step-by-step guide on how to draw cat eyes in 6 steps will show you how fun and easy it can be!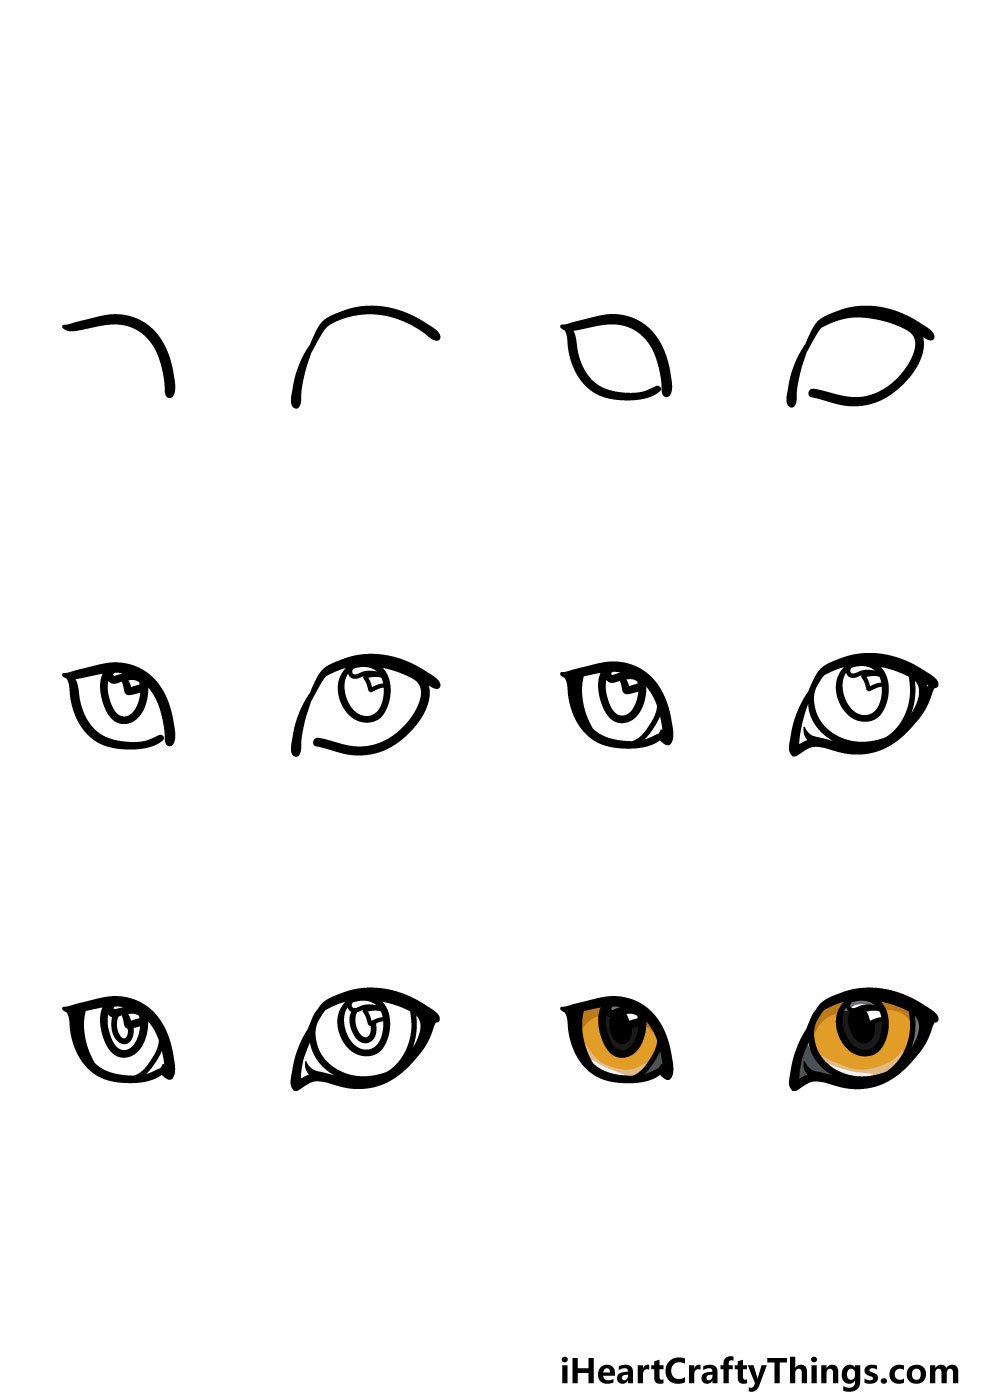
How to Draw Cat Eyes – Let’s Get Started!
Step 1

In this first step of our guide on how to draw cat eyes, we will begin with the top of the outlines for the eyes. To do this, you can simply draw two curved, rounded lines beside one another.
As you will see when we proceed further into the guide, these will be the start of the two eyes.
This is a very easy step in this guide, and once you have it looking as it does in our reference image you’re ready to move on to the next step.
Step 2 – Finish the outlines of the eyes
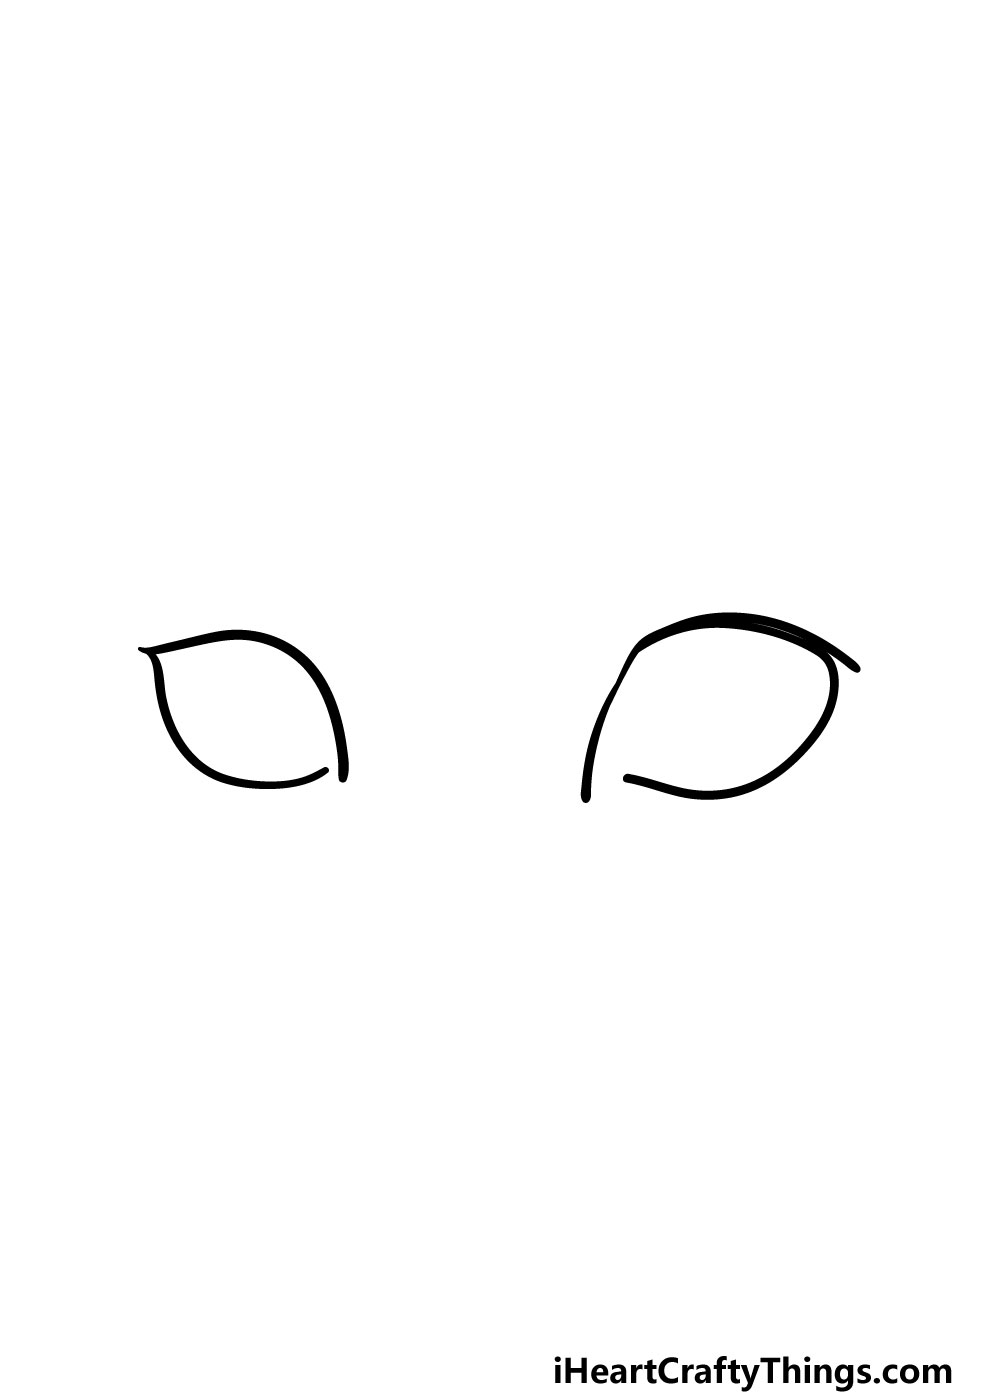
As we mentioned earlier in this guide, cats have a very distinctive eye shape, and we will finish that off in this step of your cat eyes drawing.
To do this, we will be adding some more curved lines underneath the ones that you drew in the previous step.
With all of these lines drawn, you should end up with two round shapes that have very pointy corners to them.
The eye on the right will also have a small gap at the lower left-hand corner, which we will be filling in later.
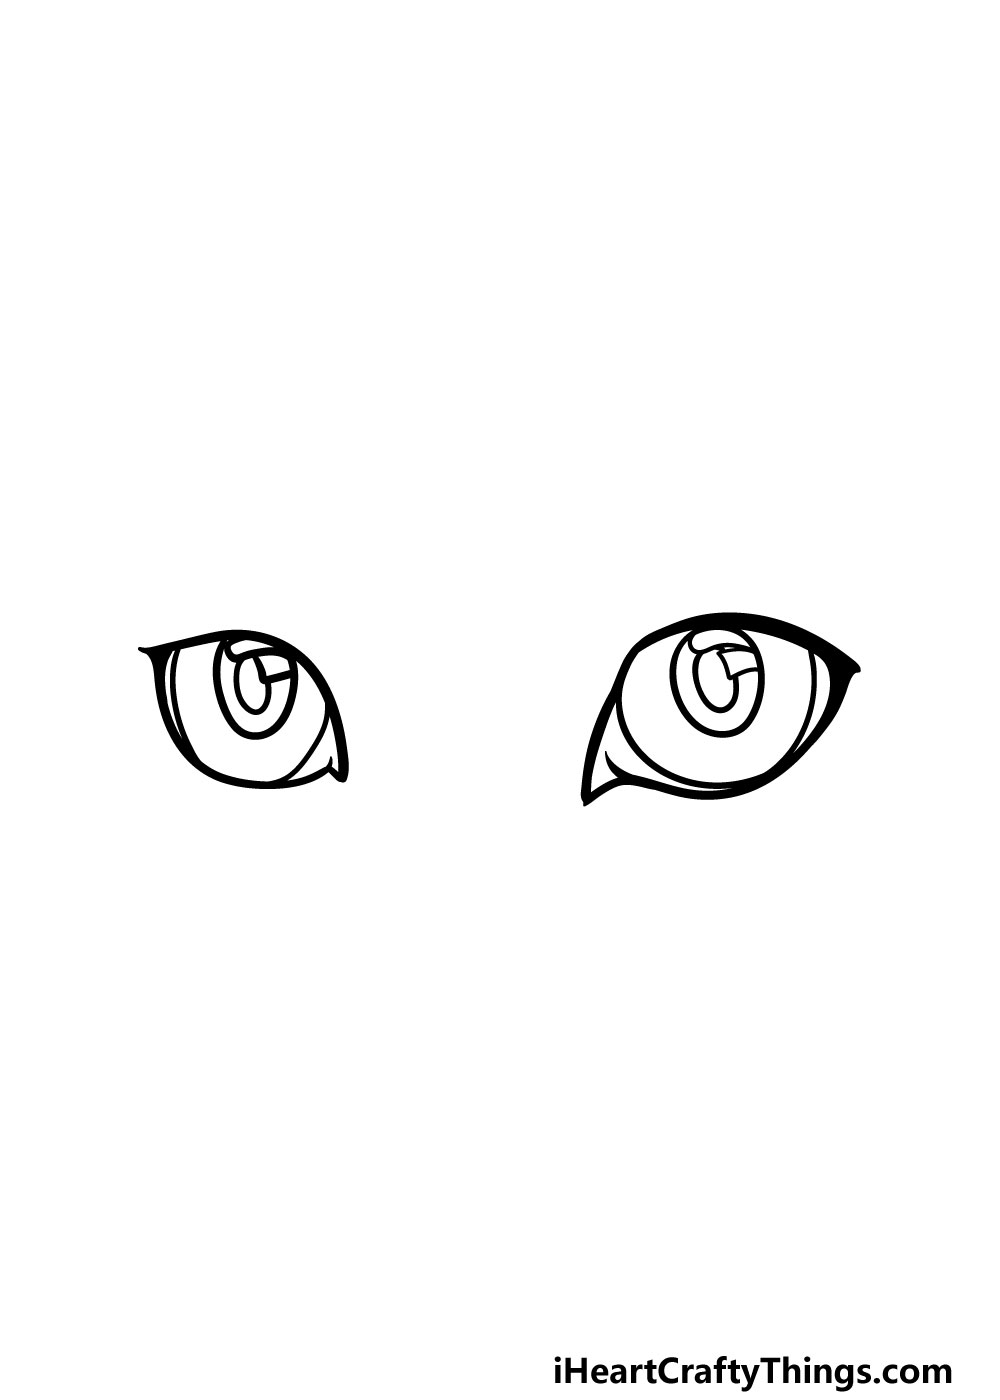
Step 3 – Next, you can draw the pupils for the eyes

We will leave the outlines of the eyes for now and focus on the pupils in this step of our guide on how to draw cat eyes. First, draw two medium-sized ovals inside the eye outlines.
These will be brushing the tops of the eyes. Then, we will be drawing two small square shapes into the eyes for some reflective glinting detail. That’s all you need to do for now, so it’s on to step 4!
Step 4 – Add some detail in this next step

In this fourth part of your cat eyes drawing, we will be adding some smaller details to the eyes. These details will be simple, but they will make a huge difference!
For the eye on the left, you will be adding some curved lines near the side edges of the eye. This will help to make the setting of the eye a bit more realistic.
Then, we will be adding similar lines to the right-hand eye. These will be similar, but they will be a bit thicker than they were for the left one. It will also fill in that gap that you had on the left-hand corner of the right eye.
Be sure to follow the reference image closely as you draw, as it will help you with positioning the lines correctly!
With these lines drawn, we have just a few more final details to add before you finish off with some amazing colors.
Step 5 – Now, you can add some final details to your cat eyes drawing
In this step of our guide on how to draw cat eyes, we will be adding some final details before moving on to the final step.
You will also have a chance to do any additions or extra elements that you may want for it, but first we will focus on those other details.
First, we will add some more small ovals to the insides of the eyes for some more pupil details. Then, we will color in any of the small spaces left in the outlines of the eyes.
That will do it for the details in this guide, but as mentioned you can also add some details of your own! There are many ways that you could go about this, and you can really let your creativity shine through.
You could draw the rest of the cat’s face for one idea, or you could incorporate it into an eye-themed background. These are just two ideas out of an infinite amount, and we can’t wait to see what you decide to do!
Step 6 – Finish off your cat eyes drawing with some color
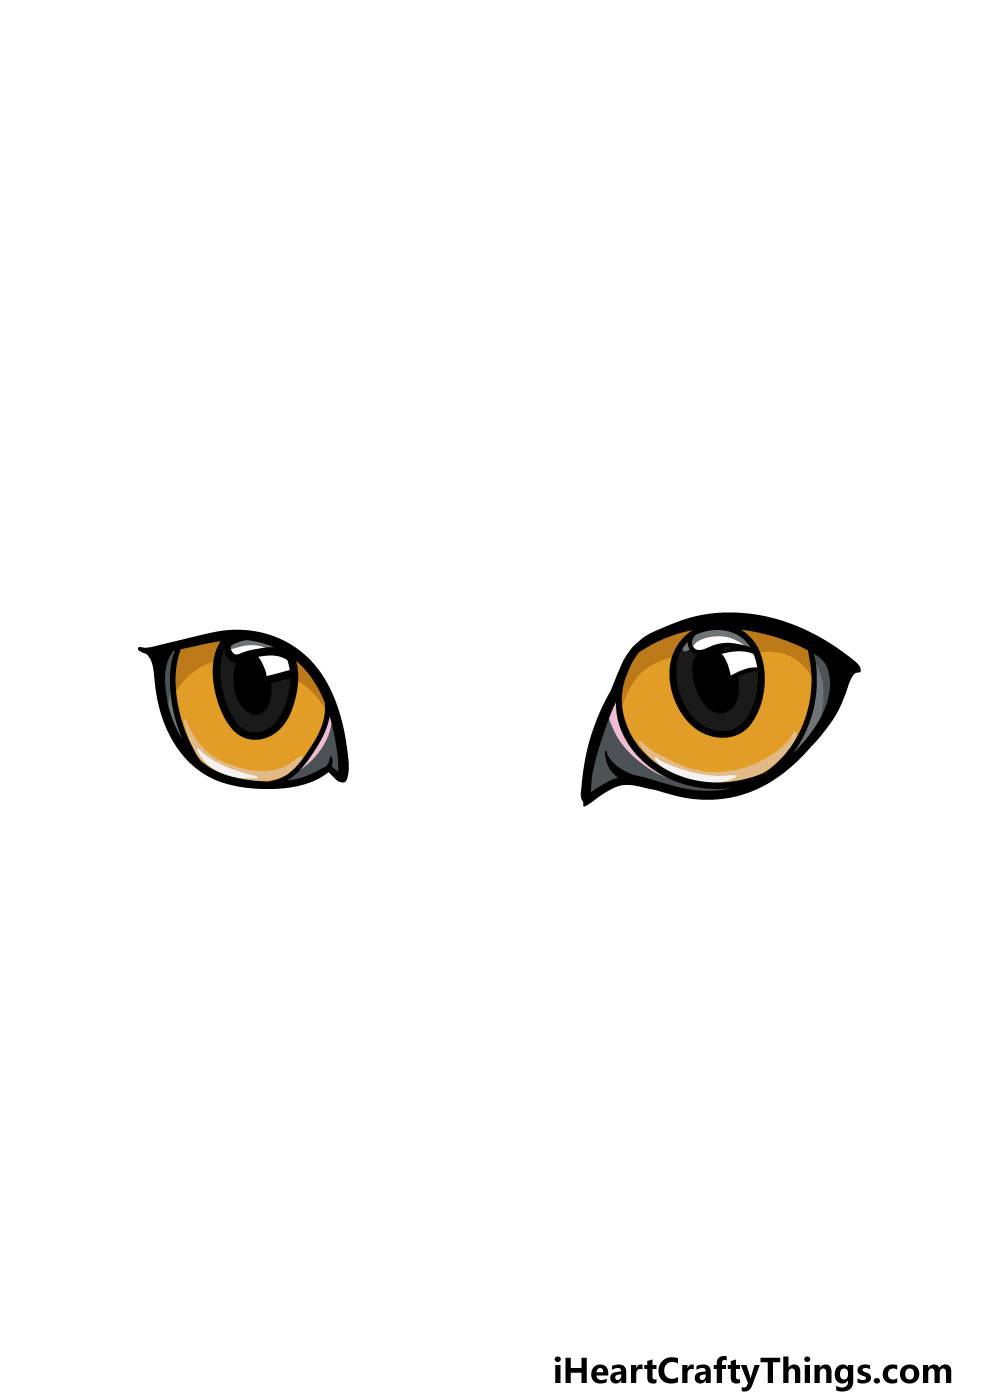
This is the sixth and final step of your cat eyes drawing, and this is the one where you get to have lots of fun adding some colors to your amazing picture!
In our reference image, we went with some yellow, grey and black for the eyes with a hint of pink for the edges. That is what we went for, but you should feel free to get creative and let your imagination run wild!
You could incorporate any of your favorite colors and shades, and then when you know what colors you would like you can choose what art mediums you will use to add them.
Whether you go with some nice bright art mediums or keep it more subtle for a more muted look, we know it will look amazing and we can’t wait to see!
4 More Ways To Make Your Cat Eyes Drawing Unique
Check out some fun tips to make your cat eyes sketch even greater!
One way that you can make this cat eyes drawing even more unique is by adding some smaller details to the eyes. These could be subtle, such as having them looking to the side a bit.
If you wanted to try out something more intricate, you could show something reflected in the eyes.
This would be a great way to show what this cat may be looking at!
What are some other small details you could add on and around the eyes?
A cat’s eyes are known to be quite bright, and you can often see them shining in the dark. You could show this aspect in your drawing of cat eyes by using colors and the surrounding background.
For the eyes, you may want to use bright and luminous mediums such as colored pens and markers to make the colors pop. then, you could emphasize it even further by making the background really dark.
That would make it look like the eyes are shining in the darkness, and it would create a stunning effect.
If you don’t want to obscure the cat in shadow, there are other things you can try. For instance, you could add the rest of the cat’s face to this cat eyes sketch.
If you have a cat at home, then you could use them to help you as you draw more of the face. Otherwise you will certainly find many pictures of cats online to use as reference.
Leading on from the previous tip, you could also add to this cat eyes drawing by adding a background. Cats can find themselves in all sorts of places, so you could create any background setting you like!
It could be a cozy house scene, or the cat could be exploring somewhere outside. There are so many options, and you could add all sorts of extras and objects for it to interact with.
What are some background ideas you have?
Your Cat Eyes Drawing is Complete!
With the final details and colors added, that means that you have finished this guide on how to draw cat eyes.
We hope that this guide was really helpful for you to use, and we also hope that it was lots of fun for you to work through as well!
Now you can keep this drawing going by adding your own details and elements. We mentioned a few ideas like drawing a background or adding the rest of the face, but what else can you think of?
Our website is the place to be when you want some more drawing fun! Be sure to check in often as we upload new guides all the time.
Once your cat eyes drawing is finished and colored, you can show us your artwork on our Facebook and Pinterest pages for us to enjoy. We can’t wait to see how you finished off this wonderful picture!