• HOME
  • ABOUT
  • TERMS
  • PRIVACY POLICY
    • Facebook
    • Instagram
    • Pinterest
    • Twitter
    • YouTube

I Heart Crafty Things

  • KIDS CRAFTS
    • ANIMALS
    • OCEAN CRAFTS
    • INSECTS
    • BIRDS
    • PAPER PLATE CRAFTS
    • CUPCAKE LINER CRAFTS
    • BOOK INSPIRED CRAFTS
  • HOLIDAYS
    • VALENTINE’S DAY
    • GROUNDHOG DAY
    • ST. PATRICK’S DAY
    • EASTER
    • EARTH DAY
    • MOTHER’S DAY
    • FATHER’S DAY
    • FOURTH OF JULY
    • BACK TO SCHOOL
    • HALLOWEEN
    • THANKSGIVING
    • CHRISTMAS
  • SEASONAL
    • WINTER
    • SPRING
    • SUMMER
    • FALL
  • Kids Activities
    • FINE MOTOR ACTIVITIES
    • SENSORY ACTIVITIES
    • PRESCHOOL GAMES
  • Shop

November 22, 2016

Easy DIY Christmas Photo Ornaments

  • Share
  • Tweet

This is a sponsored post written by me on behalf of Elmer’s. As always, all opinions are my own. We hope you add these colorful DIY Christmas Photo Ornaments to your crafting projects this holiday season.

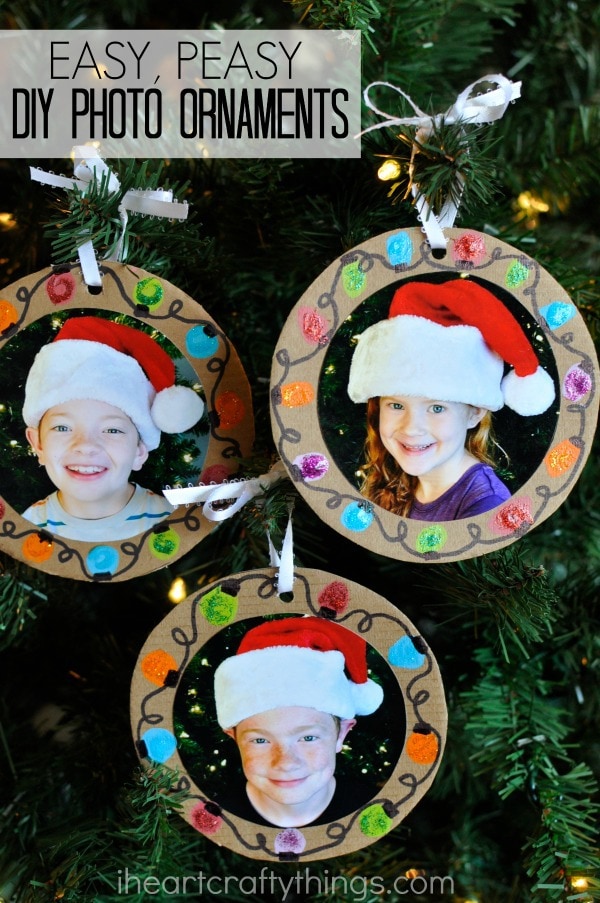
Are you looking for an easy gift for your kids to make for mom, dad or grandparents this year? We have the perfect solution!

Whether you make these DIY Christmas Photo Ornaments at home to give to grandparents, or in the classroom for a special present for Mom, they are sure to be a big hit. With the help of Elmer’s products, they a super simple to make too which is a huge plus!

diy-photo-ornaments-4

How to Make Easy DIY Christmas Photo Ornaments


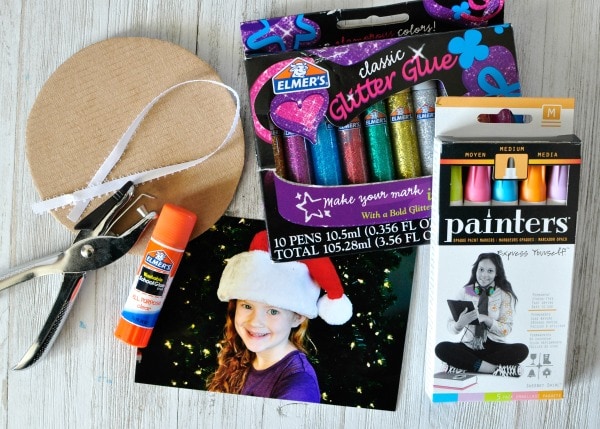
Supplies Needed to Make this DIY Photo Ornaments

4” x 6” printed photo (A photo of your child in a Santa Hat is extra festive!)
– cardboard
– hole punch
– Elmer’s School Glue Stick
– Elmer’s Sherbet Swirl Paint Markers
– Elmer’s Glitter Glue Pens
– black permanent marker
– circles for tracing (we used a wide mouth mason jar lid and a small bowl)
– ribbon
– scissors

diy-photo-ornaments-8

Instructions for Making these DIY Christmas Photo Ornaments

1. Gather your supplies. Cut a 5-inch diameter circle from your cardboard and cut your photo out into a 3 ½-inch circle. We used a small bowl to trace our cardboard circle and a wide-mouth mason jar lid to trace the circle for our photo.
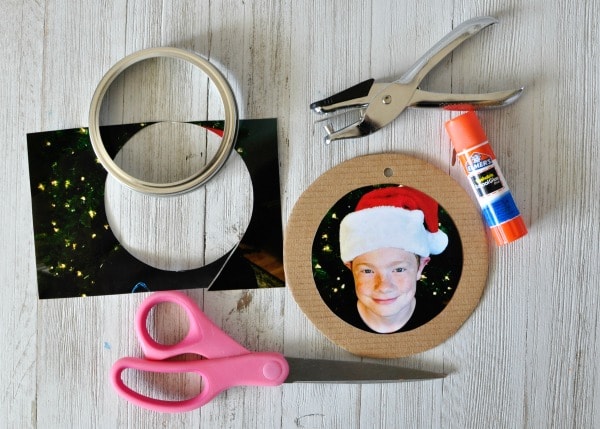
diy-photo-ornaments-9

2. Use your Elmer’s Glue Stick to glue your picture onto the middle of your cardboard circle. Punch a hole in the top of your ornament with your hole punch.
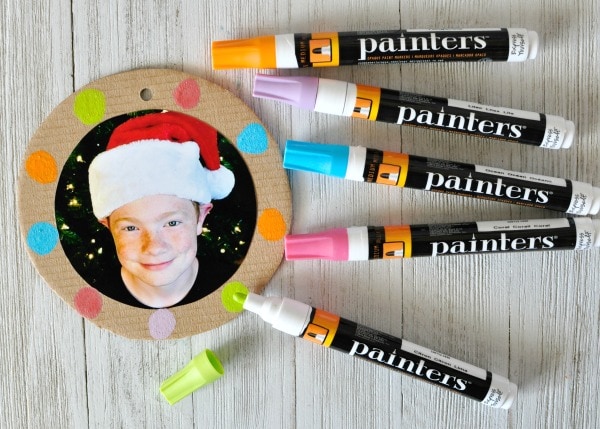
diy-photo-ornaments-10

3. Get out your Elmer’s Painters Markers and use them to draw colorful Christmas light circles on the cardboard around your photo. These markers are great because they dry quickly so there isn’t a lot of waiting time between steps.

4. Draw a small black rectangle at one end of each of your Christmas lights with a black permanent marker and then connect the lights together with squiggly black lines.
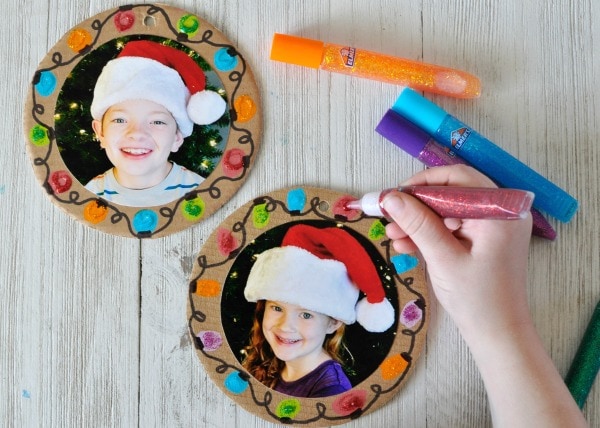
diy-photo-ornaments-12

5. Now use your Elmer’s Glitter Glue Pens to add a bold, glittery pop to the Christmas lights. We coordinated our glitter glue colors with the colors of our paint markers.
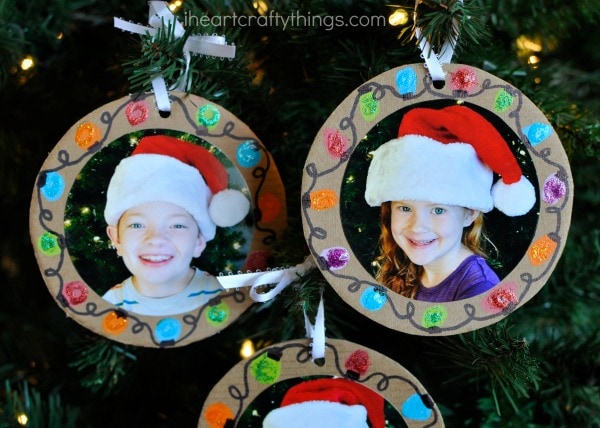
diy-photo-ornaments-2

6. Once your glitter glue dries, cut a piece of ribbon, thread it through the hole at the top of your ornament and tie a knot or bow to make a loop for hanging the ornament.

diy-photo-ornaments-5

The sparkly Christmas lights on the photo ornament mixed with the glowing lights on the Christmas tree adds such a fun pop of color.

For more fun Christmas craft ideas, visit Elmer’s and sign up for their newsletter. Make sure to check them out on Facebook, Twitter, Instagram and Pinterest too.

diy-photo-ornaments-7

MORE FUN CRAFTS MADE WITH ELMER’S GLUE:

Santa Beard Christmas Countdown Craft
Newspaper Birch Tree Winter Art
Butterfly Valentine’s Day Mailbox
Puffy Paint Leprechaun Craft

diy-photo-ornaments

  • Share
  • Tweet

Related Posts

  • DIY Christmas Picture Frames

    I am sooooo excited to be participating in The 13 Crafts of Christmas over at…

  • Grab our free template and wish someone a warm and cozy Christmas by making this DIY Cactus Christmas card. Cute homemade Christmas card idea.
    DIY Cactus Christmas Card

    We created this DIY Cactus Christmas Card as a sponsored post for Oriental Trading. The full details,…

  • DIY Christmas Gift Bags

    So I have a couple Christmas presents for people this year that aren't really wrappable…

Filed Under: Holidays 2 Comments

« Coffee Filter, Straws and Pasta Snowflake Craft
Yarn Wrapped Blue Jay Craft »

Comments

  1. Ligita says

    December 4, 2016 at 3:32 PM

    Very beautiful crafts.

    Reply
  2. Tracy says

    December 21, 2017 at 4:15 PM

    I love crafts I Bo them all the time

    Reply

Leave a Reply Cancel reply

Your email address will not be published. Required fields are marked *

This site uses Akismet to reduce spam. Learn how your comment data is processed.

POPULAR THIS WEEK

  • Two Valentine paper gnome crafts laying side by side on a pink background with heart stickers scattered around. Valentine Gnome Craft
  • The Winter months are a great time to learn about Arctic and Antarctic Animals and there are so many fabulous children's books to accompany learning about them. Here is a round up of awesome Arctic and Antarctic Animal Crafts for Kids. Best Winter Animal Crafts for Kids

I Heart Crafty Things is a participant in the Amazon Services LLC Associates Program, an affiliate advertising program designed to provide a means for sites to earn advertising fees by advertising and linking to amazon.com.

Copyright I HEART CRAFTY THINGS © 2021 · Website Design By Jumping Jax Designs