Are you looking for a simple and fun Christmas craft idea for kids to make this holiday season? If so, you are going to love this festive Christmas tree craft. In this post learn how to make this colorful Terracotta Christmas Tree craft with our helpful template, step-by-step tutorial and video.
These cute terracotta Christmas trees would also make a great gift for kids to make for parents or grandparents at school or at home. You could also use them as a simple table centerpiece for an upcoming Christmas party this holiday season.

This post contains affiliate links to the products mentioned. I Heart Crafty Things is a participant in the Amazon Services LLC Associates Program, an affiliate advertising program designed to provide a means for sites to earn advertising fees by advertising and linking to amazon.com.
Supplies needed:
- Christmas tree template <—– Get the TEMPLATE HERE
- green cardstock
- small terracotta pots
- red and white paint
- paintbrush
- pencil
- white ribbon
- kraft brown paper straws
- star stickers
- small acrylic craft jewels
- glue stick
- glue dots
- scissors
- peppermint candy
Instructions:
1. Paint your pots
Begin by painting the outside of your small terracotta pots with red paint (or green paint). Let the paint dry.
2. Stamp pot with white polkadot
When the paint has finished drying dip the end of a pencil in white paint and then stamp it onto your terracotta pot to make a polkadot. Continue dipping the pencil eraser in white paint and stamping it all around the pot to create polkadots.
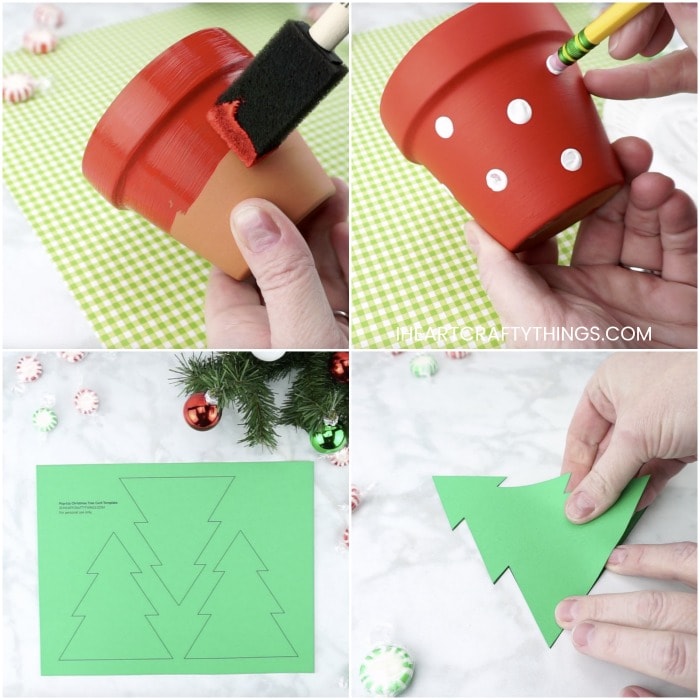
3. Print & cut out template
Download and print out the Christmas tree template on green cardstock. You can also this template to make our 3D Christmas Cards. For this project you’ll need to cut out two of the Christmas trees on the template for each terracotta pot Christmas tree craft.
4. Glue two trees together
Add glue to the edges of one of the Christmas trees, leaving a spot open at the bottom of the tree in the middle. Then line up and place the other tree on top of the glue.
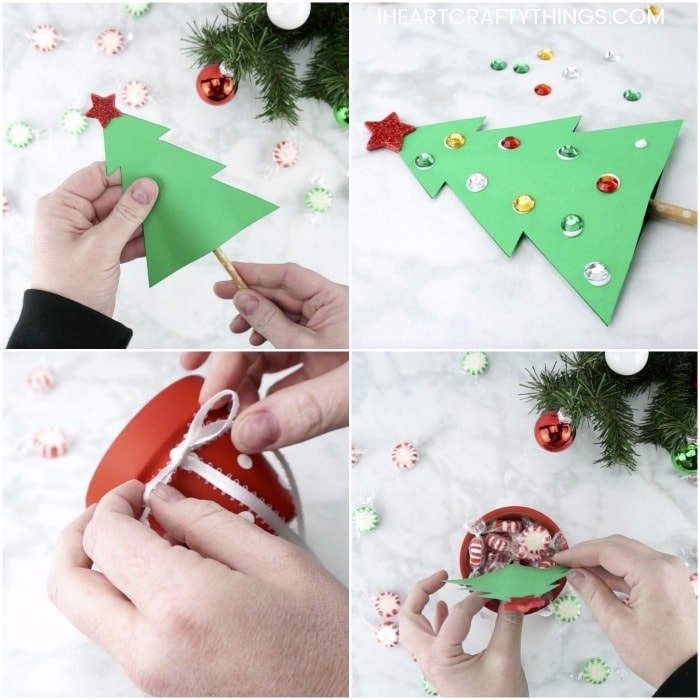
5. Glue star to the tree
Peel the backing off one of your star stickers and place it at the top of your Christmas tree. Turn it over and place the other star sticker on the back of the tree, lining it up with the other star sticker.
6. Add straw between trees
Place your brown paper straw in the opening at the bottom of the Christmas tree.
7. Decorate with acrylic jewels
Add dots of glue around the Christmas tree and then place small acrylic jewels on the tree.

8. Wrap ribbon around pot
Wrap your white ribbon around your terracotta pot and tie it into a bow at the front of the pot. You might need to add some hot glue to help hold your ribbon in place in the front and back of the pot.
9. Place tree in a pot and cover with candies
Place your Christmas tree in the center of your terracotta pot. While holding the tree in the center of the pot, pour some peppermint candies into the pot, filling it to the top. After the pot is full of candies the Christmas tree should stand in place. If it moves around too much you can add some hot glue at the bottom of the pot to glue down the tree.

Your Terracotta Christmas Tree Craft is complete
These pretty trees are so festive and colorful for Christmas. They make great Christmas decorations and can also be used as gorgeous table centerpieces for a Christmas party.