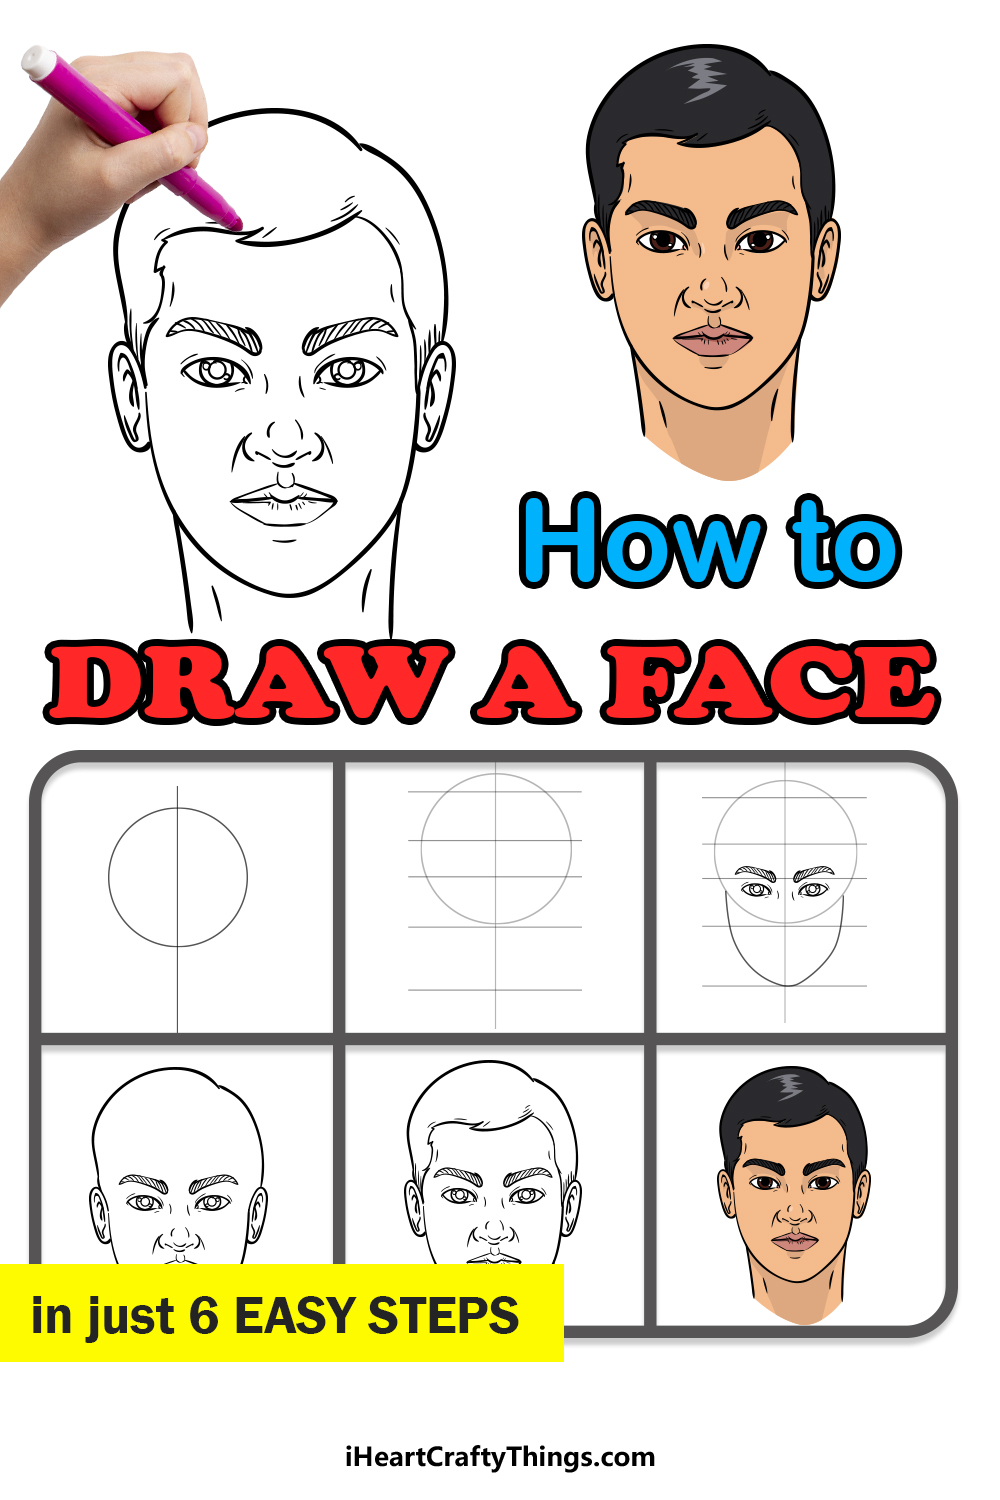
The human face is something we see every day, and our own face is probably the first one we see every morning!
Even with this constant exposure to many faces throughout the day, it can be surprisingly tricky to draw the human face when you try to.
Like any tricky task, however, it’s made so much easier when you break it down into manageable steps. Once you learn these steps, it can be really easy!
For this reason, we created this step-by-step guide on how to draw a face in 6 simple steps to help you learn how to overcome this drawing challenge!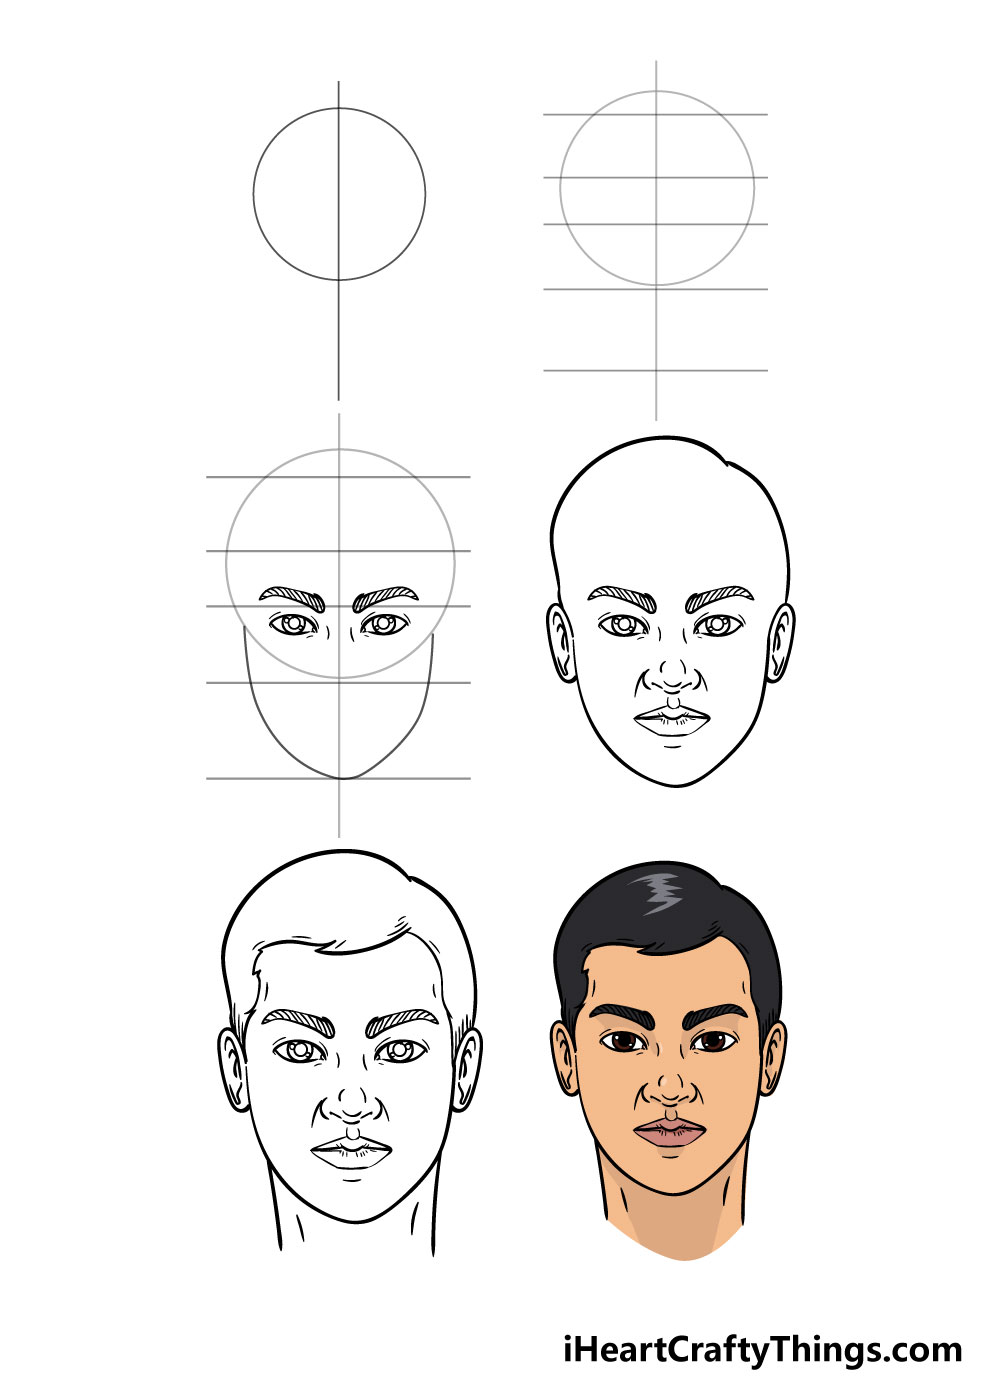
How to Draw a Face – Let’s get Started!
Step 1
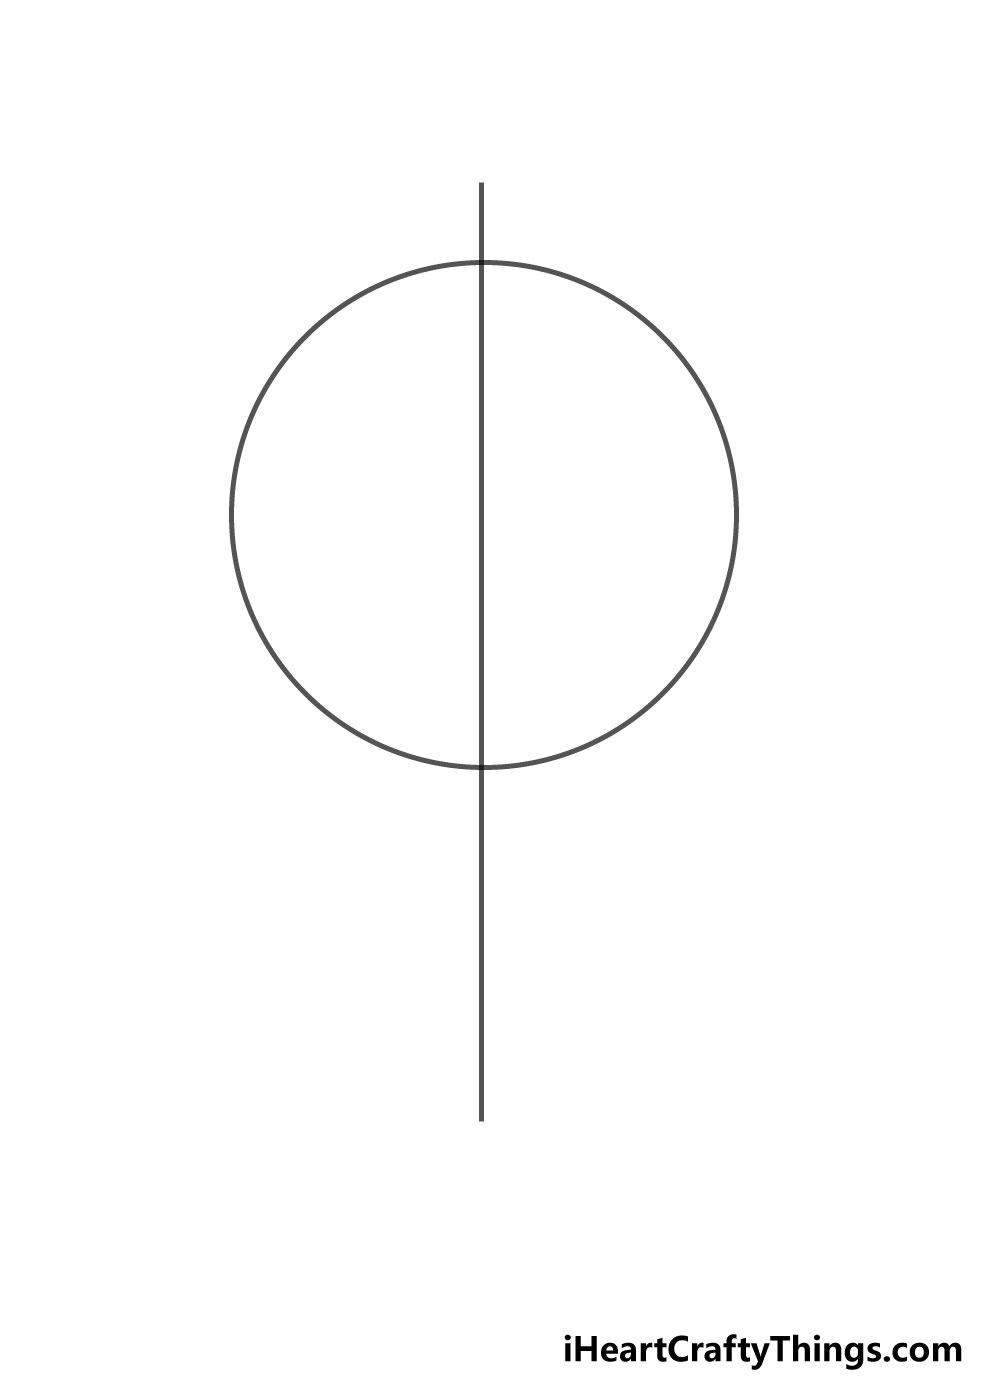
When learning how to draw a face, the best thing you can do to get started is by drawing some simple shapes to guide you.
To get started, you should draw a circle in pencil. You can try to do it freehand, but if you want a perfect circle you can use a drawing tool like a compass.
You could also trace around something round, like the cap of a glue stick.
Once you have a circle, simply use your pencil to draw a line down the middle. The closer you can get it to the exact center, the better!
The line should extend a little bit out the top of the circle and about the same length as the circle below it. You can refer to the image we provided as a guide!
Step 2 – Draw in some more guiding lines
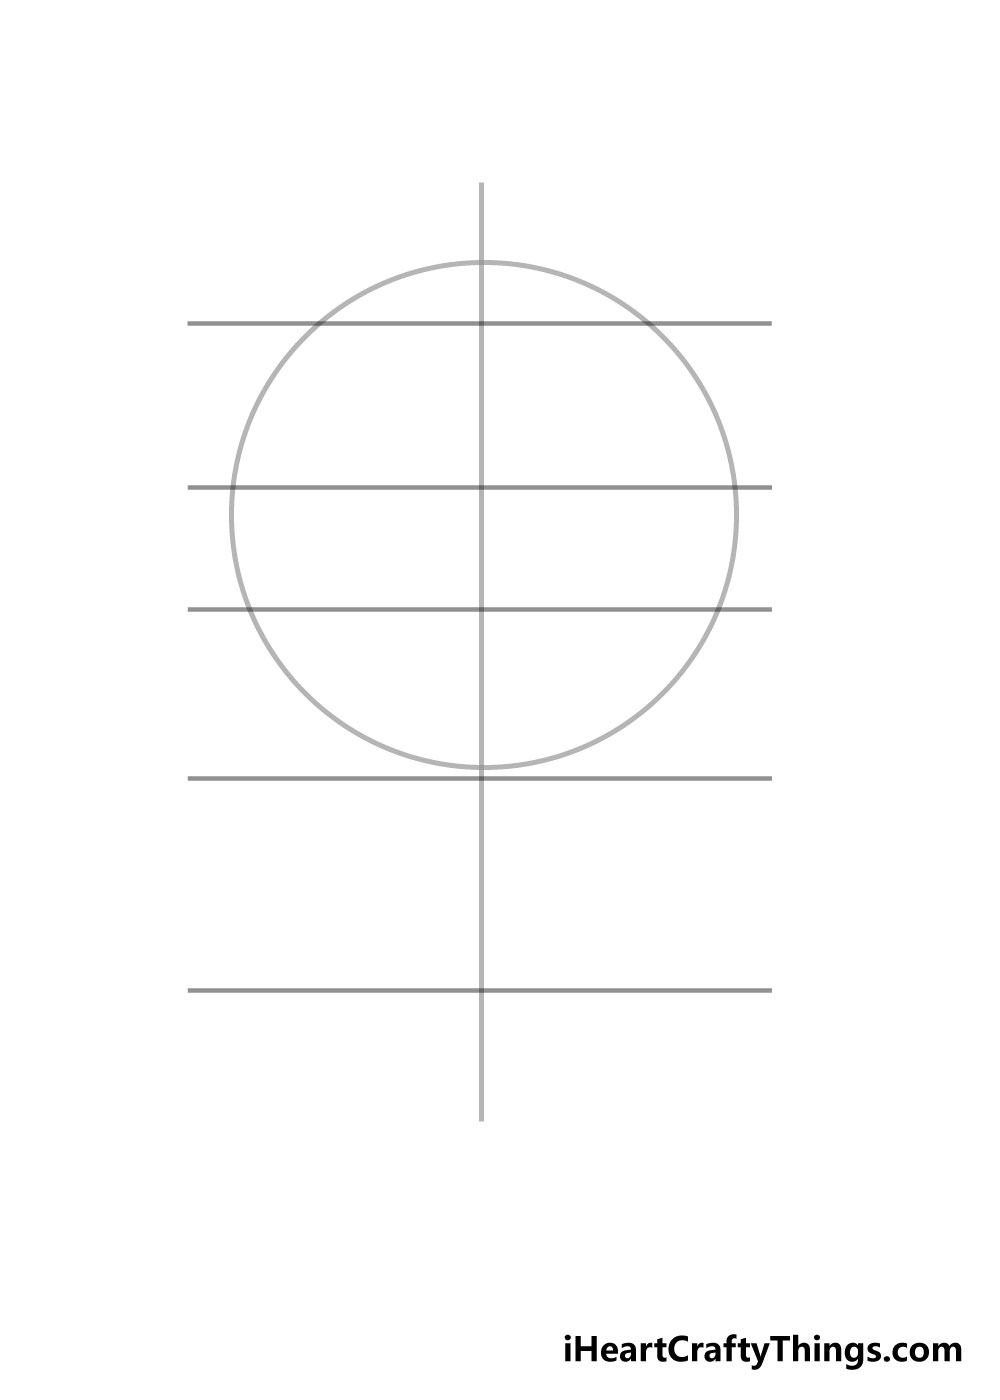
For this second step, we will be adding some more guide lines to the planning for our face drawing.
We will be adding five vertical lines in pencil, and they should all be the same length so using a ruler would be ideal for this step.
You can use the reference image we provided to tell how far they should be spaced from each other, as the spacing will be important when we start to add in more facial details.
Step 3 – Next, draw in the eyes and jaw
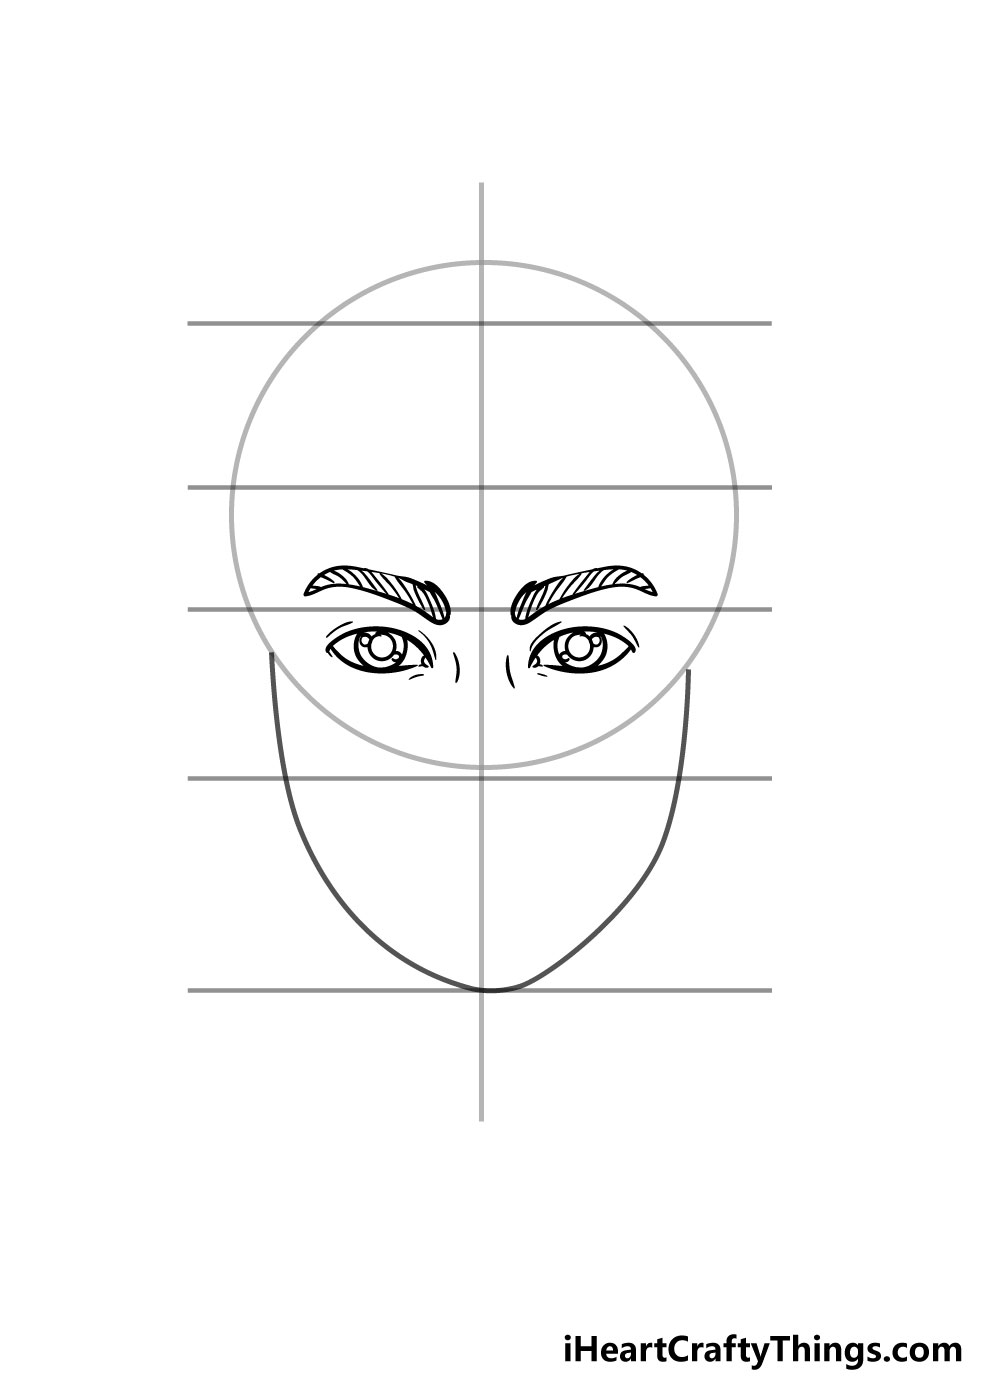
Using the lines we’ve drawn out in pencil, we can now start on the actual face drawing. First, draw a slightly curved line from the bottom of the circle right under the third line down.
It should curve down and meet at the central vertical line and the final horizontal one. Next, draw in an identical line on the other side to finish off the jaw.
Don’t be shy to consult the reference image as much as you need! You could use a pen or a darker pencil for this step and each following one, as these details will be in the final drawing.
Next, you can draw in the eyes just under the third line with some eyebrows above it. If you struggle with drawing eyes, you could maybe use another drawing tutorial or use a photo of eyes at this angle as a reference.
Step 4 – Now draw in some face details
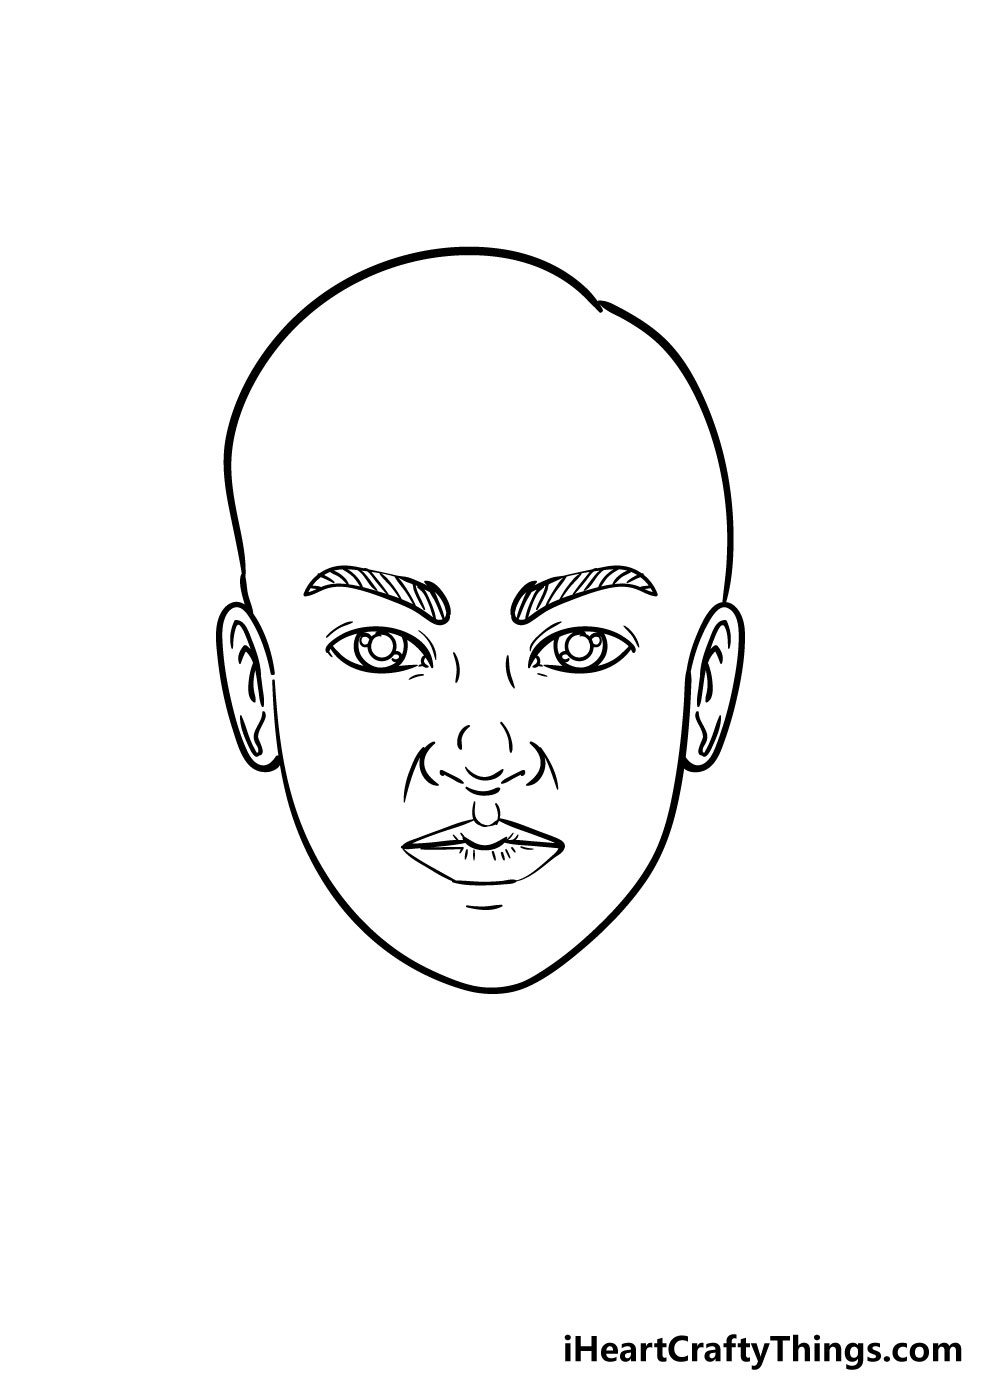
For step 4 in learning how to draw a face, you’ll start to add in more facial details.
You can draw in the ears, nose and mouth and position them on the guide lines as we show in the reference image.
Once again, you could use photos of these facial details if you need more references for drawing them!
Once you have these details in, use two curved lines from the top of the ears and meeting at the top as you can see in the picture.
Once you’re happy with these details, you can rub out the pencil guide lines and circle. Make sure that if you use a pen for the face that you let the ink dry before rubbing out the pencil!
Step 5 – Next you will be adding the hairline and neck
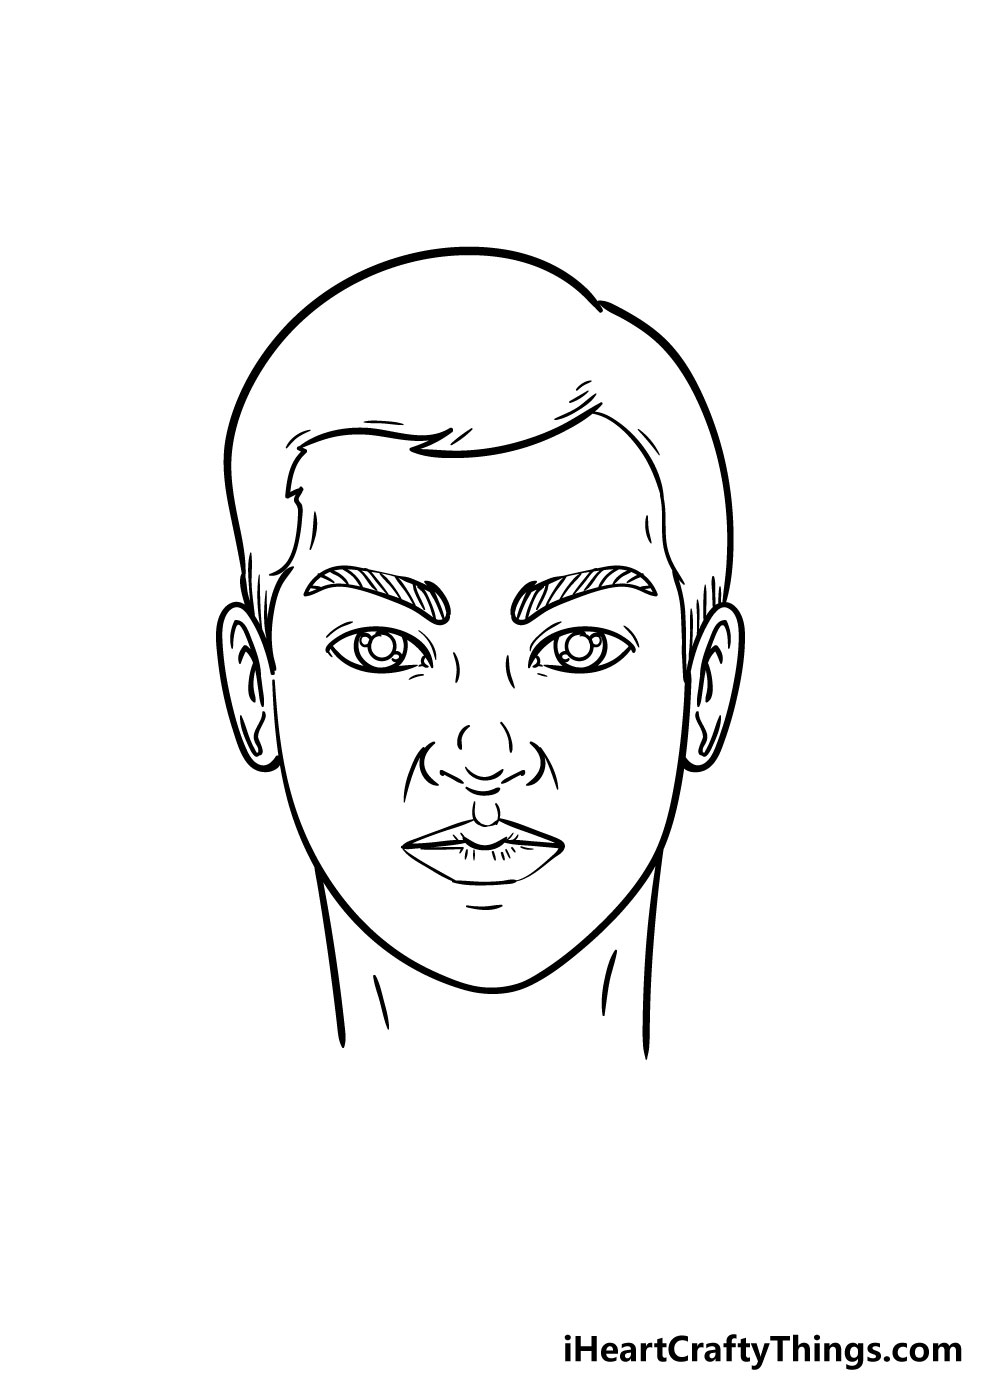
To finish off this guide on how to draw a face, we will be adding in the final details of your face drawing.
Simply add in the hairline as you see it in the reference image with some wavy lines. Lastly, add in two slightly curved from near the bottom of the jaw for the neck.
And with these final details, your face drawing is complete! Using the spatial guide lines and circle from the first few steps, you could change up the details to make this into anyone’s face!
You could use a photo of your own face or of a family member to make this face look like a real person using the steps you have learned in this guide.
Step 6 – Finish it off with some color
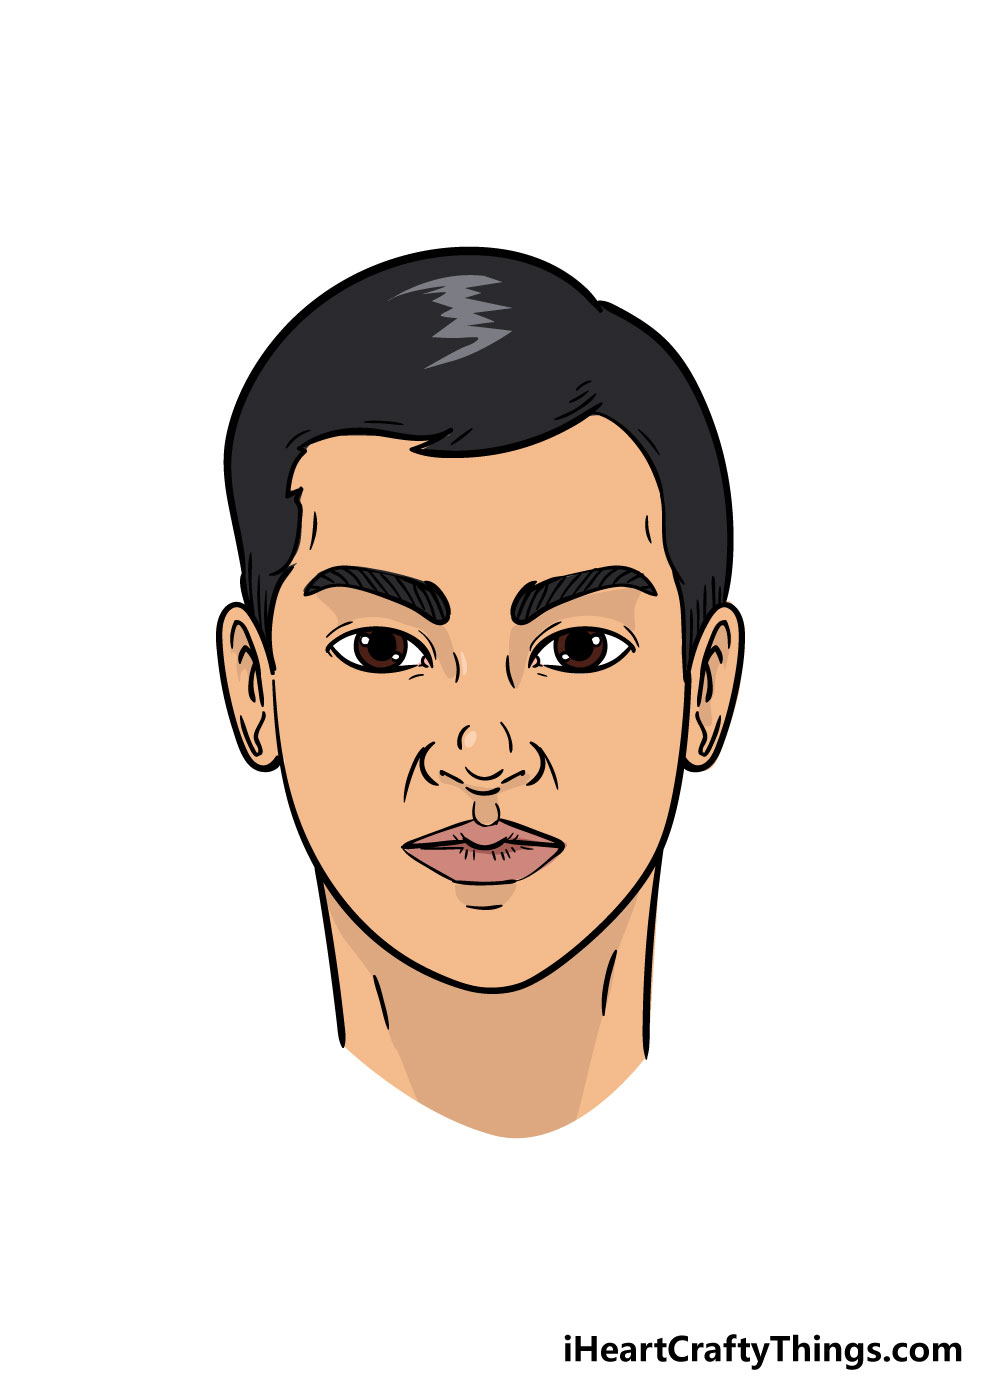
Once that is complete, all that remains is the coloring! You could use some really fun art mediums such as acrylic paints, watercolors or colored pens to give your face drawings some amazing colors.
You should really let your creativity flow in this step. You could use realistic facial colors, or you could also use your favorite bright colors for a colorful, more stylistic look to the face.
When you’ve added in the colors, your face drawing is finished and you’ve now learned how to draw a face!
4 More Ways To Make Your Face Drawing Unique
You’ll definitely want to check out these tips on making your face sketch even better!
This drawing of a face portrays a fairly neutral expression in order to make it easier to draw. Once you have the hang of it, you could draw a more unique expression.
To do this, you would be best off looking into a mirror while making different expressions. It could be a smile, a sad face or something wild and silly.
These are just a few examples, but what other expressions could you make for this face to make it more unique?
This face shows a generic character, but you could change some of the details to look more like someone else. For example, you could make the face look like your own!
This is another case where a mirror would be very helpful as you capture the details. You could also base it on a friend, family member or even a favorite celebrity.
Once you have mastered this drawing technique, you should be able to recreate anyone you like!
Next, you could also add some clothing and accessories to this face drawing. These could be rather small and simple or more drastic.
For some smaller examples, you could have nose or earrings on the character. Or, they could be wearing glasses or shades to change their look.
Makeup or tattoos would be examples of more drastic alterations to this character’s face. What are some other features you could use to change the look of this character?
Finally, if you want to challenge yourself even further, you could finish off this face sketch by adding more of the body it is attached to.
The focus is on the head and face here, but you could draw as much of the body as you like. Once again, we would recommend using a real person to help you as you draw.
It could just be the chest and arms, or you could portray the entirety of this character’s body if you preferred and have the page space.
Your Face Drawing is Complete!
We really hope that this guide we created on how to draw a face was fun and helpful for you while learning how to draw a face.
The key to drawing a face is learning about the spacing of each facial feature, and if you follow the steps in this guide you’ll learn this in no time!
Don’t forget that the face we drew in this guide is just an example, but you could use the same steps and guide shapes to draw in any face you like.
Using a front-facing photo can really help if you’re going to try this. You can extra fun by using different art tools, mediums and color variations for some stunning face drawings!
We’re going to be bringing out lots of fun and informative How To Draw guides in the future, so make sure to check in frequently for more awesome drawing tutorials!
Lastly, once you’ve drawn some amazing faces we hope that you will share your artworks to our Facebook and Pinterest pages for us to admire.
We always love to see your artistic creativity and can’t wait to see your face drawings!