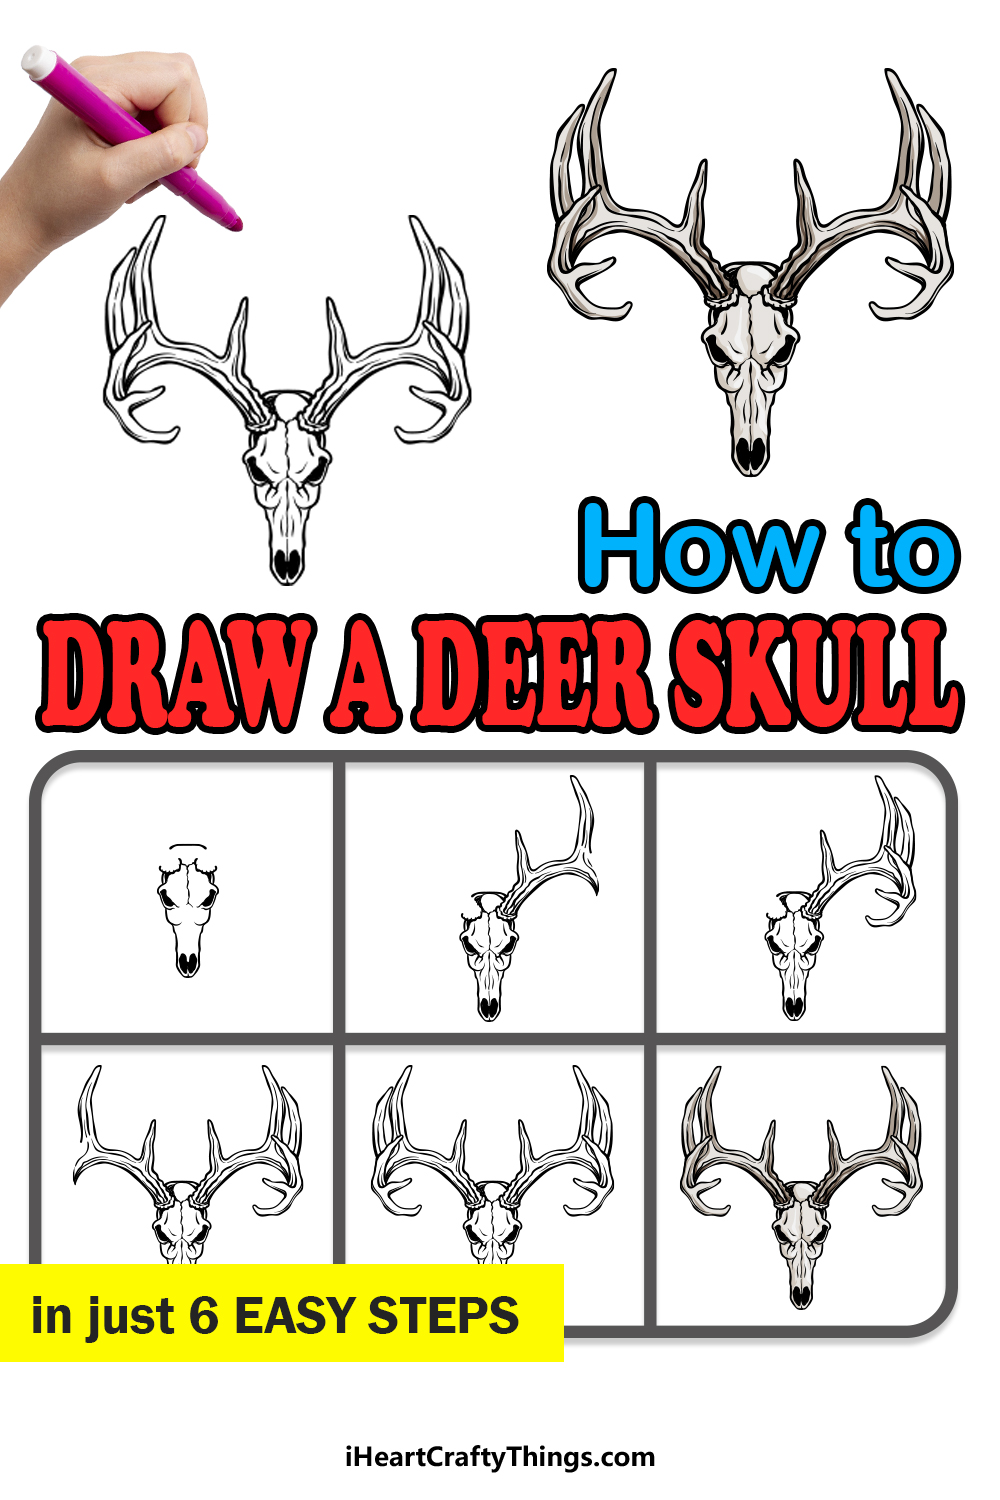
Deer are some of the most peaceful and non-threatening animals that you can find, so it’s interesting that their skulls can actually appear quite sinister and even a bit creepy.
Despite this, they can serve as a really cool fixture for a wall or as a trophy of a successful hunt. Their interesting design can also make it fun to sit down and learn how to draw a deer skull.
The unique design of these skulls can also make it a bit of a challenge, but this guide is here to help!
Our step-by-step guide on how to draw a deer skull will show you how to recreate this cool-looking skull in no time.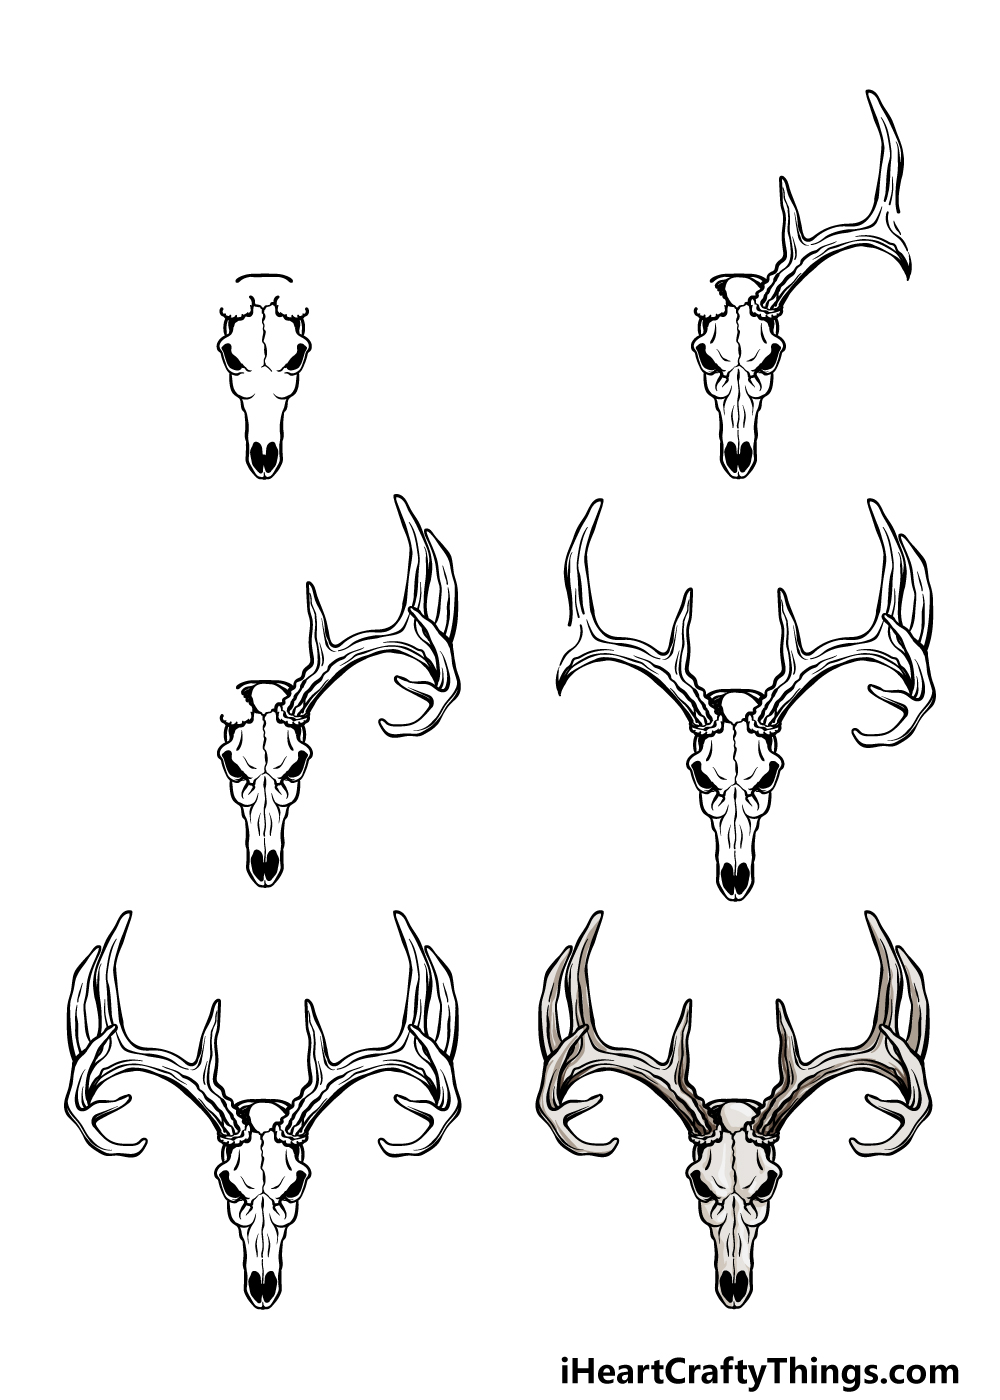
How to Draw A Deer Skull – Let’s Get Started!
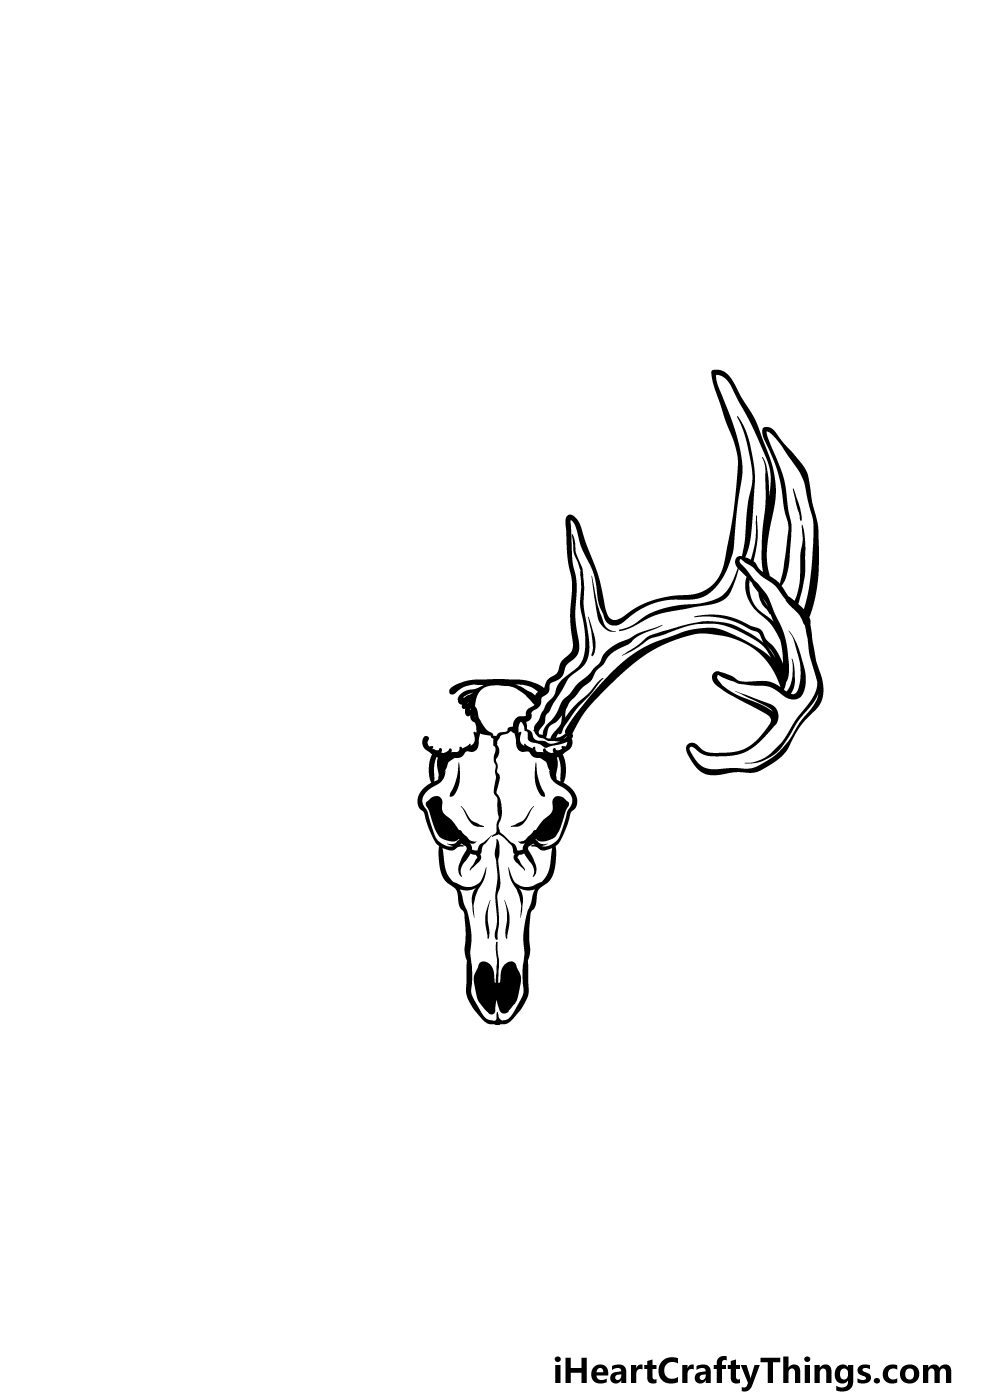
Step 1
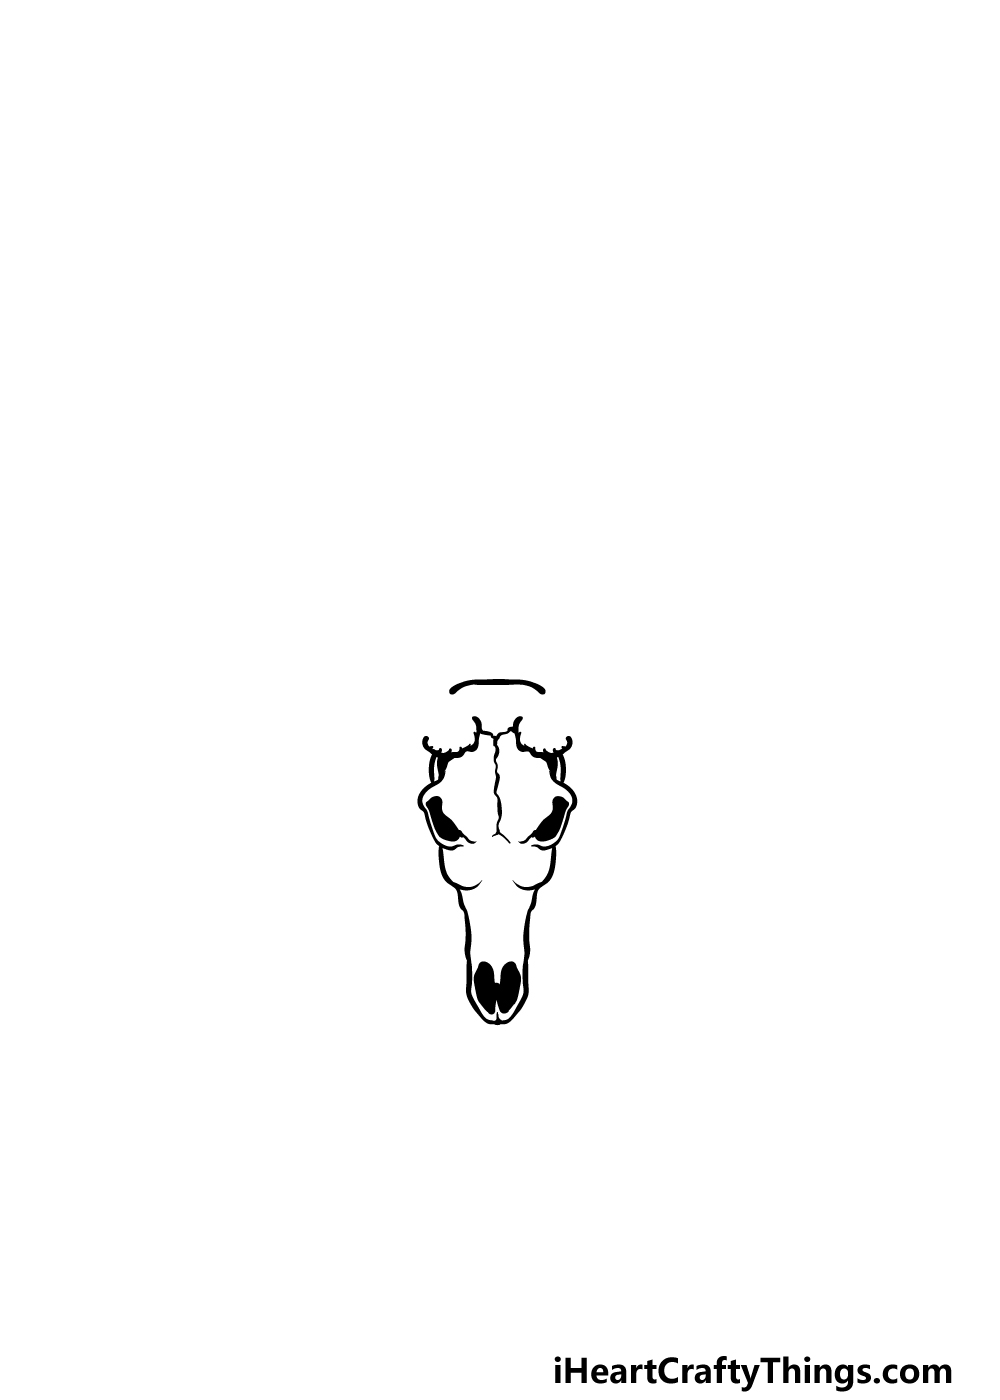
In this first step of our guide on how to draw a deer skull, we will be starting with the skull itself. You can start this with two black shapes that are angled a bit and have some lines extending into the interior of the skull.
Then, you can draw the mouth of the skull. This will extend down from some rounded lines for some cheekbones.
The mouth portion of the skull will be long and thin, and you can draw two rounded shapes connected to one another for the nostrils near the end of the mouth portion.
Finish off by drawing the top of the skull, and use two rounded lines for the base of the antlers that we will be drawing soon.
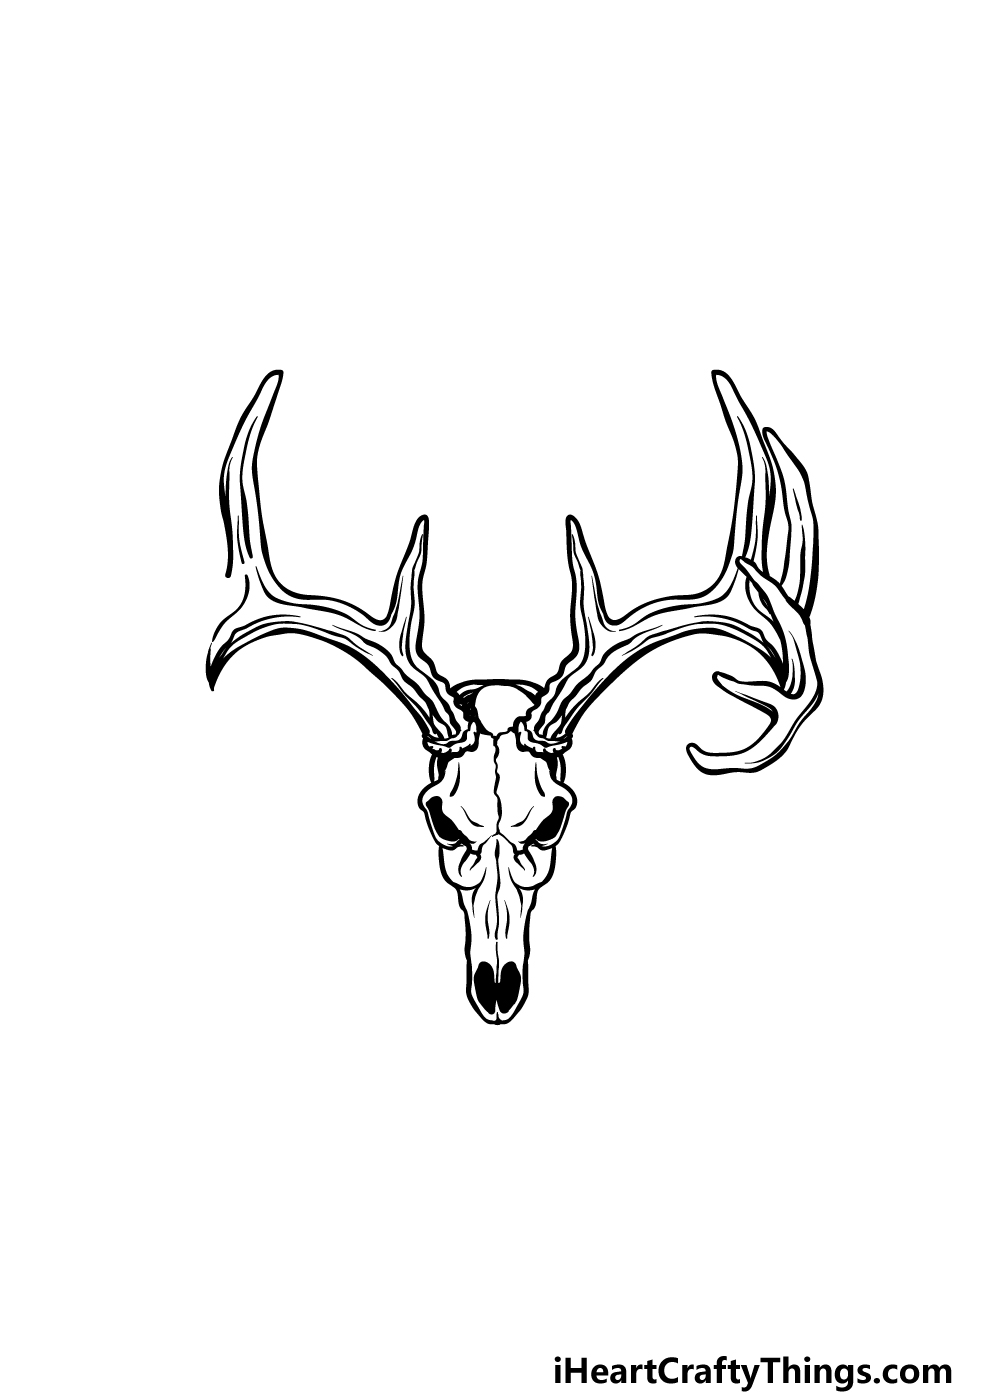
Step 2 – Next, start drawing the antlers and skull details
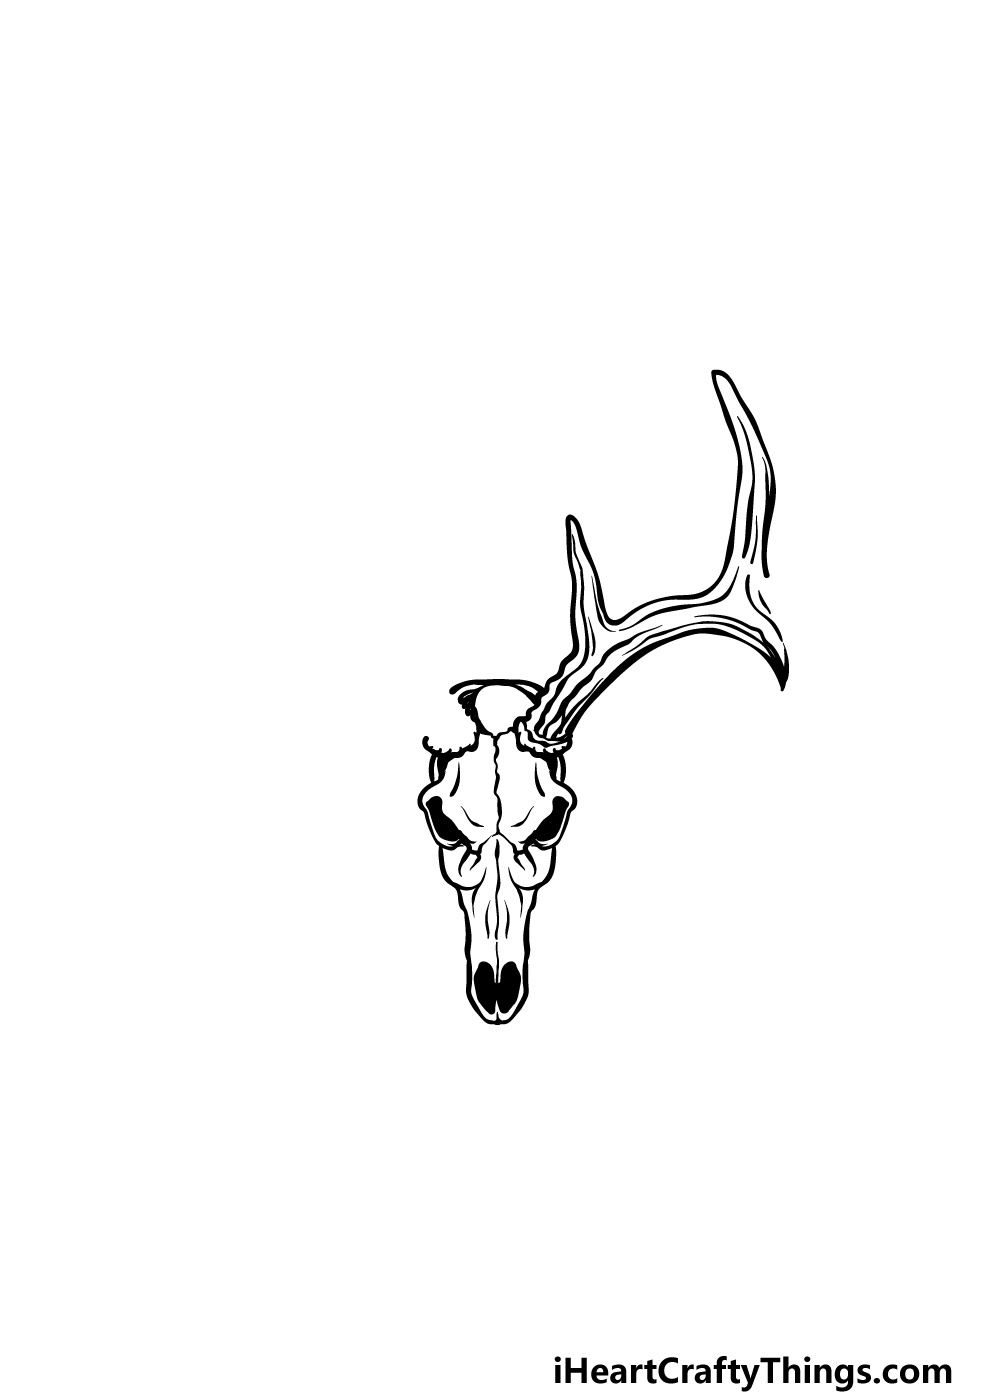
This picture wouldn’t be complete without some antlers, so we shall start drawing the first one in this part of your deer skull drawing.
For now, we will be drawing the antler on the right, and you can start it with some slightly bumpy lines coming up from the rounded line you drew for the base of the antler.
It will extend into a pointed protrusion, and then curve off into a larger protrusion further along.
Then, we will be adding a lot of line detailing to the antler to give it some texture. Finally for this step, you can also add some line detailing throughout the skull itself for some more texture there as well.
Step 3 – Finish off the first antler
The antler isn’t quite done yet, so we will be finishing it off in this step of our guide on how to draw a deer skull.
The antler will be curling in on itself, and will be extending inward towards the viewer.
To draw this section, we will be adding four more prongs onto the antler, and each one will extend inward towards the skull.
You can then finish off this new section of four prongs with some more line detailing before we continue on to step 4.
Step 4 – Next, start the second antler
The next few steps of your deer skull drawing will be basically replicating what you did in the previous 2 steps of the guide as you draw the second antler.
The second antler will be practically a mirror image of the first one, and the more symmetrical that you can make it the better.
This second antler will have the same two-prong protrusions as the first one did, and we will aim to make them the same size and proportion.
We will be leaving a similar space on the side of it as you did with the first antler, as this is where we will add the final prongs along with some last touches in the next step.
Step 5 – Finish off the antlers of your deer skull drawing
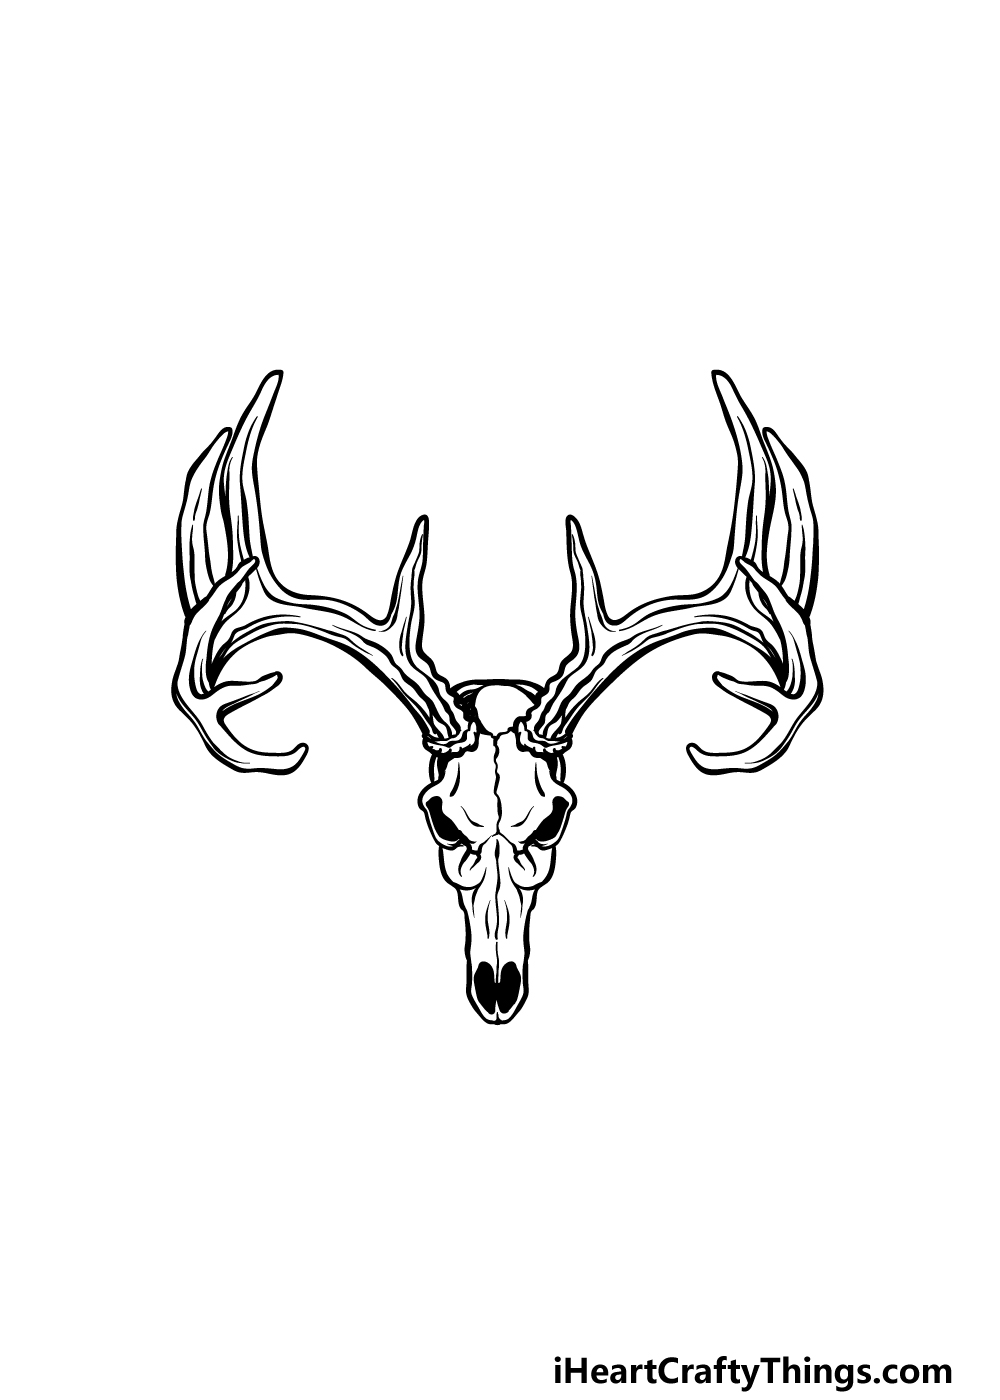
Much as you did with the first antler, we will be finishing off the second one with four more prongs in this step of our guide on how to draw a deer skull.
That means drawing these prongs moving inward on the antler, and then finishing off with some line detailing throughout the antler as a whole.
Once you have completed this second antler, you are ready for the final step! Before you move on, you can also add your own details and finishing touches.
There are lots of ideas that you could try to add your own touch to this drawing. One idea would be to draw a wooden plaque behind the skull in order to make it look like a trophy.
You could also look up a picture of a whole deer skeleton and then draw some more of the skeleton connected to the skull. What else can you think of to finish off this image?
Step 6 – Finish off your deer skull drawing with some color
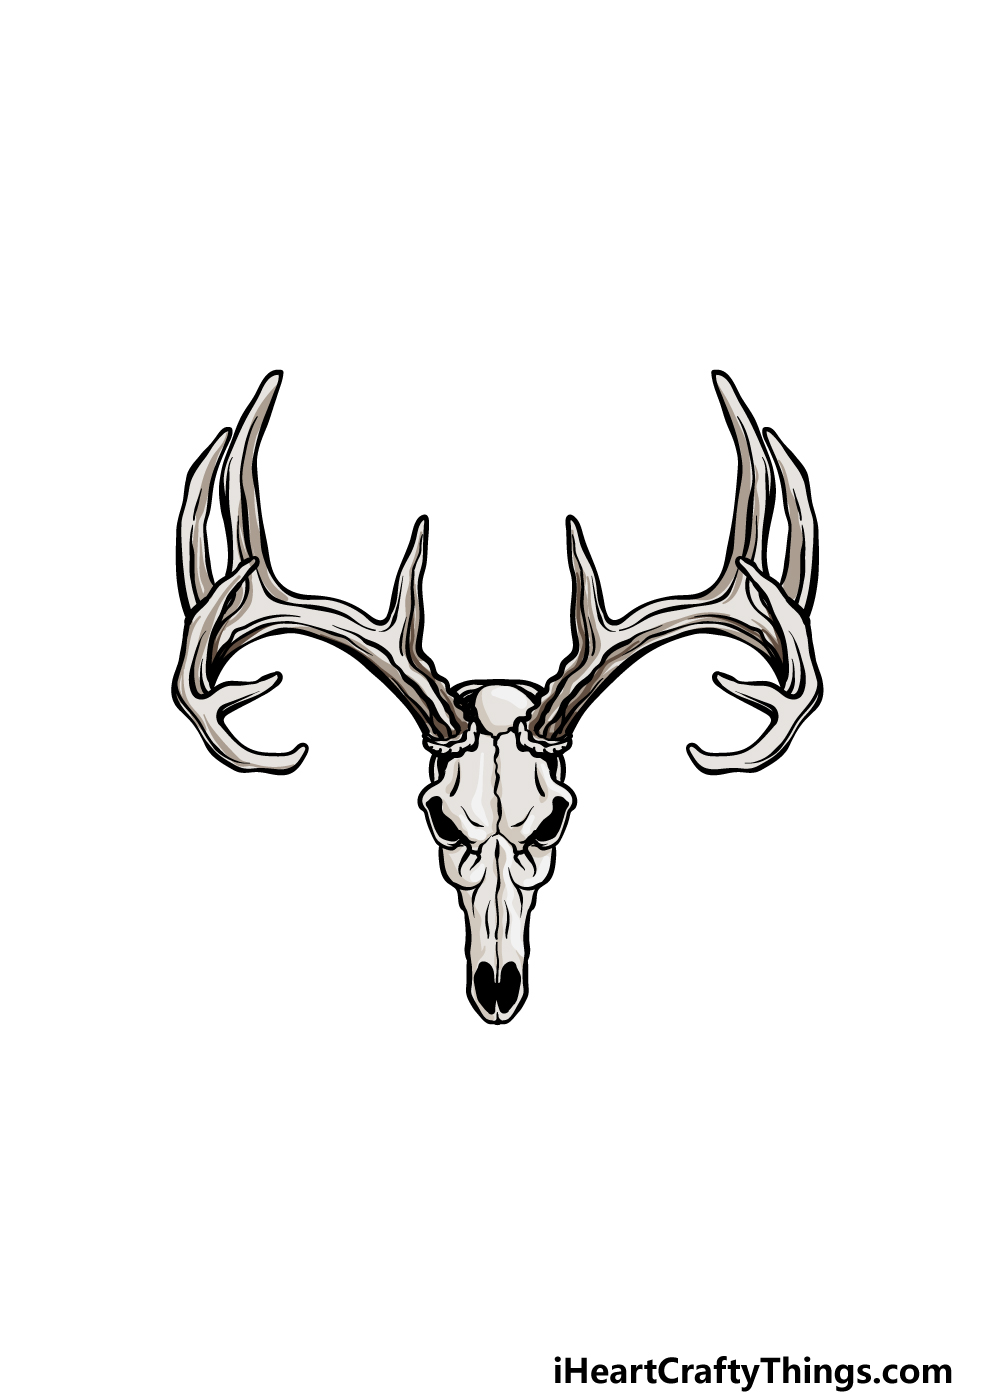
Now it’s time to finish off your deer skull drawing with some color! In our reference image, we went with some realistic, muted tones of browns for the antlers with some light greys and beige for the skull itself.
You could replicate this color scheme for a more realistic look, but you could also get creative with it if you would like a more stylistic look for the drawing.
No matter which colors you decide on, you can also vary the shades and tones depending on the various art mediums and tools that you use for it.
You could go for some acrylic paints and colored pens for brighter, more vibrant shades or watercolors and colored pencils for more muted colors.
These are just a few suggestions, but you should feel free to use any colors and mediums you would like for it to finish off!
Here’s how you can make your deer skull drawing even better…
These easy tips will show you how to make this incredible drawing even better!
This deer skull looks really cool, and it would look even cooler if you added more animal skulls to the picture.
You can readily find pictures online that are posed just like this one is, and then you can follow the steps of the guide to create them.
It would be interesting to make them all look like they are hanging on a wall together as well! What kinds of skulls would you add to this deer skull drawing?
Another cool idea for this deer skull sketch is to make it look like it is mounted as a trophy. These wooden mounts are usually wider at the top and then thinner as they go down, but they come in many different shapes.
If you know someone who has a similar trophy, using it as a model would make this idea so much easier! Even if you don’t, it would again be easy to find pictures online you could use.
Skulls are inherently a bit creepy, and this drawing of a deer skull is no different! If you wanted to make a spooky picture, maybe you could make a creepy creature with the head of a deer skull.
That would make for a scary monster, and you could get really creative with the design for the rest of the body.
This would be the perfect suggestion to use around Halloween! If you go with this idea, then creating a spooky background would be lots of fun as well.
This picture is great because you can use many different color schemes to bring it to life. These could be more muted and realistic or more stylized.
For example, maybe you could use a light purple for the skull and then color the background with a vibrant red.
That would create a striking picture, but it is just one way to do it! What colors will you choose to finish off this page?
Your Deer Skull Drawing is Complete!
You have completed all 6 steps of our guide on how to draw a deer skull. Now that you have finished the guide, you know how to draw this awesome-looking skull!
Learning how to draw it is only half the fun, as you can also have a great time bringing some amazing colors to it and changing up the details while adding your own.
Then, you can check out our website for many more awesome drawing guides. We update the list of guides often, so keep checking in to make sure you never miss out.
We would also be interested to see how you complete this deer skull drawing, so please be sure to share it on our Facebook and Pinterest pages for us to enjoy!