We read Eric Carle’s book, Mister Seahorse, this week and decided we had to make a Seahorse Craft to accompany the book! We were also inspired by the shoe tying practice available from the version we saw at Making Learning Fun.
It’s my goal for my preschooler to tie his shoes before Kindergarten, so this was the perfect lacing practice opportunity. The lacing is also a great preschool activity for working on strengthening fine motor skills.
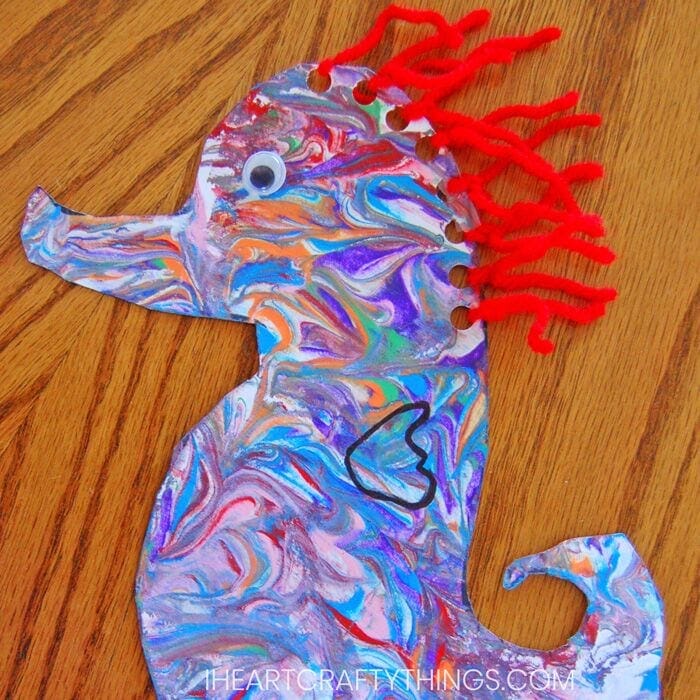
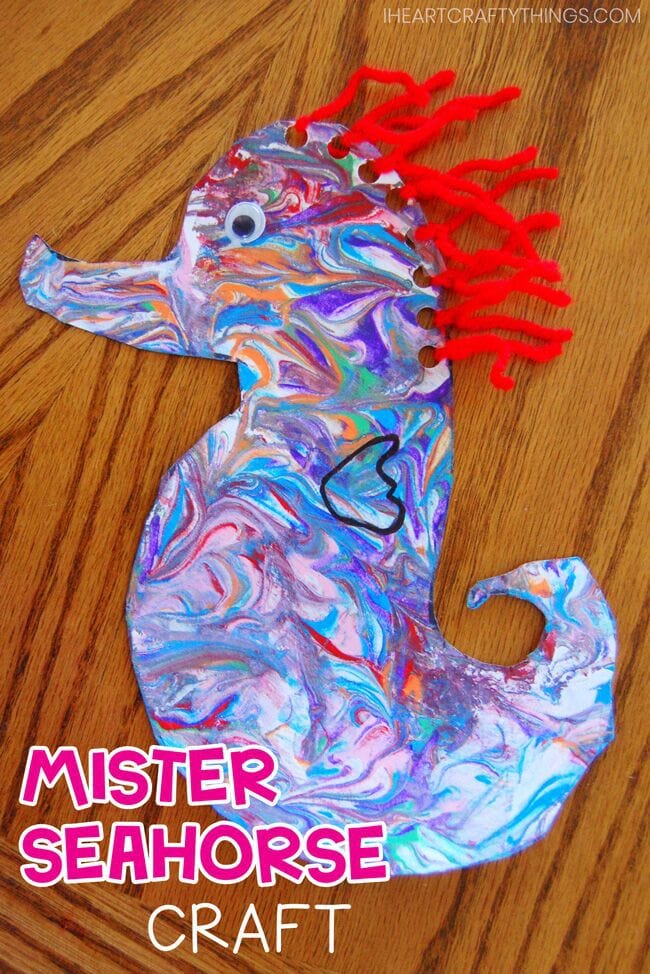
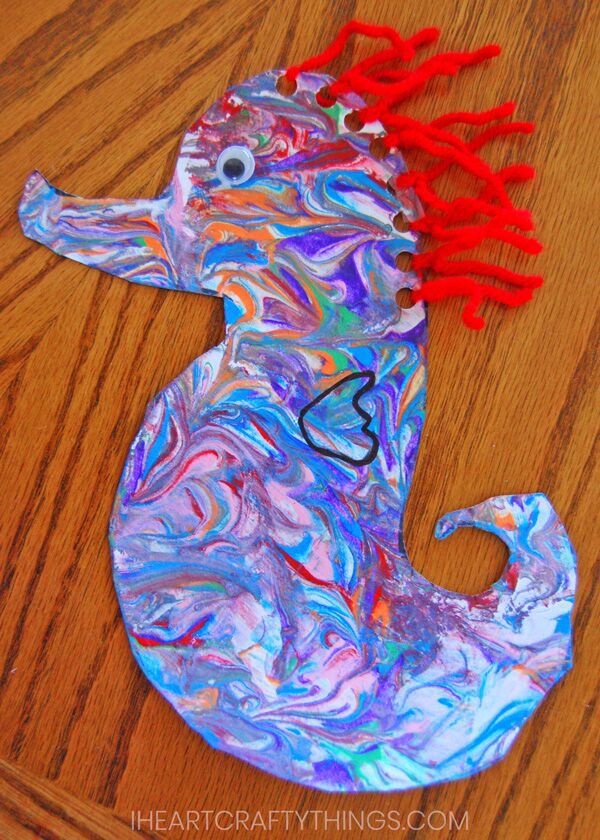
The unique marbled paint effect on our seahorse craft turned out beautifully. While others may have heard of or tried this painting technique before, this was my first time combining paint and shaving cream to create the marbled effect. And let me tell you, I am hooked!
My son really enjoyed mixing the paint and shaving cream and I really loved the look of the finished product. The marbled painting technique on a seahorse makes for a perfect ocean craft for kids!
How to make a Marbled Mister Seahorse Craft
This post contains affiliate links to the products mentioned. Read our disclosure policy for more information.
Supplies Needed to Make your Seahorse
- Seahorse template HERE
- Scissors
- Shaving cream
- Acrylic paint (variety of colors)
- Container for mixing the shaving cream and paint (must be large enough to press the sea horse into)
- Rubber spatula or spoon
- Squeegee
- Black marker
- Hole punch
- Yarn
- Googly eye (optional)
Instructions for the Marbled Painting Technique
1. Start by printing the free seahorse pattern on cardstock and have your child cut it out. (The heavier paper is necessary due to the painting technique.)
2. Squirt some shaving cream into your container, enough to fill the bottom. Use a spoon, or a rubber spatula if you have it, to spread the shaving cream evenly across the bottom of your container.
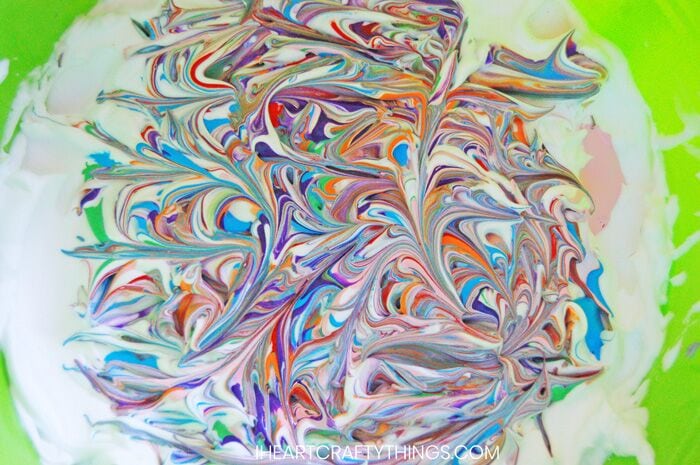
3. Add lines of various colors of acrylic paint to the top of the shaving cream and use a toothpick or the end of spoon to swirl the colors around. You can see how mine looked after swirling in the picture below.
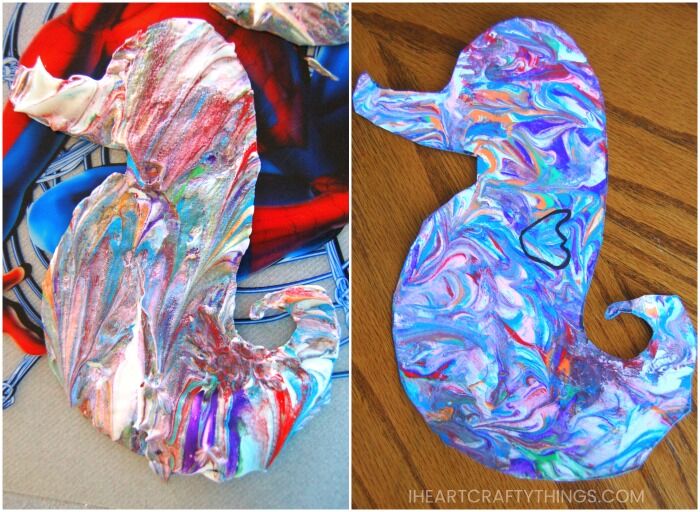
Edited to add: While I didn’t take a lot of pictures of the process that time, if you want more examples and instructions, you can look at how I replicated the marbled painting process later when we made Marbled Planet Art!
4. Gently press your seahorse down into the paint, making sure every part of the paper is touching the shaving cream. After leaving it there for several seconds, lift it out carefully.
5. Lay your sea animal down to dry for a couple minutes. Use a squeegee to remove the excess shaving cream from your seahorse craft.
Related: Colorful Jellyfish Craft
6. Let it dry completely. I used a black marker to redraw the fin as it got covered up by the paint. I couldn’t see the lines anymore, so I just had to wing it.
Instructions for Lacing Practice
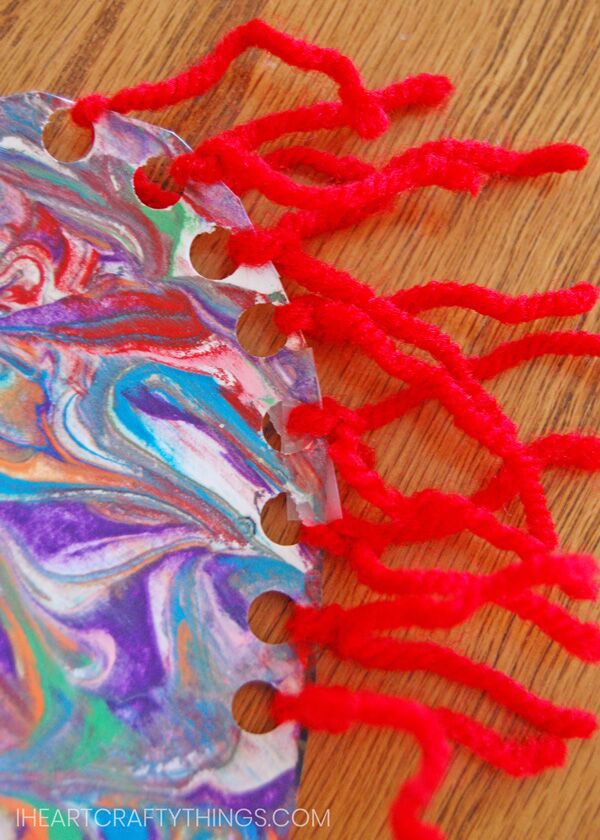
7. Use a hole punch to punch holes around the seahorse’s head to add his hair. The pattern has premade places to punch the holes, but again, you might not be able to see them after painting. Just do your best to punch holes evenly along the outside edge of the seahorse’s head.
8. Cut some pieces of yarn for your child to pull through the holes and tie a knot. If your child isn’t ready to tie the knots yet, even the act of lacing the yarn through the holes is great for fine motor practice. If the yarn pieces become uneven while they are working, you can trim the yarn evenly after they are done with tying the knots.
9. After your Mister Seahorse has hair, glue on one googly eye, if desired. Another option is to hand draw an eye with a black marker. Either way, when you are finished, you will have a beautiful ocean creature you can be proud of!
We really enjoyed the marbled painting method and will definitely be using it again! Have you tried it before? Do you have a favorite painting or crafting technique? Comment below!
Related: 25 Creative Ocean Crafts

More ideas of ways you can decorate your seahorse craft with the free printable
If the shaving cream painting feels intimidating or too advanced, or if you are crafting with toddlers, here are more ways you can create a colorful Mister Seahorse craft:
- Add different colors of paint to a paper plate and have children paint a piece of bubble wrap with different colors. Place the seahorse craft template down onto the bubble wrap, paint side up, and press the colors onto the seahorse.
- Another simple option is to decorate the seahorse template with tissue paper. To do this, cut up tissue paper squares from several different colors of tissue paper. The have children scrunch up the tissue paper squares and glue them onto the seahorse, covering it completely.
Looking for more fun craft ideas for ocean creatures with your kids? You’ll love this list of 25 creative ocean animal crafts.
Along with our love of ocean animal crafts, we also adore animal crafts. Here is a great resource of over 50 zoo animal crafts you will love! So many wonderful ideas and many with craft templates available.
This is so cute!! I love the effect. Isn't it addictive?! Thanks for the blog mention too. I
I love this craft – we will have to try this. I'm thinking I might try it for Halloween decorations for a party we're having – dip spiders in orange, white, black, and purple paint?
Isn't it interesting how sensitive kids are! I don't think I have ever read this book but I do love that seahorse!!
I remember my then 5yo son would sob when we read 'Puff the Magic Dragon' and the boy goes away. It was hard to watch him sobbing and he couldn't really explain why he was so upset, but he loved to read it ?!
Beautiful knot exercise, we'll definitley give it a go 🙂 Thanks.
I have a a two year old in my daycare that has a soft heart like that. He gets upset if he sees a movie if someone is sad, or someone is sad here. awe…
On another note I love the baby seahorse! It's beautiful. We will have to try this here.
TFS!
Oh poor Luke 🙁
His seahorse turned out so awesome!
This is the cutest! You have such wonderful ideas here. Thanks for sharing! Thanks, too, for stopping by our blog at http://letterlearning.blogspot.com — we're following you now, too! Ellen
Oh my that seahorse is adorable and I LOVE the main. What a great way to practice tying. You clever lady! The marbling is just perfect you. Love love love!
Thank you for linking up to Kids Get Crafty!
Maggy
We love the sea horse book! Love the purple marbling effect! clever idea to add a mane
This post counts as an entry in the Summer Reading Challenge.
I love the marbelization! It looks like water is flowing over him.
Ooooh….ahhhh…. literally. This is amazing! What a great idea. Shaving foam is my latest obsession with all the great crafts, especially the marbled projects. I love it – especially the sea horse mane! Thanks for sharing 🙂
That project turned out so great. I really need to try the shaving cream craft.
We did a craft off of that book too- I love your spin on the Marbling effect!
Eri Carle would be proud and so should everyone else! You totally rock the kids crafts! Way to be an awesome mommy and thanks for always linking with frog! You are the best!
HUGS~
Jenni
That is such a sweet story about your little boy… kids have the most tender spirits! I love the shaving cream technique we will have to try it! Thanks for showing off!
Carlee
http://www.ladybirdln.com
Love this like all the others, Rachel!
AWESOME!
Thanks for linking up!
~Bec 🙂
LOVE this….we are SO doing this one day soon!
How adorable!! I can't wait to make these with my niece… she loves crazy colors and fun crafts 😀
So cute! I've never tried the shaving cream! I will now! Thank you for linking to It's a Party!
Thanks for sharing the paint tutorials as well as the crafty suggestion for tying practice – we have the same goal here! We had an unexpected reaction to Sylvester and the Magic Pebble. My son's response at the end was, that's not real, right? Never one to be confused by real and imaginary, I think he just had to reassure himself that he could never accidently turn himself into a rock like sylvester.
Because this is SOOOOO amazing, I'm featuring you and this post at this week's For the Kids Link Party at Sun Scholars! Thanks for sharing!!! Stop by and grab your A++ button and share with us again this week!
http://sunscholars.blogspot.com/2011/08/for-kids-friday-25.html
love the marble affect – featuring this on this wee's Sunday Showcase! Thanks for linking up & hope to see you this week!!!
Bern
I love the marbling technique, Mister Seahorse looks awesome!
Your sons response is so cute. I have to admit I don't like reading that bit because it feel a bit mean. My son loves this book so much he asks for it every night. My hubby and I are rapidly falling out of love with Eric Carle and Mr Seahorse.
I love the marbling paint effect, I'll have to try that. Thanks for the instructions.
Sorry, me again being a bit thick – ok I tried the paint and shaving foam and it worked really well up to the point where i had to take the excess paint and foam off – then it all went a bit wrong! Can I just do a word check. In the UK a squeegee is the rubber bladed device you use to take ice or water off the car windows. It that really what you use to take the excess foam off the paper?
We're doing this today! Found you on Pinterest. Following you now.
This is amazing!! and what a great way to teach how to tie. I have a 5 year old and needed something to help her…I will be using this, you can count on it! I am following you from the blog hop today….I am Queenoftheblingandotheramazingthings.blogspot.com
I found this through sun scholar's link party and think it's adorable! I'm pinning it for when my daughter's a tad bit older.
Thanks,
Bonny @ thedomesticatedprincess.blogspot.com
🙂 I love this craft. So cute and colorful. Pinned!