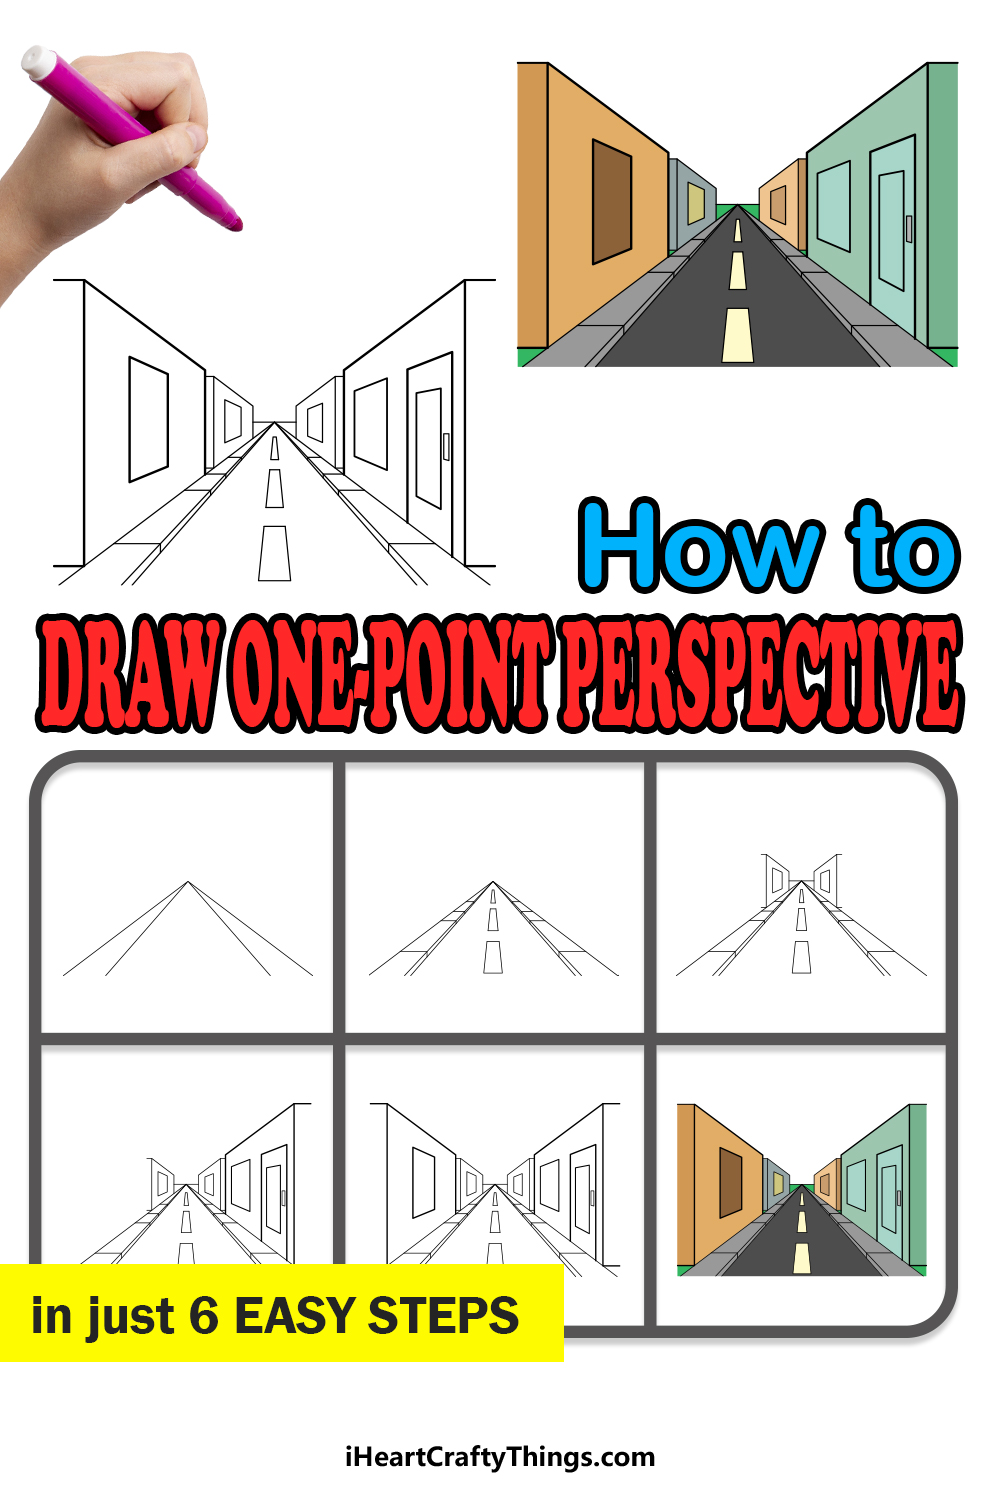
Find out how you can easily learn how to draw a one-point perspective. It’s not as hard as it seems when you have these tips to follow.
One-point perspectives are important in art, as they create the illusion of a horizon on a flat image. If you get it even a bit wrong, it can throw off the whole drawing, though.
It’s not always the easiest thing to do, so I wanted to make it simpler for anyone to grasp with this intuitive guide. Whether you’re a beginner or not, you can follow how to map out the horizon lines and add building shapes on the side.
Once you have the basics nailed down, you could even add some details to the buildings, road and other elements. You can even apply these lessons to your own designs!
Let’s begin right away and see how you can make your own one-point perspective designs.
Watch This Guide On How To Make One-Point Perspective Drawings
How to Draw A One-Point Perspective – Let’s Get Started!
Step 1
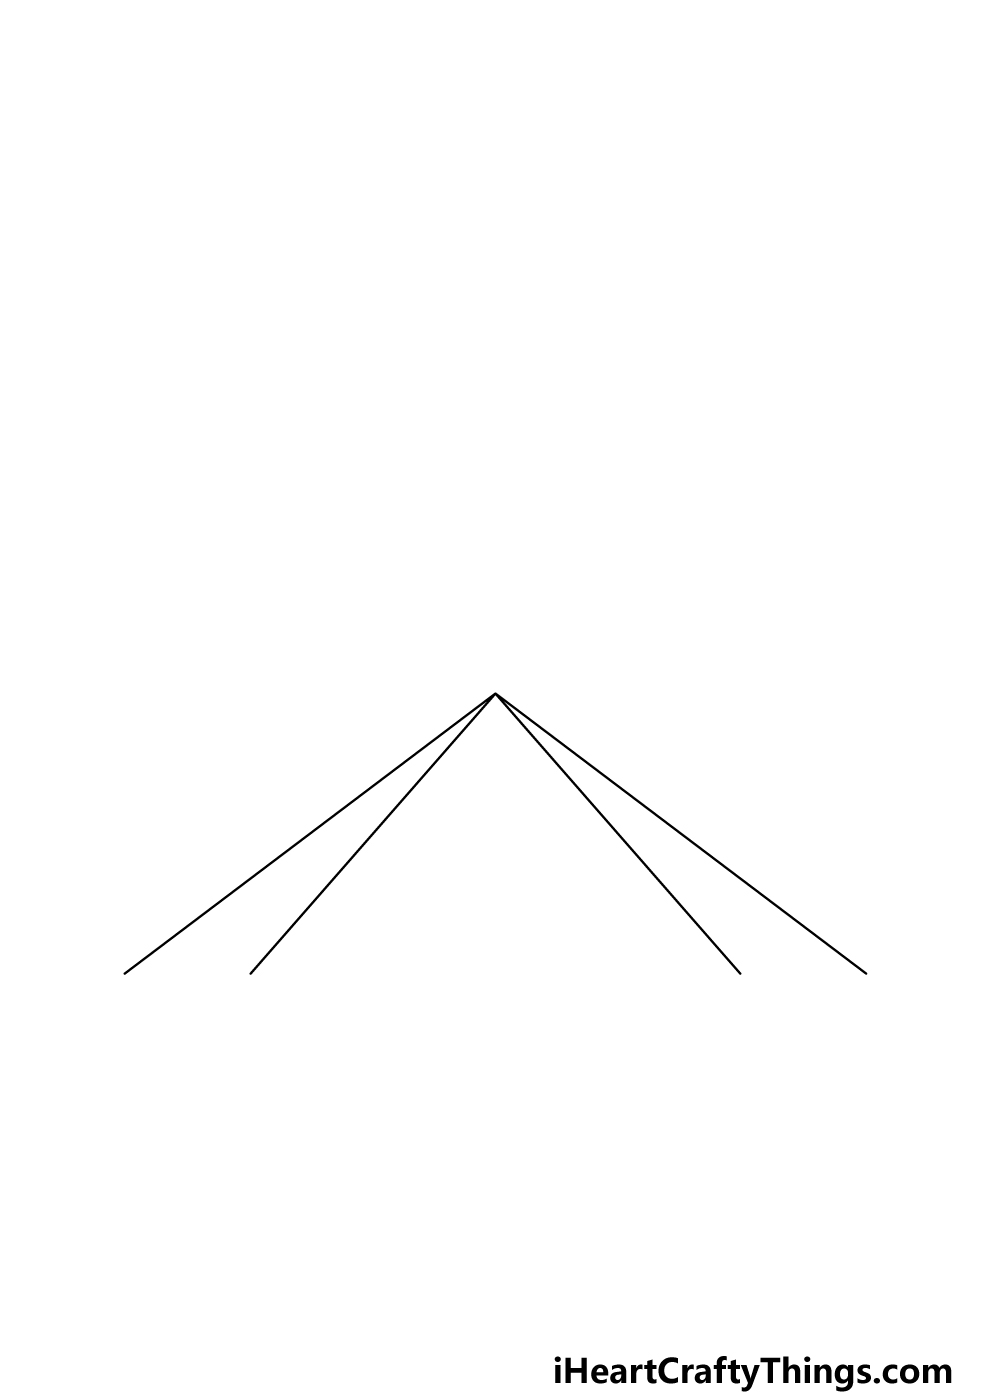
Throughout this guide on how to draw a one-point perspective, you will definitely need a ruler on hand or you’ll have a really hard time with the whole guide.
With that in mind, once you have your ruler and your favorite drawing tool we can begin with the guide.
For this first step, we will be drawing several lines, and the important aspect is that they must all originate from a single point.
Draw a dot in the center of the page, and then draw four lines moving outward.
Try your best to position them as identically to our reference image as you can, as this will serve as the street and sidewalk for the image.
Step 2 – Now, draw some details for the street
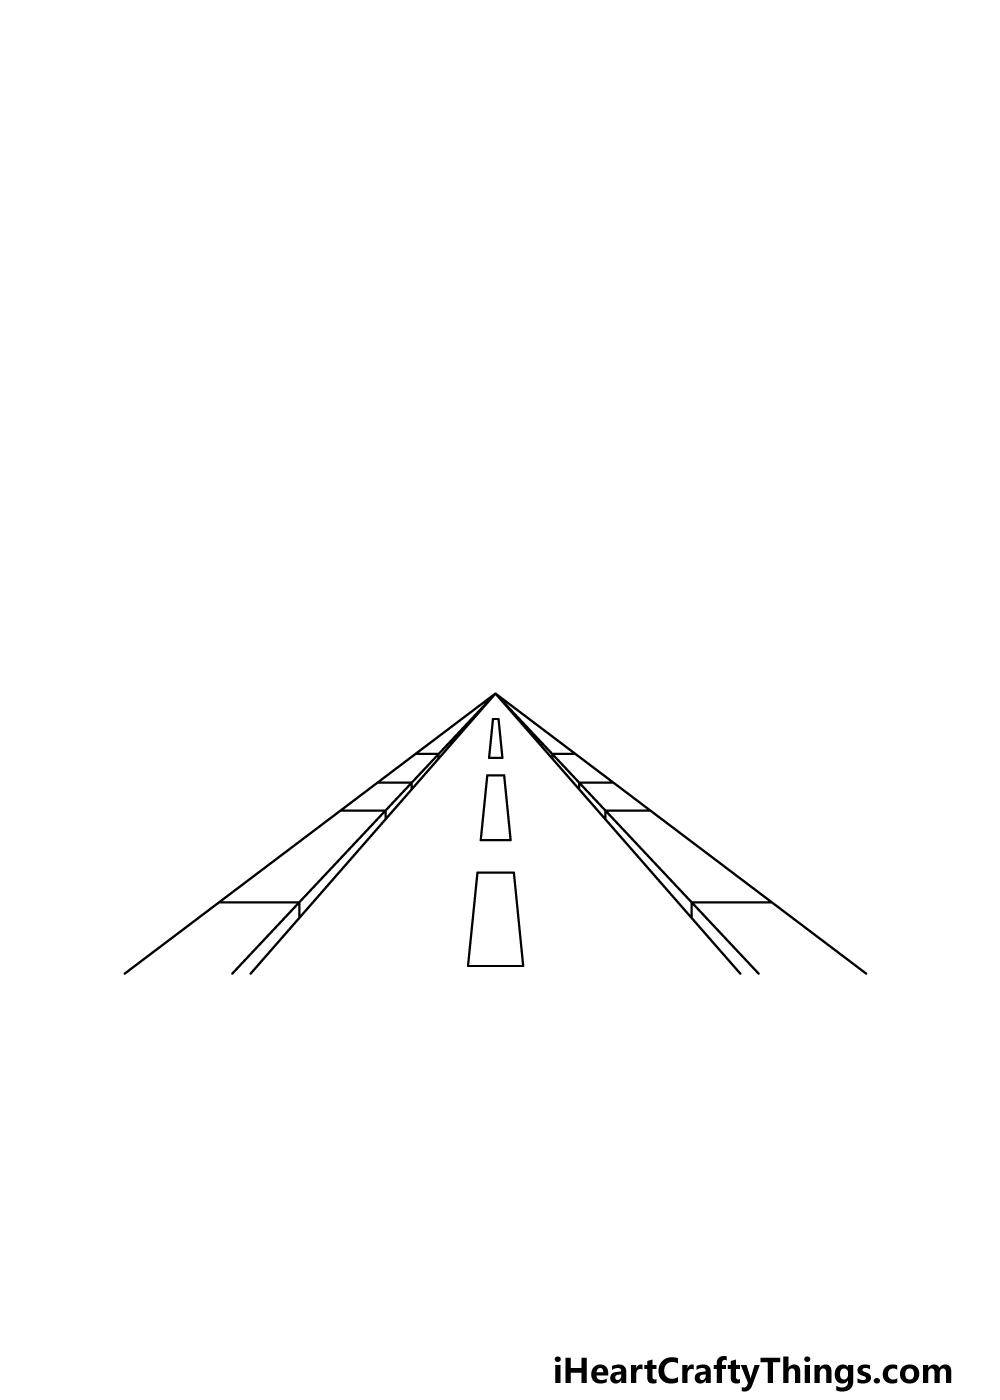
You drew the basic outline for the street in the previous part of your one-point perspective drawing, and in this next part we will be adding some more details to it.
First, you can begin by drawing some lines horizontally along the side sections of the sidewalk.
You can also draw some lines along the inner perimeters of the sidewalks, as these will give the concrete slabs a little bit of height.
Then, we will draw three rectangles in the center of the street. Each one will get progressively smaller the higher up they get, and these will further help to show the perspective of the picture.
Once these parts are all drawn, we can then move on to the third step of the guide.
Step 3 – Draw the start of the buildings on the street
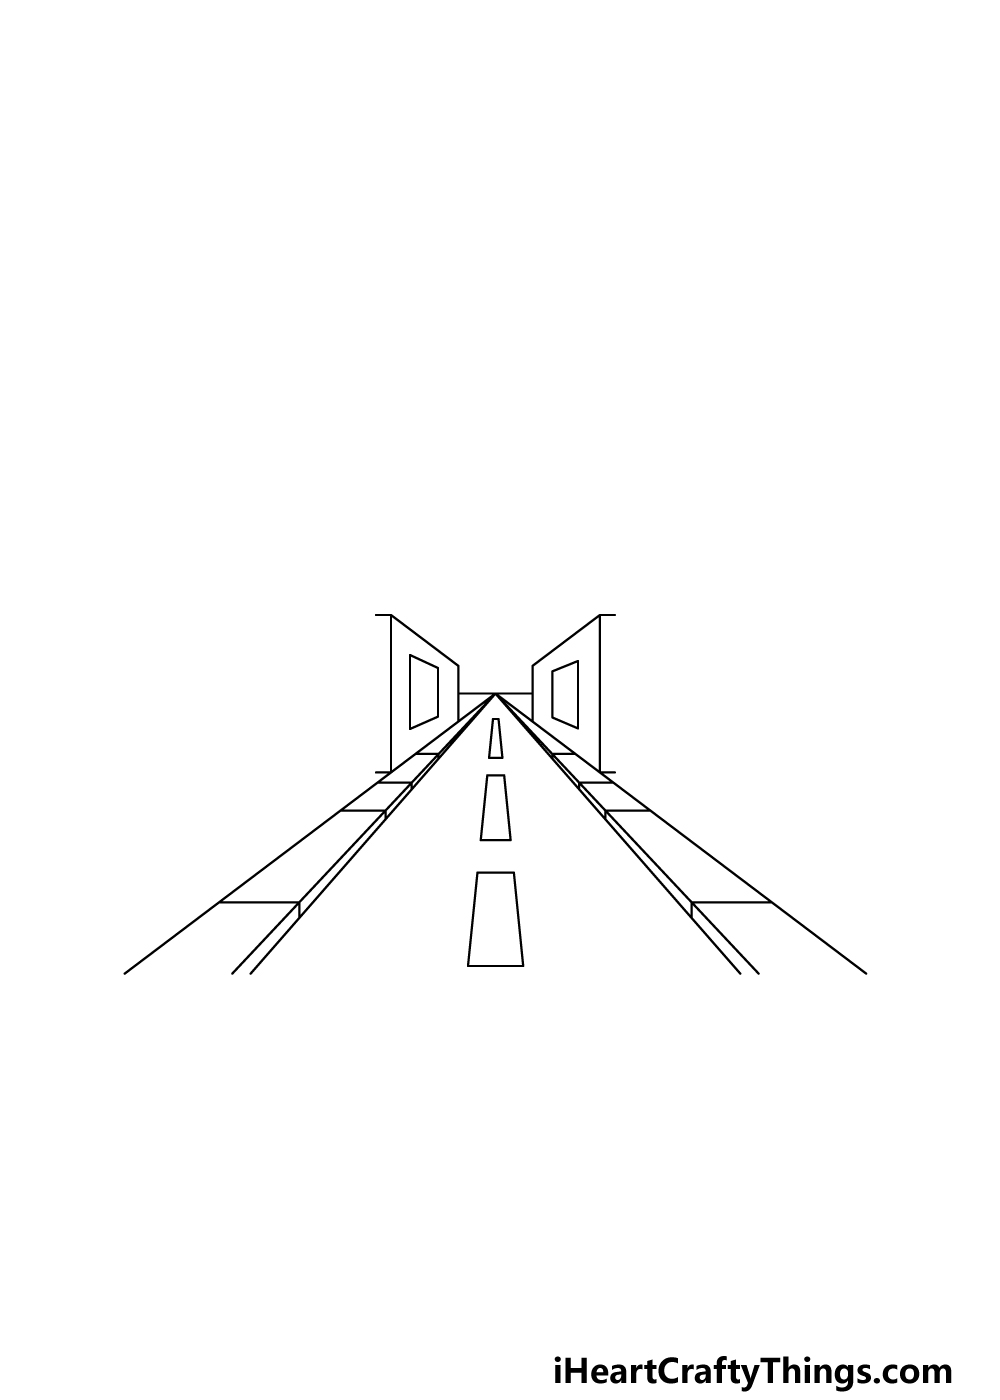
The street is done now, so for the next few steps of this guide on how to draw a one-point perspective we will be focusing on the buildings lining the street.
This aspect can be a bit trickier to draw than you may expect, so this is another one where you should try to closely follow the reference image.
You can start by drawing a short horizontal line over the tip of the road where it disappears into the horizon.
Then, we will be drawing several square and rectangle shapes for the sides of the buildings and their windows.
To fit the perspective, they will be at an angle that is consistent with the angle of the sidewalks.
Step 4 – Next, draw the next section of the buildings
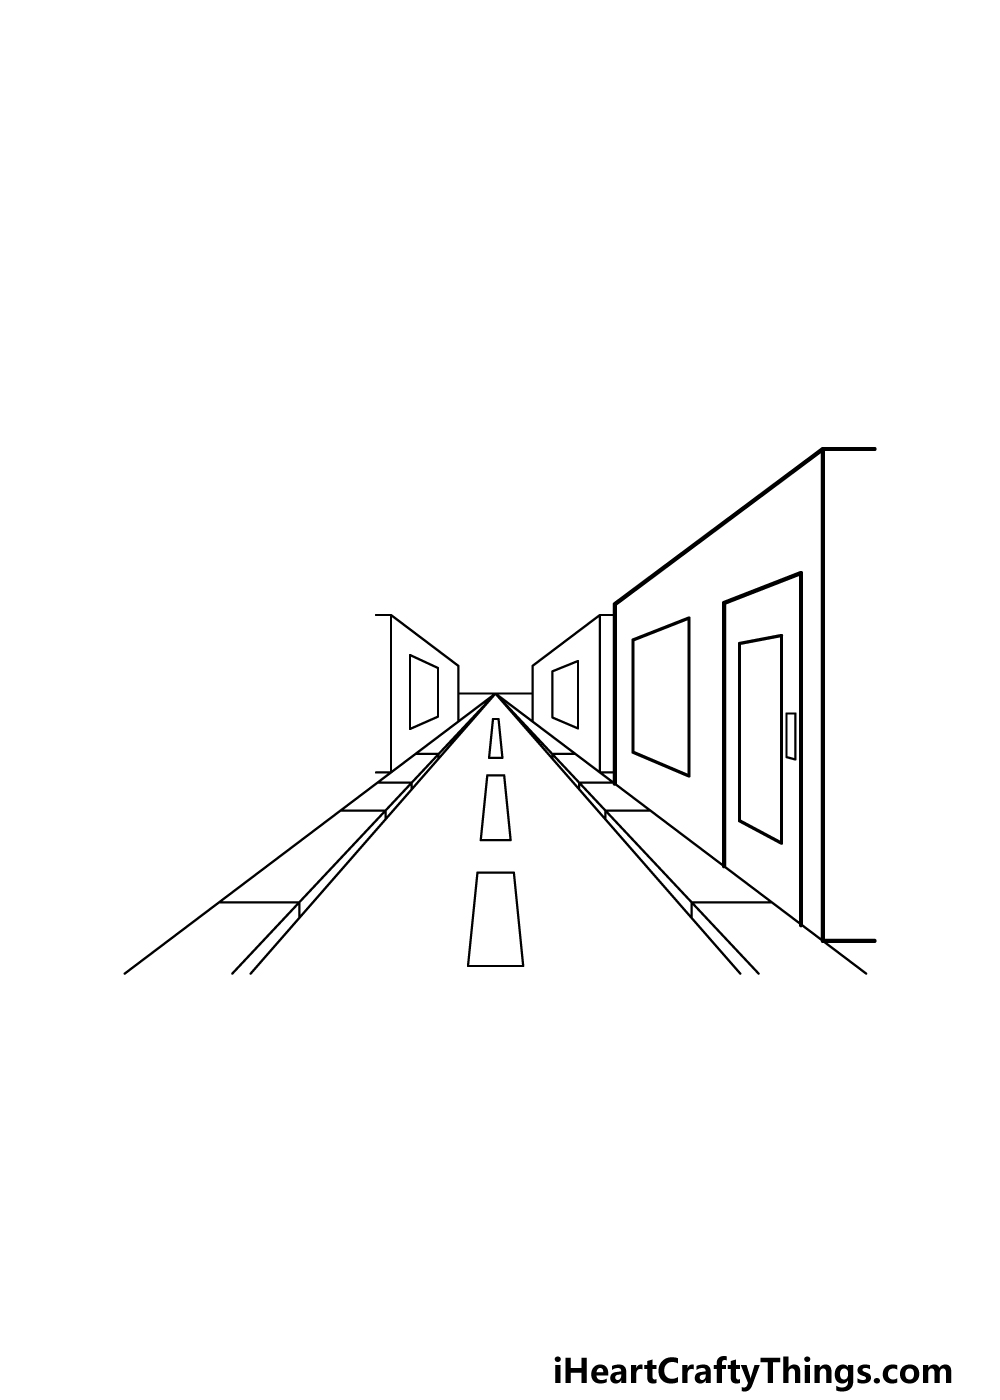
In this fourth part of your one-point perspective drawing, we will be adding another section of buildings.
This section will be on the right-hand side, and structurally it will be similar to the first section that you drew. Because it’s much closer to the viewer, this section will be much larger than the first one.
You can add some more straight lines for a door and window for the section. Once this is done, we will finish off the final elements and details in the next step of the guide.
Step 5 – Add the final details to your one-point perspective drawing
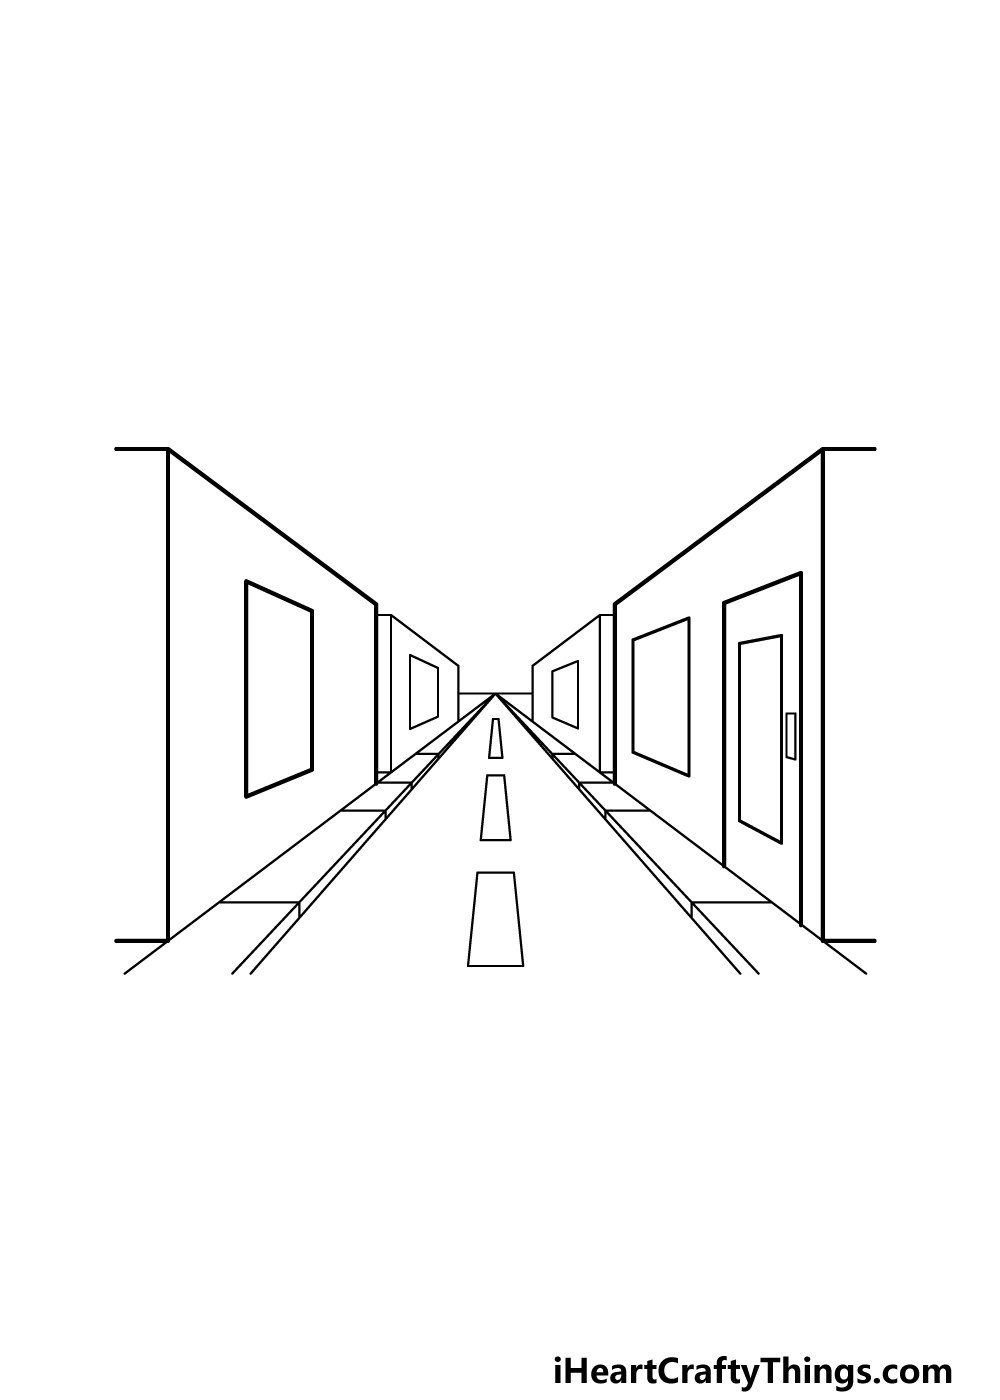
Now you’re ready to finish off the composition in this step of our guide on how to draw a one-point perspective.
In this one, we will be drawing one more buildings section that in terms of size and shape will be identical to the previous one that you just drew.
For a bit of variety, the only detail we will draw for this section will be a single window.
When you have drawn this section of buildings, you can then add any extra details of your own you may like!
These could include some signs above the doors or sky details such as clouds or the sun.
If you do add extra details, try to keep them at the correct angles in relation to the rest of the image that you have been working on.
Bonus: Use These Tips To Make This Drawing Easier
Drawing perspective of any kind in a 2D image is certainly a tricky task, even for seasoned artists. This is because you are portraying dimensions that aren’t there, and it can be easy to get it wrong.
You may have gotten to this point in the guide on how to draw one point perspective only to look at your attempt while comparing it to the reference images and thinking “why doesn’t mine look like that?”
If that sounds like you, you shouldn’t feel bad, as you might need a few extra tips to make it easier. One of the best ways to make a drawing like this easier would be by doing some rough sketches.
In the guide, we speak about how you can use rulers and other tools to create some straight lines that contribute to creating the illusion. However, we would actually recommend a much rougher sketch done freehand.
This way you can more freely experiment with creating the perspective on the page in order to get the hang of it. Even if the lines aren’t perfectly straight, you will soon see the angles you need to make it look right.
If you can find real-life places that have a similar layout to the one in our guide, then that would be super helpful as well. Streets, alleyways and other areas can be good examples, and you can see the perspective in real life.
Maybe take some photos of these real places, and then do a few of those rough sketches using them as your guide. Doing these tips may help you to wrap your head around it, but whatever you do, take your time and have fun with it!
If you work at it and keep trying, you’ll be able to do it.
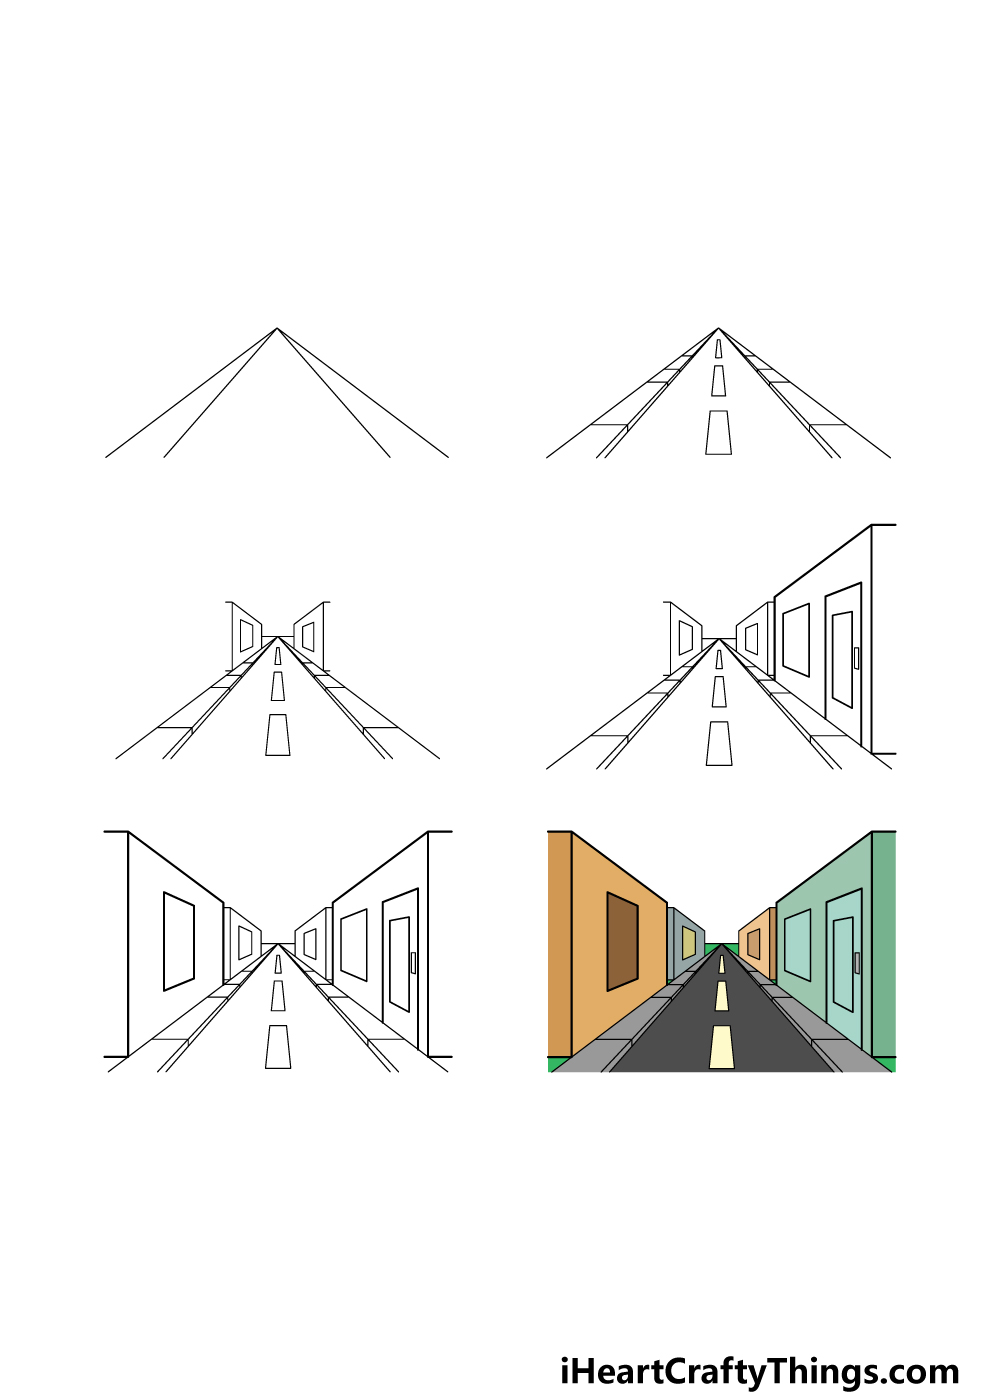
Step 6 – Finish off your one-point perspective drawing with color
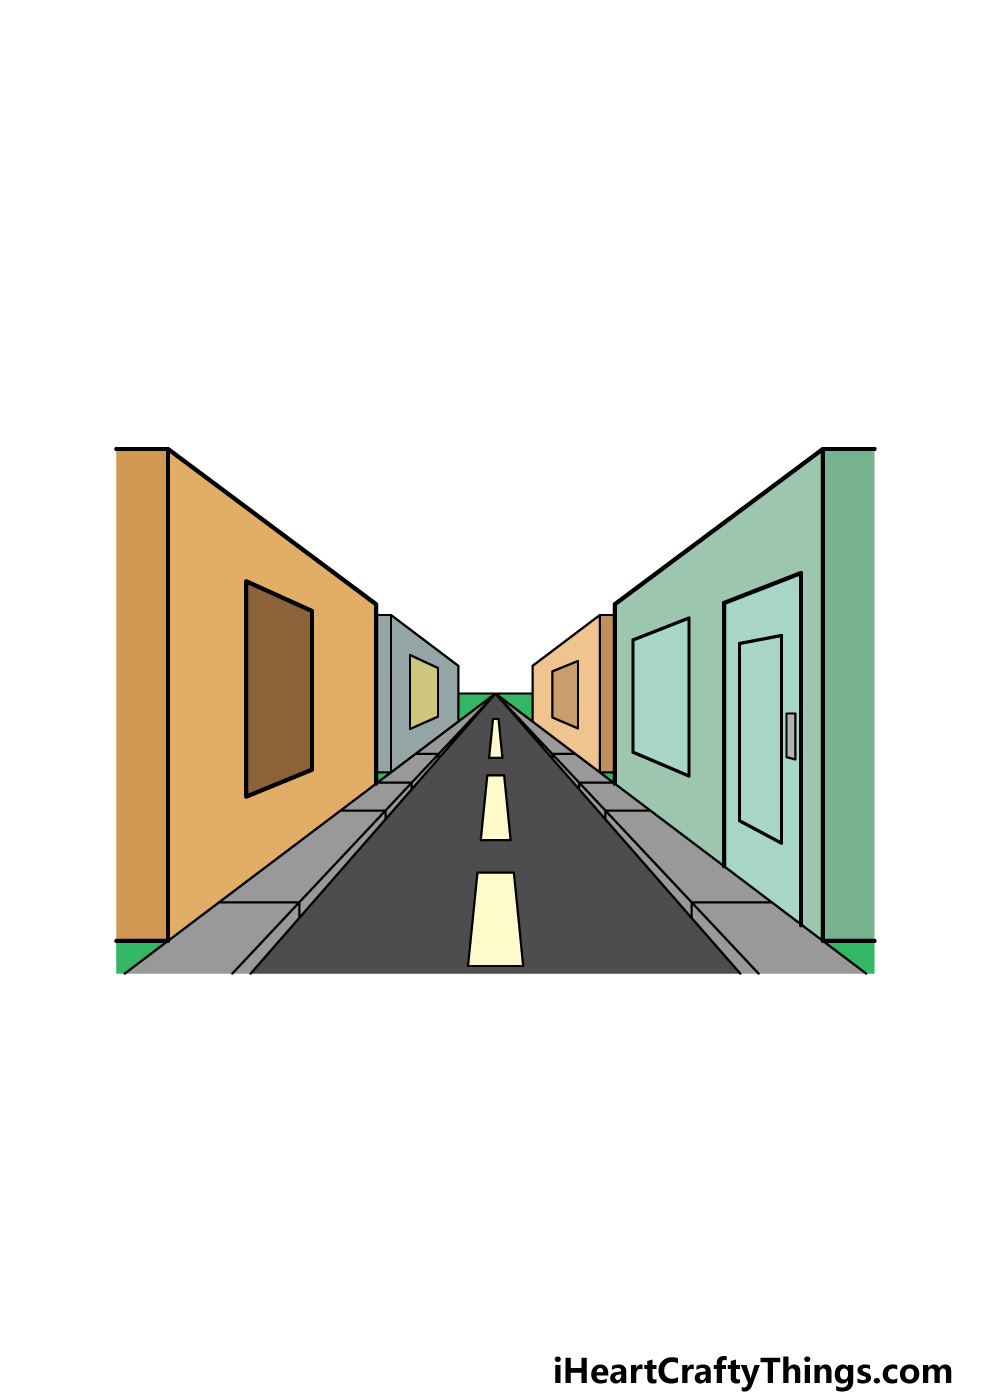
You’ve done a great job working on this one-point perspective drawing, and now you can relax with some coloring fun! With your image, you have a lot of options for how you could color it in.
You could use all of your favorite colors to finish it off and it would work brilliantly!
We showed you just one of the ways that you could color in your image in our example picture, but this is your chance to let your creativity flow as you finish it up.
What color scheme and art mediums will you use to bring this image to life?
Do this to take your one-point perspective drawing to the next level
Let’s go over a few points for making your one-point perspective sketch even better!
This drawing of a one-point perspective shows a street with a blank sky above it. This opens up a lot of possibilities for how you could decorate the sky.
For a simple approach, you could simply color a solid blue for a clear day. If you wanted to make it a bit more involved, then you could look into adding clouds, airplanes or the sun, for a few suggestions.
What kind of day would you like to create for this one-point perspective you have created?
Even with a sky added, this street still looks rather empty. Let’s look a few ways that you could populate it!
First, you could start this by adding some vehicles to the image. This could be in the form of cars, motorcycles, trucks or anything else you would expect to see in the street.
If you struggle with drawing vehicles then you could look some up online to help you as you draw.
Next, you could add some human characters to your one-point perspective drawing. They would likely look rather small on the page, so you wouldn’t need to make them very detailed.
You could have people just going about their days or maybe have workers such as construction workers, police officers or traffic cops, for a few ideas.
Can you think of some poses you would like to create with some human characters in this image?
Finally, you could add some more details to the street and buildings of this one-point perspective sketch. One way of doing this would be by adding some signs or posters on the walls or above the doors.
This would be a great way for you to show what kinds of stores and businesses are on this street. You could also add details like parking meters, manholes or traffic signals.
These are a few ideas, but what are some other details you could add to this street?
Your One-Point Perspective Drawing is Complete!
You have completed this guide on how to draw a one-point perspective, and now you have learned one of the handiest tricks in drawing!
It can be a bit of a tricky technique to get right, but as long as you follow the steps in this guide then you should get the hang of it in no time!
Once you have mastered this technique, you could take what you have learned and apply it to all manner of settings that will have some realistic perspective.
What kind of setting would you like to draw with this technique?
If you had fun working on this guide, you’ll want to check out our website for access to many more awesome guides. We have more on the way soon, so be sure to check out the website often!
We would also be thrilled to see how your one-point perspective drawing turned out, so please go ahead and share it on our Facebook and Pinterest pages for us to admire!