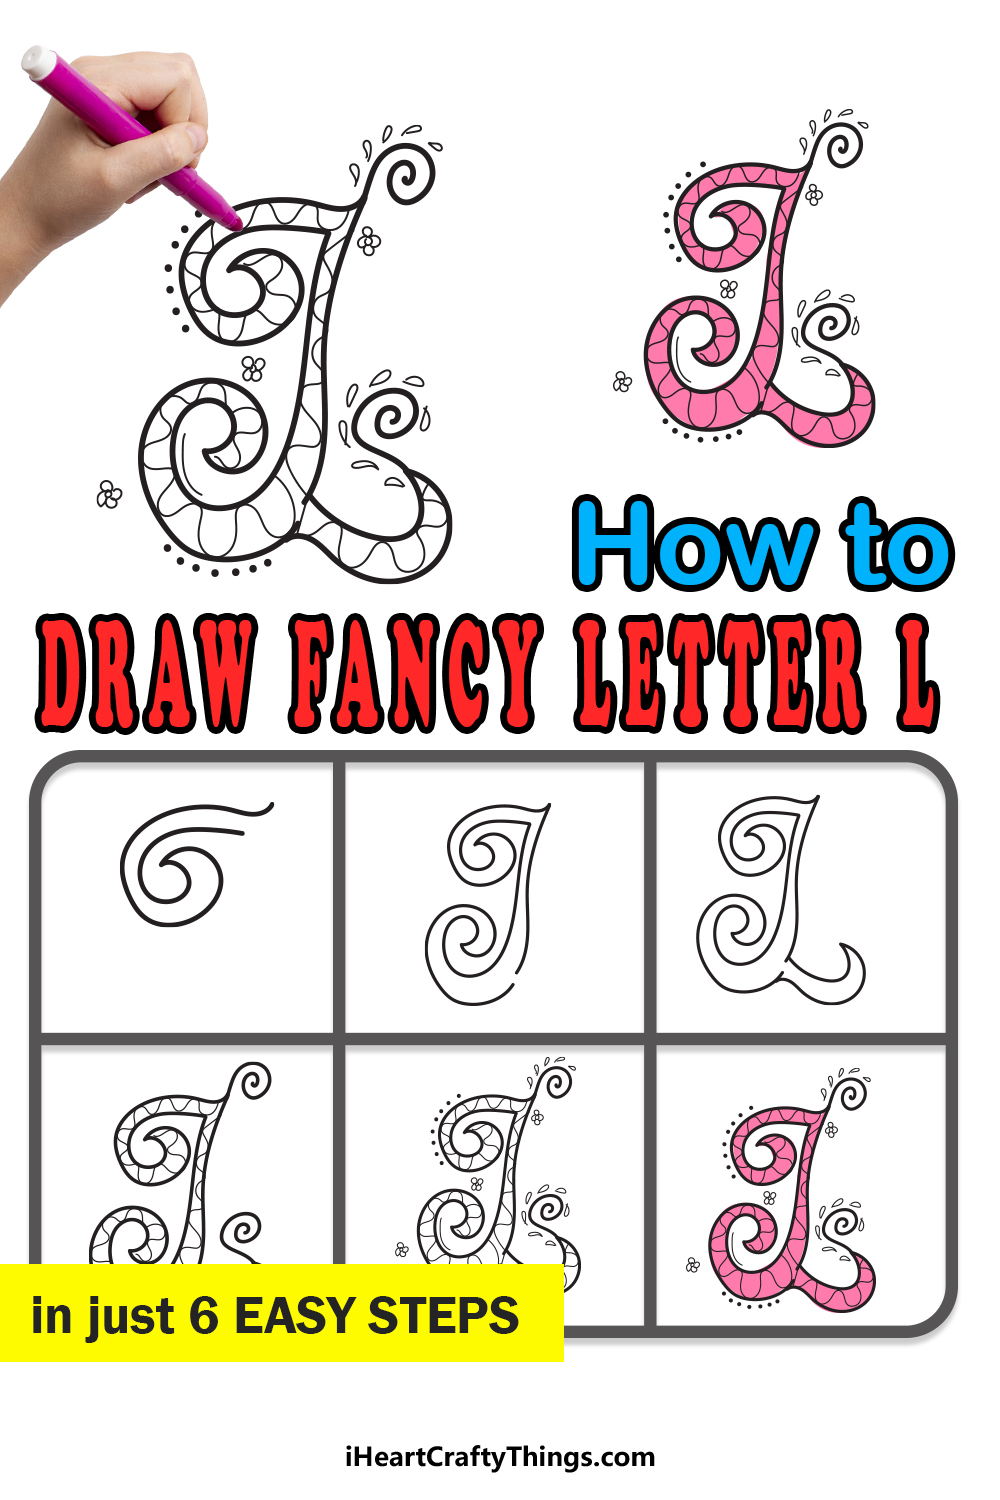
In this guide, we will be covering the humble letter L. It is the twelfth letter of the alphabet, and it has a really simple design to it.
As you will see in this very sentence, the lowercase letter L is a simple vertical line. It becomes slightly more complicated with the capital letter version, as we have another horizontal line on the base.
It is this capital letter version we will focus on, and we will make it a lot more intricate. In just 6 steps, you will learn how to draw a fancy letter L!
Not only that, but we will also go over some ways that you can bring colors and other details to the design. There will be ideas to try and ways you can bring your own flair and ideas to the table.
With all that said, let’s start with the first step of the guide.
Let’s Get Started
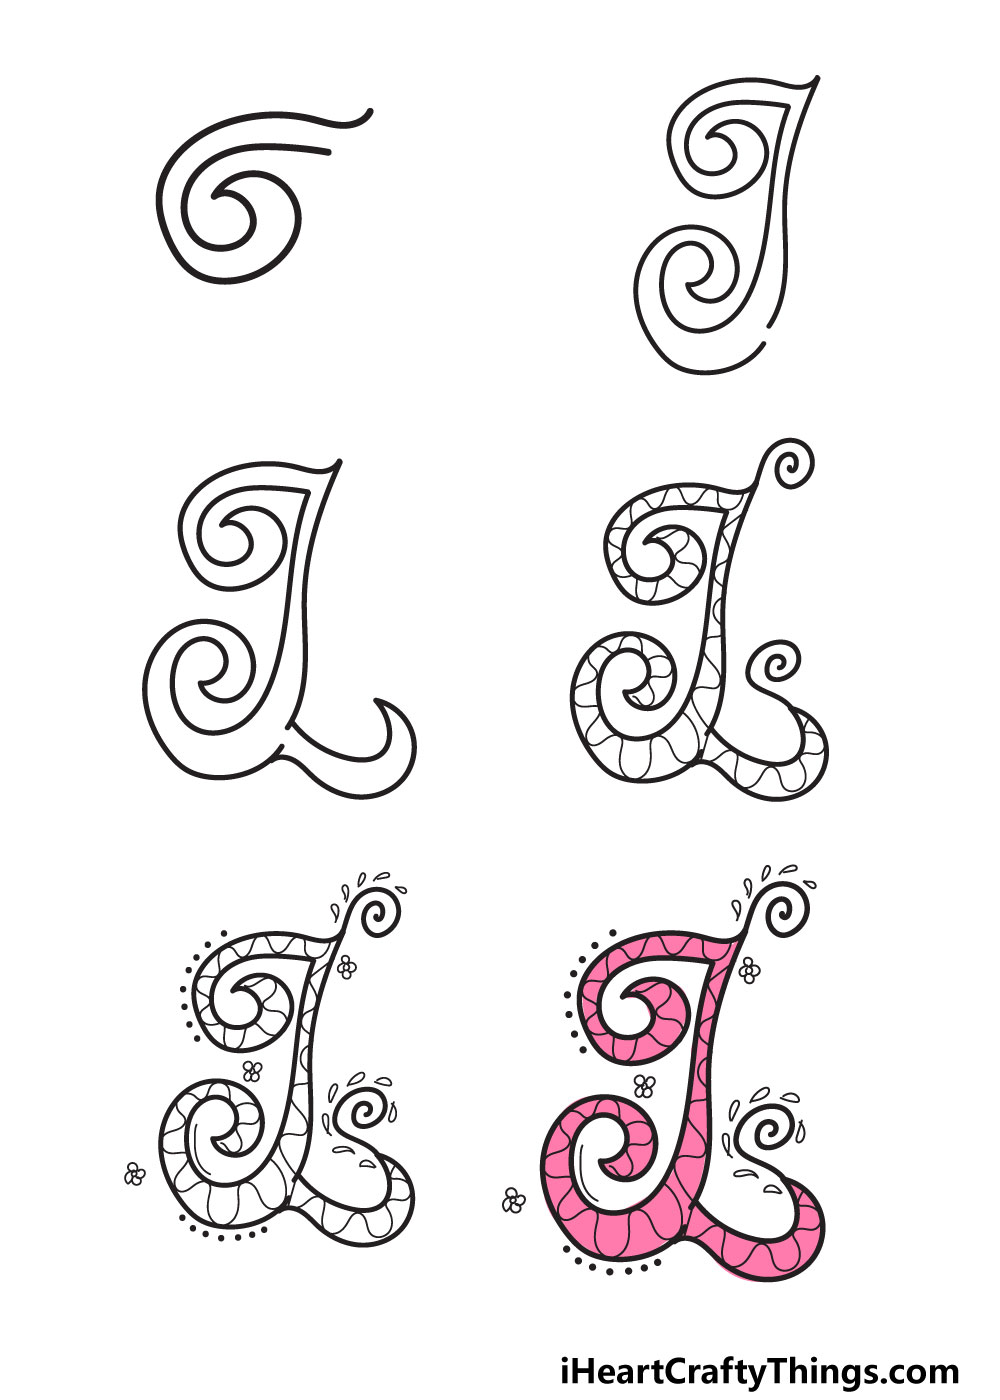
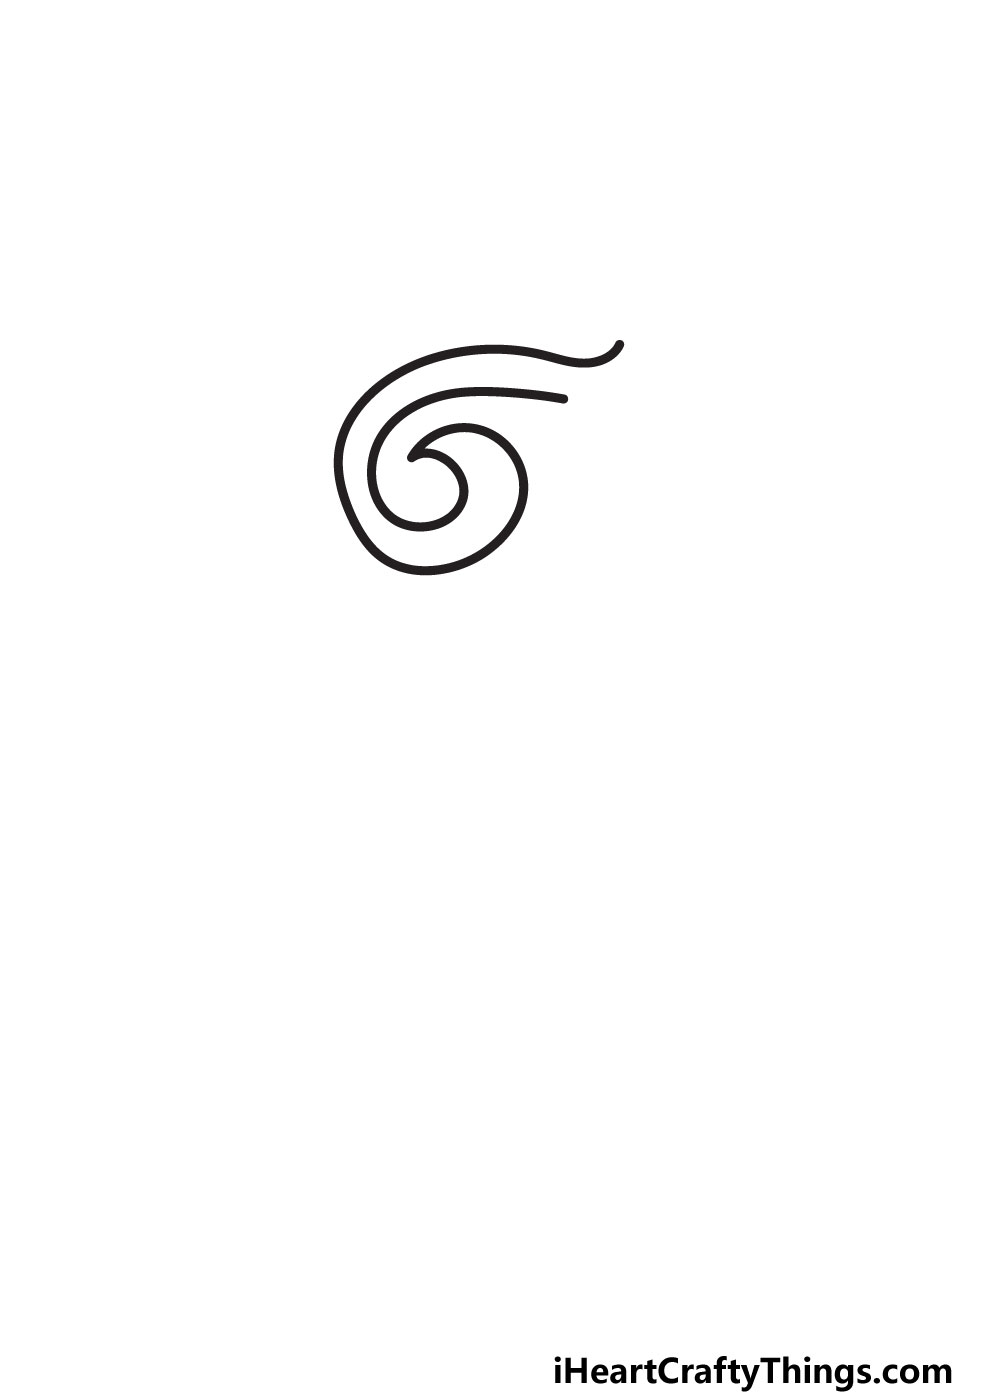
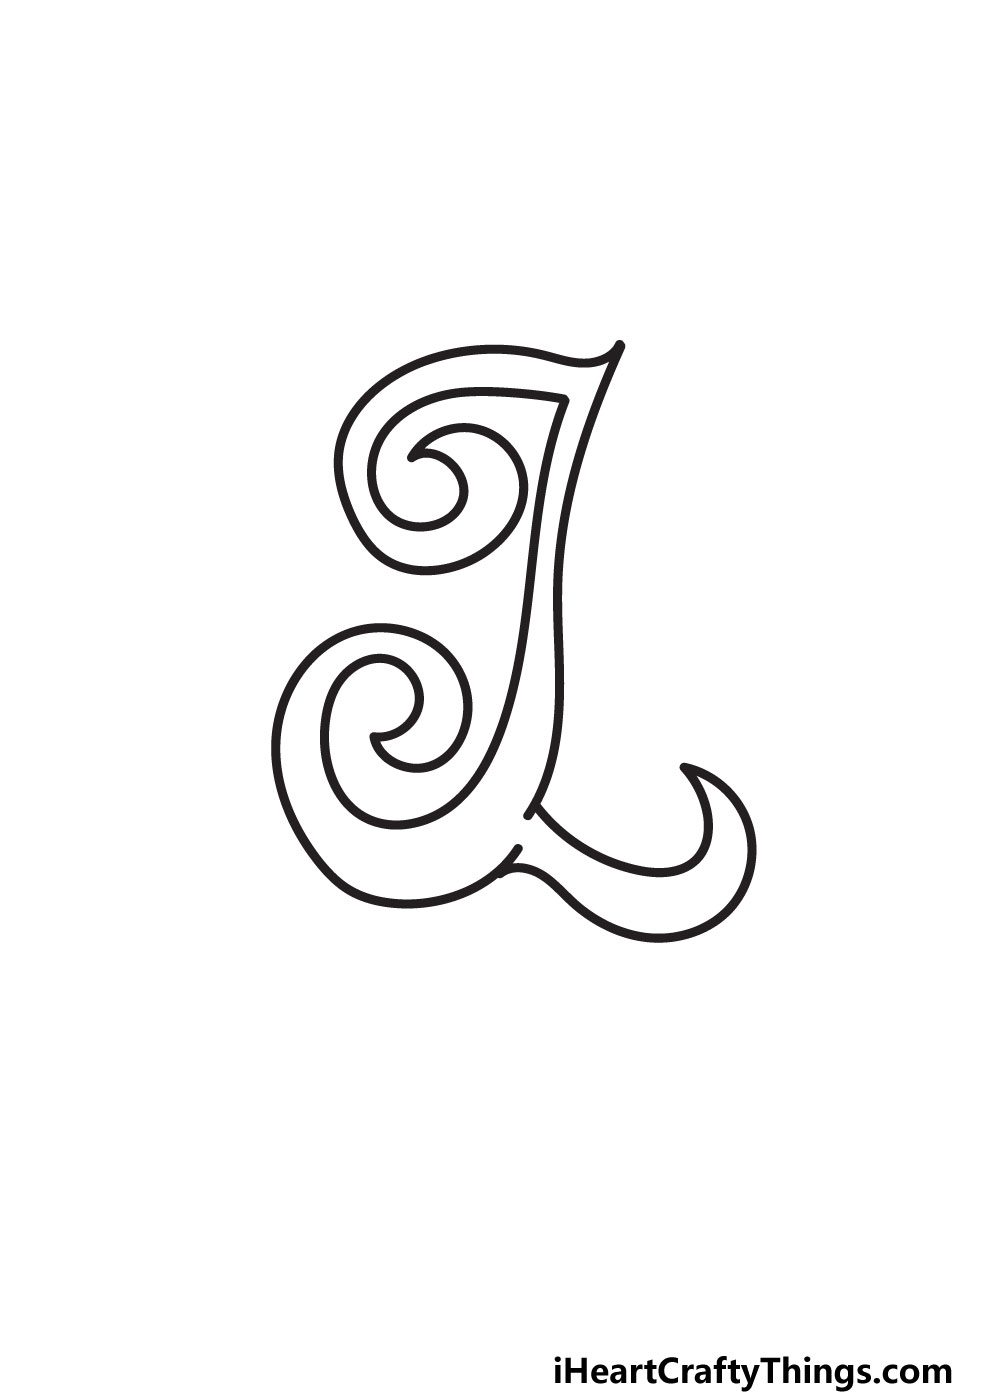
STEP 1:
In the introduction, we touched on how the capital letter L is a fairly simple one to write. When you’re writing it normally, it’s not one most people will struggle with.
We’re taking it to the next level in this guide, however, by adding all sorts of visual flourishes. Through it all, try to imagine what a regular letter L would look like when drawn in a similar size.
If you want to take this even further, you can draw out a regular letter L with your pencil. Even though the fancy letter L we will be drawing is more intricate, this will help you to maintain the shape of the letter.
With that out of the way, we can draw the first flourish of the letter. We always like to use spirals to make letters look fancy, so we will draw one of those now.
The spiral can be drawn using two lines that start close to each other and run parallel to one another as you draw the spiral.
They will curl in and then meet at a pointy tip at the center. Try to follow the spiral in our example closely as you draw.
You will also see that this spiral is at the upper left side of the letter in the final image. When you’re happy with how the spiral looks, we can then add the next section.
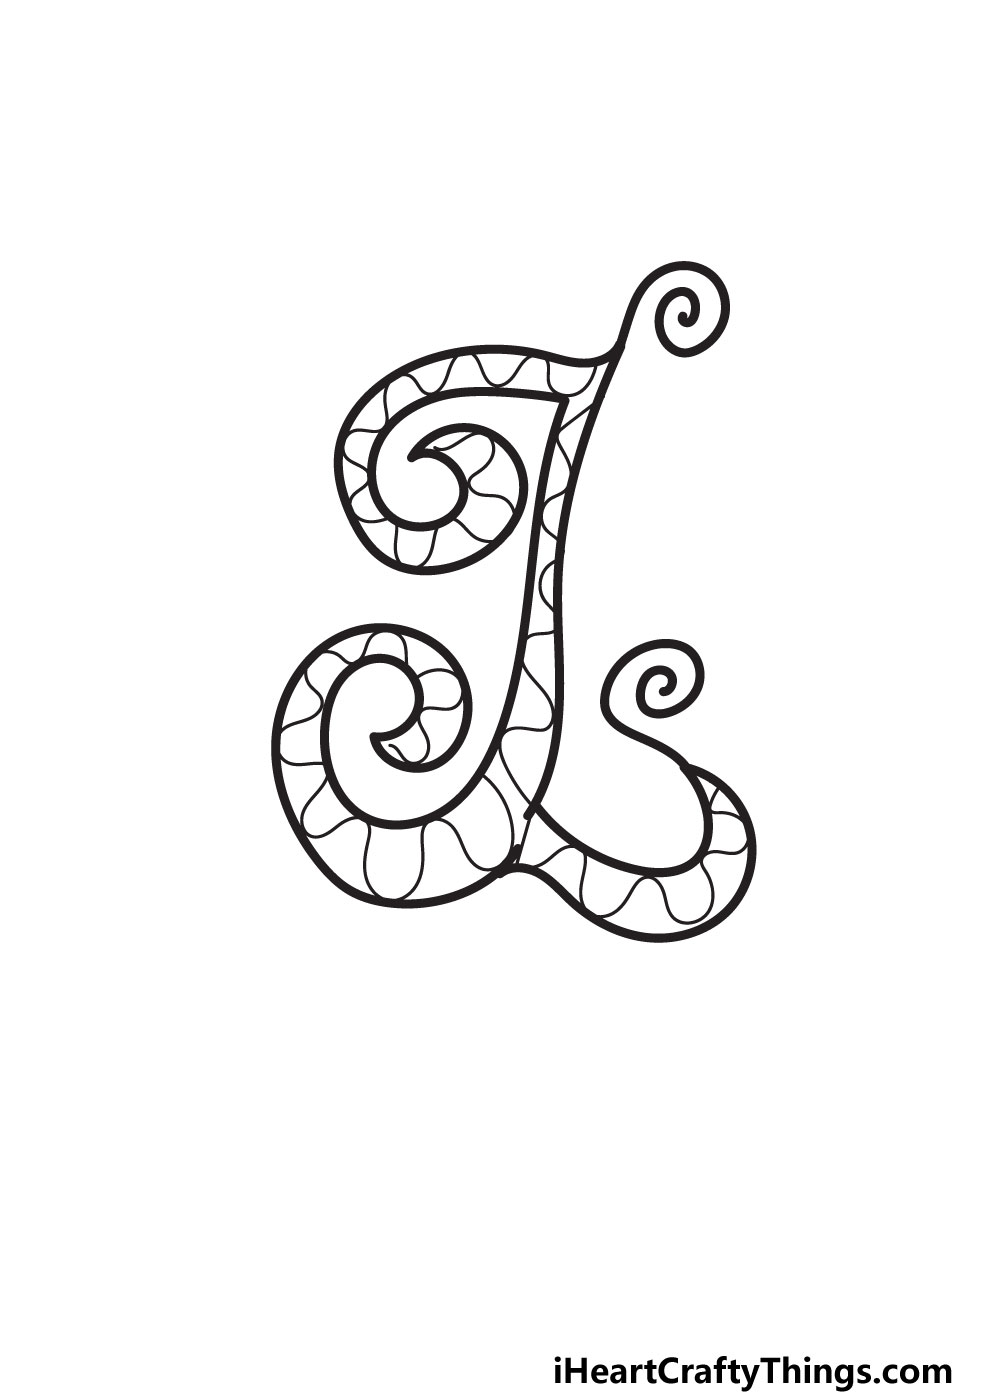
STEP 2:
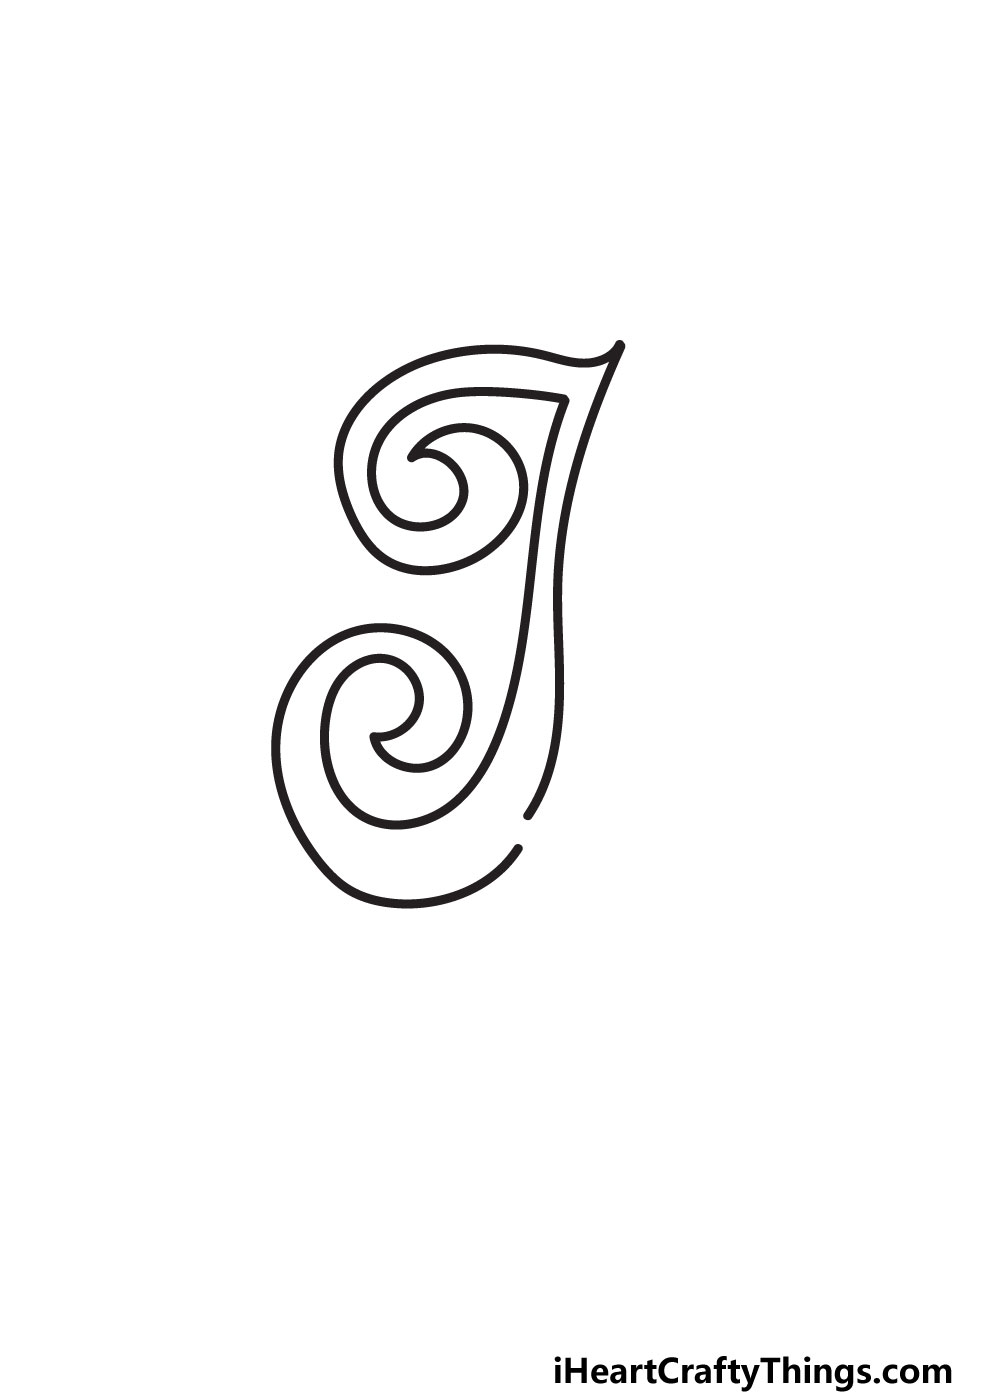
If you were to look at our image from step 2 and not look further, you may be forgiven for thinking we are drawing a letter J.
That’s not the case, though, and this will be even clearer by the end of the next step. For now, we will draw the main body of the letter.
You can start this by drawing a vertical line down from the top edge of the spiral’s opening from the first step. This will have a slight curl to it and will create a pointy tip at the top.
The line will stop near to but not quite at the base of the letter, and we will leave that for now. Next, we will draw a line down from the base of the spiral from step one.
This will also be a vertical, slightly curved line that runs mostly alongside the first vertical line. At the base, it will curl to the left to form a large, loose spiral shape.
The spiral will curve down towards the base and then up again. You will notice a small gap on the lower right side, and this is where we will add the next section in step 3.
STEP 3:
We drew quite a lot in the previous step, but there will be a lot less to draw in this step of your fancy letter L. Here, we will draw the base of the letter.
This will fill in that gap we left on the right side of the letter, and this base will take the form of a small, wavy shape.
This shape will curl up slightly to end in a sharp point. Then it will curl down and around again in a wavy line that closes out the rest of the gap.
With that done, the outline for your letter is complete, and we can focus on some interior details for the design. Be sure to neaten and clean things up before moving on, though.
For example, you should erase any pencil lines you used to plan the drawing if you followed that suggestion in step 1.
Be sure to not erase any of the final lines accidentally! You should also avoid smudging any lines if you drew the final design with a pen.
Then, we can start decorating in step 4, so let’s move on!
STEP 4:
When it comes to decorating this letter, you can make it as simple or as complex as you like. In our design, we did a halfway point between the two.
In doing this, we’re not so much presenting a rigid design you need to replicate as we are showing you some possibilities you can try out.
We started by adding some spiral lines to the tips of the letter on the right-hand side. The next details will all be inside the outline.
To fill in the interior, we went with a simple set of wavy lines all throughout the design. These not only look visually interesting but will also provide lots of spaces to add and contrast colors later.
You could go with any other patterns or designs you may prefer, however. If you want the lines to be straighter or maybe keep the interior blank, you should do so!
See where your inspiration takes you and we’re sure you will pleasantly surprise yourself. We shall add some final details in the next step to finish things up before we color it in.
STEP 5:
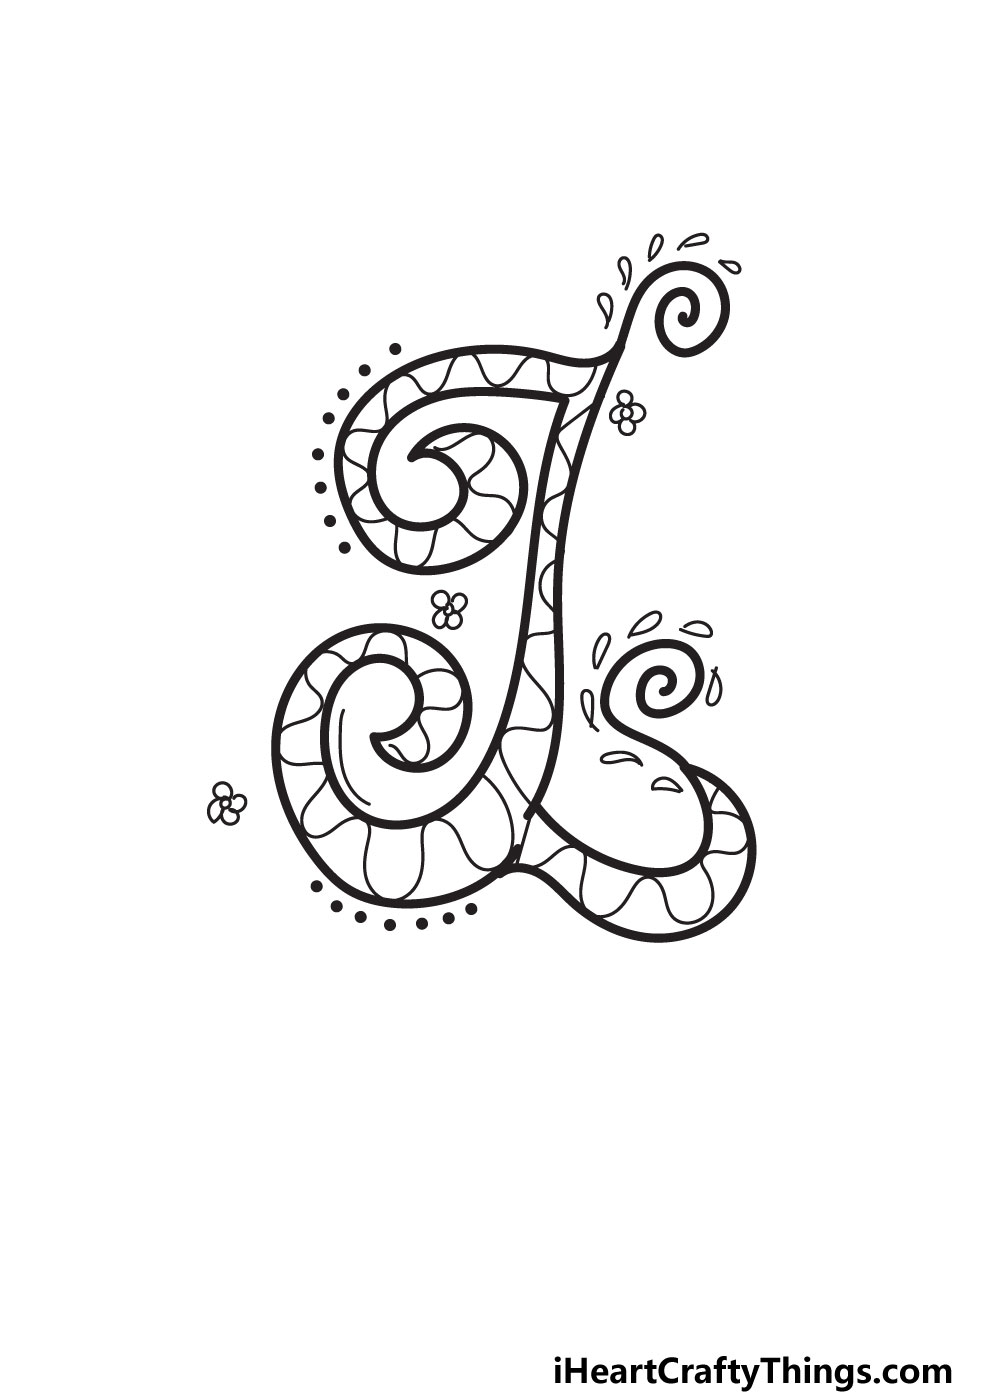
As if this letter wasn’t looking fancy enough already, we made it look even fancier with the details we added in this next step.
First, we added some dots along the outlines on the left side of the letter. Then, you will see that we added some small teardrop shapes around the spiral lines from the previous step.
Finally, we decided to incorporate a floral theme to the image. We did this by drawing some small flower shapes into the image.
These details are all basic examples of what you can add to the picture to make it look more intricate. You can move these details around a bit or add more of them if you like.
This is also a good opportunity for you to think of some extra details you can add to surround the letter. There are so many possibilities!
You also don’t need to stop at adding details around the letter, as you can also fill the background with some interesting ideas.
That’s something you can get creative with, but we will also cover some ideas to try after the final step.
STEP 6:
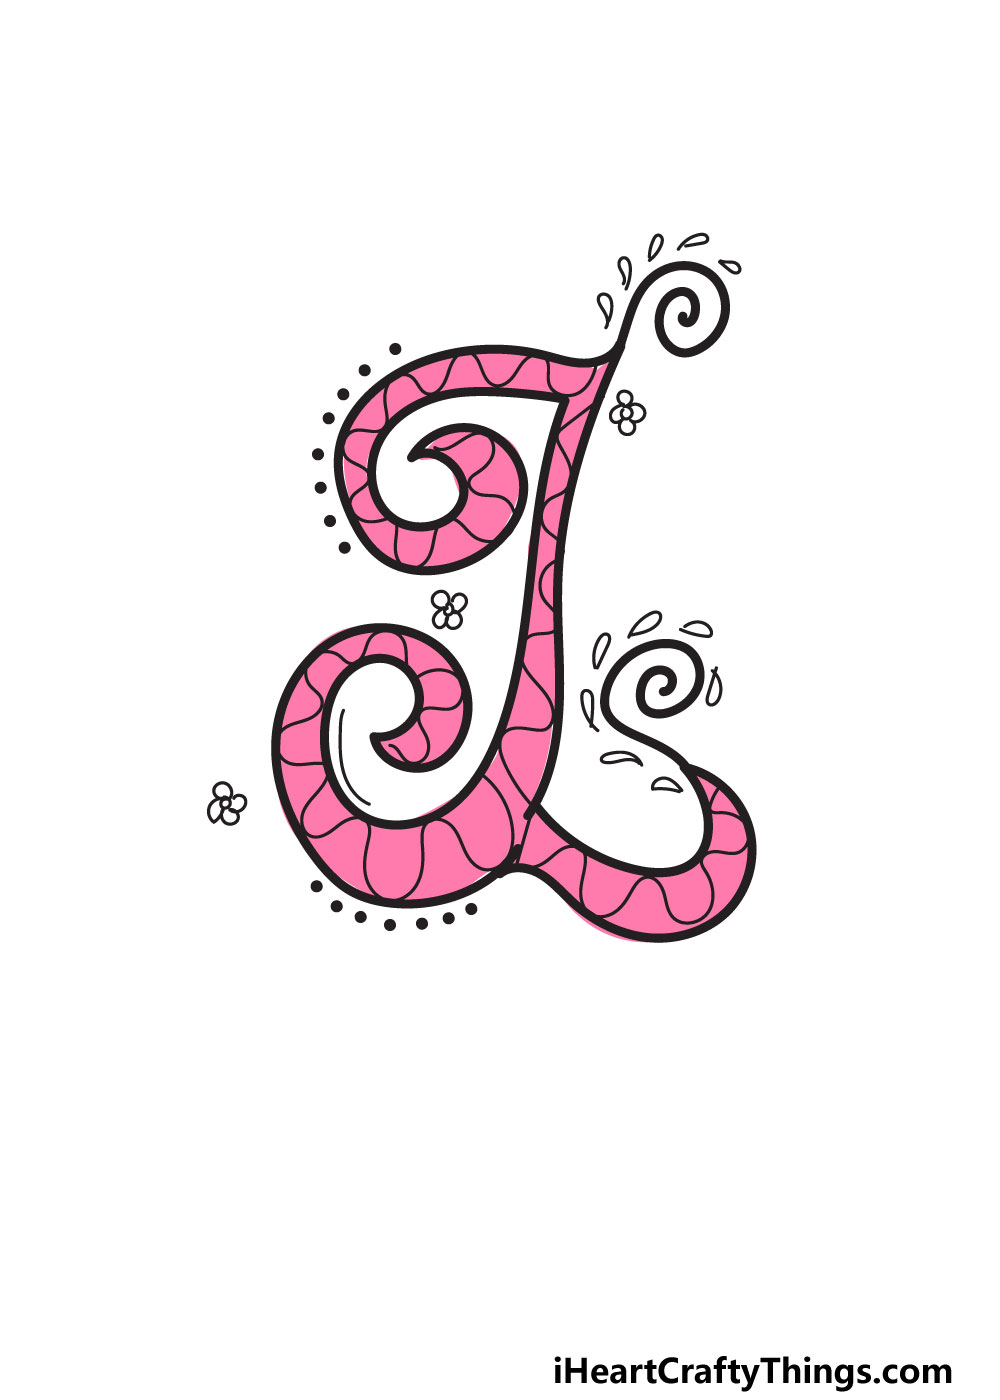
Now you’ve arrived at the final step of this guide, where we will add some color to your fancy letter L! This is another step where you can take over and show off your creativity.
In our reference, we once again show off just one possibility for color that you can go for. We chose a pretty pink color to give the letter an elegant look.
You can depict this color using your favorite art tools and mediums, but you could also use any other colors you like.
There are many ways you can get creative with it too. You could use colored pens to draw over the line details in the letter and then use complimentary colors in between these lines.
That is just one of many ways you can color in this design, but you can really get creative with it and see what happens!
What colors will you choose?
My Final Tips To Make Your Fancy Letter L Drawing Even Better!
To finish off this guide, we wanted to go over a few ideas you could use to make this drawing even more unique. One way would be to create a theme around the letter.
For example, you could write out the word London using your letter L and then adding the rest of the word in a similar fancy style.
Then, you could draw some famous London landmarks surrounding the word to make a stylish tribute to the town. It’s just one example of how you can create a theme for the picture!
You could also use the names of people you know, specifically if their names start with the letter L. We’re sure whoever you choose would be thrilled to see their name in such a fancy design!