When you hear the word coyote mentioned, you might have a certain unfortunate cartoon character come to mind.
These canine scavengers are efficient in how they navigate their environment and use their wits to survive their tough environments.
These creatures are also recognized by their eerie nighttime howls, which has made them feature in many mythologies and stories. Many people love this wily animal too, and would like to know how to draw a coyote.
This very guide will aim to answer that question for you!
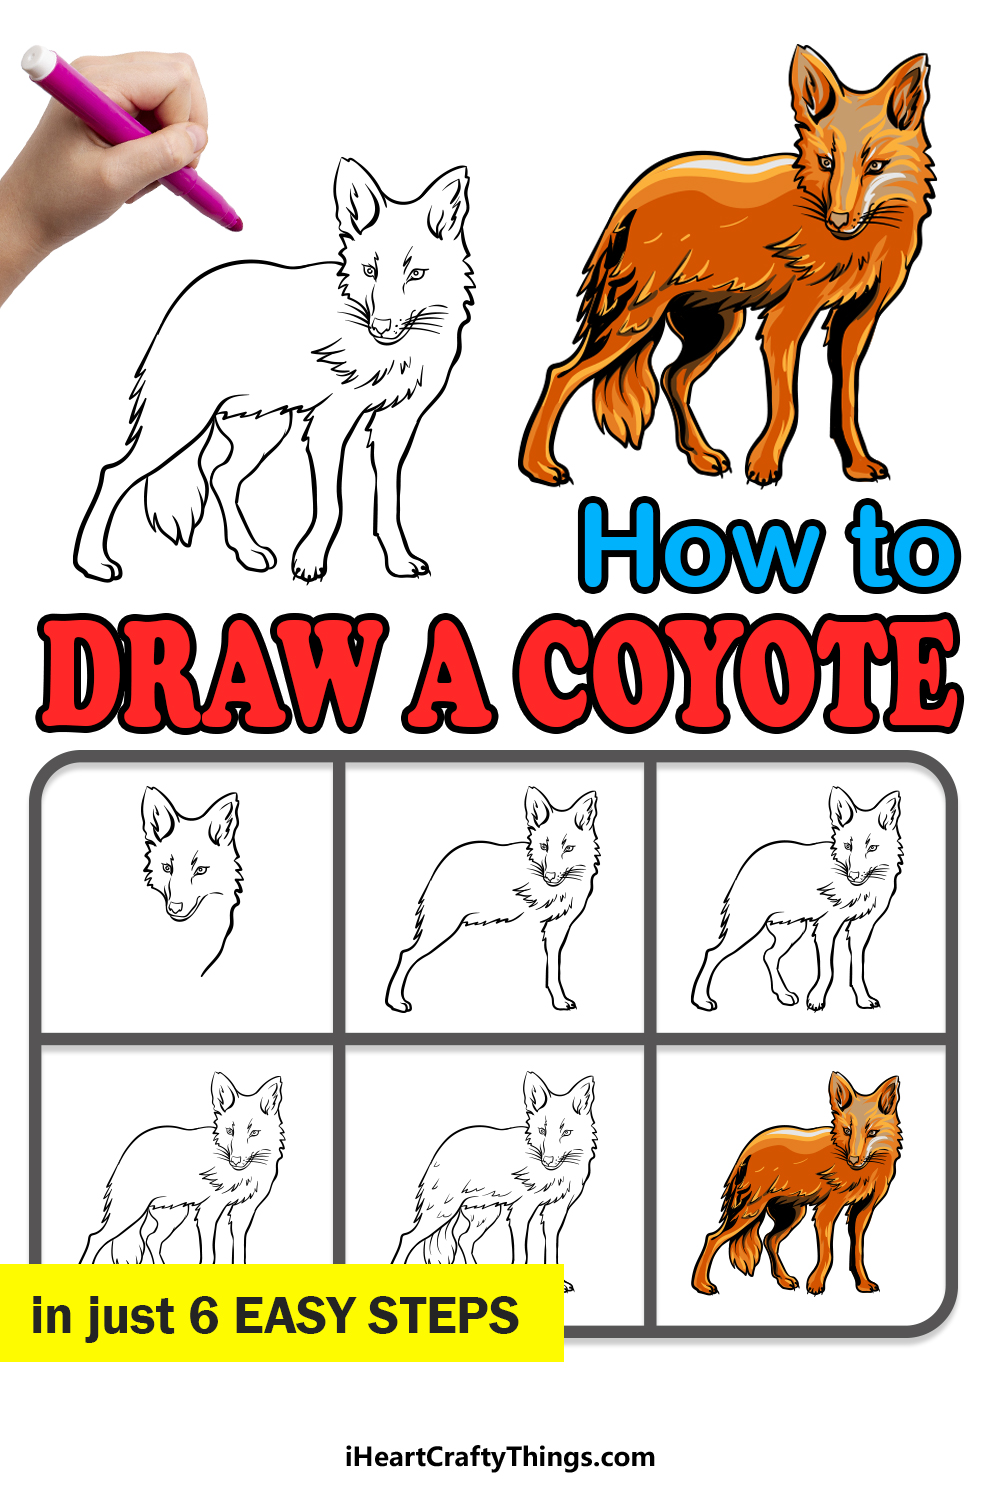
Our step-by-step guide on how to draw a coyote in just 6 steps will show you how to draw this incredible animal.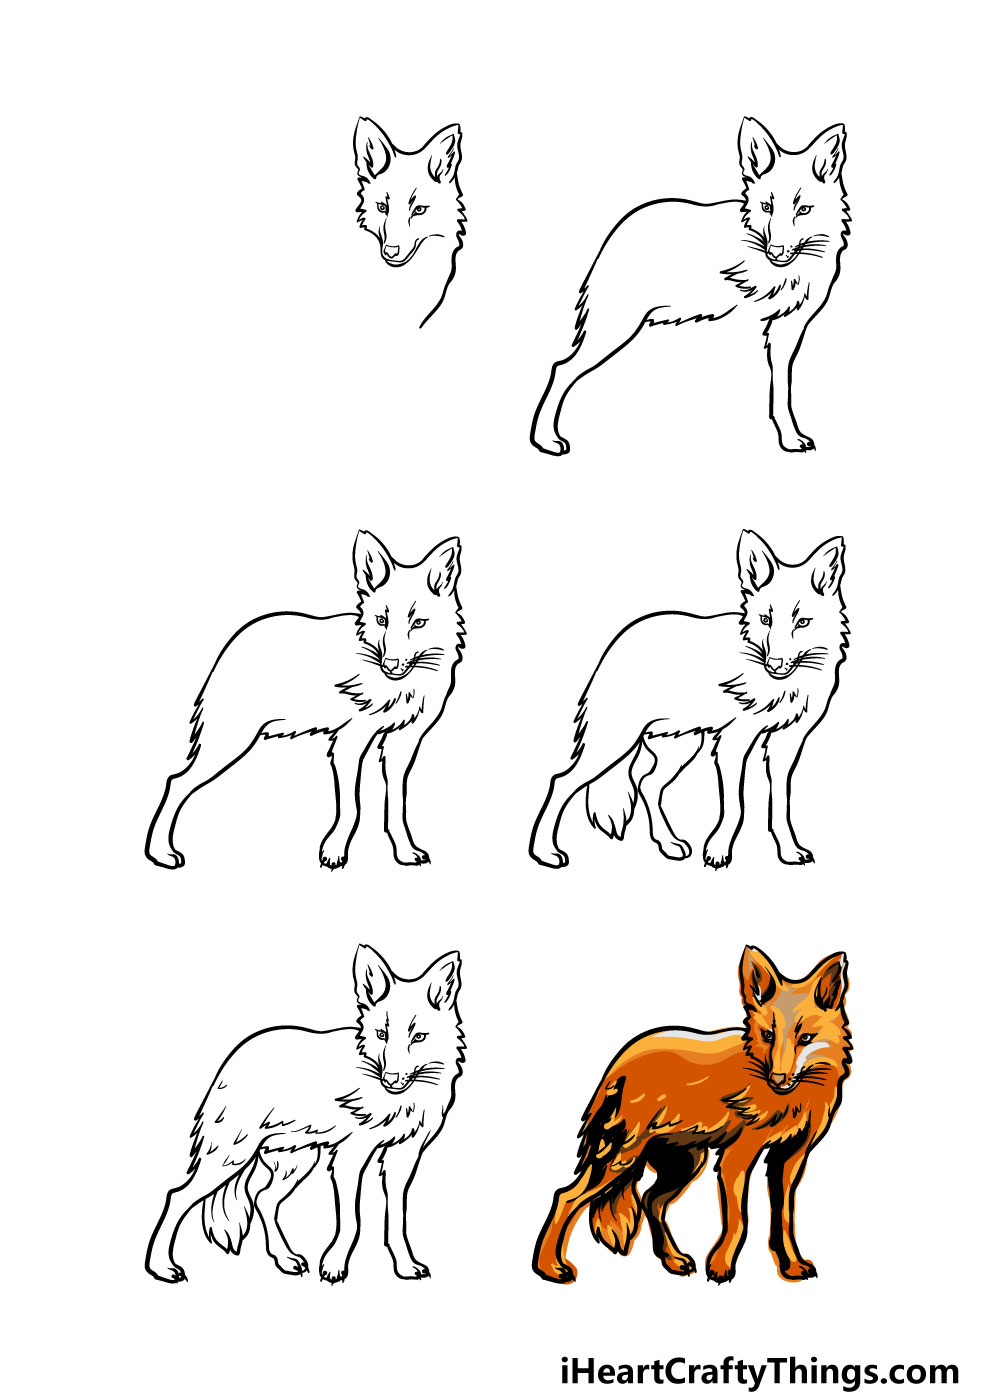
How to Draw A Coyote – Let’s Get Started!
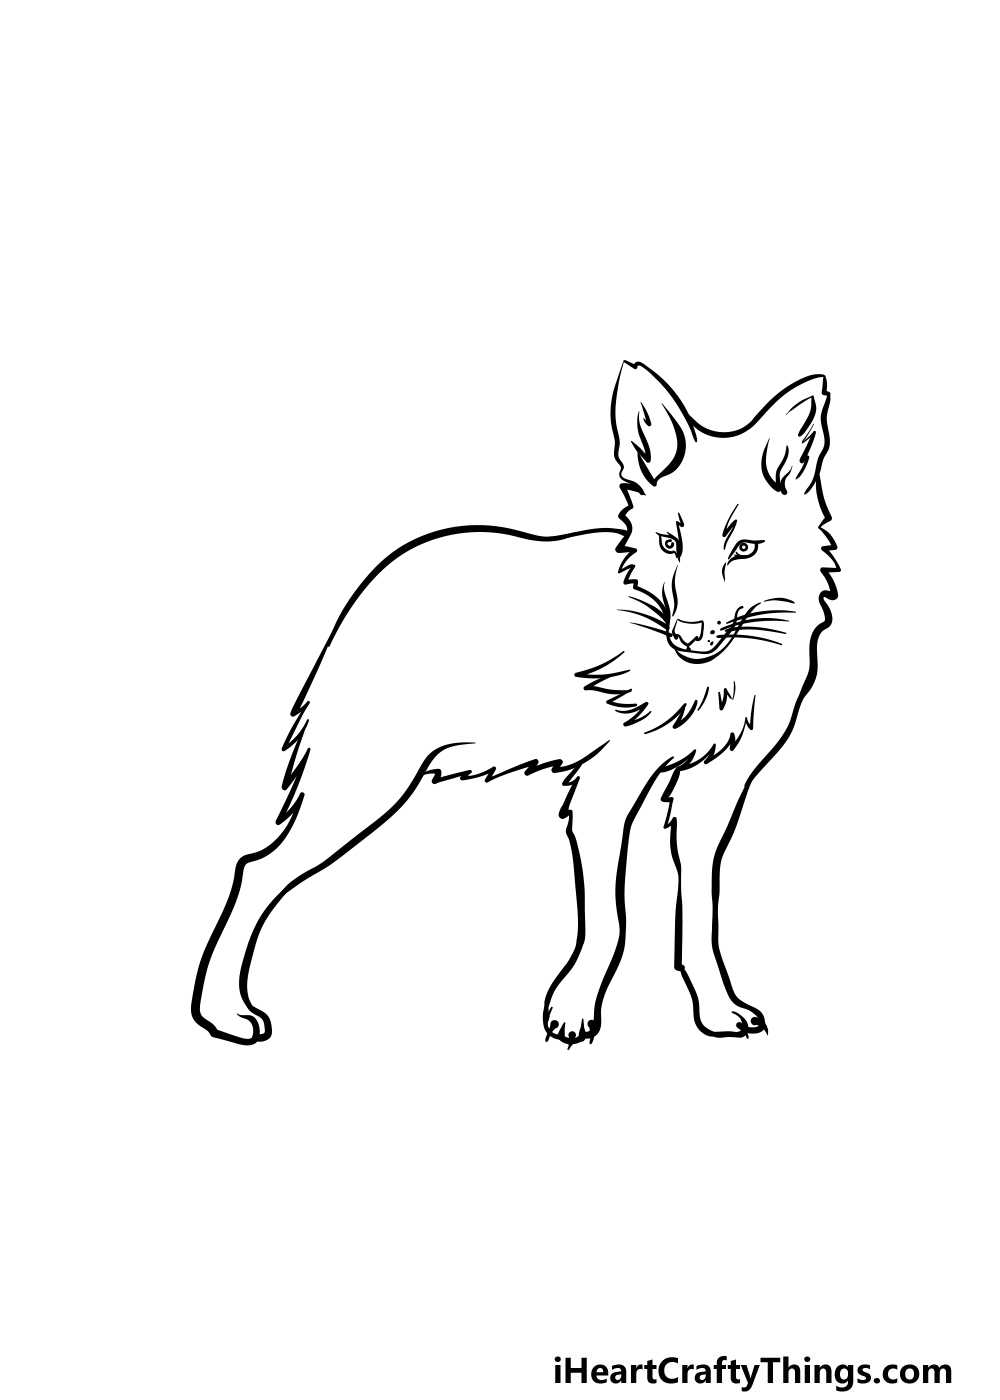
Step 1
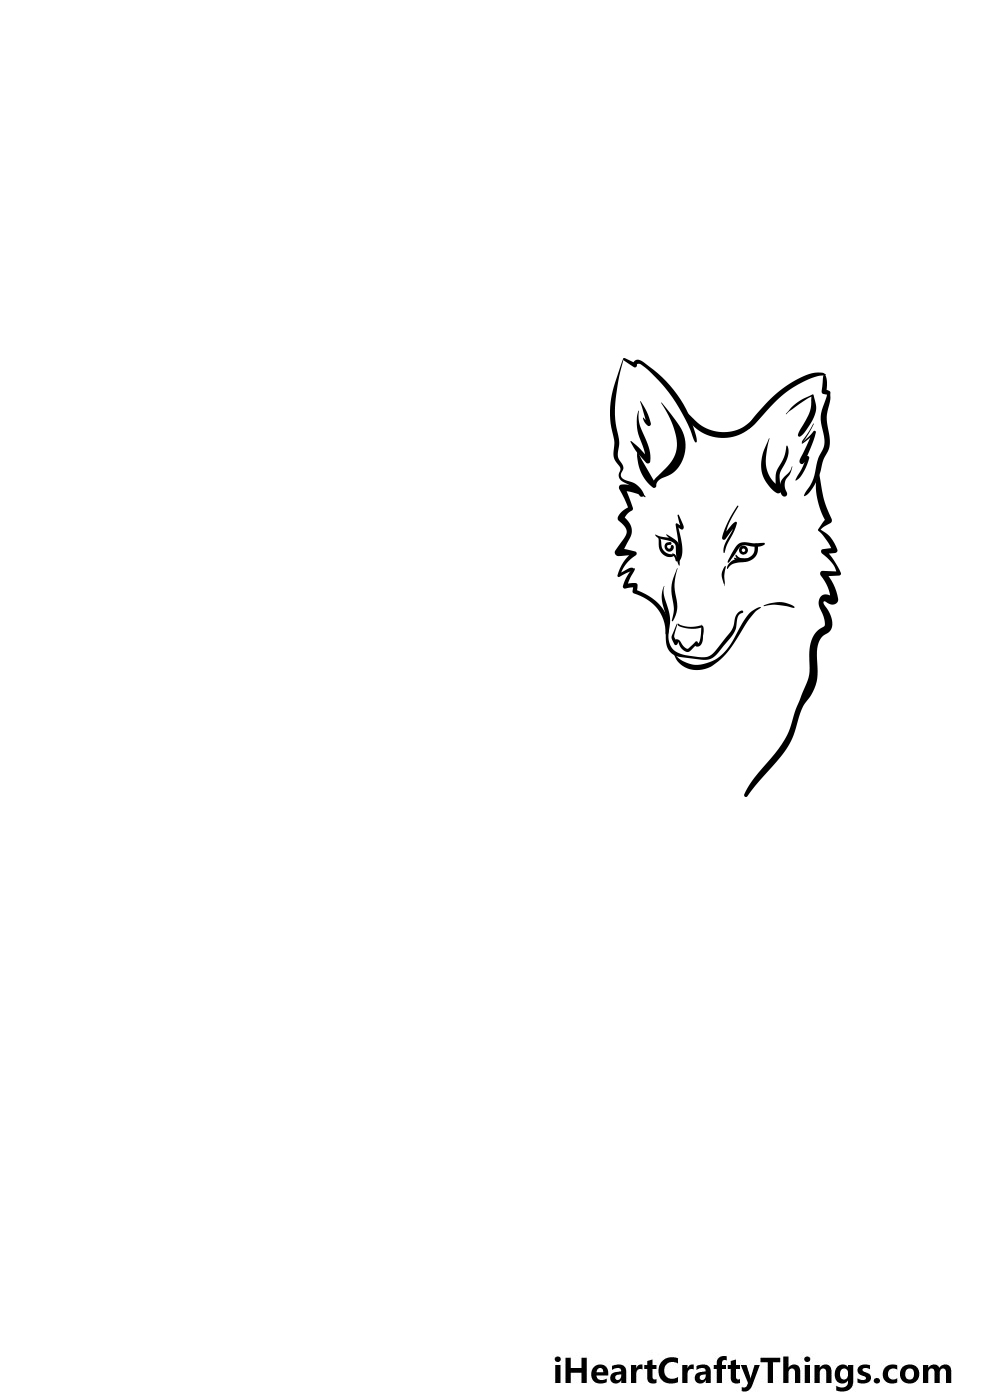
In this first part of our guide on how to draw a coyote, you will be using your pencil to draw some rough outlines for the coyote that you will be drawing.
To do this, carefully follow the line layout that we have in the reference image to make the rough coyote shape.
While it will be quite rough for now, we will be adding much more detail to it in the subsequent steps.
Once you’re happy with how these pencil lines are looking, you can use a drawing pen or a darker pencil to draw the face of the coyote in more detail.
Throughout this drawing, we will be using lots of more jagged lines to make the coyote look a bit furrier.
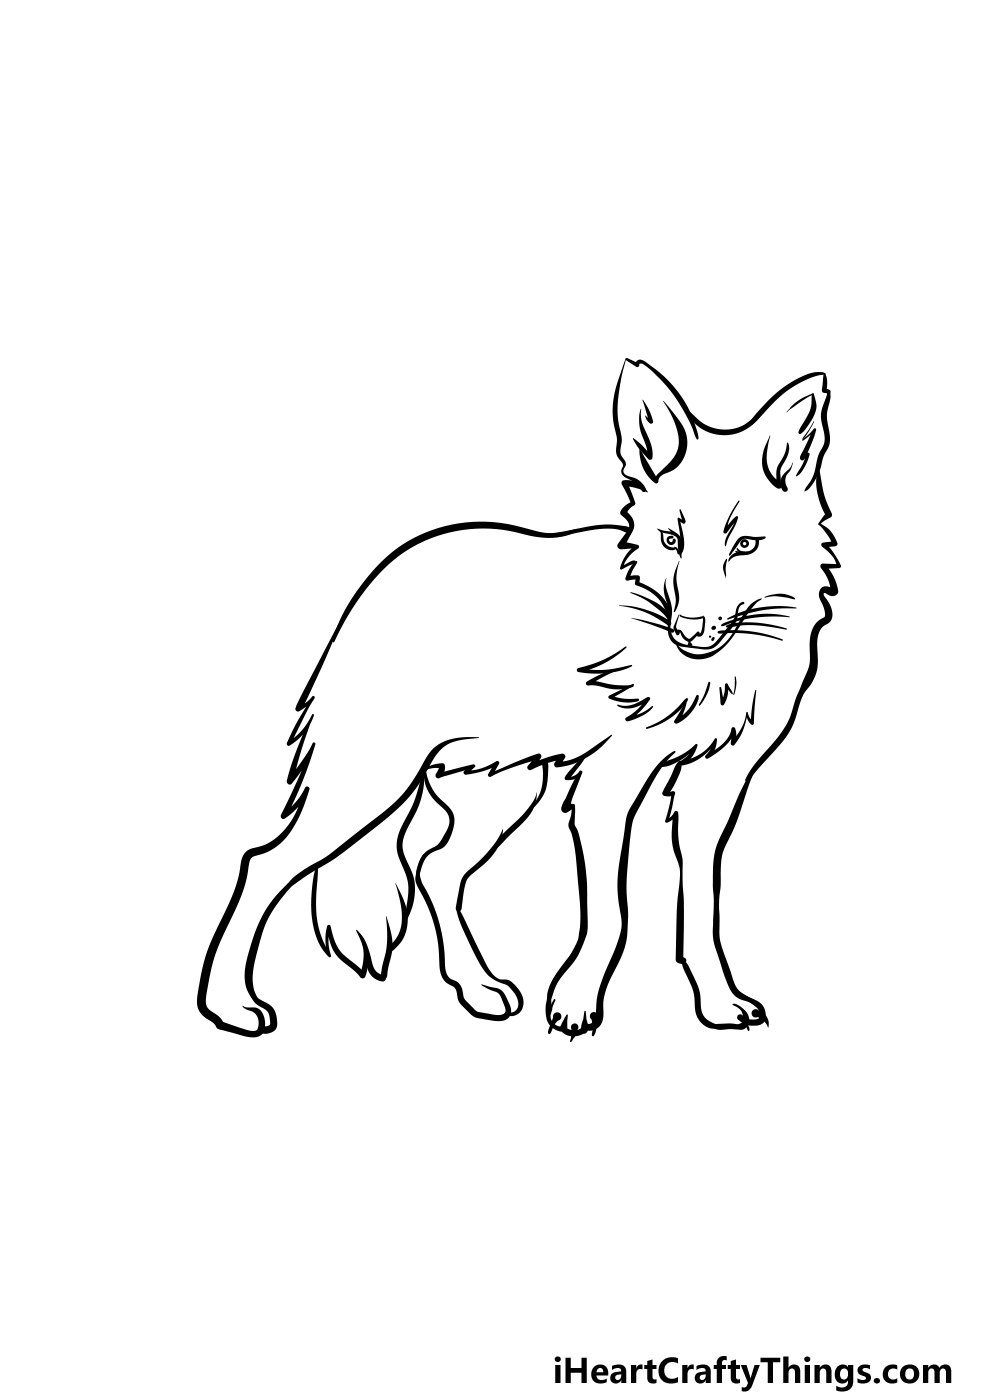
Step 2 – Add some pen detail to the body and limbs
This second step of your coyote drawing will see you using your pen to go over more of the guide lines that you drew in the previous step.
For this part, you can draw over the back of the coyote along with the two legs that you can see drawn over in the reference image.
You can also add some more of those jagged lines that we mentioned for the chest of the coyote.
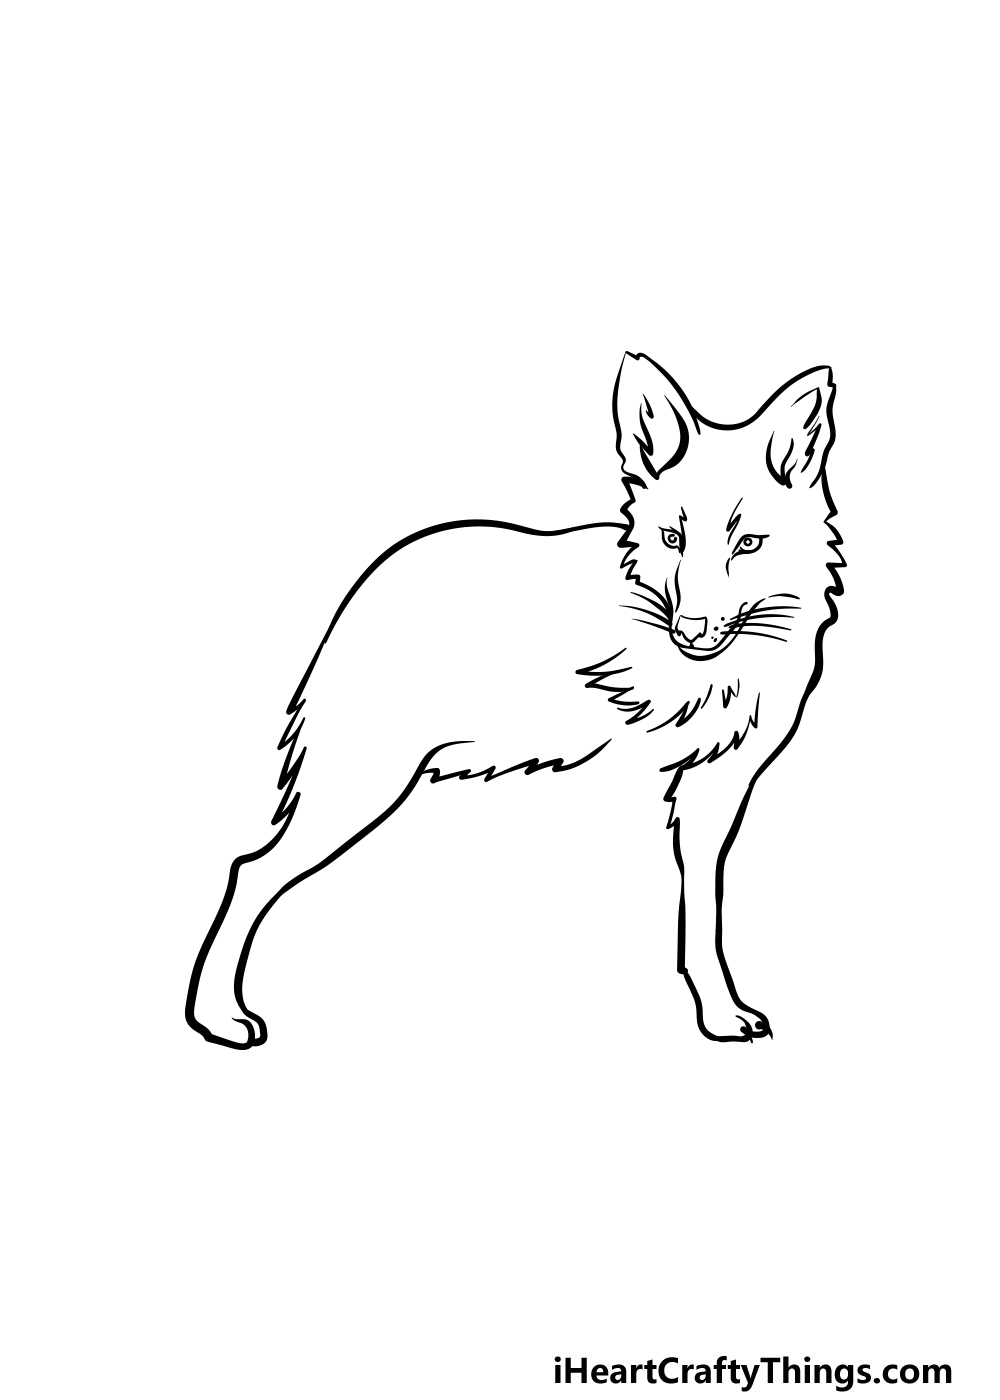
Step 3 – Now, finish off the remaining two limbs
Continuing on with this guide on how to draw a coyote, you can now add more pen lines over the remaining two undrawn legs.
Simply go over the pen lines as you have been doing, and add some detail to the legs as you go. That’s all there is to it for this step, and you’re ready to move on.
Step 4 – Draw a tail for your coyote drawing
Before moving on to the final details of your coyote drawing, there is one more aspect to add. All you need to do for this step is draw the tail of the coyote.
The tail is quite thick and bushy, and you can end it in some more jagged, pointy lines to make it look fuffy.
Once you’ve got the tail drawn, you can start to erase the pencil lines from the very first step, as you won’t be needing them anymore.
When you start erasing, you’ll want to make sure that all of the pen lines are completely dry first!
Step 5 – Now, you can add some final details to your coyote drawing
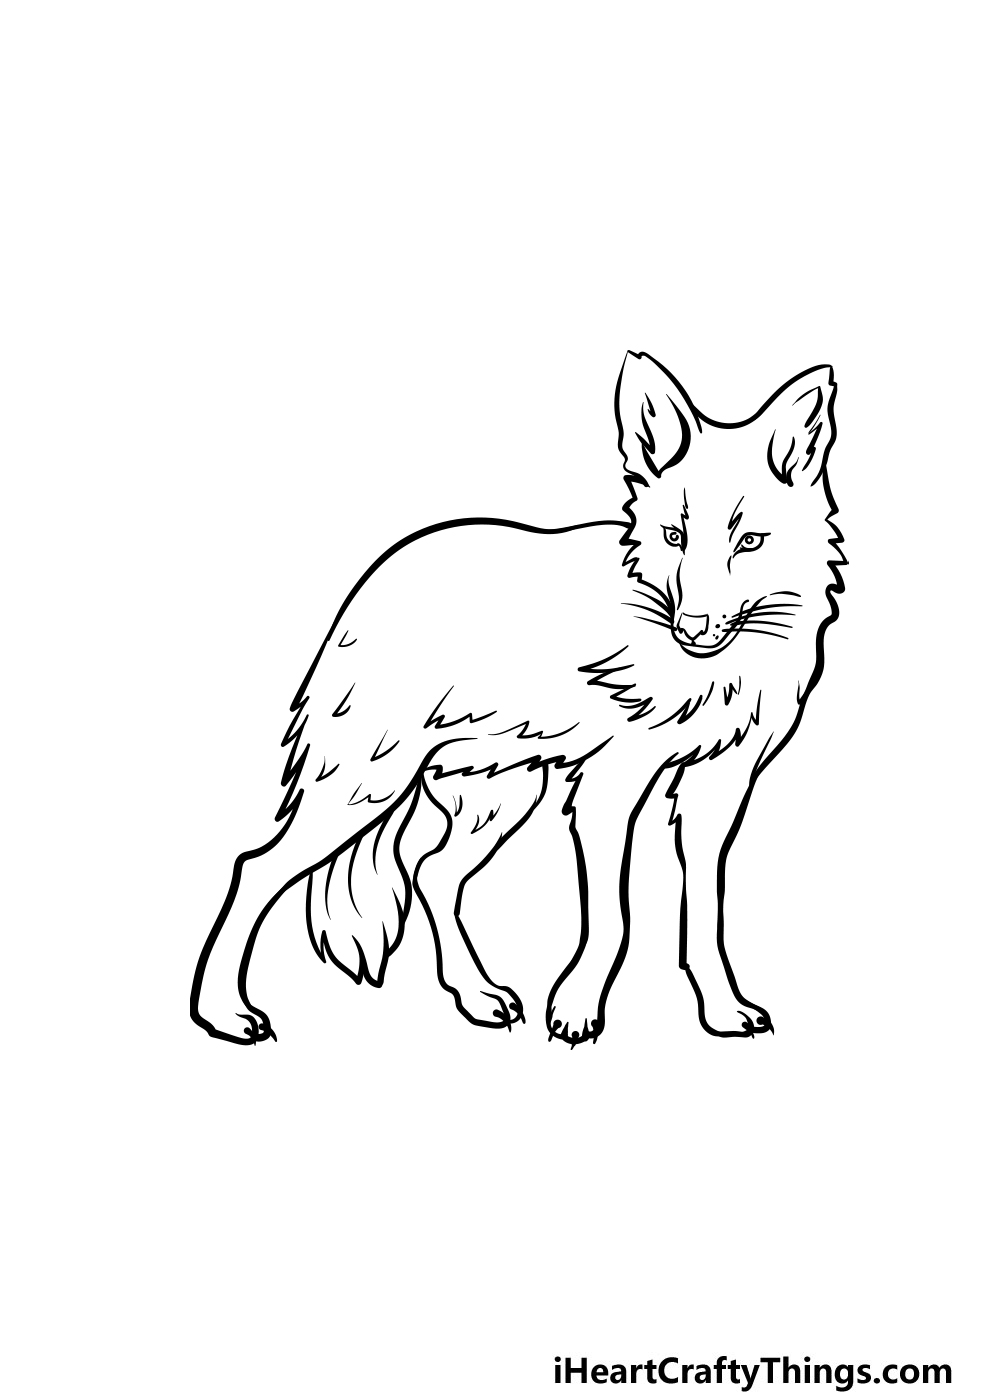
In this part of our guide on how to draw a coyote, we will be adding some final details, touches and elements to the picture.
The details that we have on our reference image are comprised mostly of some small, sharp lines throughout the coyote to give it some more furry detail.
These are the details that we would add, but you should feel free to add any of your own that you would like for this image!
Some ideas you could use would be to add some background elements to show what kind of environment this coyote is in, and you could add some seasonal details as well.
If you’re feeling extra creative, you could also add some more animals to the picture alongside it. What do you think you will do to finish off this coyote drawing?
Step 6 – Finish off your coyote drawing with some color
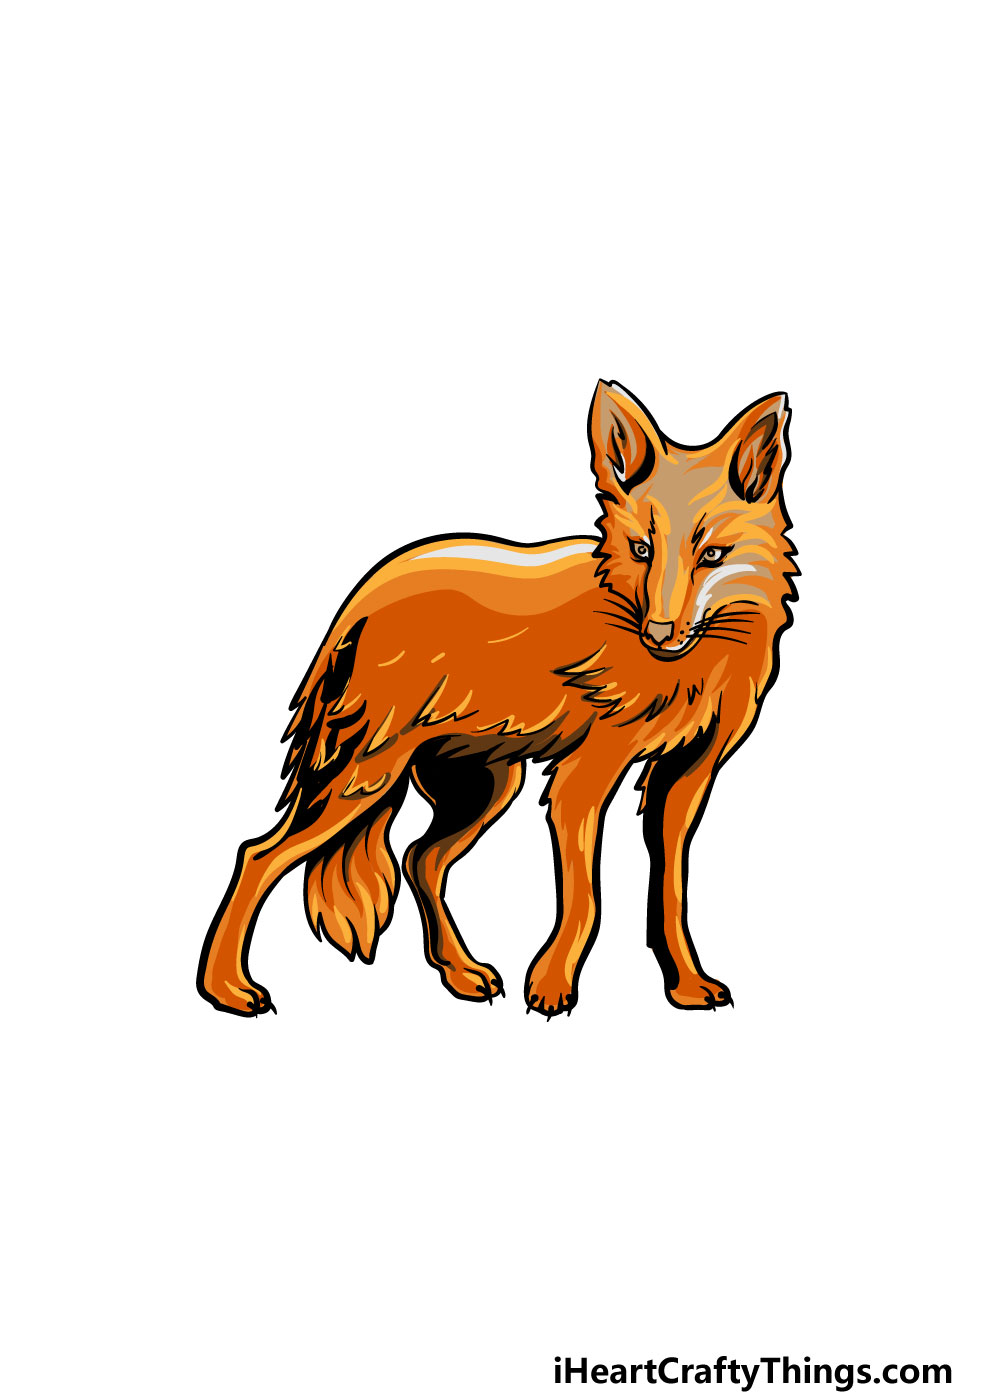
That brings us to the final step of your coyote drawing, and this is the step where you get to show off your creativity by using some beautiful colors to finish off your picture.
Coyotes can come in many different colors, and we went for the dark orange coloring that many coyotes have for our reference image.
This is just one of a few color schemes you could use, however! Coyotes can also come in shades of greys, whites, blacks and more.
You could also go for a more stylistic image if you prefer by using some bright and creative colors. It’s completely up to you, and there is no wrong way to go about it!
When you have decided which colors you will use for your picture, all that remains is picking which art mediums you would like to use.
If you want a more classic look, you could use painterly mediums such as acrylic paints and watercolors.
You could also go for more modern-looking mediums such as colored pens or markers for colors that pop!
How will you finish off your amazing coyote drawing with color?
Do this to take your coyote drawing to the next level
Make your coyote sketch even more stunning with these fun and easy tips!
We love the pose and expression that we created for this coyote drawing. If you wanted to make it more unique, you could change the pose and look of the coyote as you see fit.
This could be done whether you want to keep it to one coyote or maybe want to add some friends for this one. You could do this by following the steps of the guide again and then altering a few of the details.
We would be interested to see what kinds of poses you can come up with!
Another way to make your drawing of a coyote even more interesting would be by adding different kinds of animals. These could be animals that you would expect to see in the same environment as a coyote, or they could be any others you like.
For a fun twist, you could draw a realistic roadrunner next to the coyote for a take on the classic cartoons! What other animals could you add?
If you prefer a more cartoony or stylistic design, you could change the way that this coyote sketch looks. Once you feel confident with this drawing, you could easily change the entire look of the design.
You may want to turn it into a cartoon or maybe go for something more abstract. This depends on you, so what kind of style would you like to create for this coyote?
No matter what you choose to do for this coyote drawing, you can have a lot of fun playing around with colors. We showed you how to create a wonderful look for the colors in our guide, but these colors are just a suggestion!
You could make the colors even brighter or maybe go for something more muted. Be sure to play around with your favorite art tools and mediums in order to make the colors look exactly as you like.
What kinds of colors would you like to use?
Your Coyote Drawing is Complete!
With that, you have successfully completed this guide on how to draw a coyote! When you first saw the furry little coyote you would be drawing it may have looked intimidating, but we hope that this guide made it fun and easy to do!
Taking on a new drawing is always made much easier when you have some simple steps to follow, and it can be made more fun this way too!
Your drawing doesn’t have to end when this guide ends, however. You can keep the fun going by adding some of your own details, elements, backgrounds or creative colors and art mediums.
There are so many ways that you can put your own spin on this drawing, and we can’t wait to see what you come up with!
When you’re ready to take on more drawing challenges, we have plenty of awesome drawing guides for you to enjoy on our website! We upload new guides frequently, so be sure to check in often!
We would also love to see your completed coyote drawing, so please feel free to share your artwork on our Facebook and Pinterest pages for us to enjoy!