Brew up an incredible picture by following this guide on how to draw a coffee cup. Grab a cup of coffee and let’s begin this guide!
Coffee is a very popular beverage for people around the world. Billions of people enjoy starting their day with a cup of coffee, and it’s popular to have throughout the day for a spark of energy.
There are many different kinds of coffee that can be enjoyed in so many ways. It’s not practical to try out all of the possibilities in one go, as it would be a bit too much caffeine!
You can do so by designing your own coffee cup. I’ll show you everything you need to know in order to make it much simpler.
Once you have finished the guide, you could add a background or show what you would like to enjoy with this cup of coffee.
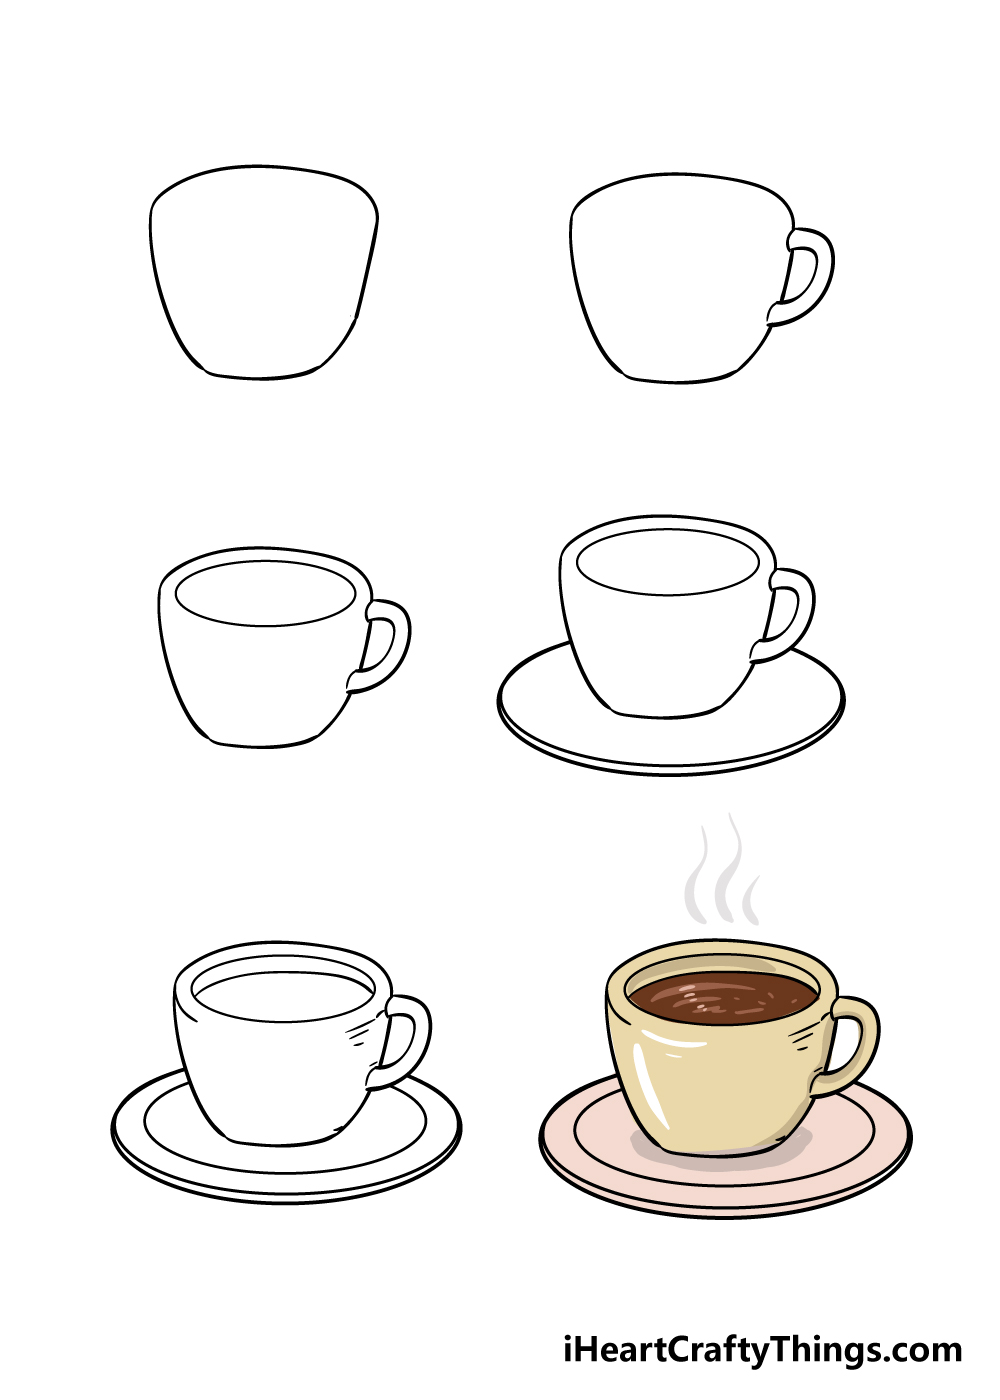
Watch These Steps To Make Your Coffee Cup Drawing
How to Draw A Coffee Cup – Let’s get Started!
Step 1
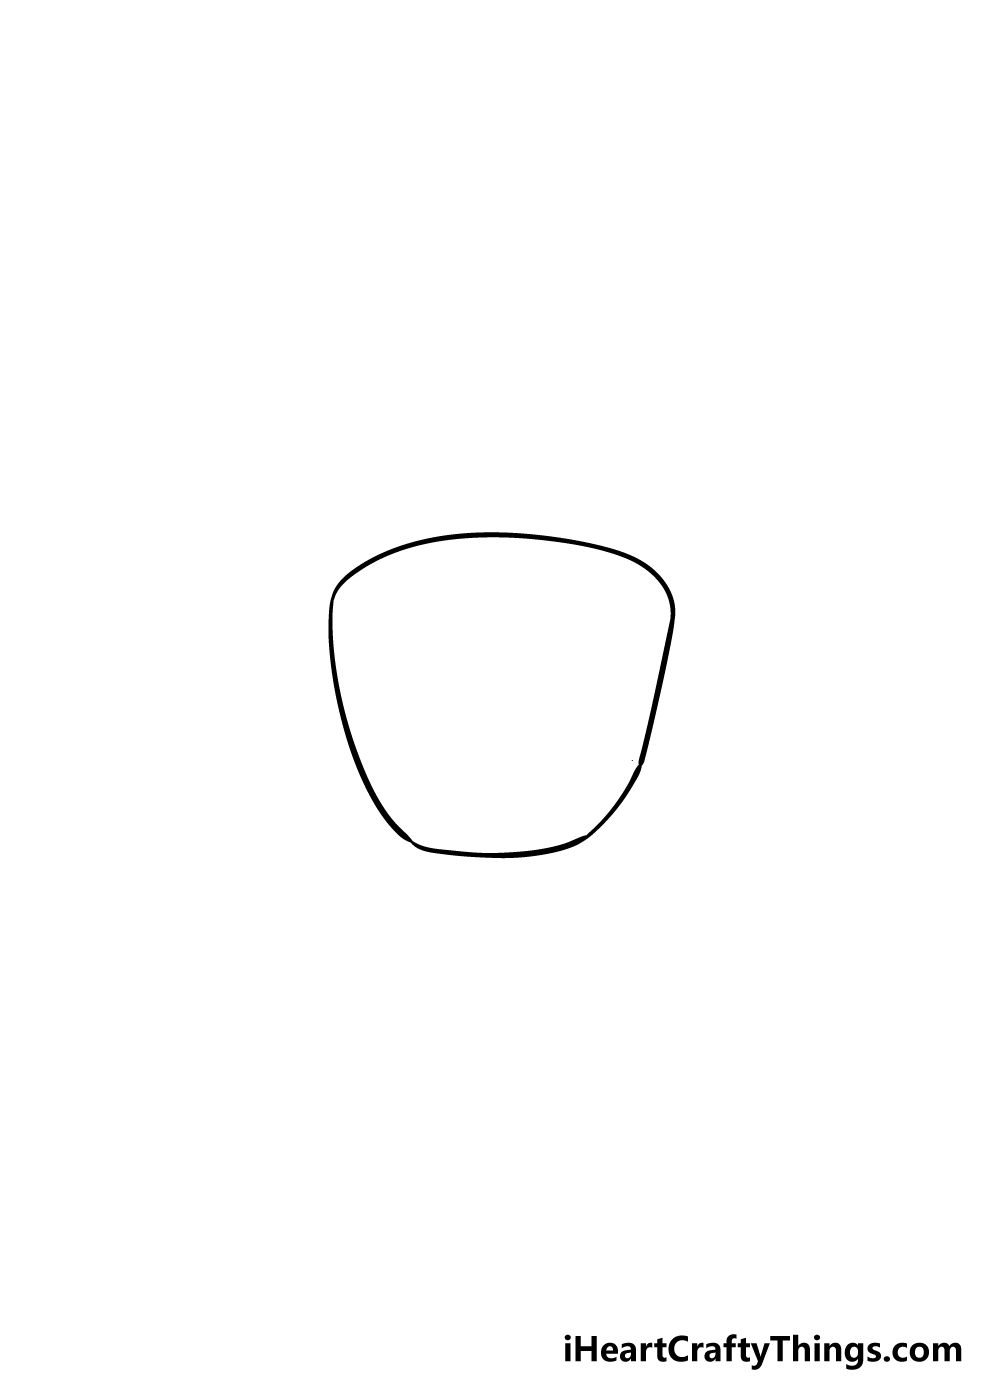
To get this guide on how to draw a coffee cup started, we shall begin with the outline of the cup itself. The cup will be slightly wider at the top with a slight curve to it as well.
The sides will be somewhat straighter, and the base of the cup will be a bit more narrow than the top while also looking a bit curved.
The reference image will give you a good idea of what it should look like! Once you’re happy with how it looks, you’re ready for step 2.
Step 2 – Draw the handle of the cup
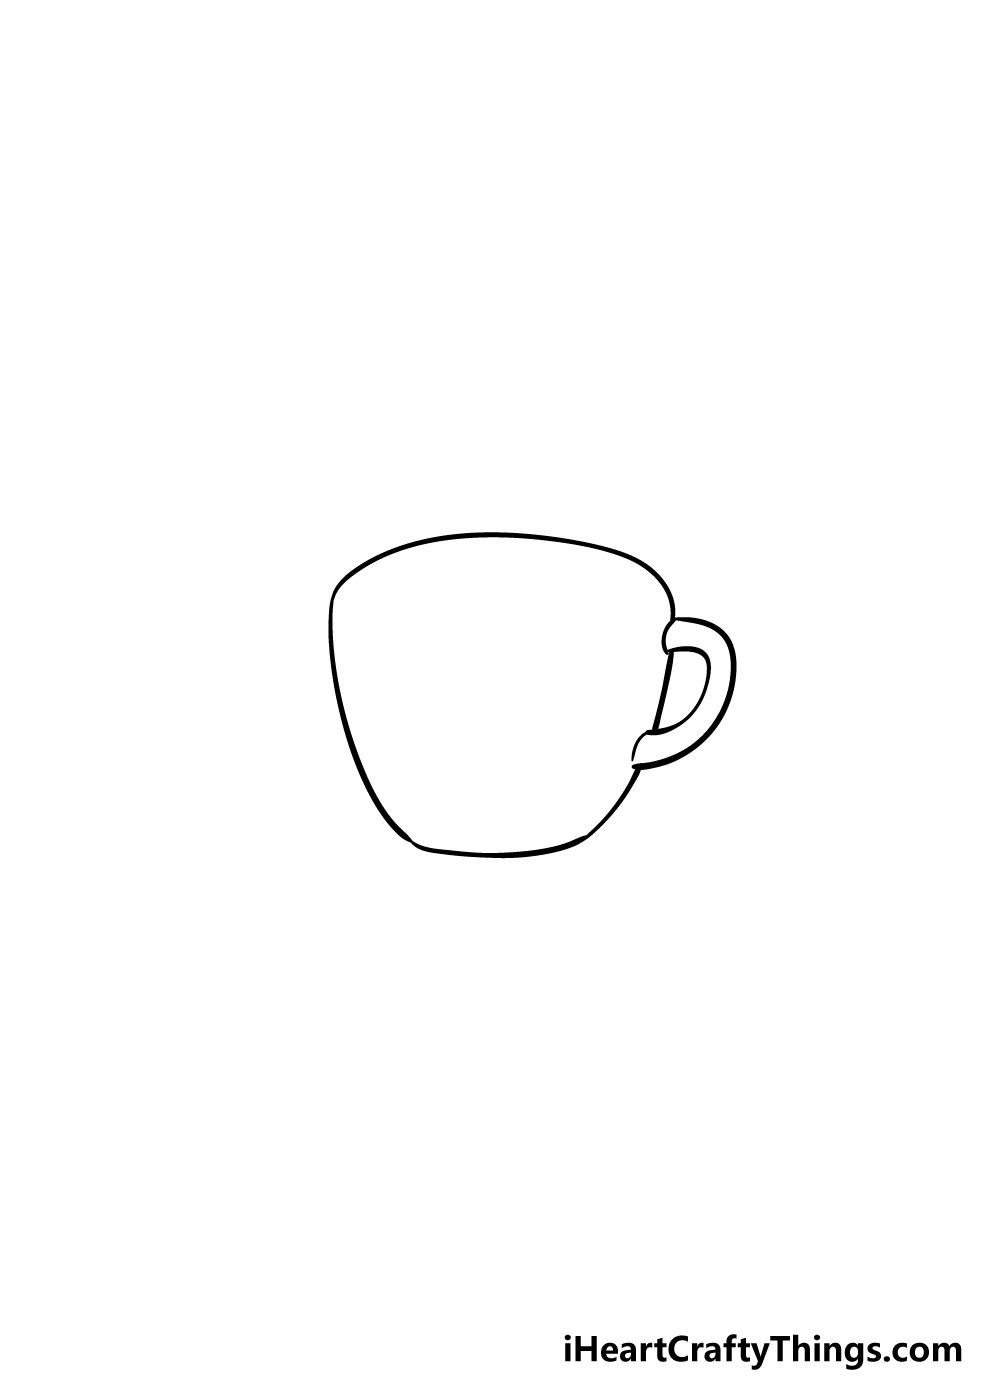
Every good coffee cup needs a handle, so we shall be adding one in this step of your coffee cup drawing! The handle will be small and curved on the right-hand side of the cup.
You can draw the handle using a curved line that looks a bit like a big, backward letter C. Then, you can draw another smaller backward C inside that first line to form the inner edge of the handle.
The two parts here the handle connects to the cup will also be a bit rounded, as you can see in the reference image.
Step 3 – Now, we shall draw the hole of the cup

For this part of our guide on how to draw a coffee cup, we shall be focusing on the hole of the cup.
This part will be drawn using an oval near the top of the inner cup. The oval will be horizontal and fairly flat.
It will also be very close to the upper line of the cup and run parallel along that line. That’s all there is to it for this step!
Step 4 – Draw the saucer for the cup

We shall be leaving the cup for now to focus on the saucer it is sitting on for this step of your coffee cup drawing.
To draw this saucer, you can draw an oval that starts from the midway point of each side of the cup.
The right-hand side will actually start from near the bottom of the handle, as it appears in our reference picture.
Then, once you have that oval drawn you can draw a curved line running close to the bottom of the saucer to represent the base of it.
Step 5 – Now, you can add some final details for your coffee cup drawing
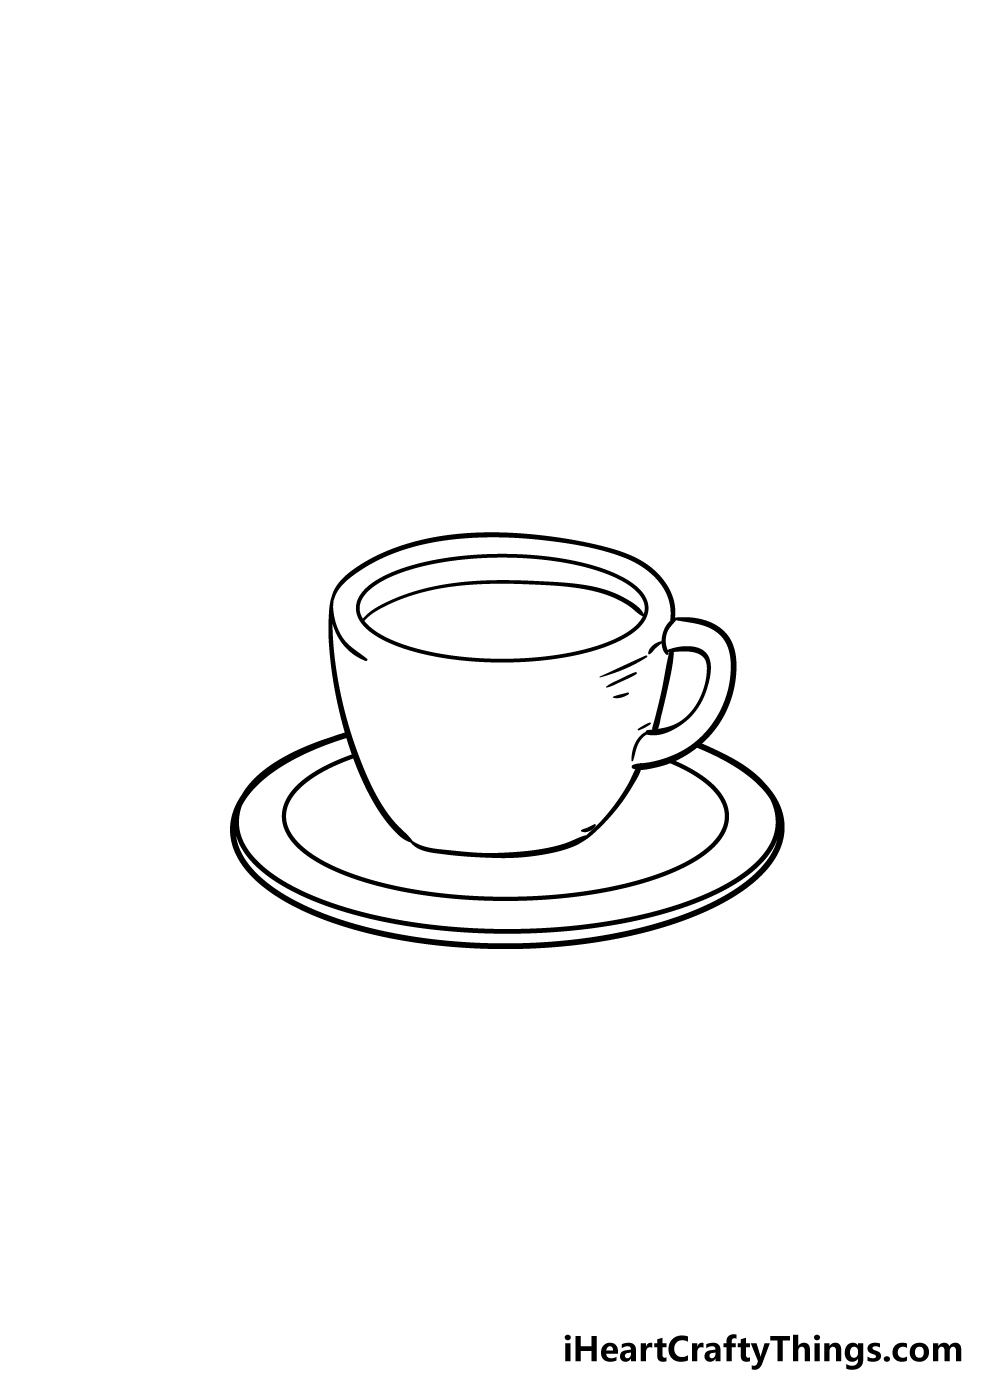
Before you start to color in your picture, we have some final details to add in this step of our guide on how to draw a coffee cup.
First, you can draw a curved line underneath the upper line of the hole of the cup, as this will show the coffee in the cup.
Once you have that, you can add some line detailing to the cup itself. Some of these will include a line at the edges of the cup’s rim and also some by the handle.
Finally, you can draw another curved line inside the saucer around the base of the cup to show the inner portion of the saucer.
These are the details we chose, but you should also add any that you would like! Maybe you could draw a picture, phrase or logo onto the cup, or you could create a background for it.
Another idea would be to draw something to go with the cup of coffee, such as a donut on a plate.
What are some details that you can think of to finish off your coffee cup drawing?
Step 6 – Finish off your coffee cup drawing with some color

Now that your coffee cup is completely drawn, it’s time to have some fun adding some beautiful colors to it in this step of your coffee cup drawing!
This is a step where you get to take charge and show us your color creativity. We used a more muted beige theme for our example, but while this is one example there are many that you could choose!
The cup could be colored with some amazingly vibrant colors or you could keep it more muted if you prefer.
If you drew any extra details or background elements, you can color those in as well! Which art mediums do you think you will use for your picture?
You could use some watercolor paints for a more muted look, whereas acrylic paints or colored pens would be great for more intense colors. We can’t wait to see what you do!
Here’s how you can make your coffee cup drawing even better…
Grab your favorite warm beverage as we make your coffee cup sketch even better!
For this coffee cup drawing, we kept the cup itself quite simple in its design. Coffee cups will often have pictures or slogans on them, so you could add a design to this cup!
There are lots of different things you could put on it, and it’s something you can really get imaginative with. Whether it’s a slogan, a picture or a logo, it’s a great way to personalize your design.
When drinking coffee, it will often be enjoyed with some other tasty treats. You could add some of these to your drawing of a coffee cup!
This would be a great to show off what your ideal coffee ensemble is. For some popular ideas, you could have a plate of cookies or maybe some donuts.
You could even take it further and create a whole breakfast spread along with the coffee cup. These are just a few ideas, but you may have a few more things you like to enjoy with coffee.
You can show off what you would like to enjoy once you have added them to this image!
Next, once you have decorated the cup and added any extras, you could then draw a background setting. Coffee is enjoyed in so many situations, from diners to the morning breakfast table.
These are just a few examples, but you can get really creative with the backgrounds you create. What kind of setting would you like for this image?
Finally, nothing finishes off a picture like some colors. The same is certainly true of this coffee cup sketch you’ve worked so hard on!
We kept the colors a bit more muted for our example, but you could make it as colorful as you like. If you added any extras, then you can color those in as well.
You can also use and mix various art tools and mediums depending on the look you want for the colors. You could use some light watercolor for the steam, for example!
Your Coffee Cup Drawing is Complete!
We hope that you really enjoyed this step-by-step guide on how to draw a coffee cup! A coffee cup is the kind of object that seems easy to draw at first but can prove more difficult when you actually try it.
We also hope that this guide was helpful in showing you that it can be easy when you know what to do!
Now it’s up to you to really put your own spin on this drawing of yours. You can do this by working in some extra details, by drawing some extra props or with a beautiful background.
These along with the colors and art mediums you choose are great ways to personalize your drawing!
We have many more step-by-step drawing guides such as this one on our website for you to enjoy!
We already have tons of great guides, but we have many more that we will be releasing constantly.
Be sure to check in often to make sure you never miss out!
Once you have completed your coffee cup drawing, please be sure to share it on our Facebook and Pinterest pages for us to admire!