There are many different wild and wonderful species of animals to behold in the animal kingdom.
Some are so strange-looking that they look like they have walked right out of an outlandish science fiction universe, and the armadillo would be a great example of that.
These bizarre and incredible creatures are characterized by the fact that they have a tough armored shell covering their backs.
Because of this really unusual look, many wildlife fans like to know how they can learn how to draw an armadillo.
That is exactly what we will be covering in this tutorial that you have in front of you, so be sure to read all the way to the end!
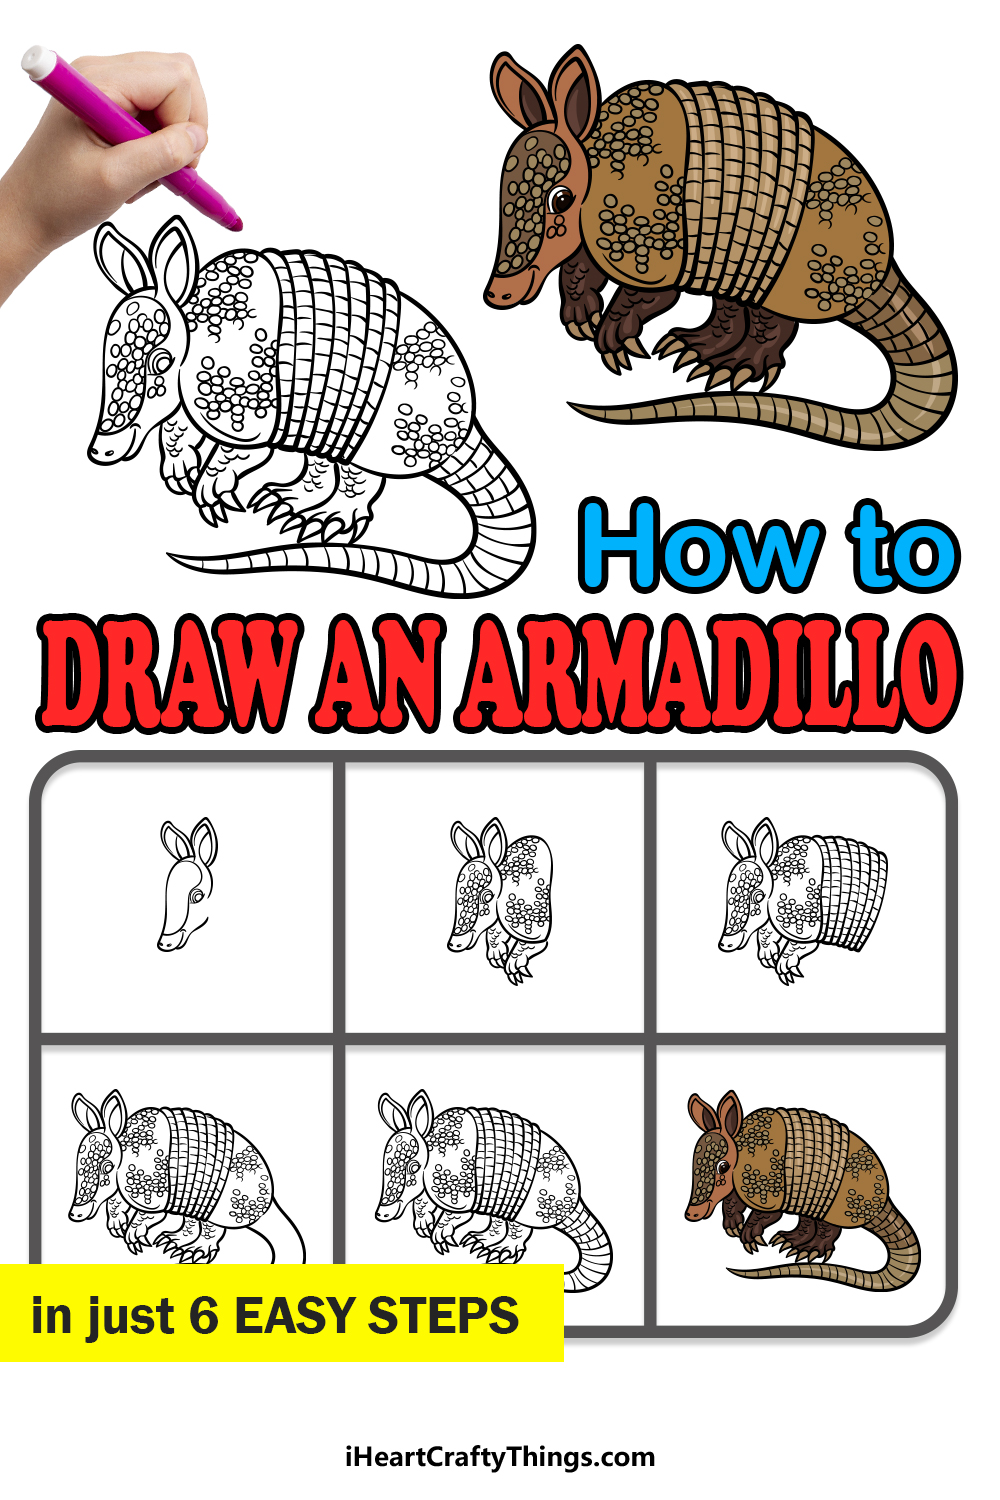
Our step-by-step guide on how to draw an armadillo in just 6 steps will show you how you can recreate this incredible creature.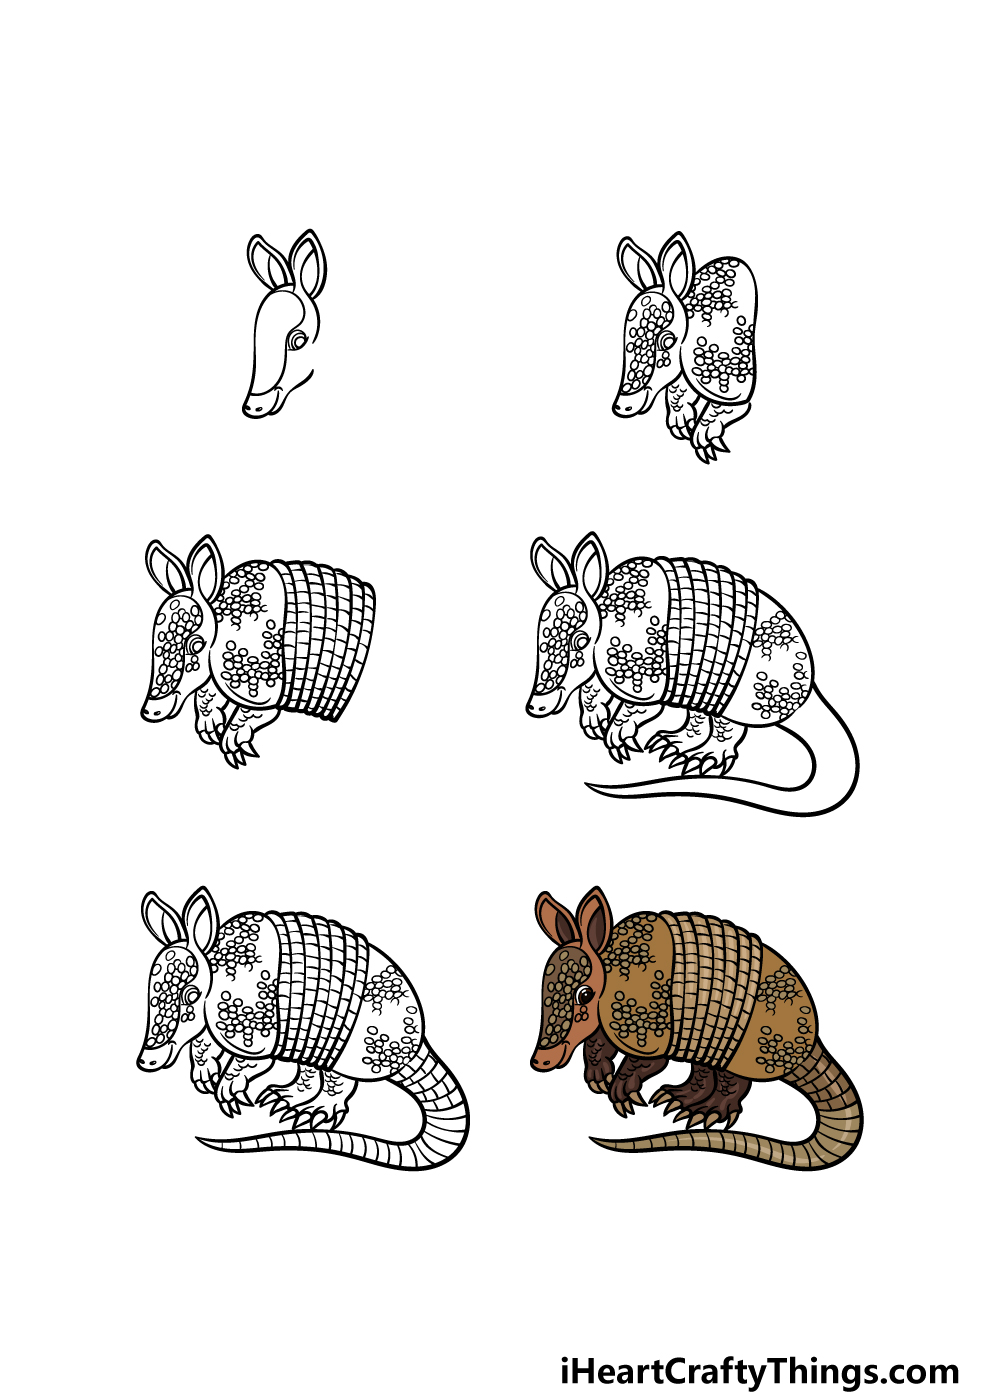
How to Draw An Armadillo – Let’s Get Started!
Step 1
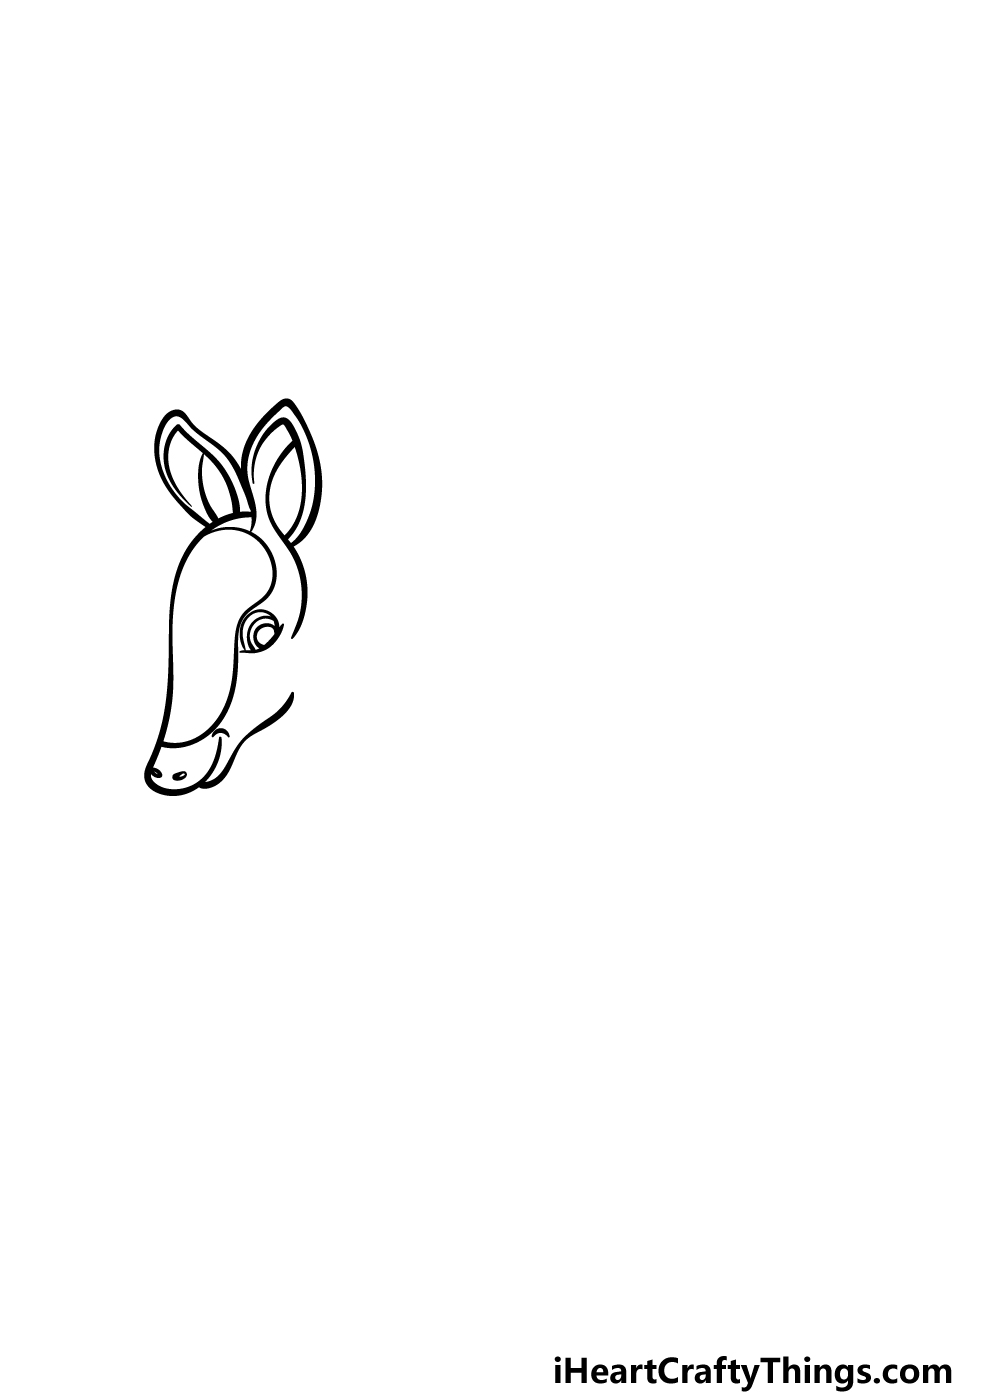
We will be creating a rather adorable portrayal of this animal during this guide on how to draw an armadillo! To begin, we will be drawing the head and face of the animal.
To do this, we will be using some curved lines for the shape of the head, and it will be drawn so that the face is long, thin and pointed.
You can then add the large, rounded ears of the armadillo, and then we will finish off by drawing some eyes and a smiling mouth.
Once the head has been drawn as it appears in our reference image, you will be ready for the second step of the guide!
Step 2 – Now, start drawing the body and legs
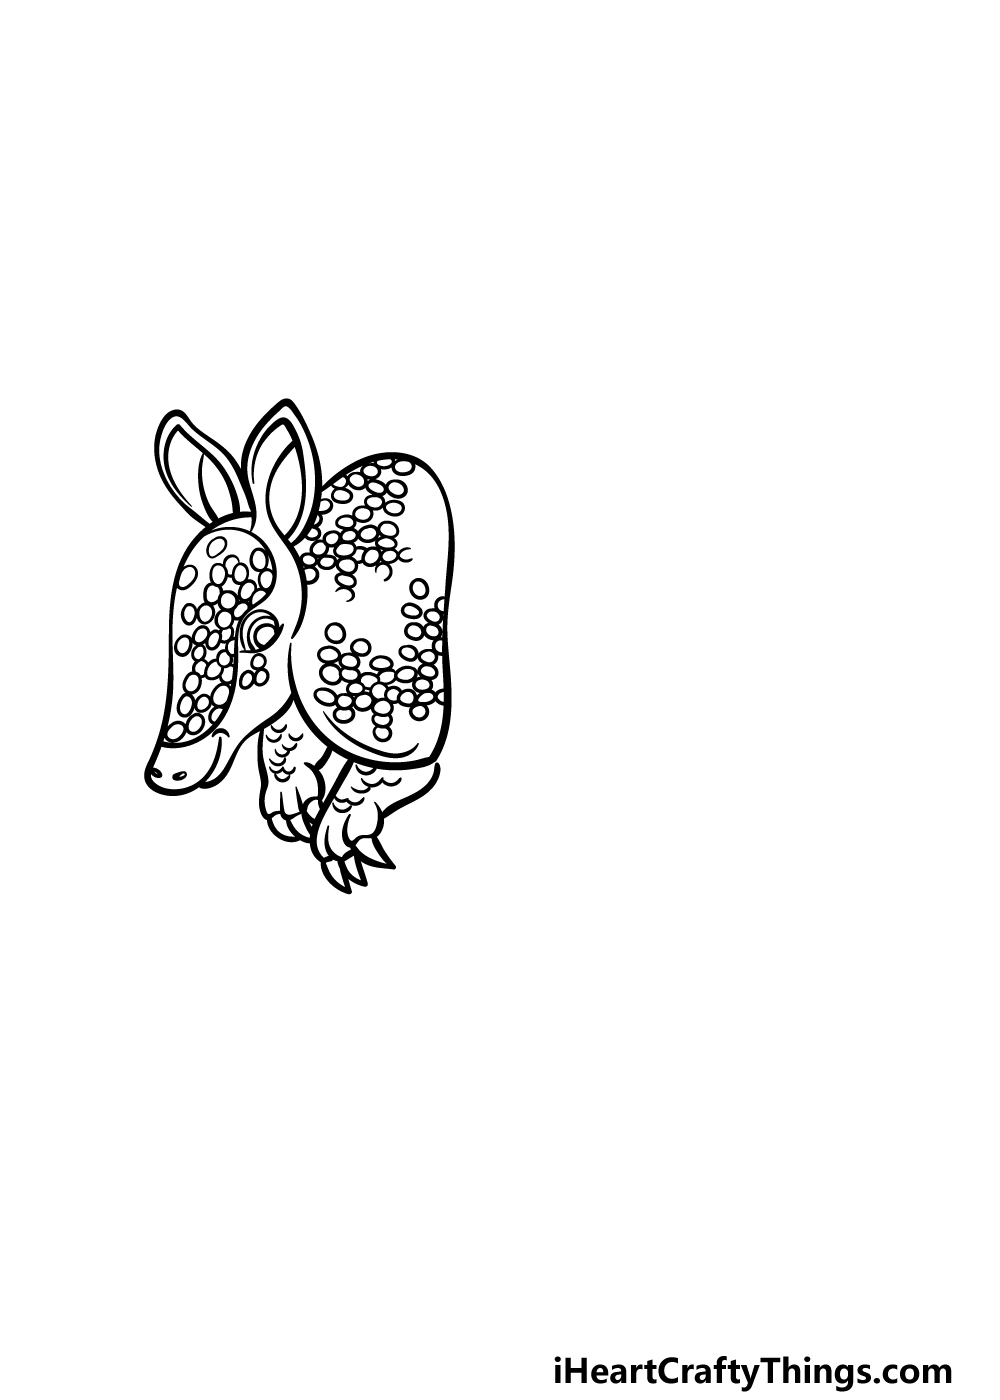
In this second step of your armadillo drawing, we will be adding the first section of the body, as well as the legs beneath it.
For the first body section, we will be drawing a large, rounded shape. This will have lots of tiny round shapes drawn inside of it, and these round shapes will also go inside the face.
Finally, draw the short front legs beneath the armadillo, and then add some sharp claws to them.
Finish off with some small, rounded line details inside of the legs, and then you can proceed to step 3!
Step 3 – Draw the armored middle section
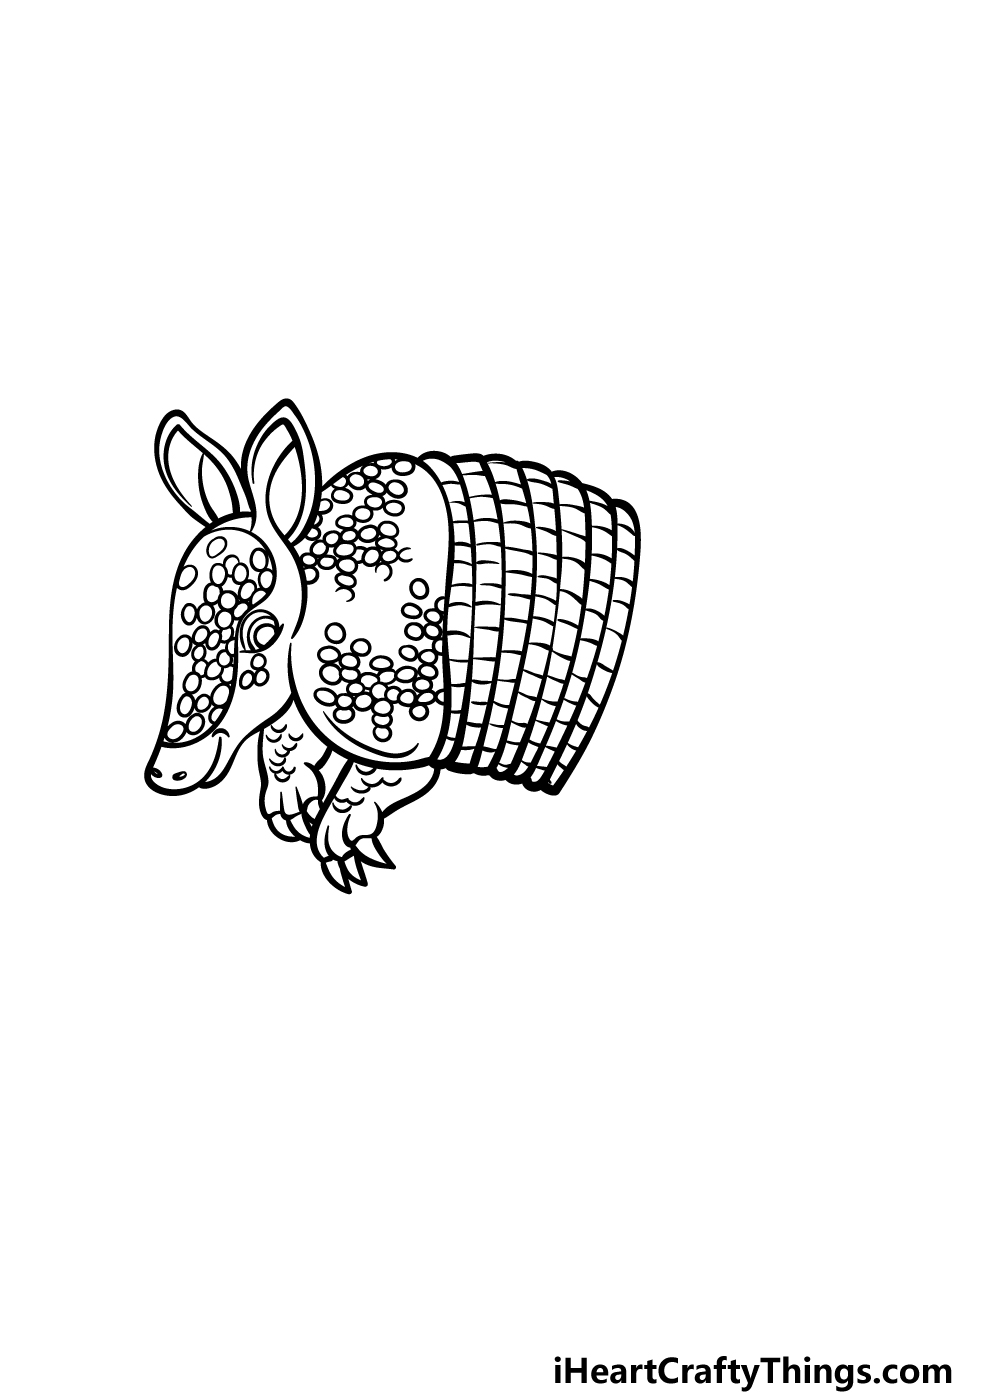
Perhaps the most distinct part of the armadillo is its bendable armored back. This is what we will be drawing in this third step of our guide on how to draw an armadillo.
To do it, we will be adding a series of thin, curved sections connecting to one another. These will then have short lines drawn across each one to finish off the armored texture.
Step 4 – Next, draw the rest of the outline
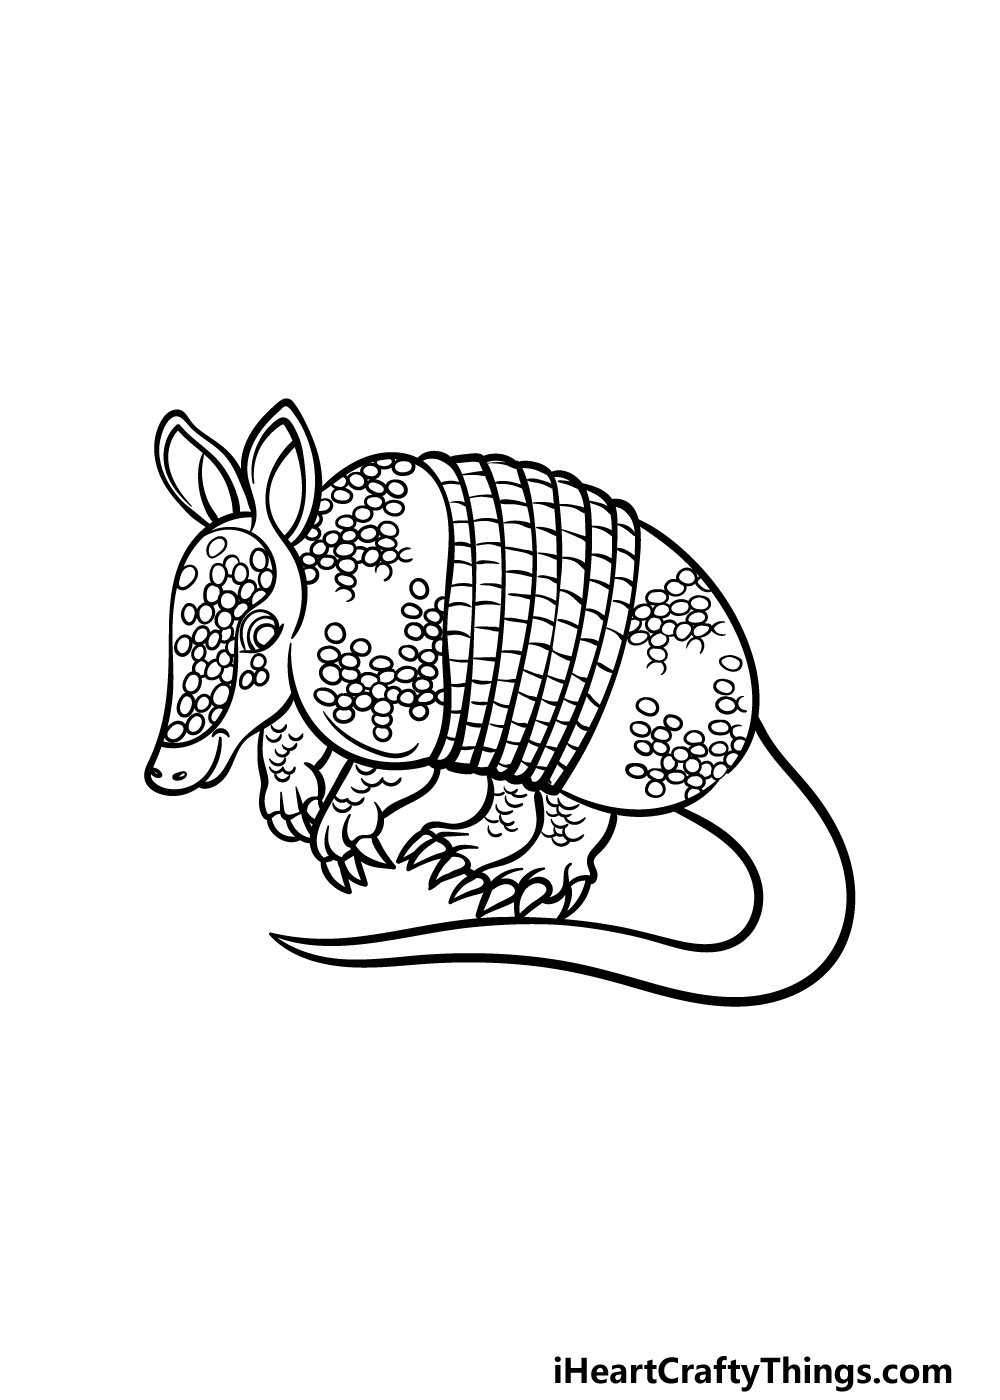
In this fourth part of your armadillo drawing, we will finish off the outlines before focusing on some final details in the next step of the guide.
First, use some curved lines to draw the final section of the body. Then, add a long, curving tail that culminates in a pointy tip near the end.
Finally, draw two short back legs that also end in some large, pointy claws.
Once these are all drawn, you can add some more of those small, curved lines to the back legs that you added to the front ones.
Lastly, draw some small circular texture details all throughout the last portion of the body. Then you will be ready for the final details in the next step!
Step 5 – Add the final details to your armadillo drawing
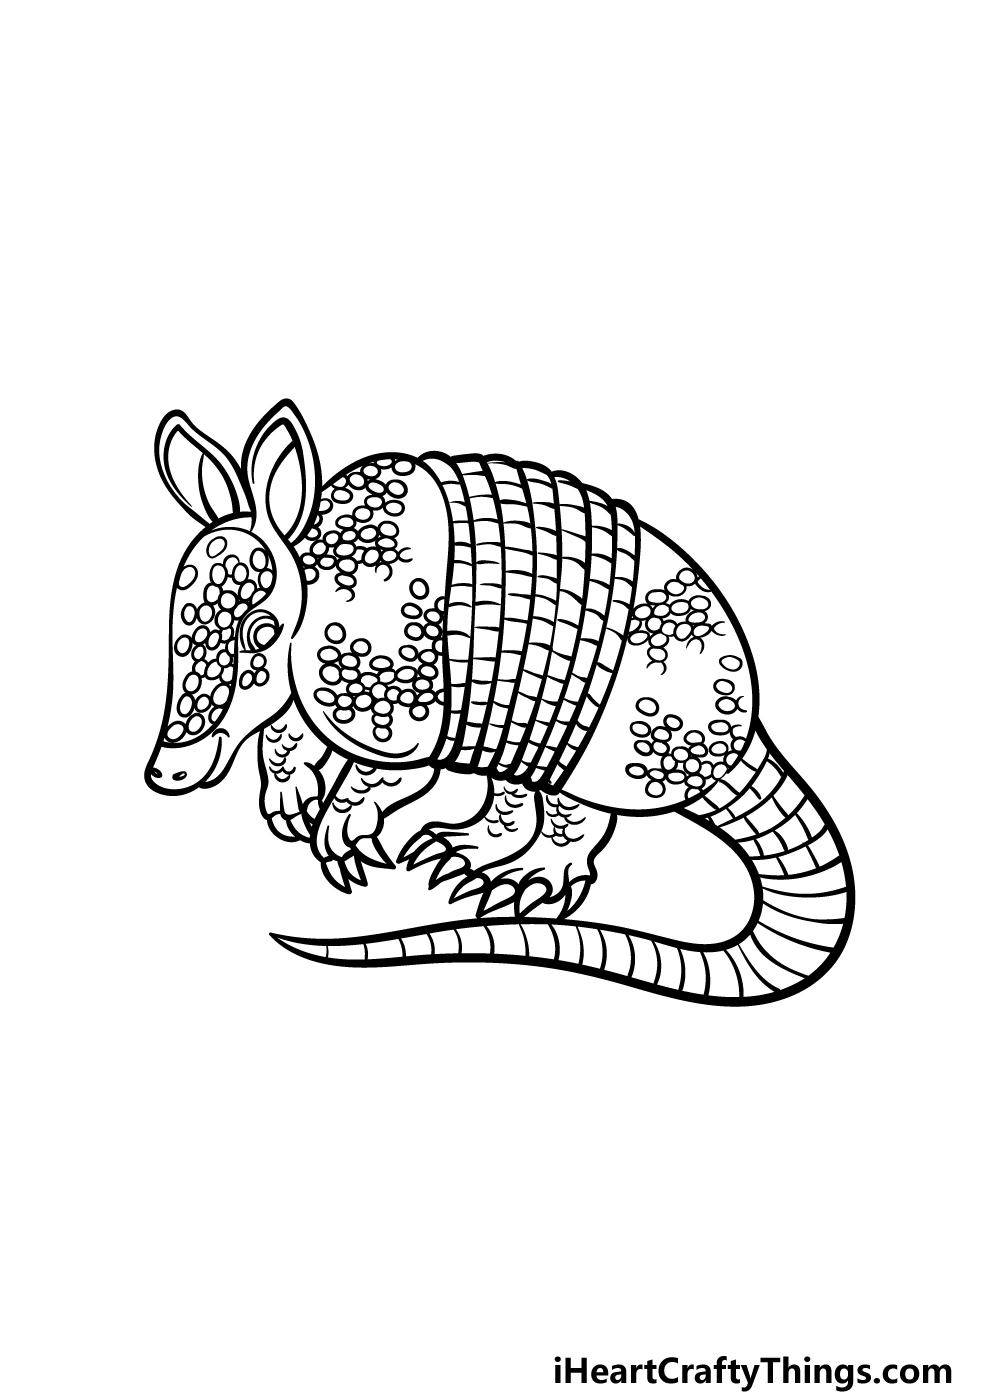
Now you’re ready to finish off the final details to complete the armored texture before you move on to the final step of this guide on how to draw an armadillo.
The last part of the animal that needs some detailing would be the tail, and we will start by drawing a grid pattern near the base of the tail.
The further down that we get on the tail, these details will turn into slightly curved lines going across the width of the tail, as shown in our reference image.
Once you have finished the tail texture details, you can also add to this image with your own details and ideas!
Armadillos can be found in a number of different environments, and you could show this off by drawing a cool background for this picture.
What kind of setting would you create for this armadillo before the final step?
Step 6 – Finish off your armadillo drawing with color
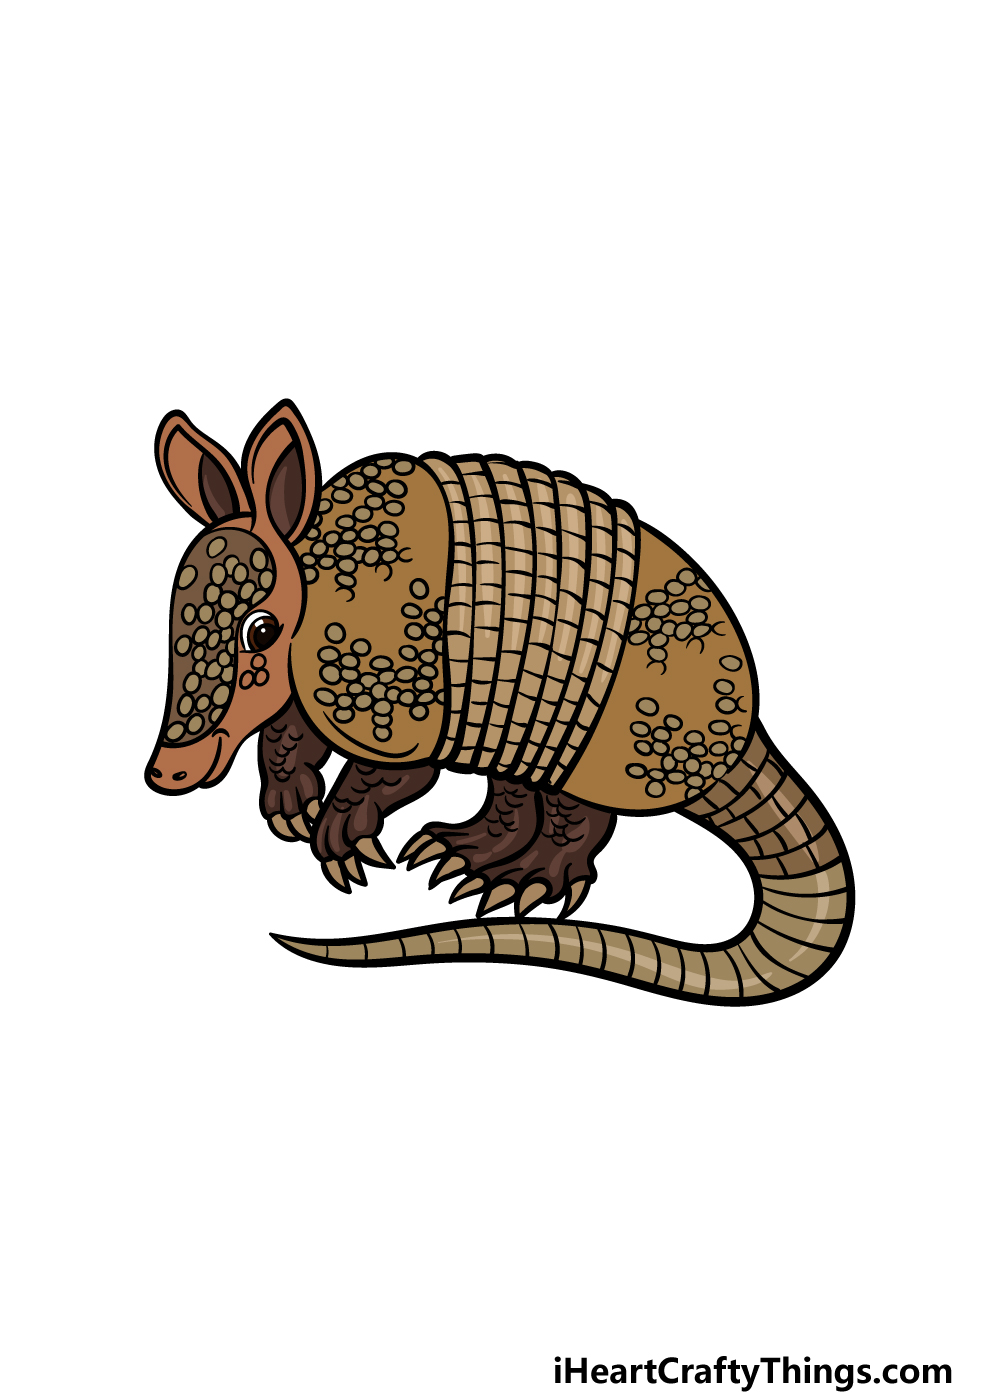
This is the final step of your armadillo drawing, and in it you can finish off with some colors. In our example picture for this image, we showed you how we would color this cute little armadillo.
We used more muted, earthy tones of various shades of brown for the body of the armadillo, and this helps to create a realistic look for the animal.
When coloring your own picture, you have many different options at your disposal.
You could go for similar colors, or you could go for a completely different approach by being more stylistic in your color choices.
You color choices along with the mediums you use give you a great deal of control over the look of your picture, so what will you choose?
4 More Ways To Make Your Armadillo Drawing Unique
Make this armadillo sketch even better with these 4 ideas to try out!
This drawing of an armadillo looks really great as it is, but it would be fun to add a second armadillo to the picture!
The best part is that you know exactly how to do this as you have completed the guide.
This second armadillo could look very similar to the first one and maybe have some minor changes to make it unique. What kinds of poses would you like to create with a second armadillo?
Another option for adding some life to this picture would be to draw some other animals in the scene.
These additional animals could be ones that you would expect to see in an armadillo’s habitat.
You shouldn’t feel limited to that, however, as you could add any animal pals you would like! This would be a great way to show off some of your favorite animals, and they could be drawn in any art style you like.
It would be fun to create an animal party, and we would love to see who is invited!
The armadillo drawing that we created in this guide is drawn in a detailed cartoon style that looks great. If you want to challenge yourself a bit, you could change the style to lean more to one of the two we mentioned.
For example, you could try to make it look even more detailed and realistic. Or you could make it look simpler and even more cartoony if you prefer!
Finally, this armadillo sketch needs a place to live, so you could create a background setting to finish it off! There are so many approaches you could take for this.
One would be to create a natural environment that shows the habitat of the armadillo. Or, you could create a more imaginative environment.
For instance, you could design a little house that this armadillo lives in! These are a few options, but where do you think this armadillo is hanging out?
Your Armadillo Drawing is Complete!
This is truly one of the most unique-looking animals on the planet, and we hope you enjoyed drawing it during this guide on how to draw an armadillo!
When drawing creatures such as this, it can sometimes prove to be a bit of a challenge, but that’s why we wanted to break it down into smaller steps for you.
With the difficulty taken out of the equation, you can focus on the fun of being creative!
You can do this by adding even more details or background elements for this armadillo to interact with, and there is no limit to how much you can personalize this picture.
This guide you have just completed is one of many that can be found on our website! We have tons of guides covering many different subjects, so there’s something for everyone.
If that wasn’t enough, we also plan to release many more soon, so you’ll want to keep checking in to never miss out.
When your armadillo drawing is all complete, you can share your finished artwork on our Facebook and Pinterest pages so we can see how it turned out!