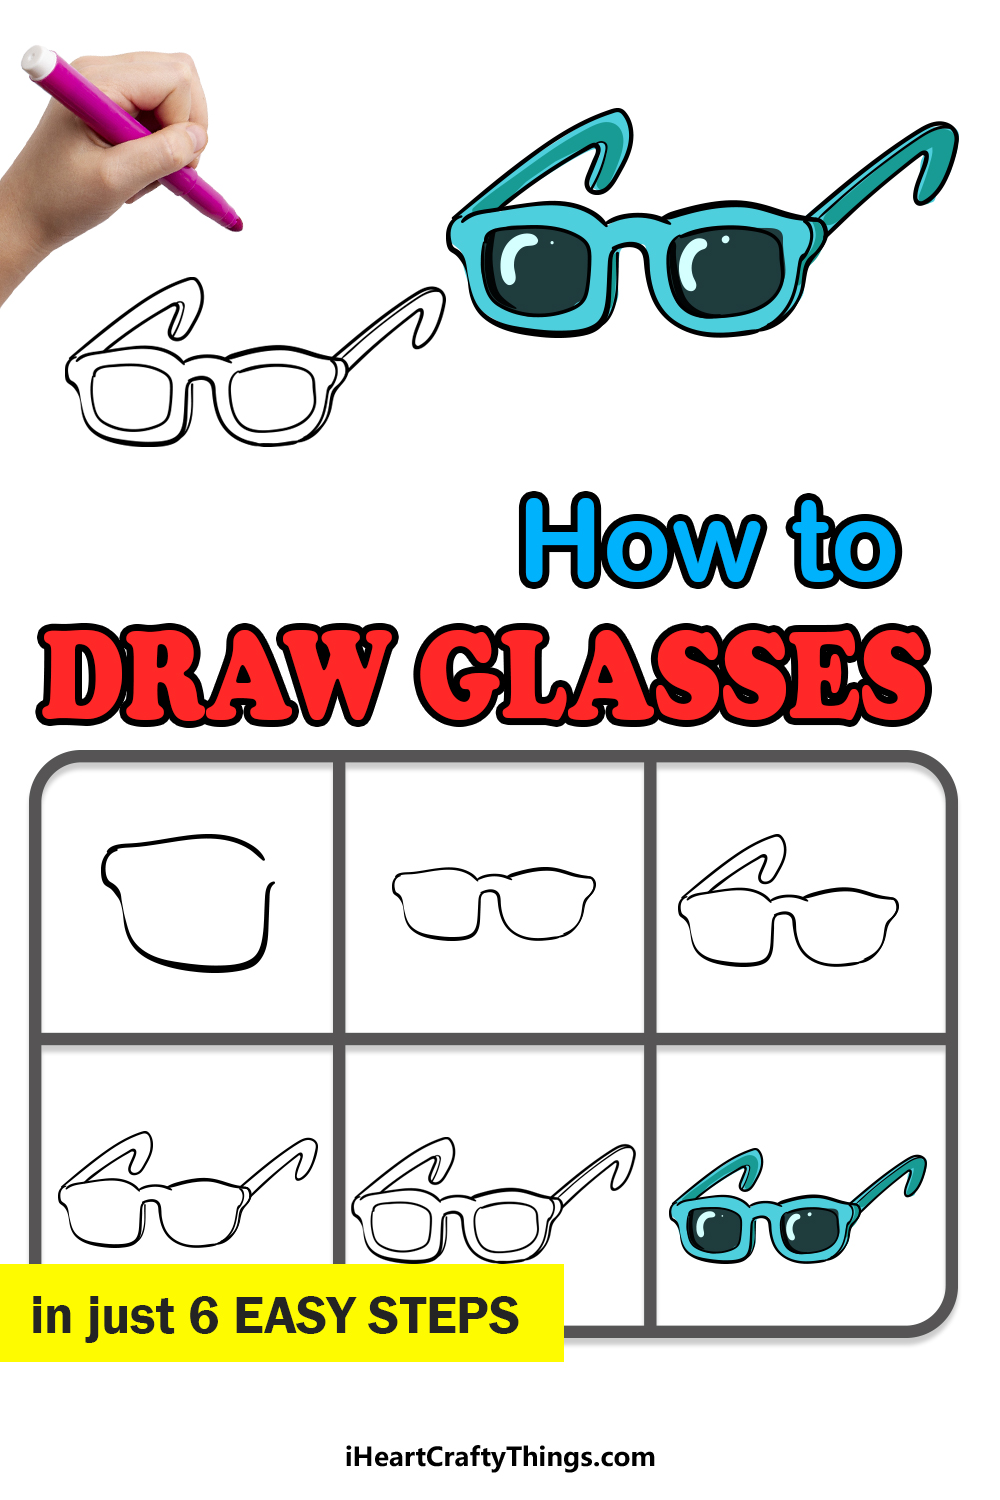
This guide for kids makes it easier than ever to learn how to draw glasses! You will be able to design your very own fancy eyewear in just a few steps.
Glasses can perform many different functions. Some help us to see better, others help to shield your eyes from the rays of the sun and others are simply meant to be a fashion accessory.
It’s easy to imagine what it would be like to design glasses of your own, but you may not know where to start. This guide will make it easier than ever, and you will be able to draw these cool glasses in just a few steps.
Once you have finished the design, you could add your own ideas, auditions, extra details and background elements. So let’s begin and see how it’s done!
Discover How To Make Your Glasses Drawing
How to Draw Glasses – Let’s Get Started!
Step 1
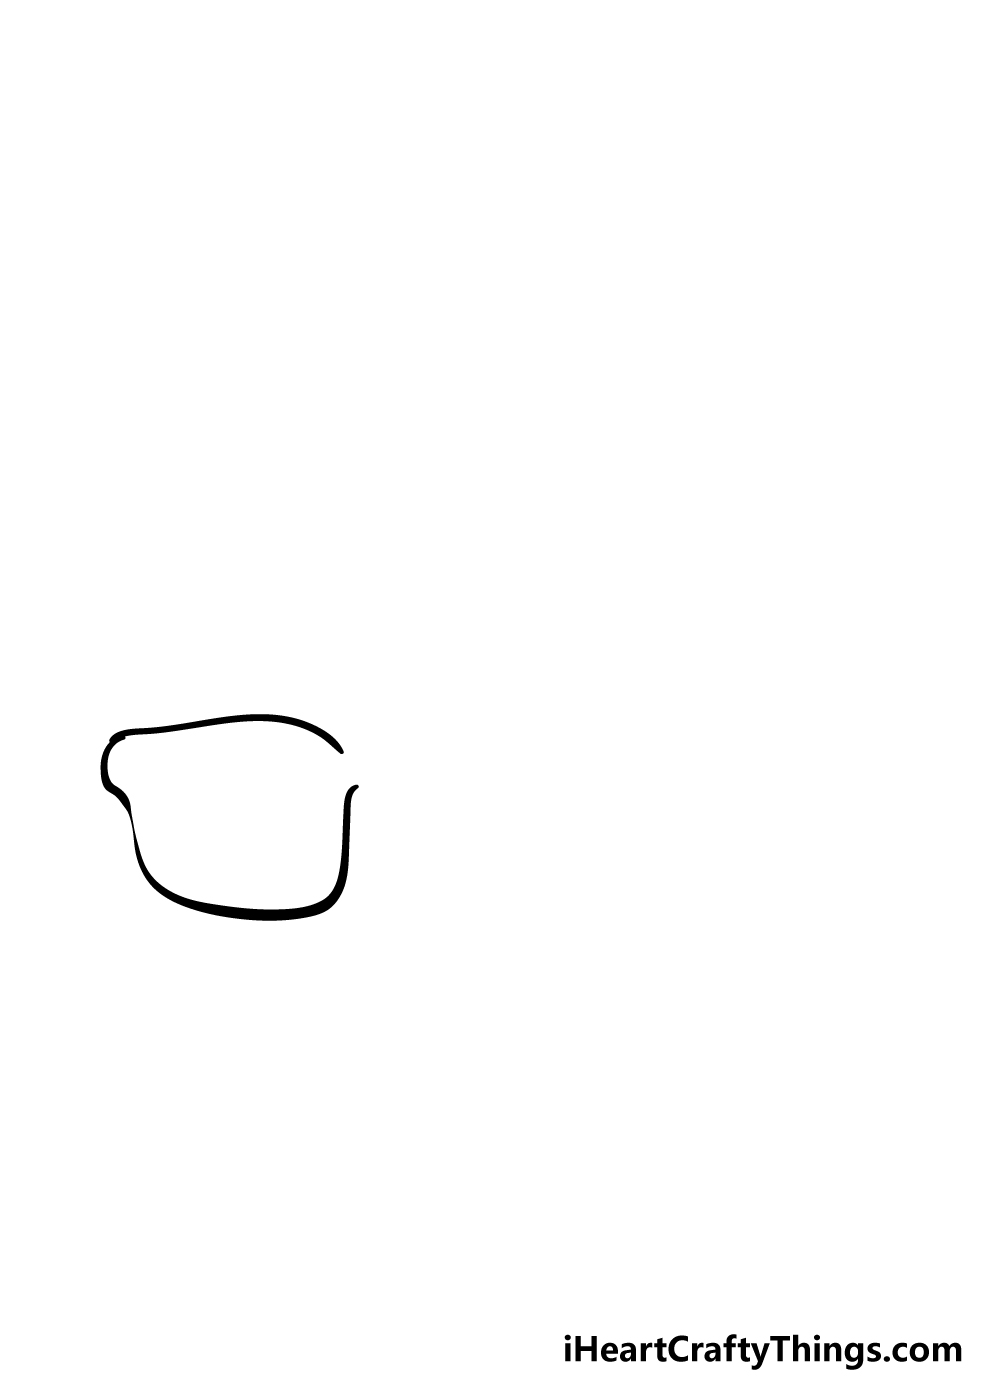
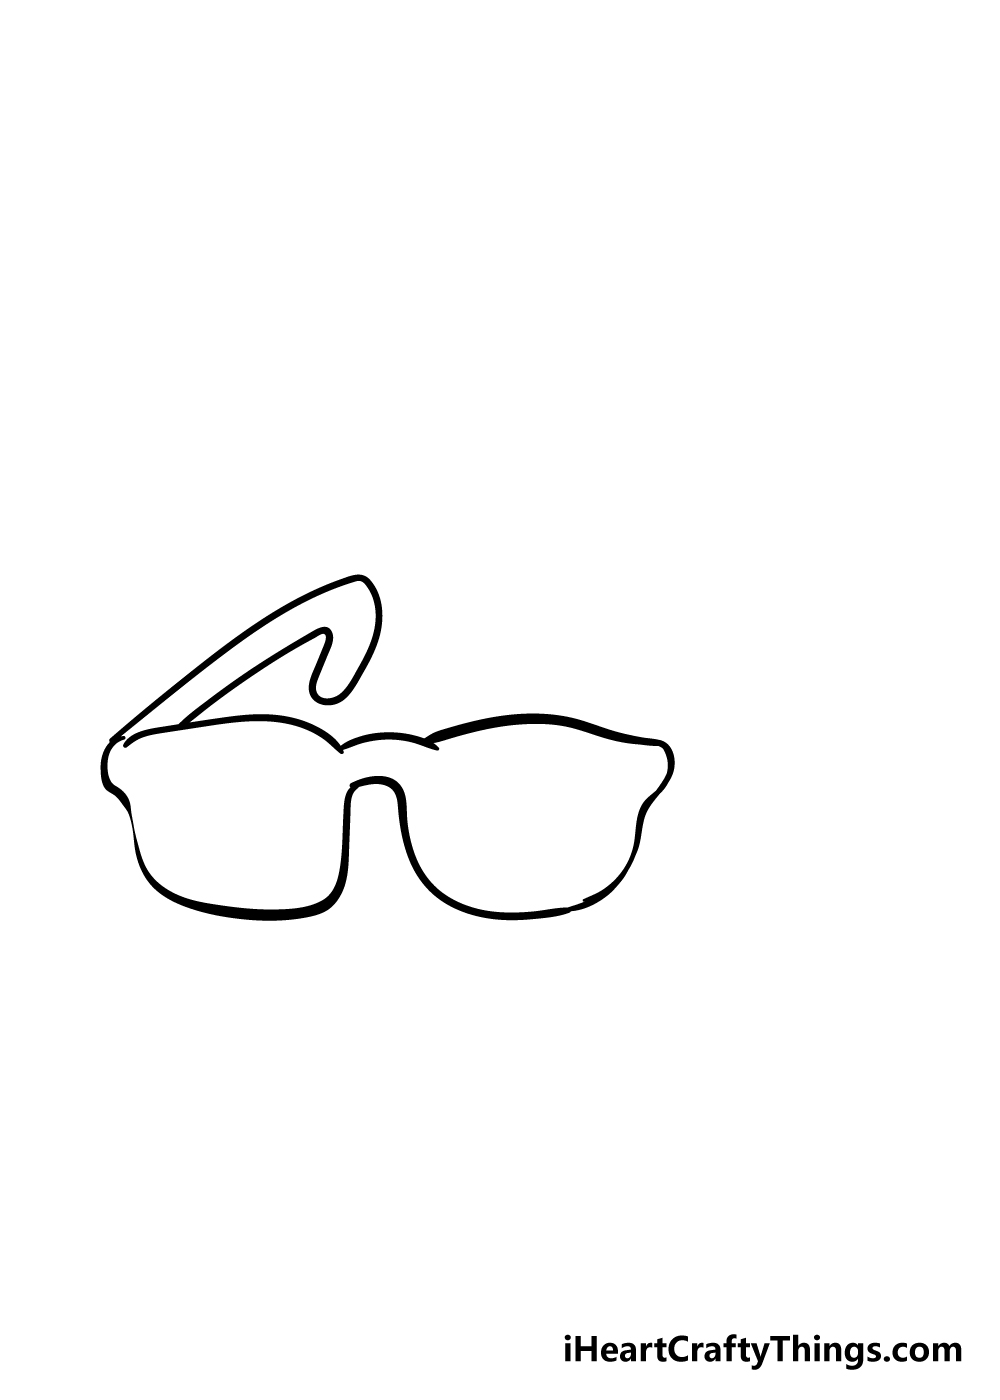
To begin this guide on how to draw glasses, we shall be starting with the frames of the glasses.
Specifically, we shall be doing the left-hand side in this particular step. The sides of the glasses will be made of some curved lines along with some straighter ones on the side as well.
Be sure to leave a small gap at the upper right corner of the glasses as we will be adding the bridge of the glasses there.
Step 2 – Draw the right-hand side of the glasses
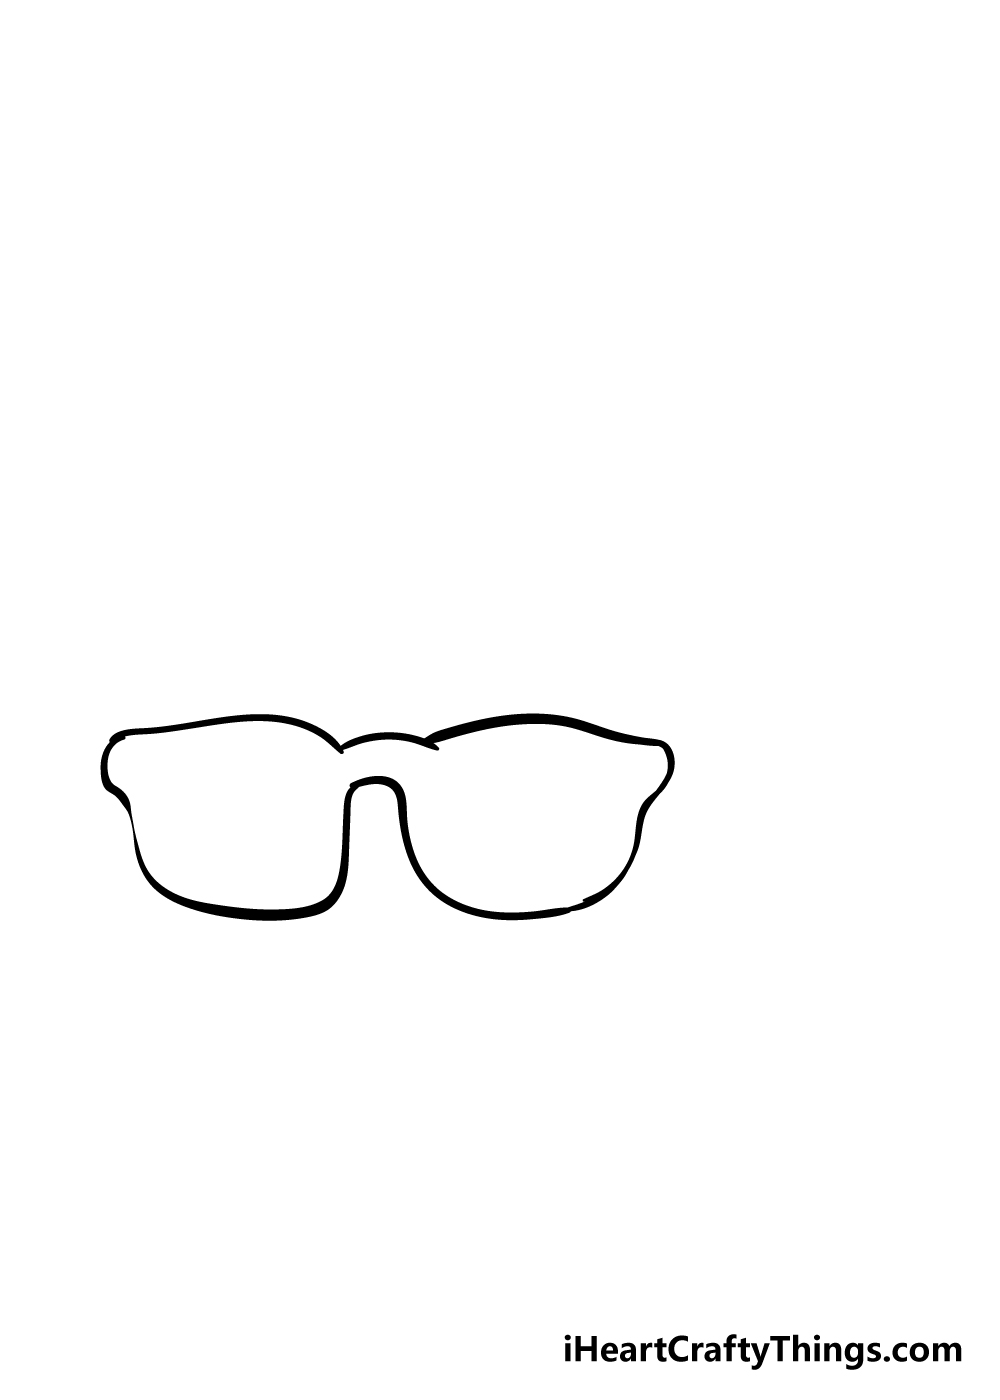
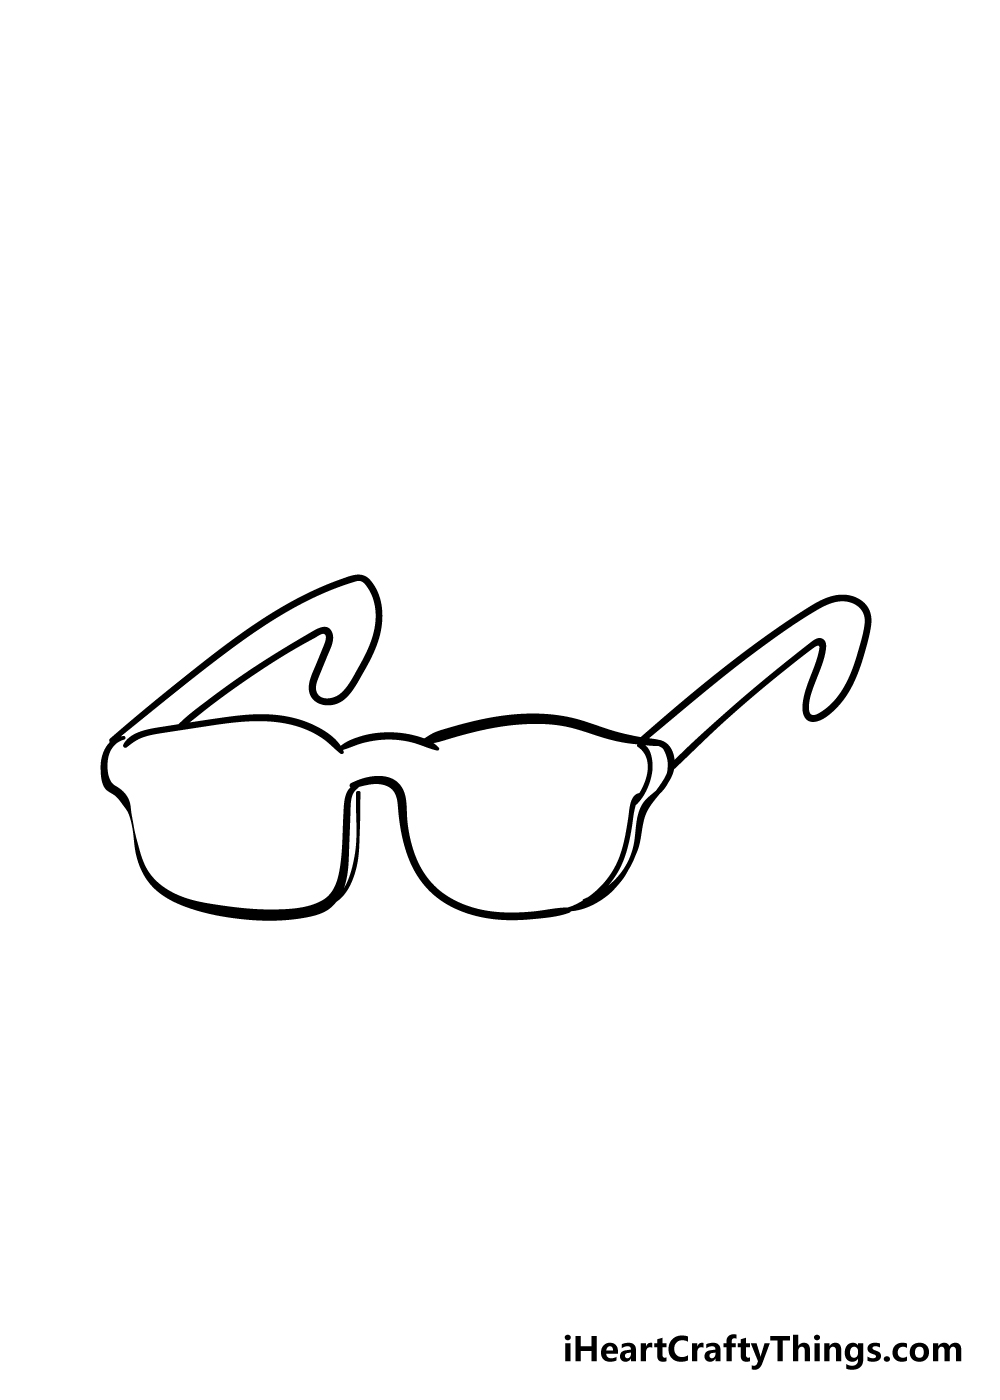
In this step of your glasses drawing, we shall be drawing the bridge and the right-hand side of the glasses frames.
For the bridge, you can simply use two curved lines coming out from the left-hand side of the frame.
Then, you can draw the right-hand frame, which will look identical to the one that you drew in the previous step.
That will give you a nice set of matching frames for your glasses. Once that’s done, it’s on to the next step!
Step 3 – Now, draw the first temple of the glasses
The thin part of glasses that extend from the frame and over your ears are called the temples, and we shall draw the first one now.
The first one will extend from the left-hand side of the glasses, and will be drawn with some curved lines to create the thin temple of the glasses drawing.
It will curve especially sharply at the end for the part that will go over the ear.
Step 4 – Next, draw the second temple of the glasses
You have drawn one temple for your glasses, so you should have no problem drawing another in this step of our guide on how to draw glasses.
Simply draw the other temple on the right-hand side exactly how you did in the previous step to finish the temples up.
Finally, you can draw some extra lines along the sides to give the appearance of thickness for the glasses.
Step 5 – Now, you can draw the lenses and final details
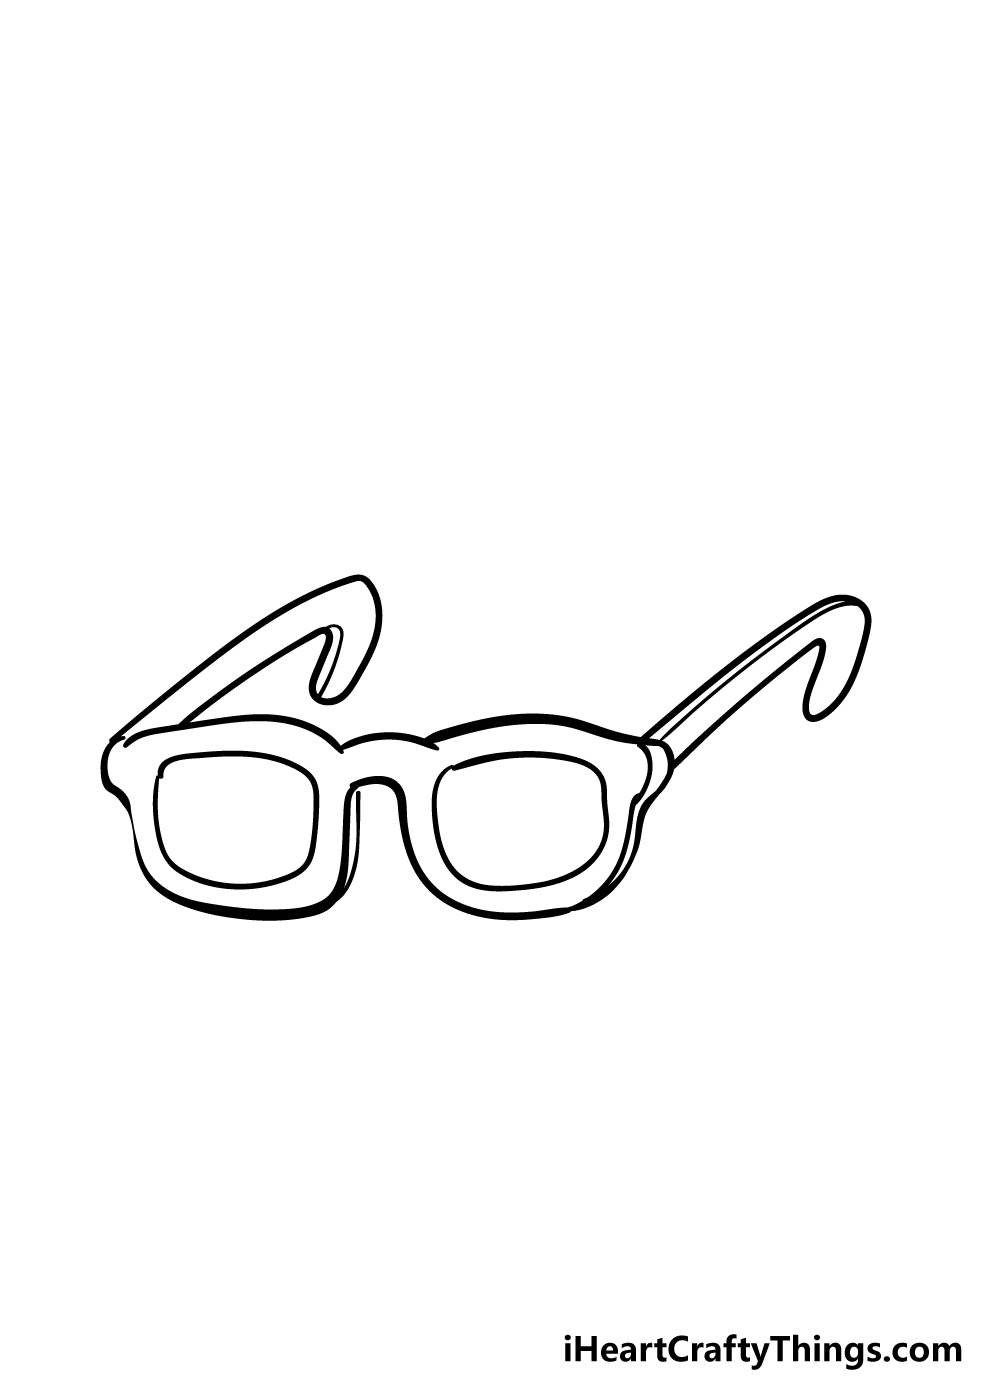
Before we move on to the final step of your glasses drawing, we have just a few more details to add.
The main thing is to add the lenses of the glasses. These will be drawn by using some squares that have rounded corners inside the frames of the glasses.
Then, as you can see in the reference image, there will be just a few more lines inside the temples to finish off the details of the glasses.
Now that you have added these final details, you can add some of your own before moving on to the final step.
There are plenty of fun ideas you could use to put your own spin on this drawing. One thing you could do if you’re feeling extra creative would be to draw a face wearing the glasses.
Perhaps you could draw a self-portrait to show yourself wearing them!
You could also draw some clips or accessories on them, or draw them on a table with some other objects. How will you finish your glasses drawing off?
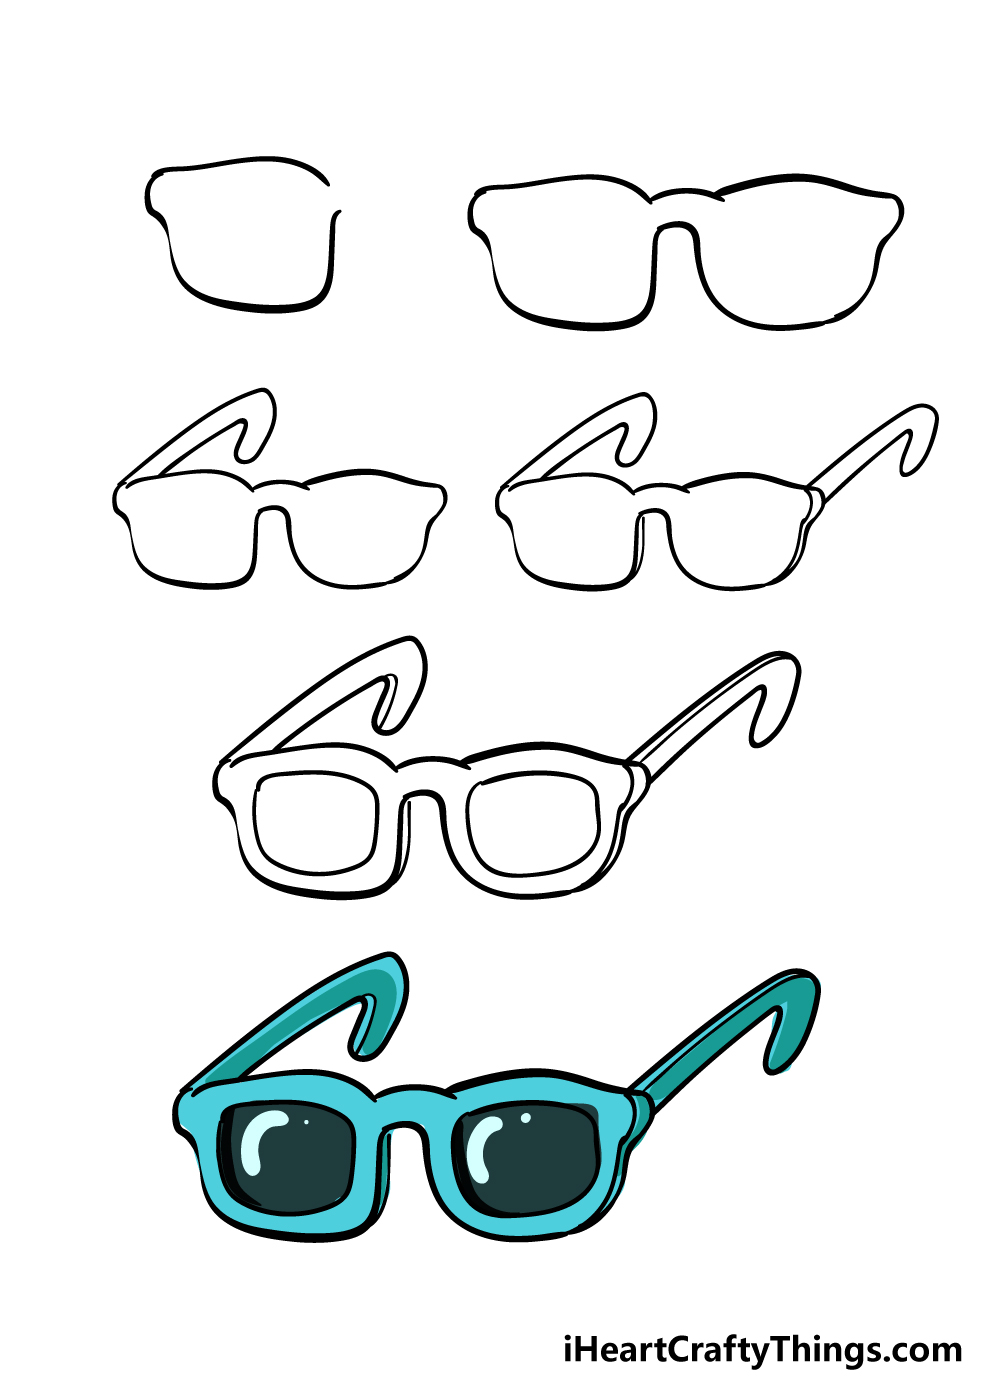
Step 6 – Finish off your glasses drawing with some color
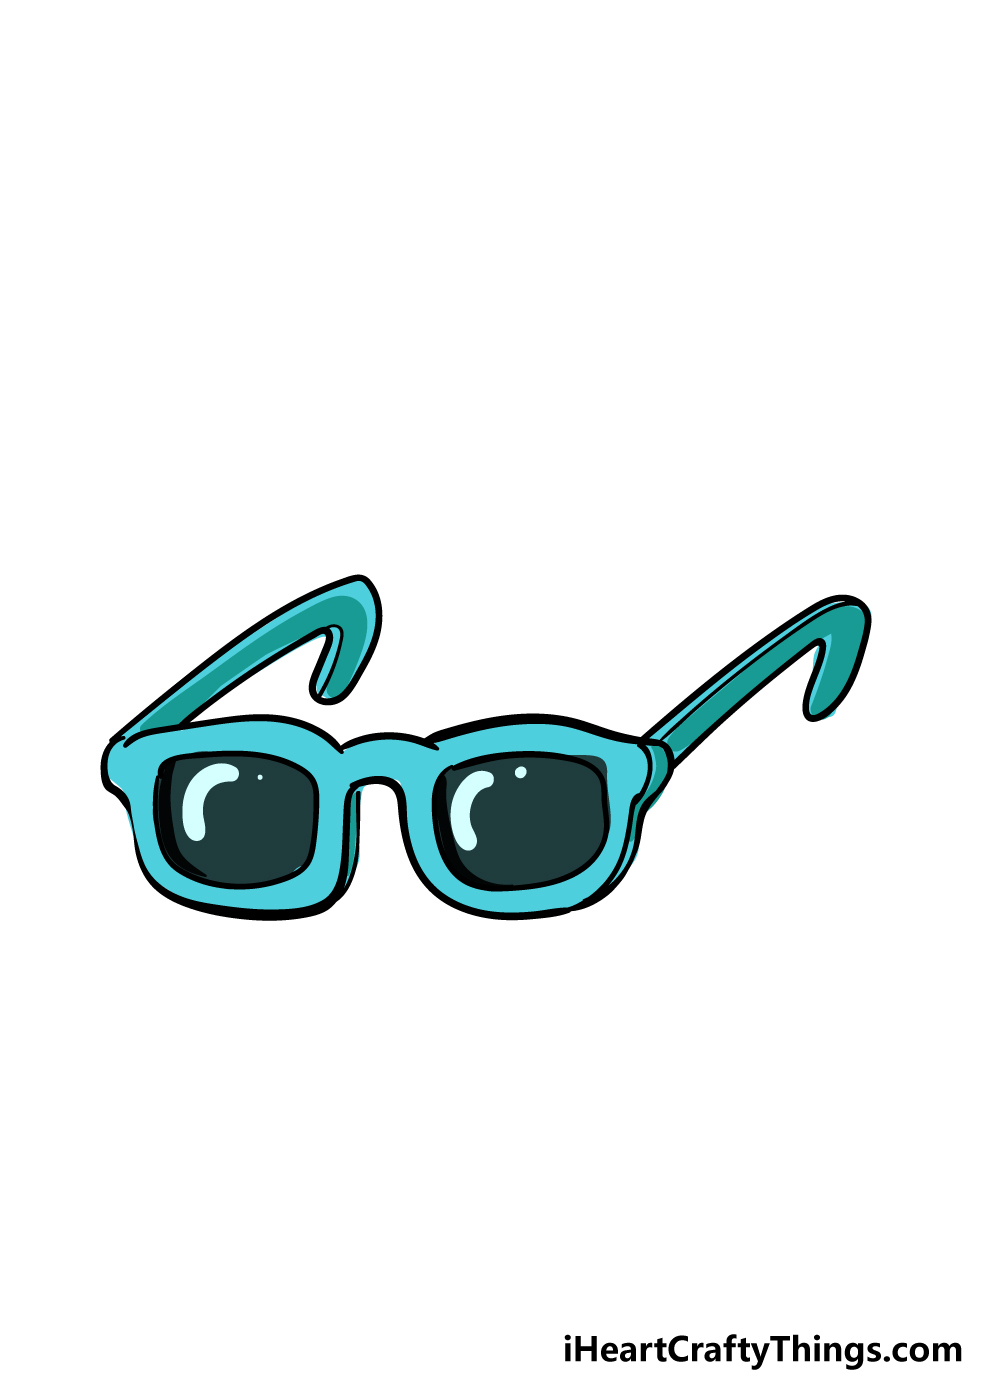
Now that you have finished your glasses drawing, you can bring your drawing to life with some beautiful colors!
For our reference image, we used some light blue to color it in. That is just one of many options at your disposal to color in your picture, so you should really let your creativity run wild!
Glasses can come in any color you can think of, so this is a great opportunity to use some of your favorite bright colors for your picture.
Once you have decided on the colors that you would like to use, you can have some fun deciding which art mediums you will use to make them pop.
If you want a more muted image, then mediums such as watercolors or colored pencils can be a great option.
If you want to go the other way and have some bright and vibrant colors, then something like acrylic paints or colored pencils would be a great bet.
If you drew a background or any extra elements for your picture, then don’t forget to color them in as well!
Do this to take your glasses drawing to the next level
Make this glasses sketch look even cooler with these tips to try out!
When you buy a pair of glasses, you need to think about more than just how they will suit your eyesight.
You also need to consider the color to make sure you will like them, and you can customize that for this drawing of glasses!
Right now, they are a light blue, but you could change this to anything you like. Whether it’s a classic black or maybe a bright color like red or yellow, you can use anything you like!
What are some colors that you could use for the glasses?
When making sure glasses suit your fashion style, you can change more than just the colors. Sometimes, people will add small accessories to their glasses.
These could include clips, wings or even some fun patterns. These could be used for these glasses as well!
Of course, if you have some other ideas then you can use them for these glasses. It could also be fun to use some art supplies like beads or stickers to beautify the glasses even more!
Once this glasses drawing is looking stylish and complete, you could then add someone to the picture to show who would wear them.
They could either be on the persons face or maybe sitting on a table next to them.
It would be fun to take it even further and use yourself as the model for this character! Who else would you like to see wearing these glasses?
Finally, you could show where you would like to wear these glasses by adding a background to your glasses sketch. A classic location would be the beach, so that would be a perfect choice.
It is far from the only background choice, and you could show off any other locations you may need glasses. It could be a pool setting or maybe a fun hike for a few more ideas.
Where else could you use as a background for this drawing?
Your Glasses Drawing is Complete!
That brings us to the end of our step-by-step guide on how to draw glasses! We really hope that by following this tutorial you found that creating this drawing was easier than you expected!
We also hope that on top of it being useful it was also lots of fun for you to do!
Now that you have finished the guide, you can keep the fun going by bringing some personal touches to your drawing.
We’ve mentioned a few things you could do to bring it to life, including drawing some accessories and a fun background for the picture.
There’s a world of possibilities open for your drawing, so be sure to be as creative as you can be!
This step-by-step drawing guide is just one of many that we have in store for you on our website!
While we already have many guides for you to enjoy, we will also be bringing out a lot more constantly, so be sure to check in to our website frequently to make sure you never miss out on the fun!
We would be thrilled to see your glasses drawing once it’s finished, so please be sure to share it on our Facebook and Pinterest pages for us to enjoy!
We can’t wait to see what you did to finish up your wonderful picture.