• HOME
  • ABOUT
  • TERMS
  • PRIVACY POLICY
    • Facebook
    • Instagram
    • Pinterest
    • Twitter
    • YouTube

I Heart Crafty Things

  • KIDS CRAFTS
    • ANIMALS
    • OCEAN CRAFTS
    • INSECTS
    • BIRDS
    • PAPER PLATE CRAFTS
    • CUPCAKE LINER CRAFTS
    • BOOK INSPIRED CRAFTS
  • HOLIDAYS
    • VALENTINE’S DAY
    • GROUNDHOG DAY
    • ST. PATRICK’S DAY
    • EASTER
    • EARTH DAY
    • MOTHER’S DAY
    • FATHER’S DAY
    • FOURTH OF JULY
    • BACK TO SCHOOL
    • HALLOWEEN
    • THANKSGIVING
    • CHRISTMAS
  • SEASONAL
    • WINTER
    • SPRING
    • SUMMER
    • FALL
  • Kids Activities
    • FINE MOTOR ACTIVITIES
    • SENSORY ACTIVITIES
    • PRESCHOOL GAMES
  • Shop

May 15, 2015

Preschool Space Craft: Marbled Planets Art

  • Share
  • Tweet
Have you ever noticed that if you look closely at the planets in our solar system, the different atmospheres create a marbled look about them? The marbled planets among the stars inspired my daughter and I when we were creating this preschool space craft. We used the popular marbled shaving cream painting method to replicate the look of the marbled planets and then set them on a black background with gold glitter “stars” to really make this beautiful Marbled Planet Artwork stand out!
Replicate the surface of planets with this preschool space craft using a unique marbled painting technique!

Making the Marbled Planets Preschool Space Craft

Supplies Needed:

  • Black and white cardstock paper (12-inch by 12-inch size)
  • Acrylic paint in several colors
  • Shaving cream
  • 3 foil containers (we found ours at Dollar Tree $1 for a pack of 4)
  • Rubber spatula
  • Toothpicks
  • Squeegee
  • Gold glitter glue
  • Sponge brush or paint brush
  • Glue stick

Instructions for Marbled Planet Artwork:

1. Start by cutting 3 different sized circle shapes from your white cardstock paper. I used different sized cups, bowls and containers to trace my circles. It really helps with keeping things uniform!

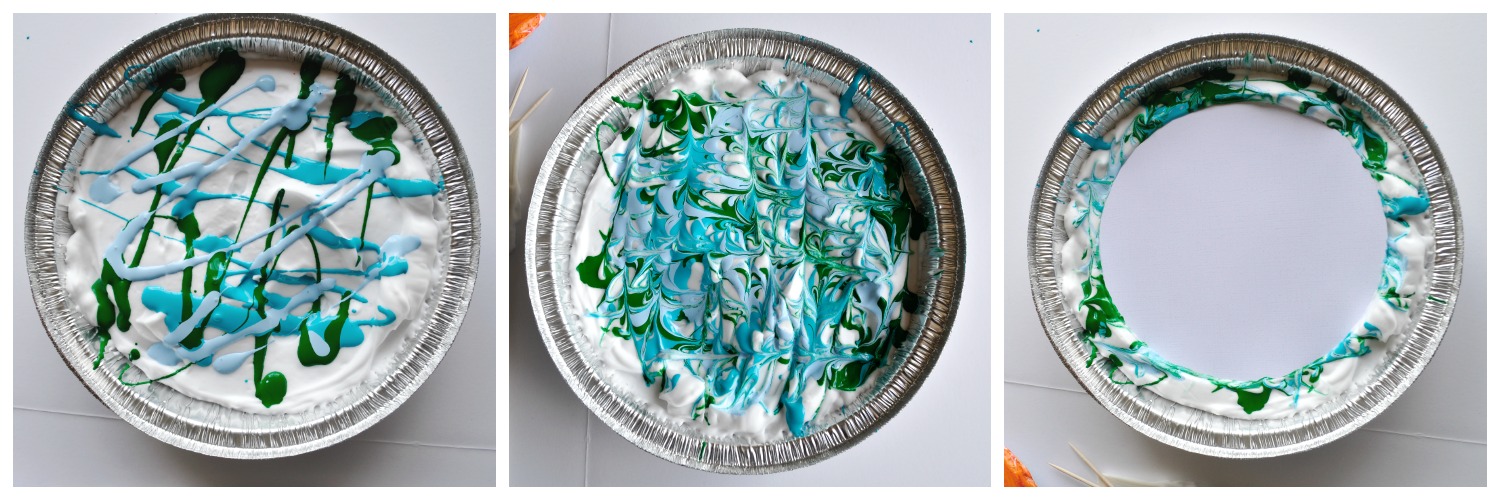
2. Squirt shaving cream into the foil containers, enough to fill the bottom of the pans. Use your rubber spatula to spread the shaving cream out evenly and make it as smooth as you can. The kids will have fun doing this part, just make sure you do the final once over.

3. Squirt various colors of acrylic paint onto the shaving cream. It seems to work best If you squirt the paint in lines of various directions. Use a toothpick to create lines up and down, side to side and diagonally. You want to end up with a marbled look in the paint as this is the design you will be transferring to your planets for your preschool space craft.

Related: Cupcake Liner & Foam Sticker Space Craft

4. Press the circle down into the paint and lightly rub all over the circle to get the shaving cream to stick to the entire circle. Carefully remove the circle from the paint and let it sit for 1-2 minutes. Use your squeegee to remove the excess shaving cream from your circle. You are left with a beautiful marbled planet.

Displaying the Marbled Planets:

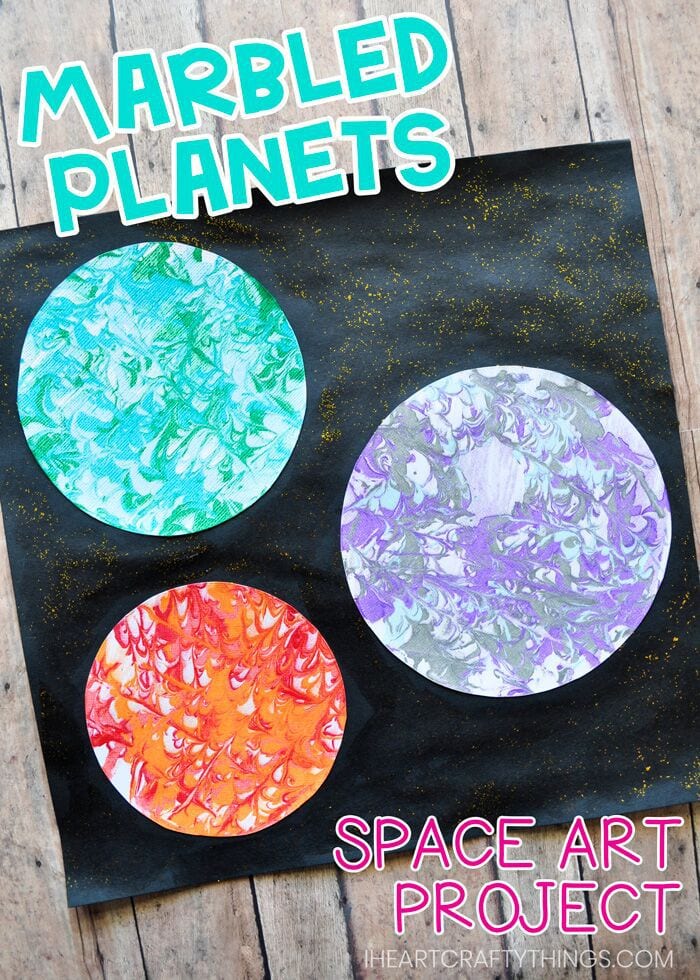
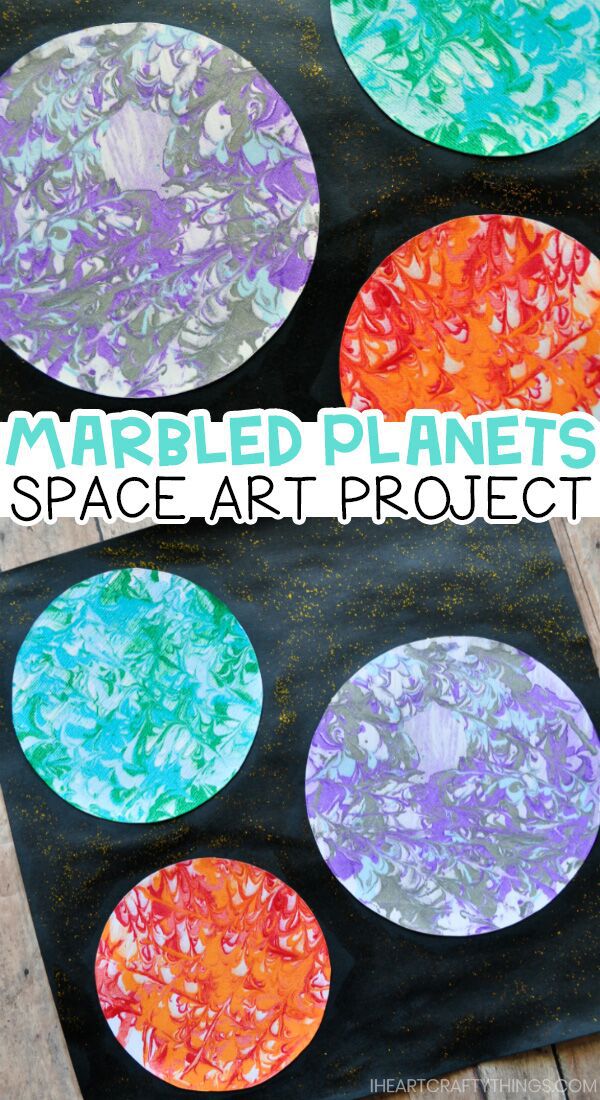
5. Adding your marbled planets to black cardstock will help give the impression that these planets are in space. After the painted circles are dry, simply glue the planets onto black cardstock paper.

Related: Space Shuttle Paper Craft

6. Although this last step is optional, the gold glitter really gives is the perfect finishing touch. Using a brush, paint some gold glitter glue all around the planets, just on the black part of the paper. The glue adds a bit of shine and the glitter makes it looks like little stars. It’s just what your preschool space art needs!

What do you think of this space themed art project? Do you think your little astronaut will like it? Does the shaving cream marbled painting technique replicate the real look of the planets in space? Comment below!

Replicate the surface of planets with this preschool space craft using a unique marbled painting technique!

Check out more space and solar system crafts and activities from our creative preschool buddies:
Pie Plate Solar System | Pink Stripey Socks
Investigating Saturn’s Rings | Hand Made Kids Art
Puffy Paint Solar System Window Art | School Time Snippets
Outer Space Discovery Bottle | Artsy Momma
Hanging Glow in the Dark Star Constellation Craft | A Little Pinch of Perfect
Replicate the surface of planets with this preschool space craft using a unique marbled painting technique!
You might also enjoy these crafts:
  • 10 Beautiful Earth Crafts for Kids
  • Coffee Filter Sun Art
  • Coffee Beans Space Sensory Bin
  • Eric Carle Inspired Moon Art
  • Out of This World Craft

You can follow I Heart Crafty Things on Facebook, 

Pinterest, Google+, Twitter, and Instagram!

rachel

  • Share
  • Tweet

Related Posts

  • Preschool Space Crafts and Activities

    We love learning about Space and the Solar System at our house. It's such a…

  • close up square image of marbled art earth day craft for kids
    Marbled Art Earth Day Craft for Kids

    This is a sponsored post written by me on behalf of Huggies® because “Kids Outgrow Diapers,…

  • A Happy Homemade Space Shuttle Craft

    Some amazing bloggers I know have worked together to create an ebook full of fun…

Filed Under: Kids Crafts, Seasonal 11 Comments

« Colorful Owl Craft for Kids using Fun Chalk
Transform your next Family Vacation with HomeAway »

Comments

  1. Katie A Little Pinch of Perfect says

    May 15, 2015 at 5:08 PM

    Love these, they look awesome and so fun to make!

    Reply
  2. Tonii says

    May 15, 2015 at 6:01 PM

    I love these planets! If you can believe it we have only painted with shaving cream once…and it was years ago! I am pinning this for our Outer Space week…thanks friend!

    Reply
  3. Rachel89352 says

    May 15, 2015 at 6:13 PM

    @Katie A Little Pinch of PerfectThank you Katie!

    Reply
  4. Rachel89352 says

    May 15, 2015 at 6:14 PM

    @ToniiThanks Tonii! It had been quite a while since we have painted with shaving cream too. It was fun to try it out again!

    Reply
  5. ΝΙΚΗ ΣΚΟΥΤΕΡΗ says

    May 15, 2015 at 6:30 PM

    delicious!

    Reply
  6. PinkStripeySocks says

    May 18, 2015 at 6:29 PM

    So, so pretty! 😉

    Reply
  7. Cheryl says

    August 18, 2016 at 5:19 PM

    I you do this with a class, how many can you make until you have to make another batch? I need to know how many cans of shaving cream I would need for a class of 20.

    Reply
    • Rachel says

      November 17, 2016 at 2:10 AM

      We usually only use the batch twice and then remake it. After two times the marbling effect doesn’t turn out great at all.

      Reply
  8. Jessica H. says

    November 6, 2016 at 5:56 AM

    This looks lovely! Are you able to dip more than one piece of paper at a time or do you have to redo the pie tin each time someone puts their paper in it? I am thinking of trying this with a class of 10. Thanks so much!

    Reply
    • Rachel says

      November 17, 2016 at 1:53 AM

      Hi Jessica, Sorry I haven’t gotten back to you! We usually use the pan for two and then remake it. After two, the marbled pattern isn’t that great. Hope that is helpful!

      Reply
  9. Bukola Alarape says

    July 29, 2017 at 11:31 PM

    This is lovely. My Preschoolers will love making it. Thanks.

    Reply

Leave a Reply Cancel reply

Your email address will not be published. Required fields are marked *

This site uses Akismet to reduce spam. Learn how your comment data is processed.

POPULAR THIS WEEK

  • Two Valentine paper gnome crafts laying side by side on a pink background with heart stickers scattered around. Valentine Gnome Craft
  • The Winter months are a great time to learn about Arctic and Antarctic Animals and there are so many fabulous children's books to accompany learning about them. Here is a round up of awesome Arctic and Antarctic Animal Crafts for Kids. Best Winter Animal Crafts for Kids

I Heart Crafty Things is a participant in the Amazon Services LLC Associates Program, an affiliate advertising program designed to provide a means for sites to earn advertising fees by advertising and linking to amazon.com.

Copyright I HEART CRAFTY THINGS © 2021 · Website Design By Jumping Jax Designs